| Category | Microsoft Docs article | Related commit history on GitHub | Change details |
|---|---|---|---|
| admin | Activity Reports | https://github.com/MicrosoftDocs/microsoft-365-docs/commits/public/microsoft-365/admin/activity-reports/activity-reports.md | Title: "Activity Reports in the Microsoft 365 admin center" + Title: "Microsoft 365 admin center activity reports" f1.keywords: - NOCSH |
| admin | Browser Usage Report | https://github.com/MicrosoftDocs/microsoft-365-docs/commits/public/microsoft-365/admin/activity-reports/browser-usage-report.md | Title: Microsoft 365 Reports in the admin center - Microsoft browser usage + Title: "Microsoft 365 admin center browser usage reports" |
| admin | Email Activity Ww | https://github.com/MicrosoftDocs/microsoft-365-docs/commits/public/microsoft-365/admin/activity-reports/email-activity-ww.md | Title: "Microsoft 365 Reports in the admin center - Email activity" + Title: "Microsoft 365 admin center email activity reports" |
| admin | Email Apps Usage Ww | https://github.com/MicrosoftDocs/microsoft-365-docs/commits/public/microsoft-365/admin/activity-reports/email-apps-usage-ww.md | Title: "Microsoft 365 Reports in the admin center - Email apps usage" + Title: "Microsoft 365 admin center email apps usage reports" |
| admin | Forms Activity Ww | https://github.com/MicrosoftDocs/microsoft-365-docs/commits/public/microsoft-365/admin/activity-reports/forms-activity-ww.md | Title: "Microsoft 365 Reports in the admin center - Forms activity" + Title: "Microsoft 365 admin center forms activity reports" f1.keywords: - NOCSH |
| admin | Forms Pro Activity Ww | https://github.com/MicrosoftDocs/microsoft-365-docs/commits/public/microsoft-365/admin/activity-reports/forms-pro-activity-ww.md | Title: "Microsoft 365 Reports in the admin center - Dynamics 365 Customer Voice activity" + Title: "Microsoft Dynamics 365 customer voice activity reports" f1.keywords: - NOCSH |
| admin | Mailbox Usage | https://github.com/MicrosoftDocs/microsoft-365-docs/commits/public/microsoft-365/admin/activity-reports/mailbox-usage.md | Title: "Microsoft 365 Reports in the admin center - Mailbox usage" + Title: "Microsoft 365 admin center mailbox usage reports" |
| admin | Microsoft Office Activations Ww | https://github.com/MicrosoftDocs/microsoft-365-docs/commits/public/microsoft-365/admin/activity-reports/microsoft-office-activations-ww.md | Title: "Microsoft 365 Reports in the admin center - Microsoft Office activations" + Title: "Microsoft 365 admin center Office activations reports" |
| admin | Microsoft Teams Device Usage Preview | https://github.com/MicrosoftDocs/microsoft-365-docs/commits/public/microsoft-365/admin/activity-reports/microsoft-teams-device-usage-preview.md | Title: "Microsoft 365 Reports in the admin center - Microsoft Teams device usage" + Title: "Microsoft 365 admin center Teams app usage reports" f1.keywords: - NOCSH |
| admin | Microsoft Teams Device Usage | https://github.com/MicrosoftDocs/microsoft-365-docs/commits/public/microsoft-365/admin/activity-reports/microsoft-teams-device-usage.md | - Title: "Microsoft Teams device usage"-- NOCSH-------- M365-subscription-management-- Adm_O365-- Adm_NonTOC--- BCS160-- MST160-- MET150-- MOE150- -description: "Gain insights into the Microsoft Teams apps used in your organization by getting the Microsoft Teams app usage report from Microsoft 365 Reports." ---# Microsoft 365 Reports in the admin center - Microsoft Teams device usage --The Microsoft 365 Reports dashboard shows you the activity overview across the products in your organization. It enables you to drill in to individual product level reports to give you more granular insight about the activities within each product. Check out [the Reports overview topic](activity-reports.md). In the Microsoft Teams app usage report, you can gain insights into the Microsoft Teams apps that are used in your organization. - -## How to get to the Microsoft Teams app usage report --1. In the admin center, go to the **Reports** \> <a href="https://go.microsoft.com/fwlink/p/?linkid=2074756" target="_blank">Usage</a> page. -- -2. From the **Select a report** drop-down, select **Microsoft Teams** \> **Device usage**. - -## Interpret the Microsoft Teams app usage report --You can get a view into Microsoft Teams app usage by looking at the **Users** and **Distribution** charts. - - - -|Item|Description| -|:--|:--| -|1. <br/> |The **Microsoft Teams device usage** report can be viewed for trends over the last 7 days, 30 days, 90 days, or 180 days. However, if you select a particular day in the report, the table (7) will show data for up to 28 days from the current date (not the date the report was generated). <br/> | -|2. <br/> |The data in each report usually covers up to the last 24 to 48 hours. <br/> | -|3. <br/> |The **Users** view shows you the number of daily unique users by app. <br/> | -|4. <br/> |The **Distribution** view shows you the number of unique users by app over the selected time period. <br/> | -|5. <br/> | On the **Users** chart, the Y axis is the number of users per app. <br/> On the **Distribution** chart, the Y axis is the number of users using the specified app. <br/> The X axis on the charts is the selected date range for the specific report. <br/> | -|6. <br/> |You can filter the series you see on the chart by selecting an item in the legend. For example, on the **Users** chart, select **Windows**, **Mac**, **Calls**, **Web**, **Android phone**, or **Windows phone** to see only the info related to each one. Changing this selection doesn't change the info in the grid table. <br/> | -|7. <br/> | The list of groups shown is determined by the set of all groups that existed (weren't deleted) across the widest (180-day) reporting time frame. The activity count will vary according to the date selection. <br/> NOTE: You might not see all the items in the list below in the columns until you add them.<br/> **Username** is the email address of the user. You can display the actual email address or make this field anonymous. <br/> **Last Activity Date (UTC)** refers to the last date that the user participated in a Microsoft Teams activity in an app. <br/> **Deleted** indicates if the team is deleted. If the team is deleted, but had activity in the reporting period, it will show up in the grid with deleted set to true. <br/> **Deleted date** is the date that the team was deleted. <br/> **Windows** is checked if the user was active in the Windows app during the specified time period. <br/> **Mac** is checked if the user was active in a Mac app during the specified time period. <br/> **Web** is checked if the user was active in a web app during the specified time period. <br/> **iOS** is checked if the user was active in an iOS app during the specified time period. <br/> **Android phone** is checked if the user was active in an Android phone app during the specified time period. <br/> **Windows phone** is checked if the user was active in a Windows Phone app during the specified time period. <br/> If your organization's policies prevents you from viewing reports where user information is identifiable, you can change the privacy setting for all these reports. Check out the **How do I hide user level details?** section in the [Activity Reports in the Microsoft 365 admin center](activity-reports.md). <br/> | -|8. <br/> |Select **Columns** to add or remove columns from the report. <br/> | -|9. <br/> |You can also export the report data into an Excel .csv file, by selecting the **Export** link. This exports data of all users and enables you to do simple sorting and filtering for further analysis. If you have less than 2000 users, you can sort and filter within the table in the report itself. If you have more than 2000 users, in order to filter and sort, you will need to export the data. <br/> | -||| - - - |
| admin | Microsoft Teams User Activity Preview | https://github.com/MicrosoftDocs/microsoft-365-docs/commits/public/microsoft-365/admin/activity-reports/microsoft-teams-user-activity-preview.md | Title: "Microsoft 365 Reports in the admin center - Microsoft Teams user activity" + Title: "Microsoft 365 admin center Teams user activity reports" |
| admin | Microsoft Teams User Activity | https://github.com/MicrosoftDocs/microsoft-365-docs/commits/public/microsoft-365/admin/activity-reports/microsoft-teams-user-activity.md | - Title: "Microsoft 365 admin center reports - Microsoft Teams user activity"-------- M365-subscription-management-- Adm_O365-- Adm_NonTOC--- BCS160-- MST160-- MET150-- MOE150 -description: "Learn how to get the Microsoft Teams user activity report and gain insights into the Teams activity in your organization." ---# Microsoft 365 admin center reports - Microsoft Teams user activity --The Microsoft 365 Reports dashboard shows you the activity overview across the products in your organization. It enables you to drill in to individual product level reports to give you more granular insight about the activities within each product. Check out [the Reports overview topic](activity-reports.md). In the Microsoft Teams user activity report, you can gain insights into the Microsoft Teams activity in your organization. - -## How to get to the Microsoft Teams user activity report --1. In the admin center, go to the **Reports** \> <a href="https://go.microsoft.com/fwlink/p/?linkid=2074756" target="_blank">Usage</a> page. -- -2. From the **Select a report** drop-down, select **Microsoft Teams** \> **User activity**. - -## Interpret the Microsoft Teams user activity report --You can get a view into Microsoft Teams user activity by looking at the **Activity** and **Users** charts.<br/> - -|Item|Description| -|:--|:--| -|1. <br/> |The **Microsoft Teams user activity** report can be viewed for trends over the last 7 days, 30 days, 90 days, or 180 days. However, if you select a particular day in the report, the table will show data for up to 28 days from the current date (not the date the report was generated). <br/> | -|2. <br/> |The data in each report usually covers up to the last 24 to 48 hours. <br/> | -|3. <br/> |To ensure data quality, we perform daily data validation checks for the past five days and will be filling any gaps detected. You may notice differences in historical data during the process. <br/> | -|4. <br/> |The **Activity** view shows you the number of Microsoft Teams activities by activity type. The activity types are number of teams chat messages, private chat messages, calls, or meetings. <br/> | -|5. <br/> |The **Users** view shows you the number of users by activity type. The activity types are number of teams chat messages, private chat messages, calls, or meetings. <br/> | -|6. <br/> | On the **Activity** chart, the Y-axis is the count of specified activity. <br/> On the **Files** chart, the Y-axis is the number of users participating in teams chats, private chats, calls, or meetings. <br/> The X-axis on the charts is the selected date range for the specific report. <br/> | -|7. <br/> |You can filter the series you see on the chart by selecting an item in the legend. For example, on the **Activity** chart, select **Channel messages**, **Chat messages**, **Calls**, or **Meetings** to see only the info related to each one. Changing this selection doesn't change the info in the grid table. <br/> | -|8. <br/> | The list of groups shown is determined by the set of all groups that existed (weren't deleted) across the widest (180-day) reporting time frame. The activity count will vary according to the date selection. <br/> NOTE: You might not see all the items in the list below in the columns until you add them.<br/>**Username** is the email address of the user. You can display the actual email address or make this field anonymous. <br/> **Last Activity Date (UTC)** refers to the last date that the user participated in a Microsoft Teams activity. <br/> **Channel messages** is the number of unique messages that the user posted in a team chat during the specified time period. <br/> **Chat messages** is the number of unique messages that the user posted in a private chat during the specified time period. <br/> **Calls** is the number of calls that the user participated in during the specified time period. <br/> **Meetings** is the number of online meetings that the user participated in during the specified time period. <br/> **Other activity** is the number of other team activities by the user. <br/> **Deleted** indicates if the team is deleted. If the team is deleted, but had activity in the reporting period, it will show up in the grid with deleted set to true. <br/> **Deleted date** is the date that the team was deleted. <br/> **Product assigned** is the list of products that are assigned to the user. <br/> If your organization's policies prevent you from viewing reports where user information is identifiable, you can change the privacy setting for all these reports. Check out the **How do I hide user level details?** section in the [Activity Reports in the Microsoft 365 admin center](activity-reports.md). <br/> | -|9. <br/> |Select **Columns** to add or remove columns from the report. <br/> | -|10. <br/> |You can also export the report data into an Excel .csv file by selecting the **Export** link. This exports data of all users and enables you to do simple sorting and filtering for further analysis. If you have less than 2000 users, you can sort and filter within the table in the report itself. If you have more than 2000 users, in order to filter and sort, you will need to export the data. <br/> | -||| - - |
| admin | Microsoft365 Apps Usage Ww | https://github.com/MicrosoftDocs/microsoft-365-docs/commits/public/microsoft-365/admin/activity-reports/microsoft365-apps-usage-ww.md | Title: "Microsoft 365 Reports in the admin center - Microsoft 365 Apps usage" + Title: "Microsoft 365 admin center apps usage reports" |
| admin | Office 365 Groups Ww | https://github.com/MicrosoftDocs/microsoft-365-docs/commits/public/microsoft-365/admin/activity-reports/office-365-groups-ww.md | Title: "Microsoft 365 Reports in the admin center - Microsoft 365 groups" + Title: "Microsoft 365 admin center groups reports" |
| admin | Onedrive For Business Activity Ww | https://github.com/MicrosoftDocs/microsoft-365-docs/commits/public/microsoft-365/admin/activity-reports/onedrive-for-business-activity-ww.md | Title: "Microsoft 365 Reports in the admin center - OneDrive for Business activity" + Title: "Microsoft 365 OneDrive for Business activity reports" f1.keywords: - NOCSH |
| admin | Onedrive For Business Usage Ww | https://github.com/MicrosoftDocs/microsoft-365-docs/commits/public/microsoft-365/admin/activity-reports/onedrive-for-business-usage-ww.md | Title: "Microsoft 365 Reports in the admin center - OneDrive for Business usage" + Title: "Microsoft 365 OneDrive for Business usage reports" f1.keywords: - NOCSH |
| admin | Sharepoint Activity Ww | https://github.com/MicrosoftDocs/microsoft-365-docs/commits/public/microsoft-365/admin/activity-reports/sharepoint-activity-ww.md | Title: "Microsoft 365 Reports in the admin center - SharePoint activity" + Title: "Microsoft 365 admin center SharePoint activity reports" f1.keywords: - NOCSH |
| admin | Sharepoint Site Usage Ww | https://github.com/MicrosoftDocs/microsoft-365-docs/commits/public/microsoft-365/admin/activity-reports/sharepoint-site-usage-ww.md | Title: "Microsoft 365 Reports in the admin center - SharePoint site usage" + Title: "Microsoft 365 admin center SharePoint site usage reports" f1.keywords: - NOCSH |
| admin | Viva Insights Activity | https://github.com/MicrosoftDocs/microsoft-365-docs/commits/public/microsoft-365/admin/activity-reports/viva-insights-activity.md | Title: "Microsoft 365 Reports in the admin center - Viva Insights activity" + Title: "Microsoft 365 admin center Viva Insights activity reports" |
| admin | Viva Learning Activity | https://github.com/MicrosoftDocs/microsoft-365-docs/commits/public/microsoft-365/admin/activity-reports/viva-learning-activity.md | Title: "Microsoft 365 Reports in the admin center - Viva Learning activity" + Title: "Microsoft 365 admin center Viva Learning activity reports" |
| admin | Yammer Activity Report Ww | https://github.com/MicrosoftDocs/microsoft-365-docs/commits/public/microsoft-365/admin/activity-reports/yammer-activity-report-ww.md | Title: "Microsoft 365 Reports in the admin center - Yammer activity report" + Title: "Microsoft 365 admin center Yammer activity reports" f1.keywords: - NOCSH |
| admin | Yammer Device Usage Report Ww | https://github.com/MicrosoftDocs/microsoft-365-docs/commits/public/microsoft-365/admin/activity-reports/yammer-device-usage-report-ww.md | Title: "Microsoft 365 Reports in the admin center - Yammer device usage report" + Title: "Microsoft 365 admin center Yammer device usage reports" f1.keywords: - NOCSH |
| admin | Yammer Groups Activity Report Ww | https://github.com/MicrosoftDocs/microsoft-365-docs/commits/public/microsoft-365/admin/activity-reports/yammer-groups-activity-report-ww.md | Title: "Microsoft 365 Reports in the admin center - Yammer groups activity report" + Title: "Microsoft 365 admin center Yammer groups activity reports" f1.keywords: - NOCSH |
| admin | Choose Between Basic Mobility And Security And Intune | https://github.com/MicrosoftDocs/microsoft-365-docs/commits/public/microsoft-365/admin/basic-mobility-security/choose-between-basic-mobility-and-security-and-intune.md | Microsoft Intune and built-in Basic Mobility and Security both give you the abil | Feature area | Feature highlights | Basic Mobility and Security | Microsoft Intune | |:--|:--|:--|:--| |Device types|Managing different OS platforms and major management mode variants. |Windows<br/>iOS<br/>Android<br/>Android Samsung KNOX<br/>|Windows<br/>iOS<br/>Android<br/>Android Samsung KNOX<br/>mac OS, iPad OS|-|Device compliance|Set and manage security policies, like device level PIN lock and jailbreak detection. |Limitations on Android 9 and later devices. See [details](capabilities.md). |Yes| +|Device compliance|Set and manage security policies, like device level PIN lock and jailbreak detection. |Limitations on Android devices. See [details](capabilities.md). |Yes| |Conditional access based on device compliance |Prevent noncompliant devices from accessing corporate email and data from the cloud. |Not supported on Windows 10.<br/>Limited to controlling access to Exchange Online, SharePoint Online, and Outlook. |Yes | |Device configuration |Configure device settings (for example, disabling the camera)|Limited set of settings.|Yes| |Email profiles |Provision a native email profile on the device. |Yes|Yes| |
| admin | Create Device Security Policies | https://github.com/MicrosoftDocs/microsoft-365-docs/commits/public/microsoft-365/admin/basic-mobility-security/create-device-security-policies.md | If you want to exclude some people from conditional access checks on their mobil When you apply a policy to user devices, the impact on each device varies somewhat among device types. See the following table for examples of the impact of policies on different devices. -|**Security Policy**|**Android 4 and later**|**Samsung KNOX**|**iOS 6 and later**|**Notes**| +|**Security Policy**|**Android**|**Samsung KNOX**|**iOS**|**Notes**| |:--|:--|:--|:--|:--| |Require encrypted backup|No|Yes|Yes|iOS encrypted backup required.| |Block cloud backup|Yes|Yes|Yes|Block Google backup on Android (grayed out), cloud backup on iOS.| When you apply a policy to user devices, the impact on each device varies somewh When you delete a policy or remove a user from a group to which the policy was deployed, the policy settings, Microsoft 365 email profile and cached emails might be removed from the user's device. See the following table to see what is removed for the different device types. -|**What's removed**|**iOS 6 and later**|**Android 4 and later (including Samsung KNOX**| +|**What's removed**|**iOS**|**Android (including Samsung KNOX**| |:--|:--|:--| |Managed email profiles<sup>1</sup>|Yes|No| |Block cloud backup|Yes|No| |
| admin | Enroll Your Mobile Device | https://github.com/MicrosoftDocs/microsoft-365-docs/commits/public/microsoft-365/admin/basic-mobility-security/enroll-your-mobile-device.md | Organizations choose Basic Mobility and Security so that employees can use their Basic Mobility and Security for Microsoft 365 hosted by the Intune service works with most, but not all, mobile devices. The following are supported with Basic Mobility and Security: -- iOS 10.0 or later+- iOS -- Android 4.4 or later+- Android - Windows 8.1 and Windows 10 (Phone and PC) |
| admin | Troubleshoot | https://github.com/MicrosoftDocs/microsoft-365-docs/commits/public/microsoft-365/admin/basic-mobility-security/troubleshoot.md | To start, check the following: ## Android phone or tablet -- Make sure the device is running Android 4.4 or later.+- Make sure the device is running Android. - Make sure that Chrome is up to date and is set as the default browser. |
| admin | Wipe Mobile Device | https://github.com/MicrosoftDocs/microsoft-365-docs/commits/public/microsoft-365/admin/basic-mobility-security/wipe-mobile-device.md | Wipe a device for these reasons: The wipe is sent immediately to the mobile device and the device is marked as not compliant in Azure active directory. While all data is removed when a device is reset to factory defaults, the following table describes what content is removed for each device type when a device when you remove company data. -|**Content impact**|**iOS 10 and later**|**Android 5 and later**| +|**Content impact**|**iOS**|**Android**| |:--|:--|:--| |Microsoft 365 app data is wiped if the device is protected by Intune App Protection policies. The apps aren't removed. For devices not protected by Mobile Application Management (MAM) policies, Outlook and OneDrive won't remove cached data.<br/>**Note** For applying Intune App protection policies you must have an Intune license.|Yes|Yes| |Policy settings applied by Basic Mobility and Security to devices are no longer enforced; users can change the settings.|Yes|Yes| |
| compliance | Declare Records | https://github.com/MicrosoftDocs/microsoft-365-docs/commits/public/microsoft-365/compliance/declare-records.md | For full instructions: ## Tenant setting for editing record properties -If you'll use retention labels to declare items as records (rather than regulatory records) in SharePoint and OneDrive, consider whether you need to change the default tenant setting that allows users to edit the properties for a labeled record when files are larger than 0 bytes. +If you'll use retention labels to declare items as records (rather than regulatory records) in SharePoint and OneDrive, consider whether you need to change the default tenant setting that allows users to edit the properties for a [locked record](record-versioning.md) when files are larger than 0 bytes. To change this default, go to the [Microsoft 365 compliance center](https://compliance.microsoft.com/) > **Records management** > **Records management settings** > **Retention labels** > **Allow editing of record properties** and then turn off the setting **Allow users to edit record properties**. |
| compliance | Dlp Conditions And Exceptions | https://github.com/MicrosoftDocs/microsoft-365-docs/commits/public/microsoft-365/compliance/dlp-conditions-and-exceptions.md | The tables in the following sections describe the conditions and exceptions that ### Senders -If you use the sender address as a condition or exception the actual field where the value is looked for varies depending on the type of rule you use. For DLP based rules, the Envelope address is used as the sender address. For Exchange transport rules the Header address is used as the sender address. +If you use the sender address as a condition or exception the actual field where the value is looked for varies depending on the sender address location configured. By default, DLP rules use the Header address as the sender address. -<!-- -> [!NOTE] -> Starting January 20, 2022, the default sender address location will be moved to the Header address along with the availability of the -SenderAddressLocation parameter to configure desired behavior at a DLP rule level. + -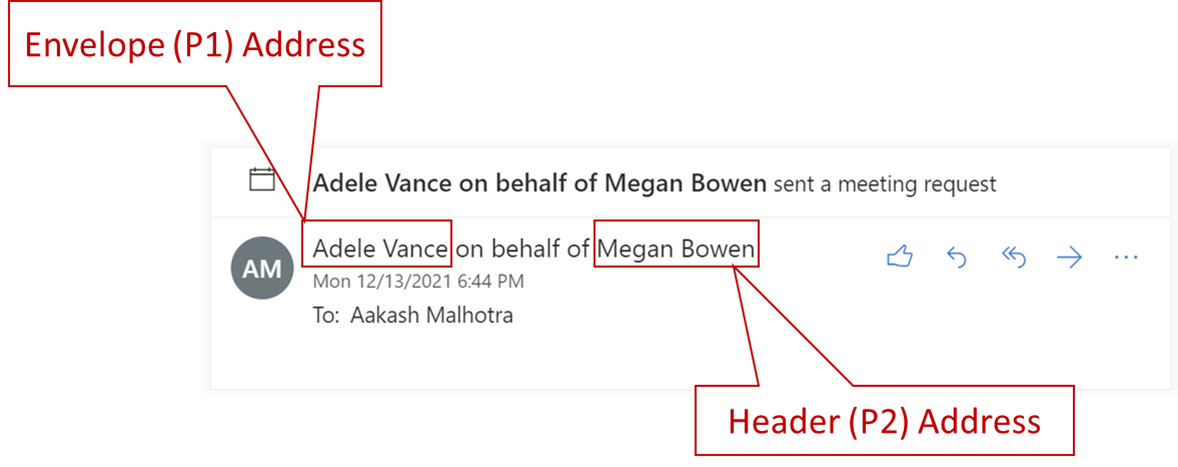 --At the tenant level, you can configure a sender address location to be used across all rules, unless overridden by a single rule. To revert tenant DLP policy configuration to evaluate the sender address from the Envelope across all rules, you can run the following command: +At the tenant level, you can configure a sender address location to be used across all rules, unless overridden by a single rule. To set tenant DLP policy configuration to evaluate the sender address from the Envelope across all rules, you can run the following command: ```PowerShell Set-PolicyConfig ΓÇôSenderAddressLocation Envelope To configure the sender address location at a DLP rule level, the parameter is _ - **Header or envelope** (`HeaderOrEnvelope`) Examine senders in the message header and the message envelope. <br>>+ |condition or exception in DLP|condition/exception parameters in Microsoft 365 PowerShell|property type|description| ||||| |Sender is|condition: *From* <br/> exception: *ExceptIfFrom*|Addresses|Messages that are sent by the specified mailboxes, mail users, mail contacts, or Microsoft 365 groups in the organization.| |
| compliance | Export Documents From Review Set | https://github.com/MicrosoftDocs/microsoft-365-docs/commits/public/microsoft-365/compliance/export-documents-from-review-set.md | If you select this export option, the exported content is organized in the follo - Summary.csv: Includes a summary of the content exported from the review set -- Root folder: This folder in named [Export Name] x of z.zip and will be repeated for each ZIP file partition.+- Root folder: This folder in named [Export Name] x of z.zip and will be repeated for each ZIP file partition. The root folder contains the following: - Export_load_file_x of z.csv: The metadata file. - Warnings and errors x of z.csv: This file includes information about errors encountered when trying to export from the review set. - - Exchange: This folder contains all content from Exchange stored in PST files. Redacted PDF files cannot be included with this option. If an attachment is selected in the review set, the parent email will be exported with the attachment attached. + - Exchange: This folder contains all content from Exchange stored in PST files. Redacted PDF files cannot be included with this option. If an attachment is selected in the review set, the parent email message will be exported with the attachment attached. This folder may also contain the following items: ++ - Information Rights Management (IRM) protected messages that have been decoded. + - Error-remediated messages. + - Modern attachments or links referenced in messages. - SharePoint: This folder contains all native content from SharePoint in a native file format. Redacted PDF files cannot be included with this option. |
| compliance | File Plan Manager | https://github.com/MicrosoftDocs/microsoft-365-docs/commits/public/microsoft-365/compliance/file-plan-manager.md | When you select **Choose** for each of these optional descriptors, you can selec 1. From the **File plan** page, select **+ Create a label** > **Retention label** -2. Follow the prompts for the configuration process. - +2. Follow the prompts for the configuration process. Be careful what name you choose, because this can't be changed after the label is saved. + For more information about the retention settings, see [Settings for retaining and deleting content](retention-settings.md#settings-for-retaining-and-deleting-content). To use the retention label to declare records, select **Mark items as records**, or **Mark items as regulatory records**. For more information, see [Configuring retention labels to declare records](declare-records.md#configuring-retention-labels-to-declare-records). When you select **Choose** for each of these optional descriptors, you can selec ## Edit retention labels -To edit an existing retention label, select it from the **File Plan** page, and then select the **Edit label** option to start the Edit retention process that lets you change the label description and any eligible settings. +To edit an existing retention label, select it from the **File Plan** page, and then select the **Edit label** option to start the edit retention process that lets you change the label description and any eligible settings. Some settings can't be changed after the label is created and saved, which include: - The retention label name and the retention settings except the retention period. However, you can't change the retention period when the retention period is based on when items were labeled. |
| compliance | Whats New | https://github.com/MicrosoftDocs/microsoft-365-docs/commits/public/microsoft-365/compliance/whats-new.md | Whether it be adding new solutions to the [Microsoft 365 compliance center](micr > > And visit the [Microsoft 365 Roadmap](https://www.microsoft.com/microsoft-365/roadmap) to learn about Microsoft 365 features that were launched, are rolling out, are in development, have been cancelled, or previously released. +## February 2022 ++### eDiscovery ++- [Manage custodian communications templates in Advanced eDiscovery](advanced-ediscovery-communications-library.md) - eDiscovery managers can now create custodian communications templates that can be used in any Advanced eDiscovery case in the organization. +- [Manage issuing officers in Advanced eDiscovery](advanced-ediscovery-issuing-officers.md) - eDiscovery managers can add a list of issuing officers that can be assigned to custodian communications in any Advanced eDiscovery case in the organization. ++### Information governance and records management ++- [Adaptive scopes](retention.md#adaptive-or-static-policy-scopes-for-retention) for retention policies and retention label policies are now generally available (GA). The instructions for [configuring an adaptive scope](retention-settings.md#to-configure-an-adaptive-scope) now include more information for SharePoint site scopes: Blog post reference for using custom site properties and how to use the site property SiteTemplate to include or exclude specific site types with the advanced query builder. +- [Policy lookup](retention.md#policy-lookup) in the Information Governance solution is now generally available (GA. +- PowerShell alternative to the records management setting that allows users to delete labeled items in SharePoint and OneDrive by using AllowFilesWithKeepLabelToBeDeletedSPO and AllowFilesWithKeepLabelToBeDeletedODB from [Get-PnPTenant](/powershell/module/sharepoint-pnp/get-pnptenant) and [Set-PnPTenant]( /powershell/module/sharepoint-pnp/set-pnptenant). ++### Sensitivity labels ++- New guidance [Why choose MIP built-in labeling over the AIP add-in for Office apps](sensitivity-labels-aip.md) if you are using the Azure Information Protection (AIP) unified labeling client for Windows computers. This page includes information about the new private preview for Office apps. +- New settings for [auto-labeling policies](apply-sensitivity-label-automatically.md#how-to-configure-auto-labeling-policies-for-sharepoint-onedrive-and-exchange): + - Additional settings for email to support always applying a matched sensitivity label, and to apply encryption to email received from outside the organization. + - Exclusions for specific instances (users, groups, sites) are supported by using the new **Excluded** option when the default selection of **All** is specified for **Included**. +- Now in preview: Mobile devices (iOS and Android) support [co-authoring](sensitivity-labels-coauthoring.md) when you have minimum versions and opt in to this preview. +- Support for setting the default sharing link type is extended to individual documents in SharePoint and OneDrive. For more information, see the new article [Use sensitivity labels to configure the default sharing link type for sites and documents in SharePoint and OneDrive]( sensitivity-labels-default-sharing-link.md). +- Teams admin center now supports container labels (sensitivity labels with the scope of Groups & sites). + ## January 2022 ### Microsoft Information Governance Datacenter asset management - Rolling out for Office apps that use built-in labels: The default label setting now supports existing documents as well as new documents. This change in behavior provides parity with the Azure Information Protection unified labeling client. For more information about the rollout per app and minimum versions, see the [capabilities table](sensitivity-labels-office-apps.md#sensitivity-label-capabilities-in-word-excel-and-powerpoint) for Word, Excel, and PowerPoint. - Container labels now support [default sharing link settings by using PowerShell advanced settings](sensitivity-labels-teams-groups-sites.md#configure-settings-for-the-default-sharing-link-type-for-a-site-by-using-powershell-advanced-settings). - The [capabilities tables](sensitivity-labels-office-apps.md#support-for-sensitivity-label-capabilities-in-apps) that list the minimum supported versions for built-in labeling now have versions for Current Channel, the Monthly Enterprise Channel, and the Semi-Annual Enterprise Channel.--## August 2021 --### App governance -- [Expanded entries for alert insights](app-governance-anomaly-detection-alerts.md#collection-alerts). New entries were added to describe additional alert insights now available in app governance.--### Communication compliance -- [Communication compliance channels](communication-compliance-channels.md) added new preview feature support for modern attachments scanning in Teams private chats and channels.--### Compliance & service assurance --- [Service assurance](/compliance/) has been updated with quarterly review content updates for certifications and statements of applicability:- - Architecture - - Audit logging - - Encryption and key management - - Identity and access management - - Microsoft 365 access management - - Network security - - Privacy - - Resiliency and continuity - - Risk management - - Security development and operation - - Security monitoring - - Supplier management - - Vulnerability management --### Data Loss Prevention --- [Data loss prevention policy reference](dlp-policy-reference.md). Added a new policy reference page to assist you in creating policies.--### Insider risk management -- [Learn about and configure insider risk management browser signal detection](insider-risk-management-browser-support.md). Preview feature for configuring browser signal detection for Edge and Chrome browsers.--### Retention and records management -- [Flowchart to determine when an item will be retained or permanently deleted](retention-flowchart.md) to supplement the concepts and examples for the principles of retention.--### Sensitivity labels -- [Enhancements to auto-labeling policies](apply-sensitivity-label-automatically.md) that include higher supported numbers for sites and policies, support for all OneDrive and SharePoint sites and the ability to select available SharePoint sites instead of having to enter each site by URL, and simulation improvements.-- Auto-labeling in Office apps as a sensitivity label setting now [supports Exact Data Match (EDM)](apply-sensitivity-label-automatically.md#custom-sensitive-information-types-with-exact-data-match).-- Default labels are now extended to [Power BI (in preview)](/power-bi/admin/service-security-sensitivity-label-default-label-policy).-- Auditing events for Outlook on the web that [surface in activity explorer](data-classification-activity-explorer-available-events.md) are now fully rolled out, which means that user activity for built-in labels is now available for all Office apps across all platform.-- The [supported capabilities tables](sensitivity-labels-office-apps.md#support-for-sensitivity-label-capabilities-in-apps) have a new footnote for Windows to clarify that the minimum versions are for the Current Channel, and a tip to more easily compare older versions that omit leading zeros against newer versions. |
| contentunderstanding | Create Local Model | https://github.com/MicrosoftDocs/microsoft-365-docs/commits/public/microsoft-365/contentunderstanding/create-local-model.md | + + Title: Create a model on a local SharePoint site with Microsoft SharePoint Syntex +++++audience: admin ++search.appverid: ++ - enabler-strategic + - m365initiative-syntex +ms.localizationpriority: medium +description: Learn how to create a local model on a local SharePoint site with SharePoint Syntex. +++# Create a model on a local SharePoint site with Microsoft SharePoint Syntex ++SharePoint Syntex now provides an option to create and train models locally on your own SharePoint site. These models can be used only on the site where they're created. ++By activating document classification and extraction on your SharePoint site, SharePoint Syntex lets you classify files in document libraries, extract information from new files, and automate activities based on extracted information. ++When you activate local model creation, the following lists and libraries will be added to your site: ++- Models document library +- Training files document library +- Explanation templates list +- Model usage list ++This feature is available only for creating [document understanding models](apply-a-model.md) and [prebuilt models](prebuilt-models.md). ++## Create a model on a local site ++1. From a SharePoint document library, select the files you want to analyze, and then select **Classify and extract**. ++  ++2. The first time you use this feature, you are activating SharePoint Syntex on your site. You'll see the following message. ++  ++3. Select **Activate** to continue. You'll see the following message. ++  ++4. Select **Create a model**. ++5. On the **Create a model** panel, type the name of the model, select the model type, and then select **Create**. ++  ++6. Proceed to [train your document understanding model](apply-a-model.md) or to [configure your prebuilt model](prebuilt-models.md) using the files that you selected. ++7. When done, the **Add to library** panel opens. ++  ++8. On the **Add to library** panel, you'll see the name of your SharePoint site and the document library that the model will be applied to. If you want to apply the model to a different library, select **Back to libraries**, and choose the library you want to use. Then select **Add**. ++9. On the model home page, in the **Where the model is applied on this site** section, you can see the libraries that have the model applied. To apply the model to other libraries on the site, select **Apply model**. ++  + |
| contentunderstanding | Index | https://github.com/MicrosoftDocs/microsoft-365-docs/commits/public/microsoft-365/contentunderstanding/index.md | The resources in this section help your users learn how to create and configure |Apply a retention label to your model|[Apply a retention label to a document understanding model](./apply-a-retention-label-to-a-model.md)| |Apply a sensitivity label to your model|[Apply a sensitivity label to a document understanding model](./apply-a-sensitivity-label-to-a-model.md)| |Use prebuilt models to extract info from documents |[Use a prebuilt model to extract info from invoices or receipts](./prebuilt-models.md)|+|Create and train models locally on a SharePoint site |[Create a model on a local SharePoint site](./create-local-model.md)| |Use trained models in other content centers |[Publish and discover document understanding models](./model-discovery.md)| |Perform metadata-based queries on document libraries|[Search for metadata in document libraries](./metadata-search.md)| |Use Managed Metadata services term store taxonomy when creating an extractor|[Leverage term store taxonomy when creating an extractor](./leverage-term-store-taxonomy.md)| |
| enterprise | Multi Geo Ediscovery Configuration | https://github.com/MicrosoftDocs/microsoft-365-docs/commits/public/microsoft-365/enterprise/multi-geo-ediscovery-configuration.md | description: Learn how to use the Region parameter to configure eDiscovery for u # Microsoft 365 Multi-Geo eDiscovery configuration -[Advanced eDiscovery capabilities](../compliance/overview-ediscovery-20.md) allow a multi-geo eDiscovery administrator to search all of the geos without needing to utilize a "Region" security filter. Data is exported to the Azure instance of the central location of the multi-geo tenant. +[Advanced eDiscovery capabilities](../compliance/overview-ediscovery-20.md) allow a multi-geo eDiscovery administrator to search all of the geos without needing to utilize a "Region" security filter. Data is exported to the Azure instance of the central location of the multi-geo tenant. The same happens with applying a hold on a custodian, however, the Hold statistics inside the hold won't appear without the "Region" security filter. Hold statistics showing 0 does not mean the hold failed as long as hold status is showing On (successful). Without advanced eDiscovery capabilities, an eDiscovery manager or administrator of a multi-geo tenant will be able to conduct eDiscovery only in the central location of that tenant. To support the ability to conduct eDiscovery for satellite locations, a new compliance security filter parameter named "Region" is available via PowerShell. This parameter can be used by tenants whose central location is in North America, Europe, or Asia Pacific. Advanced eDiscovery is recommended for tenants whose central location is not in North America, Europe, or Asia Pacific and who need to perform eDiscovery across satellite geo locations. -The Microsoft 365 global administrator must assign eDiscovery Manager permissions to allow others to perform eDiscovery and assign a "Region" parameter in their applicable Compliance Security Filter to specify the region for conducting eDiscovery as satellite location, otherwise no eDiscovery will be carried out for the satellite location. +The Microsoft 365 global administrator must assign eDiscovery Manager permissions to allow others to perform eDiscovery and assign a "Region" parameter in their applicable Compliance Security Filter to specify the region for conducting eDiscovery as satellite location, otherwise, no eDiscovery will be carried out for the satellite location. Only one "Region" security filter per user is supported, so all the regions need to be inside the same security filter. When the eDiscovery Manager or Administrator role is set for a particular satellite location, the eDiscovery Manager or Administrator will only be able to perform eDiscovery search actions against the SharePoint sites and OneDrive sites located in that satellite location. If an eDiscovery Manager or Administrator attempts to search SharePoint or OneDrive sites outside the specified satellite location, no results will be returned. Also, when the eDiscovery Manager or Administrator for a satellite location triggers an export, data is exported to the Azure instance of that region. This helps organizations stay in compliance by not allowing content to be exported across controlled borders. To set the Compliance Security Filter for a Region: New-ComplianceSecurityFilter -Action All -FilterName "NAM eDiscovery Managers" -Region NAM -Users adwood@contoso.onmicrosoft.com ``` -See the [New-ComplianceSecurityFilter](/powershell/module/exchange/new-compliancesecurityfilter) article for additional parameters and syntax. +See the [New-ComplianceSecurityFilter](/powershell/module/exchange/new-compliancesecurityfilter) article for additional parameters and syntax. |
| security | Auto Investigation Action Center | https://github.com/MicrosoftDocs/microsoft-365-docs/commits/public/microsoft-365/security/defender-endpoint/auto-investigation-action-center.md | ms.prod: m365-security ms.mktglfcycl: deploy ms.sitesec: library ms.pagetype: security--++ ms.localizationpriority: medium audience: ITPro |
| security | Autoir Investigation Results | https://github.com/MicrosoftDocs/microsoft-365-docs/commits/public/microsoft-365/security/defender-endpoint/autoir-investigation-results.md | ms.sitesec: library ms.pagetype: security f1.keywords: - NOCSH--++ ms.localizationpriority: medium audience: ITPro |
| security | Automated Investigations | https://github.com/MicrosoftDocs/microsoft-365-docs/commits/public/microsoft-365/security/defender-endpoint/automated-investigations.md | ms.technology: mde ms.mktglfcycl: deploy ms.sitesec: library ms.pagetype: security--++ Last updated 11/24/2021 ms.localizationpriority: medium |
| security | Automation Levels | https://github.com/MicrosoftDocs/microsoft-365-docs/commits/public/microsoft-365/security/defender-endpoint/automation-levels.md | ms.technology: mde ms.mktglfcycl: deploy ms.sitesec: library ms.pagetype: security--++ Last updated 10/22/2020 ms.localizationpriority: medium |
| security | Configure Automated Investigations Remediation | https://github.com/MicrosoftDocs/microsoft-365-docs/commits/public/microsoft-365/security/defender-endpoint/configure-automated-investigations-remediation.md | ms.technology: mde ms.mktglfcycl: deploy ms.sitesec: library ms.pagetype: security--++ ms.localizationpriority: medium audience: ITPro |
| security | Configure Device Discovery | https://github.com/MicrosoftDocs/microsoft-365-docs/commits/public/microsoft-365/security/defender-endpoint/configure-device-discovery.md | You can configure the devices to exclude in the **Exclusions** page. ## Select networks to monitor - Microsoft Defender for Endpoint analyzes a network and determines if it's a corporate network that needs to be monitored or a non-corporate network that can be ignored. Corporate networks are typically chosen to be monitored. However, you can override this decision by choosing to monitor non-corporate networks where onboarded devices are found. +Microsoft Defender for Endpoint analyzes a network and determines if it's a corporate network that needs to be monitored or a non-corporate network that can be ignored. To identify a network as corporate, we correlate network identifiers across all tenant's clients and if the majority of the devices in the organization report that they are connected to the same network name, with the same default gateway and DHCP server address, we assume that this is a corporate network. Corporate networks are typically chosen to be monitored. However, you can override this decision by choosing to monitor non-corporate networks where onboarded devices are found. You can configure where device discovery can be performed by specifying which networks to monitor. When a network is monitored, device discovery can be performed on it. |
| security | Configure Server Endpoints | https://github.com/MicrosoftDocs/microsoft-365-docs/commits/public/microsoft-365/security/defender-endpoint/configure-server-endpoints.md | You'll need to complete the following general steps to successfully onboard serv **Windows Server 2012 R2 and Windows Server 2016 (Preview)** +>[!IMPORTANT] +> You'll need to turn on the preview features in the Endpoints section of Microsoft 365 Defender to use this functionality. Navigate to [Microsoft 365 Defender > Settings > Endpoints > Advanced features](https://security.microsoft.com/preferences2/integration) and turn on Preview features. + - Download installation and onboarding packages - Apply the installation package - Follow the onboarding steps for the corresponding tool The new unified solution package makes it easier to onboard servers by removing - [Automated Investigation and Response (AIR)](/microsoft-365/security/defender-endpoint/automated-investigations) - [Tamper Protection](/microsoft-365/security/defender-endpoint/prevent-changes-to-security-settings-with-tamper-protection) +Depending on the server that you're onboarding, the unified solution installs Microsoft Defender Antivirus and/or the EDR sensor. The following table indicates what component is installed and what is built in by default. ++|Server version|AV|EDR| +|-|-|-| +|Windows Server 2012 R2 SP1||| +|Windows Server 2016|Built-in|| +|Windows Server 2019 or later|Built-in|Built-in| + If you have previously onboarded your servers using MMA, follow the guidance provided in [Server migration](server-migration.md) to migrate to the new solution. >[!NOTE] If you have previously onboarded your servers using MMA, follow the guidance pro The following specifics apply to the new unified solution package for Windows Server 2012 R2 and 2016: -- Ensure connectivity requirements as specified in [Enable access to Microsoft Defender for Endpoint service URLs in the proxy server](/microsoft-365/security/defender-endpoint/configure-proxy-internet?enable-access-to-microsoft-defender-for-endpoint-service-urls-in-the-proxy-server) are met. They are equivalent to those for Windows Server 2019.+- Ensure connectivity requirements as specified in [Enable access to Microsoft Defender for Endpoint service URLs in the proxy server](/microsoft-365/security/defender-endpoint/configure-proxy-internet?enable-access-to-microsoft-defender-for-endpoint-service-urls-in-the-proxy-server) are met. They are equivalent to those for Windows Server 2019. +- We are investigating an issue with Windows Server 2012 R2 connectivity to cloud when static TelemetryProxyServer is used and the certificate revocation list (CRL) URLs are not reachable from the SYSTEM account context. The immediate mitigation is to either use an alternative proxy option that provides such connectivity, or configure the same proxy via the WinInet setting on the SYSTEM account context. - Previously, the use of the Microsoft Monitoring Agent (MMA) on Windows Server 2016 and below allowed for the OMS / Log Analytics gateway to provide connectivity to Defender cloud services. The new solution, like Microsoft Defender for Endpoint on Windows Server 2019, Windows Server 2022, and Windows 10, does not support this gateway.+ - On Windows Server 2016, verify that Microsoft Defender Antivirus is installed, is active and up to date. You can download and install the latest platform version using Windows Update. Alternatively, download the update package manually from the [Microsoft Update Catalog](https://www.catalog.update.microsoft.com/Search.aspx?q=KB4052623) or from [MMPC](https://go.microsoft.com/fwlink/?linkid=870379&arch=x64). - On Windows Server 2012 R2, there is no user interface for Microsoft Defender Antivirus. In addition, the user interface on Windows Server 2016 only allows for basic operations. To perform operations on a device locally, refer to [Manage Microsoft Defender for Endpoint with PowerShell, WMI, and MPCmdRun.exe](/microsoft-365/security/defender-endpoint/manage-mde-post-migration-other-tools). As a result, features that specifically rely on user interaction, such as where the user is prompted to make a decision or perform a specific task, may not work as expected. It is recommended to disable or not enable the user interface nor require user interaction on any managed server as it may impact protection capability. - Not all Attack Surface Reduction rules are available on all operating systems. See [Attack Surface Reduction (ASR) rules](/microsoft-365/security/defender-endpoint/attack-surface-reduction-rules). For more information, see [Integration with Microsoft Defender for Cloud](azure- If you have fully updated your machines with the latest [monthly rollup](https://support.microsoft.com/topic/october-12-2021-kb5006714-monthly-rollup-4dc4a2cd-677c-477b-8079-dcfef2bda09e) package, there are **no** additional prerequisites. - The installer package will check if the following components have already been installed via an update: - [Update for customer experience and diagnostic telemetry](https://support.microsoft.com/help/3080149/update-for-customer-experience-and-diagnostic-telemetry) Aside from fully updating the machine with the Latest Cumulative Update (LCU), v > [!NOTE] > In order to successfully update the built-in version of Windows Defender, which has a version number starting with 4.10, to the latest available platform, a servicing stack update must have been applied as well as the Latest Cumulative Update (LCU) equal to or later than September 20, 2018ΓÇöKB4457127 (OS Build 14393.2515). +**Prerequisites for running with third-party security solutions** ++If you intend to use a third-party antimalware solution, you'll need to run Microsoft Defender Antivirus in passive mode. You must remember to set to passive mode during the installation and onboarding process. + **New update package for Microsoft Defender for Endpoint on Windows Server 2012 R2 and 2016** To receive regular product improvements and fixes for the EDR Sensor component, ensure Windows Update [KB5005292](https://go.microsoft.com/fwlink/?linkid=2168277) gets applied or approved. In addition, to keep protection components updated, see [Manage Microsoft Defender Antivirus updates and apply baselines](/microsoft-365/security/defender-endpoint/manage-updates-baselines-microsoft-defender-antivirus#monthly-platform-and-engine-versions). |
| security | Device Control Removable Storage Access Control | https://github.com/MicrosoftDocs/microsoft-365-docs/commits/public/microsoft-365/security/defender-endpoint/device-control-removable-storage-access-control.md | Microsoft Defender for Endpoint Device Control Removable Storage Access Control |Policy Creation|Allows you to create policy to enforce each removable media group|Steps 2 and 3 in the section, [Deploying policy via OMA-URI](#deploying-policy-via-oma-uri) | Step 2 in the section, [Deploying policy via Group Policy](#deploying-policy-via-group-policy) | |Default Enforcement|Allows you to set default access (Deny or Allow) to removable media if there is no policy|Step 4 in the section, [Deploying policy via OMA-URI](#deploying-policy-via-oma-uri) | Step 3 in the section, [Deploying policy via Group Policy](#deploying-policy-via-group-policy) | |Enable or Disable Removable Storage Access Control|If you set Disable, it will disable the Removable Storage Access Control policy on this machine| Step 5 in the section, [Deploying policy via OMA-URI](#deploying-policy-via-oma-uri) | Step 4 in the section, [Deploying policy via Group Policy](#deploying-policy-via-group-policy) |+|Capture file information|Allows you to create policy to capture file information when Write access happens| Step 2 and 6 in the section, [Deploying policy via OMA-URI](#deploying-policy-via-oma-uri) | Step 2 and 5 in the section, [Deploying policy via Group Policy](#deploying-policy-via-group-policy) | ## Prepare your endpoints Deploy Removable Storage Access Control on Windows 10 and Windows 11 devices tha - **4.18.2107 or later**: Add Windows Portable Device (WPD) support (for mobile devices, such as tablets); add AccountName into [advanced hunting](device-control-removable-storage-access-control.md#view-device-control-removable-storage-access-control-data-in-microsoft-defender-for-endpoint) -- **4.18.2111 or later**: Add 'Enable or Disable Removable Storage Access Control', 'Default Enforcement', client machine policy update time through PowerShell.+- **4.18.2111 or later**: Add 'Enable or Disable Removable Storage Access Control', 'Default Enforcement', client machine policy update time through PowerShell, file information :::image type="content" source="images/powershell.png" alt-text="The PowerShell interface."::: You can use the following properties to create a removable storage group: | **Type** | Defines the action for the removable storage groups in IncludedIDList. <p>Enforcement: Allow or Deny <p>Audit: AuditAllowed or AuditDenied<p> | Allow<p>Deny <p>AuditAllowed: Defines notification and event when access is allowed <p>AuditDenied: Defines notification and event when access is denied; has to work together with **Deny** entry.<p> When there are conflict types for the same media, the system will apply the first one in the policy. An example of a conflict type is **Allow** and **Deny**. | | **Sid** | Local user Sid or user Sid group or the Sid of the AD object, defines whether to apply this policy over a specific user or user group; one entry can have a maximum of one Sid and an entry without any Sid means applying the policy over the machine. | | | **ComputerSid** | Local computer Sid or computer Sid group or the Sid of the AD object, defines whether to apply this policy over a specific machine or machine group; one entry can have a maximum of one ComputerSid and an entry without any ComputerSid means applying the policy over the machine. If you want to apply an Entry to a specific user and specific machine, add both Sid and ComputerSid into the same Entry. | |-| **Options** | Defines whether to display notification or not |**0 or 4**: When Type Allow or Deny is selected. <p>0: nothing<p>4: disable **AuditAllowed** and **AuditDenied** for this Entry. Even if **Block** happens and the AuditDenied is setting configured, the system will not show notification. <p> When Type **AuditAllowed** is selected: <p>0: nothing <p>1: nothing <p>2: send event<p>3: send event <p> When Type **AuditDenied** is selected: <p>0: nothing <p>1: show notification <p>2: send event<p>3: show notification and send event | -|AccessMask|Defines the access. | **1-7**: <p>1: Read <p>2: Write <p>3: Read and Write <p>4: Execute <p>5: Read and Execute<p>6: Write and Execute <p>7: Read and Write and Execute | +| **Options** | Defines whether to display notification or not |**When Type Allow is selected**: <p>0: nothing<p>4: disable **AuditAllowed** and **AuditDenied** for this Entry. Even if **Allow** happens and the AuditAllowed is setting configured, the system will not send event. <p>8: capture file information and have a copy of the file as evidence for Write access. <p>16: capture file information for Write access. <p>**When Type Deny is selected**: <p>0: nothing<p>4: disable **AuditDenied** for this Entry. Even if **Block** happens and the AuditDenied is setting configured, the system will not show notification. <p>**When Type **AuditAllowed** is selected**: <p>0: nothing <p>1: nothing <p>2: send event<p>3: send event <p> **When Type **AuditDenied** is selected**: <p>0: nothing <p>1: show notification <p>2: send event<p>3: show notification and send event | +|AccessMask|Defines the access. | **Disk level access**: <p>1: Read <p>2: Write <p>4: Execute <p>**File system level access**: <p>8: File system Read <p>16: File system Write <p>32: File system Execute <p><p>You can have multiple access by performing binary OR operation, for example, the AccessMask for Read and Write and Execute will be 7; the AccessMask for Read and Write will be 3.| ## Common Removable Storage Access Control scenarios Before you get started with Removable Storage Access Control, you must confirm y 2. Combine all rules within `<PolicyRules>` `</PolicyRules>` into one xml file. If you want to restrict a specific user, then use SID property into the Entry. If there is no SID in the policy Entry, the Entry will be applied to everyone login instance for the machine.+ + If you want to monitor file information for Write access, use the right AccessMask with the right Option (8 or 16); here is the example of [Capture file information](https://github.com/microsoft/mdatp-devicecontrol/blob/main/Removable%20Storage%20Access%20Control%20Samples/Group%20Policy/Audit%20File%20Information.xml). The following image illustrates the usage of SID property, and an example of [Scenario 1: Prevent Write and Execute access to all but allow specific approved USBs](#scenario-1-prevent-write-and-execute-access-to-all-but-allow-specific-approved-usbs). Before you get started with Removable Storage Access Control, you must confirm y :::image type="content" source="images/148609685-4c05f002-5cbe-4aab-9245-83e730c5449e.png" alt-text="Enabled or Disabled device control in PowerShell code"::: +6. Set location for a copy of the file: if you want to have a copy of the file when Write access happens, you have to set the location where system can save the copy. + + You have to deploy this together with the right AccessMask and Option - see step 2 above. ++ :::image type="content" source="https://user-images.githubusercontent.com/81826151/156080704-19d68843-8ec4-4742-bdef-f8ba3bd4a636.png" alt-text="Group Policy - Set locaiton for file evidence"::: + ## Deploying and managing policy via Intune OMA-URI The Removable Storage Access Control feature enables you to apply policy via OMA-URI to either user or device, or both. Microsoft Endpoint Manager admin center (<https://endpoint.microsoft.com/>) \> * `./Vendor/MSFT/Defender/Configuration/DeviceControl/PolicyRules/%7bc544a991-5786-4402-949e-a032cb790d0e%7d/RuleData` - Data Type: String (XML file)+ + If you want to monitor file information for Write access, use the right AccessMask with the right Option (8 or 16); here is the example of [Capture file information](https://github.com/microsoft/mdatp-devicecontrol/blob/main/Removable%20Storage%20Access%20Control%20Samples/Intune%20OMA-URI/Audit%20File%20Information.xml). 3. Default enforcement: allows you to set default access (Deny or Allow) to removable media if there is no policy. For example, you only have policy (either Deny or Allow) for RemovableMediaDevices, but do not have any policy for CdRomDevices or WpdDevices, and you set default Deny through this policy, Read/Write/Execute access to CdRomDevices or WpdDevices will be blocked. Microsoft Endpoint Manager admin center (<https://endpoint.microsoft.com/>) \> * :::image type="content" source="images/148609770-3e555883-f26f-45ab-9181-3fb1ff7a38ac.png" alt-text="Removeable Storage Access Control in PowerShell code"::: +5. Set the location for a copy of the file: if you want to have a copy of the file when Write access happens, you have to set the location where the system can save the copy. + + - OMA-URI: `./Vendor/MSFT/Defender/Configuration/DataDuplicationRemoteLocation` ++ - Data Type: String + + You have to deploy this together with the right AccessMask and the right Option - see step 2 above. ++ :::image type="content" source="https://user-images.githubusercontent.com/81826151/156080498-68a807a9-6d7b-4265-92f7-ab8bf1c9a093.png" alt-text="Set locaiton for file evidence"::: + ## Deploying and managing policy by using Intune user interface This capability is available in the Microsoft Endpoint Manager admin center (<https://endpoint.microsoft.com/>). Go to **Endpoint Security** > **Attack Surface Reduction** > **Create Policy**. Choose **Platform: Windows 10 and later** with **Profile: Device Control**. If you are deploying and managing the policy via Group Policy, please make sure We don't backport the Group Policy configuration UX, but you can still get the related adml and admx files by clicking 'Raw' and 'Save as' at the [WindowsDefender.adml](https://github.com/microsoft/mdatp-devicecontrol/blob/main/Removable%20Storage%20Access%20Control%20Samples/WindowsDefender.adml) and [WindowsDefender.admx](https://github.com/microsoft/mdatp-devicecontrol/blob/main/Removable%20Storage%20Access%20Control%20Samples/WindowsDefender.admx) files. - ### How can I know whether the latest policy has been deployed to the target machine? You can run ΓÇÿGet-MpComputerStatusΓÇÖ on PowerShell as an Administrator. The following value will show whether the latest policy has been applied to the target machine. |
| security | Enable Network Protection | https://github.com/MicrosoftDocs/microsoft-365-docs/commits/public/microsoft-365/security/defender-endpoint/enable-network-protection.md | Title: Turn on network protection description: Enable network protection with Group Policy, PowerShell, or Mobile Device Management and Configuration Manager. -keywords: ANetwork protection, exploits, malicious website, ip, domain, domains, enable, turn on +keywords: Network protection, exploits, malicious website, ip, domain, domains, enable, turn on ms.prod: m365-security ms.mktglfcycl: manage ms.sitesec: library ms.localizationpriority: medium -+ ms.technology: mde If the Key is missing, Navigate to **SOFTWARE** \> **Microsoft** \> **Windows D - 2, or **Audit** mode :::image type="content" alt-text="Network Protection registry key." source="../../media/95341270-b738b280-08d3-11eb-84a0-16abb140c9fd.png" lightbox="../../media/95341270-b738b280-08d3-11eb-84a0-16abb140c9fd.png":::-+ + ## Enable network protection Enable network protection by using any of these methods: Enable network protection by using any of these methods: Use the [./Vendor/MSFT/Policy/Config/Defender/EnableNetworkProtection](/windows/client-management/mdm/policy-csp-defender) configuration service provider (CSP) to enable or disable network protection or enable audit mode. +[Update Microsoft Defender antimalware platform to the latest version](https://support.microsoft.com/topic/update-for-microsoft-defender-antimalware-platform-92e21611-8cf1-8e0e-56d6-561a07d144cc) before you enable or disable network protection or enable audit mode. ++ ### Microsoft Endpoint Manager 1. Sign into the Microsoft Endpoint Manager admin center (https://endpoint.microsoft.com). Confirm network protection is enabled on a local computer by using Registry edit 7. From the ribbon, select **Deploy** to deploy the policy to a collection. + > [!IMPORTANT] > Once you deploy an Exploit Guard policy from Configuration Manager, the Exploit Guard settings will not be removed from the clients if you remove the deployment. `Delete not supported` is recorded in the Configuration Manager client's ExploitGuardHandler.log if you remove the client's Exploit Guard deployment. <!--CMADO8538577--> > The following PowerShell script can be run under SYSTEM context to remove these settings:<!--CMADO9907132--> |
| security | Indicator File | https://github.com/MicrosoftDocs/microsoft-365-docs/commits/public/microsoft-365/security/defender-endpoint/indicator-file.md | Cert and File IoC policy handling conflict will follow the below order: - Else if the file is blocked by ASR rules, CFA, AV, SmartScreen, then **Block** - Else **Allow** (passes Windows Defender Application Control & AppLocker policy, no IoC rules apply to it) +>[!NOTE] +> In situations when Microsoft Defender Antivirus is set to **Block**, but Defender for Endpoint is set to **Allow**, the policy will default to **Allow**. + If there are conflicting file IoC policies with the same enforcement type and target, the policy of the more secure (meaning longer) hash will be applied. For example, an SHA-256 file hash IoC policy will win over an MD5 file hash IoC policy if both hash types define the same file. > [!WARNING] |
| security | Manage Auto Investigation | https://github.com/MicrosoftDocs/microsoft-365-docs/commits/public/microsoft-365/security/defender-endpoint/manage-auto-investigation.md | ms.prod: m365-security ms.mktglfcycl: deploy ms.sitesec: library ms.pagetype: security--++ ms.localizationpriority: medium audience: ITPro |
| security | Tvm Security Recommendation | https://github.com/MicrosoftDocs/microsoft-365-docs/commits/public/microsoft-365/security/defender-endpoint/tvm-security-recommendation.md | From the flyout, you can choose any of the following options: - [**Exception options**](tvm-exception.md) - Submit an exception, provide justification, and set exception duration if you can't remediate the issue yet. > [!NOTE]-> When a software change is made on a device, it typically takes 2 hours for the data to be reflected in the security portal. However, it may sometimes take longer. Configuration changes can take anywhere from 4 to 24 hours. +> When a software change is made on a Windows, Linux or macOS device, it typically takes 2-4 hours for the data to be reflected in the security portal. It can take up to 8 hours for changes on iOS and Android devices to be reflected. There may be situations where it takes longers. +> +> Configuration changes can take anywhere from 4 to 24 hours. ### Investigate changes in device exposure or impact |
| security | Alert Grading Playbook Email Forwarding | https://github.com/MicrosoftDocs/microsoft-365-docs/commits/public/microsoft-365/security/defender/alert-grading-playbook-email-forwarding.md | ms.sitesec: library ms.pagetype: security f1.keywords: - NOCSH--++ ms.localizationpriority: medium audience: ITPro |
| security | Alert Grading Playbook Inbox Forwarding Rules | https://github.com/MicrosoftDocs/microsoft-365-docs/commits/public/microsoft-365/security/defender/alert-grading-playbook-inbox-forwarding-rules.md | ms.sitesec: library ms.pagetype: security f1.keywords: - NOCSH--++ ms.localizationpriority: medium audience: ITPro |
| security | Alert Grading Playbook Inbox Manipulation Rules | https://github.com/MicrosoftDocs/microsoft-365-docs/commits/public/microsoft-365/security/defender/alert-grading-playbook-inbox-manipulation-rules.md | ms.sitesec: library ms.pagetype: security f1.keywords: - NOCSH--++ ms.localizationpriority: medium audience: ITPro |
| security | Alert Grading Playbooks | https://github.com/MicrosoftDocs/microsoft-365-docs/commits/public/microsoft-365/security/defender/alert-grading-playbooks.md | ms.sitesec: library ms.pagetype: security f1.keywords: - NOCSH--++ ms.localizationpriority: medium audience: ITPro |
| security | Eval Defender Identity Architecture | https://github.com/MicrosoftDocs/microsoft-365-docs/commits/public/microsoft-365/security/defender/eval-defender-identity-architecture.md | ms.sitesec: library ms.pagetype: security f1.keywords: - NOCSH--++ Last updated 07/09/2021 ms.localizationpriority: medium |
| security | Eval Defender Identity Enable Eval | https://github.com/MicrosoftDocs/microsoft-365-docs/commits/public/microsoft-365/security/defender/eval-defender-identity-enable-eval.md | ms.sitesec: library ms.pagetype: security f1.keywords: - NOCSH--++ Last updated 07/09/2021 ms.localizationpriority: medium |
| security | Eval Defender Identity Overview | https://github.com/MicrosoftDocs/microsoft-365-docs/commits/public/microsoft-365/security/defender/eval-defender-identity-overview.md | ms.sitesec: library ms.pagetype: security f1.keywords: - NOCSH--++ Last updated 07/09/2021 ms.localizationpriority: medium |
| security | Eval Defender Identity Pilot | https://github.com/MicrosoftDocs/microsoft-365-docs/commits/public/microsoft-365/security/defender/eval-defender-identity-pilot.md | ms.sitesec: library ms.pagetype: security f1.keywords: - NOCSH--++ Last updated 07/09/2021 ms.localizationpriority: medium |
| security | Eval Defender Investigate Respond Additional | https://github.com/MicrosoftDocs/microsoft-365-docs/commits/public/microsoft-365/security/defender/eval-defender-investigate-respond-additional.md | ms.pagetype: security f1.keywords: - NOCSH ms.localizationpriority: medium--++ Last updated 07/09/2021 audience: ITPro |
| security | Eval Defender Investigate Respond Simulate Attack | https://github.com/MicrosoftDocs/microsoft-365-docs/commits/public/microsoft-365/security/defender/eval-defender-investigate-respond-simulate-attack.md | ms.sitesec: library ms.pagetype: security f1.keywords: - NOCSH--++ Last updated 07/09/2021 ms.localizationpriority: medium |
| security | Eval Defender Investigate Respond | https://github.com/MicrosoftDocs/microsoft-365-docs/commits/public/microsoft-365/security/defender/eval-defender-investigate-respond.md | ms.pagetype: security f1.keywords: - NOCSH ms.localizationpriority: medium--++ Last updated 07/09/2021 audience: ITPro |
| security | First Incident Analyze | https://github.com/MicrosoftDocs/microsoft-365-docs/commits/public/microsoft-365/security/defender/first-incident-analyze.md | ms.sitesec: library ms.pagetype: security f1.keywords: - NOCSH--++ ms.localizationpriority: medium audience: ITPro |
| security | First Incident Overview | https://github.com/MicrosoftDocs/microsoft-365-docs/commits/public/microsoft-365/security/defender/first-incident-overview.md | ms.sitesec: library ms.pagetype: security f1.keywords: - NOCSH--++ ms.localizationpriority: medium audience: ITPro |
| security | First Incident Path Identity | https://github.com/MicrosoftDocs/microsoft-365-docs/commits/public/microsoft-365/security/defender/first-incident-path-identity.md | ms.sitesec: library ms.pagetype: security f1.keywords: - NOCSH--++ ms.localizationpriority: medium audience: ITPro |
| security | First Incident Path Phishing | https://github.com/MicrosoftDocs/microsoft-365-docs/commits/public/microsoft-365/security/defender/first-incident-path-phishing.md | ms.sitesec: library ms.pagetype: security f1.keywords: - NOCSH--++ ms.localizationpriority: medium audience: ITPro |
| security | First Incident Post | https://github.com/MicrosoftDocs/microsoft-365-docs/commits/public/microsoft-365/security/defender/first-incident-post.md | ms.sitesec: library ms.pagetype: security f1.keywords: - NOCSH--++ ms.localizationpriority: medium audience: ITPro |
| security | First Incident Prepare | https://github.com/MicrosoftDocs/microsoft-365-docs/commits/public/microsoft-365/security/defender/first-incident-prepare.md | ms.sitesec: library ms.pagetype: security f1.keywords: - NOCSH--++ ms.localizationpriority: medium audience: ITPro |
| security | First Incident Remediate | https://github.com/MicrosoftDocs/microsoft-365-docs/commits/public/microsoft-365/security/defender/first-incident-remediate.md | ms.sitesec: library ms.pagetype: security f1.keywords: - NOCSH--++ ms.localizationpriority: medium audience: ITPro |
| security | Incident Queue | https://github.com/MicrosoftDocs/microsoft-365-docs/commits/public/microsoft-365/security/defender/incident-queue.md | ms.sitesec: library ms.pagetype: security f1.keywords: - NOCSH--++ ms.localizationpriority: medium audience: ITPro |
| security | Incident Response Overview | https://github.com/MicrosoftDocs/microsoft-365-docs/commits/public/microsoft-365/security/defender/incident-response-overview.md | ms.sitesec: library ms.pagetype: security f1.keywords: - NOCSH--++ ms.localizationpriority: medium audience: ITPro |
| security | Incidents Overview | https://github.com/MicrosoftDocs/microsoft-365-docs/commits/public/microsoft-365/security/defender/incidents-overview.md | ms.sitesec: library ms.pagetype: security f1.keywords: - NOCSH--++ ms.localizationpriority: medium audience: ITPro |
| security | Integrate Microsoft 365 Defender Secops Plan | https://github.com/MicrosoftDocs/microsoft-365-docs/commits/public/microsoft-365/security/defender/integrate-microsoft-365-defender-secops-plan.md | ms.sitesec: library ms.pagetype: security f1.keywords: - NOCSH--++ ms.localizationpriority: medium audience: ITPro |
| security | Integrate Microsoft 365 Defender Secops Readiness | https://github.com/MicrosoftDocs/microsoft-365-docs/commits/public/microsoft-365/security/defender/integrate-microsoft-365-defender-secops-readiness.md | ms.sitesec: library ms.pagetype: security f1.keywords: - NOCSH--++ ms.localizationpriority: medium audience: ITPro |
| security | Integrate Microsoft 365 Defender Secops Roles | https://github.com/MicrosoftDocs/microsoft-365-docs/commits/public/microsoft-365/security/defender/integrate-microsoft-365-defender-secops-roles.md | ms.sitesec: library ms.pagetype: security f1.keywords: - NOCSH--++ ms.localizationpriority: medium audience: ITPro |
| security | Integrate Microsoft 365 Defender Secops Services | https://github.com/MicrosoftDocs/microsoft-365-docs/commits/public/microsoft-365/security/defender/integrate-microsoft-365-defender-secops-services.md | ms.sitesec: library ms.pagetype: security f1.keywords: - NOCSH--++ ms.localizationpriority: medium audience: ITPro |
| security | Integrate Microsoft 365 Defender Secops Tasks | https://github.com/MicrosoftDocs/microsoft-365-docs/commits/public/microsoft-365/security/defender/integrate-microsoft-365-defender-secops-tasks.md | ms.sitesec: library ms.pagetype: security f1.keywords: - NOCSH--++ ms.localizationpriority: medium audience: ITPro |
| security | Integrate Microsoft 365 Defender Secops Use Cases | https://github.com/MicrosoftDocs/microsoft-365-docs/commits/public/microsoft-365/security/defender/integrate-microsoft-365-defender-secops-use-cases.md | ms.sitesec: library ms.pagetype: security f1.keywords: - NOCSH--++ ms.localizationpriority: medium audience: ITPro |
| security | Integrate Microsoft 365 Defender Secops | https://github.com/MicrosoftDocs/microsoft-365-docs/commits/public/microsoft-365/security/defender/integrate-microsoft-365-defender-secops.md | ms.sitesec: library ms.pagetype: security f1.keywords: - NOCSH--++ ms.localizationpriority: medium audience: ITPro |
| security | Investigate Alerts | https://github.com/MicrosoftDocs/microsoft-365-docs/commits/public/microsoft-365/security/defender/investigate-alerts.md | ms.sitesec: library ms.pagetype: security f1.keywords: - NOCSH--++ ms.localizationpriority: medium audience: ITPro |
| security | Investigate Incidents | https://github.com/MicrosoftDocs/microsoft-365-docs/commits/public/microsoft-365/security/defender/investigate-incidents.md | ms.sitesec: library ms.pagetype: security f1.keywords: - NOCSH--++ ms.localizationpriority: medium audience: ITPro |
| security | Investigate Users | https://github.com/MicrosoftDocs/microsoft-365-docs/commits/public/microsoft-365/security/defender/investigate-users.md | ms.mktglfcycl: deploy ms.localizationpriority: medium f1.keywords: - NOCSH--++ Last updated audience: ITPro |
| security | M365d Action Center | https://github.com/MicrosoftDocs/microsoft-365-docs/commits/public/microsoft-365/security/defender/m365d-action-center.md | ms.sitesec: library ms.pagetype: security f1.keywords: - NOCSH--++ ms.localizationpriority: medium audience: ITPro |
| security | M365d Autoir Actions | https://github.com/MicrosoftDocs/microsoft-365-docs/commits/public/microsoft-365/security/defender/m365d-autoir-actions.md | ms.sitesec: library ms.pagetype: security f1.keywords: - NOCSH--++ ms.localizationpriority: medium audience: ITPro |
| security | M365d Autoir Report False Positives Negatives | https://github.com/MicrosoftDocs/microsoft-365-docs/commits/public/microsoft-365/security/defender/m365d-autoir-report-false-positives-negatives.md | ms.sitesec: library ms.pagetype: security f1.keywords: - NOCSH--++ ms.localizationpriority: medium audience: ITPro |
| security | M365d Autoir Results | https://github.com/MicrosoftDocs/microsoft-365-docs/commits/public/microsoft-365/security/defender/m365d-autoir-results.md | ms.sitesec: library ms.pagetype: security f1.keywords: - NOCSH--++ ms.localizationpriority: medium audience: ITPro |
| security | M365d Autoir | https://github.com/MicrosoftDocs/microsoft-365-docs/commits/public/microsoft-365/security/defender/m365d-autoir.md | ms.sitesec: library ms.pagetype: security f1.keywords: - NOCSH--++ ms.localizationpriority: medium audience: ITPro |
| security | M365d Configure Auto Investigation Response | https://github.com/MicrosoftDocs/microsoft-365-docs/commits/public/microsoft-365/security/defender/m365d-configure-auto-investigation-response.md | Title: Configure automated investigation and response capabilities in Microsoft 365 Defender description: Configure automated investigation and response with self-healing in Microsoft 365 Defender search.appverid: MET150--++ audience: ITPro |
| security | M365d Remediation Actions | https://github.com/MicrosoftDocs/microsoft-365-docs/commits/public/microsoft-365/security/defender/m365d-remediation-actions.md | ms.sitesec: library ms.pagetype: security f1.keywords: - NOCSH--++ ms.localizationpriority: medium audience: ITPro |
| security | Manage Incidents | https://github.com/MicrosoftDocs/microsoft-365-docs/commits/public/microsoft-365/security/defender/manage-incidents.md | ms.sitesec: library ms.pagetype: security f1.keywords: - NOCSH--++ ms.localizationpriority: medium audience: ITPro |
| security | Microsoft 365 Defender Integration With Azure Sentinel | https://github.com/MicrosoftDocs/microsoft-365-docs/commits/public/microsoft-365/security/defender/microsoft-365-defender-integration-with-azure-sentinel.md | ms.sitesec: library ms.pagetype: security f1.keywords: - NOCSH--++ ms.localizationpriority: medium audience: ITPro |
| security | Microsoft 365 Defender Train Security Staff | https://github.com/MicrosoftDocs/microsoft-365-docs/commits/public/microsoft-365/security/defender/microsoft-365-defender-train-security-staff.md | ms.sitesec: library ms.pagetype: security f1.keywords: - NOCSH--++ localization_priority: Normal audience: ITPro |
| security | Air Custom Reporting | https://github.com/MicrosoftDocs/microsoft-365-docs/commits/public/microsoft-365/security/office-365-security/air-custom-reporting.md | Title: Custom reporting solutions with automated investigation and response keywords: SIEM, API, AIR, autoIR, Microsoft Defender for Endpoint, automated investigation, integration, custom report f1.keywords: - NOCSH--++ audience: ITPro |
| security | Air Remediation Actions | https://github.com/MicrosoftDocs/microsoft-365-docs/commits/public/microsoft-365/security/office-365-security/air-remediation-actions.md | Title: Remediation actions in Microsoft Defender for Office 365 keywords: AIR, autoIR, Microsoft Defender for Endpoint, automated, investigation, response, remediation, threats, advanced, threat, protection f1.keywords: - NOCSH--++ audience: ITPro |
| security | Air Report False Positives Negatives | https://github.com/MicrosoftDocs/microsoft-365-docs/commits/public/microsoft-365/security/office-365-security/air-report-false-positives-negatives.md | ms.sitesec: library ms.pagetype: security f1.keywords: - NOCSH--++ ms.prod: m365-security Last updated 01/29/2021 ms.localizationpriority: medium |
| security | Air Review Approve Pending Completed Actions | https://github.com/MicrosoftDocs/microsoft-365-docs/commits/public/microsoft-365/security/office-365-security/air-review-approve-pending-completed-actions.md | Title: Review and manage remediation actions in Microsoft Defender for Office 36 keywords: AIR, autoIR, Microsoft Defender for Endpoint, automated, investigation, response, remediation, threats, advanced, threat, protection f1.keywords: - NOCSH--++ audience: ITPro |
| security | Air View Investigation Results | https://github.com/MicrosoftDocs/microsoft-365-docs/commits/public/microsoft-365/security/office-365-security/air-view-investigation-results.md | Title: View the results of an automated investigation in Microsoft 365 keywords: AIR, autoIR, Microsoft Defender for Endpoint, automated, investigation, remediation, actions f1.keywords: - NOCSH--++ audience: ITPro |
| security | Automated Investigation Response Office | https://github.com/MicrosoftDocs/microsoft-365-docs/commits/public/microsoft-365/security/office-365-security/automated-investigation-response-office.md | Title: How automated investigation and response works in Microsoft Defender for Office 365 f1.keywords: - NOCSH--++ audience: ITPro |
| security | Email Analysis Investigations | https://github.com/MicrosoftDocs/microsoft-365-docs/commits/public/microsoft-365/security/office-365-security/email-analysis-investigations.md | Title: Email analysis in investigations for Microsoft Defender for Office 365 f1.keywords: - NOCSH--++ audience: ITPro |
| security | External Email Forwarding | https://github.com/MicrosoftDocs/microsoft-365-docs/commits/public/microsoft-365/security/office-365-security/external-email-forwarding.md | The following types of automatic forwarding are available in Microsoft 365: You can use outbound spam filter policies to control automatic forwarding to external recipients. Three settings are available: -- **Automatic - System-controlled**: Automatic external forwarding is blocked. Internal automatic forwarding of messages will continue to work. This is the default setting.+- **Automatic - System-controlled**: This is the default setting. This setting is now the same as **Off**. When this setting was originally introduced, it was equivalent to **On**. Over time, thanks to the principles of [secure by default](secure-by-default.md), this setting was gradually changed to **Off** for all customers. For more information, see [this blog post](https://techcommunity.microsoft.com/t5/exchange-team-blog/all-you-need-to-know-about-automatic-email-forwarding-in/ba-p/2074888). - **On**: Automatic external forwarding is allowed and not restricted. - **Off**: Automatic external forwarding is disabled and will result in a non-delivery report (also known as an NDR or bounce message) to the sender. As an admin, you might have already configured other controls to allow or block - [Remote domains](/exchange/mail-flow-best-practices/remote-domains/remote-domains) to allow or block automatic email forwarding to some or all external domains. - Conditions and actions in Exchange [mail flow rules](/exchange/security-and-compliance/mail-flow-rules/mail-flow-rules) (also known as transport rules) to detect and block automatically forwarded messages to external recipients. -Remote domain settings and mail flow rules are independent of the settings in outbound spam filter policies. For example: +When one setting allows external forwarding, but another setting blocks external forwarding, the block typically wins. Examples are described in the following table: -- You allow automatic forwarding for a remote domain, but you block automatic forwarding in outbound spam filter policies. In this example, automatically forwarded messages are blocked.-- You allow automatic forwarding in outbound spam filter policies, but you use mail flow rules or remote domain settings to block automatically forwarded email. In this example, the mail flow rules or remote domain settings will block automatically forwarded messages.+<br> -This feature independence allows you to (for example) allow automatic forwarding in outbound spam filter policies, but use remote domains to control the external domains that users can forward messages to. +**** ++|Scenario|Result| +||| +|<ul><li>You configure remote domain settings to allow automatic forwarding.</li><li>Automatic forwarding in the outbound spam filter policy is set to **Off**.</li></ul>|Automatically forwarded messages to recipients in the affected domains are blocked.| +|<ul><li>You configure remote domain settings to allow automatic forwarding.</li><li>Automatic forwarding in the outbound spam filter policy is set to **Automatic - System-controlled**.</li></ul>|Automatically forwarded messages to recipients in the affected domains are blocked. <p> As described earlier, **Automatic - System-controlled** used to mean **On**, but the setting has changed over time to mean **Off** in all organizations. <p> For absolute clarity, you should configure your outbound spam filter policy to **On** or **Off**.| +|<ul><li>Automatic forwarding in the outbound spam filter policy is set to **On**</li><li>You use mail flow rules or remote domains to block automatically forwarded email.</li></ul>|Automatically forwarded messages to affected recipients are blocked by mail flow rules or remote domains.| +| ++You can use this behavior (for example) to allow automatic forwarding in outbound spam filter policies, but use remote domains to control the external domains that users can forward messages to. ## How to find users that are automatically forwarding |
| security | Identity Access Policies Guest Access | https://github.com/MicrosoftDocs/microsoft-365-docs/commits/public/microsoft-365/security/office-365-security/identity-access-policies-guest-access.md | Title: Identity and device access policies for allowing guest and external user description: Describes the recommended Conditional Access and related policies for protecting access of guests and external users. ms.prod: m365-security --++ audience: Admin f1.keywords: |
| security | Identity Access Policies | https://github.com/MicrosoftDocs/microsoft-365-docs/commits/public/microsoft-365/security/office-365-security/identity-access-policies.md | Title: Common Zero Trust identity and device access policies - Microsoft 365 for enterprise | Microsoft Docs description: Describes the recommended common Zero Trust identity and device access policies and configurations.--++ ms.prod: m365-security |
| security | Identity Access Prerequisites | https://github.com/MicrosoftDocs/microsoft-365-docs/commits/public/microsoft-365/security/office-365-security/identity-access-prerequisites.md | Title: Prerequisite work for implementing identity and device access policies - Microsoft 365 for enterprise | Microsoft Docs description: This article describes the prerequisites you need to meet to use Zero Trust identity and device access policies and configurations.--++ ms.prod: m365-security |
| security | Microsoft 365 Continuous Access Evaluation | https://github.com/MicrosoftDocs/microsoft-365-docs/commits/public/microsoft-365/security/office-365-security/microsoft-365-continuous-access-evaluation.md | Title: Continuous access evaluation for Microsoft 365 - Microsoft 365 for enterprise description: Describes how conditional access evaluation for Microsoft 365 and Azure AD proactively terminates active user sessions and enforces tenant policy changes in near real time.--++ ms.prod: m365-security |
| security | Microsoft 365 Policies Configurations | https://github.com/MicrosoftDocs/microsoft-365-docs/commits/public/microsoft-365/security/office-365-security/microsoft-365-policies-configurations.md | Title: Zero Trust identity and device access configurations - Microsoft 365 for enterprise description: Describes Microsoft recommendations and core concepts for deploying secure email, docs, and apps policies and configurations for Zero Trust.--++ ms.prod: m365-security |
| security | Office 365 Air | https://github.com/MicrosoftDocs/microsoft-365-docs/commits/public/microsoft-365/security/office-365-security/office-365-air.md | Title: Automated investigation and response in Microsoft Defender for Office 365 keywords: AIR, autoIR, Microsoft Defender for Endpoint, automated, investigation, response, remediation, threats, advanced, threat, protection f1.keywords: - NOCSH--++ audience: ITPro |
| security | Secure Email Recommended Policies | https://github.com/MicrosoftDocs/microsoft-365-docs/commits/public/microsoft-365/security/office-365-security/secure-email-recommended-policies.md | Title: Secure email recommended policies - Microsoft 365 for enterprise | Microsoft Docs description: Describes the policies for Microsoft recommendations about how to apply email policies and configurations.--++ ms.prod: m365-security |
| security | Sharepoint File Access Policies | https://github.com/MicrosoftDocs/microsoft-365-docs/commits/public/microsoft-365/security/office-365-security/sharepoint-file-access-policies.md | Title: Recommended secure document policies - Microsoft 365 for enterprise | Microsoft Docs description: Describes the policies for Microsoft recommendations about how to secure SharePoint file access.--++ ms.prod: m365-security |
| security | View Email Security Reports | https://github.com/MicrosoftDocs/microsoft-365-docs/commits/public/microsoft-365/security/office-365-security/view-email-security-reports.md | You can filter both the chart and the details table by clicking **Filter** and s When you're finished configuring the filters, click **Apply**, **Cancel**, or **Clear filters**. -On the main report page, the  **[Create schedule](#schedule-report)**,  **[Request report](#request-report)**, and  **[Export](#export-report)** buttons are available. +On the **Compromised users** page, the  **[Create schedule](#schedule-report)**,  **[Request report](#request-report)**, and  **[Export](#export-report)** buttons are available.  You can filter both the chart and the details table by clicking **Filter** and s When you're finished configuring the filters, click **Apply**, **Cancel**, or **Clear filters**. -On the main report page, the  **[Create schedule](#schedule-report)**,  **[Request report](#request-report)**, and  **[Export](#export-report)** buttons are available. +On the **Exchange transport rule report** page, the  **[Create schedule](#schedule-report)**,  **[Request report](#request-report)**, and  **[Export](#export-report)** buttons are available. ### Chart breakdown by Severity You can filter both the chart and the details table by clicking **Filter** and s When you're finished configuring the filters, click **Apply**, **Cancel**, or **Clear filters**. -On the main report page, the  **[Create schedule](#schedule-report)**,  **[Request report](#request-report)**, and  **[Export](#export-report)** buttons are available. +On the **Exchange transport rule report** page, the  **[Create schedule](#schedule-report)**,  **[Request report](#request-report)**, and  **[Export](#export-report)** buttons are available. ## Forwarding report You can filter both the chart and the details table by clicking **Filter** and s When you're finished configuring the filters, click **Apply**, **Cancel**, or **Clear filters**. -Back on the main report page, if you click **Choose a category for more details**, you can select from the following values: +Back on the **Mailflow status report** page, if you click **Choose a category for more details**, you can select from the following values: - **Phishing email**: This selection takes you to the [Threat protection status report](view-email-security-reports.md#threat-protection-status-report). - **Malware in email**: This selection takes you to the [Threat protection status report](view-email-security-reports.md#threat-protection-status-report). - **Spam detections**: This selection takes you to the [Spam Detections report](view-email-security-reports.md#spam-detections-report). - **Edge blocked spam**: This selection takes you to the [Spam Detections report](view-email-security-reports.md#spam-detections-report). -On the main report page, the  **[Create schedule](#schedule-report)** and  **[Export](#export-report)** buttons are available. +On the **Mailflow status report** page, the  **[Create schedule](#schedule-report)** and  **[Export](#export-report)** buttons are available. ### Direction view for the Mailflow status report You can filter both the chart and the details table by clicking **Filter** and s When you're finished configuring the filters, click **Apply**, **Cancel**, or **Clear filters**. -Back on the main report page, if you click **Choose a category for more details**, you can select from the following values: +Back on the **Mailflow status report** page, if you click **Choose a category for more details**, you can select from the following values: - **Phishing email**: This selection takes you to the [Threat protection status report](view-email-security-reports.md#threat-protection-status-report). - **Malware in email**: This selection takes you to the [Threat protection status report](view-email-security-reports.md#threat-protection-status-report). - **Spam detections**: This selection takes you to the [Spam Detections report](view-email-security-reports.md#spam-detections-report). - **Edge blocked spam**: This selection takes you to the [Spam Detections report](view-email-security-reports.md#spam-detections-report). -On the main report page, the  **Create schedule** and  **Export** buttons are available. +On the **Mailflow status report** page, the  **Create schedule** and  **Export** buttons are available. ### Mailflow view for the Mailflow status report You can filter both the chart and the details table by clicking **Filter** and s When you're finished configuring the filters, click **Apply**, **Cancel**, or **Clear filters**. -Back on the main report page, you can click **Show trends** to see trend graphs in the **Mailflow trends** flyout that appears. +Back on the **Mailflow status report** page, you can click **Show trends** to see trend graphs in the **Mailflow trends** flyout that appears.  -On the main report page, the  **Export** button is available. +On the **Mailflow status report** page, the  **Export** button is available. ## Malware detections report The details table below the graph shows the following information: For more information about composite authentication result codes, see [Anti-spam message headers in Microsoft 365](anti-spam-message-headers.md). -On the main report page, the  **[Create schedule](#schedule-report)**,  **[Request report](#request-report)**, and  **[Export](#export-report)** buttons are available. +On the **Spoof detections** page, the  **[Create schedule](#schedule-report)**,  **[Request report](#request-report)**, and  **[Export](#export-report)** buttons are available. ## Submissions report You can filter both the chart and the details table by clicking **Filter** and s The details table below the graph shows the same information and has the same **Group** or **Customize columns** options as on the **Submitted for analysis** tab at **Email & collaboration** \> **Submissions**. For more information, see [View admin submissions to Microsoft](admin-submission.md#view-admin-submissions-to-microsoft). -On the main report page, the **[Export](#export-report)** button is available. +On the **Submissions** page, the **[Export](#export-report)** button is available.  If you click **Filter**, the following filters are available: When you're finished configuring the filters, click **Apply**, **Cancel**, or **Clear filters**. -On the main report page, the  **[Create schedule](#schedule-report)**,  **[Request report](#request-report)**, and  **[Export](#export-report)** buttons are available. +On the **Threat protection status** page, the  **[Create schedule](#schedule-report)**,  **[Request report](#request-report)**, and  **[Export](#export-report)** buttons are available. ### View data by Email \> Spam and Chart breakdown by Detection Technology If you click **Filter**, the following filters are available: When you're finished configuring the filters, click **Apply**, **Cancel**, or **Clear filters**. -On the main report page, the  **[Create schedule](#schedule-report)**,  **[Request report](#request-report)**, and  **[Export](#export-report)** buttons are available. +On the **Threat protection status** page, the  **[Create schedule](#schedule-report)**,  **[Request report](#request-report)**, and  **[Export](#export-report)** buttons are available. ### View data by Email \> Malware and Chart breakdown by Detection Technology If you click **Filter**, the following filters are available: When you're finished configuring the filters, click **Apply**, **Cancel**, or **Clear filters**. -On the main report page, the  **[Create schedule](#schedule-report)**,  **[Request report](#request-report)**, and  **[Export](#export-report)** buttons are available. +On the**Threat protection status** page, the  **[Create schedule](#schedule-report)**,  **[Request report](#request-report)**, and  **[Export](#export-report)** buttons are available. ### Chart breakdown by Policy type If you click **Filter**, the following filters are available: When you're finished configuring the filters, click **Apply**, **Cancel**, or **Clear filters**. -On the main report page, the  **[Create schedule](#schedule-report)**,  **[Request report](#request-report)**, and  **[Export](#export-report)** buttons are available. +On the **Threat protection status** page, the  **[Create schedule](#schedule-report)**,  **[Request report](#request-report)**, and  **[Export](#export-report)** buttons are available. ### Chart breakdown by Delivery status If you click **Filter**, the following filters are available: When you're finished configuring the filters, click **Apply**, **Cancel**, or **Clear filters**. -On the main report page, the  **[Create schedule](#schedule-report)**,  **[Request report](#request-report)**, and  **[Export](#export-report)** buttons are available. +On the **Threat protection status** page, the  **[Create schedule](#schedule-report)**,  **[Request report](#request-report)**, and  **[Export](#export-report)** buttons are available. ### View data by Content \> Malware If you click **Filter**, the following filters are available: When you're finished configuring the filters, click **Apply**, **Cancel**, or **Clear filters**. -On the main report page, the  **[Create schedule](#schedule-report)**,  **[Request report](#request-report)**, and  **[Export](#export-report)** buttons are available. +On the **Threat protection status** page, the  **[Create schedule](#schedule-report)**,  **[Request report](#request-report)**, and  **[Export](#export-report)** buttons are available. ### View data by System override and Chart breakdown by Reason If you click **Filter**, the following filters are available: When you're finished configuring the filters, click **Apply**, **Cancel**, or **Clear filters**. -On the main report page, the  **[Export](#export-report)** button is available. +On the **Threat protection status** page, the  **[Export](#export-report)** button is available. ### View data by System override and Chart breakdown by Delivery location If you click **Filter**, the following filters are available: When you're finished configuring the filters, click **Apply**, **Cancel**, or **Clear filters**. -On the main report page, the  **[Export](#export-report)** button is available. +On the **Threat protection status** page, the  **[Export](#export-report)** button is available. ## Top malware report On the **Top malware report** page, a larger version of the pie chart is display If you click **Filter**, you can specify a date range with **Start date** and **End date**. -On the main report page, the  **[Create schedule](#schedule-report)** and  **[Export](#export-report)** buttons are available. +On the **Top malware** page, the  **[Create schedule](#schedule-report)** and  **[Export](#export-report)** buttons are available.  ## Top senders and recipients report -The **Top senders and recipient** report is available in both EOP and Defender for Office 365; however, the reports contain different data. For example, EOP customers can view information about top malware, spam, and phishing (spoofing) recipients, but not information about malware detected by [Safe Attachments](safe-attachments.md) or phishing detected by [impersonation protection](set-up-anti-phishing-policies.md#impersonation-settings-in-anti-phishing-policies-in-microsoft-defender-for-office-365). +The **Top senders and recipients** report is available in both EOP and Defender for Office 365; however, the reports contain different data. For example, EOP customers can view information about top malware, spam, and phishing (spoofing) recipients, but not information about malware detected by [Safe Attachments](safe-attachments.md) or phishing detected by [impersonation protection](set-up-anti-phishing-policies.md#impersonation-settings-in-anti-phishing-policies-in-microsoft-defender-for-office-365). The **Top senders and recipients** shows the top messages senders in your organization, as well as the top recipients for messages that were detected by EOP and Defender for Office 365 protection features. By default, the report shows data for the last week, but data is available for the last 90 days. You can filter both the chart and the details table by clicking **Filter** and s When you're finished configuring the filters, click **Apply**, **Cancel**, or **Clear filters**. -On the main report page, the  **Export** button is available. +On the **Top senders and recipients** page, the  **Export** button is available.  To submit a message to Microsoft for analysis, select the message entry from the - **Report spam**' - **Trigger investigation** (Defender for Office 365) -On the main report page, the  **[Export](#export-report)** button is available. +On the **User reported messages** page, the  **[Export](#export-report)** button is available. ## What permissions are needed to view these reports? If you are not seeing data in your reports, check the filters that you're using ## Schedule report -1. On the main report page, click  **Create schedule**. +1. On the main page for the specific report, click  **Create schedule**. 2. The **Create scheduled report** wizard opens. On the **Name scheduled report** page, review or customize the **Name** value, and then click **Next**. 3. On the **Set preferences** page, configure the following settings: - **Frequency**: Select one of the following values: To manage scheduled reports that you've already created, do the following steps: ## Request report -1. On the main report page, click  **Request report**. +1. On the main page for the specific report, click  **Request report**. 2. The **Create on-demand report** wizard opens. On the **Name on-demand report** page, review or customize the **Name** value, and then click **Next**. 3. On the **Set preferences** page, review or configure the following settings: - **Start date**: When generation of the report begins. The default value is one month ago. To manage scheduled reports that you've already created, do the following steps: ## Export report -1. On the main report page, click  **Export** (if that link is available). --If you click on the main report page, an **Export conditions** flyout appears where you can configure the following settings: +On the main page for the specific report, click  **Export** (if that link is available). An **Export conditions** flyout appears where you can configure the following settings: - **Select a view to export**: Select one of the following values: - **Summary**: Data is available for the last 90 days. |
| solutions | Allow Members To Send As Or Send On Behalf Of Group | https://github.com/MicrosoftDocs/microsoft-365-docs/commits/public/microsoft-365/solutions/allow-members-to-send-as-or-send-on-behalf-of-group.md | This section explains how to allow users to send email as a group in the<a href= 1. In the Exchange admin center, go to **Recipients** \> <a href="https://go.microsoft.com/fwlink/?linkid=2183233" target="_blank">**Groups**</a>. -2. Select **Edit**  on the group that you want to allow users to send as. +2. Select the group that you want to allow users to send as. -3. Select **group delegation**. +3. Select **Settings** > **Edit manage delegates**. -4. In the **Send As** section, select the **+** sign to add the users that you want to send as the Group. - -  +4. In the **Add a delegate** section, enter the email address of the user that you would like to have **Send as** access. -5. Type to search or pick a user from the list. Select **OK** and **Save**. +5. Select **Permission Type** as **Send as** from the drop-down. ++6. Select **Save changes**. + -  - ## Allow members to send email on behalf of a group This section explains how to allow users to send email on behalf of a group in the <a href="https://go.microsoft.com/fwlink/p/?linkid=2059104" target="_blank">Exchange admin center (EAC)</a> in Exchange Online. 1. In the Exchange admin center, go to **Recipients** \> <a href="https://go.microsoft.com/fwlink/?linkid=2183233" target="_blank">**Groups**</a>. -2. Select **Edit**  on the group that you want to allow users to send as. +2. Select the group that you want to allow users to send on behalf of. -3. Select **group delegation**. +3. Select **Settings** > **Edit manage delegates**. -4. In the Send on Behalf section, select the **+** sign to add the users that you want to send as the Group. - -  +4. In the **Add a delegate** section, enter the email address of the user that you would like to have **Send as** access. -5. Type to search or pick a user from the list. Select **OK** and **Save**. - -  +5. Select **Permission Type** as **Send on behalf** from the drop-down. ++6. Select **Save changes**. ## Related articles |
| solutions | Contoso Remote Onsite Work | https://github.com/MicrosoftDocs/microsoft-365-docs/commits/public/microsoft-365/solutions/contoso-remote-onsite-work.md | Title: "Contoso's COVID-19 response and support for hybrid work"-+ f1.keywords: - NOCSH-+ audience: ITPro |
| solutions | Empower People To Work Remotely Manage Endpoints | https://github.com/MicrosoftDocs/microsoft-365-docs/commits/public/microsoft-365/solutions/empower-people-to-work-remotely-manage-endpoints.md | Title: "Step 4. Deploy endpoint management for your devices, PCs, and other endpoints" f1.keywords: - NOCSH--++ audience: ITPro |
| solutions | Empower People To Work Remotely Remote Access | https://github.com/MicrosoftDocs/microsoft-365-docs/commits/public/microsoft-365/solutions/empower-people-to-work-remotely-remote-access.md | Title: "Step 2. Provide remote access to on-premises apps and services" f1.keywords: - NOCSH--++ audience: ITPro |
| solutions | Empower People To Work Remotely Secure Sign In | https://github.com/MicrosoftDocs/microsoft-365-docs/commits/public/microsoft-365/solutions/empower-people-to-work-remotely-secure-sign-in.md | Title: "Step 1. Increase sign-in security for hybrid workers with MFA" f1.keywords: - NOCSH--++ audience: ITPro |
| solutions | Empower People To Work Remotely Security Compliance | https://github.com/MicrosoftDocs/microsoft-365-docs/commits/public/microsoft-365/solutions/empower-people-to-work-remotely-security-compliance.md | Title: "Step 3: Deploy security and compliance for hybrid workers" f1.keywords: - NOCSH--++ audience: ITPro |
| solutions | Empower People To Work Remotely Teams Productivity Apps | https://github.com/MicrosoftDocs/microsoft-365-docs/commits/public/microsoft-365/solutions/empower-people-to-work-remotely-teams-productivity-apps.md | Title: "Step 5. Deploy hybrid worker productivity apps and services" f1.keywords: - NOCSH--++ audience: ITPro |
| solutions | Empower People To Work Remotely Train Monitor Usage | https://github.com/MicrosoftDocs/microsoft-365-docs/commits/public/microsoft-365/solutions/empower-people-to-work-remotely-train-monitor-usage.md | Title: "Step 6: Train your workers and address usage feedback" f1.keywords: - NOCSH--++ audience: ITPro |
| solutions | Empower People To Work Remotely | https://github.com/MicrosoftDocs/microsoft-365-docs/commits/public/microsoft-365/solutions/empower-people-to-work-remotely.md | Title: "Set up your infrastructure for hybrid work with Microsoft 365"-+ f1.keywords: - NOCSH-+ audience: ITPro |
| solutions | Ransomware Protection Microsoft 365 Attack Detection Response | https://github.com/MicrosoftDocs/microsoft-365-docs/commits/public/microsoft-365/solutions/ransomware-protection-microsoft-365-attack-detection-response.md | Title: "Step 2. Deploy attack detection and response"-+ f1.keywords: - NOCSH-+ audience: ITPro |
| solutions | Ransomware Protection Microsoft 365 Devices | https://github.com/MicrosoftDocs/microsoft-365-docs/commits/public/microsoft-365/solutions/ransomware-protection-microsoft-365-devices.md | Title: "Step 4. Protect devices"-+ f1.keywords: - NOCSH-+ audience: ITPro |
| solutions | Ransomware Protection Microsoft 365 Identities | https://github.com/MicrosoftDocs/microsoft-365-docs/commits/public/microsoft-365/solutions/ransomware-protection-microsoft-365-identities.md | Title: "Step 3. Protect identities"-+ f1.keywords: - NOCSH-+ audience: ITPro |
| solutions | Ransomware Protection Microsoft 365 Information | https://github.com/MicrosoftDocs/microsoft-365-docs/commits/public/microsoft-365/solutions/ransomware-protection-microsoft-365-information.md | Title: "Step 5. Protect information"-+ f1.keywords: - NOCSH-+ audience: ITPro |
| solutions | Ransomware Protection Microsoft 365 Security Baselines | https://github.com/MicrosoftDocs/microsoft-365-docs/commits/public/microsoft-365/solutions/ransomware-protection-microsoft-365-security-baselines.md | Title: "Step 1. Configure security baselines"-+ f1.keywords: - NOCSH-+ audience: ITPro |
| solutions | Ransomware Protection Microsoft 365 | https://github.com/MicrosoftDocs/microsoft-365-docs/commits/public/microsoft-365/solutions/ransomware-protection-microsoft-365.md | Title: "Deploy ransomware protection for your Microsoft 365 tenant"-+ f1.keywords: - NOCSH-+ audience: ITPro |