| Category | Microsoft Docs article | Related commit history on GitHub | Change details |
|---|---|---|---|
| admin | Centralized Deployment Of Add Ins | https://github.com/MicrosoftDocs/microsoft-365-docs/commits/public/microsoft-365/admin/manage/centralized-deployment-of-add-ins.md | It can take up to 24 hours for an add-in to show up for client for all users. ## Before you begin -Centralized deployment of add-ins requires that the users are using Microsoft 365 Business licenses (Business Basic, Business Standard, Business Premium), Office 365 Enterprise licenses (E1/E3/E5/F3), or Microsoft 365 Enterprise licenses (E3/E5/F3) (and are signed into Office using their organizational ID), and have Exchange Online and active Exchange Online mailboxes. Your subscription directory must either be in or federated to Azure Active Directory. +Centralized deployment of add-ins requires that the users are using Microsoft 365 Business licenses (Business Basic, Business Standard, Business Premium), Office 365 Enterprise licenses (E1/E3/E5/F3), or Microsoft 365 Enterprise licenses (E3/E5/F3) (and are signed into Office using their organizational ID), Office 365 Education licenses (A1/A3/A5), or Microsoft 365 Education licenses (A3/A5), and have Exchange Online and active Exchange Online mailboxes. Your subscription directory must either be in or federated to Azure Active Directory. You can view specific requirements for Office and Exchange below, or use the [Centralized Deployment Compatibility Checker](#centralized-deployment-compatibility-checker). Centralized Deployment doesn't support the following: |
| compliance | Advanced Audit | https://github.com/MicrosoftDocs/microsoft-365-docs/commits/public/microsoft-365/compliance/advanced-audit.md | |
| compliance | Advanced Ediscovery Historical Versions | https://github.com/MicrosoftDocs/microsoft-365-docs/commits/public/microsoft-365/compliance/advanced-ediscovery-historical-versions.md | |
| compliance | Alert Policies | https://github.com/MicrosoftDocs/microsoft-365-docs/commits/public/microsoft-365/compliance/alert-policies.md | The table also indicates the Office 365 Enterprise and Office 365 US Government |**Phish delivered due to tenant or user override**<sup>1</sup>|Generates an alert when Microsoft detects an admin or user override allowed the delivery of a phishing message to a mailbox. Examples of overrides include an inbox or mail flow rule that allows messages from a specific sender or domain, or an anti-spam policy that allows messages from specific senders or domains. This policy has a **High** severity setting.|Threat management|E5/G5 or Defender for Office 365 P2 add-on subscription| |**Suspicious email forwarding activity**|Generates an alert when someone in your organization has autoforwarded email to a suspicious external account. This is an early warning for behavior that may indicate the account is compromised, but not severe enough to restrict the user. This policy has a **High** severity setting. Although it's rare, an alert generated by this policy may be an anomaly. It's a good idea to [check whether the user account is compromised](../security/office-365-security/responding-to-a-compromised-email-account.md).|Threat management|E1/F1/G1, E3/F3/G3, or E5/G5| |**Suspicious email sending patterns detected**|Generates an alert when someone in your organization has sent suspicious email and is at risk of being restricted from sending email. This is an early warning for behavior that may indicate that the account is compromised, but not severe enough to restrict the user. This policy has a **Medium** severity setting. Although it's rare, an alert generated by this policy may be an anomaly. However, it's a good idea to [check whether the user account is compromised](../security/office-365-security/responding-to-a-compromised-email-account.md).|Threat management|E1/F1/G1, E3/F3/G3, or E5/G5 |-|**Tenant Allow/Block List entry is about to expire**|Generates an alert when a Tenant Allow/Block List entry is about to be removed. This event is triggered three days prior to expiration date, which is based when the entry was created or last updated. This alert policy has an **Informational** severity setting. This is to inform admins of upcoming changes in the filters since the allow or block could be going away. For blocks, you can extend the expiration date to keep the block in place. For allows, you need to resubmit the item so that our analysts can take another look. However, if the allow has already been graded as a false positive, then the entry will only expire when the system filters have been updated to naturally allow the entry. For more information on events that trigger this alert, see [Manage the Tenant Allow/Block list](..security/office-365-security/tenant-allow-block-list.md).|Threat management|E5/G5 or Defender for Office 365 P2 add-on subscription| +|**Tenant Allow/Block List entry is about to expire**|Generates an alert when a Tenant Allow/Block List entry is about to be removed. This event is triggered three days prior to expiration date, which is based when the entry was created or last updated. This alert policy has an **Informational** severity setting. This is to inform admins of upcoming changes in the filters since the allow or block could be going away. For blocks, you can extend the expiration date to keep the block in place. For allows, you need to resubmit the item so that our analysts can take another look. However, if the allow has already been graded as a false positive, then the entry will only expire when the system filters have been updated to naturally allow the entry. For more information on events that trigger this alert, see [Manage the Tenant Allow/Block list](../security/office-365-security/tenant-allow-block-list.md).|Threat management|E5/G5 or Defender for Office 365 P2 add-on subscription| |**Tenant restricted from sending email**|Generates an alert when most of the email traffic from your organization has been detected as suspicious and Microsoft has restricted your organization from sending email. Investigate any potentially compromised user and admin accounts, new connectors, or open relays, and then contact Microsoft Support to unblock your organization. This policy has a **High** severity setting. For more information about why organizations are blocked, see [Fix email delivery issues for error code 5.7.7xx in Exchange Online](/Exchange/mail-flow-best-practices/non-delivery-reports-in-exchange-online/fix-error-code-5-7-700-through-5-7-750).|Threat management|E1/F1/G1, E3/F3/G3, or E5/G5| |**Tenant restricted from sending unprovisioned email**|Generates an alert when too much email is being sent from unregistered domains (also known as *unprovisioned* domains). Office 365 allows a reasonable amount of email from unregistered domains, but you should configure every domain that you use to send email as an accepted domain. This alert indicates that all users in the organization can no longer send email. This policy has a **High** severity setting. For more information about why organizations are blocked, see [Fix email delivery issues for error code 5.7.7xx in Exchange Online](/Exchange/mail-flow-best-practices/non-delivery-reports-in-exchange-online/fix-error-code-5-7-700-through-5-7-750).|Threat management|E1/F1/G1, E3/F3/G3, or E5/G5| |**Unusual external user file activity**|Generates an alert when an unusually large number of activities are performed on files in SharePoint or OneDrive by users outside of your organization. This includes activities such as accessing files, downloading files, and deleting files. This policy has a **High** severity setting.|Information governance|E5/G5, Microsoft Defender for Office 365 P2, or Microsoft 365 E5 add-on subscription| |
| compliance | Assign Ediscovery Permissions | https://github.com/MicrosoftDocs/microsoft-365-docs/commits/public/microsoft-365/compliance/assign-ediscovery-permissions.md | ms.assetid: 5b9a067b-9d2e-4aa5-bb33-99d8c0d0b5d7 description: "Assign the permissions required to perform eDiscovery-related tasks using the Microsoft 365 compliance center." - seo-marvel-apr2020-- admindeeplinkMAC-- admindeeplinkEXCHANGE+- admindeeplinkCOMPLIANCE # Assign eDiscovery permissions in the Microsoft 365 compliance center The primary eDiscovery-related role group in Microsoft 365 compliance center is ## Assign eDiscovery permissions -1. Go to <https://compliance.microsoft.com> and sign in using an account that can assign permissions. +1. Go to the <a href="https://go.microsoft.com/fwlink/p/?linkid=2077149" target="_blank">Microsoft 365 compliance center</a> and sign in using an account that can assign permissions. 2. In the left pane, select **Permissions**. |
| compliance | Attorney Privilege Detection | https://github.com/MicrosoftDocs/microsoft-365-docs/commits/public/microsoft-365/compliance/attorney-privilege-detection.md | |
| compliance | Classifier How To Retrain Content Explorer | https://github.com/MicrosoftDocs/microsoft-365-docs/commits/public/microsoft-365/compliance/classifier-how-to-retrain-content-explorer.md | description: "Learn how to provide feedback to a trainable classifier in Content # How to retrain a classifier in content explorer -A Microsoft 365 trainable classifier is a tool you can train to recognize various types of content by giving it samples to look at. Once trained, you can use it to identify item for application of Office sensitivity labels, communications compliance policies, and retention label policies. +A Microsoft 365 trainable classifier is a tool you can train to recognize various types of content by giving it samples to look at. Once trained, you can use it to identify items for application of Office sensitivity labels, communications compliance policies, and retention label policies. -This article shows you how to improve the performance of custom trainable classifiers and some pre-trained classifiers by providing them additional feedback. +This article shows you how to improve the performance of custom trainable classifiers by providing them additional feedback. To learn more about the different types of classifiers, see [Learn about trainable classifiers](classifier-learn-about.md). Watch this video for a quick summary of the tuning and retraining process. You'l > [!VIDEO https://www.microsoft.com/videoplayer/embed/RWyGMs] +> [!NOTE] +> Pre-trained classifiers cannot be retrained. ## Permissions |
| compliance | Classifier Learn About | https://github.com/MicrosoftDocs/microsoft-365-docs/commits/public/microsoft-365/compliance/classifier-learn-about.md | -description: "A Microsoft 365 trainable classifier is a tool you can train to recognize various types of content for labeling or policy application by giving it positive and negative samples to look at." +description: "A Microsoft 365 trainable classifier is a tool you can use to recognize various types of content for labeling or policy application by giving it positive and negative samples to look at." # Learn about trainable classifiers Sensitivity and retention labels can then be automatically applied to make the c ## Classifiers -This classification method is particularly well suited to content that isn't easily identified by either the manual or automated pattern matching methods. This method of classification is more about training a classifier to identify an item based on what the item is, not by elements that are in the item (pattern matching). A classifier learns how to identify a type of content by looking at hundreds of examples of the content you're interested in classifying. You start by feeding it examples that are definitely in the category. Once it processes those examples, you test it by giving it a mix of both matching and non-matching examples. The classifier then makes predictions as to whether any given item falls into the category you're building. You then confirm its results, sorting out the true positives, true negatives, false positives, and false negatives to help increase the accuracy of its predictions. +This classification method is particularly well suited to content that isn't easily identified by either the manual or automated pattern matching methods. This method of classification is more about using a classifier to identify an item based on what the item is, not by elements that are in the item (pattern matching). A classifier learns how to identify a type of content by looking at hundreds of examples of the content you're interested in classifying. -When you publish the classifier, it sorts through items in locations like SharePoint Online, Exchange, and OneDrive, and classifies the content. After you publish the classifier, you can continue to train it using a feedback process that is similar to the initial training process. +### Where you can use classifiers -### Where you can use trainable classifiers -Both built-in classifiers and trainable classifiers are available as a condition for [Office autolabeling with sensitivity labels](apply-sensitivity-label-automatically.md), [auto-apply retention label policy based on a condition](apply-retention-labels-automatically.md#configuring-conditions-for-auto-apply-retention-labels) and in [communication compliance](communication-compliance.md). +Classifiers are available to use as a condition for [Office autolabeling with sensitivity labels](apply-sensitivity-label-automatically.md), [auto-apply retention label policy based on a condition](apply-retention-labels-automatically.md#configuring-conditions-for-auto-apply-retention-labels) and in [communication compliance](communication-compliance.md). Sensitivity labels can use classifiers as conditions, see [Apply a sensitivity label to content automatically](apply-sensitivity-label-automatically.md). Sensitivity labels can use classifiers as conditions, see [Apply a sensitivity l ## Types of classifiers - **pre-trained classifiers** - Microsoft has created and pre-trained multiple classifiers that you can start using without training them. These classifiers will appear with the status of `Ready to use`.-- **custom classifiers** - If you have classification needs that extend beyond what the pre-trained classifiers cover, you can create and train your own classifiers.+- **custom trainable classifiers** - If you have classification needs that extend beyond what the pre-trained classifiers cover, you can create and train your own classifiers. ### Pre-trained classifiers Pre-trained classifiers can scan content in these languages: When the pre-trained classifiers don't meet your needs, you can create and train your own classifiers. There's significantly more work involved with creating your own, but they'll be much better tailored to your organizations needs. +You start creating a custom trainable classifier by feeding it examples that are definitely in the category. Once it processes those examples, you test it by giving it a mix of both matching and non-matching examples. The classifier then makes predictions as to whether any given item falls into the category you're building. You then confirm its results, sorting out the true positives, true negatives, false positives, and false negatives to help increase the accuracy of its predictions. ++When you publish the classifier, it sorts through items in locations like SharePoint Online, Exchange, and OneDrive, and classifies the content. After you publish the classifier, you can continue to train it using a feedback process that is similar to the initial training process. + For example you could create trainable classifiers for: - Legal documents - such as attorney client privilege, closing sets, statement of work Creating and publishing a classifier for use in compliance solutions, such as re ### Retraining classifiers -You can help improve the accuracy of all custom classifiers and some pre-trained classifiers by providing them with feedback on the accuracy of the classification that they perform. This is called retraining, and follows this workflow. +You can help improve the accuracy of all custom trainable classifiers and by providing them with feedback on the accuracy of the classification that they perform. This is called retraining, and follows this workflow. ++> [!NOTE] +> Pre-trained classifiers cannot be re-trained.  |
| compliance | Conversation Review Sets | https://github.com/MicrosoftDocs/microsoft-365-docs/commits/public/microsoft-365/compliance/conversation-review-sets.md | |
| compliance | Create A Litigation Hold | https://github.com/MicrosoftDocs/microsoft-365-docs/commits/public/microsoft-365/compliance/create-a-litigation-hold.md | +audience: Admin ms.localizationpriority: medium description: "Learn how to place a mailbox on Litigation hold, retaining all the - seo-marvel-mar2020 - seo-marvel-apr2020+- admindeeplinkCOMPLIANCE # Create a Litigation hold To place an Exchange Online mailbox on Litigation hold, it must be assigned an E Here are the steps to place a mailbox on Litigation hold using the Microsoft 365 admin center. -1. Go to <https://admin.microsoft.com> and sign in. +1. Go to the <a href="https://go.microsoft.com/fwlink/p/?linkid=834822" target="_blank">Microsoft 365 admin center</a> and then click **Users** > **Active users**. -2. In the navigation pane of the admin center, click **Users** > <a href="https://go.microsoft.com/fwlink/p/?linkid=834822" target="_blank">**Active users**</a>. +2. Select the user that you want to place on Litigation hold. -3. Select the user that you want to place on Litigation hold. --4. On the properties flyout page, click the **Mail** tab, and then under **More actions**, click **Manage litigation hold**. +3. On the properties flyout page, click the **Mail** tab, and then under **More actions**, click **Manage litigation hold**.  -5. On the **Manage litigation hold** flyout page, select the **Turn on litigation hold** checkbox and then enter the following optional information: +4. On the **Manage litigation hold** flyout page, select the **Turn on litigation hold** checkbox and then enter the following optional information: 1. **Hold duration (days)**: Use this box to create a time-based hold and specify how long mailbox items are held when the mailbox is placed on Litigation hold. The duration is calculated from the date a mailbox item is received or created. When the hold duration expires for a specific item, that item will no longer be preserved. If you leave this box blank, items are preserved indefinitely or until the hold is removed. Use days to specify the duration. Here are the steps to place a mailbox on Litigation hold using the Microsoft 365 3. **Web page with more information for the user**: Use this box to direct the user to a website for more information about Litigation hold. This URL appears on the Account Information page in the user's mailbox if they are using Outlook 2010 or later. To access this page, users can click **File** in Outlook. -6. Click **Save changes** on the **Litigation hold** flyout page to create the hold. +. Click **Save changes** on the **Litigation hold** flyout page to create the hold. The system displays a banner saying it might take up to 240 minutes for the change to take effect. |
| compliance | De Duplication In Ediscovery Search Results | https://github.com/MicrosoftDocs/microsoft-365-docs/commits/public/microsoft-365/compliance/de-duplication-in-ediscovery-search-results.md | |
| compliance | Detailed Properties In The Office 365 Audit Log | https://github.com/MicrosoftDocs/microsoft-365-docs/commits/public/microsoft-365/compliance/detailed-properties-in-the-office-365-audit-log.md | |
| compliance | Differences Between Estimated And Actual Ediscovery Search Results | https://github.com/MicrosoftDocs/microsoft-365-docs/commits/public/microsoft-365/compliance/differences-between-estimated-and-actual-ediscovery-search-results.md | |
| compliance | Dlp Conditions And Exceptions | https://github.com/MicrosoftDocs/microsoft-365-docs/commits/public/microsoft-365/compliance/dlp-conditions-and-exceptions.md | The tables in the following sections describe the conditions and exceptions that ### Senders -<br> +If you use the sender address as a condition or exception the actual field where the value is looked for varies depending on the type of rule you use. For DLP based rules, the Envelope address is used as the sender address. For Exchange transport rules the Header address is used as the sender address. +<!-- REMOVE COMMENTS ON 1/20/2022 +> [!NOTE] +> Starting January 20, 2022, the default sender address location will be moved to the Header address along with the availability of the -SenderAddressLocation parameter to configure desired behavior at a DLP rule level. -**** +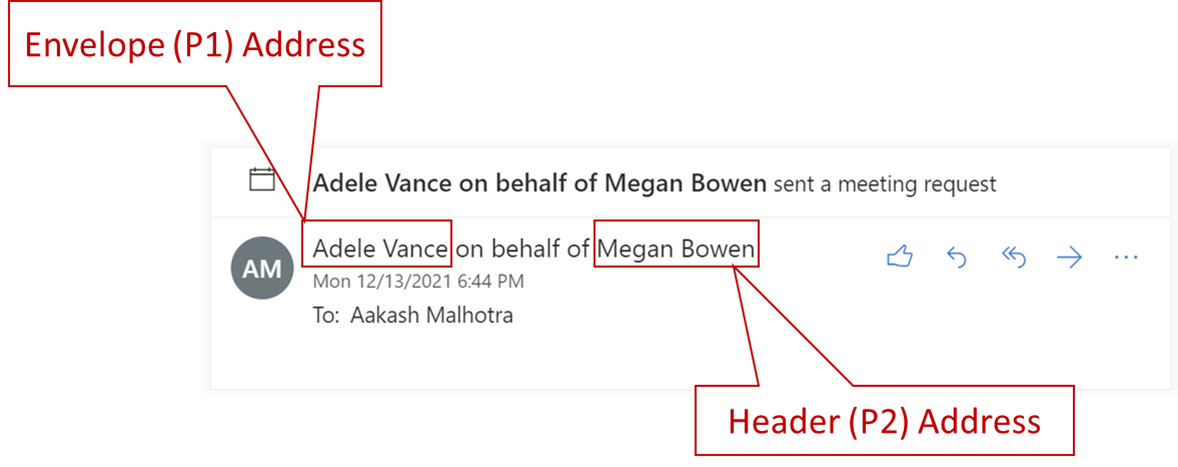 ++At the tenant level, you can configure a sender address location to be used across all rules, unless overridden by a single rule. To revert tenant DLP policy configuration to evaluate the sender address from the Envelope across all rules, you can run the following command: ++```PowerShell +Set-PolicyConfig ΓÇôSenderAddressLocation Envelope +``` ++To configure the sender address location at a DLP rule level, the parameter is _SenderAddressLocation_. The available values are: ++- **Header**: Only examine senders in the message headers (for example, the **From**, **Sender**, or **Reply-To** fields). This is the default value. ++- **Envelope**: Only examine senders from the message envelope (the **MAIL FROM** value that was used in the SMTP transmission, which is typically stored in the **Return-Path** field). ++- **Header or envelope** (`HeaderOrEnvelope`) Examine senders in the message header and the message envelope. +<br> +--> |condition or exception in DLP|condition/exception parameters in Microsoft 365 PowerShell|property type|description| ||||| |
| compliance | Document Metadata Fields In Advanced Ediscovery | https://github.com/MicrosoftDocs/microsoft-365-docs/commits/public/microsoft-365/compliance/document-metadata-fields-in-Advanced-eDiscovery.md | |
| compliance | Ediscovery Cjk Support | https://github.com/MicrosoftDocs/microsoft-365-docs/commits/public/microsoft-365/compliance/ediscovery-cjk-support.md | |
| compliance | Ediscovery Decryption | https://github.com/MicrosoftDocs/microsoft-365-docs/commits/public/microsoft-365/compliance/ediscovery-decryption.md | For more information about these settings, see the "Configure encryption setting Documents encrypted with the previous settings can still be returned by an eDiscovery search. This may happen when a document property (such as the title, author, or modified date) matches the search criteria. Although these documents might be included in search results, they can't be previewed or reviewed. These documents will also remain encrypted when they're exported in Advanced eDiscovery. +> [!IMPORTANT] +> Decryption isn't supported for files that are locally encrypted and then uploaded to SharePoint or OneDrive. For example, local files that are encrypted by the Azure Information Protection (AIP) client and then uploaded to Microsoft 365 aren't supported. Only files that are encrypted in the SharePoint or OneDrive service are supported for decryption. + ## Decryption limitations with email attachments The following scenarios describe limitations in the decryption of files attached to email messages. These scenario descriptions also include workarounds to mitigate these limitations. |
| compliance | Ediscovery Diagnostic Info | https://github.com/MicrosoftDocs/microsoft-365-docs/commits/public/microsoft-365/compliance/ediscovery-diagnostic-info.md | |
| compliance | Insider Risk Management Settings | https://github.com/MicrosoftDocs/microsoft-365-docs/commits/public/microsoft-365/compliance/insider-risk-management-settings.md | Depending on the number of users assigned to insider risk management role groups Insider risk analytics enables you to conduct an evaluation of potential insider risks in your organization without configuring any insider risk policies. This evaluation can help your organization identify potential areas of higher user risk and help determine the type and scope of insider risk management policies you may consider configuring. Analytics scans offer the following advantages for your organization: - Easy to configure: To get started with analytics scans, you can select Run scan when prompted by the analytics recommendation or go to **Insider risk settings** > **Analytics** and enable analytics.-- Minimal privacy requirements: Scan results and insights are returned as anonymized user activity, individual user names are not identifiable by reviewers.+- Privacy by design: Scan results and insights are returned as aggregated and anonymized user activity, individual user names are not identifiable by reviewers. - Understand potential risks through consolidated insights: Scan results can help you quickly identify potential risk areas for your users and which policy would be best to help mitigate these risks. Check out the [Insider Risk Management Analytics video](https://www.youtube.com/watch?v=5c0P5MCXNXk) to help understand how analytics can help accelerate the identification of potential insider risks and help you to quickly take action. |
| compliance | Investigating Partially Indexed Items In Ediscovery | https://github.com/MicrosoftDocs/microsoft-365-docs/commits/public/microsoft-365/compliance/investigating-partially-indexed-items-in-ediscovery.md | |
| compliance | Limits Core Ediscovery | https://github.com/MicrosoftDocs/microsoft-365-docs/commits/public/microsoft-365/compliance/limits-core-ediscovery.md | |
| compliance | Limits For Content Search | https://github.com/MicrosoftDocs/microsoft-365-docs/commits/public/microsoft-365/compliance/limits-for-content-search.md | |
| compliance | Managing Jobs Ediscovery20 | https://github.com/MicrosoftDocs/microsoft-365-docs/commits/public/microsoft-365/compliance/managing-jobs-ediscovery20.md | |
| compliance | Partially Indexed Items In Content Search | https://github.com/MicrosoftDocs/microsoft-365-docs/commits/public/microsoft-365/compliance/partially-indexed-items-in-content-search.md | |
| compliance | Permissions Filtering For Content Search | https://github.com/MicrosoftDocs/microsoft-365-docs/commits/public/microsoft-365/compliance/permissions-filtering-for-content-search.md | |
| compliance | Preserve Bcc And Expanded Distribution Group Recipients For Ediscovery | https://github.com/MicrosoftDocs/microsoft-365-docs/commits/public/microsoft-365/compliance/preserve-bcc-and-expanded-distribution-group-recipients-for-ediscovery.md | |
| compliance | Search Cloud Based Mailboxes For On Premises Users | https://github.com/MicrosoftDocs/microsoft-365-docs/commits/public/microsoft-365/compliance/search-cloud-based-mailboxes-for-on-premises-users.md | search.appverid: - MST160 - MET150 ms.assetid: 3f7dde1a-a8ea-4366-86da-8ee6777f357c-description: Use eDiscovery tools in Microsoft 365 to search for and export Teams chat data for on-premises users in an Exchange hybrid deployment. +description: "Admins can use eDiscovery tools in Microsoft 365 to search for and export Teams chat data for on-premises users in an Exchange hybrid deployment." The following graphic shows the workflow of how Teams chat data for on-premises In addition to this capability, you can also use eDiscovery tools to search, preview, and export Teams content in the cloud-based SharePoint site and Exchange mailbox associated with each Microsoft Team and 1xN Teams chat data in the Exchange Online mailbox for cloud-based users. -### How this feature is supported in Content search and Core eDiscovery search tools --The following UI elements in Content search and in the search tool associated with Core eDiscovery cases in the Microsoft 365 compliance center: - -- The **Add app content for on-premises users** checkbox is displayed on the **Locations** wizard page in Content search tool and selected by default. Keep this checkbox selected to include the cloud-based storage for on-premises users in a content search.--  - -- You can search for on-premises users when you choose specific users to search for.- ## Searching for Teams chat content for on-premises users -Here's how to use Content search in the Microsoft 365 compliance center to search for Teams chat data for on-premises users. +Here's how to use Content search in the Microsoft 365 compliance center to search for Teams chat data for on-premises users. You can also use the search tool in Core eDiscovery to search for chat data for on-premises users. 1. In the Microsoft 365 compliance center, go to **Content search**. 2. On the **Searches** tab, click **New search**, and name the new search. -3. On the **Locations** page, set the toggle to **On** for Exchange mailboxes. Notice that the **Add app content for on-premises users** checkbox is displayed and selected by default. +3. On the **Locations** page, set the toggle to **On** for Exchange mailboxes. ++4. To search for Teams content for specific users (including on-premises users), select **Choose user, groups, or teams** and choose specific users to include in the search. If you don't list specific users, the search will include all users, including on-premises users. -4. To search for Teams content for specific users, select **Choose user, groups, or teams** and choose specific users to include in the search. Otherwise, click **Next** to search for Teams content for all users, including on-premises users +5. Make sure the **Add app content for on-premises users** checkbox is selected. This ensures that the cloud-bases storage for on-premises users will be searched. -5. On the **Define your search conditions** page, create a keyword query and add conditions to the search query if necessary. To only search for Team chats data, you can add the following query in the **Keywords** box: +  ++6. On the **Define your search conditions** page, create a keyword query and add conditions to the search query if necessary. To only search for Team chats data, you can add the following query in the **Keywords** box: ```text kind:im AND kind:microsoftteams Here's how to use Content search in the Microsoft 365 compliance center to searc ## Using PowerShell to search for Teams chat data for on-premises users -You can use the **New-ComplianceSearch** and **Set-ComplianceSearch** cmdlets in Security & Compliance Center PowerShell to search for Teams chat data for on-premises users. As previously explained, you don't have to submit a support request to use PowerShell to search for Teams chat data for on-premises users. +You can use the **New-ComplianceSearch** cmdlets in Security & Compliance Center PowerShell to search for Teams chat data for on-premises users. As previously explained, you don't have to submit a support request to use PowerShell to search for Teams chat data for on-premises users. 1. [Connect to Security & Compliance Center PowerShell](/powershell/exchange/connect-to-scc-powershell). For more information using these cmdlets, see: - [New-ComplianceSearch](/powershell/module/exchange/new-compliancesearch) -- [Set-ComplianceSearch](/powershell/module/exchange/set-compliancesearch)- - [Start-ComplianceSearch](/powershell/module/exchange/start-compliancesearch) ## Known issues No. When you migrate the primary mailbox of an on-premises user to the cloud, th **Can I apply an eDiscovery hold or retention policies to on-premises users?** -Yes. You can apply eDiscovery holds or retention policies for Teams chats and channel messages of on-premises users. However, to preserve or retain Teams content for on-premises users, an on-premises user must be assigned an Exchange Online Plan 2 license. +Yes. You can apply eDiscovery holds or retention policies for Teams chats and channel messages of on-premises users. But to preserve or retain Teams content for on-premises users, an on-premises user must be assigned an Exchange Online Plan 2 license. |
| compliance | Search For Content | https://github.com/MicrosoftDocs/microsoft-365-docs/commits/public/microsoft-365/compliance/search-for-content.md | The first step is to starting using the Content search tool to choose content lo - [Create and run](content-search.md) a Content search -- [Feature reference](content-search-reference.md) for Content search- - [Build search queries and use conditions](keyword-queries-and-search-conditions.md) to narrow your search +- [Feature reference](content-search-reference.md) for Content search + - [Configure search permissions filtering](permissions-filtering-for-content-search.md) so that an eDiscovery manager can only search subset of mailboxes or sites in your organization - [Search cloud-based mailboxes](search-cloud-based-mailboxes-for-on-premises-users.md) for on-premises users in Microsoft 365 The first step is to starting using the Content search tool to choose content lo - [Search for third-party data](use-content-search-to-search-third-party-data-that-was-imported.md) that your organization has imported to Microsoft 365 -- [Retry a Content search](retry-failed-content-search.md) to resolve a content location error- - [Preserve Bcc recipients](/exchange/policy-and-compliance/holds/preserve-bcc-recipients-and-group-members) so you can search for them ## Perform actions on content you find After you run a search and refine it as necessary, the next step is to do someth Content search is easy to use, but it's also a powerful tool. Behind-the-scenes, there's a lot going on. The more you know about it and understand its behavior and its limitations, the more successful you'll be using it for your organization's search and investigation needs. Learn about: -- [Partially indexed items in Exchange and SharePoint](partially-indexed-items-in-content-search.md) and how to include or exclude them when you export and download search results+- [Content search limits](limits-for-content-search.md), such as the maximum number of searches that you can run at one time and the maximum number of content locations you can include in a single search -- [Investigate partially indexed items](investigating-partially-indexed-items-in-ediscovery.md) and determine your organization's exposure to them+- [Estimated and actual search results](differences-between-estimated-and-actual-ediscovery-search-results.md) and the reasons why there might be differences between them when you export and download search results -- [Limits of the Content search tool](limits-for-content-search.md), such as the maximum number of searches that you can run at one time and the maximum number of content locations you can include in a single search+- [Partially indexed items in Exchange and SharePoint](partially-indexed-items-in-content-search.md) and how to include or exclude them when you export and download search results -- [Estimated and actual search results](differences-between-estimated-and-actual-ediscovery-search-results.md) and the reasons why there might be differences between them when you export and download search results+- [Investigate partially indexed items](investigating-partially-indexed-items-in-ediscovery.md) and determine your organization's exposure to them - [De-duplication in search results](de-duplication-in-ediscovery-search-results.md) that you can enable when you export email messages that are the results of a search Content search is easy to use, but it's also a powerful tool. Behind-the-scenes, Sometimes you have to perform more advanced, complex, and repetitive content search tasks. In these cases, it's easier and faster to use commands in Security & Compliance Center PowerShell. To help make this easier, we've created a number of Security & Compliance Center PowerShell scripts to help you complete complex content search-related tasks. -- [Search specific mailbox and site folders](use-content-search-for-targeted-collections.md) (called a *targeted collection) when you're confident that items responsive to a case are located in that folder+- [Search specific mailbox and site folders](use-content-search-for-targeted-collections.md) (called a *targeted* collection) when you're confident that items responsive to a case are located in that folder - [Search the mailbox and OneDrive location](search-the-mailbox-and-onedrive-for-business-for-a-list-of-users.md) for a list of users - [Create, report on, and delete multiple searches](create-report-on-and-delete-multiple-content-searches.md) to quickly and efficiently identify and cull search data -- [Clone a content search](clone-a-content-search.md) and quickly compare the results of different keyword search queries run on the same content locations; or use the script to save time by not having to re-enter a large number of content locations when you create a new search+- [Clone a content search](clone-a-content-search.md) and quickly compare the results of different keyword search queries run on the same content locations; or use the script to save time by not having to re-enter a large number of content locations when you create a new search |
| compliance | Search For Ediscovery Activities In The Audit Log | https://github.com/MicrosoftDocs/microsoft-365-docs/commits/public/microsoft-365/compliance/search-for-ediscovery-activities-in-the-audit-log.md | |
| compliance | Search Statistics In Advanced Ediscovery | https://github.com/MicrosoftDocs/microsoft-365-docs/commits/public/microsoft-365/compliance/search-statistics-in-advanced-ediscovery.md | |
| compliance | Supported Filetypes Ediscovery20 | https://github.com/MicrosoftDocs/microsoft-365-docs/commits/public/microsoft-365/compliance/supported-filetypes-ediscovery20.md | |
| compliance | View Documents In Review Set | https://github.com/MicrosoftDocs/microsoft-365-docs/commits/public/microsoft-365/compliance/view-documents-in-review-set.md | |
| compliance | View Keyword Statistics For Content Search | https://github.com/MicrosoftDocs/microsoft-365-docs/commits/public/microsoft-365/compliance/view-keyword-statistics-for-content-search.md | |
| managed-desktop | Access Admin Portal | https://github.com/MicrosoftDocs/microsoft-365-docs/commits/public/microsoft-365/managed-desktop/get-started/access-admin-portal.md | Your administrative account will need specific permissions in order to access th |Global Administrator | Admins with this role will have **read and write permissions to all features** in the Microsoft Managed Desktop Admin portal. | |Global Reader | Admins with this role will have **read-only permissions to all features** in the Microsoft Managed Desktop Admin portal. | |Intune Service Administrator | Admins with this role will have **read and write permissions to features not related to security** in the Microsoft Managed Desktop Admin portal. |-|Service Support Administrator | Admins with this role will have **read-only permissions to features not related to security** and **write permissions to manage support requests** in the Microsoft Managed Desktop Admin portal. | +|Service Support Administrator | Admins with this role will have **read-only permissions to features not related to security** and **write permissions to manage support requests including escalation requests** in the Microsoft Managed Desktop Admin portal. | |Security Admin | Admins with this role will have **read-only permissions to all features** and **write permissions for security related features** in Microsoft Managed Desktop in the Admin portal. | |Security Reader |Admins with this role will have **read-only permissions to all features** in the Microsoft Managed Desktop Admin portal.| If you need help with assigning Azure Active Directory roles, see [Azure AD buil |Built-in role |Microsoft Managed Desktop permissions | |||-|Microsoft Managed Desktop Service Administrator | When assigned to a user, this role gives the admin **read and write permissions to features not related to security** in the Microsoft Managed Desktop Admin portal. | -|Microsoft Managed Desktop Service Reader | When assigned to a user, this role gives the admin **read-only permissions to features not related to security** in the Microsoft Managed Desktop Admin portal. | +|Microsoft Managed Desktop Service Administrator | When assigned to a user, this role gives the admin **read and write permissions to Microsoft Managed Desktop features not related to security** in the Microsoft Managed Desktop Admin portal. | +|Microsoft Managed Desktop Service Reader | When assigned to a user, this role gives the admin **read-only permissions to Microsoft Managed Desktop features not related to security** in the Microsoft Managed Desktop Admin portal. | |Microsoft Managed Desktop Security Manager |When assigned to a user, this role gives that admin **read and write permissions only for security related features** in the Microsoft Managed Desktop Admin portal. |+|Microsoft Managed Desktop Support Partner |When assigned to a user, this role gives the admin **read and write permissions only for creating and managing elevation requests and support partner engaged escalation requests** in the Microsoft Managed Desktop Admin portal. | > [!NOTE] > Security features include security-related communications, management of security contacts, management of security-related support requests, and access to security related reports. If you need to assign one or more of the built-in roles to a existing group, fol 1. Set up [first-run experience with Autopilot and the Enrollment Status Page](esp-first-run.md). 1. [Enable user support features](enable-support.md). 1. [Get your users ready to use devices](get-started-devices.md).-1. [Get started with app control](get-started-app-control.md). +1. [Get started with app control](get-started-app-control.md). |
| security | Microsoft 365 Zero Trust | https://github.com/MicrosoftDocs/microsoft-365-docs/commits/public/microsoft-365/security/Microsoft-365-zero-trust.md | search.appverid: - deploy zero trust - zero trust strategy+- M365-security-compliance +- m365solution-zerotrust +- m365solution-overview # Microsoft 365 Zero Trust deployment plan |
| security | Configure Server Endpoints | https://github.com/MicrosoftDocs/microsoft-365-docs/commits/public/microsoft-365/security/defender-endpoint/configure-server-endpoints.md | You'll need to complete the following general steps to successfully onboard serv **Windows Server 2012 R2 and Windows Server 2016 (Preview)** - Download installation and onboarding packages-- Install application+- Apply the installation package - Follow the onboarding steps for the corresponding tool **Windows Server Semi-Annual Enterprise Channel and Windows Server 2019** If you have previously onboarded your servers using MMA, follow the guidance pro >[!NOTE] >While this method of onboarding Windows Server 2012 R2 and Windows Server 2016 is in preview, you can choose to continue to use the previous onboarding method using Microsoft Monitoring Agent (MMA). For more information, see [Install and configure endpoints using MMA](onboard-downlevel.md#install-and-configure-microsoft-monitoring-agent-mma). -#### Known issues and limitations +#### Known issues and limitations on the new, unified solution package for Windows Server 2012 R2 and 2016 The following specifics apply to the new unified solution package for Windows Server 2012 R2 and 2016: For more information, see [Integration with Microsoft Defender for Cloud](azure- > [!NOTE] > For Windows Server 2012 R2 and 2016 running the modern unified solution preview, integration with Microsoft Defender for Cloud / Microsoft Defender for servers for alerting and automated deployment is not yet available. Whilst you can install the new solution on these machines, no alerts will be displayed in Microsoft Defender for Cloud. +> [!NOTE] +> - The integration between Microsoft Defender for servers and Microsoft Defender for Endpoint has been expanded to support Windows Server 2022, [Windows Server 2019, and Windows Virtual Desktop (WVD)](/azure/security-center/release-notes#microsoft-defender-for-endpoint-integration-with-azure-defender-now-supports-windows-server-2019-and-windows-10-virtual-desktop-wvd-in-preview). +> - Server endpoint monitoring utilizing this integration has been disabled for Office 365 GCC customers. + ## Windows Server 2012 R2 and Windows Server 2016 > [!NOTE] Aside from fully updating the machine with the Latest Cumulative Update (LCU), v To receive regular product improvements and fixes for the EDR Sensor component, ensure Windows Update [KB5005292](https://go.microsoft.com/fwlink/?linkid=2168277) gets applied or approved. In addition, to keep protection components updated, see [Manage Microsoft Defender Antivirus updates and apply baselines](/microsoft-365/security/defender-endpoint/manage-updates-baselines-microsoft-defender-antivirus#monthly-platform-and-engine-versions). -### Download installation and onboarding packages +### Onboarding steps summary -1. In Microsoft Defender Security Center, go to **Settings > Device Management > Onboarding**. +- STEP 1: [Download the installation and onboarding packages](#step-1-download-installation-and-onboarding-packages) +- STEP 2: [Apply the installation and onboarding package](#step-2-apply-the-installation-and-onboarding-package) +- STEP 3: [Complete the onboarding steps](#step-3-complete-the-onboarding-steps) -2. Select **Windows Server 2012 R2 and 2016**. -3. Select **Download installation package** and save the .msi file. You can run the msi package through the installation wizard, or follow the command-line steps in [Install Microsoft Defender for Endpoint using the command line](#install-microsoft-defender-for-endpoint-using-command-line). +### STEP 1: Download installation and onboarding packages - > [!NOTE] - > Microsoft Defender Antivirus will get installed and will be active unless you set it to passive mode. +You will need to download both the **installation** and **onboarding** packages from the portal. ++> [!div class="mx-imgBorder"] +>  +The **installation package** contains an MSI file that installs the Microsoft Defender for Endpoint agent. ++The **onboarding package** contains the following files: ++- `OptionalParamsPolicy` - contains the setting that enables sample collection +- `WindowsDefenderATPOnboardingScript.cmd` - contains the onboarding script ++Use the following steps to download the packages: ++1. In Microsoft Defender Security Center, go to **Settings > Device Management > Onboarding**. ++2. Select **Windows Server 2012 R2 and 2016**. ++3. Select **Download installation package** and save the .msi file. + 4. Select **Download onboarding package** and save the .zip file. -5. Install the installation package using any of the options to install Microsoft Defender Antivirus. -6. Follow the steps provided in the [onboarding steps](#onboarding-steps) section. -### Options to install Microsoft Defender for Endpoint +### STEP 2: Apply the installation and onboarding package +In this step you will install the prevention and detection components required before onboarding your device to the Microsoft Defender for Endpoint cloud environment, to prepare the machine for onboarding. Ensure all [prerequisites](#prerequisites) have been met. ++ > [!NOTE] + > Microsoft Defender Antivirus will get installed and will be active unless you set it to passive mode. ++#### Options to install the Microsoft Defender for Endpoint packages ++In the previous section, you downloaded an installation package. The installation package contains the installer for all Microsoft Defender for Endpoint components. -In the previous section, you downloaded an installation package. The installation package contains the installer for all Microsoft Defender for Endpoint components. +You can use any of the following options to install the agent: +- [Install using the command line](#install-microsoft-defender-for-endpoint-using-the-command-line) +- [Install using a script](#install-microsoft-defender-for-endpoint-using-a-script) +- [Apply the installation and onboarding packages using Group Policy](#apply-the-microsoft-defender-for-endpoint-installation-and-onboarding-packages-using-group-policy) -### Install Microsoft Defender for Endpoint using command line +##### Install Microsoft Defender For Endpoint using the command line +Use the installation package from the previous step to install Microsoft Defender for Endpoint. -Use the installation package from the previous step to install Microsoft Defender for Endpoint. Run the following command to install Microsoft Defender for Endpoint: The `/quiet` switch suppresses all notifications. Support for Windows Server provides deeper insight into server activities, coverage for kernel and memory attack detection, and enables response actions. -### Install Microsoft Defender for Endpoint using a script +##### Install Microsoft Defender for Endpoint using a script -You can also use the [installer script](server-migration.md#installer-script) to help automate installation, uninstallation, and onboarding. +You can use the [installer script](server-migration.md#installer-script) to help automate installation, uninstallation, and onboarding. For more information, see the instructions in the following section to use the script with Group Policy. -## Windows Server Semi-Annual Enterprise Channel and Windows Server 2019 and Windows Server 2022 +##### Apply the Microsoft Defender for Endpoint installation and onboarding packages using Group policy -The onboarding package for Windows Server 2019 and Windows Server 2022 through Microsoft Endpoint Manager currently ships a script. For more information on how to deploy scripts in Configuration Manager, see [Packages and programs in Configuration Manager](/configmgr/apps/deploy-use/packages-and-programs). +1. Create a group policy: <br> Open the [Group Policy Management Console](/internet-explorer/ie11-deploy-guide/group-policy-and-group-policy-mgmt-console-ie11) (GPMC), right-click **Group Policy Objects** you want to configure and click **New**. Enter the name of the new GPO in the dialogue box that is displayed and click **OK**. -### Download package +2. Open the [Group Policy Management Console](/internet-explorer/ie11-deploy-guide/group-policy-and-group-policy-mgmt-console-ie11) (GPMC), right-click the Group Policy Object (GPO) you want to configure and click **Edit**. -1. In Microsoft Defender Security Center, go to **Settings > Device Management > Onboarding**. +3. In the **Group Policy Management Editor**, go to **Computer configuration**, then **Preferences**, and then **Control panel settings**. -2. Select **Windows Server 1803 and 2019**. +4. Right-click **Scheduled tasks**, point to **New**, and then click **Immediate Task (At least Windows 7)**. -3. Select **Download package**. Save it as WindowsDefenderATPOnboardingPackage.zip. +5. In the **Task** window that opens, go to the **General** tab. Under **Security options** click **Change User or Group** and type SYSTEM and then click **Check Names** then **OK**. NT AUTHORITY\SYSTEM appears as the user account the task will run as. ++6. Select **Run whether user is logged on or not** and check the **Run with highest privileges** check box. ++7. In the Name field, type an appropriate name for the scheduled task (for example, Defender for Endpoint Deployment). ++8. Go to the **Actions** tab and select **New...** Ensure that **Start a program** is selected in the **Action** field. The [installer script](server-migration.md#installer-script) handles the installation, and immediately perform the onboarding step after installation completes. Select *C:\Windows\System32\WindowsPowerShell\v1.0\powershell.exe* then provide the arguments: ++ ```console + -ExecutionPolicy RemoteSigned \\servername-or-dfs-space\share-name\install.ps1 -OnboardingScript \\servername-or-dfs-space\share-name\windowsdefenderatponboardingscript.cmd + ``` ++ >[!NOTE] + >The recommended execution policy setting is `Allsigned`. This requires importing the script's signing certificate into the Local Computer Trusted Publishers store if the script is running as SYSTEM on the endpoint. -4. Follow the steps provided in the [onboarding steps](#onboarding-steps) section. + Replace \\servername-or-dfs-space\share-name with the UNC path, using the file server's fully qualified domain name (FQDN), of the shared *install.ps1* file. The installer package md4ws.msi must be placed in the same directory. Also ensure that the permissions of the UNC path allows read access to the computer account that's installing the platform. -## Onboarding steps + -1. Now that you have downloaded the required onboarding packages use the guidance listed in [onboarding tools and methods](configure-endpoints.md#endpoint-onboarding-tools) for your server. + For scenarios where you want Microsoft Defender Antivirus to co-exist with non-Microsoft antimalware solutions, add the $Passive parameter to set passive mode during installation. -2. (Only applicable if you're using a third-party anti-malware solution). You'll need to apply the following Microsoft Defender Antivirus passive mode settings. Verify that it was configured correctly: +9. Select **OK** and close any open GPMC windows. - 1. Set the following registry entry: - - Path: `HKLM\SOFTWARE\Policies\Microsoft\Windows Advanced Threat Protection` - - Name: `ForceDefenderPassiveMode` - - Type: `REG_DWORD` - - Value: `1` +10. To link the GPO to an Organization Unit (OU), right-click and select **Link an existing GPO**. In the dialogue box that is displayed, select the Group Policy Object that you wish to link. Click **OK**. - 2. Run the following PowerShell command to verify that the passive mode was configured: +For additional configuration setttings, see [Configure sample collection settings](configure-endpoints-gp.md#configure-sample-collection-settings) and [Other recommended configuration settings](configure-endpoints-gp.md#other-recommended-configuration-settings). - ```powershell - Get-WinEvent -FilterHashtable @{ProviderName="Microsoft-Windows-Sense" ;ID=84} - ``` +### STEP 3: Complete the onboarding steps - > [!NOTE] - > - The integration between Microsoft Defender for servers and Microsoft Defender for Endpoint has been expanded to support Windows Server 2022, [Windows Server 2019, and Windows Virtual Desktop (WVD)](/azure/security-center/release-notes#microsoft-defender-for-endpoint-integration-with-azure-defender-now-supports-windows-server-2019-and-windows-10-virtual-desktop-wvd-in-preview). - > - Server endpoint monitoring utilizing this integration has been disabled for Office 365 GCC customers. +The following steps are only applicable if you're using a third-party anti-malware solution. You'll need to apply the following Microsoft Defender Antivirus passive mode setting. Verify that it was configured correctly: - 3. Confirm that a recent event containing the passive mode event is found: +1. Set the following registry entry: + - Path: `HKLM\SOFTWARE\Policies\Microsoft\Windows Advanced Threat Protection` + - Name: `ForceDefenderPassiveMode` + - Type: `REG_DWORD` + - Value: `1` -  +2. Run the following PowerShell command to verify that the passive mode was configured: ++ ```powershell + Get-WinEvent -FilterHashtable @{ProviderName="Microsoft-Windows-Sense" ;ID=84} + ``` ++3. Confirm that a recent event containing the passive mode event is found: ++  > [!IMPORTANT] > Data collected by Defender for Endpoint is stored in the geo-location of the ten > - If you use Defender for Endpoint before using Microsoft Defender for Cloud, your data will be stored in the location you specified when you created your tenant even if you integrate with Microsoft Defender for Cloud at a later time. > - Once configured, you cannot change the location where your data is stored. If you need to move your data to another location, you need to contact Microsoft Support to reset the tenant. ++## Windows Server Semi-Annual Enterprise Channel and Windows Server 2019 and Windows Server 2022 ++The onboarding package for Windows Server 2019 and Windows Server 2022 through Microsoft Endpoint Manager currently ships a script. For more information on how to deploy scripts in Configuration Manager, see [Packages and programs in Configuration Manager](/configmgr/apps/deploy-use/packages-and-programs). ++### Download package ++1. In Microsoft Defender Security Center, go to **Settings > Device Management > Onboarding**. ++2. Select **Windows Server 1803 and 2019**. ++3. Select **Download package**. Save it as WindowsDefenderATPOnboardingPackage.zip. ++4. Follow the steps provided in the [Complete the onboarding steps](#step-3-complete-the-onboarding-steps) section. ++ ## Verify the onboarding and installation Verify that Microsoft Defender Antivirus and Microsoft Defender for Endpoint are running. |
| security | Get Started Partner Integration | https://github.com/MicrosoftDocs/microsoft-365-docs/commits/public/microsoft-365/security/defender-endpoint/get-started-partner-integration.md | The best way for technology partners to certify that their integration works is Once the Microsoft Defender for Endpoint team has reviewed and approves the integration, we will direct you to be included as a partner at the Microsoft Intelligent Security Association. -## Step 3: Become a Microsoft Intelligent Security Association member --[Microsoft Intelligent Security Association](https://www.microsoft.com/security/partnerships/intelligent-security-association) is a program specifically for Microsoft security partners to help enrich your security products and improve customer discoverability of your integrations to Microsoft security products. --## Step 4: Get listed in the Microsoft Defender for Endpoint partner application portal +## Step 3: Get listed in the Microsoft Defender for Endpoint partner application portal Microsoft Defender for Endpoint supports third-party applications discovery and integration using the in-product [partner page](partner-applications.md) that is embedded within the Microsoft Defender for Endpoint management portal. |
| security | Get User Information | https://github.com/MicrosoftDocs/microsoft-365-docs/commits/public/microsoft-365/security/defender-endpoint/get-user-information.md | - Title: Get user information API -description: Learn how to use the Get user information API to retrieve a User entity by key, or user name, in Microsoft Defender for Endpoint. -keywords: apis, graph api, supported apis, get, user, user information -search.product: eADQiWindows 10XVcnh -ms.sitesec: library -ms.pagetype: security ---------# Get user information API ---**Applies to:** -- [Microsoft Defender for Endpoint Plan 1](https://go.microsoft.com/fwlink/p/?linkid=2154037)-- [Microsoft Defender for Endpoint Plan 2](https://go.microsoft.com/fwlink/p/?linkid=2154037)--> Want to experience Microsoft Defender for Endpoint? [Sign up for a free trial.](https://signup.microsoft.com/create-account/signup?products=7f379fee-c4f9-4278-b0a1-e4c8c2fcdf7e&ru=https://aka.ms/MDEp2OpenTrial?ocid=docs-wdatp-exposedapis-abovefoldlink) ----> Want to experience Defender for Endpoint? [Sign up for a free trial.](https://signup.microsoft.com/create-account/signup?products=7f379fee-c4f9-4278-b0a1-e4c8c2fcdf7e&ru=https://aka.ms/MDEp2OpenTrial?ocid=docs-wdatp-exposedapis-abovefoldlink) -Retrieve a User entity by key (user name). --## Permissions --One of the following permissions is required to call this API. To learn more, including how to choose permissions, see [Use Microsoft Defender for Endpoint APIs](apis-intro.md) --Permission type|Permission|Permission display name -:|:|: -Application|User.Read.All|'Read all user profiles' --## HTTP request --```http -GET /api/users/{id}/ -``` --## Request headers --Name|Type|Description -:|:|: -Authorization | String | Bearer {token}. **Required**. --## Request body --Empty --## Response --If successful and user exists - 200 OK with [user](user.md) entity in the body. If user does not exist - 404 Not Found. --## Example --### Request --Here is an example of the request. --```http -GET https://api.securitycenter.microsoft.com/api/users/user1 -Content-type: application/json -``` --### Response example --Here is an example of the response. ---``` -HTTP/1.1 200 OK -Content-type: application/json -{ - "@odata.context": "https://api.securitycenter.microsoft.com/api/$metadata#Users/$entity", - "id": "user1", - "firstSeen": "2018-08-02T00:00:00Z", - "lastSeen": "2018-08-04T00:00:00Z", - "mostPrevalentMachineId": null, - "leastPrevalentMachineId": null, - "logonTypes": "Network", - "logOnMachinesCount": 3, - "isDomainAdmin": false, - "isOnlyNetworkUser": null -} -``` |
| security | Microsoft Defender Antivirus On Windows Server | https://github.com/MicrosoftDocs/microsoft-365-docs/commits/public/microsoft-365/security/defender-endpoint/microsoft-defender-antivirus-on-windows-server.md | By default, Microsoft Defender Antivirus is installed and functional on Windows If the GUI is not installed on your server, and you want to install it, either the **Add Roles and Features** wizard or PowerShell cmdlets. > [!NOTE]-> This option is not available for Windows Server 2012 R2. For more information, see [Options to install Microsoft Defender for Endpoint](configure-server-endpoints.md#options-to-install-microsoft-defender-for-endpoint). +> This option is not available for Windows Server 2012 R2. For more information, see [Options to install Microsoft Defender for Endpoint](configure-server-endpoints.md#options-to-install-the-microsoft-defender-for-endpoint-packages). ### Turn on the GUI using the Add Roles and Features Wizard Uninstall-WindowsFeature -Name Windows-Defender-GUI ### Are you using Windows Server 2012 R2 or Windows Server 2016? -You can now run Microsoft Defender Antivirus in passive mode on Windows Server 2012 R2 and and Windows Server 2016. For more information, see [Options to install Microsoft Defender for Endpoint](configure-server-endpoints.md#options-to-install-microsoft-defender-for-endpoint). +You can now run Microsoft Defender Antivirus in passive mode on Windows Server 2012 R2 and and Windows Server 2016. For more information, see [Options to install Microsoft Defender for Endpoint](configure-server-endpoints.md#options-to-install-the-microsoft-defender-for-endpoint-packages). <br/><br/> |
| security | Minimum Requirements | https://github.com/MicrosoftDocs/microsoft-365-docs/commits/public/microsoft-365/security/defender-endpoint/minimum-requirements.md | There are some minimum requirements for onboarding devices to the service. Learn > - Defender for Endpoint demonstrated industry-leading optics and detection capabilities in the recent MITRE evaluation. Read: [Insights from the MITRE ATT&CK-based evaluation](https://cloudblogs.microsoft.com/microsoftsecure/2018/12/03/insights-from-the-mitre-attack-based-evaluation-of-windows-defender-atp/). ## Licensing requirements+For information licensing requirements for Microsoft Defender for Endpoint, see [Microsoft Defender for Endpoint licensing information](/office365/servicedescriptions/microsoft-365-service-descriptions/microsoft-365-tenantlevel-services-licensing-guidance/microsoft-365-security-compliance-licensing-guidance#microsoft-defender-for-endpoint). -Microsoft Defender for Endpoint requires one of the following Microsoft volume licensing offers: --- Windows 11 Enterprise E5-- Windows 11 Education A5-- Windows 10 Enterprise E5-- Windows 10 Education A5-- Microsoft 365 E5 (M365 E5) which includes Windows 10 Enterprise E5 or Windows 11 Enterprise E5-- Microsoft 365 A5 (M365 A5) -- Microsoft 365 E3 (M365 E3) with Enterprise Mobility + Security E5 Add-on-- Microsoft 365 Business Premium when purchased from a [Microsoft Cloud Solution Provider](https://partner.microsoft.com/membership/cloud-solution-provider/find-a-provider)-- Microsoft 365 E5 Security-- Microsoft 365 A5 Security-- Microsoft Defender for Endpoint--> [!NOTE] -> Eligible licensed users may use Microsoft Defender for Endpoint on up to five concurrent devices. -> Microsoft Defender for Endpoint is also available for purchase from a Cloud Solution Provider (CSP). -> RDSH VMs do not require a separate Defender for Endpoint license. --Microsoft Defender for Endpoint on servers requires one of the following licensing options: --- [Microsoft Defender for Cloud with enhanced security features enabled](/azure/security-center/enable-enhanced-security)-- Microsoft Defender for Endpoint Server SKU (one per covered server)--> [!NOTE] -> Customers may acquire server licenses (one per covered server Operating System Environment (OSE)) to run Microsoft Defender for Endpoint on servers if they have a combined minimum of 50 licenses for one or more of the following user licenses: -> -> - Microsoft Defender for Endpoint -> - Windows E5/A5 -> - Microsoft 365 E5/A5 -> - Microsoft 365 E5/A5 Security For detailed licensing information, see the [Product Terms site](https://www.microsoft.com/licensing/terms/) and work with your account team to learn more about the terms and conditions. |
| security | Server Migration | https://github.com/MicrosoftDocs/microsoft-365-docs/commits/public/microsoft-365/security/defender-endpoint/server-migration.md | Migration steps: 5. Create an application to perform the following tasks: 1. Remove the MMA workspace configuration for Microsoft Defender for Endpoint. See [Remove a workspace using PowerShell](/azure/azure-monitor/agents/agent-manage). This step is optional; the previous EDR sensor will stop running after the newer one becomes active (note this can take several hours). 2. Install the [prerequisites](configure-server-endpoints.md#prerequisites) where applicable.- 3. Install the Microsoft Defender for Endpoint for Windows Server 2012 R2 and 2016 package and **enable passive mode**. See [Install Microsoft Defender Antivirus using command line](configure-server-endpoints.md#install-microsoft-defender-for-endpoint-using-command-line). + 3. Install the Microsoft Defender for Endpoint for Windows Server 2012 R2 and 2016 package and **enable passive mode**. See [Install Microsoft Defender Antivirus using command line](configure-server-endpoints.md#install-microsoft-defender-for-endpoint-using-the-command-line). 4. Apply the onboarding script **for use with Group Policy** downloaded from [Microsoft 365 Defender](https://security.microsoft.com). 6. Apply updates. 7. Remove your non-Microsoft antivirus software by either using the non-Microsoft antivirus console or by using Microsoft Endpoint Configuration Manager as Value: 0 ### You have a server on which you want to install Microsoft Defender for Endpoint. It has a non-Microsoft endpoint protection or endpoint detection and response solution installed. You do not intend to use Microsoft Endpoint Configuration Manager or Microsoft Defender for Cloud. You use your own deployment mechanism. 1. Fully update the machine including Microsoft Defender Antivirus (Windows Server 2016).-2. Install the Microsoft Defender for Endpoint for Windows Server 2012 R2 & 2016 package and **enable passive mode**. See [Install Microsoft Defender Antivirus using command line](configure-server-endpoints.md#install-microsoft-defender-for-endpoint-using-command-line). +2. Install the Microsoft Defender for Endpoint for Windows Server 2012 R2 & 2016 package and **enable passive mode**. See [Install Microsoft Defender Antivirus using command line](configure-server-endpoints.md#install-microsoft-defender-for-endpoint-using-the-command-line). 3. Apply the onboarding script, appropriate to your environment, downloaded from [Microsoft 365 Defender](https://security.microsoft.com). 4. Remove the non-Microsoft endpoint protection or endpoint detection and response solution, and remove passive mode.* 5. Apply updates. |
| security | Switch To Mde Phase 2 | https://github.com/MicrosoftDocs/microsoft-365-docs/commits/public/microsoft-365/security/defender-endpoint/switch-to-mde-phase-2.md | You can use the [Malware Protection Command-Line Utility](command-line-arguments ### Set Microsoft Defender Antivirus to passive mode on Windows Server > [!TIP]-> You can now run Microsoft Defender Antivirus in passive mode on Windows Server 2012 R2 and 2016. For more information, see [Options to install Microsoft Defender for Endpoint](configure-server-endpoints.md#options-to-install-microsoft-defender-for-endpoint). +> You can now run Microsoft Defender Antivirus in passive mode on Windows Server 2012 R2 and 2016. For more information, see [Options to install Microsoft Defender for Endpoint](configure-server-endpoints.md#options-to-install-the-microsoft-defender-for-endpoint-packages). 1. Open Registry Editor, and then navigate to You can use the [Malware Protection Command-Line Utility](command-line-arguments > [!NOTE] > After onboarding to Defender for Endpoint, you might have to set Microsoft Defender Antivirus to passive mode on Windows Server. To validate that passive mode was set as expected, search for *event 5007* in the **Microsoft-Windows-Windows Defender Operational** log (located at `C:\Windows\System32\winevt\Logs`), and confirm that either the **ForceDefenderPassiveMode** or **PassiveMode** registry keys were set by to **0x1**. +### Are you using Windows Server 2012 R2 or Windows Server 2016? ++You can now run Microsoft Defender Antivirus in passive mode on Windows Server 2012 R2 and 2016 using the method above. For more information, see [Options to install Microsoft Defender for Endpoint](configure-server-endpoints.md#options-to-install-the-microsoft-defender-for-endpoint-packages). + ## Configure Defender for Endpoint This step of the migration process involves configuring Microsoft Defender Antivirus for your endpoints. We recommend using Intune; however, you can any of the methods that are listed in the following table: |
| security | Troubleshoot Microsoft Defender Antivirus | https://github.com/MicrosoftDocs/microsoft-365-docs/commits/public/microsoft-365/security/defender-endpoint/troubleshoot-microsoft-defender-antivirus.md | Microsoft Defender Antivirus client is up and running in a healthy state. </td> </tr> <tr>+<th colspan="2">Event ID: 1127</th> +</tr> +<tr><td> +Symbolic name: +</td> +<td > +<b>MALWAREPROTECTION_FOLDER_GUARD_SECTOR_BLOCK</b> +</td> +</tr> +<tr> +<td> +Message: +</td> +<td > +<b>Controlled Folder Access(CFA) blocked an untrusted process from making changes to the memory. +</b> +</td> +</tr> +<tr> +<td> +Description: +</td> +<td > +Controlled Folder Access has blocked an untrusted process from potentially modifying disk sectors. +<br/> For more information about the event record, see the following: +<dl> +<dt>EventID: <EventID>, for example: 1127</dt> +<dt>Version: <Version>, for example: 0</dt> +<dt>Level: <Level>, for example: win:Warning</dt> +<dt>TimeCreated: <SystemTime>, time when the event was created</dt> +<dt>EventRecordID: <EventRecordID>, index number of the event in the event log</dt> +<dt>Execution ProcessID: <Execution ProcessID>, process that generated the event</dt> +<dt>Channel: <Event channel>, for example: Microsoft-Windows-Windows Defender/Operational</dt> +<dt>Computer: <Computer name></dt> +<dt>Security UserID: <Security UserID></dt> +<dt>Product Name: <Product Name>, for example: Microsoft Defender Antivirus</dt> +<dt>Product Version: <Product Version></dt> +<dt>Detection Time: <Detection Time>, time when CFA blocked an untrusted process</dt> +<dt>User: <Domain>\<User></dt> +<dt>Path: <Device name>, name of the device or disk that an untrusted process accessed for modification</dt> +<dt>Process Name: <Process path>, the process path name that CFA blocked from accessing the device or disk for modification</dt> +<dt>Security Intelligence Version: <Security intelligence version></dt> +<dt>Engine Version: <Antimalware Engine version></dt> +</dl> +</td> +</tr> +<tr> +<td> +User action: +</td> +<td > +The user can add the blocked process to the <i>Allowed Process</i> list for CFA, using Powershell or Windows Security Center. +</td> +</tr> +<tr> <th colspan="2">Event ID: 1150</th> </tr> <tr><td> |
| security | Microsoft Secure Score History Metrics Trends | https://github.com/MicrosoftDocs/microsoft-365-docs/commits/public/microsoft-365/security/defender/microsoft-secure-score-history-metrics-trends.md | There are two places to see how your score compares to organizations that are si #### Comparison bar chart -The comparison bar chart is the **Overview** tab. Hover over the chart to view the score and score opportunity. The comparison data is anonymized so we donΓÇÖt know exactly which others tenants are in the mix. +The comparison bar chart is available on the **Overview** tab. Hover over the chart to view the score and score opportunity. - +**Organizations like yours** is an average score of other tenants in same region (provided we have at least five or more tenants to compare) with a similar organization size to yours. -- **Organizations like yours**: an average score of other tenants (provided we have at least five or more tenants to compare) that qualify with the following criteria:- 1. Same industry - 2. Same organization size - 3. All regions - 4. Microsoft products used are 80% similar - 5. Opportunity (max score that can be achieved by current license) within a 20% range from your tenant +The comparison data is anonymized so we donΓÇÖt know exactly which others tenants are in the mix. + #### Comparison trend |
| security | Email Security In Microsoft Defender | https://github.com/MicrosoftDocs/microsoft-365-docs/commits/public/microsoft-365/security/office-365-security/email-security-in-microsoft-defender.md | In this article: - [Start automated investigation and response](#start-automated-investigation-and-response) > [!NOTE]-> This is part of a **3-article series** on **Threat Explorer (Explorer)**, **email security**, and **Explorer and Real-time detections basics** (such as differences between the tools, and permissions needed to operate them). The other two articles in this series are [Threat hunting in Threat Explorer](threat-hunting-in-threat-explorer.md) and [Threat Explorer and Real-time detections basics](real-time-detections.md). +> This is part of a **3-article series** on **Threat Explorer (Explorer)**, **email security**, and **Explorer and Real-time detections** (such as differences between the tools, and permissions needed to operate them). The other two articles in this series are [Threat hunting in Threat Explorer](threat-hunting-in-threat-explorer.md) and [Threat Explorer and Real-time detections](real-time-detections.md). This article explains how to view and investigate malware and phishing attempts that are detected in email by Microsoft 365 security features. |
| security | Mdo Email Entity Page | https://github.com/MicrosoftDocs/microsoft-365-docs/commits/public/microsoft-365/security/office-365-security/mdo-email-entity-page.md | These details are specific to email attachments and URLs. Users can see these de Users will see enriched detonation details for known malicious attachments or URLs found in their emails, which got detonated for their specific tenant. It will comprise of Detonation chain, Detonation summary, Screenshot, and Observed behavior details to help customers understand why the attachment or URL was deemed malicious and detonated. -1. *Detonation chain*. A single file or URL detonation can trigger multiple detonations. The Detonation chain tracks the path of detonations, including the original malicious file or URL that caused the verdict, and all other files or URLs effected by the detonation. These URLs or attached files may not be directly present in the email, but including that analysis is important to determining why the file or URL was found to be malicious. +1. *Detonation chain*. A single file or URL detonation can trigger multiple detonations. The Detonation chain tracks the path of detonations, including the original malicious file or URL that caused the verdict, and all other files or URLs affected by the detonation. These URLs or attached files may not be directly present in the email, but including that analysis is important to determining why the file or URL was found to be malicious. > [!NOTE] > This may show just the top level item if none of the entities linked to it were found to be problematic, or were detonated. Users will see enriched detonation details for known malicious attachments or UR - Sender Policy Framework (**SPF**): Describes results for SPF check for the message. Possible values can be: - Pass (IP address): The SPF check for the message passed and includes the sender's IP address. The client is authorized to send or relay email on behalf of the sender's domain.- - Fail (IP address): The SPF check for the message failed and includes the sender's IP address. This is sometimes called hard fail. + - Fail (IP address): The SPF check for the message failed, and includes the sender's IP address. This is sometimes called hard fail. - Softfail (reason): The SPF record designated the host as not being allowed to send but is in transition. - Neutral: The SPF record explicitly states that it does not assert whether the IP address is authorized to send. - None: The domain doesn't have an SPF record, or the SPF record doesn't evaluate to a result. Users will see enriched detonation details for known malicious attachments or UR - None: Indicates that no DMARC TXT record exists for the sending domain in DNS. *Composite Authentication*: This is a value used by Microsoft 365 to combine email authentication like SPF, DKIM, and DMARC, to determine if the message is authentic. It uses the *From:* domain of the mail as the basis of evaluation.++### Email summary panel ++The email summary panel is a summarized view of the full email entity page. It contains standardized details about the email (e.g., detections), as well as context-specific information (e.g., for Quarantine or Submissions metadata). The email summary panel replaces the traditional Real-time Detections, Threat Explorer, Submissions, and Reporting flyouts. ++> [!div class="mx-imgBorder"] +>  ++> [!NOTE] +> To view all the components, click on the **Open email entity** link to open the full email entity page. ++The email summary panel is divided into the following sections: ++- *Delivery details*: Contains information about threats and corresponding confidence level, detection technologies, and original and latest delivery location. ++- *Email details*: Contains information about email properties like sender name, sender address, time received, authentication details, and other several other details. ++- *URLs*: By default, you will see 3 URLs and their corresponding threats. You can always click **View all URLs** to expand and see all URLs and export them. ++- *Attachments*: By default, you will see 3 attachments. You can always click **View all attachments** to expand and see all attachments. ++In addition to the above sections, you will also see sections specific to few experiences which are integrated with the summary panel: ++- Submissions: ++ - *Submission details*: Contains information about the specific submissions such as: + - Date submitted + - Subject + - Submission type + - Reason for submitting + - Submission ID + - Submitted by ++ - *Result details*: Messages that are submitted are reviewed. You can see the result of your submission as well as any recommended next steps. ++- Quarantine: ++ - *Quarantine details*: Contains quarantine-specific details. For more information, see [Manage quarantined messages](manage-quarantined-messages-and-files.md#view-quarantined-message-details). ++ - Expires: The date/time when the message will be automatically and permanently deleted from quarantine. + - Released to: All email addresses (if any) to which the message has been released. + - Not yet released to: All email addresses (if any) to which the message has not yet been released. ++ - *Quarantine actions*: For more information on different quarantine actions, see [Manage quarantined messages](manage-quarantined-messages-and-files.md#take-action-on-quarantined-email). |
| security | Real Time Detections | https://github.com/MicrosoftDocs/microsoft-365-docs/commits/public/microsoft-365/security/office-365-security/real-time-detections.md | ms.technology: mdo ms.prod: m365-security -# Explorer and Real-time detections basics +# Explorer and Real-time detections **Applies to** - [Microsoft Defender for Office 365 plan 1 and plan 2](defender-for-office-365.md) ms.prod: m365-security In this article: - [Differences between Explorer and Real-time detections](#differences-between-explorer-and-real-time-detections)+- [Updated experience for Explorer and Real-time detections](#updated-experience-for-explorer-and-real-time-detections) - [Required licenses and permissions](#required-licenses-and-permissions) > [!NOTE] > This is part of a **3-article series** on **Explorer (also known as Threat Explorer)**, **email security**, and **Explorer and Real-time detections basics** (such as differences between the tools, and permissions needed to operate them). The other two articles in this series are [Threat hunting in Explorer](threat-hunting-in-threat-explorer.md) and [Email security with Explorer](email-security-in-microsoft-defender.md). -This article explains the difference between Explorer and real-time detections reporting, and the licenses and permissions that are required. +This article explains the difference between Explorer and real-time detections reporting, updated experience with Explorer and real-time detections where you can toggle between old and new experiences, and the licenses and permissions that are required. If your organization has [Microsoft Defender for Office 365](defender-for-office-365.md), and you have the [permissions](#required-licenses-and-permissions), you can use **Explorer** (also known as **Threat Explorer**) or **Real-time detections** to detect and remediate threats. For more information, see [Email security with Explorer](email-security-in-micro - An *All email* view is available in Threat Explorer, but not included in the Real-time detections report. - Rich filtering capabilities and remediation actions are included in Threat Explorer. For more information, see [Microsoft Defender for Office 365 Service Description: Feature availability across Defender for Office 365 plans](/office365/servicedescriptions/office-365-advanced-threat-protection-service-description#feature-availability-across-advanced-threat-protection-atp-plans). +## Updated experience for Explorer and Real-time detections ++The experience for Threat Explorer and Real-time detections is updated to align with modern accessibility standards, and to optimize the workflow. For a short while, you will be able to toggle between the old experience and the new one. ++> [!NOTE] +> Toggling impacts only your account and does not impact anyone else within your tenant. ++Threat Explorer and Real-time detections is divided into the following views: ++- *All email*: Shows all email analyzed by Defender for office 365 and contains both good and malicious emails. This feature is only present in Threat Explorer and is not available for Real-time detections. By default, it is set to show data for two days, which can be expanded up to 30 days. This is also the default view for Threat Explorer. ++- *Malware view*: Shows emails on which a malware threat was identified. This is the default view for Real-time detections, and shows data for two days (can be expanded to 30 days). ++- *Phish view*: Shows emails on which a phish threat was identified. ++- *Content malware view*: Shows malicious detections identified in files shared through OneDrive, SharePoint, or Teams. ++Here are the common components within these experiences: ++- Filters ++ - You can use the various filters to view the data based on email or file attributes. ++ - By default, the time filter is applied to the records, and is applied for two days. ++ - If you are applying multiple filters, they are applied in ΓÇÿANDΓÇÖ mode and you can use the advanced filter to change it to ΓÇÿORΓÇÖ mode. ++ - You can use commas to add multiple values for the same filter. ++ > [!div class="mx-imgBorder"] + >  ++- Charts ++ - Charts provide a visual, aggregate view of data based on filters. You can use different filters to view the data by different dimensions. ++ > [!NOTE] + > You may see no results in chart view even if you are seeing an entry in the list view. This happens if the filter does not produce any data. For example, if you have applied the filter malware family, but the underlying data does not have any malicious emails, then you may see the message no data available for this scenario. ++ > [!div class="mx-imgBorder"] + >  ++- Results grid ++ - Results grid shows the email results based on the filters you have applied. ++ - Based on the configuration set in your tenant, data will be shown in UTC or local timezone, with the timezone information available in the first column. ++ - You can navigate to the individual email entity page from the list view by clicking the **Open in new window** icon. ++ - You can also customize your columns to add or remove columns to optimize your view. ++ > [!Note] + > You can toggle between the *Chart View* and the *List View* to maximize your result set. ++ > [!div class="mx-imgBorder"] + >  ++- Detailed flyout ++ - You can click on hyperlinks to get to the email summary panel (entries in Subject column), recipient, or IP flyout. ++ - The email summary panel replaces the legacy email flyout, and also provides a path to access the email entity panel. ++ - The individual entity flyouts like IP, recipient, and URL would reflect the same information, but presented in a single tab-based view, with the ability to expand and collapse the different sections based on requirement. ++ - For flyouts like URLs, you can click **View all Email** or **View all Clicks** to view the full set of emails/clicks containing that URL, as well as export the result set. ++- Actions ++ - From Threat Explorer, you can trigger remediation actions like *Delete an email*. For more information on remediation, remediation limits, and tracking remediation see [Remediate malicious email](remediate-malicious-email-delivered-office-365.md). ++- Export ++ - You can click **Export chart data** to export the chart details. Similarly, click **Export email list** to export email details. ++ - You can export up to 200K records for email list. However, for better system performance and reduced download time, you should use various email filters. ++ > [!div class="mx-imgBorder"] + >  ++In addition to these features, you will also get updated experiences like *Top URLs*, *Top clicks*, *Top targeted users*, and *Email origin*. *Top URLs*, *Top clicks*, and *Top targeted users* can be further filtered based on the filter that you apply within Explorer. + ## Required licenses and permissions You must have [Microsoft Defender for Office 365](defender-for-office-365.md) to use either of Explorer or Real-time detections: |
| security | Threat Hunting In Threat Explorer | https://github.com/MicrosoftDocs/microsoft-365-docs/commits/public/microsoft-365/security/office-365-security/threat-hunting-in-threat-explorer.md | In this article: - [Improvements to threat hunting experience](#improvements-to-threat-hunting-experience) > [!NOTE]-> This is part of a **3-article series** on **Threat Explorer (Explorer)**, **email security**, and **Explorer and Real-time detections basics** (such as differences between the tools, and permissions needed to operate them). The other two articles in this series are [Email security with Threat Explorer](email-security-in-microsoft-defender.md) and [Threat Explorer and Real-time detections basics](real-time-detections.md). +> This is part of a **3-article series** on **Threat Explorer (Explorer)**, **email security**, and **Explorer and Real-time detections** (such as differences between the tools, and permissions needed to operate them). The other two articles in this series are [Email security with Threat Explorer](email-security-in-microsoft-defender.md) and [Threat Explorer and Real-time detections](real-time-detections.md). **Applies to** |
| solutions | Manage Devices With Intune App Protection | https://github.com/MicrosoftDocs/microsoft-365-docs/commits/public/microsoft-365/solutions/manage-devices-with-intune-app-protection.md | +- set up mobile ap protection +- m365solution-managedevices +- m365solution-scenario keywords: |
| solutions | Manage Devices With Intune Compliance Policies | https://github.com/MicrosoftDocs/microsoft-365-docs/commits/public/microsoft-365/solutions/manage-devices-with-intune-compliance-policies.md | ms.prod: microsoft-365-enterprise ms.localizationpriority: high - Create compliance policies-- Intune device compliance policy+- Intune device compliance policy- +- m365solution-managedevices +- m365solution-scenario keywords: |
| solutions | Manage Devices With Intune Configuration Profiles | https://github.com/MicrosoftDocs/microsoft-365-docs/commits/public/microsoft-365/solutions/manage-devices-with-intune-configuration-profiles.md | ms.localizationpriority: high - Configuration profiles - Windows security baselines for Intune-- customize configuration profiles+- customize configuration profiles- +- m365solution-managedevices +- m365solution-scenario keywords: |
| solutions | Manage Devices With Intune Dlp Mip | https://github.com/MicrosoftDocs/microsoft-365-docs/commits/public/microsoft-365/solutions/manage-devices-with-intune-dlp-mip.md | ms.localizationpriority: high - endpoint dlp - data loss prevention-- dlp policies+- dlp policies +- m365solution-managedevices +- m365solution-scenario keywords: description: Implement Endpoint DLP by working with your information protection and governance team to create DLP policies for your organization. |
| solutions | Manage Devices With Intune Enroll | https://github.com/MicrosoftDocs/microsoft-365-docs/commits/public/microsoft-365/solutions/manage-devices-with-intune-enroll.md | +- m365solution-managedevices +- m365solution-scenario keywords: |
| solutions | Manage Devices With Intune Monitor Risk | https://github.com/MicrosoftDocs/microsoft-365-docs/commits/public/microsoft-365/solutions/manage-devices-with-intune-monitor-risk.md | +- m365solution-managedevices +- m365solution-scenario keywords: |
| solutions | Manage Devices With Intune Overview | https://github.com/MicrosoftDocs/microsoft-365-docs/commits/public/microsoft-365/solutions/manage-devices-with-intune-overview.md | +- m365solution-managedevices +- m365solution-overview keywords: |
| solutions | Manage Devices With Intune Require Compliance | https://github.com/MicrosoftDocs/microsoft-365-docs/commits/public/microsoft-365/solutions/manage-devices-with-intune-require-compliance.md | +- m365solution-managedevices +- m365solution-scenario |
| solutions | Productivity Illustrations | https://github.com/MicrosoftDocs/microsoft-365-docs/commits/public/microsoft-365/solutions/productivity-illustrations.md | The logical architecture of productivity services in Microsoft 365, leading with |:--|:--| |[](https://github.com/MicrosoftDocs/microsoft-365-docs/raw/public/microsoft-365/downloads/msft-m365-teams-logical-architecture.pdf) <br/> [PDF](https://github.com/MicrosoftDocs/microsoft-365-docs/raw/public/microsoft-365/downloads/msft-m365-teams-logical-architecture.pdf) \| [Visio](https://github.com/MicrosoftDocs/microsoft-365-docs/raw/public/microsoft-365/downloads/msft-m365-teams-logical-architecture.vsdx) <br>Updated January 2021 |Microsoft provides a suite of productivity services that work together to provide collaboration experiences with data governance, security, and compliance capabilities. <br/> <br/>This series of illustrations provides a view into the logical architecture of productivity services for enterprise architects, leading with Microsoft Teams.| +## Corporate communications with Microsoft 365 ΓÇö a Contoso case study +Employee engagement is a significant contributor to workplace satisfaction, retention, and productivity at any organization. Across Microsoft 365, there are multiple ways to communicate and engage your audience. ++Knowing which method (or combinations of methods) to use and when to use them depends on your audience and the communication culture of your organization. ++| Item | Description | +|:--|:--| +|[](https://download.microsoft.com/download/0/3/4/034fbee5-ecf4-4559-86d3-815e898f21ea/contoso-corporate-communication-poster.pdf) <br/> [PDF](https://download.microsoft.com/download/0/3/4/034fbee5-ecf4-4559-86d3-815e898f21ea/contoso-corporate-communication-poster.pdf) \| [Visio](https://download.microsoft.com/download/0/3/4/034fbee5-ecf4-4559-86d3-815e898f21ea/contoso-corporate-communication-poster.vsdx) <br>Updated January 2022 |This poster illustrates how Contoso keeps employees informed and engaged across popular communication scenarios. Contoso uses a variety of M365 apps, including a new offering, Viva Connections.<br/><br/>**Related solution guides** <br/> <ul><li>[Organizational communications: Guidance, methods, and products](/sharepoint/corporate-communications-overview)| ++ ## Groups in Microsoft 365 for IT Architects This illustration includes information for IT architects about Microsoft 365 Groups. To learn about configuring and administering Microsoft 365 Groups and teams for collaboration in your organization, see [Set up secure collaboration with Microsoft 365](/microsoft-365/solutions/setup-secure-collaboration-with-teams) and [What is collaboration governance?](/microsoft-365/solutions/collaboration-governance-overview). |