| Service | Microsoft Docs article | Related commit history on GitHub | Change details |
|---|---|---|---|
| active-directory | On Premises Scim Provisioning | https://github.com/MicrosoftDocs/azure-docs/commits/main/articles/active-directory/app-provisioning/on-premises-scim-provisioning.md | The Azure Active Directory (Azure AD) provisioning service supports a [SCIM 2.0] - Administrator role for installing the agent. This task is a one-time effort and should be an Azure account that's either a hybrid administrator or a global administrator. - Administrator role for configuring the application in the cloud (application administrator, cloud application administrator, global administrator, or a custom role with permissions). -## On-premises app provisioning to SCIM-enabled apps -To provision users to SCIM-enabled apps: -- 1. [Download](https://aka.ms/OnPremProvisioningAgent) the provisioning agent and copy it onto the virtual machine or server that your SCIM endpoint is hosted on. - 1. Open the provisioning agent installer, agree to the terms of service, and select **Install**. - 1. Open the provisioning agent wizard, and select **On-premises provisioning** when prompted for the extension you want to enable. - 1. Provide credentials for an Azure AD administrator when you're prompted to authorize. Hybrid administrator or global administrator is required. - 1. Select **Confirm** to confirm the installation was successful. - 1. Navigate to the Azure Portal and add the **On-premises SCIM app** from the [gallery](../../active-directory/manage-apps/add-application-portal.md). - 1. Select **On-Premises Connectivity**, and download the provisioning agent. 1. Go back to your application, and select **On-Premises Connectivity**. - 1. Select the agent that you installed from the dropdown list, and select **Assign Agent(s)**. - 1. Wait 20 minutes prior to completing the next step, to provide time for the agent assignment to complete. - 1. Provide the URL for your SCIM endpoint in the **Tenant URL** box. An example is https://localhost:8585/scim. -  - 1. Select **Test Connection**, and save the credentials. Use the steps [here](on-premises-ecma-troubleshoot.md#troubleshoot-test-connection-issues) if you run into connectivity issues. - 1. Configure any [attribute mappings](customize-application-attributes.md) or [scoping](define-conditional-rules-for-provisioning-user-accounts.md) rules required for your application. - 1. Add users to scope by [assigning users and groups](../../active-directory/manage-apps/add-application-portal-assign-users.md) to the application. - 1. Test provisioning a few users [on demand](provision-on-demand.md). - 1. Add more users into scope by assigning them to your application. - 1. Go to the **Provisioning** pane, and select **Start provisioning**. - 1. Monitor using the [provisioning logs](../../active-directory/reports-monitoring/concept-provisioning-logs.md). +## Deploying Azure AD provisioning agent +The Azure AD Provisioning agent can be deployed on the same server hosting a SCIM enabled application, or a seperate server, providing it has line of sight to the application's SCIM endpoint. A single agent also supports provision to multiple applications hosted locally on the same server or seperate hosts, again as long as each SCIM endpoint is reachable by the agent. ++ 1. [Download](https://aka.ms/OnPremProvisioningAgent) the provisioning agent and copy it onto the virtual machine or server that your SCIM application endpoint is hosted on. + 2. Run the provisioning agent installer, agree to the terms of service, and select **Install**. + 3. Once installed, locate and launch the **AAD Connect Provisioning Agent wizard**, and when prompted for an extensions select **On-premises provisioning** + 4. For the agent to register itself with your tenant, provide credentials for an Azure AD admin with Hybrid administrator or global administrator permissions. + 5. Select **Confirm** to confirm the installation was successful. + +## Provisioning to SCIM-enabled application +Once the agent is installed, no further configuration is necesary on-prem, and all provisioning configurations are then managed from the portal. Repeat the below steps for every on-premises application being provisioned via SCIM. + + 1. In the Azure portal navigate to the Enterprise applications and add the **On-premises SCIM app** from the [gallery](../../active-directory/manage-apps/add-application-portal.md). + 2. From the left hand menu navigate to the **Provisioning** option and select **Get started**. + 3. Select **Automatic** from the dropdown list and expand the **On-Premises Connectivity** option. + 4. Select the agent that you installed from the dropdown list and select **Assign Agent(s)**. + 5. Now either wait 10 minutes or restart the **Microsoft Azure AD Connect Provisioning Agent** before proceeding to the next step & testing the connection. + 6. In the **Tenant URL** field, provide the SCIM endpoint URL for your application. The URL is typically unique to each target application and must be resolveable by DNS. An example for a scenario where the agent is installed on the same host as the application is https://localhost:8585/scim  + 7. Select **Test Connection**, and save the credentials. The application SCIM endpoint must be actively listening for inbound provisioning requests, otherwise the test will fail. Use the steps [here](on-premises-ecma-troubleshoot.md#troubleshoot-test-connection-issues) if you run into connectivity issues. + 8. Configure any [attribute mappings](customize-application-attributes.md) or [scoping](define-conditional-rules-for-provisioning-user-accounts.md) rules required for your application. + 9. Add users to scope by [assigning users and groups](../../active-directory/manage-apps/add-application-portal-assign-users.md) to the application. + 10. Test provisioning a few users [on demand](provision-on-demand.md). + 11. Add more users into scope by assigning them to your application. + 12. Go to the **Provisioning** pane, and select **Start provisioning**. + 13. Monitor using the [provisioning logs](../../active-directory/reports-monitoring/concept-provisioning-logs.md). ## Additional requirements * Ensure your [SCIM](https://techcommunity.microsoft.com/t5/identity-standards-blog/provisioning-with-scim-getting-started/ba-p/880010) implementation meets the [Azure AD SCIM requirements](use-scim-to-provision-users-and-groups.md). |
| active-directory | Access Tokens | https://github.com/MicrosoftDocs/azure-docs/commits/main/articles/active-directory/develop/access-tokens.md | Don't use mutable, human-readable identifiers like `email` or `upn` for uniquely #### Validate application sign-in -Use the `scp` claim to validate that the user has granted the calling application permission to call the API. Ensure the calling client is allowed to call the API using the `appid` claim. +* Use the `scp` claim to validate that the user has granted the calling app permission to call your API. +* Ensure the calling client is allowed to call your API using the `appid` claim (for v1.0 tokens) or the `azp` claim (for v2.0 tokens). + * You only need to validate these claims (`appid`, `azp`) if you want to restrict your web API to be called only by pre-determined applications (e.g., line-of-business applications or web APIs called by well-known frontends). APIs intended to allow access from any calling application do not need to validate these claims. ## User and application tokens |
| active-directory | Id Tokens | https://github.com/MicrosoftDocs/azure-docs/commits/main/articles/active-directory/develop/id-tokens.md | The table below shows the claims that are in most ID tokens by default (except w |`roles`| Array of strings | The set of roles that were assigned to the user who is logging in. | |`rh` | Opaque String |An internal claim used by Azure to revalidate tokens. Should be ignored. | |`sub` | String | The principal about which the token asserts information, such as the user of an app. This value is immutable and cannot be reassigned or reused. The subject is a pairwise identifier - it is unique to a particular application ID. If a single user signs into two different apps using two different client IDs, those apps will receive two different values for the subject claim. This may or may not be wanted depending on your architecture and privacy requirements. |-|`tid` | String, a GUID | Represents the tenant that the user is signing in to. For work and school accounts, the GUID is the immutable tenant ID of the organization that the user is signing in to. For sign-ins to the personal Microsoft account tenant (services like Xbox, Teams for Life, or Outlook), the value is `9188040d-6c67-4c5b-b112-36a304b66dad`. To receive this claim, your app must request the `profile` scope. | +|`tid` | String, a GUID | Represents the tenant that the user is signing in to. For work and school accounts, the GUID is the immutable tenant ID of the organization that the user is signing in to. For sign-ins to the personal Microsoft account tenant (services like Xbox, Teams for Life, or Outlook), the value is `9188040d-6c67-4c5b-b112-36a304b66dad`.| | `unique_name` | String | Only present in v1.0 tokens. Provides a human readable value that identifies the subject of the token. This value is not guaranteed to be unique within a tenant and should be used only for display purposes. | | `uti` | String | Token identifier claim, equivalent to `jti` in the JWT specification. Unique, per-token identifier that is case-sensitive.| |`ver` | String, either 1.0 or 2.0 | Indicates the version of the id_token. | |
| active-directory | Howto Vm Sign In Azure Ad Linux | https://github.com/MicrosoftDocs/azure-docs/commits/main/articles/active-directory/devices/howto-vm-sign-in-azure-ad-linux.md | There are two ways to configure role assignments for a VM: - Azure Cloud Shell experience > [!NOTE]-> The Virtual Machine Administrator Login and Virtual Machine User Login roles use `dataActions` and can be assigned at the management group, subscription, resource group, or resource scope. We recommend that you assign the roles at the management group, subscription, or resource level and not at the individual VM level. This practice avoids the risk of reaching the [Azure role assignments limit](../../role-based-access-control/troubleshooting.md#azure-role-assignments-limit) per subscription. +> The Virtual Machine Administrator Login and Virtual Machine User Login roles use `dataActions` and can be assigned at the management group, subscription, resource group, or resource scope. We recommend that you assign the roles at the management group, subscription, or resource level and not at the individual VM level. This practice avoids the risk of reaching the [Azure role assignments limit](../../role-based-access-control/troubleshooting.md#limits) per subscription. ### Azure AD portal If you get a message that says the token couldn't be retrieved from the local ca ### Access denied: Azure role not assigned -If you see an "Azure role not assigned" error on your SSH prompt, verify that you've configured Azure RBAC policies for the VM that grants the user either the Virtual Machine Administrator Login role or the Virtual Machine User Login role. If you're having problems with Azure role assignments, see the article [Troubleshoot Azure RBAC](../../role-based-access-control/troubleshooting.md#azure-role-assignments-limit). +If you see an "Azure role not assigned" error on your SSH prompt, verify that you've configured Azure RBAC policies for the VM that grants the user either the Virtual Machine Administrator Login role or the Virtual Machine User Login role. If you're having problems with Azure role assignments, see the article [Troubleshoot Azure RBAC](../../role-based-access-control/troubleshooting.md#limits). ### Problems deleting the old (AADLoginForLinux) extension |
| active-directory | Howto Vm Sign In Azure Ad Windows | https://github.com/MicrosoftDocs/azure-docs/commits/main/articles/active-directory/devices/howto-vm-sign-in-azure-ad-windows.md | You might get the following error message when you initiate a remote desktop con Verify that you've [configured Azure RBAC policies](../../virtual-machines/linux/login-using-aad.md) for the VM that grant the user the Virtual Machine Administrator Login or Virtual Machine User Login role. > [!NOTE]-> If you're having problems with Azure role assignments, see [Troubleshoot Azure RBAC](../../role-based-access-control/troubleshooting.md#azure-role-assignments-limit). +> If you're having problems with Azure role assignments, see [Troubleshoot Azure RBAC](../../role-based-access-control/troubleshooting.md#limits). ### Unauthorized client or password change required |
| active-directory | Scenario Azure First Sap Identity Integration | https://github.com/MicrosoftDocs/azure-docs/commits/main/articles/active-directory/fundamentals/scenario-azure-first-sap-identity-integration.md | This document provides advice on the technical design and configuration of SAP p | [IPS](https://help.sap.com/viewer/f48e822d6d484fa5ade7dda78b64d9f5/Cloud/en-US/2d2685d469a54a56b886105a06ccdae6.html) | SAP Cloud Identity Services - Identity Provisioning Service. IPS helps to synchronize identities between different stores / target systems. | | [XSUAA](https://blogs.sap.com/2019/01/07/uaa-xsuaa-platform-uaa-cfuaa-what-is-it-all-about/) | Extended Services for Cloud Foundry User Account and Authentication. XSUAA is a multi-tenant OAuth authorization server within the SAP BTP. | | [CF](https://www.cloudfoundry.org/) | Cloud Foundry. Cloud Foundry is the environment on which SAP built their multi-cloud offering for BTP (AWS, Azure, GCP, Alibaba). |-| [Fiori](https://www.sap.com/products/fiori/develop.html) | The web-based user experience of SAP (as opposed to the desktop-based experience). | +| [Fiori](https://www.sap.com/products/fiori.html) | The web-based user experience of SAP (as opposed to the desktop-based experience). | ## Overview Azure AD B2C doesn't natively support the use of groups to create collections of Fortunately, Azure AD B2C is highly customizable, so you can configure the SAML tokens it sends to IAS to include any custom information. For various options on supporting authorization claims, see the documentation accompanying the [Azure AD B2C App Roles sample](https://github.com/azure-ad-b2c/api-connector-samples/tree/main/Authorization-AppRoles), but in summary: through its [API Connector](../../active-directory-b2c/api-connectors-overview.md) extensibility mechanism you can optionally still use groups, app roles, or even a custom database to determine what the user is allowed to access. -Regardless of where the authorization information comes from, it can then be emitted as the `Groups` attribute inside the SAML token by configuring that attribute name as the [default partner claim type on the claims schema](../../active-directory-b2c/claimsschema.md#defaultpartnerclaimtypes) or by overriding the [partner claim type on the output claims](../../active-directory-b2c/relyingparty.md#outputclaims). Note however that BTP allows you to [map Role Collections to User Attributes](https://help.sap.com/products/BTP/65de2977205c403bbc107264b8eccf4b/b3fbb1a9232d4cf99967a0b29dd85d4c.html), which means that *any* attribute name can be used for authorization decisions, even if you don't use the `Groups` attribute name. +Regardless of where the authorization information comes from, it can then be emitted as the `Groups` attribute inside the SAML token by configuring that attribute name as the [default partner claim type on the claims schema](../../active-directory-b2c/claimsschema.md#defaultpartnerclaimtypes) or by overriding the [partner claim type on the output claims](../../active-directory-b2c/relyingparty.md#outputclaims). Note however that BTP allows you to [map Role Collections to User Attributes](https://help.sap.com/products/BTP/65de2977205c403bbc107264b8eccf4b/b3fbb1a9232d4cf99967a0b29dd85d4c.html), which means that *any* attribute name can be used for authorization decisions, even if you don't use the `Groups` attribute name. |
| active-directory | Create Service Principal Cross Tenant | https://github.com/MicrosoftDocs/azure-docs/commits/main/articles/active-directory/manage-apps/create-service-principal-cross-tenant.md | + + Title: 'Create an enterprise application from a multi-tenant application' +description: Create an enterprise application using the client ID for a multi-tenant application. +++++++ Last updated : 07/26/2022++++zone_pivot_groups: enterprise-apps-cli +++#Customer intent: As an administrator of an Azure AD tenant, I want to create an enterprise application using client ID for a multi-tenant application provided by a service provider or independent software vendor. +++# Create an enterprise application from a multi-tenant application in Azure Active Directory ++In this article, you'll learn how to create an enterprise application in your tenant using the client ID for a multi-tenant application. An enterprise application refers to a service principal within a tenant. The service principal discussed in this article is the local representation, or application instance, of a global application object in a single tenant or directory. ++Before you proceed to add the application using any of these options, check whether the enterprise application is already in your tenant by attempting to sign in to the application. If the sign-in is successful, the enterprise application already exists in your tenant. ++If you have verified that the application isn't in your tenant, proceed with any of the following ways to add the enterprise application to your tenant using the appId ++## Prerequisites ++To add an enterprise application to your Azure AD tenant, you need: ++- An Azure AD user account. If you don't already have one, you can [Create an account for free](https://azure.microsoft.com/free/?WT.mc_id=A261C142F). +- One of the following roles: Global Administrator, Cloud Application Administrator, or Application Administrator. +- The client ID of the multi-tenant application. +++## Create an enterprise application +++If you've been provided with the admin consent URL, navigate to the URL through a web browser to [grant tenant-wide admin consent](grant-admin-consent.md) to the application. Granting tenant-wide admin consent to the application will add it to your tenant. The tenant-wide admin consent URL has the following format: ++```http +https://login.microsoftonline.com/common/oauth2/authorize?response_type=code&client_id=248e869f-0e5c-484d-b5ea1fba9563df41&redirect_uri=https://www.your-app-url.com +``` +where: ++- `{client-id}` is the application's client ID (also known as appId). ++++1. Run `connect-MgGraph -Scopes "Application.ReadWrite.All"` and sign in with a Global Admin user account. +1. Run the following command to create the enterprise application: ++ ```powershell + New-MgServicePrincipal -AppId fc876dd1-6bcb-4304-b9b6-18ddf1526b62 + ``` +1. To delete the enterprise application you created, run the command: ++ ```powershell + Remove-MgServicePrincipal + -ServicePrincipalId <objectID> + ``` ++From the Microsoft Graph explorer window: ++1. To create the enterprise application, insert the following query: + + ```http + POST /servicePrincipals. + ``` +1. Supply the following request in the **Request body**. ++ { + "appId": "fc876dd1-6bcb-4304-b9b6-18ddf1526b62" + } +1. Grant the Application.ReadWrite.All permission under the **Modify permissions** tab and select **Run query**. ++1. To delete the enterprise application you created, run the query: ++ ```http + DELETE /servicePrincipals/{objectID} + ``` +1. To create the enterprise application, run the following command: + + ```azurecli + az ad sp create --id fc876dd1-6bcb-4304-b9b6-18ddf1526b62 + ``` ++1. To delete the enterprise application you created, run the command: ++ ```azurecli + az ad sp delete --id + ``` +++## Next steps ++- [Add RBAC role to the enterprise application](/azure/role-based-access-control/role-assignments-portal) +- [Assign users to your application](add-application-portal-assign-users.md) |
| active-directory | What Is Application Management | https://github.com/MicrosoftDocs/azure-docs/commits/main/articles/active-directory/manage-apps/what-is-application-management.md | To [manage access](what-is-access-management.md) for an application, you want to You can [manage user consent settings](configure-user-consent.md) to choose whether users can allow an application or service to access user profiles and organizational data. When applications are granted access, users can sign in to applications integrated with Azure AD, and the application can access your organization's data to deliver rich data-driven experiences. -Users often are unable to consent to the permissions an application is requesting. Configure the [admin consent workflow](configure-admin-consent-workflow.md) to allow users to provide a justification and request an administrator's review and approval of an application. +Users often are unable to consent to the permissions an application is requesting. Configure the admin consent workflow to allow users to provide a justification and request an administrator's review and approval of an application. For training on how to configure admin consent workflow in your Azure AD tenant, see [Configure admin consent workflow](/learn/modules/configure-admin-consent-workflow). As an administrator, you can [grant tenant-wide admin consent](grant-admin-consent.md) to an application. Tenant-wide admin consent is necessary when an application requires permissions that regular users aren't allowed to grant, and allows organizations to implement their own review processes. Always carefully review the permissions the application is requesting before granting consent. When an application has been granted tenant-wide admin consent, all users are able to sign into the application unless it has been configured to require user assignment. |
| active-directory | Managed Identity Best Practice Recommendations | https://github.com/MicrosoftDocs/azure-docs/commits/main/articles/active-directory/managed-identities-azure-resources/managed-identity-best-practice-recommendations.md | You'll need to manually delete a user-assigned identity when it's no longer requ Role assignments aren't automatically deleted when either system-assigned or user-assigned managed identities are deleted. These role assignments should be manually deleted so the limit of role assignments per subscription isn't exceeded. Role assignments that are associated with deleted managed identities-will be displayed with ΓÇ£Identity not foundΓÇ¥ when viewed in the portal. [Read more](../../role-based-access-control/troubleshooting.md#role-assignments-with-identity-not-found). +will be displayed with ΓÇ£Identity not foundΓÇ¥ when viewed in the portal. [Read more](../../role-based-access-control/troubleshooting.md#symptomrole-assignments-with-identity-not-found). :::image type="content" source="media/managed-identity-best-practice-recommendations/identity-not-found.png" alt-text="Identity not found for role assignment."::: |
| active-directory | Azure Pim Resource Rbac | https://github.com/MicrosoftDocs/azure-docs/commits/main/articles/active-directory/privileged-identity-management/azure-pim-resource-rbac.md | Title: View audit report for Azure resource roles in Privileged Identity Managem description: View activity and audit history for Azure resource roles in Azure AD Privileged Identity Management (PIM). documentationcenter: ''-+ editor: '' |
| active-directory | Concept Privileged Access Versus Role Assignable | https://github.com/MicrosoftDocs/azure-docs/commits/main/articles/active-directory/privileged-identity-management/concept-privileged-access-versus-role-assignable.md | Title: What's the difference between Privileged Access groups and role-assignabl description: Learn how to tell the difference between Privileged Access groups and role-assignable groups in Azure AD Privileged Identity Management (PIM). documentationcenter: ''-+ na Last updated 06/24/2022-+ |
| active-directory | Groups Activate Roles | https://github.com/MicrosoftDocs/azure-docs/commits/main/articles/active-directory/privileged-identity-management/groups-activate-roles.md | Title: Activate privileged access group roles in PIM - Azure AD | Microsoft Docs description: Learn how to activate your privileged access group roles in Azure AD Privileged Identity Management (PIM). documentationcenter: ''-+ na Last updated 02/24/2022-+ |
| active-directory | Groups Approval Workflow | https://github.com/MicrosoftDocs/azure-docs/commits/main/articles/active-directory/privileged-identity-management/groups-approval-workflow.md | Title: Approve activation requests for group members and owners in Privileged Id description: Learn how to approve or deny requests for role-assignable groups in Azure AD Privileged Identity Management (PIM). documentationcenter: ''-+ na Last updated 06/24/2022-+ |
| active-directory | Groups Assign Member Owner | https://github.com/MicrosoftDocs/azure-docs/commits/main/articles/active-directory/privileged-identity-management/groups-assign-member-owner.md | Title: Assign eligible owners and members for privileged access groups - Azure A description: Learn how to assign eligible owners or members of a role-assignable group in Azure AD Privileged Identity Management (PIM). documentationcenter: ''-+ na Last updated 06/24/2022-+ |
| active-directory | Groups Audit | https://github.com/MicrosoftDocs/azure-docs/commits/main/articles/active-directory/privileged-identity-management/groups-audit.md | Title: View audit report for privileged access group assignments in Privileged I description: View activity and audit history for privileged access group assignments in Azure AD Privileged Identity Management (PIM). documentationcenter: ''-+ editor: '' |
| active-directory | Groups Discover Groups | https://github.com/MicrosoftDocs/azure-docs/commits/main/articles/active-directory/privileged-identity-management/groups-discover-groups.md | Title: Identify a group to manage in Privileged Identity Management - Azure AD | description: Learn how to onboard role-assignable groups to manage as privileged access groups in Privileged Identity Management (PIM). documentationcenter: ''-+ na Last updated 06/24/2022-+ |
| active-directory | Groups Features | https://github.com/MicrosoftDocs/azure-docs/commits/main/articles/active-directory/privileged-identity-management/groups-features.md | Title: Managing Privileged Access groups in Privileged Identity Management (PIM) description: How to manage members and owners of privileged access groups in Privileged Identity Management (PIM) documentationcenter: ''-+ ms.assetid: |
| active-directory | Groups Renew Extend | https://github.com/MicrosoftDocs/azure-docs/commits/main/articles/active-directory/privileged-identity-management/groups-renew-extend.md | Title: Renew expired group owner or member assignments in Privileged Identity Ma description: Learn how to extend or renew role-assignable group assignments in Azure AD Privileged Identity Management (PIM). documentationcenter: ''-+ na Last updated 06/24/2022-+ |
| active-directory | Groups Role Settings | https://github.com/MicrosoftDocs/azure-docs/commits/main/articles/active-directory/privileged-identity-management/groups-role-settings.md | Title: Configure privileged access groups settings in PIM - Azure Active Directo description: Learn how to configure role-assignable groups settings in Azure AD Privileged Identity Management (PIM). documentationcenter: ''-+ na Last updated 06/24/2022-+ |
| active-directory | Pim Apis | https://github.com/MicrosoftDocs/azure-docs/commits/main/articles/active-directory/privileged-identity-management/pim-apis.md | Title: API concepts in Privileged Identity management - Azure AD | Microsoft Doc description: Information for understanding the APIs in Azure AD Privileged Identity Management (PIM). documentationcenter: ''-+ editor: '' The only link between the PIM entity and the role assignment entity for persiste ## Next steps -- [Azure AD Privileged Identity Management API reference](/graph/api/resources/privilegedidentitymanagementv3-overview)+- [Azure AD Privileged Identity Management API reference](/graph/api/resources/privilegedidentitymanagementv3-overview) |
| active-directory | Pim Complete Azure Ad Roles And Resource Roles Review | https://github.com/MicrosoftDocs/azure-docs/commits/main/articles/active-directory/privileged-identity-management/pim-complete-azure-ad-roles-and-resource-roles-review.md | Title: Complete an access review of Azure resource and Azure AD roles in PIM - A description: Learn how to complete an access review of Azure resource and Azure AD roles Privileged Identity Management in Azure Active Directory. documentationcenter: ''-+ editor: '' na Last updated 10/07/2021-+ |
| active-directory | Pim Configure | https://github.com/MicrosoftDocs/azure-docs/commits/main/articles/active-directory/privileged-identity-management/pim-configure.md | Title: What is Privileged Identity Management? - Azure AD | Microsoft Docs description: Provides an overview of Azure AD Privileged Identity Management (PIM). documentationcenter: ''-+ editor: '' |
| active-directory | Pim Create Azure Ad Roles And Resource Roles Review | https://github.com/MicrosoftDocs/azure-docs/commits/main/articles/active-directory/privileged-identity-management/pim-create-azure-ad-roles-and-resource-roles-review.md | Title: Create an access review of Azure resource and Azure AD roles in PIM - Azu description: Learn how to create an access review of Azure resource and Azure AD roles in Azure AD Privileged Identity Management (PIM). documentationcenter: ''-+ editor: '' |
| active-directory | Pim Deployment Plan | https://github.com/MicrosoftDocs/azure-docs/commits/main/articles/active-directory/privileged-identity-management/pim-deployment-plan.md | Title: Plan a Privileged Identity Management deployment - Azure AD | Microsoft D description: Learn how to deploy Privileged Identity Management (PIM) in your Azure AD organization. documentationcenter: ''-+ editor: '' |
| active-directory | Pim Email Notifications | https://github.com/MicrosoftDocs/azure-docs/commits/main/articles/active-directory/privileged-identity-management/pim-email-notifications.md | Title: Email notifications in Privileged Identity Management (PIM) - Azure Activ description: Describes email notifications in Azure AD Privileged Identity Management (PIM). documentationcenter: ''-+ na Last updated 10/07/2021-+ |
| active-directory | Pim Getting Started | https://github.com/MicrosoftDocs/azure-docs/commits/main/articles/active-directory/privileged-identity-management/pim-getting-started.md | Title: Start using PIM - Azure Active Directory | Microsoft Docs description: Learn how to enable and get started using Azure AD Privileged Identity Management (PIM) in the Azure portal. documentationcenter: ''-+ editor: '' |
| active-directory | Pim How To Activate Role | https://github.com/MicrosoftDocs/azure-docs/commits/main/articles/active-directory/privileged-identity-management/pim-how-to-activate-role.md | Title: Activate Azure AD roles in PIM - Azure Active Directory | Microsoft Docs description: Learn how to activate Azure AD roles in Azure AD Privileged Identity Management (PIM). documentationcenter: ''-+ editor: '' |
| active-directory | Pim How To Add Role To User | https://github.com/MicrosoftDocs/azure-docs/commits/main/articles/active-directory/privileged-identity-management/pim-how-to-add-role-to-user.md | Title: Assign Azure AD roles in PIM - Azure Active Directory | Microsoft Docs description: Learn how to assign Azure AD roles in Azure AD Privileged Identity Management (PIM). documentationcenter: ''-+ editor: '' |
| active-directory | Pim How To Change Default Settings | https://github.com/MicrosoftDocs/azure-docs/commits/main/articles/active-directory/privileged-identity-management/pim-how-to-change-default-settings.md | Title: Configure Azure AD role settings in PIM - Azure AD | Microsoft Docs description: Learn how to configure Azure AD role settings in Azure AD Privileged Identity Management (PIM). documentationcenter: ''-+ editor: '' |
| active-directory | Pim How To Configure Security Alerts | https://github.com/MicrosoftDocs/azure-docs/commits/main/articles/active-directory/privileged-identity-management/pim-how-to-configure-security-alerts.md | Title: Security alerts for Azure AD roles in PIM - Azure AD | Microsoft Docs description: Configure security alerts for Azure AD roles Privileged Identity Management in Azure Active Directory. documentationcenter: ''-+ editor: '' Customize settings on the different alerts to work with your environment and sec ## Next steps -- [Configure Azure AD role settings in Privileged Identity Management](pim-how-to-change-default-settings.md)+- [Configure Azure AD role settings in Privileged Identity Management](pim-how-to-change-default-settings.md) |
| active-directory | Pim How To Renew Extend | https://github.com/MicrosoftDocs/azure-docs/commits/main/articles/active-directory/privileged-identity-management/pim-how-to-renew-extend.md | Title: Renew Azure AD role assignments in PIM - Azure Active Directory | Microso description: Learn how to extend or renew Azure Active Directory role assignments in Azure AD Privileged Identity Management (PIM). documentationcenter: ''-+ editor: '' na Last updated 06/24/2022-+ |
| active-directory | Pim How To Require Mfa | https://github.com/MicrosoftDocs/azure-docs/commits/main/articles/active-directory/privileged-identity-management/pim-how-to-require-mfa.md | Title: MFA or 2FA and Privileged Identity Management - Azure AD | Microsoft Docs description: Learn how Azure AD Privileged Identity Management (PIM) validates multifactor authentication (MFA). documentationcenter: ''-+ editor: '' |
| active-directory | Pim How To Use Audit Log | https://github.com/MicrosoftDocs/azure-docs/commits/main/articles/active-directory/privileged-identity-management/pim-how-to-use-audit-log.md | Title: View audit log report for Azure AD roles in Azure AD PIM | Microsoft Docs description: Learn how to view the audit log history for Azure AD roles in Azure AD Privileged Identity Management (PIM). documentationcenter: ''-+ editor: '' |
| active-directory | Pim Perform Azure Ad Roles And Resource Roles Review | https://github.com/MicrosoftDocs/azure-docs/commits/main/articles/active-directory/privileged-identity-management/pim-perform-azure-ad-roles-and-resource-roles-review.md | Title: Perform an access review of Azure resource and Azure AD roles in PIM - Az description: Learn how to review access of Azure resource and Azure AD roles in Azure AD Privileged Identity Management (PIM). documentationcenter: ''-+ editor: '' na Last updated 10/07/2021-+ |
| active-directory | Pim Resource Roles Activate Your Roles | https://github.com/MicrosoftDocs/azure-docs/commits/main/articles/active-directory/privileged-identity-management/pim-resource-roles-activate-your-roles.md | Title: Activate Azure resource roles in PIM - Azure AD | Microsoft Docs description: Learn how to activate your Azure resource roles in Azure AD Privileged Identity Management (PIM). documentationcenter: ''-+ na Last updated 06/24/2022-+ -Use Privileged Identity Management (PIM) in Azure Active Diretory (Azure AD), part of Microsoft Entra, to allow eligible role members for Azure resources to schedule activation for a future date and time. They can also select a specific activation duration within the maximum (configured by administrators). +Use Privileged Identity Management (PIM) in Azure Active Directory (Azure AD), part of Microsoft Entra, to allow eligible role members for Azure resources to schedule activation for a future date and time. They can also select a specific activation duration within the maximum (configured by administrators). This article is for members who need to activate their Azure resource role in Privileged Identity Management. |
| active-directory | Pim Resource Roles Approval Workflow | https://github.com/MicrosoftDocs/azure-docs/commits/main/articles/active-directory/privileged-identity-management/pim-resource-roles-approval-workflow.md | Title: Approve requests for Azure resource roles in PIM - Azure AD | Microsoft D description: Learn how to approve or deny requests for Azure resource roles in Azure AD Privileged Identity Management (PIM). documentationcenter: ''-+ na Last updated 06/24/2022-+ |
| active-directory | Pim Resource Roles Assign Roles | https://github.com/MicrosoftDocs/azure-docs/commits/main/articles/active-directory/privileged-identity-management/pim-resource-roles-assign-roles.md | Title: Assign Azure resource roles in Privileged Identity Management - Azure Act description: Learn how to assign Azure resource roles in Azure AD Privileged Identity Management (PIM). documentationcenter: ''-+ na Last updated 06/24/2022-+ |
| active-directory | Pim Resource Roles Configure Alerts | https://github.com/MicrosoftDocs/azure-docs/commits/main/articles/active-directory/privileged-identity-management/pim-resource-roles-configure-alerts.md | Title: Configure security alerts for Azure roles in Privileged Identity Manageme description: Learn how to configure security alerts for Azure resource roles in Azure AD Privileged Identity Management (PIM). documentationcenter: ''-+ na Last updated 06/24/2022-+ |
| active-directory | Pim Resource Roles Configure Role Settings | https://github.com/MicrosoftDocs/azure-docs/commits/main/articles/active-directory/privileged-identity-management/pim-resource-roles-configure-role-settings.md | Title: Configure Azure resource role settings in PIM - Azure AD | Microsoft Docs description: Learn how to configure Azure resource role settings in Azure AD Privileged Identity Management (PIM). documentationcenter: ''-+ na Last updated 06/24/2022-+ |
| active-directory | Pim Resource Roles Custom Role Policy | https://github.com/MicrosoftDocs/azure-docs/commits/main/articles/active-directory/privileged-identity-management/pim-resource-roles-custom-role-policy.md | Title: Use Azure custom roles in PIM - Azure AD | Microsoft Docs description: Learn how to use Azure custom roles in Azure AD Privileged Identity Management (PIM). documentationcenter: ''-+ na Last updated 06/27/2022-+ Finally, [assign roles](pim-resource-roles-assign-roles.md) to the distinct grou ## Next steps - [Configure Azure resource role settings in Privileged Identity Management](pim-resource-roles-configure-role-settings.md)-- [Custom roles in Azure](../../role-based-access-control/custom-roles.md)+- [Custom roles in Azure](../../role-based-access-control/custom-roles.md) |
| active-directory | Pim Resource Roles Discover Resources | https://github.com/MicrosoftDocs/azure-docs/commits/main/articles/active-directory/privileged-identity-management/pim-resource-roles-discover-resources.md | Title: Discover Azure resources to manage in PIM - Azure AD | Microsoft Docs description: Learn how to discover Azure resources to manage in Azure AD Privileged Identity Management (PIM). documentationcenter: ''-+ na Last updated 06/27/2022-+ |
| active-directory | Pim Resource Roles Overview Dashboards | https://github.com/MicrosoftDocs/azure-docs/commits/main/articles/active-directory/privileged-identity-management/pim-resource-roles-overview-dashboards.md | Title: Resource dashboards for access reviews in PIM - Azure AD | Microsoft Docs description: Describes how to use a resource dashboard to perform an access review in Azure AD Privileged Identity Management (PIM). documentationcenter: ''-+ editor: markwahl-msft na Last updated 06/27/2022-+ Below the charts are listed the number of users and groups with new role assignm ## Next steps -- [Start an access review for Azure resource roles in Privileged Identity Management](./pim-create-azure-ad-roles-and-resource-roles-review.md)+- [Start an access review for Azure resource roles in Privileged Identity Management](./pim-create-azure-ad-roles-and-resource-roles-review.md) |
| active-directory | Pim Resource Roles Renew Extend | https://github.com/MicrosoftDocs/azure-docs/commits/main/articles/active-directory/privileged-identity-management/pim-resource-roles-renew-extend.md | Title: Renew Azure resource role assignments in PIM - Azure AD | Microsoft Docs description: Learn how to extend or renew Azure resource role assignments in Azure AD Privileged Identity Management (PIM). documentationcenter: ''-+ editor: '' na Last updated 10/19/2021-+ |
| active-directory | Pim Roles | https://github.com/MicrosoftDocs/azure-docs/commits/main/articles/active-directory/privileged-identity-management/pim-roles.md | Title: Roles you cannot manage in Privileged Identity Management - Azure Active description: Describes the roles you cannot manage in Azure AD Privileged Identity Management (PIM). documentationcenter: ''-+ editor: '' We support all Microsoft 365 roles in the Azure AD Roles and Administrators port ## Next steps - [Assign Azure AD roles in Privileged Identity Management](pim-how-to-add-role-to-user.md)-- [Assign Azure resource roles in Privileged Identity Management](pim-resource-roles-assign-roles.md)+- [Assign Azure resource roles in Privileged Identity Management](pim-resource-roles-assign-roles.md) |
| active-directory | Pim Security Wizard | https://github.com/MicrosoftDocs/azure-docs/commits/main/articles/active-directory/privileged-identity-management/pim-security-wizard.md | Title: Azure AD roles Discovery and insights (preview) in Privileged Identity Ma description: Discovery and insights (formerly Security Wizard) help you convert permanent Azure AD role assignments to just-in-time assignments with Privileged Identity Management. documentationcenter: ''-+ editor: '' |
| active-directory | Pim Troubleshoot | https://github.com/MicrosoftDocs/azure-docs/commits/main/articles/active-directory/privileged-identity-management/pim-troubleshoot.md | Title: Troubleshoot resource access denied in Privileged Identity Management - A description: Learn how to troubleshoot system errors with roles in Azure AD Privileged Identity Management (PIM). documentationcenter: ''-+ editor: '' Assign the User Access Administrator role to the Privileged identity Management - [License requirements to use Privileged Identity Management](subscription-requirements.md) - [Securing privileged access for hybrid and cloud deployments in Azure AD](../roles/security-planning.md?toc=%2fazure%2factive-directory%2fprivileged-identity-management%2ftoc.json)-- [Deploy Privileged Identity Management](pim-deployment-plan.md)+- [Deploy Privileged Identity Management](pim-deployment-plan.md) |
| active-directory | Powershell For Azure Ad Roles | https://github.com/MicrosoftDocs/azure-docs/commits/main/articles/active-directory/privileged-identity-management/powershell-for-azure-ad-roles.md | Title: PowerShell for Azure AD roles in PIM - Azure AD | Microsoft Docs description: Manage Azure AD roles using PowerShell cmdlets in Azure AD Privileged Identity Management (PIM). documentationcenter: ''-+ editor: '' |
| active-directory | Subscription Requirements | https://github.com/MicrosoftDocs/azure-docs/commits/main/articles/active-directory/privileged-identity-management/subscription-requirements.md | If an Azure AD Premium P2, EMS E5, or trial license expires, Privileged Identity - [Start using Privileged Identity Management](pim-getting-started.md) - [Roles you can't manage in Privileged Identity Management](pim-roles.md) - [Create an access review of Azure resource roles in PIM](./pim-create-azure-ad-roles-and-resource-roles-review.md)-- [Create an access review of Azure AD roles in PIM](./pim-create-azure-ad-roles-and-resource-roles-review.md)+- [Create an access review of Azure AD roles in PIM](./pim-create-azure-ad-roles-and-resource-roles-review.md) |
| active-directory | 8X8 Provisioning Tutorial | https://github.com/MicrosoftDocs/azure-docs/commits/main/articles/active-directory/saas-apps/8x8-provisioning-tutorial.md | This tutorial describes the steps you need to perform in both 8x8 Admin Console ## Capabilities supported > [!div class="checklist"] > * Create users in 8x8-> * Remove users in 8x8 when they do not require access anymore +> * Deactivate users in 8x8 when they do not require access anymore > * Keep user attributes synchronized between Azure AD and 8x8 > * [Single sign-on](./8x8virtualoffice-tutorial.md) to 8x8 (recommended) This section guides you through the steps to configure 8x8 to support provisioni ### To configure a user provisioning access token in 8x8 Admin Console: -1. Sign in to [Admin Console](https://admin.8x8.com). Select **Identity Management**. +1. Sign in to [Admin Console](https://admin.8x8.com). Select **Identity and Security**. -  + [  ](./media/8x8-provisioning-tutorial/8x8-identity-and-security.png#lightbox) -2. Click the **Show user provisioning information** link to generate a token. +2. In the **User Provisioning Integration (SCIM)** pane, click the toggle to enable and then click **Save**. -  + [  ](./media/8x8-provisioning-tutorial/8x8-enable-user-provisioning.png#lightbox) 3. Copy the **8x8 URL** and **8x8 API Token** values. These values will be entered in the **Tenant URL** and **Secret Token** fields respectively in the Provisioning tab of your 8x8 application in the Azure portal. -  + [  ](./media/8x8-provisioning-tutorial/8x8-copy-url-token.png#lightbox) ## Step 3. Add 8x8 from the Azure AD application gallery This section guides you through the steps to configure the Azure AD provisioning 1. Sign in to the [Azure portal](https://portal.azure.com). Select **Enterprise Applications**, then select **All applications**. -  +  -  +  2. In the applications list, select **8x8**. -  +  3. Select the **Provisioning** tab. Click on **Get started**.  -  +  4. Set the **Provisioning Mode** to **Automatic**. This section guides you through the steps to configure the Azure AD provisioning 6. In the **Notification Email** field, enter the email address of a person or group who should receive the provisioning error notifications and select the **Send an email notification when a failure occurs** check box. -  +  7. Select **Save**. Once you've configured provisioning, use the following resources to monitor your ## Next steps -* [Learn how to review logs and get reports on provisioning activity](../app-provisioning/check-status-user-account-provisioning.md) +* [Learn how to review logs and get reports on provisioning activity](../app-provisioning/check-status-user-account-provisioning.md) |
| active-directory | Articulate360 Tutorial | https://github.com/MicrosoftDocs/azure-docs/commits/main/articles/active-directory/saas-apps/articulate360-tutorial.md | Follow these steps to enable Azure AD SSO in the Azure portal.  -1. In addition to above, Articulate 360 application expects few more attributes to be passed back in SAML response, which are shown below. These attributes are also pre populated but you can review them as per your requirements. +1. Articulate 360 application expects the default attributes to be replaced with the specific attributes as shown below. These attributes are also pre populated but you can review them as per your requirements. | Name | Source Attribute| | | | |
| active-directory | Aws Clientvpn Tutorial | https://github.com/MicrosoftDocs/azure-docs/commits/main/articles/active-directory/saas-apps/aws-clientvpn-tutorial.md | Follow these steps to enable Azure AD SSO in the Azure portal. 1. Click on **Manifest** and you need to keep the Reply URL as **http** instead of **https** to get the integration working, click on **Save**. -  +  1. AWS ClientVPN application expects the SAML assertions in a specific format, which requires you to add custom attribute mappings to your SAML token attributes configuration. The following screenshot shows the list of default attributes. Follow these steps to enable Azure AD SSO in the Azure portal. | Name | Source Attribute| | -- | | | memberOf | user.groups |+ | FirstName | user.givenname | + | LastName | user.surname | 1. On the **Set up single sign-on with SAML** page, in the **SAML Signing Certificate** section, find **Federation Metadata XML** and select **Download** to download the certificate and save it on your computer.  +1. In the **SAML Signing Certificate** section, click the edit icon and change the **Signing Option** to **Sign SAML response and assertion**. Click **Save**. ++  + 1. On the **Set up AWS ClientVPN** section, copy the appropriate URL(s) based on your requirement.  |
| active-directory | Cheetah For Benelux Tutorial | https://github.com/MicrosoftDocs/azure-docs/commits/main/articles/active-directory/saas-apps/cheetah-for-benelux-tutorial.md | + + Title: 'Tutorial: Azure AD SSO integration with Cheetah For Benelux' +description: Learn how to configure single sign-on between Azure Active Directory and Cheetah For Benelux. ++++++++ Last updated : 07/21/2022+++++# Tutorial: Azure AD SSO integration with Cheetah For Benelux ++In this tutorial, you'll learn how to integrate Cheetah For Benelux with Azure Active Directory (Azure AD). When you integrate Cheetah For Benelux with Azure AD, you can: ++* Control in Azure AD who has access to Cheetah For Benelux. +* Enable your users to be automatically signed-in to Cheetah For Benelux with their Azure AD accounts. +* Manage your accounts in one central location - the Azure portal. ++## Prerequisites ++To get started, you need the following items: ++* An Azure AD subscription. If you don't have a subscription, you can get a [free account](https://azure.microsoft.com/free/). +* Cheetah For Benelux single sign-on (SSO) enabled subscription. +* Along with Cloud Application Administrator, Application Administrator can also add or manage applications in Azure AD. +For more information, see [Azure built-in roles](../roles/permissions-reference.md). ++## Scenario description ++In this tutorial, you configure and test Azure AD SSO in a test environment. ++* Cheetah For Benelux supports **SP** initiated SSO. +* Cheetah For Benelux supports **Just In Time** user provisioning. ++> [!NOTE] +> Identifier of this application is a fixed string value so only one instance can be configured in one tenant. ++## Add Cheetah For Benelux from the gallery ++To configure the integration of Cheetah For Benelux into Azure AD, you need to add Cheetah For Benelux from the gallery to your list of managed SaaS apps. ++1. Sign in to the Azure portal using either a work or school account, or a personal Microsoft account. +1. On the left navigation pane, select the **Azure Active Directory** service. +1. Navigate to **Enterprise Applications** and then select **All Applications**. +1. To add new application, select **New application**. +1. In the **Add from the gallery** section, type **Cheetah For Benelux** in the search box. +1. Select **Cheetah For Benelux** from results panel and then add the app. Wait a few seconds while the app is added to your tenant. ++## Configure and test Azure AD SSO for Cheetah For Benelux ++Configure and test Azure AD SSO with Cheetah For Benelux using a test user called **B.Simon**. For SSO to work, you need to establish a link relationship between an Azure AD user and the related user in Cheetah For Benelux. ++To configure and test Azure AD SSO with Cheetah For Benelux, perform the following steps: ++1. **[Configure Azure AD SSO](#configure-azure-ad-sso)** - to enable your users to use this feature. + 1. **[Create an Azure AD test user](#create-an-azure-ad-test-user)** - to test Azure AD single sign-on with B.Simon. + 1. **[Assign the Azure AD test user](#assign-the-azure-ad-test-user)** - to enable B.Simon to use Azure AD single sign-on. +1. **[Configure Cheetah For Benelux SSO](#configure-cheetah-for-benelux-sso)** - to configure the single sign-on settings on application side. + 1. **[Create Cheetah For Benelux test user](#create-cheetah-for-benelux-test-user)** - to have a counterpart of B.Simon in Cheetah For Benelux that is linked to the Azure AD representation of user. +1. **[Test SSO](#test-sso)** - to verify whether the configuration works. ++## Configure Azure AD SSO ++Follow these steps to enable Azure AD SSO in the Azure portal. ++1. In the Azure portal, on the **Cheetah For Benelux** application integration page, find the **Manage** section and select **single sign-on**. +1. On the **Select a single sign-on method** page, select **SAML**. +1. On the **Set up single sign-on with SAML** page, click the pencil icon for **Basic SAML Configuration** to edit the settings. ++  ++1. On the **Basic SAML Configuration** section, perform the following steps: ++ a. In the **Reply URL** textbox, type the URL: + `https://ups.eu.sso.cheetah.com/saml2/idpresponse` ++ b. In the **Sign-on URL** text box, type the URL: + `https://ups.eu.sso.cheetah.com/login?client_id=5c2m16mhv4cd4o5cpgekmsmlne&response_type=token&scope=aws.cognito.signin.user.admin+openid+profile&redirect_uri=https://prodeditor.eu.cheetah.com/CssWebTask/landing/?cheetah_client=BNLX` ++1. On the **Set-up single sign-on with SAML** page, in the **SAML Signing Certificate** section, find **Federation Metadata XML** and select **Download** to download the certificate and save it on your computer. ++  ++1. On the **Set up Cheetah For Benelux** section, copy the appropriate URL(s) based on your requirement. ++  ++### Create an Azure AD test user ++In this section, you'll create a test user in the Azure portal called B.Simon. ++1. From the left pane in the Azure portal, select **Azure Active Directory**, select **Users**, and then select **All users**. +1. Select **New user** at the top of the screen. +1. In the **User** properties, follow these steps: + 1. In the **Name** field, enter `B.Simon`. + 1. In the **User name** field, enter the username@companydomain.extension. For example, `B.Simon@contoso.com`. + 1. Select the **Show password** check box, and then write down the value that's displayed in the **Password** box. + 1. Click **Create**. ++### Assign the Azure AD test user ++In this section, you'll enable B.Simon to use Azure single sign-on by granting access to Cheetah For Benelux. ++1. In the Azure portal, select **Enterprise Applications**, and then select **All applications**. +1. In the applications list, select **Cheetah For Benelux**. +1. In the app's overview page, find the **Manage** section and select **Users and groups**. +1. Select **Add user**, then select **Users and groups** in the **Add Assignment** dialog. +1. In the **Users and groups** dialog, select **B.Simon** from the Users list, then click the **Select** button at the bottom of the screen. +1. If you are expecting a role to be assigned to the users, you can select it from the **Select a role** dropdown. If no role has been set up for this app, you see "Default Access" role selected. +1. In the **Add Assignment** dialog, click the **Assign** button. ++## Configure Cheetah For Benelux SSO ++To configure single sign-on on **Cheetah For Benelux** side, you need to send the downloaded **Federation Metadata XML** and appropriate copied URLs from Azure portal to [Cheetah For Benelux support team](mailto:support@cheetah.com). They set this setting to have the SAML SSO connection set properly on both sides. ++### Create Cheetah For Benelux test user ++In this section, a user called B.Simon is created in Cheetah For Benelux. Cheetah For Benelux supports just-in-time user provisioning, which is enabled by default. There is no action item for you in this section. If a user doesn't already exist in Cheetah For Benelux, a new one is created after authentication. ++## Test SSO ++In this section, you test your Azure AD single sign-on configuration with following options. ++* Click on **Test this application** in Azure portal. This will redirect to Cheetah For Benelux Sign-on URL where you can initiate the login flow. ++* Go to Cheetah For Benelux Sign-on URL directly and initiate the login flow from there. ++* You can use Microsoft My Apps. When you click the Cheetah For Benelux tile in the My Apps, this will redirect to Cheetah For Benelux Sign-on URL. For more information about the My Apps, see [Introduction to the My Apps](../user-help/my-apps-portal-end-user-access.md). ++## Next steps ++Once you configure Cheetah For Benelux you can enforce session control, which protects exfiltration and infiltration of your organizationΓÇÖs sensitive data in real time. Session control extends from Conditional Access. [Learn how to enforce session control with Microsoft Cloud App Security](/cloud-app-security/proxy-deployment-aad). |
| active-directory | Expensify Tutorial | https://github.com/MicrosoftDocs/azure-docs/commits/main/articles/active-directory/saas-apps/expensify-tutorial.md | In this section, you'll enable B.Simon to use Azure single sign-on by granting a ## Configure Expensify SSO -To enable SSO in Expensify, you first need to enable **Domain Control** in the application. You can enable Domain Control in the application through the steps listed [here](https://help.expensify.com/domain-control). For additional support, work with [Expensify Client support team](mailto:help@expensify.com). Once you have Domain Control enabled, follow these steps: +To enable SSO in Expensify, you first need to enable **Domain Control** in the application. For additional support, work with [Expensify Client support team](mailto:help@expensify.com). Once you have Domain Control enabled, follow these steps:  |
| active-directory | Lusid Tutorial | https://github.com/MicrosoftDocs/azure-docs/commits/main/articles/active-directory/saas-apps/lusid-tutorial.md | + + Title: 'Tutorial: Azure AD SSO integration with LUSID' +description: Learn how to configure single sign-on between Azure Active Directory and LUSID. ++++++++ Last updated : 07/21/2022+++++# Tutorial: Azure AD SSO integration with LUSID ++In this tutorial, you'll learn how to integrate LUSID with Azure Active Directory (Azure AD). When you integrate LUSID with Azure AD, you can: ++* Control in Azure AD who has access to LUSID. +* Enable your users to be automatically signed-in to LUSID with their Azure AD accounts. +* Manage your accounts in one central location - the Azure portal. ++## Prerequisites ++To get started, you need the following items: ++* An Azure AD subscription. If you don't have a subscription, you can get a [free account](https://azure.microsoft.com/free/). +* LUSID single sign-on (SSO) enabled subscription. +* Along with Cloud Application Administrator, Application Administrator can also add or manage applications in Azure AD. +For more information, see [Azure built-in roles](../roles/permissions-reference.md). ++## Scenario description ++In this tutorial, you configure and test Azure AD SSO in a test environment. ++* LUSID supports **SP** and **IDP** initiated SSO. +* LUSID supports **Just In Time** user provisioning. ++## Add LUSID from the gallery ++To configure the integration of LUSID into Azure AD, you need to add LUSID from the gallery to your list of managed SaaS apps. ++1. Sign in to the Azure portal using either a work or school account, or a personal Microsoft account. +1. On the left navigation pane, select the **Azure Active Directory** service. +1. Navigate to **Enterprise Applications** and then select **All Applications**. +1. To add new application, select **New application**. +1. In the **Add from the gallery** section, type **LUSID** in the search box. +1. Select **LUSID** from results panel and then add the app. Wait a few seconds while the app is added to your tenant. ++## Configure and test Azure AD SSO for LUSID ++Configure and test Azure AD SSO with LUSID using a test user called **B.Simon**. For SSO to work, you need to establish a link relationship between an Azure AD user and the related user at LUSID. ++To configure and test Azure AD SSO with LUSID, perform the following steps: ++1. **[Configure Azure AD SSO](#configure-azure-ad-sso)** - to enable your users to use this feature. + 1. **[Create an Azure AD test user](#create-an-azure-ad-test-user)** - to test Azure AD single sign-on with B.Simon. + 1. **[Assign the Azure AD test user](#assign-the-azure-ad-test-user)** - to enable B.Simon to use Azure AD single sign-on. +1. **[Configure LUSID SSO](#configure-lusid-sso)** - to configure the single sign-on settings on application side. + 1. **[Create LUSID test user](#create-lusid-test-user)** - to have a counterpart of B.Simon in LUSID that is linked to the Azure AD representation of user. +1. **[Test SSO](#test-sso)** - to verify whether the configuration works. ++## Configure Azure AD SSO ++Follow these steps to enable Azure AD SSO in the Azure portal. ++1. In the Azure portal, on the **LUSID** application integration page, find the **Manage** section and select **single sign-on**. +1. On the **Select a single sign-on method** page, select **SAML**. +1. On the **Set up single sign-on with SAML** page, click the pencil icon for **Basic SAML Configuration** to edit the settings. ++  ++1. On the **Basic SAML Configuration** section, perform the following steps: ++ a. In the **Identifier** textbox, type a URL using the following pattern: + `https://www.okta.com/saml2/service-provider/<ID>` ++ b. In the **Reply URL** textbox, type a URL using the following pattern: + `https://<CustomerDomain>.identity.lusid.com/sso/saml2/<ID>` ++1. Click **Set additional URLs** and perform the following steps, if you wish to configure the application in **SP** initiated mode: ++ a. In the **Sign-on URL** text box, type a URL using the following pattern: + `https://<CustomerDomain>.lusid.com/ ` ++ b. In the **Relay State** text box, type a URL using the following pattern: + `https://<CustomerDomain>.lusid.com/app/home` ++ > [!Note] + > These values are not real. Update these values with the actual Identifier, Reply URL, Sign on URL and Relay State URL. Contact [LUSID support team](mailto:support@finbourne.com) to get these values. You can also refer to the patterns shown in the **Basic SAML Configuration** section in the Azure portal. ++1. LUSID application expects the SAML assertions in a specific format, which requires you to add custom attribute mappings to your SAML token attributes configuration. The following screenshot shows the list of default attributes. ++  ++1. In addition to above, LUSID application expects few more attributes to be passed back in SAML response, which are shown below. These attributes are also pre populated but you can review them as per your requirements. ++ | Name | Source Attribute| + | | | + | email | user.mail | + | firstName | user.givenname | + | lastName | user.surname | + | fbn-groups | user.assignedroles | ++ > [!NOTE] + > Please click [here](../develop/howto-add-app-roles-in-azure-ad-apps.md#app-roles-ui) to know how to configure Role in Azure AD. ++1. On the **Set up single sign-on with SAML** page, in the **SAML Signing Certificate** section, find **Certificate (Base64)** and select **Download** to download the certificate and save it on your computer. ++  ++1. On the **Set up LUSID** section, copy the appropriate URL(s) based on your requirement. ++  ++### Create an Azure AD test user ++In this section, you'll create a test user in the Azure portal called B.Simon. ++1. From the left pane in the Azure portal, select **Azure Active Directory**, select **Users**, and then select **All users**. +1. Select **New user** at the top of the screen. +1. In the **User** properties, follow these steps: + 1. In the **Name** field, enter `B.Simon`. + 1. In the **User name** field, enter the username@companydomain.extension. For example, `B.Simon@contoso.com`. + 1. Select the **Show password** check box, and then write down the value that's displayed in the **Password** box. + 1. Click **Create**. ++### Assign the Azure AD test user ++In this section, you'll enable B.Simon to use Azure single sign-on by granting access to LUSID. ++1. In the Azure portal, select **Enterprise Applications**, and then select **All applications**. +1. In the applications list, select **LUSID**. +1. In the app's overview page, find the **Manage** section and select **Users and groups**. +1. Select **Add user**, then select **Users and groups** in the **Add Assignment** dialog. +1. In the **Users and groups** dialog, select **B.Simon** from the Users list, then click the **Select** button at the bottom of the screen. +1. If you are expecting a role to be assigned to the users, you can select it from the **Select a role** dropdown. If no role has been set up for this app, you see "Default Access" role selected. +1. In the **Add Assignment** dialog, click the **Assign** button. ++## Configure LUSID SSO ++To configure single sign-on on **LUSID** side, you need to send the downloaded **Certificate (Base64)** and appropriate copied URLs from Azure portal to [LUSID support team](mailto:support@finbourne.com). They set this setting to have the SAML SSO connection set properly on both sides. ++### Create LUSID test user ++In this section, a user called B.Simon is created in LUSID. LUSID supports just-in-time user provisioning, which is enabled by default. There is no action item for you in this section. If a user doesn't already exist in LUSID, a new one is created after authentication. ++## Test SSO ++In this section, you test your Azure AD single sign-on configuration with following options. ++#### SP initiated: ++* Click on **Test this application** in Azure portal. This will redirect to LUSID Sign-on URL where you can initiate the login flow. ++* Go to LUSID Sign-on URL directly and initiate the login flow from there. ++#### IDP initiated: ++* Click on **Test this application** in Azure portal and you should be automatically signed in to the LUSID for which you set up the SSO. ++You can also use Microsoft My Apps to test the application in any mode. When you click the LUSID tile in the My Apps, if configured in SP mode you would be redirected to the application sign-on page for initiating the login flow and if configured in IDP mode, you should be automatically signed in to the LUSID for which you set up the SSO. For more information about the My Apps, see [Introduction to the My Apps](../user-help/my-apps-portal-end-user-access.md). ++## Next steps ++Once you configure LUSID you can enforce session control, which protects exfiltration and infiltration of your organizationΓÇÖs sensitive data in real time. Session control extends from Conditional Access. [Learn how to enforce session control with Microsoft Cloud App Security](/cloud-app-security/proxy-deployment-aad). |
| active-directory | Lytx Drivecam Tutorial | https://github.com/MicrosoftDocs/azure-docs/commits/main/articles/active-directory/saas-apps/lytx-drivecam-tutorial.md | + + Title: 'Tutorial: Azure AD SSO integration with Lytx DriveCam' +description: Learn how to configure single sign-on between Azure Active Directory and Lytx DriveCam. ++++++++ Last updated : 07/23/2022+++++# Tutorial: Azure AD SSO integration with Lytx DriveCam ++In this tutorial, you'll learn how to integrate Lytx DriveCam with Azure Active Directory (Azure AD). When you integrate Lytx DriveCam with Azure AD, you can: ++* Control in Azure AD who has access to Lytx DriveCam. +* Enable your users to be automatically signed-in to Lytx DriveCam with their Azure AD accounts. +* Manage your accounts in one central location - the Azure portal. ++## Prerequisites ++To get started, you need the following items: ++* An Azure AD subscription. If you don't have a subscription, you can get a [free account](https://azure.microsoft.com/free/). +* Lytx DriveCam single sign-on (SSO) enabled subscription. +* Along with Cloud Application Administrator, Application Administrator can also add or manage applications in Azure AD. +For more information, see [Azure built-in roles](../roles/permissions-reference.md). ++## Scenario description ++In this tutorial, you configure and test Azure AD SSO in a test environment. ++* Lytx DriveCam supports **IDP** initiated SSO. ++## Add Lytx DriveCam from the gallery ++To configure the integration of Lytx DriveCam into Azure AD, you need to add Lytx DriveCam from the gallery to your list of managed SaaS apps. ++1. Sign in to the Azure portal using either a work or school account, or a personal Microsoft account. +1. On the left navigation pane, select the **Azure Active Directory** service. +1. Navigate to **Enterprise Applications** and then select **All Applications**. +1. To add new application, select **New application**. +1. In the **Add from the gallery** section, type **Lytx DriveCam** in the search box. +1. Select **Lytx DriveCam** from results panel and then add the app. Wait a few seconds while the app is added to your tenant. ++## Configure and test Azure AD SSO for Lytx DriveCam ++Configure and test Azure AD SSO with Lytx DriveCam using a test user called **B.Simon**. For SSO to work, you need to establish a link relationship between an Azure AD user and the related user at Lytx DriveCam. ++To configure and test Azure AD SSO with Lytx DriveCam, perform the following steps: ++1. **[Configure Azure AD SSO](#configure-azure-ad-sso)** - to enable your users to use this feature. + 1. **[Create an Azure AD test user](#create-an-azure-ad-test-user)** - to test Azure AD single sign-on with B.Simon. + 1. **[Assign the Azure AD test user](#assign-the-azure-ad-test-user)** - to enable B.Simon to use Azure AD single sign-on. +1. **[Configure Lytx DriveCam SSO](#configure-lytx-drivecam-sso)** - to configure the single sign-on settings on application side. + 1. **[Create Lytx DriveCam test user](#create-lytx-drivecam-test-user)** - to have a counterpart of B.Simon in Lytx DriveCam that is linked to the Azure AD representation of user. +1. **[Test SSO](#test-sso)** - to verify whether the configuration works. ++## Configure Azure AD SSO ++Follow these steps to enable Azure AD SSO in the Azure portal. ++1. In the Azure portal, on the **Lytx DriveCam** application integration page, find the **Manage** section and select **single sign-on**. +1. On the **Select a single sign-on method** page, select **SAML**. +1. On the **Set up single sign-on with SAML** page, click the pencil icon for **Basic SAML Configuration** to edit the settings. ++  ++1. On the **Basic SAML Configuration** section, the application is pre-configured and the necessary URLs are already pre-populated with Azure. The user needs to save the configuration by clicking the **Save** button. ++1. On the **Set up single sign-on with SAML** page, in the **SAML Signing Certificate** section, find **Certificate (Base64)** and select **Download** to download the certificate and save it on your computer. ++  ++1. On the **Set up Lytx DriveCam** section, copy the appropriate URL(s) based on your requirement. ++  ++### Create an Azure AD test user ++In this section, you'll create a test user in the Azure portal called B.Simon. ++1. From the left pane in the Azure portal, select **Azure Active Directory**, select **Users**, and then select **All users**. +1. Select **New user** at the top of the screen. +1. In the **User** properties, follow these steps: + 1. In the **Name** field, enter `B.Simon`. + 1. In the **User name** field, enter the username@companydomain.extension. For example, `B.Simon@contoso.com`. + 1. Select the **Show password** check box, and then write down the value that's displayed in the **Password** box. + 1. Click **Create**. ++### Assign the Azure AD test user ++In this section, you'll enable B.Simon to use Azure single sign-on by granting access to Lytx DriveCam. ++1. In the Azure portal, select **Enterprise Applications**, and then select **All applications**. +1. In the applications list, select **Lytx DriveCam**. +1. In the app's overview page, find the **Manage** section and select **Users and groups**. +1. Select **Add user**, then select **Users and groups** in the **Add Assignment** dialog. +1. In the **Users and groups** dialog, select **B.Simon** from the Users list, then click the **Select** button at the bottom of the screen. +1. If you are expecting a role to be assigned to the users, you can select it from the **Select a role** dropdown. If no role has been set up for this app, you see "Default Access" role selected. +1. In the **Add Assignment** dialog, click the **Assign** button. ++## Configure Lytx DriveCam SSO ++To configure single sign-on on **Lytx DriveCam** side, you need to send the downloaded **Certificate (Base64)** and appropriate copied URLs from Azure portal to [Lytx DriveCam support team](mailto:support@lytx.com). They set this setting to have the SAML SSO connection set properly on both sides. ++### Create Lytx DriveCam test user ++In this section, you create a user called Britta Simon at Lytx DriveCam. Work with [Lytx DriveCam support team](mailto:support@lytx.com) to add the users in the Lytx DriveCam platform. Users must be created and activated before you use single sign-on. ++## Test SSO ++In this section, you test your Azure AD single sign-on configuration with following options. ++* Click on Test this application in Azure portal and you should be automatically signed in to the Lytx DriveCam for which you set up the SSO. ++* You can use Microsoft My Apps. When you click the Lytx DriveCam tile in the My Apps, you should be automatically signed in to the Lytx DriveCam for which you set up the SSO. For more information about the My Apps, see [Introduction to the My Apps](../user-help/my-apps-portal-end-user-access.md). ++## Next steps ++Once you configure Lytx DriveCam you can enforce session control, which protects exfiltration and infiltration of your organizationΓÇÖs sensitive data in real time. Session control extends from Conditional Access. [Learn how to enforce session control with Microsoft Cloud App Security](/cloud-app-security/proxy-deployment-aad). |
| active-directory | Mist Cloud Admin Tutorial | https://github.com/MicrosoftDocs/azure-docs/commits/main/articles/active-directory/saas-apps/mist-cloud-admin-tutorial.md | + + Title: 'Tutorial: Azure AD SSO integration with Mist Cloud Admin SSO' +description: Learn how to configure single sign-on between Azure Active Directory and Mist Cloud Admin SSO. ++++++++ Last updated : 07/28/2022+++++# Tutorial: Azure AD SSO integration with Mist Cloud Admin SSO ++In this tutorial, you'll learn how to integrate Mist Cloud Admin SSO with Azure Active Directory (Azure AD). When you integrate Mist Cloud Admin SSO with Azure AD, you can: ++* Control in Azure AD who has access to Mist Cloud Admin SSO. +* Enable your users to be automatically signed-in to Mist Cloud Admin SSO with their Azure AD accounts. +* Manage your accounts in one central location - the Azure portal. ++## Prerequisites ++To get started, you need the following items: ++* An Azure AD subscription. If you don't have a subscription, you can get a [free account](https://azure.microsoft.com/free/). +* Mist Cloud Admin SSO single sign-on (SSO) enabled subscription. +* Along with Cloud Application Administrator, Application Administrator can also add or manage applications in Azure AD. +For more information, see [Azure built-in roles](../roles/permissions-reference.md). ++## Scenario description ++In this tutorial, you configure and test Azure AD SSO in a test environment. ++* Mist Cloud Admin SSO supports **SP** and **IDP** initiated SSO. ++## Add Mist Cloud Admin SSO from the gallery ++To configure the integration of Mist Cloud Admin SSO into Azure AD, you need to add Mist Cloud Admin SSO from the gallery to your list of managed SaaS apps. ++1. Sign in to the Azure portal using either a work or school account, or a personal Microsoft account. +1. On the left navigation pane, select the **Azure Active Directory** service. +1. Navigate to **Enterprise Applications** and then select **All Applications**. +1. To add new application, select **New application**. +1. In the **Add from the gallery** section, type **Mist Cloud Admin SSO** in the search box. +1. Select **Mist Cloud Admin SSO** from results panel and then add the app. Wait a few seconds while the app is added to your tenant. ++## Configure and test Azure AD SSO for Mist Cloud Admin SSO ++Configure and test Azure AD SSO with Mist Cloud Admin SSO using a test user called **B.Simon**. For SSO to work, you need to establish a link relationship between an Azure AD user and the related user at Mist Cloud Admin SSO. ++To configure and test Azure AD SSO with Mist Cloud Admin SSO, perform the following steps: ++1. **[Configure Azure AD SSO](#configure-azure-ad-sso)** - to enable your users to use this feature. + 1. **[Create an Azure AD test user](#create-an-azure-ad-test-user)** - to test Azure AD single sign-on with B.Simon. + 1. **[Assign the Azure AD test user](#assign-the-azure-ad-test-user)** - to enable B.Simon to use Azure AD single sign-on. +1. **[Configure Mist Cloud Admin SSO](#configure-mist-cloud-admin-sso)** - to configure the single sign-on settings on application side. + 1. **[Create Mist Cloud Admin SSO test user](#create-mist-cloud-admin-sso-test-user)** - to have a counterpart of B.Simon in Mist Cloud Admin SSO that is linked to the Azure AD representation of user. +1. **[Test SSO](#test-sso)** - to verify whether the configuration works. ++## Configure Azure AD SSO ++Follow these steps to enable Azure AD SSO in the Azure portal. ++1. In the Azure portal, on the **Mist Cloud Admin SSO** application integration page, find the **Manage** section and select **single sign-on**. +1. On the **Select a single sign-on method** page, select **SAML**. +1. On the **Set up single sign-on with SAML** page, click the pencil icon for **Basic SAML Configuration** to edit the settings. ++  ++1. On the **Basic SAML Configuration** section, perform the following steps: ++ a. In the **Identifier** textbox, type a value using the following pattern: + `https://api.<MISTCLOUDREGION>.mist.com/api/v1/saml/<SSOUNIQUEID>/login` ++ b. In the **Reply URL** textbox, type a URL using the following pattern: + `https://api.<MISTCLOUDREGION>.mist.com/api/v1/saml/<SSOUNIQUEID>/login` ++1. Click **Set additional URLs** and perform the following step, if you wish to configure the application in **SP** initiated mode: ++ In the **Sign-on URL** text box, type the URL: + `https://manage.mist.com` ++ > [!Note] + > These values are not real. Update these values with the actual Identifier and Reply URL. Contact [Mist Cloud Admin SSO support team](mailto:support@mist.com) to get these values. You can also refer to the patterns shown in the **Basic SAML Configuration** section in the Azure portal. ++1. Mist Cloud Admin SSO application expects the SAML assertions in a specific format, which requires you to add custom attribute mappings to your SAML token attributes configuration. The following screenshot shows the list of default attributes. ++  ++1. In addition to above, Mist Cloud Admin SSO application expects few more attributes to be passed back in SAML response, which are shown below. These attributes are also pre populated but you can review them as per your requirements. ++ | Name | Source Attribute| + | | | + | FirstName | user.givenname | + | LastName | user.surname | + | Role | user.assignedroles | ++ > [!NOTE] + > Please click [here](../develop/howto-add-app-roles-in-azure-ad-apps.md#app-roles-ui) to know how to configure Role in Azure AD. ++1. On the **Set up single sign-on with SAML** page, in the **SAML Signing Certificate** section, find **Certificate (Base64)** and select **Download** to download the certificate and save it on your computer. ++  ++1. On the **Set up Mist Cloud Admin SSO** section, copy the appropriate URL(s) based on your requirement. ++  ++### Create an Azure AD test user ++In this section, you'll create a test user in the Azure portal called B.Simon. ++1. From the left pane in the Azure portal, select **Azure Active Directory**, select **Users**, and then select **All users**. +1. Select **New user** at the top of the screen. +1. In the **User** properties, follow these steps: + 1. In the **Name** field, enter `B.Simon`. + 1. In the **User name** field, enter the username@companydomain.extension. For example, `B.Simon@contoso.com`. + 1. Select the **Show password** check box, and then write down the value that's displayed in the **Password** box. + 1. Click **Create**. ++### Assign the Azure AD test user ++In this section, you'll enable B.Simon to use Azure single sign-on by granting access to Mist Cloud Admin SSO. ++1. In the Azure portal, select **Enterprise Applications**, and then select **All applications**. +1. In the applications list, select **Mist Cloud Admin SSO**. +1. In the app's overview page, find the **Manage** section and select **Users and groups**. +1. Select **Add user**, then select **Users and groups** in the **Add Assignment** dialog. +1. In the **Users and groups** dialog, select **B.Simon** from the Users list, then click the **Select** button at the bottom of the screen. +1. If you are expecting a role to be assigned to the users, you can select it from the **Select a role** dropdown. If no role has been set up for this app, you see "Default Access" role selected. +1. In the **Add Assignment** dialog, click the **Assign** button. ++## Configure Mist Cloud Admin SSO ++1. Log in to your Mist Cloud Admin SSO company site as an administrator. ++1. Go to **Organization** > **Settings** > **Single Sign-On** > **Add IdP**. + +  ++1. In the **Create Identity Provider** section, perform the following steps: ++  ++ 1. In the **Issuer** textbox, paste the **Azure AD Identifier** value which you have copied from the Azure portal. ++ 1. Open the downloaded **Certificate (Base64)** from the Azure portal into Notepad and paste the content into the **Certificate** textbox. ++ 1. In the **SSO URL** textbox, paste the **Login URL** value which you have copied from the Azure portal. ++ 1. In the **Custom Logout URL** textbox, paste the **Logout URL** value which you have copied from the Azure portal. ++ 1. Copy **ACS URL** value, paste this value into the **Reply URL** text box in the **Basic SAML Configuration** section in the Azure portal. ++ 1. Click **Save**. ++### Create Mist Cloud Admin SSO test user ++In this section, you create a user called Britta Simon at Mist Cloud Admin SSO. Work with [Mist Cloud Admin SSO support team](mailto:support@mist.com) to add the users in the Mist Cloud Admin SSO platform. Users must be created and activated before you use single sign-on. ++## Test SSO ++In this section, you test your Azure AD single sign-on configuration with following options. ++#### SP initiated: ++* Click on **Test this application** in Azure portal. This will redirect to Mist Cloud Admin SSO Sign-on URL where you can initiate the login flow. ++* Go to Mist Cloud Admin SSO Sign-on URL directly and initiate the login flow from there. ++#### IDP initiated: ++* Click on **Test this application** in Azure portal and you should be automatically signed in to the Mist Cloud Admin SSO for which you set up the SSO. ++You can also use Microsoft My Apps to test the application in any mode. When you click the Mist Cloud Admin SSO tile in the My Apps, if configured in SP mode you would be redirected to the application sign-on page for initiating the login flow and if configured in IDP mode, you should be automatically signed in to the Mist Cloud Admin SSO for which you set up the SSO. For more information about the My Apps, see [Introduction to the My Apps](../user-help/my-apps-portal-end-user-access.md). ++## Next steps ++Once you configure Mist Cloud Admin SSO you can enforce session control, which protects exfiltration and infiltration of your organizationΓÇÖs sensitive data in real time. Session control extends from Conditional Access. [Learn how to enforce session control with Microsoft Cloud App Security](/cloud-app-security/proxy-deployment-aad). |
| active-directory | Myaos Tutorial | https://github.com/MicrosoftDocs/azure-docs/commits/main/articles/active-directory/saas-apps/myaos-tutorial.md | + + Title: 'Tutorial: Azure AD SSO integration with myAOS' +description: Learn how to configure single sign-on between Azure Active Directory and myAOS. ++++++++ Last updated : 07/14/2022+++++# Tutorial: Azure AD SSO integration with myAOS ++In this tutorial, you'll learn how to integrate myAOS with Azure Active Directory (Azure AD). When you integrate myAOS with Azure AD, you can: ++* Control in Azure AD who has access to myAOS. +* Enable your users to be automatically signed-in to myAOS with their Azure AD accounts. +* Manage your accounts in one central location - the Azure portal. ++## Prerequisites ++To get started, you need the following items: ++* An Azure AD subscription. If you don't have a subscription, you can get a [free account](https://azure.microsoft.com/free/). +* myAOS single sign-on (SSO) enabled subscription. +* Along with Cloud Application Administrator, Application Administrator can also add or manage applications in Azure AD. +For more information, see [Azure built-in roles](../roles/permissions-reference.md). ++## Scenario description ++In this tutorial, you configure and test Azure AD SSO in a test environment. ++* myAOS supports **IDP** initiated SSO. ++## Add myAOS from the gallery ++To configure the integration of myAOS into Azure AD, you need to add myAOS from the gallery to your list of managed SaaS apps. ++1. Sign in to the Azure portal using either a work or school account, or a personal Microsoft account. +1. On the left navigation pane, select the **Azure Active Directory** service. +1. Navigate to **Enterprise Applications** and then select **All Applications**. +1. To add new application, select **New application**. +1. In the **Add from the gallery** section, type **myAOS** in the search box. +1. Select **myAOS** from results panel and then add the app. Wait a few seconds while the app is added to your tenant. ++## Configure and test Azure AD SSO for myAOS ++Configure and test Azure AD SSO with myAOS using a test user called **B.Simon**. For SSO to work, you need to establish a link relationship between an Azure AD user and the related user in myAOS. ++To configure and test Azure AD SSO with myAOS, perform the following steps: ++1. **[Configure Azure AD SSO](#configure-azure-ad-sso)** - to enable your users to use this feature. + 1. **[Create an Azure AD test user](#create-an-azure-ad-test-user)** - to test Azure AD single sign-on with B.Simon. + 1. **[Assign the Azure AD test user](#assign-the-azure-ad-test-user)** - to enable B.Simon to use Azure AD single sign-on. +1. **[Configure myAOS SSO](#configure-myaos-sso)** - to configure the single sign-on settings on application side. + 1. **[Create myAOS test user](#create-myaos-test-user)** - to have a counterpart of B.Simon in myAOS that is linked to the Azure AD representation of user. +1. **[Test SSO](#test-sso)** - to verify whether the configuration works. ++## Configure Azure AD SSO ++Follow these steps to enable Azure AD SSO in the Azure portal. ++1. In the Azure portal, on the **myAOS** application integration page, find the **Manage** section and select **single sign-on**. +1. On the **Select a single sign-on method** page, select **SAML**. +1. On the **Set up single sign-on with SAML** page, click the pencil icon for **Basic SAML Configuration** to edit the settings. ++  ++1. On the **Basic SAML Configuration** section, the application is pre-configured and the necessary URLs are already pre-populated with Azure. The user needs to save the configuration by clicking the **Save** button. ++1. On the **Set-up single sign-on with SAML** page, in the **SAML Signing Certificate** section, find **Federation Metadata XML** and select **Download** to download the certificate and save it on your computer. ++  ++1. On the **Set up myAOS** section, copy the appropriate URL(s) based on your requirement. ++  ++### Create an Azure AD test user ++In this section, you'll create a test user in the Azure portal called B.Simon. ++1. From the left pane in the Azure portal, select **Azure Active Directory**, select **Users**, and then select **All users**. +1. Select **New user** at the top of the screen. +1. In the **User** properties, follow these steps: + 1. In the **Name** field, enter `B.Simon`. + 1. In the **User name** field, enter the username@companydomain.extension. For example, `B.Simon@contoso.com`. + 1. Select the **Show password** check box, and then write down the value that's displayed in the **Password** box. + 1. Click **Create**. ++### Assign the Azure AD test user ++In this section, you'll enable B.Simon to use Azure single sign-on by granting access to myAOS. ++1. In the Azure portal, select **Enterprise Applications**, and then select **All applications**. +1. In the applications list, select **myAOS**. +1. In the app's overview page, find the **Manage** section and select **Users and groups**. +1. Select **Add user**, then select **Users and groups** in the **Add Assignment** dialog. +1. In the **Users and groups** dialog, select **B.Simon** from the Users list, then click the **Select** button at the bottom of the screen. +1. If you are expecting a role to be assigned to the users, you can select it from the **Select a role** dropdown. If no role has been set up for this app, you see "Default Access" role selected. +1. In the **Add Assignment** dialog, click the **Assign** button. ++## Configure myAOS SSO ++To configure single sign-on on **myAOS** side, you need to send the downloaded **Federation Metadata XML** and appropriate copied URLs from Azure portal to [myAOS support team](mailto:support@vialto.com). They set this setting to have the SAML SSO connection set properly on both sides. ++### Create myAOS test user ++In this section, you create a user called Britta Simon in myAOS. Work with [myAOS support team](mailto:support@vialto.com) to add the users in the myAOS platform. Users must be created and activated before you use single sign-on. ++## Test SSO ++In this section, you test your Azure AD single sign-on configuration with following options. ++* Click on Test this application in Azure portal and you should be automatically signed in to the myAOS for which you set up the SSO. ++* You can use Microsoft My Apps. When you click the myAOS tile in the My Apps, you should be automatically signed in to the myAOS for which you set up the SSO. For more information about the My Apps, see [Introduction to the My Apps](../user-help/my-apps-portal-end-user-access.md). ++## Next steps ++Once you configure myAOS you can enforce session control, which protects exfiltration and infiltration of your organizationΓÇÖs sensitive data in real time. Session control extends from Conditional Access. [Learn how to enforce session control with Microsoft Cloud App Security](/cloud-app-security/proxy-deployment-aad). |
| active-directory | Zylo Tutorial | https://github.com/MicrosoftDocs/azure-docs/commits/main/articles/active-directory/saas-apps/zylo-tutorial.md | Title: 'Tutorial: Azure Active Directory single sign-on (SSO) integration with Zylo | Microsoft Docs' description: Learn how to configure single sign-on between Azure Active Directory and Zylo. ---++ Previously updated : 08/04/2021 Last updated : 07/19/2022 - # Tutorial: Azure Active Directory single sign-on (SSO) integration with Zylo In this section, you'll enable B.Simon to use Azure single sign-on by granting a c. In the **SAML SSO URL** textbox, paste the **Login URL** value which you have copied from the Azure portal. - d. In the **Identity Provider Issuer** textbox, paste the **Entity ID** value which you have copied from the Azure portal. + d. In the **Identity Provider Issuer** textbox, paste the **Application ID** value which you have copied from Zylo's overview page in Azure portal. e. Open the downloaded **Certificate (Base64)** from the Azure portal into Notepad and paste the content into the **Public Certificate (from Identity Provider)** textbox. |
| app-service | Configure Connect To Azure Storage | https://github.com/MicrosoftDocs/azure-docs/commits/main/articles/app-service/configure-connect-to-azure-storage.md | The following features are supported for Linux containers: - Mapping `/mounts`, `mounts/foo/bar`, `/`, and `/mounts/foo.bar/` to custom-mounted storage is not supported (you can only use /mounts/pathname for mounting custom storage to your web app.) - Storage mounts cannot be used together with clone settings option during [deployment slot](deploy-staging-slots.md) creation. - Storage mounts are not backed up when you [back up your app](manage-backup.md). Be sure to follow best practices to back up the Azure Storage accounts. +- Only Azure Files [SMB](/azure/storage/files/files-smb-protocol) are supported. Azure Files [NFS](/azure/storage/files/files-nfs-protocol) is not currently supported for Linux App Services. ::: zone-end Verify your storage is mounted by running the following command: az webapp config storage-account list --resource-group <resource-group> --name <app-name> ``` -Verify your configuration by running the following command: --```azurecli -az webapp config storage-account list --resource-group <resource-group> --name <app-name> -``` - > [!NOTE] |
| app-service | Overview | https://github.com/MicrosoftDocs/azure-docs/commits/main/articles/app-service/environment/overview.md | Title: App Service Environment overview description: This article discusses the Azure App Service Environment feature of Azure App Service. Previously updated : 06/30/2022 Last updated : 07/28/2022 An App Service Environment is an Azure App Service feature that provides a fully > [!NOTE] > This article covers the features, benefits, and use cases of App Service Environment v3, which is used with App Service Isolated v2 plans. > - An App Service Environment can host your: - Windows web apps Reserved Instance pricing for Isolated v2 is available and is described in [How App Service Environment v3 is available in the following regions: -| Normal and dedicated host regions | Availability zone regions | -||| -| Australia East | Australia East | -| Australia Southeast | Brazil South | -| Brazil South | Canada Central | -| Canada Central | Central India | -| Canada East | Central US | -| Central India | East Asia | -| Central US | East US | -| East Asia | East US 2 | -| East US | France Central | -| East US 2 | Germany West Central | -| France Central | Japan East | -| Germany West Central | Korea Central | -| Japan East | North Europe | -| Korea Central | Norway East | -| North Central US | South Africa North | -| North Europe | South Central US | -| Norway East | Southeast Asia | -| South Africa North | UK South | -| South Central US | West Europe | -| Southeast Asia | West US 2 | -| Switzerland North | West US 3 | -| UAE North | | -| UK South | | -| UK West | | -| West Central US | | -| West Europe | | -| West US | | -| West US 2 | | -| West US 3 | | -| US Gov Texas | | -| US Gov Arizona | | -| US Gov Virginia | | +### Azure Public: ++| Region | Normal and dedicated host | Availability zone support | +| -- | :-: | :-: | +| Australia East | x | x | +| Australia Southeast | x | | +| Brazil South | x | x | +| Canada Central | x | x | +| Canada East | x | | +| Central India | x | x | +| Central US | x | x | +| East Asia | x | x | +| East US | x | x | +| East US 2 | x | x | +| France Central | x | x | +| Germany West Central | x | x | +| Japan East | x | x | +| Korea Central | x | x | +| North Central US | x | | +| North Europe | x | x | +| Norway East | x | x | +| South Africa North | x | x | +| South Central US | x | x | +| Southeast Asia | x | x | +| Switzerland North | x | | +| UAE North | x | | +| UK South | x | x | +| UK West | x | | +| West Central US | x | | +| West Europe | x | x | +| West US | x | | +| West US 2 | x | x | +| West US 3 | x | x | ++### Azure Government: ++| Region | Normal and dedicated host | Availability zone support | +| -- | :-: | :-: | +| US Gov Texas | x | | +| US Gov Arizona | x | | +| US Gov Virginia | x | | ## App Service Environment v2 App Service Environment has three versions: App Service Environment v1, App Serv ## Next steps > [!div class="nextstepaction"]-> [Whitepaper on Using App Service Environment v3 in Compliance-Oriented Industries](https://azure.microsoft.com/resources/using-app-service-environment-v3-in-compliance-oriented-industries/) +> [Whitepaper on Using App Service Environment v3 in Compliance-Oriented Industries](https://azure.microsoft.com/resources/using-app-service-environment-v3-in-compliance-oriented-industries/) |
| applied-ai-services | Try V3 Csharp Sdk | https://github.com/MicrosoftDocs/azure-docs/commits/main/articles/applied-ai-services/form-recognizer/quickstarts/try-v3-csharp-sdk.md | To interact with the Form Recognizer service, you'll need to create an instance * [**Prebuilt model**](#prebuilt-model) > [!IMPORTANT]-> -> * Remember to remove the key from your code when you're done, and never post it publicly. For production, use secure methods to store and access your credentials. For more information, *see* Cognitive Services [security](../../../cognitive-services/cognitive-services-security.md). -+> Remember to remove the key from your code when you're done, and never post it publicly. For production, use a secure way of storing and accessing your credentials like [Azure Key Vault](../../../key-vault/general/overview.md). See the Cognitive Services [security](../../../cognitive-services/cognitive-services-security.md) article for more information. <!-- ### [.NET Command-line interface (CLI)](#tab/cli) |
| applied-ai-services | Try V3 Java Sdk | https://github.com/MicrosoftDocs/azure-docs/commits/main/articles/applied-ai-services/form-recognizer/quickstarts/try-v3-java-sdk.md | To interact with the Form Recognizer service, you'll need to create an instance * [**Prebuilt Invoice**](#prebuilt-model) > [!IMPORTANT]-> -> Remember to remove the key from your code when you're done, and never post it publicly. For production, use secure methods to store and access your credentials. For more information, see* the Cognitive Services [security](../../../cognitive-services/cognitive-services-security.md). +> Remember to remove the key from your code when you're done, and never post it publicly. For production, use a secure way of storing and accessing your credentials like [Azure Key Vault](../../../key-vault/general/overview.md). See the Cognitive Services [security](../../../cognitive-services/cognitive-services-security.md) article for more information. ## General document model |
| applied-ai-services | Try V3 Javascript Sdk | https://github.com/MicrosoftDocs/azure-docs/commits/main/articles/applied-ai-services/form-recognizer/quickstarts/try-v3-javascript-sdk.md | To interact with the Form Recognizer service, you'll need to create an instance * [**Prebuilt Invoice**](#prebuilt-model) > [!IMPORTANT]-> -> Remember to remove the key from your code when you're done, and never post it publicly. For production, use secure methods to store and access your credentials. For more information, see* the Cognitive Services [security](../../../cognitive-services/cognitive-services-security.md). +> Remember to remove the key from your code when you're done, and never post it publicly. For production, use a secure way of storing and accessing your credentials like [Azure Key Vault](../../../key-vault/general/overview.md). See the Cognitive Services [security](../../../cognitive-services/cognitive-services-security.md) article for more information. <!-- markdownlint-disable MD036 --> |
| applied-ai-services | Try V3 Python Sdk | https://github.com/MicrosoftDocs/azure-docs/commits/main/articles/applied-ai-services/form-recognizer/quickstarts/try-v3-python-sdk.md | To interact with the Form Recognizer service, you'll need to create an instance * [**Prebuilt Invoice**](#prebuilt-model) > [!IMPORTANT]-> -> Remember to remove the key from your code when you're done, and never post it publicly. For production, use secure methods to store and access your credentials. For more information, *see* Cognitive Services [security](../../../cognitive-services/cognitive-services-security.md). +> Remember to remove the key from your code when you're done, and never post it publicly. For production, use a secure way of storing and accessing your credentials like [Azure Key Vault](../../../key-vault/general/overview.md). See the Cognitive Services [security](../../../cognitive-services/cognitive-services-security.md) article for more information. <!-- markdownlint-disable MD036 --> |
| applied-ai-services | Try V3 Rest Api | https://github.com/MicrosoftDocs/azure-docs/commits/main/articles/applied-ai-services/form-recognizer/quickstarts/try-v3-rest-api.md | Before you run the cURL command, make the following changes: 1. You'll need a document file at a URL. For this quickstart, you can use the sample forms provided in the table below for each feature. +> [!IMPORTANT] +> Remember to remove the key from your code when you're done, and never post it publicly. For production, use a secure way of storing and accessing your credentials like [Azure Key Vault](../../../key-vault/general/overview.md). See the Cognitive Services [security](../../../cognitive-services/cognitive-services-security.md) article for more information. + #### POST request ```bash |
| automation | Add User Assigned Identity | https://github.com/MicrosoftDocs/azure-docs/commits/main/articles/automation/add-user-assigned-identity.md | If you don't have an Azure subscription, create a [free account](https://azure.m - An Azure resource that you want to access from your Automation runbook. This resource needs to have a role defined for the user-assigned managed identity, which helps the Automation runbook authenticate access to the resource. To add roles, you need to be an owner for the resource in the corresponding Azure AD tenant. -- To assign an Azure role, you must have ```Microsoft.Authorization/roleAssignments/write``` permissions, such as [User Access Administrator](/azure/role-based-access-control/built-in-roles.md#user-access-administrator) or [Owner](/azure/role-based-access-control/built-in-roles.md.md#owner).+- To assign an Azure role, you must have ```Microsoft.Authorization/roleAssignments/write``` permissions, such as [User Access Administrator](/azure/role-based-access-control/built-in-roles#user-access-administrator) or [Owner](/azure/role-based-access-control/built-in-roles#owner). ## Add user-assigned managed identity for Azure Automation account |
| availability-zones | Migrate App Gateway V2 | https://github.com/MicrosoftDocs/azure-docs/commits/main/articles/availability-zones/migrate-app-gateway-v2.md | Title: Migrate Azure Application Gateway and WAF deployments to availability zone support + Title: Migrate Azure Application Gateway Standard and WAF v2 deployments to availability zone support description: Learn how to migrate your Azure Application Gateway and WAF deployments to availability zone support. Previously updated : 07/26/2022 Last updated : 07/28/2022 -[Application Gateway Standard v2](/azure/application-gateway/overview-v2) or [WAF v2](/azure/web-application-firewall/ag/ag-overview) supports zonal and zone redundant deployments. For more information about zone redundancy, see [Regions and availability zones](az-overview.md). +[Application Gateway Standard v2](/azure/application-gateway/overview-v2) and Application Gateway with [WAF v2](/azure/web-application-firewall/ag/ag-overview) supports zonal and zone redundant deployments. For more information about zone redundancy, see [Regions and availability zones](az-overview.md). -If you previously deployed Azure Application Gateway Standard v2 or WAF v2 without zonal support, you must redeploy these services to enable zone redundancy. Two migration options to redeploy these services are described in this article. +If you previously deployed **Azure Application Gateway Standard v2** or **Azure Application Gateway Standard v2 + WAF v2** without zonal support, you must redeploy these services to enable zone redundancy. Two migration options to redeploy these services are described in this article. ## Prerequisites -- Your deployment must be Standard v2 or WAF v2 SKU. Earlier SKUs (Standard and WAF) don't support zone awareness.+- Your deployment must be Standard v2 or WAF v2 SKU. Earlier SKUs (Standard and WAF) don't support availability zones. ## Downtime requirements Use this option to: To create a separate Application Gateway, WAF (optional) and IP address: 1. Go to the [Azure portal](https://portal.azure.com).-2. Follow the steps in [Create an application gateway](../application-gateway/quick-create-portal.md#create-an-application-gateway) or [Create an application gateway with a Web Application Firewall](/azure/web-application-firewall/ag/application-gateway-web-application-firewall-portal) to create a new Application Gateway v2 or Application Gateway V2 + WAF v2, respectively. You can reuse your existing Virtual Network or create a new one, but you must create a new frontend Public IP address. +2. Follow the steps in [Create an application gateway](../application-gateway/quick-create-portal.md#create-an-application-gateway) or [Create an application gateway with a Web Application Firewall](/azure/web-application-firewall/ag/application-gateway-web-application-firewall-portal) to create a new Application Gateway v2 or Application Gateway v2 + WAF v2, respectively. You can reuse your existing Virtual Network or create a new one, but you must create a new frontend Public IP address. 3. Verify that the application gateway and WAF are working as intended. 4. Migrate your DNS configuration to the new public IP address. 5. Delete the old Application gateway and WAF resources. To delete the Application Gateway and WAF and redeploy: 1. Go to the [Azure portal](https://portal.azure.com). 2. Select **All resources**, and then select the resource group that contains the Application Gateway. 3. Select the Application Gateway resource and then select **Delete**. Type **yes** to confirm deletion, and then click **Delete**.-4. Follow the steps in [Create an application gateway](../application-gateway/quick-create-portal.md#create-an-application-gateway) or [Create an application gateway with a Web Application Firewall](/azure/web-application-firewall/ag/application-gateway-web-application-firewall-portal) to create a new Application Gateway v2 or Application Gateway V2 + WAF v2, respectively, using the same Virtual Network, subnets, and Public IP address that you used previously. +4. Follow the steps in [Create an application gateway](../application-gateway/quick-create-portal.md#create-an-application-gateway) or [Create an application gateway with a Web Application Firewall](/azure/web-application-firewall/ag/application-gateway-web-application-firewall-portal) to create a new Application Gateway v2 or Application Gateway v2 + WAF v2, respectively, using the same Virtual Network, subnets, and Public IP address that you used previously. ## Next steps |
| azure-arc | Active Directory Prerequisites | https://github.com/MicrosoftDocs/azure-docs/commits/main/articles/azure-arc/data/active-directory-prerequisites.md | Whether you have created a new account for the DSA or are using an existing Acti - **Write all properties** - **Create User objects** - **Delete User objects**- - **Reset Password for Descendant User objects** - Select **OK**. |
| azure-arc | Uninstall Azure Arc Data Controller | https://github.com/MicrosoftDocs/azure-docs/commits/main/articles/azure-arc/data/uninstall-azure-arc-data-controller.md | Title: Cleanup from partial deployment -description: Cleanup from partial deployment + Title: Uninstall Azure Arc-enabled data services +description: Uninstall Azure Arc-enabled data services Previously updated : 11/30/2021 Last updated : 07/28/2022 |
| azure-arc | Validation Program | https://github.com/MicrosoftDocs/azure-docs/commits/main/articles/azure-arc/data/validation-program.md | To see how all Azure Arc-enabled components are validated, see [Validation progr |Solution and version | Kubernetes version | Azure Arc-enabled data services version | SQL engine version | PostgreSQL Hyperscale version |--|--|--|--|--|-|WindRiver| v1.22.5|v1.1.0_2021-11-02 |15.0.2195.191|postgres 12.3 (Ubuntu 12.3-1) | +|WindRiver| v1.23.1|v1.9.0_2022-07-12 |16.0.312.4243|postgres 12.3 (Ubuntu 12.3-1) | ## Data services validation process |
| azure-arc | Quickstart Connect Cluster | https://github.com/MicrosoftDocs/azure-docs/commits/main/articles/azure-arc/kubernetes/quickstart-connect-cluster.md | Title: "Quickstart: Connect an existing Kubernetes cluster to Azure Arc" description: In this quickstart, you learn how to connect an Azure Arc-enabled Kubernetes cluster. Previously updated : 05/24/2022 Last updated : 07/28/2022 ms.devlang: azurecli If your cluster is behind an outbound proxy server, requests must be routed via export NO_PROXY=<cluster-apiserver-ip-address>:<port> ``` -2. Run the connect command with proxy parameters specified: +2. Run the connect command with the `proxy-https` and `proxy-http` parameters specified. If your proxy server is set up with both HTTP and HTTPS, be sure to use `--proxy-http` for the HTTP proxy and `--proxy-https` for the HTTPS proxy. If your proxy server only uses HTTP, you can use that value for both parameters. ```azurecli az connectedk8s connect --name <cluster-name> --resource-group <resource-group> --proxy-https https://<proxy-server-ip-address>:<port> --proxy-http http://<proxy-server-ip-address>:<port> --proxy-skip-range <excludedIP>,<excludedCIDR> --proxy-cert <path-to-cert-file> |
| azure-arc | Onboard Group Policy | https://github.com/MicrosoftDocs/azure-docs/commits/main/articles/azure-arc/servers/onboard-group-policy.md | The group policy will project machines as Arc-enabled servers in the Azure subsc Before you can run the script to connect your machines, you'll need to save the onboarding script to the remote share. This will be referenced when creating the Group Policy Object. +> [!NOTE] +> If you're using a proxy server, you'll need to modify the `Invoke-WebRequest` command in the script to include the `Proxy` parameter and web address, as in: `Invoke-WebRequest -Uri "https://aka.ms/azcmagent-windows" -Proxy "http://xx.x.x.xx:xxxx -TimeoutSec 30 -OutFile "$InstallationFolder\install_windows_azcmagent.ps1"` + <!--1. Edit the field for `remotePath` to reflect the distributed share location with the configuration file and Connected Machine Agent. 1. Edit the `localPath` with the local path where the logs generated from the onboarding to Azure Arc-enabled servers will be saved per machine. try ``` ## Create a Group Policy Object+> [!NOTE] +> Before applying the Group Policy Scheduled Task, you must first check the folder `ScheduledTasks` (located within the `Preferences` folder) and modify the `ScheduledTasks.xml` file by changing `<GroupId>NT AUTHORITY\SYSTEM<\GroupId>` to `<UserId>NT AUTHORITY\SYSTEM</UserId>`. Create a new Group Policy Object (GPO) to run the onboarding script using the configuration file details: |
| azure-cache-for-redis | Cache Whats New | https://github.com/MicrosoftDocs/azure-docs/commits/main/articles/azure-cache-for-redis/cache-whats-new.md | +## July 2022 ++### Redis 6 becomes default for new cache instances ++On November 1, 2022, all the versions of Azure Cache for Redis REST API, PowerShell, Azure CLI, and Azure SDK will create Redis instances using the latest stable version of Redis offered by Azure Cache for Redis by default. Previously, Redis version 4.0 was the default version used. However, as of October 2021, the latest stable Redis version offered in Azure Cache for Redis is 6.0. ++>[!NOTE] +> This change does not affect any existing instances. It is only applicable to new instances created from November 1, 2022, and onward. +> +> The default Redis version that is used when creating a cache instance can vary because it is based on the latest stable version offered in Azure Cache for Redis. ++If you need a specific version of Redis for your application, we recommend using latest artifact versions as shown in the table below. Then, choose the Redis version explicitly when you create the cache. ++| Artifact | Version that supports specifying Redis version | +||| +| REST API | 2020-06-01 and newer | +| PowerShell | 6.3.0 and newer | +| Azure CLI | 2.27.0 and newer | +| Azure SDK for .NET | 7.0.0 and newer | +| Azure SDK for Python | 13.0.0 and newer | +| Azure SDK for Java | 2.2.0 and newer | +| Azure SDK for JavaScript| 6.0.0 and newer | +| Azure SDK for Go | v49.1.0 and newer | + ## April 2022 ### New metrics for connection creation rate These two new metrics can help identify whether Azure Cache for Redis clients ar - Connections Created Per Second - Connections Closed Per Second -For more information, see [View cache metrics ](cache-how-to-monitor.md#view-cache-metrics). +For more information, see [View cache metrics](cache-how-to-monitor.md#view-cache-metrics). ### Default cache change |
| azure-monitor | Java In Process Agent | https://github.com/MicrosoftDocs/azure-docs/commits/main/articles/azure-monitor/app/java-in-process-agent.md | The following table represents currently supported custom telemetry types that y - Custom requests, dependencies, and exceptions are supported through `opentelemetry-api`. - Any type of the custom telemetry is supported through the [Application Insights Java 2.x SDK](#send-custom-telemetry-by-using-the-2x-sdk). -| Custom telemetry type | Micrometer | Log4j, logback, JUL | 2.x SDK | opentelemetry-api | -|||||-| -| Custom events | | | Yes | | -| Custom metrics | Yes | | Yes | | -| Dependencies | | | Yes | Yes | -| Exceptions | | Yes | Yes | Yes | -| Page views | | | Yes | | -| Requests | | | Yes | Yes | -| Traces | | Yes | Yes | Yes | +| Custom telemetry type | Micrometer | Log4j, logback, JUL | 2.x SDK | opentelemetry-api | +|--||||-| +| Custom events | | | Yes | | +| Custom metrics | Yes | | Yes | Yes | +| Dependencies | | | Yes | Yes | +| Exceptions | | Yes | Yes | Yes | +| Page views | | | Yes | | +| Requests | | | Yes | Yes | +| Traces | | Yes | Yes | Yes | Currently, we're not planning to release an SDK with Application Insights 3.x. -Application Insights Java 3.x is already listening for telemetry that's sent to the Application Insights Java 2.x SDK. This functionality is an important part of the upgrade story for existing 2.x users. And it fills an important gap in our custom telemetry support until the OpenTelemetry API is generally available. +Application Insights Java 3.x is already listening for telemetry that's sent to the Application Insights Java 2.x SDK. This functionality is an important part of the upgrade story for existing 2.x users. And it fills an important gap in our custom telemetry support until all custom telemetry types are supported via the OpenTelemetry API. ### Send custom metrics by using Micrometer |
| azure-monitor | Proactive Cloud Services | https://github.com/MicrosoftDocs/azure-docs/commits/main/articles/azure-monitor/app/proactive-cloud-services.md | - Title: Alert on issues in Azure Cloud Services using the Azure Diagnostics integration with Azure Application Insights | Microsoft Docs -description: Monitor for issues like startup failures, crashes, and role recycle loops in Azure Cloud Services with Azure Application Insights - Previously updated : 06/07/2018----# Alert on issues in Azure Cloud Services using the Azure diagnostics integration with Azure Application Insights --In this article, we will describe how to set up alert rules that monitor for issues like startup failures, crashes, and role recycle loops in Azure Cloud Services (web and worker roles). --The method described in this article is based on the [Azure Diagnostics integration with Application Insights](https://azure.microsoft.com/blog/azure-diagnostics-integration-with-application-insights/), and the recently released [Log Alerts for Application Insights](https://azure.microsoft.com/blog/log-alerts-for-application-insights-preview/) capability. --## Define a base query --To get started, we will define a base query that retrieves the Windows Event Log events from the Windows Azure channel, which are captured into Application Insights as trace records. -These records can be used for detecting a variety of issues in Azure Cloud Services, like startup failures, runtime failures and recycle loops. --> [!NOTE] -> The base query below checks for issues in a time window of 30 minutes, and assumes a 10 minutes latency in ingesting the telemetry records. These defaults can be configured as you see fit. --``` -let window = 30m; -let endTime = ago(10m); -let EventLogs = traces -| where timestamp > endTime - window and timestamp < endTime -| extend channel = tostring(customDimensions.Channel), eventId = tostring(customDimensions.EventId) -| where channel == 'Windows Azure' and isnotempty(eventId) -| where tostring(customDimensions.DeploymentName) !contains 'deployment' // discard records captured from local machines -| project timestamp, channel, eventId, message, cloud_RoleInstance, cloud_RoleName, itemCount; -``` --## Check for specific event IDs --After retrieving the Windows Event Log events, specific issues can be detected by checking for their respective event ID and message properties (see examples below). -Simply combine the base query above with one of the queries below, and used that combined query when defining the log alert rule. --> [!NOTE] -> In the examples below, an issue will be detected if more than three events are found during the analyzed time window. This default can be configured to change the sensitivity of the alert rule. --``` -// Detect failures in the OnStart method -EventLogs -| where eventId == '2001' -| where message contains '.OnStart()' -| summarize Failures = sum(itemCount) by cloud_RoleInstance, cloud_RoleName -| where Failures > 3 -``` --``` -// Detect failures during runtime -EventLogs -| where eventId == '2001' -| where message contains '.Run()' -| summarize Failures = sum(itemCount) by cloud_RoleInstance, cloud_RoleName -| where Failures > 3 -``` --``` -// Detect failures when running a startup task -EventLogs -| where eventId == '1000' -| summarize Failures = sum(itemCount) by cloud_RoleInstance, cloud_RoleName -| where Failures > 3 -``` --``` -// Detect recycle loops -EventLogs -| where eventId == '1006' -| summarize Failures = sum(itemCount) by cloud_RoleInstance, cloud_RoleName -| where Failures > 3 -``` --## Create an alert --In the navigation menu within your Application Insights resource, go to **Alerts**, and then select **New Alert Rule**. -- --In the **Create rule** window, under the **Define alert condition** section, click on **Add criteria**, and then select **Custom log search**. -- --In the **Search query** box, paste the combined query you prepared in the previous step. --Then, continue to the **Threshold** box, and set its value to 0. You may optionally tweak the **Period** and Frequency **fields**. -Click **Done**. -- --Under the **Define alert details** section, provide a **Name** and **Description** to the alert rule, and set its **Severity**. -Also, make sure that the **Enable rule upon creation** button is set to **Yes**. -- --Under the **Define action group** section, you can select an existing **Action group** or create a new one. -You may choose to have the action group contain multiple actions of various types. -- --Once you've defined the Action group, confirm your changes and click **Create alert rule**. --## Next Steps --Learn more about automatically detecting: --[Failure anomalies](./proactive-failure-diagnostics.md) -[Memory Leaks](./proactive-potential-memory-leak.md) -[Performance anomalies](./proactive-performance-diagnostics.md) - |
| azure-monitor | Metrics Custom Overview | https://github.com/MicrosoftDocs/azure-docs/commits/main/articles/azure-monitor/essentials/metrics-custom-overview.md | If you have 100 regions, 200 departments, and 2,000 customers, that gives you 10 Again, this limit isn't for an individual metric. It's for the sum of all such metrics across a subscription and region. +The following steps will provide more information to assist with troubleshooting. ++1. Navigate to the Monitor section of the Azure portal. +1. Select **Metrics** on the left hand side. +1. Under **Select a scope**, check the applicable subscription and resource groups. +1. Under **Refine scope**, choose **Custom Metric Usage** and the desired location. +1. Select the **Apply** button. +1. Choose either **Active Time Series**, **Active Time Series Limit**, or **Throttled Time Series**. + ## Design limitations and considerations **Using Application Insights for the purpose of auditing.** The Application Insights telemetry pipeline is optimized for minimizing the performance impact and limiting the network traffic from monitoring your application. As such, it throttles or samples (takes only a percentage of your telemetry and ignores the rest) if the initial dataset becomes too large. Because of this behavior, you can't use it for auditing purposes because some records are likely to be dropped. |
| azure-monitor | Cost Logs | https://github.com/MicrosoftDocs/azure-docs/commits/main/articles/azure-monitor/logs/cost-logs.md | The cluster commitment tier has a 31-day commitment period after the commitment There are two modes of billing for a cluster that you specify when you create the cluster. -- **Cluster (default)**: Billing for ingested data is done at the cluster level. The ingested data quantities from each workspace associated to a cluster are aggregated to calculate the daily bill for the cluster. Per-node allocations from [Microsoft Defender for Cloud](../../security-center/index.yml) are applied at the workspace level prior to this aggregation of aggregated data across all workspaces in the cluster. +- **Cluster (default)**: Billing for ingested data is done at the cluster level. The ingested data quantities from each workspace associated to a cluster are aggregated to calculate the daily bill for the cluster. Per-node allocations from [Microsoft Defender for Cloud](../../security-center/index.yml) are applied at the workspace level prior to this aggregation of data across all workspaces in the cluster. - **Workspaces**: Commitment tier costs for your cluster are attributed proportionately to the workspaces in the cluster, by each workspace's data ingestion volume (after accounting for per-node allocations from [Microsoft Defender for Cloud](../../security-center/index.yml) for each workspace.)<br><br>If the total data volume ingested into a cluster for a day is less than the commitment tier, each workspace is billed for its ingested data at the effective per-GB commitment tier rate by billing them a fraction of the commitment tier. The unused part of the commitment tier is then billed to the cluster resource.<br><br>If the total data volume ingested into a cluster for a day is more than the commitment tier, each workspace is billed for a fraction of the commitment tier, based on its fraction of the ingested data that day and each workspace for a fraction of the ingested data above the commitment tier. If the total data volume ingested into a workspace for a day is above the commitment tier, nothing is billed to the cluster resource. |
| azure-monitor | Restore | https://github.com/MicrosoftDocs/azure-docs/commits/main/articles/azure-monitor/logs/restore.md | You can: - Run only one active restore on a specific table at a given time. Executing a second restore on a table that already has an active restore will fail. ## Pricing model-The charge for the restore operation is based on the volume of data you restore and the number of days the data is available. The cost of retaining data for part of a day is the same as for a full day. +The charge for maintaining restored logs is calculated based on the volume of data you restore, in GB, and the number or days for which you restore the data. Charges are prorated and subject to the minimum restore duration and data volume. There is no charge for querying against restored logs. -For example, if your table holds 500 GB a day and you restore 10 days of data, you'll be charged for 5000 GB a day until you dismiss the restored data. +For example, if your table holds 500 GB a day and you restore 10 days of data, you'll be charged for 5000 GB a day until you dismiss the restored data. > [!NOTE] > There is no charge for restored data during the preview period. |
| azure-monitor | Profiler Overview | https://github.com/MicrosoftDocs/azure-docs/commits/main/articles/azure-monitor/profiler/profiler-overview.md | If you've enabled Profiler but aren't seeing traces, check our [Troubleshooting ## Limitations - **Data retention**: The default data retention period is five days. -- **Profiling web apps**: While you can use the Profiler at no extra cost, your web app must be hosted in the basic tier of the Web Apps feature of Azure App Service, at minimum.+- **Profiling web apps**: + - While you can use the Profiler at no extra cost, your web app must be hosted in the basic tier of the Web Apps feature of Azure App Service, at minimum. + - You can only attach 1 profiler to each web app. ## Next steps Learn how to enable Profiler on your Azure service: |
| azure-netapp-files | Azure Netapp Files Configure Export Policy | https://github.com/MicrosoftDocs/azure-docs/commits/main/articles/azure-netapp-files/azure-netapp-files-configure-export-policy.md | You can create up to five export policy rules. * **Allowed Clients**: Specify the value in one of the following formats: * IPv4 address. Example: `10.1.12.24` * IPv4 address with a subnet mask expressed as a number of bits. Example: `10.1.12.10/4`- * Comma-separated IP addresses. You can enter multiple host IPs in a single rule by separating them with commas. The length limit is 4096 characters. Example: `10.1.12.25,10.1.12.28,10.1.12.29` + * Comma-separated IP addresses. You can enter multiple host IPs or subnet masks in a single rule by separating them with commas. The length limit is 4096 characters. Example: `10.1.12.25,10.1.12.28,10.1.12.29,10.1.12.10/4` * **Access**: Select one of the following access types: * No Access |
| azure-netapp-files | Azure Netapp Files Network Topologies | https://github.com/MicrosoftDocs/azure-docs/commits/main/articles/azure-netapp-files/azure-netapp-files-network-topologies.md | Azure NetApp Files standard network features are supported for the following reg * East US 2 * France Central * Germany West Central+* Japan East * North Central US * North Europe * South Central US+* Switzerland North * UK South * West Europe+* West US * West US 2 * West US 3 |
| azure-netapp-files | Create Volumes Dual Protocol | https://github.com/MicrosoftDocs/azure-docs/commits/main/articles/azure-netapp-files/create-volumes-dual-protocol.md | To create NFS volumes, see [Create an NFS volume](azure-netapp-files-create-volu ## Considerations * Ensure that you meet the [Requirements for Active Directory connections](create-active-directory-connections.md#requirements-for-active-directory-connections). -* Create a `pcuser` account in your Active Directory (AD) and ensure that the account is enabled. This account will serve as the default user. It will be used for mapping UNIX users for accessing a dual-protocol volume configured with NTFS security style. The `pcuser` account is used only when there is no user present in the AD. If a user has an account in the AD with the POSIX attributes set, then that account will be the one used for authentication, and it will not map to the `pcuser` account. * Create a reverse lookup zone on the DNS server and then add a pointer (PTR) record of the AD host machine in that reverse lookup zone. Otherwise, the dual-protocol volume creation will fail. * The **Allow local NFS users with LDAP** option in Active Directory connections intends to provide occasional and temporary access to local users. When this option is enabled, user authentication and lookup from the LDAP server stop working, and the number of group memberships that Azure NetApp Files will support will be limited to 16. As such, you should keep this option *disabled* on Active Directory connections, except for the occasion when a local user needs to access LDAP-enabled volumes. In that case, you should disable this option as soon as local user access is no longer required for the volume. See [Allow local NFS users with LDAP to access a dual-protocol volume](#allow-local-nfs-users-with-ldap-to-access-a-dual-protocol-volume) about managing local user access. * Ensure that the NFS client is up to date and running the latest updates for the operating system. |
| azure-netapp-files | Troubleshoot Volumes | https://github.com/MicrosoftDocs/azure-docs/commits/main/articles/azure-netapp-files/troubleshoot-volumes.md | This article describes error messages and resolutions that can help you troubles ## Errors for SMB and dual-protocol volumes | Error conditions | Resolutions |-|-|-| +|--|-| | The SMB or dual-protocol volume creation fails with the following error: <br> `{"code":"DeploymentFailed","message":"At least one resource deployment operation failed. Please list deployment operations for details. Please see https://aka.ms/DeployOperations for usage details.","details":[{"code":"InternalServerError", "message":"Error when creating - Could not query DNS server. Verify that the network configuration is correct and that DNS servers are available."}]}` | This error indicates that the DNS is not reachable. <br> Consider the following solutions: <ul><li>Check if AD DS and the volume are being deployed in same region.</li> <li>Check if AD DS and the volume are using the same VNet. If they are using different VNETs, make sure that the VNets are peered with each other. See [Guidelines for Azure NetApp Files network planning](azure-netapp-files-network-topologies.md). </li> <li>The DNS server might have network security groups (NSGs) applied. As such, it does not allow the traffic to flow. In this case, open the NSGs to the DNS or AD to connect to various ports. For port requirements, see [Requirements for Active Directory connections](create-active-directory-connections.md#requirements-for-active-directory-connections). </li></ul> <br>The same solutions apply for Azure AD DS. Azure AD DS should be deployed in the same region. The VNet should be in the same region or peered with the VNet used by the volume. | | The SMB or dual-protocol volume creation fails with the following error: <br> `{"code":"DeploymentFailed","message":"At least one resource deployment operation failed. Please list deployment operations for details. Please see https://aka.ms/DeployOperations for usage details.","details":[{"code":"InternalServerError", "message":"Error when creating - Failed to create the Active Directory machine account \"SMBTESTAD-C1C8\". Reason: Kerberos Error: Invalid credentials were given Details: Error: Machine account creation procedure failed\n [ 563] Loaded the preliminary configuration.\n**[ 670] FAILURE: Could not authenticate as 'test@contoso.com':\n** Unknown user (KRB5KDC_ERR_C_PRINCIPAL_UNKNOWN)\n. "}]}` | <ul><li>Make sure that the username entered is correct. </li> <li>Make sure that the user is part of the Administrator group that has the privilege to create machine accounts. </li> <li> If you use Azure AD DS, make sure that the user is part of the Azure AD group `Azure AD DC Administrators`. </li></ul> | | The SMB or dual-protocol volume creation fails with the following error: <br> `{"code":"DeploymentFailed","message":"At least one resource deployment operation failed. Please list deployment operations for details. Please see https://aka.ms/DeployOperations for usage details.","details":[{"code":"InternalServerError", "message":"Error when creating - Failed to create the Active Directory machine account \"SMBTESTAD-A452\". Reason: Kerberos Error: Pre-authentication information was invalid Details: Error: Machine account creation procedure failed\n [ 567] Loaded the preliminary configuration.\n [ 671] Successfully connected to ip 10.x.x.x, port 88 using TCP\n**[ 1099] FAILURE: Could not authenticate as\n** 'user@contoso.com': CIFS server account password does\n** not match password stored in Active Directory\n** (KRB5KDC_ERR_PREAUTH_FAILED)\n. "}]}` | Make sure that the password entered for joining the AD connection is correct. | This article describes error messages and resolutions that can help you troubles | Dual-protocol volume creation fails with the error `Failed to validate LDAP configuration, try again after correcting LDAP configuration`. | The pointer (PTR) record of the AD host machine might be missing on the DNS server. You need to create a reverse lookup zone on the DNS server, and then add a PTR record of the AD host machine in that reverse lookup zone. <br> For example, assume that the IP address of the AD machine is `10.x.x.x`, the hostname of the AD machine (as found by using the `hostname` command) is `AD1`, and the domain name is `contoso.com`. The PTR record added to the reverse lookup zone should be `10.x.x.x` -> `contoso.com`. | | Dual-protocol volume creation fails with the error `Failed to create the Active Directory machine account \\\"TESTAD-C8DD\\\". Reason: Kerberos Error: Pre-authentication information was invalid Details: Error: Machine account creation procedure failed\\n [ 434] Loaded the preliminary configuration.\\n [ 537] Successfully connected to ip 10.x.x.x, port 88 using TCP\\n**[ 950] FAILURE`. | This error indicates that the AD password is incorrect when Active Directory is joined to the NetApp account. Update the AD connection with the correct password and try again. | | Dual-protocol volume creation fails with the error `Could not query DNS server. Verify that the network configuration is correct and that DNS servers are available`. | This error indicates that DNS is not reachable. The reason might be because DNS IP is incorrect, or there is a networking issue. Check the DNS IP entered in AD connection and make sure that the IP is correct. <br> Also, make sure that the AD and the volume are in same region and in same VNet. If they are in different VNETs, ensure that VNet peering is established between the two VNets. <br> See [Guidelines for Azure NetApp Files network planning](azure-netapp-files-network-topologies.md#azure-native-environments) for details. |-| Permission is denied error when mounting a dual-protocol volume. | A dual-protocol volume supports both the NFS and SMB protocols. When you try to access the mounted volume on the UNIX system, the system attempts to map the UNIX user you use to a Windows user. If no mapping is found, the ΓÇ£Permission deniedΓÇ¥ error occurs. <br> This situation applies also when you use the ΓÇÿrootΓÇÖ user for the access. <br> To avoid the ΓÇ£Permission deniedΓÇ¥ issue, make sure that Windows Active Directory includes `pcuser` before you access the mount point. If you add `pcuser` after encountering the ΓÇ£Permission deniedΓÇ¥ issue, wait 24 hours for the cache entry to clear before trying the access again. | +| Permission is denied error when mounting a dual-protocol volume. | A dual-protocol volume supports both the NFS and SMB protocols. When you try to access the mounted volume on the UNIX system, the system attempts to map the UNIX user you use to a Windows user. <br> Ensure that the `POSIX` attributes are properly set on the AD DS User object. | ## Errors for NFSv4.1 Kerberos volumes This article describes error messages and resolutions that can help you troubles ## Errors for LDAP volumes | Error conditions | Resolutions |-|-|-| +|-|-| | Error when creating an SMB volume with ldapEnabled as true: <br> `Error Message: ldapEnabled option is only supported with NFS protocol volume. ` | You cannot create an SMB volume with LDAP enabled. <br> Create SMB volumes with LDAP disabled. | | Error when updating the ldapEnabled parameter value for an existing volume: <br> `Error Message: ldapEnabled parameter is not allowed to update` | You cannot modify the LDAP option setting after creating a volume. <br> Do not update the LDAP option setting on a created volume. See [Configure AD DS LDAP with extended groups for NFS volume access](configure-ldap-extended-groups.md) for details. | | Error when creating an LDAP-enabled NFS volume: <br> `Could not query DNS server` <br> `Sample error message:` <br> `"log": time="2020-10-21 05:04:04.300" level=info msg=Res method=GET url=/v2/Volumes/070d0d72-d82c-c893-8ce3-17894e56cea3 x-correlation-id=9bb9e9fe-abb6-4eb5-a1e4-9e5fbb838813 x-request-id=c8032cb4-2453-05a9-6d61-31ca4a922d85 xresp="200: {\"created\":\"2020-10-21T05:02:55.000Z\",\"lifeCycleState\":\"error\",\"lifeCycleStateDetails\":\"Error when creating - Could not query DNS server. Verify that the network configuration is correct and that DNS servers are available.\",\"name\":\"smb1\",\"ownerId\ \":\"8c925a51-b913-11e9-b0de-9af5941b8ed0\",\"region\":\"westus2stage\",\"volumeId\":\"070d0d72-d82c-c893-8ce3-` | This error occurs because DNS is unreachable. <br> <ul><li> Check if you have configured the correct site (site scoping) for Azure NetApp Files. </li><li> The reason that DNS is unreachable might be an incorrect DNS IP address or networking issues. Check the DNS IP address entered in the AD connection to make sure that it is correct. </li><li> Make sure that the AD and the volume are in the same region and the same VNet. If they are in different VNets, ensure that VNet peering is established between the two VNets.</li></ul> | |
| cognitive-services | Image Lists Quickstart Dotnet | https://github.com/MicrosoftDocs/azure-docs/commits/main/articles/cognitive-services/Content-Moderator/image-lists-quickstart-dotnet.md | public static class Clients } ``` +> [!IMPORTANT] +> Remember to remove the key from your code when you're done, and never post it publicly. For production, use a secure way of storing and accessing your credentials like [Azure Key Vault](../../key-vault/general/overview.md). See the Cognitive Services [security](../cognitive-services-security.md) article for more information. ### Initialize application-specific settings |
| cognitive-services | Term Lists Quickstart Dotnet | https://github.com/MicrosoftDocs/azure-docs/commits/main/articles/cognitive-services/Content-Moderator/term-lists-quickstart-dotnet.md | public static class Clients } ``` +> [!IMPORTANT] +> Remember to remove the key from your code when you're done, and never post it publicly. For production, use a secure way of storing and accessing your credentials like [Azure Key Vault](../../key-vault/general/overview.md). See the Cognitive Services [security](../cognitive-services-security.md) article for more information. + ### Add private properties Add the following private properties to namespace TermLists, class Program. |
| cognitive-services | Video Moderation Api | https://github.com/MicrosoftDocs/azure-docs/commits/main/articles/cognitive-services/Content-Moderator/video-moderation-api.md | private static readonly string CONTENT_MODERATOR_PRESET_FILE = "preset.json"; ``` +> [!IMPORTANT] +> Remember to remove the keys from your code when you're done, and never post them publicly. For production, use a secure way of storing and accessing your credentials like [Azure Key Vault](../../key-vault/general/overview.md). See the Cognitive Services [security](../cognitive-services-security.md) article for more information. + If you wish to use a local video file (simplest case), add it to the project and enter its path as the `INPUT_FILE` value (relative paths are relative to the execution directory). You will also need to create the _preset.json_ file in the current directory and use it to specify a version number. For example: |
| cognitive-services | Luis Tutorial Node Import Utterances Csv | https://github.com/MicrosoftDocs/azure-docs/commits/main/articles/cognitive-services/LUIS/luis-tutorial-node-import-utterances-csv.md | To generate a new LUIS app from the CSV file: You can see this program flow in the last part of the `index.js` file. Copy or [download](https://github.com/Azure-Samples/cognitive-services-language-understanding/blob/master/examples/build-app-programmatically-csv/index.js) this code and save it in `index.js`. + [!code-javascript[Node.js code for calling the steps to build a LUIS app](~/samples-luis/examples/build-app-programmatically-csv/index.js)] |
| cognitive-services | Get Analytics Knowledge Base | https://github.com/MicrosoftDocs/azure-docs/commits/main/articles/cognitive-services/QnAMaker/How-To/get-analytics-knowledge-base.md | traces | extend id = operation_ParentId | order by timestamp desc ``` +> **NOTE** +> If you cannot get properly the log by using Application Insight, please confirm the Application Insights settings on the App Service resource. +> Open App Service resource and go to Application Insights. And then please check whether it is Enabled or Disabled. If it is disabled, please enable it and then apply there. + ## Next steps > [!div class="nextstepaction"] |
| cognitive-services | Customize Pronunciation | https://github.com/MicrosoftDocs/azure-docs/commits/main/articles/cognitive-services/Speech-Service/customize-pronunciation.md | -UPS pronunciations consist of a string of UPS phones, each separated by whitespace. The phone set is case-sensitive. UPS phone labels are all defined using ASCII character strings. +UPS pronunciations consist of a string of UPS phones, each separated by whitespace. UPS phone labels are all defined using ASCII character strings. For steps on implementing UPS, see [Structured text phonetic pronunciation](how-to-custom-speech-test-and-train.md#structured-text-data-for-training). Structured text phonetic pronunciation data is separate from [pronunciation data](how-to-custom-speech-test-and-train.md#pronunciation-data-for-training), and they cannot be used together. The first one is "sounds-like" or spoken-form data, and is input as a separate file, and trains the model what the spoken form sounds like |
| cognitive-services | Language Identification | https://github.com/MicrosoftDocs/azure-docs/commits/main/articles/cognitive-services/Speech-Service/language-identification.md | Code snippets are included with the concepts described next. Complete samples fo You provide candidate languages, at least one of which is expected be in the audio. You can include up to 4 languages for [at-start LID](#at-start-and-continuous-language-identification) or up to 10 languages for [continuous LID](#at-start-and-continuous-language-identification). -You must provide the full 4-letter locale, but language identification only uses one locale per base language. Do not include multiple locales (e.g., "en-US" and "en-GB") for the same language. +You must provide the full locale with dash (`-`) separator, but language identification only uses one locale per base language. Do not include multiple locales (e.g., "en-US" and "en-GB") for the same language. ::: zone pivot="programming-language-csharp" |
| cognitive-services | Language Support | https://github.com/MicrosoftDocs/azure-docs/commits/main/articles/cognitive-services/Speech-Service/language-support.md | The following table lists the released languages and public preview languages. ## Speech translation -The Speech Translation API supports different languages for speech-to-speech and speech-to-text translation. The source language must always be from the speech-to-text language table. The available target languages depend on whether the translation target is speech or text. You may translate incoming speech into any of the [supported languages](https://www.microsoft.com/translator/business/languages/). A subset of languages is available for [speech synthesis](language-support.md#text-languages). +Speech Translation supports different languages for speech-to-speech and speech-to-text translation. The available target languages depend on whether the translation target is speech or text. ++To set the input speech recognition language, specify the full locale with a dash (`-`) separator. See the [speech-to-text language table](#speech-to-text) above. The default language is `en-US` if you don't specify a language. ++To set the translation target language, with few exceptions you only specify the language code that precedes the locale dash (`-`) separator. For example, use `es` for Spanish (Spain) instead of `es-ES`. See the speech translation target language table below. The default language is `en` if you don't specify a language. ### Text languages |
| cognitive-services | Get Started With Document Translation | https://github.com/MicrosoftDocs/azure-docs/commits/main/articles/cognitive-services/Translator/document-translation/get-started-with-document-translation.md | gradle run > [!IMPORTANT] >-> For the code samples below, you'll hard-code your key and endpoint where indicated; remember to remove the key from your code when you're done, and never post it publicly. See [Azure Cognitive Services security](../../cognitive-services-security.md?tabs=command-line%2ccsharp) for ways to securely store and access your credentials. +> For the code samples below, you'll hard-code your Shared Access Signature (SAS) URL where indicated. Remember to remove the SAS URL from your code when you're done, and never post it publicly. For production, use a secure way of storing and accessing your credentials like [Azure Key Vault](../../../key-vault/general/overview.md). See the Cognitive Services [security](../../cognitive-services-security.md) article for more information. > > You may need to update the following fields, depending upon the operation: >>> |
| cognitive-services | Quickstart Translator | https://github.com/MicrosoftDocs/azure-docs/commits/main/articles/cognitive-services/Translator/quickstart-translator.md | For more information on Translator authentication options, *see* the [Translator ||| > [!IMPORTANT]-> -> Remember to remove the key from your code when you're done, and **never** post it publicly. For production, use secure methods to store and access your credentials. For more information, *see* Cognitive Services [security](../../cognitive-services/cognitive-services-security.md). +> Remember to remove the key from your code when you're done, and never post it publicly. For production, use a secure way of storing and accessing your credentials like [Azure Key Vault](../../key-vault/general/overview.md). See the Cognitive Services [security](../cognitive-services-security.md) article for more information. ## Translate text |
| cognitive-services | Translator Text Apis | https://github.com/MicrosoftDocs/azure-docs/commits/main/articles/cognitive-services/Translator/translator-text-apis.md | In this how-to guide, you'll learn to use the [Translator service REST APIs](ref :::image type="content" source="media/keys-and-endpoint-portal.png" alt-text="Screenshot: Azure portal keys and endpoint page."::: +> [!IMPORTANT] +> Remember to remove the key from your code when you're done, and never post it publicly. For production, use a secure way of storing and accessing your credentials like [Azure Key Vault](../../key-vault/general/overview.md). See the Cognitive Services [security](../cognitive-services-security.md) article for more information. + ## Headers To call the Translator service via the [REST API](reference/rest-api-guide.md), you'll need to make sure the following headers are included with each request. Don't worry, we'll include the headers in the sample code in the following sections. |
| communication-services | Email Authentication Best Practice | https://github.com/MicrosoftDocs/azure-docs/commits/main/articles/communication-services/concepts/email/email-authentication-best-practice.md | A DMARC policy record allows a domain to announce that their email uses authenti The following documents may be interesting to you: - Familiarize yourself with the [Email client library](../email/sdk-features.md)-- How to send emails with custom verified domains?[Add custom domains](../../quickstarts/email/add-custom-verified-domains.md)-- How to send emails with Azure Managed Domains?[Add Azure Managed domains](../../quickstarts/email/add-azure-managed-domains.md)+- How to send emails with custom verified domains? [Add custom domains](../../quickstarts/email/add-custom-verified-domains.md) +- How to send emails with Azure Managed Domains? [Add Azure Managed domains](../../quickstarts/email/add-azure-managed-domains.md) |
| communication-services | Email Domain And Sender Authentication | https://github.com/MicrosoftDocs/azure-docs/commits/main/articles/communication-services/concepts/email/email-domain-and-sender-authentication.md | Email Communication Service resources are designed to enable domain validation s The following documents may be interesting to you: - Familiarize yourself with the [Email client library](../email/sdk-features.md)-- How to send emails with custom verified domains?[Add custom domains](../../quickstarts/email/add-custom-verified-domains.md)-- How to send emails with Azure Managed Domains?[Add Azure Managed domains](../../quickstarts/email/add-azure-managed-domains.md)+- How to send emails with custom verified domains? [Add custom domains](../../quickstarts/email/add-custom-verified-domains.md) +- How to send emails with Azure Managed Domains? [Add Azure Managed domains](../../quickstarts/email/add-azure-managed-domains.md) |
| communication-services | Email Overview | https://github.com/MicrosoftDocs/azure-docs/commits/main/articles/communication-services/concepts/email/email-overview.md | Key features include: The following documents may be interesting to you: - Familiarize yourself with the [Email client library](../email/sdk-features.md)-- How to send emails with custom verified domains?[Add custom domains](../../quickstarts/email/add-custom-verified-domains.md)-- How to send emails with Azure Managed Domains?[Add Azure Managed domains](../../quickstarts/email/add-azure-managed-domains.md)+- How to send emails with custom verified domains? [Add custom domains](../../quickstarts/email/add-custom-verified-domains.md) +- How to send emails with Azure Managed Domains? [Add Azure Managed domains](../../quickstarts/email/add-azure-managed-domains.md) |
| communication-services | Prepare Email Communication Resource | https://github.com/MicrosoftDocs/azure-docs/commits/main/articles/communication-services/concepts/email/prepare-email-communication-resource.md | Your Azure Administrators will create a new resource of type ΓÇ£Email Communicat The following documents may be interesting to you: - Familiarize yourself with the [Email client library](../email/sdk-features.md)-- How to send emails with custom verified domains?[Add custom domains](../../quickstarts/email/add-custom-verified-domains.md)-- How to send emails with Azure Managed Domains?[Add Azure Managed domains](../../quickstarts/email/add-azure-managed-domains.md)+- How to send emails with custom verified domains? [Add custom domains](../../quickstarts/email/add-custom-verified-domains.md) +- How to send emails with Azure Managed Domains? [Add Azure Managed domains](../../quickstarts/email/add-azure-managed-domains.md) |
| communication-services | Sdk Features | https://github.com/MicrosoftDocs/azure-docs/commits/main/articles/communication-services/concepts/email/sdk-features.md | Your Azure account has a set of limitation on the number of email messages that The following documents may be interesting to you: -- How to send emails with custom verified domains?[Add custom domains](../../quickstarts/email/add-custom-verified-domains.md)-- How to send emails with Azure Managed Domains?[Add Azure Managed domains](../../quickstarts/email/add-azure-managed-domains.md)+- How to send emails with custom verified domains? [Add custom domains](../../quickstarts/email/add-custom-verified-domains.md) +- How to send emails with Azure Managed Domains? [Add Azure Managed domains](../../quickstarts/email/add-azure-managed-domains.md) - How to send emails with Azure Communication Service using Email client library? [How to send an Email?](../../quickstarts/email/send-email.md) |
| communication-services | Metrics | https://github.com/MicrosoftDocs/azure-docs/commits/main/articles/communication-services/concepts/metrics.md | The following operations are available on SMS API request metrics: The following operations are available on Authentication API request metrics: -| Operation / Route | Description | -| -- | - | -| CreateIdentity | Creates an identity representing a single user. | -| DeleteIdentity | Deletes an identity. | -| CreateToken | Creates an access token. | -| RevokeToken | Revokes all access tokens created for an identity before a time given. | +| Operation / Route | Description | +| -- | - | +| CreateIdentity | Creates an identity representing a single user. | +| DeleteIdentity | Deletes an identity. | +| CreateToken | Creates an access token. | +| RevokeToken | Revokes all access tokens created for an identity before a time given. | +| ExchangeTeamsUserAccessToken | Exchange an Azure Active Directory (Azure AD) access token of a Teams user for a new Communication Identity access token with a matching expiration time.| :::image type="content" source="./media/acs-auth-metrics.png" alt-text="Authentication Request Metric."::: |
| communication-services | Troubleshooting Info | https://github.com/MicrosoftDocs/azure-docs/commits/main/articles/communication-services/concepts/troubleshooting-info.md | To verify your Teams License eligibility via Teams web client, follow the steps 1. Open your browser and navigate to [Teams web client](https://teams.microsoft.com/). 1. Sign in with credentials that have a valid Teams license. -1. If the authentication is successful and you remain in the https://teams.microsoft.com/ domain, then your Teams License is eligible. If authentication fails or you're redirected to the https://www.teams.live.com domain, then your Teams License isn't eligible to use Azure Communication Services support for Teams users. +1. If the authentication is successful and you remain in the https://teams.microsoft.com/ domain, then your Teams License is eligible. If authentication fails or you're redirected to the https://teams.live.com/v2/ domain, then your Teams License isn't eligible to use Azure Communication Services support for Teams users. #### Checking your current Teams license via Microsoft Graph API You can find your current Teams license using [licenseDetails](/graph/api/resources/licensedetails) Microsoft Graph API that returns licenses assigned to a user. Follow the steps below to use the Graph Explorer tool to view licenses assigned to a user: The Azure Communication Services SMS SDK uses the following error codes to help ## Related information - [Logs and diagnostics](logging-and-diagnostics.md) - [Metrics](metrics.md)-- [Service limits](service-limits.md)+- [Service limits](service-limits.md) |
| communication-services | Add Custom Verified Domains | https://github.com/MicrosoftDocs/azure-docs/commits/main/articles/communication-services/quickstarts/email/add-custom-verified-domains.md | To provision a custom domain you need to ## Changing MailFrom and FROM display name for custom domains -When Azure Manged Domain is provisioned to send mail, it has default Mail from address as donotreply@xxxxxxxx-xxxx-xxxx-xxxx-xxxxxxxxxxxx.azurecomm.net and the FROM display name would be the same. You'll able to configure and change the Mail from address and FROM display name to more user friendly value. +When Azure Managed Domain is provisioned to send mail, it has default Mail from address as donotreply@xxxxxxxx-xxxx-xxxx-xxxx-xxxxxxxxxxxx.azurecomm.net and the FROM display name would be the same. You'll able to configure and change the Mail from address and FROM display name to more user friendly value. 1. Go the overview page of the Email Communications Service resource that you created earlier. 2. Click **Provision Domains** on the left navigation panel. You'll see list of provisioned domains. |
| container-apps | Ingress | https://github.com/MicrosoftDocs/azure-docs/commits/main/articles/container-apps/ingress.md | The following settings are available when configuring ingress: | Property | Description | Values | Required | |||||-| `external` | Your ingress IP and fully qualified domain name can either be visible externally to the internet, or internally within a VNET. |`true` for external visibility, `false` for internal visibility (default) | Yes | +| `external` | The ingress IP and fully qualified domain name (FQDN) can either be accessible externally from the internet or a VNET, or internally within the app environment only. | `true` for external visibility from the internet or a VNET, `false` for internal visibility within app environment only (default) | Yes | | `targetPort` | The port your container listens to for incoming requests. | Set this value to the port number that your container uses. Your application ingress endpoint is always exposed on port `443`. | Yes | | `transport` | You can use either HTTP/1.1 or HTTP/2, or you can set it to automatically detect the transport type. | `http` for HTTP/1, `http2` for HTTP/2, `auto` to automatically detect the transport type (default) | No | | `allowInsecure` | Allows insecure traffic to your container app. | `false` (default), `true`<br><br>If set to `true`, HTTP requests to port 80 are not automatically redirected to port 443 using HTTPS, allowing insecure connections. | No | |
| container-apps | Manage Secrets | https://github.com/MicrosoftDocs/azure-docs/commits/main/articles/container-apps/manage-secrets.md | Here, a connection string to a queue storage account is declared in the `--secre ## Using secrets -The secret value is mapped to the secret name declared at the application level as described in the [defining secrets](#defining-secrets) section. The `passwordSecretRef` and `secretRef` parameters are used to reference the secret names as environment variables at the container level. The `passwordSecretRef` provides a descriptive parameter name for secrets containing passwords. +The secret value is mapped to the secret name declared at the application level as described in the [defining secrets](#defining-secrets) section. The `passwordSecretRef` and `secretref` parameters are used to reference the secret names as environment variables at the container level. The `passwordSecretRef` provides a descriptive parameter name for secrets containing passwords. ## Example -The following example shows an application that declares a connection string at the application level and is used throughout the configuration via `secretRef`. +The following example shows an application that declares a connection string at the application level and is used throughout the configuration via `secretref`. # [ARM template](#tab/arm-template) az containerapp create \ --env-vars "QueueName=myqueue" "ConnectionString=secretref:queue-connection-string" ``` -Here, the environment variable named `connection-string` gets its value from the application-level `queue-connection-string` secret by using `secretRef`. +Here, the environment variable named `connection-string` gets its value from the application-level `queue-connection-string` secret by using `secretref`. # [PowerShell](#tab/powershell) az containerapp create ` --env-vars "QueueName=myqueue" "ConnectionString=secretref:queue-connection-string" ``` -Here, the environment variable named `connection-string` gets its value from the application-level `queue-connection-string` secret by using `secretRef`. +Here, the environment variable named `connection-string` gets its value from the application-level `queue-connection-string` secret by using `secretref`. |
| container-apps | Samples | https://github.com/MicrosoftDocs/azure-docs/commits/main/articles/container-apps/samples.md | Refer to the following samples to learn how to use Azure Container Apps in diffe | Name | Description | |--|--|-| [A/B Testing your ASP.NET Core apps using Azure Container Apps](https://github.com/Azure-Samples/dotNET-Frontend-AB-Testing-on-Azure-Container-Apps)<br /> | Shows how to use Azure App Configuration, ASP.NET Core Feature Flags, and Azure Container Apps revisions together to gradually release features or perform A/B tests. <br /> | -| [gRPC with ASP.NET Core on Azure Container Apps](https://github.com/Azure-Samples/dotNET-Workers-with-gRPC-messaging-on-Azure-Container-Apps) | This repository contains a simple scenario built to demonstrate how ASP.NET Core 6.0 can be used to build a cloud-native application hosted in Azure Container Apps that uses gRPC request/response transmission from Worker microservices. The gRPC service simultaneously streams sensor data to a Blazor server frontend, so you can watch the data be charted in real-time. <br /> | -| [Deploy an Orleans Cluster to Container Apps](https://github.com/Azure-Samples/Orleans-Cluster-on-Azure-Container-Apps) | An end-to-end sample and tutorial for getting a Microsoft Orleans cluster running on Azure Container Apps. Worker microservices rapidly transmit data to a back-end Orleans cluster for monitoring and storage, emulating thousands of physical devices in the field.<br /> | +| [A/B Testing your ASP.NET Core apps using Azure Container Apps](https://github.com/Azure-Samples/dotNET-Frontend-AB-Testing-on-Azure-Container-Apps)<br /> | Shows how to use Azure App Configuration, ASP.NET Core Feature Flags, and Azure Container Apps revisions together to gradually release features or perform A/B tests. | +| [gRPC with ASP.NET Core on Azure Container Apps](https://github.com/Azure-Samples/dotNET-Workers-with-gRPC-messaging-on-Azure-Container-Apps) | This repository contains a simple scenario built to demonstrate how ASP.NET Core 6.0 can be used to build a cloud-native application hosted in Azure Container Apps that uses gRPC request/response transmission from Worker microservices. The gRPC service simultaneously streams sensor data to a Blazor server frontend, so you can watch the data be charted in real-time. | +| [Deploy an Orleans Cluster to Container Apps](https://github.com/Azure-Samples/Orleans-Cluster-on-Azure-Container-Apps) | An end-to-end sample and tutorial for getting a Microsoft Orleans cluster running on Azure Container Apps. Worker microservices rapidly transmit data to a back-end Orleans cluster for monitoring and storage, emulating thousands of physical devices in the field. | +| [Deploy a shopping cart Orleans app to Container Apps](https://github.com/Azure-Samples/orleans-blazor-server-shopping-cart-on-container-apps) | An end-to-end example shopping cart app built in ASP.NET Core Blazor Server with Orleans deployed to Azure Container Apps. | | [ASP.NET Core front-end with two back-end APIs on Azure Container Apps](https://github.com/Azure-Samples/dotNET-FrontEnd-to-BackEnd-on-Azure-Container-Apps )<br /> | This sample demonstrates ASP.NET Core 6.0 can be used to build a cloud-native application hosted in Azure Container Apps. | | [ASP.NET Core front-end with two back-end APIs on Azure Container Apps (with Dapr)](https://github.com/Azure-Samples/dotNET-FrontEnd-to-BackEnd-with-DAPR-on-Azure-Container-Apps )<br /> | Demonstrates how ASP.NET Core 6.0 is used to build a cloud-native application hosted in Azure Container Apps using Dapr. | |
| container-instances | Container Instances Quickstart Portal | https://github.com/MicrosoftDocs/azure-docs/commits/main/articles/container-instances/container-instances-quickstart-portal.md | If you don't have an Azure subscription, create a [free account][azure-free-acco ## Create a container instance -Select the **Create a resource** > **Containers** > **Container Instances**. +On the Azure portal homepage, select **Create a resource**. -On the **Basics** page, enter the following values in the **Resource group**, **Container name**, and **Container image** text boxes. Leave the other values at their defaults, then select **OK**. +Select **Containers** > **Container Instances**. +++On the **Basics** page, choose a subscription and enter the following values for **Resource group**, **Container name**, **Image source**, and **Container image**. * Resource group: **Create new** > `myresourcegroup` * Container name: `mycontainer` * Image source: **Quickstart images**-* Container image: `mcr.microsoft.com/azuredocs/aci-helloworld` (Linux) +* Container image: `mcr.microsoft.com/azuredocs/aci-helloworld:latest` (Linux) :::image type="content" source="media/container-instances-quickstart-portal/qs-portal-03.png" alt-text="Configuring basic settings for a new container instance in the Azure portal"::: -For this quickstart, you use default settings to deploy the public Microsoft `aci-helloworld` image. This sample Linux image packages a small web app written in Node.js that serves a static HTML page. You can also bring your own container images stored in Azure Container Registry, Docker Hub, or other registries. +> [!NOTE] +> For this quickstart, you use default settings to deploy the public Microsoft `aci-helloworld:latest` image. This sample Linux image packages a small web app written in Node.js that serves a static HTML page. You can also bring your own container images stored in Azure Container Registry, Docker Hub, or other registries. ++Leave the other values as their defaults, then select **Next: Networking**. On the **Networking** page, specify a **DNS name label** for your container. The name must be unique within the Azure region where you create the container instance. Your container will be publicly reachable at `<dns-name-label>.<region>.azurecontainer.io`. If you receive a "DNS name label not available" error message, try a different DNS name label. +An auto-generated hash is added as a DNS name label to your container instance's fully qualified domain name (FQDN), which prevents malicious subdomain takeover. Specify the **DNS name label scope reuse** for the FQDN. You can choose one of these options: ++* Tenant +* Subscription +* Resource Group +* No reuse +* Any reuse (This option is the least secure.) ++For this example, select **Tenant**. + :::image type="content" source="media/container-instances-quickstart-portal/qs-portal-04.png" alt-text="Configuring network settings for a new container instance in the Azure portal"::: -Leave the other settings at their defaults, then select **Review + create**. +Leave all other settings as their defaults, then select **Review + create**. When the validation completes, you're shown a summary of the container's settings. Select **Create** to submit your container deployment request. :::image type="content" source="media/container-instances-quickstart-portal/qs-portal-05.png" alt-text="Settings summary for a new container instance in the Azure portal"::: -When deployment starts, a notification appears to indicate the deployment is in progress. Another notification is displayed when the container group has been deployed. +When deployment starts, a notification appears that indicates the deployment is in progress. Another notification is displayed when the container group has been deployed. -Open the overview for the container group by navigating to **Resource Groups** > **myresourcegroup** > **mycontainer**. Take note of the **FQDN** (the fully qualified domain name) of the container instance, as well its **Status**. +Open the overview for the container group by navigating to **Resource Groups** > **myresourcegroup** > **mycontainer**. Make a note of the **FQDN** of the container instance and its **Status**. :::image type="content" source="media/container-instances-quickstart-portal/qs-portal-06.png" alt-text="Container group overview in the Azure portal"::: Congratulations! By configuring just a few settings, you've deployed a publicly Viewing the logs for a container instance is helpful when troubleshooting issues with your container or the application it runs. -To view the container's logs, under **Settings**, select **Containers**, then **Logs**. You should see the HTTP GET request generated when you viewed the application in your browser. +To view the container's logs, under **Settings**, select **Containers** > **Logs**. You should see the HTTP GET request generated when you viewed the application in your browser. :::image type="content" source="media/container-instances-quickstart-portal/qs-portal-11.png" alt-text="Container logs in the Azure portal"::: |
| cosmos-db | How To Setup Rbac | https://github.com/MicrosoftDocs/azure-docs/commits/main/articles/cosmos-db/mongodb/how-to-setup-rbac.md | When creating or updating your Azure Cosmos DB account using Azure Resource Mana ## Limitations - The number of users and roles you can create must equal less than 10,000. -- The commands listCollections, listDatabases, killCursors are excluded from RBAC in the preview.+- The commands listCollections, listDatabases, killCursors, and currentOp are excluded from RBAC in the preview. - Backup/Restore is not supported in the preview. - [Azure Synapse Link for Azure Cosmos DB](../synapse-link.md) is not supported in the preview. - Users and Roles across databases are not supported in the preview. |
| cost-management-billing | Cancel Azure Subscription | https://github.com/MicrosoftDocs/azure-docs/commits/main/articles/cost-management-billing/manage/cancel-azure-subscription.md | Although not required, Microsoft *recommends* that you take the following action * Shut down your services. Go to the [resources page in the management portal](https://portal.azure.com/?flight=1#blade/HubsExtension/Resources/resourceType/Microsoft.Resources%2Fresources), and **Stop** any running virtual machines, applications, or other services. * Consider migrating your data. See [Move resources to new resource group or subscription](../../azure-resource-manager/management/move-resource-group-and-subscription.md). * Delete all resources and all resource groups.-* If you have any custom roles that reference this subscription in `AssignableScopes`, you should update those custom roles to remove the subscription. If you try to update a custom role after you cancel a subscription, you might get an error. For more information, see [Troubleshoot problems with custom roles](../../role-based-access-control/troubleshooting.md#problems-with-custom-roles) and [Azure custom roles](../../role-based-access-control/custom-roles.md). +* If you have any custom roles that reference this subscription in `AssignableScopes`, you should update those custom roles to remove the subscription. If you try to update a custom role after you cancel a subscription, you might get an error. For more information, see [Troubleshoot problems with custom roles](../../role-based-access-control/troubleshooting.md#custom-roles) and [Azure custom roles](../../role-based-access-control/custom-roles.md). > [!NOTE] > After you cancel your subscription, you'll receive a final invoice for the pay-as-you-go usage that you incurred in the last billing cycle. |
| cost-management-billing | Track Consumption Commitment | https://github.com/MicrosoftDocs/azure-docs/commits/main/articles/cost-management-billing/manage/track-consumption-commitment.md | tags: billing Previously updated : 03/02/2022 Last updated : 07/28/2022 +MACC functionality in the Azure portal is only available for direct MCA and direct EA customers. A direct agreement is between Microsoft and a customer. An indirect agreement is one where a customer signs an agreement with a Microsoft partner. + In the scenario that a MACC commitment has been transacted prior to the expiration or completion of a prior MACC (on the same enrollment/billing account), actual decrement of a commitment will begin upon completion or expiration of the prior commitment. In other words, if you have a new MACC following the expiration or completion of an older MACC on the same enrollment or billing account, use of the new commitment starts when the old commitment expires or is completed. ## Track your MACC Commitment |
| cost-management-billing | View All Accounts | https://github.com/MicrosoftDocs/azure-docs/commits/main/articles/cost-management-billing/manage/view-all-accounts.md | tags: billing Previously updated : 07/25/2022 Last updated : 07/28/2022 Azure portal supports the following type of billing accounts: - **Microsoft Online Services Program**: A billing account for a Microsoft Online Services Program is created when you sign up for Azure through the Azure website. For example, when you sign up for an [Azure Free Account](https://azure.microsoft.com/offers/ms-azr-0044p/), [account with pay-as-you-go rates](https://azure.microsoft.com/offers/ms-azr-0003p/) or as a [Visual studio subscriber](https://azure.microsoft.com/pricing/member-offers/credit-for-visual-studio-subscribers/). -- **Enterprise Agreement**: A billing account for an Enterprise Agreement (EA) is created when your organization signs an [Enterprise Agreement](https://azure.microsoft.com/pricing/enterprise-agreement/) to use Azure. An EA enrollment can contain an unlimited number of EA accounts. However, an EA account has a subscription limit of 5000. If you need more subscriptions than the limit, create more EA accounts. Generally speaking, a subscription is a billing container. We recommend that you avoid creating multiple subscriptions to implement access boundaries. To separate resources with an access boundary, consider using a resource group. For more information about resource groups, see [Manage Azure resource groups by using the Azure portal](../../azure-resource-manager/management/manage-resource-groups-portal.md).+- **Enterprise Agreement**: A billing account for an Enterprise Agreement (EA) is created when your organization signs an [Enterprise Agreement](https://azure.microsoft.com/pricing/enterprise-agreement/) to use Azure. An EA enrollment can contain an unlimited number of EA accounts. However, an EA account has a subscription limit of 5000. *Regardless of a subscription's state, its included in the limit. So, deleted and disabled subscriptions are included in the limit*. If you need more subscriptions than the limit, create more EA accounts. Generally speaking, a subscription is a billing container. We recommend that you avoid creating multiple subscriptions to implement access boundaries. To separate resources with an access boundary, consider using a resource group. For more information about resource groups, see [Manage Azure resource groups by using the Azure portal](../../azure-resource-manager/management/manage-resource-groups-portal.md). - **Microsoft Customer Agreement**: A billing account for a Microsoft Customer Agreement is created when your organization works with a Microsoft representative to sign a Microsoft Customer Agreement. Some customers in select regions, who sign up through the Azure website for an [account with pay-as-you-go rates](https://azure.microsoft.com/offers/ms-azr-0003p/) or an [Azure Free Account](https://azure.microsoft.com/offers/ms-azr-0044p/) may have a billing account for a Microsoft Customer Agreement as well. You can have a maximum of 20 subscriptions in a Microsoft Customer Agreement for an individual. A Microsoft Customer Agreement for an enterprise can have up to 5000 subscriptions under it. |
| cost-management-billing | View Reservations | https://github.com/MicrosoftDocs/azure-docs/commits/main/articles/cost-management-billing/reservations/view-reservations.md | When you use the PowerShell script to assign the ownership role and it runs succ - Accept wildcard characters: False ## Tenant-level access-[User Access Administrator](../../role-based-access-control/built-in-roles.md#user-access-administrator) rights are required before you can grant users or groups the Reservation Administrator and Reservation Reader roles at the tenant level. +[User Access Administrator](../../role-based-access-control/built-in-roles.md#user-access-administrator) rights are required before you can grant users or groups the Reservation Administrator and Reservation Reader roles at the tenant level. In order to get User Access Administrator rights at the tenant level, follow [Elevate access](../../role-based-access-control/elevate-access-global-admin.md) steps. ## Add a Reservation Administrator role at the tenant level |
| data-factory | Data Factory Service Identity | https://github.com/MicrosoftDocs/azure-docs/commits/main/articles/data-factory/data-factory-service-identity.md | Title: Managed identity- -description: Learn about using managed identities in Azure Data Factory and Azure Synapse. ++description: Learn about using managed identities in Azure Data Factory. Last updated 01/27/2022 -+ -# Managed identity for Azure Data Factory and Azure Synapse +# Managed identity for Azure Data Factory -This article helps you understand managed identity (formerly known as Managed Service Identity/MSI) and how it works in Azure Data Factory and Azure Synapse. +This article helps you understand managed identity (formerly known as Managed Service Identity/MSI) and how it works in Azure Data Factory. [!INCLUDE [updated-for-az](../../includes/updated-for-az.md)] Managed identities eliminate the need to manage credentials. Managed identities There are two types of supported managed identities: -- **System-assigned:** You can enable a managed identity directly on a service instance. When you allow a system-assigned managed identity during the creation of the service, an identity is created in Azure AD tied to that service instance's lifecycle. By design, only that Azure resource can use this identity to request tokens from Azure AD. So when the resource is deleted, Azure automatically deletes the identity for you. Azure Synapse Analytics requires that a system-assigned managed identity must be created along with the Synapse workspace.-- **User-assigned:** You may also create a managed identity as a standalone Azure resource. You can [create a user-assigned managed identity](../active-directory/managed-identities-azure-resources/how-to-manage-ua-identity-portal.md) and assign it to one or more instances of a data factory or Synapse workspace. In user-assigned managed identities, the identity is managed separately from the resources that use it.+- **System-assigned:** You can enable a managed identity directly on a service instance. When you allow a system-assigned managed identity during the creation of the service, an identity is created in Azure AD tied to that service instance's lifecycle. By design, only that Azure resource can use this identity to request tokens from Azure AD. So when the resource is deleted, Azure automatically deletes the identity for you. +- +- **User-assigned:** You may also create a managed identity as a standalone Azure resource. You can [create a user-assigned managed identity](../active-directory/managed-identities-azure-resources/how-to-manage-ua-identity-portal.md) and assign it to one or more instances of a data factory. In user-assigned managed identities, the identity is managed separately from the resources that use it. Managed identity provides the below benefits: Managed identity provides the below benefits: ## System-assigned managed identity >[!NOTE]-> System-assigned managed identity is also referred to as 'Managed identity' elsewhere in the documentation and in the Data Factory Studio and Synapse Studio UI for backward compatibility purpose. We will explicitly mention 'User-assigned managed identity' when referring to it. +> System-assigned managed identity is also referred to as 'Managed identity' elsewhere in the documentation and in the Data Factory Studio for backward compatibility purpose. We will explicitly mention 'User-assigned managed identity' when referring to it. ### <a name="generate-managed-identity"></a> Generate system-assigned managed identity System-assigned managed identity is generated as follows: -- When creating a data factory or Synapse workspace through **Azure portal or PowerShell**, managed identity will always be created automatically.-- When creating data factory or workspace through **SDK**, managed identity will be created only if you specify "Identity = new FactoryIdentity()" in the factory object or Identity = new ManagedIdentity" in the Synapse workspace object for creation." See example in [.NET Quickstart - Create data factory](quickstart-create-data-factory-dot-net.md#create-a-data-factory).-- When creating data factory or Synapse workspace through **REST API**, managed identity will be created only if you specify "identity" section in request body. See example in [REST quickstart - create data factory](quickstart-create-data-factory-rest-api.md#create-a-data-factory).+- When creating a data factory through **Azure portal or PowerShell**, managed identity will always be created automatically. +- When creating data factory through **SDK**, managed identity will be created only if you specify "Identity = new FactoryIdentity()" in the factory object for creation." See example in [.NET Quickstart - Create data factory](quickstart-create-data-factory-dot-net.md#create-a-data-factory). +- When creating a data factory through **REST API**, managed identity will be created only if you specify "identity" section in request body. See example in [REST quickstart - create data factory](quickstart-create-data-factory-rest-api.md#create-a-data-factory). If you find your service instance doesn't have a managed identity associated following [retrieve managed identity](#retrieve-managed-identity) instruction, you can explicitly generate one by updating it with identity initiator programmatically: If you find your service instance doesn't have a managed identity associated fol >[!NOTE] > >- Managed identity cannot be modified. Updating a service instance which already has a managed identity won't have any impact, and the managed identity is kept unchanged.->- If you update a service instance which already has a managed identity without specifying the "identity" parameter in the factory or workspace objects or without specifying "identity" section in REST request body, you will get an error. +>- If you update a service instance which already has a managed identity without specifying the "identity" parameter in the factory objects or without specifying "identity" section in REST request body, you will get an error. >- When you delete a service instance, the associated managed identity will be deleted along. #### Generate system-assigned managed identity using PowerShell -# [Azure Data Factory](#tab/data-factory) - Call **Set-AzDataFactoryV2** command, then you see "Identity" fields being newly generated: ```powershell Tags : {} Identity : Microsoft.Azure.Management.DataFactory.Models.FactoryIdentity ProvisioningState : Succeeded ```-# [Azure Synapse](#tab/synapse-analytics) --Call **New-AzSynapseWorkspace** command, then you see "Identity" fields being newly generated: --```powershell -PS C:\> $creds = New-Object System.Management.Automation.PSCredential ("ContosoUser", $password) -PS C:\> New-AzSynapseWorkspace -ResourceGroupName <resourceGroupName> -Name <workspaceName> -Location <region> -DefaultDataLakeStorageAccountName <storageAccountName> -DefaultDataLakeStorageFileSystem <fileSystemName> -SqlAdministratorLoginCredential $creds --DefaultDataLakeStorage : Microsoft.Azure.Commands.Synapse.Models.PSDataLakeStorageAccountDetails -ProvisioningState : Succeeded -SqlAdministratorLogin : ContosoUser -VirtualNetworkProfile : -Identity : Microsoft.Azure.Commands.Synapse.Models.PSManagedIdentity -ManagedVirtualNetwork : -PrivateEndpointConnections : {} -WorkspaceUID : <workspaceUid> -ExtraProperties : {[WorkspaceType, Normal], [IsScopeEnabled, False]} -ManagedVirtualNetworkSettings : -Encryption : Microsoft.Azure.Commands.Synapse.Models.PSEncryptionDetails -WorkspaceRepositoryConfiguration : -Tags : -TagsTable : -Location : <region> -Id : /subscriptions/<subsID>/resourceGroups/<resourceGroupName>/providers/ - Microsoft.Synapse/workspaces/<workspaceName> -Name : <workspaceName> -Type : Microsoft.Synapse/workspaces -``` - #### Generate system-assigned managed identity using REST API -# [Azure Data Factory](#tab/data-factory) - > [!NOTE] > If you attempt to update a service instance that already has a managed identity without either specifying the **identity** parameter in the factory object or providing an **identity** section in the REST request body, you will get an error. PATCH https://management.azure.com/subscriptions/<subsID>/resourceGroups/<resour "location": "<region>" } ```-# [Azure Synapse](#tab/synapse-analytics) --> [!NOTE] -> If you attempt to update a service instance that already has a managed identity without either specifying the **identity** parameter in the workspace object or providing an **identity** section in the REST request body, you will get an error. --Call the API below with the "identity" section in the request body: --``` -PATCH https://management.azure.com/subscriptions/{subscriptionId}/resourceGroups/{resourceGroupName}/providers/Microsoft.Synapse/workspaces/{workspaceName}?api-version=2018-06-01 -``` --**Request body**: add "identity": { "type": "SystemAssigned" }. --```json -{ - "name": "<workspaceName>", - "location": "<region>", - "properties": {}, - "identity": { - "type": "SystemAssigned" - } -} -``` --**Response**: managed identity is created automatically, and "identity" section is populated accordingly. --```json -{ - "name": "<workspaceName>", - "tags": {}, - "properties": { - "provisioningState": "Succeeded", - "loggingStorageAccountKey": "**********", - "createTime": "2021-09-26T04:10:01.1135678Z", - "version": "2018-06-01" - }, - "identity": { - "type": "SystemAssigned", - "principalId": "765ad4ab-XXXX-XXXX-XXXX-51ed985819dc", - "tenantId": "72f988bf-XXXX-XXXX-XXXX-2d7cd011db47" - }, - "id": "/subscriptions/<subscriptionId>/resourceGroups/<resourceGroupName>/providers/Microsoft.Synapse/workspaces/<workspaceName>", - "type": "Microsoft.Synapse/workspaces", - "location": "<region>" -} -``` - #### Generate system-assigned managed identity using an Azure Resource Manager template -# [Azure Data Factory](#tab/data-factory) **Template**: add "identity": { "type": "SystemAssigned" }. ```json PATCH https://management.azure.com/subscriptions/{subscriptionId}/resourceGroups }] } ```-# [Azure Synapse](#tab/synapse-analytics) -**Template**: add "identity": { "type": "SystemAssigned" }. --```json -{ - "contentVersion": "1.0.0.0", - "$schema": "https://schema.management.azure.com/schemas/2019-04-01/deploymentTemplate.json#", - "resources": [{ - "name": "<workspaceName>", - "apiVersion": "2018-06-01", - "type": "Microsoft.Synapse/workspaces", - "location": "<region>", - "identity": { - "type": "SystemAssigned" - } - }] -} -``` - #### Generate system-assigned managed identity using SDK -# [Azure Data Factory](#tab/data-factory) Call the create_or_update function with Identity=new FactoryIdentity(). Sample code using .NET: ```csharp Factory dataFactory = new Factory }; client.Factories.CreateOrUpdate(resourceGroup, dataFactoryName, dataFactory); ```-# [Azure Synapse](#tab/synapse-analytics) -```csharp -Workspace workspace = new Workspace -{ - Identity = new ManagedIdentity - { - Type = ResourceIdentityType.SystemAssigned - }, - DefaultDataLakeStorage = new DataLakeStorageAccountDetails - { - AccountUrl = <defaultDataLakeStorageAccountUrl>, - Filesystem = <DefaultDataLakeStorageFilesystem> - }, - SqlAdministratorLogin = <SqlAdministratorLoginCredentialUserName> - SqlAdministratorLoginPassword = <SqlAdministratorLoginCredentialPassword>, - Location = <region> -}; -client.Workspaces.CreateOrUpdate(resourceGroupName, workspaceName, workspace); -``` - ### <a name="retrieve-managed-identity"></a> Retrieve system-assigned managed identity You can retrieve the managed identity from Azure portal or programmatically. The #### Retrieve system-assigned managed identity using Azure portal -# [Azure Data Factory](#tab/data-factory) -You can find the managed identity information from Azure portal -> your data factory or Synapse workspace -> Properties. +You can find the managed identity information from Azure portal -> your data factory -> Properties. :::image type="content" source="media/data-factory-service-identity/system-managed-identity-in-portal.png" alt-text="Shows the Azure portal with the system-managed identity object ID and Identity Tenant for an Azure Data Factory." lightbox="media/data-factory-service-identity/system-managed-identity-in-portal.png"::: -# [Synapse Analytics](#tab/synapse-analytics) --You can find the managed identity information from Azure portal -> your data factory or Synapse workspace -> Properties. --- - Managed Identity Object ID-- Managed Identity Tenant (only applicable for Azure Data Factory)+- Managed Identity Tenant The managed identity information will also show up when you create linked service, which supports managed identity authentication, like Azure Blob, Azure Data Lake Storage, Azure Key Vault, etc. To grant permissions, follow these steps. For detailed steps, see [Assign Azure #### Retrieve system-assigned managed identity using PowerShell -# [Azure Data Factory](#tab/data-factory) The managed identity principal ID and tenant ID will be returned when you get a specific service instance as follows. Use the **PrincipalId** to grant access: ```powershell DisplayName : ADFV2DemoFactory Id : 765ad4ab-XXXX-XXXX-XXXX-51ed985819dc Type : ServicePrincipal ```-# [Azure Synapse](#tab/synapse-analytics) -The managed identity principal ID and tenant ID will be returned when you get a specific service instance as follows. Use the **PrincipalId** to grant access: --```powershell -PS C:\> (Get-AzSynapseWorkspace -ResourceGroupName <resourceGroupName> -Name <workspaceName>).Identity --IdentityType PrincipalId TenantId - -- -- -SystemAssigned cadadb30-XXXX-XXXX-XXXX-ef3500e2ff05 72f988bf-XXXX-XXXX-XXXX-2d7cd011db47 -``` --You can get the application ID by copying above principal ID, then running below Azure Active Directory command with principal ID as parameter. --```powershell -PS C:\> Get-AzADServicePrincipal -ObjectId cadadb30-XXXX-XXXX-XXXX-ef3500e2ff05 --ServicePrincipalNames : {76f668b3-XXXX-XXXX-XXXX-1b3348c75e02, https://identity.azure.net/P86P8g6nt1QxfPJx22om8MOooMf/Ag0Qf/nnREppHkU=} -ApplicationId : 76f668b3-XXXX-XXXX-XXXX-1b3348c75e02 -DisplayName : <workspaceName> -Id : cadadb30-XXXX-XXXX-XXXX-ef3500e2ff05 -Type : ServicePrincipal -``` - #### Retrieve managed identity using REST API -# [Azure Data Factory](#tab/data-factory) The managed identity principal ID and tenant ID will be returned when you get a specific service instance as follows. Call below API in the request: GET https://management.azure.com/subscriptions/{subscriptionId}/resourceGroups/{ } } ```-# [Azure Synapse](#tab/synapse-analytics) -The managed identity principal ID and tenant ID will be returned when you get a specific service instance as follows. --Call below API in the request: --``` -GET https://management.azure.com/subscriptions/{subscriptionId}/resourceGroups/{resourceGroupName}/providers/Microsoft.Synapse/workspaces/{workspaceName}?api-version=2018-06-01 -``` --**Response**: You will get response like shown in below example. The "identity" section is populated accordingly. --```json -{ - "properties": { - "defaultDataLakeStorage": { - "accountUrl": "https://exampledatalakeaccount.dfs.core.windows.net", - "filesystem": "examplefilesystem" - }, - "encryption": { - "doubleEncryptionEnabled": false - }, - "provisioningState": "Succeeded", - "connectivityEndpoints": { - "web": "https://web.azuresynapse.net?workspace=%2fsubscriptions%2{subscriptionId}%2fresourceGroups%2f{resourceGroupName}%2fproviders%2fMicrosoft.Synapse%2fworkspaces%2f{workspaceName}", - "dev": "https://{workspaceName}.dev.azuresynapse.net", - "sqlOnDemand": "{workspaceName}-ondemand.sql.azuresynapse.net", - "sql": "{workspaceName}.sql.azuresynapse.net" - }, - "managedResourceGroupName": "synapseworkspace-managedrg-f77f7cf2-XXXX-XXXX-XXXX-c4cb7ac3cf4f", - "sqlAdministratorLogin": "sqladminuser", - "privateEndpointConnections": [], - "workspaceUID": "e56f5773-XXXX-XXXX-XXXX-a0dc107af9ea", - "extraProperties": { - "WorkspaceType": "Normal", - "IsScopeEnabled": false - }, - "publicNetworkAccess": "Enabled", - "cspWorkspaceAdminProperties": { - "initialWorkspaceAdminObjectId": "3746a407-XXXX-XXXX-XXXX-842b6cf1fbcc" - }, - "trustedServiceBypassEnabled": false - }, - "type": "Microsoft.Synapse/workspaces", - "id": "/subscriptions/{subscriptionId}/resourceGroups/{resourceGroupName}/providers/Microsoft.Synapse/workspaces/{workspaceName}", - "location": "eastus", - "name": "{workspaceName}", - "identity": { - "type": "SystemAssigned", - "tenantId": "72f988bf-XXXX-XXXX-XXXX-2d7cd011db47", - "principalId": "cadadb30-XXXX-XXXX-XXXX-ef3500e2ff05" - }, - "tags": {} -} -``` --> [!TIP] -> To retrieve the managed identity from an ARM template, add an **outputs** section in the ARM JSON: --```json -{ - "outputs":{ - "managedIdentityObjectId":{ - "type":"string", - "value":"[reference(resourceId('Microsoft.Synapse/workspaces', parameters('<workspaceName>')), '2018-06-01', 'Full').identity.principalId]" - } - } -} -``` - ## User-assigned managed identity See the following topics that introduce when and how to use managed identity: - [Store credential in Azure Key Vault](store-credentials-in-key-vault.md). - [Copy data from/to Azure Data Lake Store using managed identities for Azure resources authentication](connector-azure-data-lake-store.md). -See [Managed Identities for Azure Resources Overview](../active-directory/managed-identities-azure-resources/overview.md) for more background on managed identities for Azure resources, on which managed identity in Azure Data Factory and Azure Synapse is based. +See [Managed Identities for Azure Resources Overview](../active-directory/managed-identities-azure-resources/overview.md) for more background on managed identities for Azure resources, on which managed identity in Azure Data Factory is based. |
| defender-for-cloud | Alerts Reference | https://github.com/MicrosoftDocs/azure-docs/commits/main/articles/defender-for-cloud/alerts-reference.md | Title: Reference table for all security alerts in Microsoft Defender for Cloud description: This article lists the security alerts visible in Microsoft Defender for Cloud++ -- Previously updated : 06/30/2022 Last updated : 07/19/2022 # Security alerts - a reference guide The series of steps that describe the progression of a cyberattack from reconnai Defender for Cloud's supported kill chain intents are based on [version 9 of the MITRE ATT&CK matrix](https://attack.mitre.org/versions/v9/) and described in the table below. -| Tactic | Description | -|--|-| -| **PreAttack** | PreAttack could be either an attempt to access a certain resource regardless of a malicious intent, or a failed attempt to gain access to a target system to gather information prior to exploitation. This step is usually detected as an attempt, originating from outside the network, to scan the target system and identify an entry point. | -| **Initial Access** | Initial Access is the stage where an attacker manages to get a foothold on the attacked resource. This stage is relevant for compute hosts and resources such as user accounts, certificates etc. Threat actors will often be able to control the resource after this stage. | -| **Persistence** | Persistence is any access, action, or configuration change to a system that gives a threat actor a persistent presence on that system. Threat actors will often need to maintain access to systems through interruptions such as system restarts, loss of credentials, or other failures that would require a remote access tool to restart or provide an alternate backdoor for them to regain access. | -| **Privilege Escalation** | Privilege escalation is the result of actions that allow an adversary to obtain a higher level of permissions on a system or network. Certain tools or actions require a higher level of privilege to work and are likely necessary at many points throughout an operation. User accounts with permissions to access specific systems or perform specific functions necessary for adversaries to achieve their objective may also be considered an escalation of privilege. | -| **Defense Evasion** | Defense evasion consists of techniques an adversary may use to evade detection or avoid other defenses. Sometimes these actions are the same as (or variations of) techniques in other categories that have the added benefit of subverting a particular defense or mitigation. | +| Tactic | ATT&CK Version | Description | +| | | -- | +| **PreAttack** | | [PreAttack](https://attack.mitre.org/matrices/enterprise/pre/) could be either an attempt to access a certain resource regardless of a malicious intent, or a failed attempt to gain access to a target system to gather information prior to exploitation. This step is usually detected as an attempt, originating from outside the network, to scan the target system and identify an entry point. | +| **Initial Access** | V7, V9 | Initial Access is the stage where an attacker manages to get a foothold on the attacked resource. This stage is relevant for compute hosts and resources such as user accounts, certificates etc. Threat actors will often be able to control the resource after this stage. | +| **Persistence** | V7, V9 | Persistence is any access, action, or configuration change to a system that gives a threat actor a persistent presence on that system. Threat actors will often need to maintain access to systems through interruptions such as system restarts, loss of credentials, or other failures that would require a remote access tool to restart or provide an alternate backdoor for them to regain access. | +| **Privilege Escalation** | V7, V9 | Privilege escalation is the result of actions that allow an adversary to obtain a higher level of permissions on a system or network. Certain tools or actions require a higher level of privilege to work and are likely necessary at many points throughout an operation. User accounts with permissions to access specific systems or perform specific functions necessary for adversaries to achieve their objective may also be considered an escalation of privilege. | +| **Defense Evasion** | V7, V9 | Defense evasion consists of techniques an adversary may use to evade detection or avoid other defenses. Sometimes these actions are the same as (or variations of) techniques in other categories that have the added benefit of subverting a particular defense or mitigation. | | **Credential Access** | Credential access represents techniques resulting in access to or control over system, domain, or service credentials that are used within an enterprise environment. Adversaries will likely attempt to obtain legitimate credentials from users or administrator accounts (local system administrator or domain users with administrator access) to use within the network. With sufficient access within a network, an adversary can create accounts for later use within the environment. |-| **Discovery** | Discovery consists of techniques that allow the adversary to gain knowledge about the system and internal network. When adversaries gain access to a new system, they must orient themselves to what they now have control of and what benefits operating from that system give to their current objective or overall goals during the intrusion. The operating system provides many native tools that aid in this post-compromise information-gathering phase. | -| **LateralMovement** | Lateral movement consists of techniques that enable an adversary to access and control remote systems on a network and could, but does not necessarily, include execution of tools on remote systems. The lateral movement techniques could allow an adversary to gather information from a system without needing additional tools, such as a remote access tool. An adversary can use lateral movement for many purposes, including remote Execution of tools, pivoting to additional systems, access to specific information or files, access to additional credentials, or to cause an effect. | -| **Execution** | The execution tactic represents techniques that result in execution of adversary-controlled code on a local or remote system. This tactic is often used in conjunction with lateral movement to expand access to remote systems on a network. | -| **Collection** | Collection consists of techniques used to identify and gather information, such as sensitive files, from a target network prior to exfiltration. This category also covers locations on a system or network where the adversary may look for information to exfiltrate. | -| **Command and Control** | The command and control tactic represents how adversaries communicate with systems under their control within a target network. | -| **Exfiltration** | Exfiltration refers to techniques and attributes that result or aid in the adversary removing files and information from a target network. This category also covers locations on a system or network where the adversary may look for information to exfiltrate. | -| **Impact** | Impact events primarily try to directly reduce the availability or integrity of a system, service, or network; including manipulation of data to impact a business or operational process. This would often refer to techniques such as ransomware, defacement, data manipulation, and others. | +| **Discovery** | V7, V9 | Discovery consists of techniques that allow the adversary to gain knowledge about the system and internal network. When adversaries gain access to a new system, they must orient themselves to what they now have control of and what benefits operating from that system give to their current objective or overall goals during the intrusion. The operating system provides many native tools that aid in this post-compromise information-gathering phase. | +| **LateralMovement** | V7, V9 | Lateral movement consists of techniques that enable an adversary to access and control remote systems on a network and could, but does not necessarily, include execution of tools on remote systems. The lateral movement techniques could allow an adversary to gather information from a system without needing additional tools, such as a remote access tool. An adversary can use lateral movement for many purposes, including remote Execution of tools, pivoting to additional systems, access to specific information or files, access to additional credentials, or to cause an effect. | +| **Execution** | V7, V9 | The execution tactic represents techniques that result in execution of adversary-controlled code on a local or remote system. This tactic is often used in conjunction with lateral movement to expand access to remote systems on a network. | +| **Collection** | V7, V9 | Collection consists of techniques used to identify and gather information, such as sensitive files, from a target network prior to exfiltration. This category also covers locations on a system or network where the adversary may look for information to exfiltrate. | +| **Command and Control** | V7, V9 | The command and control tactic represents how adversaries communicate with systems under their control within a target network. | +| **Exfiltration** | V7, V9 | Exfiltration refers to techniques and attributes that result or aid in the adversary removing files and information from a target network. This category also covers locations on a system or network where the adversary may look for information to exfiltrate. | +| **Impact** | V7, V9 | Impact events primarily try to directly reduce the availability or integrity of a system, service, or network; including manipulation of data to impact a business or operational process. This would often refer to techniques such as ransomware, defacement, data manipulation, and others. | > [!NOTE] |
| defender-for-cloud | Defender For Sql Introduction | https://github.com/MicrosoftDocs/azure-docs/commits/main/articles/defender-for-cloud/defender-for-sql-introduction.md | Title: Microsoft Defender for SQL - the benefits and features -description: Learn about the benefits and features of Microsoft Defender for Azure SQL . Previously updated : 06/01/2022+ Title: Microsoft Defender for Azure SQL - the benefits and features +description: Learn how Microsoft Defender for Azure SQL protects your Azure SQL databases. Last updated : 07/28/2022 -# Overview of Microsoft Defender for SQL +# Overview of Microsoft Defender for Azure SQL -Microsoft Defender for SQL includes two Microsoft Defender plans that extend Microsoft Defender for Cloud's [data security package](/azure/azure-sql/database/azure-defender-for-sql) to protect your SQL estate regardless of where it is located (Azure, multicloud or Hybrid environments). Microsoft Defender for SQL includes functions that can be used to discover and mitigate potential database vulnerabilities. Defender for SQL can also detect anomalous activities that may be an indication of a threat to your databases. --To protect SQL databases in hybrid and multicloud environments, Defender for Cloud uses Azure Arc. Azure ARC connects your hybrid and multicloud machines. You can check out the following articles for more information: --- [Connect your non-Azure machines to Microsoft Defender for Cloud](quickstart-onboard-machines.md)--- [Connect your AWS accounts to Microsoft Defender for Cloud](quickstart-onboard-aws.md)--- [Connect your GCP project to Microsoft Defender for Cloud](quickstart-onboard-gcp.md)+Microsoft Defender for Azure SQL includes two Microsoft Defender plans that extend Microsoft Defender for Cloud's [data security package](/azure/azure-sql/database/azure-defender-for-sql) to protect your SQL estate regardless of where it is located (Azure, multicloud or hybrid environments). Microsoft Defender for Azure SQL includes functions that can be used to discover and mitigate potential database vulnerabilities. Defender for Azure SQL can also detect anomalous activities that may be an indication of a threat to your databases. ## Availability |Aspect|Details| |-|:-|-|Release state:|**Microsoft Defender for Azure SQL database servers** - Generally available (GA)<br>**Microsoft Defender for SQL servers on machines** - Generally available (GA) | -|Pricing:|The two plans that form **Microsoft Defender for SQL** are billed as shown on the [pricing page](https://azure.microsoft.com/pricing/details/defender-for-cloud/)| -|Protected SQL versions:|[SQL on Azure virtual machines](/azure/azure-sql/virtual-machines/windows/sql-server-on-azure-vm-iaas-what-is-overview)<br>[SQL Server on Azure Arc-enabled servers](/sql/sql-server/azure-arc/overview)<br>On-premises SQL servers on Windows machines without Azure Arc<br>Azure SQL [single databases](/azure/azure-sql/database/single-database-overview) and [elastic pools](/azure/azure-sql/database/elastic-pool-overview)<br>[Azure SQL Managed Instance](/azure/azure-sql/managed-instance/sql-managed-instance-paas-overview)<br>[Azure Synapse Analytics (formerly SQL DW) dedicated SQL pool](../synapse-analytics/sql-data-warehouse/sql-data-warehouse-overview-what-is.md)| +|Release state:|Generally available (GA)| +|Pricing:|**Microsoft Defender for Azure SQL** is billed as shown on the [pricing page](https://azure.microsoft.com/pricing/details/defender-for-cloud/)| +|Protected SQL versions:|Azure SQL [single databases](/azure/azure-sql/database/single-database-overview) and [elastic pools](/azure/azure-sql/database/elastic-pool-overview)<br>[Azure SQL Managed Instance](/azure/azure-sql/managed-instance/sql-managed-instance-paas-overview)<br>[Azure Synapse Analytics (formerly SQL DW) dedicated SQL pool](../synapse-analytics/sql-data-warehouse/sql-data-warehouse-overview-what-is.md)| |Clouds:|:::image type="icon" source="./media/icons/yes-icon.png"::: Commercial clouds<br>:::image type="icon" source="./media/icons/yes-icon.png"::: Azure Government<br>:::image type="icon" source="./media/icons/yes-icon.png"::: Azure China 21Vianet (**Partial**: Subset of alerts and vulnerability assessment for SQL servers. Behavioral threat protections aren't available.)| +## What does Microsoft Defender for Azure SQL protect? -## What does Microsoft Defender for SQL protect? --**Microsoft Defender for SQL** comprises two separate Microsoft Defender plans: --- **Microsoft Defender for Azure SQL database servers** protects:-- - [Azure SQL Database](/azure/azure-sql/database/sql-database-paas-overview) -- - [Azure SQL Managed Instance](/azure/azure-sql/managed-instance/sql-managed-instance-paas-overview) -- - [Dedicated SQL pool in Azure Synapse](../synapse-analytics/sql-data-warehouse/sql-data-warehouse-overview-what-is.md) --- **Microsoft Defender for SQL servers on machines** extends the protections for your Azure-native SQL Servers to fully support hybrid environments and protect SQL servers (all supported version) hosted in Azure, other cloud environments, and even on-premises machines:-- - [SQL Server on Virtual Machines](https://azure.microsoft.com/services/virtual-machines/sql-server/) - - - On-premises SQL servers: -- - [Azure Arc-enabled SQL Server (preview)](/sql/sql-server/azure-arc/overview) - - - [SQL Server running on Windows machines without Azure Arc](../azure-monitor/agents/agent-windows.md) - - - Multicloud SQL servers: +Microsoft Defender for Azure SQL databases protects: - - [Connect your AWS accounts to Microsoft Defender for Cloud](quickstart-onboard-aws.md) +- [Azure SQL Database](/azure/azure-sql/database/sql-database-paas-overview) +- [Azure SQL Managed Instance](/azure/azure-sql/managed-instance/sql-managed-instance-paas-overview) +- [Dedicated SQL pool in Azure Synapse](../synapse-analytics/sql-data-warehouse/sql-data-warehouse-overview-what-is.md) - - [Connect your GCP project to Microsoft Defender for Cloud](quickstart-onboard-gcp.md) --When you enable either of these plans, all supported resources that exist within the subscription are protected. Future resources created on the same subscription will also be protected. +When you enabled **Microsoft Defender for Azure SQL**, all supported resources that exist within the subscription are protected. Future resources created on the same subscription are also be protected. > [!NOTE]-> Microsoft Defender for SQL database currently works for read-write replicas only. +> Microsoft Defender for Azure SQL database currently works for read-write replicas only. -## What are the benefits of Microsoft Defender for SQL? +## What are the benefits of Microsoft Defender for Azure SQL? -These two plans include functionality for identifying and mitigating potential database vulnerabilities and detecting anomalous activities that could indicate threats to your databases. +This plan includes functionality for identifying and mitigating potential database vulnerabilities and detecting anomalous activities that could indicate threats to your databases. A vulnerability assessment service discovers, tracks, and helps you remediate potential database vulnerabilities. Assessment scans provide an overview of your SQL machines' security state, and details of any security findings. -- Learn more about [vulnerability assessment for Azure SQL Database](/azure/azure-sql/database/sql-vulnerability-assessment).-- Learn more about [vulnerability assessment for Azure SQL servers on machines](defender-for-sql-on-machines-vulnerability-assessment.md).+Learn more about [vulnerability assessment for Azure SQL Database](/azure/azure-sql/database/sql-vulnerability-assessment). An advanced threat protection service continuously monitors your SQL servers for threats such as SQL injection, brute-force attacks, and privilege abuse. This service provides action-oriented security alerts in Microsoft Defender for Cloud with details of the suspicious activity, guidance on how to mitigate to the threats, and options for continuing your investigations with Microsoft Sentinel. Learn more about [advanced threat protection](/azure/azure-sql/database/threat-detection-overview). - > [!TIP] - > View the list of security alerts for SQL servers [in the alerts reference page](alerts-reference.md#alerts-sql-db-and-warehouse). ---## Is there a performance impact from deploying Microsoft Defender for SQL on machines? --The focus of **Microsoft Defender for SQL on machines** is obviously security. But we also care about your business and so we've prioritized performance to ensure the minimal impact on your SQL servers. --The service has a split architecture to balance data uploading and speed with performance: --- Some of our detectors, including an [extended events trace](/azure/azure-sql/database/xevent-db-diff-from-svr) named `SQLAdvancedThreatProtectionTraffic`, run on the machine for real-time speed advantages.-- Other detectors run in the cloud to spare the machine from heavy computational loads.+> [!TIP] +> View the list of security alerts for SQL servers [in the alerts reference page](alerts-reference.md#alerts-sql-db-and-warehouse). -Lab tests of our solution, comparing it against benchmark loads, showed CPU usage averaging 3% for peak slices. An analysis of the telemetry for our current users shows a negligible impact on CPU and memory usage. --Of course, performance always varies between environments, machines, and loads. The statements and numbers above are provided as a general guideline, not a guarantee for any individual deployment. ---## What kind of alerts does Microsoft Defender for SQL provide? +## What kind of alerts does Microsoft Defender for Azure SQL provide? Threat intelligence enriched security alerts are triggered when there's: Threat intelligence enriched security alerts are triggered when there's: Alerts include details of the incident that triggered them, as well as recommendations on how to investigate and remediate threats. -- ## Next steps -In this article, you learned about Microsoft Defender for SQL. To use the services that have been described: +In this article, you learned about Microsoft Defender for Azure SQL. ++For related information, see these resources: -- Use Microsoft Defender for SQL servers on machines to [scan your SQL servers for vulnerabilities](defender-for-sql-usage.md)-- For a presentation of Microsoft Defender for SQL, see [how Microsoft Defender for SQL can protect SQL servers anywhere](https://www.youtube.com/watch?v=V7RdB6RSVpc)+- [How Microsoft Defender for Azure SQL can protect SQL servers anywhere](https://www.youtube.com/watch?v=V7RdB6RSVpc). +- [Set up email notifications for security alerts](configure-email-notifications.md) +- [Learn more about Microsoft Sentinel](../sentinel/index.yml) |
| defender-for-cloud | Defender For Sql Usage | https://github.com/MicrosoftDocs/azure-docs/commits/main/articles/defender-for-cloud/defender-for-sql-usage.md | Title: How to set up Microsoft Defender for SQL -description: Learn how to enable Microsoft Defender for Cloud's optional Microsoft Defender for SQL plan + Title: How to enable Microsoft Defender for SQL servers on machines +description: Learn how to protect your Microsoft SQL servers on Azure VMs, on-premises, and in hybrid and multicloud environments with Microsoft Defender for Cloud. Previously updated : 11/09/2021 Last updated : 07/28/2022 # Enable Microsoft Defender for SQL servers on machines This Microsoft Defender plan detects anomalous activities indicating unusual and You'll see alerts when there are suspicious database activities, potential vulnerabilities, or SQL injection attacks, and anomalous database access and query patterns. +Microsoft Defender for SQL servers on machines extends the protections for your Azure-native SQL servers to fully support hybrid environments and protect SQL servers hosted in Azure, multicloud environments, and even on-premises machines: ++- [SQL Server on Virtual Machines](https://azure.microsoft.com/services/virtual-machines/sql-server/) ++- On-premises SQL servers: ++ - [Azure Arc-enabled SQL Server (preview)](/sql/sql-server/azure-arc/overview) + + - [SQL Server running on Windows machines without Azure Arc](../azure-monitor/agents/agent-windows.md) + +- Multicloud SQL servers: ++ - [Connect your AWS accounts to Microsoft Defender for Cloud](quickstart-onboard-aws.md) ++ - [Connect your GCP project to Microsoft Defender for Cloud](quickstart-onboard-gcp.md) ++ > [!NOTE] + > Enable database protection for your multicloud SQL servers through the AWS connector](quickstart-onboard-aws.md?pivots=env-settings#connect-your-aws-account) or the [GCP connector](quickstart-onboard-gcp.md?pivots=env-settings#configure-the-databases-plan). ++This plan includes functionality for identifying and mitigating potential database vulnerabilities and detecting anomalous activities that could indicate threats to your databases. ++A vulnerability assessment service discovers, tracks, and helps you remediate potential database vulnerabilities. Assessment scans provide an overview of your SQL machines' security state, and details of any security findings. ++Learn more about [vulnerability assessment for Azure SQL servers on machines](defender-for-sql-on-machines-vulnerability-assessment.md). + ## Availability |Aspect|Details| |-|:-| |Release state:|General availability (GA)| |Pricing:|**Microsoft Defender for SQL servers on machines** is billed as shown on the [pricing page](https://azure.microsoft.com/pricing/details/defender-for-cloud/)|-|Protected SQL versions:|SQL Server (versions currently [supported by Microsoft](/mem/configmgr/core/plan-design/configs/support-for-sql-server-versions))| +|Protected SQL versions:|[SQL Server versions currently supported by Microsoft](/mem/configmgr/core/plan-design/configs/support-for-sql-server-versions) in: +<br>- [SQL on Azure virtual machines](/azure/azure-sql/virtual-machines/windows/sql-server-on-azure-vm-iaas-what-is-overview)<br>- [SQL Server on Azure Arc-enabled servers](/sql/sql-server/azure-arc/overview)<br>- On-premises SQL servers on Windows machines without Azure Arc<br>| |Clouds:|:::image type="icon" source="./media/icons/yes-icon.png"::: Commercial clouds<br>:::image type="icon" source="./media/icons/yes-icon.png"::: Azure Government<br>:::image type="icon" source="./media/icons/no-icon.png"::: Azure China 21Vianet| --- ## Set up Microsoft Defender for SQL servers on machines To enable this plan: To enable this plan: [Step 3. Enable the optional plan in Defender for Cloud's environment settings page:](#step-3-enable-the-optional-plan-in-defender-for-clouds-environment-settings-page) - ### Step 1. Install the agent extension - **SQL Server on Azure VM** - Register your SQL Server VM with the SQL IaaS Agent extension as explained in [Register SQL Server VM with SQL IaaS Agent Extension](/azure/azure-sql/virtual-machines/windows/sql-agent-extension-manually-register-single-vm). To enable this plan: ### Step 2. Provision the Log Analytics agent on your SQL server's host: --<a name="auto-provision-mma"></a>+<a name="auto-provision-mma"></a> - **SQL Server on Azure VM** - If your SQL machine is hosted on an Azure VM, you can [enable auto provisioning of the Log Analytics agent](enable-data-collection.md#auto-provision-mma). Alternatively, you can follow the manual procedure for [Onboard your Azure Stack Hub VMs](quickstart-onboard-machines.md?pivots=azure-portal#onboard-your-azure-stack-hub-vms). +- **SQL Server on Azure VM** - If your SQL machine is hosted on an Azure VM, you can [enable auto provisioning of the Log Analytics agent](enable-data-collection.md#auto-provision-mma). Alternatively, you can follow the manual procedure for [Onboard your Azure Stack Hub VMs](quickstart-onboard-machines.md?pivots=azure-portal#onboard-your-azure-stack-hub-vms). - **SQL Server on Azure Arc-enabled servers** - If your SQL Server is managed by [Azure Arc](../azure-arc/index.yml) enabled servers, you can deploy the Log Analytics agent using the Defender for Cloud recommendation ΓÇ£Log Analytics agent should be installed on your Windows-based Azure Arc machines (Preview)ΓÇ¥. -- **SQL Server on-prem** - If your SQL Server is hosted on an on-premises Windows machine without Azure Arc, you have two options for connecting it to Azure:+- **SQL Server on-premises** - If your SQL Server is hosted on an on-premises Windows machine without Azure Arc, you can connect the machine to Azure by either: - **Deploy Azure Arc** - You can connect any Windows machine to Defender for Cloud. However, Azure Arc provides deeper integration across *all* of your Azure environment. If you set up Azure Arc, you'll see the **SQL Server ΓÇô Azure Arc** page in the portal and your security alerts will appear on a dedicated **Security** tab on that page. So the first and recommended option is to [set up Azure Arc on the host](../azure-arc/servers/onboard-portal.md#install-and-validate-the-agent-on-windows) and follow the instructions for **SQL Server on Azure Arc**, above. To enable this plan: 1. From Defender for Cloud's menu, open the **Environment settings** page. - - If you're using **Microsoft Defender for Cloud's default workspace** (named ΓÇ£defaultworkspace-[your subscription ID]-[region]ΓÇ¥), select the relevant **subscription**. + - If you're using **Microsoft Defender for Cloud's default workspace** (named ΓÇ£default workspace-\<your subscription ID>-\<region>ΓÇ¥), select the relevant **subscription**. - If you're using **a non-default workspace**, select the relevant **workspace** (enter the workspace's name in the filter if necessary). Alerts are generated by unusual and potentially harmful attempts to access or ex ## Explore and investigate security alerts -Microsoft Defender for SQL alerts are available in Defender for Cloud's alerts page, the machine's security page, the [workload protections dashboard](workload-protections-dashboard.md), or through the direct link in the alert emails. +Microsoft Defender for SQL alerts are available in: ++- The Defender for Cloud's alerts page +- The machine's security page +- The [workload protections dashboard](workload-protections-dashboard.md) +- Through the direct link in the alert emails -1. To view alerts, select **Security alerts** from Defender for Cloud's menu and select an alert. +To view alerts: ++1. Select **Security alerts** from Defender for Cloud's menu and select an alert. 1. Alerts are designed to be self-contained, with detailed remediation steps and investigation information in each one. You can investigate further by using other Microsoft Defender for Cloud and Microsoft Sentinel capabilities for a broader view: * Enable SQL Server's auditing feature for further investigations. If you're a Microsoft Sentinel user, you can upload the SQL auditing logs from the Windows Security Log events to Sentinel and enjoy a rich investigation experience. [Learn more about SQL Server Auditing](/sql/relational-databases/security/auditing/create-a-server-audit-and-server-audit-specification?preserve-view=true&view=sql-server-ver15).- * To improve your security posture, use Defender for Cloud's recommendations for the host machine indicated in each alert. This will reduce the risks of future attacks. ++ * To improve your security posture, use Defender for Cloud's recommendations for the host machine indicated in each alert to reduce the risks of future attacks. [Learn more about managing and responding to alerts](managing-and-responding-alerts.md). Microsoft Defender for SQL alerts are available in Defender for Cloud's alerts p ### If I enable this Microsoft Defender plan on my subscription, are all SQL servers on the subscription protected? -No. To defend a SQL Server deployment on an Azure virtual machine, or a SQL Server running on an Azure Arc-enabled machine, Defender for Cloud requires the following: +No. To defend a SQL Server deployment on an Azure virtual machine, or a SQL Server running on an Azure Arc-enabled machine, Defender for Cloud requires: - a Log Analytics agent on the machine - the relevant Log Analytics workspace to have the Microsoft Defender for SQL solution enabled The subscription *status*, shown in the SQL server page in the Azure portal, reflects the default workspace status and applies to all connected machines. Only the SQL servers on hosts with a Log Analytics agent reporting to that workspace are protected by Defender for Cloud. +### Is there a performance effect from deploying Microsoft Defender for Azure SQL on machines? ++The focus of **Microsoft Defender for SQL on machines** is obviously security. But we also care about your business and so we've prioritized performance to ensure the minimal effect on your SQL servers. ++The service has a split architecture to balance data uploading and speed with performance: ++- Some of our detectors, including an [extended events trace](/azure/azure-sql/database/xevent-db-diff-from-svr) named `SQLAdvancedThreatProtectionTraffic`, run on the machine for real-time speed advantages. +- Other detectors run in the cloud to spare the machine from heavy computational loads. +Lab tests of our solution showed CPU usage averaging 3% for peak slices, comparing it against benchmark loads. An analysis of our current user data shows a negligible effect on CPU and memory usage. +Of course, performance always varies between environments, machines, and loads. The statements and numbers above are provided as a general guideline, not a guarantee for any individual deployment. ## Next steps -For related material, see the following article: +For related information, see these resources: +- [How Microsoft Defender for Azure SQL can protect SQL servers anywhere](https://www.youtube.com/watch?v=V7RdB6RSVpc). - [Security alerts for SQL Database and Azure Synapse Analytics](alerts-reference.md#alerts-sql-db-and-warehouse) - [Set up email notifications for security alerts](configure-email-notifications.md) - [Learn more about Microsoft Sentinel](../sentinel/index.yml) |
| defender-for-cloud | Integration Defender For Endpoint | https://github.com/MicrosoftDocs/azure-docs/commits/main/articles/defender-for-cloud/integration-defender-for-endpoint.md | Confirm that your machine meets the necessary requirements for Defender for Endp ### [**Windows**](#tab/windows) -[The new MDE unified solution](/microsoft-365/security/defender-endpoint/configure-server-endpoints#new-windows-server-2012-r2-and-2016-functionality-in-the-modern-unified-solution) doesn't use or require installation of the Log Analytics agent. The unified solution is automatically deployed for all Windows servers connected through Azure Arc and multicloud servers connected through the multicloud connectors, except for Windows 2012 R2 and 2016 servers on Azure that are protected by Defender for Servers Plan 2. You can choose to deploy the MDE unified solution to those machines. +[The MDE unified solution](/microsoft-365/security/defender-endpoint/configure-server-endpoints#new-windows-server-2012-r2-and-2016-functionality-in-the-modern-unified-solution) doesn't use or require installation of the Log Analytics agent. The unified solution is automatically deployed for all Windows servers connected through Azure Arc and multicloud servers connected through the multicloud connectors, except for Windows 2012 R2 and 2016 servers on Azure that are protected by Defender for Servers Plan 2. You can choose to deploy the MDE unified solution to those machines. You'll deploy Defender for Endpoint to your Windows machines in one of two ways - depending on whether you've already deployed it to your Windows machines: You'll deploy Defender for Endpoint to your Windows machines in one of two ways If you've already enabled the integration with **Defender for Endpoint**, you have complete control over when and whether to deploy the MDE unified solution to your **Windows** machines. +To deploy the MDE unified solution, you'll need to use the [REST API call](#enable-the-mde-unified-solution-at-scale) or the Azure portal: + 1. From Defender for Cloud's menu, select **Environment settings** and select the subscription with the Windows machines that you want to receive Defender for Endpoint. 1. Select **Integrations**. You'll know that the integration is enabled if the checkbox for **Allow Microsoft Defender for Endpoint to access my data** is selected as shown: If you've already enabled the integration with **Defender for Endpoint**, you ha If you've never enabled the integration for Windows, the **Allow Microsoft Defender for Endpoint to access my data** option will enable Defender for Cloud to deploy Defender for Endpoint to *both* your Windows and Linux machines. +To deploy the MDE unified solution, you'll need to use the [REST API call](#enable-the-mde-unified-solution-at-scale) or the Azure portal: + 1. From Defender for Cloud's menu, select **Environment settings** and select the subscription with the machines that you want to receive Defender for Endpoint. 1. Select **Integrations**. If you've never enabled the integration for Windows, the **Allow Microsoft Defen In addition, in the Azure portal you'll see a new Azure extension on your machines called `MDE.Linux`. +### Enable the MDE unified solution at scale ++You can also enable the MDE unified solution at scale through the supplied REST API version 2022-05-01. For full details see the [API documentation](/rest/api/securitycenter/settings/update?tabs=HTTP). ++This is an example request body for the PUT request to enable the MDE unified solution: ++URI: `https://management.microsoft.com/subscriptions/<subscriptionId>/providers/Microsoft.Security/settings&api-version=2022-05-01-preview` ++```json +{ + "name": "WDATP_UNIFIED_SOLUTION", + "type": "Microsoft.Security/settings", + "kind": "DataExportSettings", + "properties": { + "enabled": true + } +} +``` + ## Access the Microsoft Defender for Endpoint portal 1. Ensure the user account has the necessary permissions. Learn more in [Assign user access to Microsoft Defender Security Center](/windows/security/threat-protection/microsoft-defender-atp/assign-portal-access). |
| defender-for-cloud | Multi Factor Authentication Enforcement | https://github.com/MicrosoftDocs/azure-docs/commits/main/articles/defender-for-cloud/multi-factor-authentication-enforcement.md | Defender for Cloud's MFA recommendations refer to [Azure RBAC](../role-based-acc Defender for Cloud's MFA recommendations currently don't support PIM accounts. You can add these accounts to a CA Policy in the Users/Group section. ### Can I exempt or dismiss some of the accounts?-The capability to exempt some accounts that donΓÇÖt use MFA isn't currently supported. +The capability to exempt some accounts that donΓÇÖt use MFA isn't currently supported. There are plans to add this capability, and the information can be viewed in our [Important upcoming changes](/azure/defender-for-cloud/upcoming-changes#multiple-changes-to-identity-recommendations) page. ### Are there any limitations to Defender for Cloud's identity and access protections? There are some limitations to Defender for Cloud's identity and access protections: -- Identity recommendations aren't available for subscriptions with more than 600 accounts. In such cases, these recommendations will be listed under "unavailable assessments".+- Identity recommendations aren't available for subscriptions with more than 6,000 accounts. In these cases, these types of subscriptions will be listed under Not applicable tab. - Identity recommendations aren't available for Cloud Solution Provider (CSP) partner's admin agents. - Identity recommendations donΓÇÖt identify accounts that are managed with a privileged identity management (PIM) system. If you're using a PIM tool, you might see inaccurate results in the **Manage access and permissions** control. |
| defender-for-cloud | Quickstart Enable Database Protections | https://github.com/MicrosoftDocs/azure-docs/commits/main/articles/defender-for-cloud/quickstart-enable-database-protections.md | description: Learn how to enable Microsoft Defender for Cloud for all of your da Previously updated : 06/15/2022 Last updated : 07/28/2022 # Enable Microsoft Defender for Cloud database plans -This article explains how to enable Microsoft Defender for Cloud's database (DB) protection for the most common database types that exist on your subscription. +This article explains how to enable Microsoft Defender for Cloud's database protections for the most common database types, Azure, hybrid, and multicloud environments. -Workload protections are provided through the Microsoft Defender plans that are specific to the types of resources in your subscriptions. +Defender for Cloud database protections lets you protect your entire database estate with attack detection and threat response for the most popular database types in Azure. Defender for Cloud provides protection for the database engines and for data types, according to their attack surface and security risks. -Microsoft Defender for Cloud database security, allows you to protect your entire database estate, by detecting common attacks, supporting enablement, and threat response for the most popular database types in Azure. +Database protection includes: -The types of protected databases are: --- Azure SQL Databases -- SQL servers on machines -- Open-source relational databases (OSS RDB) -- Azure Cosmos DB--Database provides protection to engines, and data types, with different attack surface, and security risks. Security detections are made for the specific attack surface of each DB type. +- [Microsoft Defender for Azure SQL databases](defender-for-sql-introduction.md) +- [Microsoft Defender for SQL servers on machines](defender-for-sql-usage.md) +- [Microsoft Defender for open-source relational databases](defender-for-databases-introduction.md) +- [Microsoft Defender for Azure Cosmos DB](concept-defender-for-cosmos.md) -Defender for CloudΓÇÖs database protection detects unusual and potentially harmful attempts to access, or exploit your databases. Advanced threat detection capabilities and [Microsoft Threat Intelligence](https://www.microsoft.com/insidetrack/microsoft-uses-threat-intelligence-to-protect-detect-and-respond-to-threats) data are used to provide contextual security alerts. Those alerts include steps to mitigate the detected threats, and prevent future attacks. +When you turn on database protection, you enable all of these Defender plans and protect all of the supported databases in your subscription. If you only want to protect specific types of databases, you can also turn on the database plans individually and exclude specific database resource types. -You can enable database protection on your subscription, or exclude specific database resource types. +Defender for CloudΓÇÖs database protection detects unusual and potentially harmful attempts to access or exploit your databases. Advanced threat detection capabilities and [Microsoft Threat Intelligence](https://www.microsoft.com/insidetrack/microsoft-uses-threat-intelligence-to-protect-detect-and-respond-to-threats) data are used to provide contextual security alerts. The alerts include steps to mitigate the detected threats and prevent future attacks. ## Prerequisites You must have: - [Subscription Owner](../role-based-access-control/built-in-roles.md#owner) access. - An Azure account. If you don't already have an Azure account, you can [create your Azure free account today](https://azure.microsoft.com/free/).+- To protect SQL databases in hybrid and multicloud environments, you have to connect your AWS account or GCP project to Defender for Cloud. Defender for Cloud uses Azure Arc to communicate with your hybrid and multicloud machines. Check out the following articles for more information: ++ - [Connect your AWS accounts to Microsoft Defender for Cloud](quickstart-onboard-aws.md) + - [Connect your GCP project to Microsoft Defender for Cloud](quickstart-onboard-gcp.md) + - [Connect your on-premises and other cloud machines to Microsoft Defender for Cloud](quickstart-onboard-machines.md) ## Enable database protection on your subscription **To enable Defender for Databases on a specific subscription**: 1. Sign in to the [Azure portal](https://portal.azure.com).- 1. Navigate to **Microsoft Defender for Cloud** > **Environment settings**.- 1. Select the relevant subscription.+1. Either: -1. To protect all database types toggle the Databases plan to **On**. --1. (Optional) Use **Select types** to enable protections for specific database types. + - **Protect all database types** - Select **On** in the Databases section to protect all database types. + - **Protect specific database types**: + + 1. Select **Select types** to see the list of Defender plans for databases. - :::image type="content" source="media/quickstart-enable-database-protections/select-type.png" alt-text="Screenshot showing the toggles to enable specific resource types."::: + :::image type="content" source="media/quickstart-enable-database-protections/select-type.png" alt-text="Screenshot showing the toggles to enable specific resource types."::: - 1. Toggle each desired resource type to **On**. + 1. Select **On** for each database type that you want to protect. - :::image type="content" source="media/quickstart-enable-database-protections/resource-type.png" alt-text="Screenshot showing the types of resources available."::: + :::image type="content" source="media/quickstart-enable-database-protections/resource-type.png" alt-text="Screenshot showing the types of resources available."::: - 1. Select **Continue**. + 1. Select **Continue**. -1. Select :::image type="icon" source="media/quickstart-enable-database-protections/save-icon.png" border="false":::. +1. Select **Save**. ## Next steps -In this article, you learned how to enable Microsoft Defender for Cloud for all database types on your subscription. Next, read more about each of the resource types. +In this article, you learned how to enable Microsoft Defender for Cloud for all database types on your subscription. Next, read more about each of the resource types: - [Microsoft Defender for Azure SQL databases](defender-for-sql-introduction.md) - [Microsoft Defender for open-source relational databases](defender-for-databases-introduction.md) |
| defender-for-cloud | Release Notes | https://github.com/MicrosoftDocs/azure-docs/commits/main/articles/defender-for-cloud/release-notes.md | Updates in July include: - [General availability (GA) of the Cloud-native security agent for Kubernetes runtime protection](#general-availability-ga-of-the-cloud-native-security-agent-for-kubernetes-runtime-protection) - [Defender for Container's VA adds support for the detection of language specific packages (Preview)](#defender-for-containers-va-adds-support-for-the-detection-of-language-specific-packages-preview)+- [Protect against the Operations Management Suite vulnerability CVE-2022-29149](#protect-against-the-operations-management-suite-vulnerability-cve-2022-29149) ### General availability (GA) of the Cloud-native security agent for Kubernetes runtime protection This feature is in `preview` and is only available for Linux images. To see all of the included language specific packages that have been added, check out Defender for Container's full list of [features and their availability](supported-machines-endpoint-solutions-clouds-containers.md#registries-and-images). +### Protect against the Operations Management Suite vulnerability CVE-2022-29149 ++Operations Management Suite (OMS) is a collection of cloud-based services for managing on-premises and cloud environments from one single place. Rather than deploying and managing on-premises resources, OMS components are entirely hosted in Azure. ++Log Analytics integrated with Azure HDInsight running OMS version 13 requires a patch to remediate [CVE-2022-29149](https://nvd.nist.gov/vuln/detail/CVE-2022-29149). Review the report about this vulnerability in the [Microsoft Security Update guide](https://msrc.microsoft.com/update-guide/en-US/vulnerability/CVE-2022-29149) for information about how to identify resources that are affected by this vulnerability and remediation steps. ++If you have Defender for Servers enabled with Vulnerability Assessment, you can use [this workbook](https://github.com/Azure/Microsoft-Defender-for-Cloud/tree/main/Workbooks/OMI%20Vulnerability%20Dashboard) to identify affected resources. + ## June 2022 Updates in June include: |
| defender-for-cloud | Upcoming Changes | https://github.com/MicrosoftDocs/azure-docs/commits/main/articles/defender-for-cloud/upcoming-changes.md | Title: Important changes coming to Microsoft Defender for Cloud description: Upcoming changes to Microsoft Defender for Cloud that you might need to be aware of and for which you might need to plan Previously updated : 07/10/2022 Last updated : 07/28/2022 # Important upcoming changes to Microsoft Defender for Cloud If you're looking for the latest release notes, you'll find them in the [What's | [Changes to recommendations for managing endpoint protection solutions](#changes-to-recommendations-for-managing-endpoint-protection-solutions) | June 2022 | | [Key Vault recommendations changed to "audit"](#key-vault-recommendations-changed-to-audit) | June 2022 | | [Deprecating three VM alerts](#deprecating-three-vm-alerts) | June 2022|-| [Multiple changes to identity recommendations](#multiple-changes-to-identity-recommendations) | July 2022 | | [Deprecate API App policies for App Service](#deprecate-api-app-policies-for-app-service) | July 2022 | | [Change in pricing of Runtime protection for Arc-enabled Kubernetes clusters](#change-in-pricing-of-runtime-protection-for-arc-enabled-kubernetes-clusters) | August 2022 |+| [Multiple changes to identity recommendations](#multiple-changes-to-identity-recommendations) | September 2022 | ### Changes to recommendations for managing endpoint protection solutions The following table lists the alerts that will be deprecated during June 2022. These alerts are used to notify a user about suspicious activity connected to a Kubernetes cluster. The alerts will be replaced with matching alerts that are part of the Microsoft Defender for Cloud Container alerts (`K8S.NODE_ImageBuildOnNode`, `K8S.NODE_ KubernetesAPI` and `K8S.NODE_ ContainerSSH`) which will provide improved fidelity and comprehensive context to investigate and act on the alerts. Learn more about alerts for [Kubernetes Clusters](alerts-reference.md). +### Deprecate API App policies for App Service ++**Estimated date for change:** July 2022 ++We will be deprecating the following policies to corresponding policies that already exist to include API apps: ++| To be deprecated | Changing to | +|--|--| +|`Ensure API app has 'Client Certificates (Incoming client certificates)' set to 'On'` | `App Service apps should have 'Client Certificates (Incoming client certificates)' enabled` | +| `Ensure that 'Python version' is the latest, if used as a part of the API app` | `App Service apps that use Python should use the latest 'Python version` | +| `CORS should not allow every resource to access your API App` | `App Service apps should not have CORS configured to allow every resource to access your apps` | +| `Managed identity should be used in your API App` | `App Service apps should use managed identity` | +| `Remote debugging should be turned off for API Apps` | `App Service apps should have remote debugging turned off` | +| `Ensure that 'PHP version' is the latest, if used as a part of the API app` | `App Service apps that use PHP should use the latest 'PHP version'`| +| `FTPS only should be required in your API App` | `App Service apps should require FTPS only` | +| `Ensure that 'Java version' is the latest, if used as a part of the API app` | `App Service apps that use Java should use the latest 'Java version` | +| `Latest TLS version should be used in your API App` | `App Service apps should use the latest TLS version` | ++### Change in pricing of runtime protection for Arc-enabled Kubernetes clusters ++**Estimated date for change:** August 2022 ++Runtime protection is currently a preview feature for Arc-enabled Kubernetes clusters. In August, Arc-enabled Kubernetes clusters will be charged for runtime protection. You can view pricing details on the [pricing page](https://azure.microsoft.com/pricing/details/defender-for-cloud/). Subscriptions with Kubernetes clusters already onboarded to Arc, will begin to incur charges in August. + ### Multiple changes to identity recommendations **Estimated date for change:** July 2022 The new release will bring the following capabilities: |Blocked accounts with owner permissions on Azure resources should be removed|050ac097-3dda-4d24-ab6d-82568e7a50cf| |Blocked accounts with read and write permissions on Azure resources should be removed| 1ff0b4c9-ed56-4de6-be9c-d7ab39645926 | -### Deprecate API App policies for App Service --**Estimated date for change:** July 2022 --We will be deprecating the following policies to corresponding policies that already exist to include API apps: --| To be deprecated | Changing to | -|--|--| -|`Ensure API app has 'Client Certificates (Incoming client certificates)' set to 'On'` | `App Service apps should have 'Client Certificates (Incoming client certificates)' enabled` | -| `Ensure that 'Python version' is the latest, if used as a part of the API app` | `App Service apps that use Python should use the latest 'Python version` | -| `CORS should not allow every resource to access your API App` | `App Service apps should not have CORS configured to allow every resource to access your apps` | -| `Managed identity should be used in your API App` | `App Service apps should use managed identity` | -| `Remote debugging should be turned off for API Apps` | `App Service apps should have remote debugging turned off` | -| `Ensure that 'PHP version' is the latest, if used as a part of the API app` | `App Service apps that use PHP should use the latest 'PHP version'`| -| `FTPS only should be required in your API App` | `App Service apps should require FTPS only` | -| `Ensure that 'Java version' is the latest, if used as a part of the API app` | `App Service apps that use Java should use the latest 'Java version` | -| `Latest TLS version should be used in your API App` | `App Service apps should use the latest TLS version` | --### Change in pricing of runtime protection for Arc-enabled Kubernetes clusters --**Estimated date for change:** August 2022 --Runtime protection is currently a preview feature for Arc-enabled Kubernetes clusters. In August, Arc-enabled Kubernetes clusters will be charged for runtime protection. You can view pricing details on the [pricing page](https://azure.microsoft.com/pricing/details/defender-for-cloud/). Subscriptions with Kubernetes clusters already onboarded to Arc, will begin to incur charges in August. - ## Next steps For all recent changes to Defender for Cloud, see [What's new in Microsoft Defender for Cloud?](release-notes.md) |
| defender-for-iot | Getting Started | https://github.com/MicrosoftDocs/azure-docs/commits/main/articles/defender-for-iot/organizations/getting-started.md | If you're using a legacy version of the sensor traffic and are connecting throug If you're working with an OT network, we recommend that you identify system requirements and plan your system architecture before you start, even if you plan to start with a trial subscription. > [!NOTE]-> If you're setting up network monitoring for Enterprise IoT systems, you can skip directly to [Add a Defender for IoT plan to an Azure subscription](#add-a-defender-for-iot-plan-to-an-azure-subscription). +> If you're setting up network monitoring for Enterprise IoT systems, you can skip directly to [Add a Defender for IoT plan for Enterprise IoT networks to an Azure subscription](#add-a-defender-for-iot-plan-for-enterprise-iot-networks-to-an-azure-subscription). **When working with an OT network**: For more information, see: - [Predeployment checklist](pre-deployment-checklist.md) - [Identify required appliances](how-to-identify-required-appliances.md) -## Add a Defender for IoT plan to an Azure subscription +## Add a Defender for IoT plan for OT networks to an Azure subscription -This procedure describes how to add a Defender for IoT plan to an Azure subscription. +This procedure describes how to add a Defender for IoT plan for OT networks to an Azure subscription. -**To add a Defender for IoT plan to an Azure subscription:** +**To onboard a Defender for IoT plan for OT networks:** -1. In the Azure portal, go to **Defender for IoT** > **Plans and pricing**. +1. In the Azure portal, go to **Defender for IoT** > **Pricing**. 1. Select **Add plan**. -1. In the **Plan settings** pane, define the plan: +1. In the **Purchase** pane, define the plan: ++ - **Purchase method**. Select a monthly or annual commitment, or a [trial](how-to-manage-subscriptions.md#about-defender-for-iot-trials). Microsoft Defender for IoT provides a 30-day free trial for the first 1,000 committed devices for evaluation purposes. + + For more information, see the [Microsoft Defender for IoT pricing page](https://azure.microsoft.com/pricing/details/iot-defender/). - **Subscription**. Select the subscription where you would like to add a plan.- - Toggle on the **OT - Operational / ICS networks** and/or **EIoT - Enterprise IoT for corporate networks** options as needed for your network types. - - **Price plan**. Select a monthly or annual commitment, or a [trial](how-to-manage-subscriptions.md#about-defender-for-iot-trials). Microsoft Defender for IoT provides a 30-day free trial for the first 1,000 committed devices for evaluation purposes. - For more information, see the [Microsoft Defender for IoT pricing page](https://azure.microsoft.com/pricing/details/iot-defender/). + - **Number of sites** (for annual commitment only). Enter the number of committed sites. ++ - **Committed devices**. If you selected a monthly or annual commitment, enter the number of assets you'll want to monitor. If you selected a trial, this section doesn't appear as you have a default of 1000 devices. - - **Committed sites** (for OT annual commitment only). Enter the number of committed sites. + For example: - - **Number of devices**. If you selected a monthly or annual commitment, enter the number of devices you'll want to monitor. If you selected a trial, this section doesn't appear as you have a default of 1000 devices. + :::image type="content" source="media/how-to-manage-subscriptions/onboard-plan-2.png" alt-text="Screenshot of adding a plan for OT networks to your subscription."::: - :::image type="content" source="media/how-to-manage-subscriptions/onboard-plan.png" alt-text="Screenshot of adding a plan to your subscription." lightbox="media/how-to-manage-subscriptions/onboard-plan.png"::: +1. Select **I accept the terms** option, and then select **Save**. -1. Select **Next**. +Your OT networks plan will be shown under the associated subscription in the **Plans** grid. -1. **Review & purchase**. Review the listed charges for your selections and **accept the terms and conditions**. +## Add a Defender for IoT plan for Enterprise IoT networks to an Azure subscription -1. Select **Purchase**. +Onboard your Defender for IoT plan for Enterprise IoT networks in the Defender for Endpoint portal. For more information, see [Onboard Microsoft Defender for IoT](/microsoft-365/security/defender-endpoint/enable-microsoft-defender-for-iot-integration) in the Defender for Endpoint documentation. -Your plan will be shown under the associated subscription in the **Plans and pricing** grid. +Once you've onboarded a plan for Enterprise IoT networks from Defender for Endpoint, you'll see the plan in Defender for IoT in the Azure portal, under the associated subscription in the **Plans** grid, on the **Defender for IoT** > **Pricing** page. For more information, see [Manage your subscriptions](how-to-manage-subscriptions.md). |
| defender-for-iot | How To Activate And Set Up Your On Premises Management Console | https://github.com/MicrosoftDocs/azure-docs/commits/main/articles/defender-for-iot/organizations/how-to-activate-and-set-up-your-on-premises-management-console.md | After you sign in for the first time, you need to activate the on-premises manag :::image type="content" source="media/how-to-manage-sensors-from-the-on-premises-management-console/multiple-subscriptions.png" alt-text="Screenshot that shows selecting multiple subscriptions." lightbox="media/how-to-manage-sensors-from-the-on-premises-management-console/multiple-subscriptions.png"::: - If you haven't already onboarded Defender for IoT to a subscription, see [Onboard a Defender for IoT plan to a subscription](how-to-manage-subscriptions.md#onboard-a-defender-for-iot-plan-to-a-subscription). + If you haven't already onboarded Defender for IoT to a subscription, see [Onboard a Defender for IoT plan for OT networks](how-to-manage-subscriptions.md#onboard-a-defender-for-iot-plan-for-ot-networks). > [!Note] > If you delete a subscription, you must upload a new activation file to the on-premises management console that was affiliated with the deleted subscription. After activating an on-premises management console, you'll need to apply new act |Location |Activation process | |||-|**On-premises management console** | Apply a new activation file on your on-premises management console if you've [modified the number of committed devices](how-to-manage-subscriptions.md#edit-a-plan) in your subscription. | +|**On-premises management console** | Apply a new activation file on your on-premises management console if you've [modified the number of committed devices](how-to-manage-subscriptions.md#edit-a-plan-for-ot-networks) in your subscription. | |**Cloud-connected sensors** | Cloud-connected sensors remain activated for as long as your Azure subscription with your Defender for IoT plan is active. <br><br>However, you'll also need to apply a new activation file when [updating your sensor software](update-ot-software.md#download-and-apply-a-new-activation-file) from a legacy version to version 22.2.x. | | **Locally-managed** | Apply a new activation file to locally-managed sensors every year. After a sensor's activation file has expired, the sensor will continue to monitor your network, but you'll see a warning message when signing in to the sensor. | |
| defender-for-iot | How To Manage Subscriptions | https://github.com/MicrosoftDocs/azure-docs/commits/main/articles/defender-for-iot/organizations/how-to-manage-subscriptions.md | -Your Defender for IoT deployment is managed through a Microsoft Defender for IoT plan on your Azure subscriptions. You can onboard, edit, and cancel a Defender for IoT plan from your subscriptions in the [Azure portal](https://portal.azure.com/#blade/Microsoft_Azure_IoT_Defender/IoTDefenderDashboard/Getting_Started). +Your Defender for IoT deployment is managed through a Microsoft Defender for IoT plan on your Azure subscription. ++- **For OT networks**, onboard, edit, and cancel Defender for IoT plans from Defender for IoT in the Azure portal. +- **For Enterprise IoT networks**, onboard and cancel Defender for IoT plans in Microsoft Defender for Endpoint. For each plan, you'll be asked to define the number of *committed devices*. Committed devices are the approximate number of devices that will be monitored in your enterprise. If you already have access to an Azure subscription, but it isn't listed when ad ### User permission requirements -Azure **Security admin**, **Subscription owners** and **Subscription contributors** can onboard, update, and remove Defender for IoT. For more information on user permissions, see [Defender for IoT user permissions](getting-started.md#permissions). +Azure **Security admin**, **Subscription owners** and **Subscription contributors** can onboard, update, and remove Defender for IoT plans. For more information on user permissions, see [Defender for IoT user permissions](getting-started.md#permissions). ### Defender for IoT committed devices We recommend making an initial estimate of your committed devices when onboardin If you are also a Defender for Endpoint customer, you can identify devices managed by Defender for Endpoint in the Defender for Endpoint **Device inventory** page. In the **Endpoints** tab, filter for devices by **Onboarding status**. For more information, see [Defender for Endpoint Device discovery overview](/microsoft-365/security/defender-endpoint/device-discovery). -After you've set up your network sensor and have full visibility into all devices, you can [edit your plan](#edit-a-plan) to update the number of committed devices as needed. +After you've set up your network sensor and have full visibility into all devices, you can [Edit a plan](#edit-a-plan-for-ot-networks) to update the number of committed devices as needed. -## Onboard a Defender for IoT plan to a subscription +## Onboard a Defender for IoT plan for OT networks -This procedure describes how to add a Defender for IoT plan to an Azure subscription. +This procedure describes how to add a Defender for IoT plan for OT networks to an Azure subscription. -**To onboard a Defender for IoT plan to a subscription:** +**To onboard a Defender for IoT plan for OT networks:** -1. In the Azure portal, go to **Defender for IoT** > **Plans and pricing**. +1. In the Azure portal, go to **Defender for IoT** > **Pricing**. 1. Select **Add plan**. -1. In the **Plan settings** pane, define the plan: +1. In the **Purchase** pane, define the plan: - - **Subscription**. Select the subscription where you would like to add a plan. - - Toggle on the **OT - Operational / ICS networks** and/or **EIoT - Enterprise IoT for corporate networks** options as needed for your network types. - - **Price plan**. Select a monthly or annual commitment, or a [trial](#about-defender-for-iot-trials). Microsoft Defender for IoT provides a 30-day free trial for the first 1,000 committed devices for evaluation purposes. + - **Purchase method**. Select a monthly or annual commitment, or a [trial](#about-defender-for-iot-trials). Microsoft Defender for IoT provides a 30-day free trial for the first 1,000 committed devices for evaluation purposes. For more information, see the [Microsoft Defender for IoT pricing page](https://azure.microsoft.com/pricing/details/iot-defender/). - - **Committed sites** (for OT annual commitment only). Enter the number of committed sites. + - **Subscription**. Select the subscription where you would like to add a plan. ++ - **Number of sites** (for annual commitment only). Enter the number of committed sites. - - **Number of devices**. If you selected a monthly or annual commitment, enter the number of devices you'll want to monitor. If you selected a trial, this section doesn't appear as you have a default of 1000 devices. + - **Committed devices**. If you selected a monthly or annual commitment, enter the number of assets you'll want to monitor. If you selected a trial, this section doesn't appear as you have a default of 1000 devices. - :::image type="content" source="media/how-to-manage-subscriptions/onboard-plan.png" alt-text="Screenshot of adding a plan to your subscription. "::: + For example: -1. Select **Next**. + :::image type="content" source="media/how-to-manage-subscriptions/onboard-plan-2.png" alt-text="Screenshot of adding a plan for OT networks to your subscription."::: -1. **Review & purchase**. Review the listed charges for your selections and **accept the terms and conditions**. +1. Select the **I accept the terms** option, and then select **Save**. -1. Select **Purchase**. +Your OT networks plan will be shown under the associated subscription in the **Plans** grid. -Your plan will be shown under the associated subscription in the **Plans and pricing** grid. +## Onboard a Defender for IoT plan for Enterprise IoT networks ++Onboard your Defender for IoT plan for Enterprise IoT networks in the Defender for Endpoint portal. For more information, see [Onboard Microsoft Defender for IoT](/microsoft-365/security/defender-endpoint/enable-microsoft-defender-for-iot-integration) in the Defender for Endpoint documentation. ++Once you've onboarded a plan for Enterprise IoT networks from Defender for Endpoint, you'll see the plan in Defender for IoT in the Azure portal, under the associated subscription in the **Plans** grid, on the **Defender for IoT** > **Pricing** page. ### About Defender for IoT trials If you would like to evaluate Defender for IoT, you can use a trial commitment. The trial is valid for 30 days and supports 1000 committed devices. Using the trial lets you deploy one or more Defender for IoT sensors on your network. Use the sensors to monitor traffic, analyze data, generate alerts, learn about network risks and vulnerabilities, and more. The trial also allows you to download an on-premises management console to view aggregated information generated by sensors.- -## Edit a plan +## Edit a plan for OT networks -You may need to make changes to your plan, such as to update the number of committed devices or committed sites, change your plan commitment, or remove OT or Enterprise IoT from your plan. +You can make changes to your OT networks plan, such as to change your plan commitment, update the number of committed devices, or committed sites. -For example, you may have more devices that require monitoring if you're increasing existing site coverage, have discovered more devices than expected, or there are network changes such as adding switches. If the actual number of devices exceeds the number of committed devices on your plan, you'll see a warning on the **Plans and pricing** page, and will need to adjust the number of committed devices on your plan accordingly. +For example, you may have more devices that require monitoring if you're increasing existing site coverage, have discovered more devices than expected, or there are network changes such as adding switches. If the actual number of devices exceeds the number of committed devices on your plan, you'll see a warning on the **Pricing** page, and will need to adjust the number of committed devices on your plan accordingly. **To edit a plan:** -1. In the Azure portal, go to **Defender for IoT** > **Plans and pricing**. +1. In the Azure portal, go to **Defender for IoT** > **Pricing**. 1. On the subscription row, select the options menu (**...**) at the right. 1. Select **Edit plan**. 1. Make your changes as needed: - - Update the number of committed devices - - Update the number of sites (OT only) - - Remove an OT or Enterprise IoT network from your plan by toggling off the **OT - Operational / ICS networks** or **EIoT - Enterprise IoT for corporate networks** options as needed. -1. Select **Next**. --1. On the **Review & purchase** pane, review your selections, and then accept the terms and conditions. + - Change your purchase method + - Update the number of committed devices + - Update the number of sites (annual commitments only) -1. Select **Save**. +1. Select the **I accept the terms** option, and then select **Save**. Changes to your plan will take effect one hour after confirming the change. Billing for these changes will be reflected at the beginning of the month following confirmation of the change. Changes to your plan will take effect one hour after confirming the change. Bill > **For an on-premises management console:** After any changes are made, you will need to upload a new activation file to your on-premises management console. The activation file reflects the new number of committed devices. For more information, see [Upload an activation file](how-to-manage-the-on-premises-management-console.md#upload-an-activation-file). - ## Cancel a Defender for IoT plan from a subscription You may need to cancel a Defender for IoT plan from your Azure subscription, for example, if you need to work with a new payment entity. Your changes take effect one hour after confirmation. Your upcoming monthly bill will reflect this change. Delete all sensors that are associated with the subscription prior to removing t **To cancel Defender for IoT from a subscription:** -1. In the Azure portal, go to **Defender for IoT** > **Plans and pricing**. +1. In the Azure portal, go to **Defender for IoT** > **Pricing**. 1. On the subscription row, select the options menu (**...**) at the right. 1. Select **Cancel plan**. -1. In the plan cancellation dialog, confirm that you've removed all associated sensors, and then select **Confirm cancellation** to remove the Defender for IoT plan from the subscription. +1. In the plan cancellation dialog, confirm that you've removed all associated sensors, and then select **Confirm cancellation** to cancel the Defender for IoT plan from the subscription. +> [!NOTE] +> To remove Enterprise IoT only from your plan, cancel your plan from Microsoft Defender for Endpoint. For more information, see the [Defender for Endpoint documentation](/microsoft-365/security/defender-endpoint/enable-microsoft-defender-for-iot-integration#cancel-your-defender-for-iot-plan). ## Move existing sensors to a different subscription Business considerations may require that you apply your existing IoT sensors to **To switch to a new subscription**: -1. [Onboard a new plan to the new subscription you want to use](#onboard-a-defender-for-iot-plan-to-a-subscription). To avoid double billing, onboard the new plan as a [trial](#about-defender-for-iot-trials) until you've removed the sensors from the legacy subscription. +1. Onboard a new plan to the new subscription you want to use. For more information, see: ++ [Onboard a plan for OT networks](#onboard-a-defender-for-iot-plan-for-ot-networks) in the Azure portal ++ [Onboard a plan for Enterprise IoT networks](#onboard-a-defender-for-iot-plan-for-enterprise-iot-networks) in Defender for Endpoint 1. Register your sensors under the new subscription. For more information, see [Set up an Enterprise IoT sensor](tutorial-getting-started-eiot-sensor.md#set-up-an-enterprise-iot-sensor). Business considerations may require that you apply your existing IoT sensors to 1. If relevant, [cancel the Defender for IoT plan](#cancel-a-defender-for-iot-plan-from-a-subscription) from the legacy subscription. - ## Next steps - [Manage sensors with Defender for IoT in the Azure portal](how-to-manage-sensors-on-the-cloud.md) |
| defender-for-iot | Tutorial Getting Started Eiot Sensor | https://github.com/MicrosoftDocs/azure-docs/commits/main/articles/defender-for-iot/organizations/tutorial-getting-started-eiot-sensor.md | In this tutorial, you learn how to: > [!IMPORTANT] > The **Enterprise IoT network sensor** is currently in **PREVIEW**. See the [Supplemental Terms of Use for Microsoft Azure Previews](https://azure.microsoft.com/support/legal/preview-supplemental-terms/) for additional legal terms that apply to Azure features that are in beta, preview, or otherwise not yet released into general availability. -## Prerequisites +## Microsoft Defender for Endpoint integration -Before you start, make sure that you have: +Once youΓÇÖve onboarded a plan and set up your sensor, your device data integrates automatically with Microsoft Defender for Endpoint. Discovered devices appear in both the Defender for IoT and Defender for Endpoint portals. Use this integration to extend security analytics capabilities for your Enterprise IoT devices and providing complete coverage. -- A Defender for IoT plan added to your Azure subscription. +In Defender for Endpoint, you can view discovered IoT devices and related alerts, vulnerabilities, and recommendations. For more information, see: ++- [Microsoft Defender for IoT integration](/microsoft-365/security/defender-endpoint/enable-microsoft-defender-for-iot-integration) +- [Defender for Endpoint device inventory](/microsoft-365/security/defender-endpoint/machines-view-overview) +- [View and organize the Microsoft Defender for Endpoint Alerts queue](/microsoft-365/security/defender-endpoint/alerts-queue) +- [Vulnerabilities in my organization](/microsoft-365/security/defender-vulnerability-management/) +- [Security recommendations](/microsoft-365/security/defender-vulnerability-management/tvm-security-recommendation) ++## Prerequisites - You can add a plan from Defender for IoT in the Azure portal, or from Defender for Endpoint. If you already have a subscription that has Defender for IoT onboarded for OT environments, youΓÇÖll need to edit the plan to add Enterprise IoT. +Before you start, make sure that you have: - For more information, see [Quickstart: Get started with Defender for IoT](getting-started.md), [Edit a plan](how-to-manage-subscriptions.md#edit-a-plan), or the [Defender for Endpoint documentation](/microsoft-365/security/defender-endpoint/enable-microsoft-defender-for-iot-integration). +- Added a Defender for IoT plan for Enterprise IoT networks to your Azure subscription from the Microsoft Defender for Endpoint portal. +To onboard a plan, see [Onboard with Microsoft Defender for IoT](/microsoft-365/security/defender-endpoint/enable-microsoft-defender-for-iot-integration). - Required Azure permissions, as listed in [Quickstart: Getting Started with Defender for IoT](getting-started.md#permissions). For more information, see: > [!TIP] > If you don't see your Enterprise IoT data in Defender for IoT as expected, make sure that you're viewing the Azure portal with the correct subscriptions selected. For more information, see [Manage Azure portal settings](/azure/azure-portal/set-preferences). -## Microsoft Defender for Endpoint integration --Once youΓÇÖve onboarded a plan and set up your sensor, your device data integrates automatically with Microsoft Defender for Endpoint. Discovered devices appear in both the Defender for IoT and Defender for Endpoint portals. Use this integration to extend security analytics capabilities for your Enterprise IoT devices and providing complete coverage. --In Defender for Endpoint, you can view discovered IoT devices and related alerts, vulnerabilities, and recommendations. For more information, see: --- [Microsoft Defender for IoT integration](/microsoft-365/security/defender-endpoint/enable-microsoft-defender-for-iot-integration)-- [Defender for Endpoint device inventory](/microsoft-365/security/defender-endpoint/machines-view-overview)-- [View and organize the Microsoft Defender for Endpoint Alerts queue](/microsoft-365/security/defender-endpoint/alerts-queue)-- [Vulnerabilities in my organization](/microsoft-365/security/defender-vulnerability-management/)-- [Security recommendations](/microsoft-365/security/defender-vulnerability-management/tvm-security-recommendation)- ## Remove an Enterprise IoT network sensor (optional) Remove a sensor if it's no longer in use with Defender for IoT. |
| dms | Ads Sku Recommend | https://github.com/MicrosoftDocs/azure-docs/commits/main/articles/dms/ads-sku-recommend.md | Title: Get right-sized Azure recommendation for your on-premises SQL Server database(s) description: Learn how to use the Azure SQL migration extension in Azure Data Studio to get SKU recommendation to migrate SQL Server database(s) to the right-sized Azure SQL Managed Instance or SQL Server on Azure Virtual Machines. -+ |
| dms | Dms Overview | https://github.com/MicrosoftDocs/azure-docs/commits/main/articles/dms/dms-overview.md | Title: What is Azure Database Migration Service? description: Overview of Azure Database Migration Service, which provides seamless migrations from many database sources to Azure Data platforms. -+ |
| dms | Dms Tools Matrix | https://github.com/MicrosoftDocs/azure-docs/commits/main/articles/dms/dms-tools-matrix.md | Title: Azure Database Migration Service tools matrix description: Learn about the services and tools available to migrate databases and to support various phases of the migration process. -+ |
| dms | How To Migrate Ssis Packages Managed Instance | https://github.com/MicrosoftDocs/azure-docs/commits/main/articles/dms/how-to-migrate-ssis-packages-managed-instance.md | Title: Migrate SSIS packages to SQL Managed Instance description: Learn how to migrate SQL Server Integration Services (SSIS) packages and projects to an Azure SQL Managed Instance using the Azure Database Migration Service or the Data Migration Assistant. -+ |
| dms | How To Migrate Ssis Packages | https://github.com/MicrosoftDocs/azure-docs/commits/main/articles/dms/how-to-migrate-ssis-packages.md | Title: Redeploy SSIS packages to SQL single database description: Learn how to migrate or redeploy SQL Server Integration Services packages and projects to Azure SQL Database single database using the Azure Database Migration Service and Data Migration Assistant. -+ |
| dms | How To Monitor Migration Activity | https://github.com/MicrosoftDocs/azure-docs/commits/main/articles/dms/how-to-monitor-migration-activity.md | Title: Monitor migration activity - Azure Database Migration Service description: Learn to use the Azure Database Migration Service to monitor migration activity. -+ |
| dms | Howto Sql Server To Azure Sql Managed Instance Powershell Offline | https://github.com/MicrosoftDocs/azure-docs/commits/main/articles/dms/howto-sql-server-to-azure-sql-managed-instance-powershell-offline.md | Title: "PowerShell: Migrate SQL Server to SQL Managed Instance offline" description: Learn to offline migrate from SQL Server to Azure SQL Managed Instance by using Azure PowerShell and the Azure Database Migration Service. -+ |
| dms | Howto Sql Server To Azure Sql Managed Instance Powershell Online | https://github.com/MicrosoftDocs/azure-docs/commits/main/articles/dms/howto-sql-server-to-azure-sql-managed-instance-powershell-online.md | Title: "PowerShell: Migrate SQL Server to SQL Managed Instance online" description: Learn to online migrate from SQL Server to Azure SQL Managed Instance by using Azure PowerShell and the Azure Database Migration Service. -+ |
| dms | Howto Sql Server To Azure Sql Powershell | https://github.com/MicrosoftDocs/azure-docs/commits/main/articles/dms/howto-sql-server-to-azure-sql-powershell.md | Title: "PowerShell: Migrate SQL Server to SQL Database" description: Learn to migrate a database from SQL Server to Azure SQL Database by using Azure PowerShell with the Azure Database Migration Service. -+ |
| dms | Known Issues Azure Postgresql Online | https://github.com/MicrosoftDocs/azure-docs/commits/main/articles/dms/known-issues-azure-postgresql-online.md | Title: "Known issues: Online migrations from PostgreSQL to Azure Database for Po description: Learn about known issues and migration limitations with online migrations from PostgreSQL to Azure Database for PostgreSQL using the Azure Database Migration Service. -+ |
| dms | Known Issues Azure Sql Db Managed Instance Online | https://github.com/MicrosoftDocs/azure-docs/commits/main/articles/dms/known-issues-azure-sql-db-managed-instance-online.md | Title: Known issues and limitations with online migrations to Azure SQL Managed Instance description: Learn about known issues/migration limitations associated with online migrations to Azure SQL Managed Instance. -+ |
| dms | Known Issues Dms Hybrid Mode | https://github.com/MicrosoftDocs/azure-docs/commits/main/articles/dms/known-issues-dms-hybrid-mode.md | Title: Known issues/migration limitations with using Hybrid mode description: Learn about known issues/migration limitations with using Azure Database Migration Service in hybrid mode. -+ |
| dms | Known Issues Mongo Cosmos Db | https://github.com/MicrosoftDocs/azure-docs/commits/main/articles/dms/known-issues-mongo-cosmos-db.md | Title: "Known issues: Migrate from MongoDB to Azure Cosmos DB" description: Learn about known issues and migration limitations with migrations from MongoDB to Azure Cosmos DB using the Azure Database Migration Service. -+ |
| dms | Known Issues Troubleshooting Dms Source Connectivity | https://github.com/MicrosoftDocs/azure-docs/commits/main/articles/dms/known-issues-troubleshooting-dms-source-connectivity.md | Title: "Issues connecting source databases" description: Learn about how to troubleshoot known issues/errors associated with connecting Azure Database Migration Service to source databases. -+ |
| dms | Known Issues Troubleshooting Dms | https://github.com/MicrosoftDocs/azure-docs/commits/main/articles/dms/known-issues-troubleshooting-dms.md | Title: "Common issues - Azure Database Migration Service" description: Learn about how to troubleshoot common known issues/errors associated with using Azure Database Migration Service. -+ |
| dms | Migration Dms Powershell Cli | https://github.com/MicrosoftDocs/azure-docs/commits/main/articles/dms/migration-dms-powershell-cli.md | Title: Migrate databases at scale using Azure PowerShell / CLI description: Learn how to use Azure PowerShell or CLI to migrate databases at scale using the capabilities of Azure SQL migration extension in Azure Data Studio with Azure Database Migration Service. -+ |
| dms | Migration Using Azure Data Studio | https://github.com/MicrosoftDocs/azure-docs/commits/main/articles/dms/migration-using-azure-data-studio.md | Title: Migrate using Azure Data Studio description: Learn how to use the Azure SQL migration extension in Azure Data Studio to migrate databases with Azure Database Migration Service. -+ |
| dms | Pre Reqs | https://github.com/MicrosoftDocs/azure-docs/commits/main/articles/dms/pre-reqs.md | Title: Prerequisites for Azure Database Migration Service description: Learn about an overview of the prerequisites for using the Azure Database Migration Service to perform database migrations. -+ |
| dms | Quickstart Create Data Migration Service Hybrid Portal | https://github.com/MicrosoftDocs/azure-docs/commits/main/articles/dms/quickstart-create-data-migration-service-hybrid-portal.md | Title: "Quickstart: Create a hybrid mode instance with Azure portal" description: Use the Azure portal to create an instance of Azure Database Migration Service in hybrid mode. -+ |
| dms | Quickstart Create Data Migration Service Portal | https://github.com/MicrosoftDocs/azure-docs/commits/main/articles/dms/quickstart-create-data-migration-service-portal.md | Title: "Quickstart: Create an instance using the Azure portal" description: Use the Azure portal to create an instance of Azure Database Migration Service. -+ |
| dms | Resource Custom Roles Sql Db Managed Instance | https://github.com/MicrosoftDocs/azure-docs/commits/main/articles/dms/resource-custom-roles-sql-db-managed-instance.md | Title: "Custom roles: Online SQL Server to SQL Managed Instance migrations" description: Learn to use the custom roles for SQL Server to Azure SQL Managed Instance online migrations. -+ |
| dms | Resource Network Topologies | https://github.com/MicrosoftDocs/azure-docs/commits/main/articles/dms/resource-network-topologies.md | Title: Network topologies for SQL Managed Instance migrations description: Learn the source and target configurations for Azure SQL Managed Instance migrations using the Azure Database Migration Service.-+ |
| dms | Resource Scenario Status | https://github.com/MicrosoftDocs/azure-docs/commits/main/articles/dms/resource-scenario-status.md | Title: Database migration scenario status description: Learn about the status of the migration scenarios supported by Azure Database Migration Service.-+ |
| dms | Tutorial Azure Postgresql To Azure Postgresql Online Portal | https://github.com/MicrosoftDocs/azure-docs/commits/main/articles/dms/tutorial-azure-postgresql-to-azure-postgresql-online-portal.md | Title: "Tutorial: Migrate Azure DB for PostgreSQL to Azure DB for PostgreSQL onl description: Learn to perform an online migration from one Azure DB for PostgreSQL to another Azure Database for PostgreSQL by using Azure Database Migration Service via the Azure portal. -+ |
| dms | Tutorial Mongodb Cosmos Db Online | https://github.com/MicrosoftDocs/azure-docs/commits/main/articles/dms/tutorial-mongodb-cosmos-db-online.md | Title: "Tutorial: Migrate MongoDB online to Azure Cosmos DB API for MongoDB" description: Learn to migrate from MongoDB on-premises to Azure Cosmos DB API for MongoDB online by using Azure Database Migration Service. -+ |
| dms | Tutorial Mongodb Cosmos Db | https://github.com/MicrosoftDocs/azure-docs/commits/main/articles/dms/tutorial-mongodb-cosmos-db.md | Title: "Tutorial: Migrate MongoDB offline to Azure Cosmos DB API for MongoDB" description: Migrate from MongoDB on-premises to Azure Cosmos DB API for MongoDB offline, by using Azure Database Migration Service. -+ |
| dms | Tutorial Postgresql Azure Postgresql Online Portal | https://github.com/MicrosoftDocs/azure-docs/commits/main/articles/dms/tutorial-postgresql-azure-postgresql-online-portal.md | Title: "Tutorial: Migrate PostgreSQL to Azure DB for PostgreSQL online via the A description: Learn to perform an online migration from PostgreSQL on-premises to Azure Database for PostgreSQL by using Azure Database Migration Service via the Azure portal. -+ |
| dms | Tutorial Postgresql Azure Postgresql Online | https://github.com/MicrosoftDocs/azure-docs/commits/main/articles/dms/tutorial-postgresql-azure-postgresql-online.md | Title: "Tutorial: Migrate PostgreSQL to Azure Database for PostgreSQL online via description: Learn to perform an online migration from PostgreSQL on-premises to Azure Database for PostgreSQL by using Azure Database Migration Service via the CLI. -+ |
| dms | Tutorial Rds Postgresql Server Azure Db For Postgresql Online | https://github.com/MicrosoftDocs/azure-docs/commits/main/articles/dms/tutorial-rds-postgresql-server-azure-db-for-postgresql-online.md | Title: "Tutorial: Migrate RDS PostgreSQL online to Azure Database for PostgreSQL description: Learn to perform an online migration from RDS PostgreSQL to Azure Database for PostgreSQL by using the Azure Database Migration Service. -+ |
| dms | Tutorial Sql Server Managed Instance Offline Ads | https://github.com/MicrosoftDocs/azure-docs/commits/main/articles/dms/tutorial-sql-server-managed-instance-offline-ads.md | Title: "Tutorial: Migrate SQL Server to Azure SQL Managed Instance offline using description: Migrate SQL Server to an Azure SQL Managed Instance offline using Azure Data Studio with Azure Database Migration Service (Preview) -+ |
| dms | Tutorial Sql Server Managed Instance Online Ads | https://github.com/MicrosoftDocs/azure-docs/commits/main/articles/dms/tutorial-sql-server-managed-instance-online-ads.md | Title: "Tutorial: Migrate SQL Server to Azure SQL Managed Instance online using description: Migrate SQL Server to an Azure SQL Managed Instance online using Azure Data Studio with Azure Database Migration Service -+ |
| dms | Tutorial Sql Server Managed Instance Online | https://github.com/MicrosoftDocs/azure-docs/commits/main/articles/dms/tutorial-sql-server-managed-instance-online.md | Title: "Tutorial: Migrate SQL Server online to SQL Managed Instance" description: Learn to perform an online migration from SQL Server to an Azure SQL Managed Instance by using Azure Database Migration Service. -+ |
| dms | Tutorial Sql Server To Azure Sql | https://github.com/MicrosoftDocs/azure-docs/commits/main/articles/dms/tutorial-sql-server-to-azure-sql.md | Title: "Tutorial: Migrate SQL Server offline to Azure SQL Database" description: Learn to migrate from SQL Server to Azure SQL Database offline by using Azure Database Migration Service. -+ |
| dms | Tutorial Sql Server To Managed Instance | https://github.com/MicrosoftDocs/azure-docs/commits/main/articles/dms/tutorial-sql-server-to-managed-instance.md | Title: "Tutorial: Migrate SQL Server to SQL Managed Instance" description: Learn to migrate from SQL Server to an Azure SQL Managed Instance by using Azure Database Migration Service. -+ |
| firewall-manager | Deploy Trusted Security Partner | https://github.com/MicrosoftDocs/azure-docs/commits/main/articles/firewall-manager/deploy-trusted-security-partner.md | To set up tunnels to your virtual hubΓÇÖs VPN Gateway, third-party providers nee 1. Follow your partner provided instructions to complete the setup. This includes submitting AAD information to detect and connect to the hub, update the egress policies, and check connectivity status and logs. - [Zscaler: Configure Microsoft Azure Virtual WAN integration](https://help.zscaler.com/zia/configuring-microsoft-azure-virtual-wan-integration).- - [Check Point: Configure Microsoft Azure Virtual WAN integration](https://sc1.checkpoint.com/documents/Infinity_Portal/WebAdminGuides/EN/CloudGuard-Connect-Azure-Virtual-WAN/Default.htm). + - [Check Point: Configure Microsoft Azure Virtual WAN integration](https://www.checkpoint.com/cloudguard/microsoft-azure-security/wan). - [iboss: Configure Microsoft Azure Virtual WAN integration](https://www.iboss.com/blog/securing-microsoft-azure-with-iboss-saas-network-security). 2. You can look at the tunnel creation status on the Azure Virtual WAN portal in Azure. Once the tunnels show **connected** on both Azure and the partner portal, continue with the next steps to set up routes to select which branches and VNets should send Internet traffic to the partner. After finishing the route setting steps, the VNet virtual machines as well as th ## Next steps -- [Tutorial: Secure your cloud network with Azure Firewall Manager using the Azure portal](secure-cloud-network.md)+- [Tutorial: Secure your cloud network with Azure Firewall Manager using the Azure portal](secure-cloud-network.md) |
| firewall | Protect Azure Kubernetes Service | https://github.com/MicrosoftDocs/azure-docs/commits/main/articles/firewall/protect-azure-kubernetes-service.md | Title: Use Azure Firewall to protect Azure Kubernetes Service (AKS) Deployments -description: Learn how to use Azure Firewall to protect Azure Kubernetes Service (AKS) Deployments + Title: Use Azure Firewall to protect Azure Kubernetes Service (AKS) clusters +description: Learn how to use Azure Firewall to protect Azure Kubernetes Service (AKS) clusters Previously updated : 08/03/2021 Last updated : 07/28/2022 -# Use Azure Firewall to protect Azure Kubernetes Service (AKS) Deployments +# Use Azure Firewall to protect Azure Kubernetes Service (AKS) clusters -Azure Kubernetes Service (AKS) offers a managed Kubernetes cluster on Azure. It reduces the complexity and operational overhead of managing Kubernetes by offloading much of that responsibility to Azure. AKS handles critical tasks, such as health monitoring and maintenance for you and delivers an enterprise-grade and secure cluster with facilitated governance. +This article shows you how you can protect Azure Kubernetes Service (AKS) clusters by using Azure Firewall to secure outbound and inbound traffic. -Kubernetes orchestrates clusters of virtual machines and schedules containers to run on those virtual machines based on their available compute resources and the resource requirements of each container. Containers are grouped into pods, the basic operational unit for Kubernetes, and those pods scale to the state that you want. +## Background -For management and operational purposes, nodes in an AKS cluster need to access certain ports and fully qualified domain names (FQDNs). These actions could be to communicate with the API server, or to download and then install core Kubernetes cluster components and node security updates. Azure Firewall can help you lock down your environment and filter outbound traffic. +Azure Kubernetes Service (AKS) offers a managed Kubernetes cluster on Azure. For more information, see [Azure Kubernetes Service](../aks/intro-kubernetes.md). -See the following video by Jorge Cortes for an overview: +Despite AKS being a fully managed solution, it does not offer a built-in solution to secure ingress and egress traffic between the cluster and external networks. Azure Firewall offers a solution to this. -> [!VIDEO https://www.microsoft.com/videoplayer/embed/RWIcAo] +AKS clusters are deployed on a virtual network. This network can be managed (created by AKS) or custom (pre-configured by the user beforehand). In either case, the cluster has outbound dependencies on services outside of that virtual network (the service has no inbound dependencies). For management and operational purposes, nodes in an AKS cluster need to access certain ports and fully qualified domain names (FQDNs) describing these outbound dependencies. This is required for various functions including, but not limited to, the nodes that communicate with the Kubernetes API server. They download and install core Kubernetes cluster components and node security updates, or pull base system container images from Microsoft Container Registry (MCR), and so on. These outbound dependencies are almost entirely defined with FQDNs, which don't have static addresses behind them. The lack of static addresses means that Network Security Groups can't be used to lock down outbound traffic from an AKS cluster. For this reason, by default, AKS clusters have unrestricted outbound (egress) Internet access. This level of network access allows nodes and services you run to access external resources as needed. + +However, in a production environment, communications with a Kubernetes cluster should be protected to prevent against data exfiltration along with other vulnerabilities. All incoming and outgoing network traffic must be monitored and controlled based on a set of security rules. If you want to do this, you will have to restrict egress traffic, but a limited number of ports and addresses must remain accessible to maintain healthy cluster maintenance tasks and satisfy those outbound dependencies previously mentioned. + +The simplest solution uses a firewall device that can control outbound traffic based on domain names. A firewall typically establishes a barrier between a trusted network and an untrusted network, such as the Internet. Azure Firewall, for example, can restrict outbound HTTP and HTTPS traffic based on the FQDN of the destination, giving you fine-grained egress traffic control, but at the same time allows you to provide access to the FQDNs encompassing an AKS clusterΓÇÖs outbound dependencies (something that NSGs cannot do). Likewise, you can control ingress traffic and improve security by enabling threat intelligence-based filtering on an Azure Firewall deployed to a shared perimeter network. This filtering can provide alerts, and deny traffic to and from known malicious IP addresses and domains. -Follow the guidelines in this article to provide additional protection for your Azure Kubernetes cluster using Azure Firewall. +See the following video by Abhinav Sriram for a quick overview on how this works in practice on a sample environment: -## Prerequisites +> [!VIDEO https://www.microsoft.com/en-us/videoplayer/embed/RE529Qc] -- A deployed Azure Kubernetes cluster with running application.+You can download a zip file from the [Microsoft Download Center](https://download.microsoft.com/download/0/1/3/0131e87a-c862-45f8-8ee6-31fa103a03ff/aks-azfw-protection-setup.zip) that contains a bash script file and a yaml file to automatically configure the sample environment used in the video. It configures Azure Firewall to protect both ingress and egress traffic. The following guides walk through each step of the script in more detail so you can set up a custom configuration. - For more information, see [Tutorial: Deploy an Azure Kubernetes Service (AKS) cluster](../aks/tutorial-kubernetes-deploy-cluster.md) and [Tutorial: Run applications in Azure Kubernetes Service (AKS)](../aks/tutorial-kubernetes-deploy-application.md). +The following diagram shows the sample environment from the video that the script and guide configure: -## Securing AKS +There is one difference between the script and the following guide. The script uses managed identities, but the guide uses a service principal. This shows you two different ways to create an identity to manage and create cluster resources. -Azure Firewall provides an AKS FQDN Tag to simplify the configuration. Use the following steps to allow outbound AKS platform traffic: +## Restrict egress traffic using Azure Firewall -- When you use Azure Firewall to restrict outbound traffic and create a user-defined route (UDR) to direct all outbound traffic, make sure you create an appropriate DNAT rule in Firewall to correctly allow inbound traffic. +### Set configuration via environment variables - Using Azure Firewall with a UDR breaks the inbound setup because of asymmetric routing. The issue occurs if the AKS subnet has a default route that goes to the firewall's private IP address, but you're using a public load balancer. For example, inbound or Kubernetes service of type *LoadBalancer*. +Define a set of environment variables to be used in resource creations. - In this case, the incoming load balancer traffic is received via its public IP address, but the return path goes through the firewall's private IP address. Because the firewall is stateful, it drops the returning packet because the firewall isn't aware of an established session. To learn how to integrate Azure Firewall with your ingress or service load balancer, see [Integrate Azure Firewall with Azure Standard Load Balancer](integrate-lb.md). -- Create an application rule collection and add a rule to enable the *AzureKubernetesService* FQDN tag. The source IP address range is the host pool virtual network, the protocol is https, and the destination is AzureKubernetesService.-- The following outbound ports / network rules are required for an AKS cluster:+```bash +PREFIX="aks-egress" +RG="${PREFIX}-rg" +LOC="eastus" +PLUGIN=azure +AKSNAME="${PREFIX}" +VNET_NAME="${PREFIX}-vnet" +AKSSUBNET_NAME="aks-subnet" +# DO NOT CHANGE FWSUBNET_NAME - This is currently a requirement for Azure Firewall. +FWSUBNET_NAME="AzureFirewallSubnet" +FWNAME="${PREFIX}-fw" +FWPUBLICIP_NAME="${PREFIX}-fwpublicip" +FWIPCONFIG_NAME="${PREFIX}-fwconfig" +FWROUTE_TABLE_NAME="${PREFIX}-fwrt" +FWROUTE_NAME="${PREFIX}-fwrn" +FWROUTE_NAME_INTERNET="${PREFIX}-fwinternet" +``` - - TCP port 443 - - TCP [*IPAddrOfYourAPIServer*]:443 is required if you have an app that needs to talk to the API server. This change can be set after the cluster is created. - - TCP port 9000, and UDP port 1194 for the tunnel front pod to communicate with the tunnel end on the API server. +### Create a virtual network with multiple subnets - To be more specific, see the addresses in the following table: +Provision a virtual network with two separate subnets, one for the cluster, one for the firewall. Optionally you could also create one for internal service ingress. - | Destination Endpoint | Protocol | Port | Use | - |-|-||| - | **`*:1194`** <br/> *Or* <br/> [ServiceTag](../virtual-network/service-tags-overview.md#available-service-tags) - **`AzureCloud.<Region>:1194`** <br/> *Or* <br/> [Regional CIDRs](../virtual-network/service-tags-overview.md#discover-service-tags-by-using-downloadable-json-files) - **`RegionCIDRs:1194`** <br/> *Or* <br/> **`APIServerIP:1194`** `(only known after cluster creation)` | UDP | 1194 | For tunneled secure communication between the nodes and the control plane. | - | **`*:9000`** <br/> *Or* <br/> [ServiceTag](../virtual-network/service-tags-overview.md#available-service-tags) - **`AzureCloud.<Region>:9000`** <br/> *Or* <br/> [Regional CIDRs](../virtual-network/service-tags-overview.md#discover-service-tags-by-using-downloadable-json-files) - **`RegionCIDRs:9000`** <br/> *Or* <br/> **`APIServerIP:9000`** `(only known after cluster creation)` | TCP | 9000 | For tunneled secure communication between the nodes and the control plane. | + - - UDP port 123 for Network Time Protocol (NTP) time synchronization (Linux nodes). - - UDP port 53 for DNS is also required if you have pods directly accessing the API server. +Create a resource group to hold all of the resources. - For more information, see [Control egress traffic for cluster nodes in Azure Kubernetes Service (AKS)](../aks/limit-egress-traffic.md). -- Configure AzureMonitor and Storage service tags. Azure Monitor receives log analytics data.+```azurecli +# Create Resource Group - You can also allow your workspace URL individually: `<worksapceguid>.ods.opinsights.azure.com`, and `<worksapceguid>.oms.opinsights.azure.com`. You can address this in one of the following ways: +az group create --name $RG --location $LOC +``` - - Allow https access from your host pool subnet to `*. ods.opinsights.azure.com`, and `*.oms. opinsights.azure.com`. These wildcard FQDNs enable the required access but are less restrictive. - - Use the following log analytics query to list the exact required FQDNs, and then allow them explicitly in your firewall application rules: - ``` - AzureDiagnostics - | where Category == "AzureFirewallApplicationRule" - | search "Allow" - | search "*. ods.opinsights.azure.com" or "*.oms. opinsights.azure.com" - | parse msg_s with Protocol " request from " SourceIP ":" SourcePort:int " to " FQDN ":" * - | project TimeGenerated,Protocol,FQDN - ``` +Create a virtual network with two subnets to host the AKS cluster and the Azure Firewall. Each will have their own subnet. Let's start with the AKS network. +``` +# Dedicated virtual network with AKS subnet ++az network vnet create \ + --resource-group $RG \ + --name $VNET_NAME \ + --location $LOC \ + --address-prefixes 10.42.0.0/16 \ + --subnet-name $AKSSUBNET_NAME \ + --subnet-prefix 10.42.1.0/24 ++# Dedicated subnet for Azure Firewall (Firewall name cannot be changed) ++az network vnet subnet create \ + --resource-group $RG \ + --vnet-name $VNET_NAME \ + --name $FWSUBNET_NAME \ + --address-prefix 10.42.2.0/24 +``` ++### Create and set up an Azure Firewall with a UDR ++Azure Firewall inbound and outbound rules must be configured. The main purpose of the firewall is to enable organizations to configure granular ingress and egress traffic rules into and out of the AKS Cluster. ++ ++> [!IMPORTANT] +> If your cluster or application creates a large number of outbound connections directed to the same or small subset of destinations, you might require more firewall frontend IPs to avoid maxing out the ports per frontend IP. +> For more information on how to create an Azure firewall with multiple IPs, see [**here**](../firewall/quick-create-multiple-ip-template.md) ++Create a standard SKU public IP resource that will be used as the Azure Firewall frontend address. ++```azurecli +az network public-ip create -g $RG -n $FWPUBLICIP_NAME -l $LOC --sku "Standard" +``` ++Register the preview cli-extension to create an Azure Firewall. ++```azurecli +# Install Azure Firewall preview CLI extension ++az extension add --name azure-firewall ++# Deploy Azure Firewall ++az network firewall create -g $RG -n $FWNAME -l $LOC --enable-dns-proxy true +``` ++The IP address created earlier can now be assigned to the firewall frontend. ++> [!NOTE] +> Set up of the public IP address to the Azure Firewall may take a few minutes. +> To leverage FQDN on network rules we need DNS proxy enabled, when enabled the firewall will listen on port 53 and will forward DNS requests to the DNS server specified above. This will allow the firewall to translate that FQDN automatically. ++```azurecli +# Configure Firewall IP Config ++az network firewall ip-config create -g $RG -f $FWNAME -n $FWIPCONFIG_NAME --public-ip-address $FWPUBLICIP_NAME --vnet-name $VNET_NAME +``` ++When the previous command has succeeded, save the firewall frontend IP address for configuration later. ++```azurecli +# Capture Firewall IP Address for Later Use ++FWPUBLIC_IP=$(az network public-ip show -g $RG -n $FWPUBLICIP_NAME --query "ipAddress" -o tsv) +FWPRIVATE_IP=$(az network firewall show -g $RG -n $FWNAME --query "ipConfigurations[0].privateIpAddress" -o tsv) +``` ++> [!NOTE] +> If you use secure access to the AKS API server with [authorized IP address ranges](../aks/api-server-authorized-ip-ranges.md), you need to add the firewall public IP into the authorized IP range. ++### Create a UDR with a hop to Azure Firewall ++Azure automatically routes traffic between Azure subnets, virtual networks, and on-premises networks. If you want to change any of Azure's default routing, you do so by creating a route table. ++Create an empty route table to be associated with a given subnet. The route table will define the next hop as the Azure Firewall created above. Each subnet can have zero or one route table associated to it. ++```azurecli +# Create UDR and add a route for Azure Firewall ++az network route-table create -g $RG -l $LOC --name $FWROUTE_TABLE_NAME +az network route-table route create -g $RG --name $FWROUTE_NAME --route-table-name $FWROUTE_TABLE_NAME --address-prefix 0.0.0.0/0 --next-hop-type VirtualAppliance --next-hop-ip-address $FWPRIVATE_IP +az network route-table route create -g $RG --name $FWROUTE_NAME_INTERNET --route-table-name $FWROUTE_TABLE_NAME --address-prefix $FWPUBLIC_IP/32 --next-hop-type Internet +``` ++See [virtual network route table documentation](../virtual-network/virtual-networks-udr-overview.md#user-defined) about how you can override Azure's default system routes or add additional routes to a subnet's route table. ++### Adding firewall rules ++> [!NOTE] +> For applications outside of the kube-system or gatekeeper-system namespaces that needs to talk to the API server, an additional network rule to allow TCP communication to port 443 for the API server IP in addition to adding application rule for fqdn-tag AzureKubernetesService is required. +++Below are three network rules you can use to configure on your firewall, you may need to adapt these rules based on your deployment. The first rule allows access to port 9000 via TCP. The second rule allows access to port 1194 and 123 via UDP. Both these rules will only allow traffic destined to the Azure Region CIDR that we're using, in this case East US. +Finally, we'll add a third network rule opening port 123 to `ntp.ubuntu.com` FQDN via UDP (adding an FQDN as a network rule is one of the specific features of Azure Firewall, and you'll need to adapt it when using your own options). ++After setting the network rules, we'll also add an application rule using the `AzureKubernetesService` that covers all needed FQDNs accessible through TCP port 443 and port 80. ++``` +# Add FW Network Rules ++az network firewall network-rule create -g $RG -f $FWNAME --collection-name 'aksfwnr' -n 'apiudp' --protocols 'UDP' --source-addresses '*' --destination-addresses "AzureCloud.$LOC" --destination-ports 1194 --action allow --priority 100 +az network firewall network-rule create -g $RG -f $FWNAME --collection-name 'aksfwnr' -n 'apitcp' --protocols 'TCP' --source-addresses '*' --destination-addresses "AzureCloud.$LOC" --destination-ports 9000 +az network firewall network-rule create -g $RG -f $FWNAME --collection-name 'aksfwnr' -n 'time' --protocols 'UDP' --source-addresses '*' --destination-fqdns 'ntp.ubuntu.com' --destination-ports 123 ++# Add FW Application Rules ++az network firewall application-rule create -g $RG -f $FWNAME --collection-name 'aksfwar' -n 'fqdn' --source-addresses '*' --protocols 'http=80' 'https=443' --fqdn-tags "AzureKubernetesService" --action allow --priority 100 +``` ++See [Azure Firewall documentation](overview.md) to learn more about the Azure Firewall service. ++### Associate the route table to AKS ++To associate the cluster with the firewall, the dedicated subnet for the cluster's subnet must reference the route table created above. Association can be done by issuing a command to the virtual network holding both the cluster and firewall to update the route table of the cluster's subnet. ++```azurecli +# Associate route table with next hop to Firewall to the AKS subnet ++az network vnet subnet update -g $RG --vnet-name $VNET_NAME --name $AKSSUBNET_NAME --route-table $FWROUTE_TABLE_NAME +``` ++### Deploy AKS with outbound type of UDR to the existing network ++Now an AKS cluster can be deployed into the existing virtual network. We'll also use [outbound type `userDefinedRouting`](../aks/egress-outboundtype.md), this feature ensures any outbound traffic will be forced through the firewall and no other egress paths will exist (by default the Load Balancer outbound type could be used). ++ ++The target subnet to be deployed into is defined with the environment variable, `$SUBNETID`. We didn't define the `$SUBNETID` variable in the previous steps. To set the value for the subnet ID, you can use the following command: ++```azurecli +SUBNETID=$(az network vnet subnet show -g $RG --vnet-name $VNET_NAME --name $AKSSUBNET_NAME --query id -o tsv) +``` ++You'll define the outbound type to use the UDR that already exists on the subnet. This configuration will enable AKS to skip the setup and IP provisioning for the load balancer. ++> [!IMPORTANT] +> For more information on outbound type UDR including limitations, see [**egress outbound type UDR**](../aks/egress-outboundtype.md#limitations). ++> [!TIP] +> Additional features can be added to the cluster deployment such as [**Private Cluster**](../aks/private-clusters.md). +> +> The AKS feature for [**API server authorized IP ranges**](../aks/api-server-authorized-ip-ranges.md) can be added to limit API server access to only the firewall's public endpoint. The authorized IP ranges feature is denoted in the diagram as optional. When enabling the authorized IP range feature to limit API server access, your developer tools must use a jumpbox from the firewall's virtual network or you must add all developer endpoints to the authorized IP range. ++```azurecli +az aks create -g $RG -n $AKSNAME -l $LOC \ + --node-count 3 \ + --network-plugin $PLUGIN \ + --outbound-type userDefinedRouting \ + --vnet-subnet-id $SUBNETID \ + --api-server-authorized-ip-ranges $FWPUBLIC_IP +``` ++> [!NOTE] +> For creating and using your own VNet and route table where the resources are outside of the worker node resource group, the CLI will add the role assignment automatically. If you are using an ARM template or other client, you need to use the Principal ID of the cluster managed identity to perform a [role assignment.][add role to identity] +> +> If you are not using the CLI but using your own VNet or route table which are outside of the worker node resource group, it's recommended to use [user-assigned control plane identity][Bring your own control plane managed identity]. For system-assigned control plane identity, we cannot get the identity ID before creating cluster, which causes delay for role assignment to take effect. +++### Enable developer access to the API server ++If you used authorized IP ranges for the cluster on the previous step, you must add your developer tooling IP addresses to the AKS cluster list of approved IP ranges in order to access the API server from there. Another option is to configure a jumpbox with the needed tooling inside a separate subnet in the Firewall's virtual network. ++Add another IP address to the approved ranges with the following command ++```bash +# Retrieve your IP address +CURRENT_IP=$(dig @resolver1.opendns.com ANY myip.opendns.com +short) ++# Add to AKS approved list +az aks update -g $RG -n $AKSNAME --api-server-authorized-ip-ranges $CURRENT_IP/32 +``` ++Use the [az aks get-credentials][az-aks-get-credentials] command to configure `kubectl` to connect to your newly created Kubernetes cluster. ++```azurecli +az aks get-credentials -g $RG -n $AKSNAME +``` ++## Restrict ingress traffic using Azure Firewall ++You can now start exposing services and deploying applications to this cluster. In this example, we'll expose a public service, but you may also choose to expose an internal service via [internal load balancer](../aks/internal-lb.md). ++ ++Deploy the Azure voting app application by copying the yaml below to a file named `example.yaml`. ++```yaml +# voting-storage-deployment.yaml +apiVersion: apps/v1 +kind: Deployment +metadata: + name: voting-storage +spec: + replicas: 1 + selector: + matchLabels: + app: voting-storage + template: + metadata: + labels: + app: voting-storage + spec: + containers: + - name: voting-storage + image: mcr.microsoft.com/aks/samples/voting/storage:2.0 + args: ["--ignore-db-dir=lost+found"] + resources: + requests: + cpu: 100m + memory: 128Mi + limits: + cpu: 250m + memory: 256Mi + ports: + - containerPort: 3306 + name: mysql + volumeMounts: + - name: mysql-persistent-storage + mountPath: /var/lib/mysql + env: + - name: MYSQL_ROOT_PASSWORD + valueFrom: + secretKeyRef: + name: voting-storage-secret + key: MYSQL_ROOT_PASSWORD + - name: MYSQL_USER + valueFrom: + secretKeyRef: + name: voting-storage-secret + key: MYSQL_USER + - name: MYSQL_PASSWORD + valueFrom: + secretKeyRef: + name: voting-storage-secret + key: MYSQL_PASSWORD + - name: MYSQL_DATABASE + valueFrom: + secretKeyRef: + name: voting-storage-secret + key: MYSQL_DATABASE + volumes: + - name: mysql-persistent-storage + persistentVolumeClaim: + claimName: mysql-pv-claim ++# voting-storage-secret.yaml +apiVersion: v1 +kind: Secret +metadata: + name: voting-storage-secret +type: Opaque +data: + MYSQL_USER: ZGJ1c2Vy + MYSQL_PASSWORD: UGFzc3dvcmQxMg== + MYSQL_DATABASE: YXp1cmV2b3Rl + MYSQL_ROOT_PASSWORD: UGFzc3dvcmQxMg== ++# voting-storage-pv-claim.yaml +apiVersion: v1 +kind: PersistentVolumeClaim +metadata: + name: mysql-pv-claim +spec: + accessModes: + - ReadWriteOnce + resources: + requests: + storage: 1Gi ++# voting-storage-service.yaml +apiVersion: v1 +kind: Service +metadata: + name: voting-storage + labels: + app: voting-storage +spec: + ports: + - port: 3306 + name: mysql + selector: + app: voting-storage ++# voting-app-deployment.yaml +apiVersion: apps/v1 +kind: Deployment +metadata: + name: voting-app +spec: + replicas: 1 + selector: + matchLabels: + app: voting-app + template: + metadata: + labels: + app: voting-app + spec: + containers: + - name: voting-app + image: mcr.microsoft.com/aks/samples/voting/app:2.0 + imagePullPolicy: Always + ports: + - containerPort: 8080 + name: http + env: + - name: MYSQL_HOST + value: "voting-storage" + - name: MYSQL_USER + valueFrom: + secretKeyRef: + name: voting-storage-secret + key: MYSQL_USER + - name: MYSQL_PASSWORD + valueFrom: + secretKeyRef: + name: voting-storage-secret + key: MYSQL_PASSWORD + - name: MYSQL_DATABASE + valueFrom: + secretKeyRef: + name: voting-storage-secret + key: MYSQL_DATABASE + - name: ANALYTICS_HOST + value: "voting-analytics" ++# voting-app-service.yaml +apiVersion: v1 +kind: Service +metadata: + name: voting-app + labels: + app: voting-app +spec: + type: LoadBalancer + ports: + - port: 80 + targetPort: 8080 + name: http + selector: + app: voting-app ++# voting-analytics-deployment.yaml +apiVersion: apps/v1 +kind: Deployment +metadata: + name: voting-analytics +spec: + replicas: 1 + selector: + matchLabels: + app: voting-analytics + version: "2.0" + template: + metadata: + labels: + app: voting-analytics + version: "2.0" + spec: + containers: + - name: voting-analytics + image: mcr.microsoft.com/aks/samples/voting/analytics:2.0 + imagePullPolicy: Always + ports: + - containerPort: 8080 + name: http + env: + - name: MYSQL_HOST + value: "voting-storage" + - name: MYSQL_USER + valueFrom: + secretKeyRef: + name: voting-storage-secret + key: MYSQL_USER + - name: MYSQL_PASSWORD + valueFrom: + secretKeyRef: + name: voting-storage-secret + key: MYSQL_PASSWORD + - name: MYSQL_DATABASE + valueFrom: + secretKeyRef: + name: voting-storage-secret + key: MYSQL_DATABASE ++# voting-analytics-service.yaml +apiVersion: v1 +kind: Service +metadata: + name: voting-analytics + labels: + app: voting-analytics +spec: + ports: + - port: 8080 + name: http + selector: + app: voting-analytics +``` ++Deploy the service by running: ++```bash +kubectl apply -f example.yaml +``` ++### Add a DNAT rule to Azure Firewall ++> [!IMPORTANT] +> When you use Azure Firewall to restrict egress traffic and create a user-defined route (UDR) to force all egress traffic, make sure you create an appropriate DNAT rule in Firewall to correctly allow ingress traffic. Using Azure Firewall with a UDR breaks the ingress setup due to asymmetric routing. (The issue occurs if the AKS subnet has a default route that goes to the firewall's private IP address, but you're using a public load balancer - ingress or Kubernetes service of type: LoadBalancer). In this case, the incoming load balancer traffic is received via its public IP address, but the return path goes through the firewall's private IP address. Because the firewall is stateful, it drops the returning packet because the firewall isn't aware of an established session. To learn how to integrate Azure Firewall with your ingress or service load balancer, see [Integrate Azure Firewall with Azure Standard Load Balancer](../firewall/integrate-lb.md). ++To configure inbound connectivity, a DNAT rule must be written to the Azure Firewall. To test connectivity to your cluster, a rule is defined for the firewall frontend public IP address to route to the internal IP exposed by the internal service. ++The destination address can be customized as it's the port on the firewall to be accessed. The translated address must be the IP address of the internal load balancer. The translated port must be the exposed port for your Kubernetes service. ++You'll need to specify the internal IP address assigned to the load balancer created by the Kubernetes service. Retrieve the address by running: ++```bash +kubectl get services +``` ++The IP address needed will be listed in the EXTERNAL-IP column, similar to the following. ++```bash +NAME TYPE CLUSTER-IP EXTERNAL-IP PORT(S) AGE +kubernetes ClusterIP 10.41.0.1 <none> 443/TCP 10h +voting-analytics ClusterIP 10.41.88.129 <none> 8080/TCP 9m +voting-app LoadBalancer 10.41.185.82 20.39.18.6 80:32718/TCP 9m +voting-storage ClusterIP 10.41.221.201 <none> 3306/TCP 9m +``` ++Get the service IP by running: ++```bash +SERVICE_IP=$(kubectl get svc voting-app -o jsonpath='{.status.loadBalancer.ingress[*].ip}') +``` ++Add the NAT rule by running: ++```azurecli +az network firewall nat-rule create --collection-name exampleset --destination-addresses $FWPUBLIC_IP --destination-ports 80 --firewall-name $FWNAME --name inboundrule --protocols Any --resource-group $RG --source-addresses '*' --translated-port 80 --action Dnat --priority 100 --translated-address $SERVICE_IP +``` ++### Validate connectivity ++Navigate to the Azure Firewall frontend IP address in a browser to validate connectivity. ++You should see the AKS voting app. In this example, the Firewall public IP was `52.253.228.132`. ++ ++## Clean up resources ++To clean up Azure resources, delete the AKS resource group. ++```azurecli +az group delete -g $RG +``` ## Next steps |
| hdinsight | Hdinsight Overview | https://github.com/MicrosoftDocs/azure-docs/commits/main/articles/hdinsight/hdinsight-overview.md | Title: What is Azure HDInsight -description: An introduction to HDInsight, and the Apache Hadoop and Apache Spark technology stack and components, including Kafka, Hive, Storm, and HBase for big data analysis. +description: An introduction to HDInsight, and the Apache Hadoop and Apache Spark technology stack and components, including Kafka, Hive, and HBase for big data analysis. Previously updated : 07/11/2022 Last updated : 07/28/2022 #Customer intent: As a data analyst, I want understand what is Hadoop and how it is offered in Azure HDInsight so that I can decide on using HDInsight instead of on premises clusters. # What is Azure HDInsight? -Azure HDInsight is a managed, full-spectrum, open-source analytics service in the cloud for enterprises. With HDInsight, you can use open-source frameworks such as Hadoop, Apache Spark, Apache Hive, LLAP, Apache Kafka, Apache Storm, and more, in your Azure environment. +Azure HDInsight is a managed, full-spectrum, open-source analytics service in the cloud for enterprises. With HDInsight, you can use open-source frameworks such as Hadoop, Apache Spark, Apache Hive, LLAP, Apache Kafka, and more, in your Azure environment. ## What is HDInsight and the Hadoop technology stack? -Azure HDInsight is a cloud distribution of Hadoop components. Azure HDInsight makes it easy, fast, and cost-effective to process massive amounts of data in a customizable environment. You can use the most popular open-source frameworks such as Hadoop, Spark, Hive, LLAP, Kafka, Storm and more. With these frameworks, you can enable a broad range of scenarios such as extract, transform, and load (ETL), data warehousing, machine learning, and IoT. +Azure HDInsight is a cloud distribution of Hadoop components. Azure HDInsight makes it easy, fast, and cost-effective to process massive amounts of data in a customizable environment. You can use the most popular open-source frameworks such as Hadoop, Spark, Hive, LLAP, Kafka and more. With these frameworks, you can enable a broad range of scenarios such as extract, transform, and load (ETL), data warehousing, machine learning, and IoT. To see available Hadoop technology stack components on HDInsight, see [Components and versions available with HDInsight](./hdinsight-component-versioning.md). To read more about Hadoop in HDInsight, see the [Azure features page for HDInsight](https://azure.microsoft.com/services/hdinsight/). To see available Hadoop technology stack components on HDInsight, see [Component |Capability |Description | |||-|Cloud native | Azure HDInsight enables you to create optimized clusters for Hadoop, Spark, [Interactive query (LLAP)](./interactive-query/apache-interactive-query-get-started.md), Kafka, Storm, HBase on Azure. HDInsight also provides an end-to-end SLA on all your production workloads. | +|Cloud native | Azure HDInsight enables you to create optimized clusters for Hadoop, Spark, [Interactive query (LLAP)](./interactive-query/apache-interactive-query-get-started.md), Kafka, HBase on Azure. HDInsight also provides an end-to-end SLA on all your production workloads. | |Low-cost and scalable | HDInsight enables you to scale workloads up or down. You can reduce costs by creating clusters on demand and paying only for what you use. You can also build data pipelines to operationalize your jobs. Decoupled compute and storage provide better performance and flexibility. | |Secure and compliant | HDInsight enables you to protect your enterprise data assets with Azure Virtual Network, encryption, and integration with Azure Active Directory. HDInsight also meets the most popular industry and government compliance standards. | |Monitoring | Azure HDInsight integrates with Azure Monitor logs to provide a single interface with which you can monitor all your clusters. | |Global availability | HDInsight is available in more regions than any other [big data](#what-is-big-data) analytics offering. Azure HDInsight is also available in Azure Government, China, and Germany, which allows you to meet your enterprise needs in key sovereign areas. | -|Productivity | Azure HDInsight enables you to use rich productive tools for Hadoop and Spark with your preferred development environments. These development environments include Visual Studio, VSCode, Eclipse, and IntelliJ for Scala, Python, Java, and .NET support. Data scientists can also collaborate using popular notebooks such as Jupyter and Zeppelin. | +|Productivity | Azure HDInsight enables you to use rich productive tools for Hadoop and Spark with your preferred development environments. These development environments include Visual Studio, VSCode, Eclipse, and IntelliJ for Scala, Python, Java, and .NET support. | |Extensibility | You can extend the HDInsight clusters with installed components (Hue, Presto, and so on) by using script actions, by adding edge nodes, or by integrating with other [big data](#what-is-big-data) certified applications. HDInsight enables seamless integration with the most popular [big data](#what-is-big-data) solutions with a one-click deployment.| ### What is big data? HDInsight includes specific cluster types and cluster customization capabilities |[Apache Hadoop](./hadoop/apache-hadoop-introduction.md)|A framework that uses HDFS, YARN resource management, and a simple MapReduce programming model to process and analyze batch data in parallel.| [Create an Apache Hadoop cluster](hadoop/apache-hadoop-linux-create-cluster-get-started-portal.md) |[Apache Spark](./spark/apache-spark-overview.md)|An open-source, parallel-processing framework that supports in-memory processing to boost the performance of big-data analysis applications. See [What is Apache Spark in HDInsight?](./spark/apache-spark-overview.md).|[Create an Apache Spark cluster](spark/apache-spark-jupyter-spark-sql-use-portal.md) |[Apache HBase](./hbase/apache-hbase-overview.md)|A NoSQL database built on Hadoop that provides random access and strong consistency for large amounts of unstructured and semi-structured data--potentially billions of rows times millions of columns. See [What is HBase on HDInsight?](./hbase/apache-hbase-overview.md)|[Create an Apache HBase cluster](hbase/quickstart-resource-manager-template.md)-|[Apache Storm](./storm/apache-storm-overview.md)|A distributed, real-time computation system for processing large streams of data fast. Storm is offered as a managed cluster in HDInsight. See [Analyze real-time sensor data using Storm and Hadoop](./storm/apache-storm-overview.md).|[Create an Apache Storm topology](storm/apache-storm-quickstart.md) |[Apache Interactive Query](./interactive-query/apache-interactive-query-get-started.md)|In-memory caching for interactive and faster Hive queries. See [Use Interactive Query in HDInsight](./interactive-query/apache-interactive-query-get-started.md).|[Create an Interactive Query cluster](interactive-query/quickstart-resource-manager-template.md) |[Apache Kafka](./kafk) You can use HDInsight to perform interactive queries at petabyte scales over str You can use HDInsight to process streaming data that's received in real time from different kinds of devices. For more information, [read this blog post from Azure that announces the public preview of Apache Kafka on HDInsight with Azure Managed disks](https://azure.microsoft.com/blog/announcing-public-preview-of-apache-kafka-on-hdinsight-with-azure-managed-disks/). --### Data science --You can use HDInsight to build applications that extract critical insights from data. You can also use Azure Machine Learning on top of that to predict future trends for your business. For more information, [read this customer story](https://customers.microsoft.com/story/pros). - ### Hybrid You can use HDInsight to extend your existing on-premises [big data](#what-is-bi ## Open-source components in HDInsight -Azure HDInsight enables you to create clusters with open-source frameworks such as Hadoop, Spark, Hive, LLAP, Kafka, Storm, HBase, and R. These clusters, by default, come with other open-source components that are included on the cluster such as Apache Ambari5, Avro5, Apache Hive3, HCatalog2, Apache Mahout2, Apache Hadoop MapReduce3, Apache Hadoop YARN2, Apache Phoenix3, Apache Pig3, Apache Sqoop3, Apache Tez3, Apache Oozie2, and Apache ZooKeeper5. +Azure HDInsight enables you to create clusters with open-source frameworks such as Hadoop, Spark, Hive, LLAP, Kafka, and HBase. These clusters, by default, come with other open-source components that are included on the cluster such as Apache Ambari, Avro, Apache Hive3, HCatalog, Apache Hadoop MapReduce, Apache Hadoop YARN, Apache Phoenix, Apache Pig, Apache Sqoop, Apache Tez, Apache Oozie, and Apache ZooKeeper. ## Programming languages in HDInsight Familiar business intelligence (BI) tools retrieve, analyze, and report data tha ## In-region data residency -Spark, Hadoop, LLAP, and Storm don't store customer data, so these services automatically satisfy in-region data residency requirements including those specified in the [Trust Center](https://azuredatacentermap.azurewebsites.net/). +Spark, Hadoop, and LLAP don't store customer data, so these services automatically satisfy in-region data residency requirements including those specified in the [Trust Center](https://azuredatacentermap.azurewebsites.net/). Kafka and HBase do store customer data. This data is automatically stored by Kafka and HBase in a single region, so this service satisfies in-region data residency requirements including those specified in the [Trust Center](https://azuredatacentermap.azurewebsites.net/). |
| iot-central | Concepts Telemetry Properties Commands | https://github.com/MicrosoftDocs/azure-docs/commits/main/articles/iot-central/core/concepts-telemetry-properties-commands.md | A device template in Azure IoT Central is a blueprint that defines the: This article describes the JSON payloads that devices send and receive for telemetry, properties, and commands defined in a device template. +> [!IMPORTANT] +> IoT Central expects to receive UTF-8 encoded JSON data. + The article doesn't describe every possible type of telemetry, property, and command payload, but the examples illustrate all the key types. Each example shows a snippet from the device model that defines the type and example JSON payloads to illustrate how the device should interact with the IoT Central application. IoT Central lets you view the raw data that a device sends to an application. Th ## Telemetry +To learn more about the DTDL telemetry naming rules, see [DTDL > Telemetry](https://github.com/Azure/opendigitaltwins-dtdl/blob/master/DTDL/v2/dtdlv2.md#telemetry). You can't start a telemetry name using the `_` character. ++Don't create telemetry types with the following names. IoT Central uses these reserved names internally. If you try to use these names, IoT Central will ignore your data: ++* `EventEnqueuedUtcTime` +* `EventProcessedUtcTime` +* `PartitionId` +* `EventHub` +* `User` +* `$metadata` +* `$version` + ### Telemetry in components If the telemetry is defined in a component, add a custom message property called `$.sub` with the name of the component as defined in the device model. To learn more, see [Tutorial: Create and connect a client application to your Azure IoT Central application](tutorial-connect-device.md). A device client should send the state as JSON that looks like the following exam ## Properties +To learn more about the DTDL property naming rules, see [DTDL > Property](https://github.com/Azure/opendigitaltwins-dtdl/blob/master/DTDL/v2/dtdlv2.md#property). You can't start a property name using the `_` character. + > [!NOTE] > The payload formats for properties applies to applications created on or after 07/14/2020. The device should send the following JSON payload to IoT Central after it proces ## Commands +To learn more about the DTDL command naming rules, see [DTDL > Command](https://github.com/Azure/opendigitaltwins-dtdl/blob/master/DTDL/v2/dtdlv2.md#command). You can't start a command name using the `_` character. + If the command is defined in a component, the name of the command the device receives includes the component name. For example, if the command is called `getMaxMinReport` and the component is called `thermostat2`, the device receives a request to execute a command called `thermostat2*getMaxMinReport`. The following snippet from a device model shows the definition of a command that has no parameters and that doesn't expect the device to return anything: |
| iot-dps | Libraries Sdks | https://github.com/MicrosoftDocs/azure-docs/commits/main/articles/iot-dps/libraries-sdks.md | The DPS device SDKs provide code that runs on your IoT devices and simplifies pr | .NET|[NuGet](https://www.nuget.org/packages/Microsoft.Azure.Devices.Provisioning.Client/) |[GitHub](https://github.com/Azure/azure-iot-sdk-csharp/)|[Samples](https://github.com/Azure-Samples/azure-iot-samples-csharp/tree/main/provisioning/Samples/device)|[Quickstart](./quick-create-simulated-device-x509.md?pivots=programming-language-csharp&tabs=windows)| [Reference](/dotnet/api/microsoft.azure.devices.provisioning.client) | | C|[apt-get, MBED, Arduino IDE or iOS](https://github.com/Azure/azure-iot-sdk-c/blob/master/readme.md#packages-and-libraries)|[GitHub](https://github.com/Azure/azure-iot-sdk-c/blob/master/provisioning\_client)|[Samples](https://github.com/Azure/azure-iot-sdk-c/tree/main/provisioning_client/samples)|[Quickstart](./quick-create-simulated-device-x509.md?pivots=programming-language-ansi-c&tabs=windows)|[Reference](/azure/iot-hub/iot-c-sdk-ref/) | | Java|[Maven](https://mvnrepository.com/artifact/com.microsoft.azure.sdk.iot.provisioning/provisioning-device-client)|[GitHub](https://github.com/Azure/azure-iot-sdk-jav?pivots=programming-language-java&tabs=windows)|[Reference](/java/api/com.microsoft.azure.sdk.iot.provisioning.device) |-| Node.js|[npm](https://www.npmjs.com/package/azure-iot-provisioning-device) |[GitHub](https://github.com/Azure/azure-iot-sdk-node/tree/main/provisioning)|[Samples](https://github.com/Azure/azure-iot-sdk-node/tree/main/provisioning/device/samples)|[Quickstart](./quick-create-simulated-device-x509.md?pivots=programming-language-nodejs&tabs=windows)|[Reference](/javascript/api/overview/azure/iothubdeviceprovisioning) | +| Node.js|[npm](https://www.npmjs.com/package/azure-iot-provisioning-device) |[GitHub](https://github.com/Azure/azure-iot-sdk-node/tree/main/provisioning)|[Samples](https://github.com/Azure/azure-iot-sdk-node/tree/main/provisioning/device/samples)|[Quickstart](./quick-create-simulated-device-x509.md?pivots=programming-language-nodejs&tabs=windows)|[Reference](/javascript/api/azure-iot-provisioning-device) | | Python|[pip](https://pypi.org/project/azure-iot-device/) |[GitHub](https://github.com/Azure/azure-iot-sdk-python)|[Samples](https://github.com/Azure/azure-iot-sdk-python/tree/main/azure-iot-device/samples/async-hub-scenarios)|[Quickstart](./quick-create-simulated-device-x509.md?pivots=programming-language-python&tabs=windows)|[Reference](/python/api/azure-iot-device/azure.iot.device.provisioningdeviceclient) | Microsoft also provides embedded device SDKs to facilitate development on resource-constrained devices. To learn more, see the [IoT Device Development Documentation](../iot-develop/about-iot-sdks.md). The DPS service SDKs help you build backend applications to manage enrollments a | --|--|--|--|--|--| | .NET|[NuGet](https://www.nuget.org/packages/Microsoft.Azure.Devices.Provisioning.Service/) |[GitHub](https://github.com/Azure/azure-iot-sdk-csharp/)|[Samples](https://github.com/Azure-Samples/azure-iot-samples-csharp/tree/main/provisioning/Samples/service)|[Quickstart](./quick-enroll-device-tpm.md?pivots=programming-language-csharp&tabs=symmetrickey)|[Reference](/dotnet/api/microsoft.azure.devices.provisioning.service) | | Java|[Maven](https://mvnrepository.com/artifact/com.microsoft.azure.sdk.iot.provisioning/provisioning-service-client)|[GitHub](https://github.com/Azure/azure-iot-sdk-jav?pivots=programming-language-java&tabs=symmetrickey)|[Reference](/java/api/com.microsoft.azure.sdk.iot.provisioning.service) |-| Node.js|[npm](https://www.npmjs.com/package/azure-iot-provisioning-service)|[GitHub](https://github.com/Azure/azure-iot-sdk-node/tree/main/provisioning)|[Samples](https://github.com/Azure/azure-iot-sdk-node/tree/main/provisioning/service/samples)|[Quickstart](./quick-enroll-device-tpm.md?pivots=programming-language-nodejs&tabs=symmetrickey)|[Reference](/javascript/api/overview/azure/iothubdeviceprovisioning) | +| Node.js|[npm](https://www.npmjs.com/package/azure-iot-provisioning-service)|[GitHub](https://github.com/Azure/azure-iot-sdk-node/tree/main/provisioning)|[Samples](https://github.com/Azure/azure-iot-sdk-node/tree/main/provisioning/service/samples)|[Quickstart](./quick-enroll-device-tpm.md?pivots=programming-language-nodejs&tabs=symmetrickey)|[Reference](/javascript/api/azure-iot-provisioning-service) | ## Management SDKs The DPS management SDKs help you build backend applications that manage the DPS | --|--|--|--| | .NET|[NuGet](https://www.nuget.org/packages/Microsoft.Azure.Management.DeviceProvisioningServices) |[GitHub](https://github.com/Azure/azure-sdk-for-net/tree/main/sdk/deviceprovisioningservices/Microsoft.Azure.Management.DeviceProvisioningServices)| [Reference](/dotnet/api/overview/azure/deviceprovisioningservice/management) | | Java|[Maven](https://mvnrepository.com/artifact/com.azure.resourcemanager/azure-resourcemanager-deviceprovisioningservices) |[GitHub](https://github.com/Azure/azure-sdk-for-java/tree/main/sdk/deviceprovisioningservices/azure-resourcemanager-deviceprovisioningservices)| [Reference](/java/api/com.azure.resourcemanager.deviceprovisioningservices) |-| Node.js|[npm](https://www.npmjs.com/package/@azure/arm-deviceprovisioningservices)|[GitHub](https://github.com/Azure/azure-sdk-for-js/tree/main/sdk/deviceprovisioningservices/arm-deviceprovisioningservices)|[Reference](/javascript/api/@azure/arm-deviceprovisioningservices) | +| Node.js|[npm](https://www.npmjs.com/package/@azure/arm-deviceprovisioningservices)|[GitHub](https://github.com/Azure/azure-sdk-for-js/tree/main/sdk/deviceprovisioningservices/arm-deviceprovisioningservices)|[Reference](/javascript/api/overview/azure/arm-deviceprovisioningservices-readme) | | Python|[pip](https://pypi.org/project/azure-mgmt-iothubprovisioningservices/) |[GitHub](https://github.com/Azure/azure-sdk-for-python/tree/main/sdk/iothub/azure-mgmt-iothubprovisioningservices)|[Reference](/python/api/azure-mgmt-iothubprovisioningservices) | ## Next steps |
| iot-hub-device-update | Device Update Ubuntu Agent | https://github.com/MicrosoftDocs/azure-docs/commits/main/articles/iot-hub-device-update/device-update-ubuntu-agent.md | For convenience, this tutorial uses a [cloud-init](../virtual-machines/linux/usi > [](../iot-edge/media/how-to-install-iot-edge-ubuntuvm/iotedge-vm-dns-name.png) > [!TIP]- > If you want to SSH into this VM after setup, use the associated **DNS name** with the following command: + > To SSH into this VM after setup, use the associated **DNS name** with the following command: `ssh <adminUsername>@<DNS_Name>`. + 1. Open the configuration details (See how to [set up configuration file here](device-update-configuration-file.md) with the command below. Set your connectionType as 'AIS' and connectionData as empty string. ++ ```markdown + /etc/adu/du-config.json + ``` ++ 5. Restart the Device Update agent by running the following command: ++ ```markdown + sudo systemctl restart adu-agent + ``` ++Device Update for Azure IoT Hub software packages are subject to the following license terms: ++ * [Device update for IoT Hub license](https://github.com/Azure/iot-hub-device-update/blob/main/LICENSE) + * [Delivery optimization client license](https://github.com/microsoft/do-client/blob/main/LICENSE) ++Read the license terms before you use a package. Your installation and use of a package constitutes your acceptance of these terms. If you don't agree with the license terms, don't use that package. + ### Manually prepare a device Similar to the steps automated by the [cloud-init script](https://github.com/Azure/iotedge-vm-deploy/blob/1.2.0-rc4/cloud-init.txt), the following manual steps are used to install and configure a device. Use these steps to prepare a physical device. Similar to the steps automated by the [cloud-init script](https://github.com/Azu /etc/adu/du-config.json ``` -1. Restart the Device Update agent by running the following command: +5. Restart the Device Update agent by running the following command: ```markdown sudo systemctl restart adu-agent Use the following tutorials for a simple demonstration of Device Update for IoT - [Image Update: Getting started with Raspberry Pi 3 B+ reference Yocto image](device-update-raspberry-pi.md) extensible via open source to build your own images for other architecture as needed. - [Proxy Update: Getting started using Device Update binary agent for downstream devices](device-update-howto-proxy-updates.md). - [Getting started using Ubuntu (18.04 x64) simulator reference agent](device-update-simulator.md).-- [Device Update for Azure IoT Hub tutorial for Azure real-time operating system](device-update-azure-real-time-operating-system.md).+- [Device Update for Azure IoT Hub tutorial for Azure real-time operating system](device-update-azure-real-time-operating-system.md). |
| machine-learning | Concept Enterprise Security | https://github.com/MicrosoftDocs/azure-docs/commits/main/articles/machine-learning/concept-enterprise-security.md | For more information, see the following documents: * [Secure workspace resources](how-to-secure-workspace-vnet.md) * [Secure training environment](how-to-secure-training-vnet.md) * For securing inference, see the following documents:- * If using CLI v1 or SDK v1 - [Secure inference environment](how-to-secure-inferencing-vnet.md) + * If using CLI v1 or SDK v1 - [Secure inference environment](./v1/how-to-secure-inferencing-vnet.md) * If using CLI v2 or SDK v2 - [Network isolation for managed online endpoints](how-to-secure-online-endpoint.md) * [Use studio in a secured virtual network](how-to-enable-studio-virtual-network.md) * [Use custom DNS](how-to-custom-dns.md) |
| machine-learning | Concept Plan Manage Cost | https://github.com/MicrosoftDocs/azure-docs/commits/main/articles/machine-learning/concept-plan-manage-cost.md | After you delete an Azure Machine Learning workspace in the Azure portal or with To delete the workspace along with these dependent resources, use the SDK: ```python-ws.delete(delete_dependent_resources=True) +from azure.ai.ml.entities import Workspace +ml_client.workspaces.begin_delete(name=ws.name, delete_dependent_resources=True) ``` If you create Azure Kubernetes Service (AKS) in your workspace, or if you attach any compute resources to your workspace you must delete them separately in [Azure portal](https://portal.azure.com). |
| machine-learning | How To Access Azureml Behind Firewall | https://github.com/MicrosoftDocs/azure-docs/commits/main/articles/machine-learning/how-to-access-azureml-behind-firewall.md | In this article, learn about the network communication requirements when securin > * [Secure the workspace resources](how-to-secure-workspace-vnet.md) > * [Secure the training environment](how-to-secure-training-vnet.md) > * For securing inference, see the following documents:-> * If using CLI v1 or SDK v1 - [Secure inference environment](how-to-secure-inferencing-vnet.md) +> * If using CLI v1 or SDK v1 - [Secure inference environment](./v1/how-to-secure-inferencing-vnet.md) > * If using CLI v2 or SDK v2 - [Network isolation for managed online endpoints](how-to-secure-online-endpoint.md) > * [Enable studio functionality](how-to-enable-studio-virtual-network.md) > * [Use custom DNS](how-to-custom-dns.md) These rule collections are described in more detail in [What are some Azure Fire | __\*.kusto.windows.net__<br>__\*.table.core.windows.net__<br>__\*.queue.core.windows.net__ | https:443 | Required to upload system logs to Kusto. |**✓**|**✓**| | __\*.azurecr.io__ | https:443 | Azure container registry, required to pull docker images used for machine learning workloads.|**✓**|**✓**| | __\*.blob.core.windows.net__ | https:443 | Azure blob storage, required to fetch machine learning project scripts,data or models, and upload job logs/outputs.|**✓**|**✓**|-| __\*.workspace.\<region\>.api.azureml.ms__<br>__\<region\>.experiments.azureml.net__<br>__\<region\>.api.azureml.ms__ | https:443 | Azure machince learning service API.|**✓**|**✓**| +| __\*.workspace.\<region\>.api.azureml.ms__<br>__\<region\>.experiments.azureml.net__<br>__\<region\>.api.azureml.ms__ | https:443 | Azure Machine Learning service API.|**✓**|**✓**| | __pypi.org__ | https:443 | Python package index, to install pip packages used for training job environment initialization.|**✓**|N/A| | __archive.ubuntu.com__<br>__security.ubuntu.com__<br>__ppa.launchpad.net__ | http:80 | Required to download the necessary security patches. |**✓**|N/A| This article is part of a series on securing an Azure Machine Learning workflow. * [Secure the workspace resources](how-to-secure-workspace-vnet.md) * [Secure the training environment](how-to-secure-training-vnet.md) * For securing inference, see the following documents:- * If using CLI v1 or SDK v1 - [Secure inference environment](how-to-secure-inferencing-vnet.md) + * If using CLI v1 or SDK v1 - [Secure inference environment](./v1/how-to-secure-inferencing-vnet.md) * If using CLI v2 or SDK v2 - [Network isolation for managed online endpoints](how-to-secure-online-endpoint.md) * [Enable studio functionality](how-to-enable-studio-virtual-network.md) * [Use custom DNS](how-to-custom-dns.md) |
| machine-learning | How To Assign Roles | https://github.com/MicrosoftDocs/azure-docs/commits/main/articles/machine-learning/how-to-assign-roles.md | If you're an owner of a workspace, you can add and remove roles for the workspac You can use Azure AD security groups to manage access to workspaces. This approach has following benefits: * Team or project leaders can manage user access to workspace as security group owners, without needing Owner role on the workspace resource directly. * You can organize, manage and revoke users' permissions on workspace and other resources as a group, without having to manage permissions on user-by-user basis.- * Using Azure AD groups helps you to avoid reaching the [subscription limit](../role-based-access-control/troubleshooting.md#azure-role-assignments-limit) on role assignments. + * Using Azure AD groups helps you to avoid reaching the [subscription limit](../role-based-access-control/troubleshooting.md#limits) on role assignments. To use Azure AD security groups: 1. [Create a security group](../active-directory/fundamentals/active-directory-groups-create-azure-portal.md). |
| machine-learning | How To Attach Kubernetes Anywhere | https://github.com/MicrosoftDocs/azure-docs/commits/main/articles/machine-learning/how-to-attach-kubernetes-anywhere.md | +> [!div class="op_single_selector" title1="Select the version of Azure Machine Learning SDK or CLI extension you are using:"] +> * [v1](./v1/how-to-create-attach-kubernetes.md) +> * [v2 (current version)](how-to-attach-kubernetes-anywhere.md) Azure Machine Learning Kubernetes compute enables you to run training jobs such as AutoML, pipeline, and distributed jobs, or to deploy models as online endpoint or batch endpoint. Azure ML Kubernetes compute supports two kinds of Kubernetes cluster: * **[Azure Kubernetes Services](https://azure.microsoft.com/services/kubernetes-service/)** (AKS) cluster in Azure. With your own managed AKS cluster in Azure, you can gain security and controls to meet compliance requirement as well as flexibility to manage teams' ML workload. |
| machine-learning | How To Configure Network Isolation With V2 | https://github.com/MicrosoftDocs/azure-docs/commits/main/articles/machine-learning/how-to-configure-network-isolation-with-v2.md | The return value of the `az ml workspace update` command may not show the update az ml workspace show -g <myresourcegroup> -w <myworkspace> --query v1LegacyMode ``` +> [!IMPORTANT] +> Note that it takes about 30 minutes to an hour or more for changing v1_legacy_mode parameter from __true__ to __false__ to be reflected in the workspace. Therefore, if you set the parameter to __false__ but receive an error that the parameter is __true__ in a subsequent operation, please try after a few more minutes. + ## Next steps |
| machine-learning | How To Configure Private Link | https://github.com/MicrosoftDocs/azure-docs/commits/main/articles/machine-learning/how-to-configure-private-link.md | Azure Private Link enables you to connect to your workspace using a private endp > * [Secure workspace resources](how-to-secure-workspace-vnet.md). > * [Secure training environments](how-to-secure-training-vnet.md). > * For securing inference, see the following documents:-> * If using CLI v1 or SDK v1 - [Secure inference environment](how-to-secure-inferencing-vnet.md) +> * If using CLI v1 or SDK v1 - [Secure inference environment](./v1/how-to-secure-inferencing-vnet.md) > * If using CLI v2 or SDK v2 - [Network isolation for managed online endpoints](how-to-secure-online-endpoint.md) > * [Use Azure Machine Learning studio in a VNet](how-to-enable-studio-virtual-network.md). > * [API platform network isolation](how-to-configure-network-isolation-with-v2.md) Azure Private Link enables you to connect to your workspace using a private endp * If you enable public access for a workspace secured with private endpoint and use Azure Machine Learning studio over the public internet, some features such as the designer may fail to access your data. This problem happens when the data is stored on a service that is secured behind the VNet. For example, an Azure Storage Account. * You may encounter problems trying to access the private endpoint for your workspace if you are using Mozilla Firefox. This problem may be related to DNS over HTTPS in Mozilla. We recommend using Microsoft Edge or Google Chrome as a workaround.-* Using a private endpoint does not effect Azure control plane (management operations) such as deleting the workspace or managing compute resources. For example, creating, updating, or deleting a compute target. These operations are performed over the public Internet as normal. Data plane operations, such as using Azure Machine Learning studio, APIs (including published pipelines), or the SDK use the private endpoint. +* Using a private endpoint does not affect Azure control plane (management operations) such as deleting the workspace or managing compute resources. For example, creating, updating, or deleting a compute target. These operations are performed over the public Internet as normal. Data plane operations, such as using Azure Machine Learning studio, APIs (including published pipelines), or the SDK use the private endpoint. * When creating a compute instance or compute cluster in a workspace with a private endpoint, the compute instance and compute cluster must be in the same Azure region as the workspace. * When creating or attaching an Azure Kubernetes Service cluster to a workspace with a private endpoint, the cluster must be in the same region as the workspace. * When using a workspace with multiple private endpoints, one of the private endpoints must be in the same VNet as the following dependency |
| machine-learning | How To Create Attach Compute Studio | https://github.com/MicrosoftDocs/azure-docs/commits/main/articles/machine-learning/how-to-create-attach-compute-studio.md | Create or attach an Azure Kubernetes Service (AKS) cluster for large scale infer |Virtual machine size | Supported virtual machine sizes might be restricted in your region. Check the [availability list](https://azure.microsoft.com/global-infrastructure/services/?products=virtual-machines) | |Cluster purpose | Select **Production** or **Dev-test** | |Number of nodes | The number of nodes multiplied by the virtual machineΓÇÖs number of cores (vCPUs) must be greater than or equal to 12. |-| Network configuration | Select **Advanced** to create the compute within an existing virtual network. For more information about AKS in a virtual network, see [Network isolation during training and inference with private endpoints and virtual networks](./how-to-secure-inferencing-vnet.md). | +| Network configuration | Select **Advanced** to create the compute within an existing virtual network. For more information about AKS in a virtual network, see [Network isolation during training and inference with private endpoints and virtual networks](./v1/how-to-secure-inferencing-vnet.md). | | Enable SSL configuration | Use this to configure SSL certificate on the compute | ## <a name="attached-compute"></a> Attach other compute |
| machine-learning | How To Custom Dns | https://github.com/MicrosoftDocs/azure-docs/commits/main/articles/machine-learning/how-to-custom-dns.md | When using an Azure Machine Learning workspace with a private endpoint, there ar > * [Secure the workspace resources](how-to-secure-workspace-vnet.md) > * [Secure the training environment](how-to-secure-training-vnet.md) > * For securing inference, see the following documents:-> * If using CLI v1 or SDK v1 - [Secure inference environment](how-to-secure-inferencing-vnet.md) +> * If using CLI v1 or SDK v1 - [Secure inference environment](./v1/how-to-secure-inferencing-vnet.md) > * If using CLI v2 or SDK v2 - [Network isolation for managed online endpoints](how-to-secure-online-endpoint.md) > * [Enable studio functionality](how-to-enable-studio-virtual-network.md) > * [Use a firewall](how-to-access-azureml-behind-firewall.md) This article is part of a series on securing an Azure Machine Learning workflow. * [Secure the workspace resources](how-to-secure-workspace-vnet.md) * [Secure the training environment](how-to-secure-training-vnet.md) * For securing inference, see the following documents:- * If using CLI v1 or SDK v1 - [Secure inference environment](how-to-secure-inferencing-vnet.md) + * If using CLI v1 or SDK v1 - [Secure inference environment](./v1/how-to-secure-inferencing-vnet.md) * If using CLI v2 or SDK v2 - [Network isolation for managed online endpoints](how-to-secure-online-endpoint.md) * [Enable studio functionality](how-to-enable-studio-virtual-network.md) * [Use a firewall](how-to-access-azureml-behind-firewall.md) |
| machine-learning | How To Enable Studio Virtual Network | https://github.com/MicrosoftDocs/azure-docs/commits/main/articles/machine-learning/how-to-enable-studio-virtual-network.md | In this article, you learn how to: > * [Secure the workspace resources](how-to-secure-workspace-vnet.md) > * [Secure the training environment](how-to-secure-training-vnet.md) > * For securing inference, see the following documents:-> * If using CLI v1 or SDK v1 - [Secure inference environment](how-to-secure-inferencing-vnet.md) +> * If using CLI v1 or SDK v1 - [Secure inference environment](./v1/how-to-secure-inferencing-vnet.md) > * If using CLI v2 or SDK v2 - [Network isolation for managed online endpoints](how-to-secure-online-endpoint.md) > * [Use custom DNS](how-to-custom-dns.md) > * [Use a firewall](how-to-access-azureml-behind-firewall.md) This article is part of a series on securing an Azure Machine Learning workflow. * [Secure the workspace resources](how-to-secure-workspace-vnet.md) * [Secure the training environment](how-to-secure-training-vnet.md) * For securing inference, see the following documents:- * If using CLI v1 or SDK v1 - [Secure inference environment](how-to-secure-inferencing-vnet.md) + * If using CLI v1 or SDK v1 - [Secure inference environment](./v1/how-to-secure-inferencing-vnet.md) * If using CLI v2 or SDK v2 - [Network isolation for managed online endpoints](how-to-secure-online-endpoint.md) * [Use custom DNS](how-to-custom-dns.md) * [Use a firewall](how-to-access-azureml-behind-firewall.md) |
| machine-learning | How To Log View Metrics | https://github.com/MicrosoftDocs/azure-docs/commits/main/articles/machine-learning/how-to-log-view-metrics.md | Title: Log & view parameters, metrics and files + Title: Log & view parameters, metrics and files with MLflow description: Enable logging on your ML training runs to monitor real-time run metrics with MLflow, and to help diagnose errors and warnings. -# Log & view metrics and log files +# Log & view metrics and log files with MLflow > [!div class="op_single_selector" title1="Select the version of Azure Machine Learning Python SDK you are using:"] > * [v1](./v1/how-to-log-view-metrics.md) |
| machine-learning | How To Manage Rest | https://github.com/MicrosoftDocs/azure-docs/commits/main/articles/machine-learning/how-to-manage-rest.md | curl -h "Authorization:Bearer <YOUR-ACCESS-TOKEN>" ...more args... To retrieve the list of resource groups associated with your subscription, run: ```bash-curl https://management.azure.com/subscriptions/<YOUR-SUBSCRIPTION-ID>/resourceGroups?api-version=2021-03-01-preview -H "Authorization:Bearer <YOUR-ACCESS-TOKEN>" +curl https://management.azure.com/subscriptions/<YOUR-SUBSCRIPTION-ID>/resourceGroups?api-version=2021-04-01 -H "Authorization:Bearer <YOUR-ACCESS-TOKEN>" ``` -Across Azure, many REST APIs are published. Each service provider updates their API on their own cadence, but does so without breaking existing programs. The service provider uses the `api-version` argument to ensure compatibility. The `api-version` argument varies from service to service. For the Machine Learning Service, for instance, the current API version is `2021-03-01-preview`. For storage accounts, it's `2019-08-01`. For key vaults, it's `2019-09-01`. All REST calls should set the `api-version` argument to the expected value. You can rely on the syntax and semantics of the specified version even as the API continues to evolve. If you send a request to a provider without the `api-version` argument, the response will contain a human-readable list of supported values. +Across Azure, many REST APIs are published. Each service provider updates their API on their own cadence, but does so without breaking existing programs. The service provider uses the `api-version` argument to ensure compatibility. ++> [!IMPORTANT] +> The `api-version` argument varies from service to service. For the Machine Learning Service, for instance, the current API version is `2022-05-01`. To find the latest API version for other Azure services, see the [Azure REST API reference](/rest/api/azure/) for the specific service. ++All REST calls should set the `api-version` argument to the expected value. You can rely on the syntax and semantics of the specified version even as the API continues to evolve. If you send a request to a provider without the `api-version` argument, the response will contain a human-readable list of supported values. The above call will result in a compacted JSON response of the form: The above call will result in a compacted JSON response of the form: To retrieve the set of workspaces in a resource group, run the following, replacing `<YOUR-SUBSCRIPTION-ID>`, `<YOUR-RESOURCE-GROUP>`, and `<YOUR-ACCESS-TOKEN>`: ```-curl https://management.azure.com/subscriptions/<YOUR-SUBSCRIPTION-ID>/resourceGroups/<YOUR-RESOURCE-GROUP>/providers/Microsoft.MachineLearningServices/workspaces/?api-version=2021-03-01-preview \ +curl https://management.azure.com/subscriptions/<YOUR-SUBSCRIPTION-ID>/resourceGroups/<YOUR-RESOURCE-GROUP>/providers/Microsoft.MachineLearningServices/workspaces/?api-version=2022-05-01 \ -H "Authorization:Bearer <YOUR-ACCESS-TOKEN>" ``` The value of the `api` response is the URL of the server that you'll use for mor ```bash curl https://<REGIONAL-API-SERVER>/history/v1.0/subscriptions/<YOUR-SUBSCRIPTION-ID>/resourceGroups/<YOUR-RESOURCE-GROUP>/\-providers/Microsoft.MachineLearningServices/workspaces/<YOUR-WORKSPACE-NAME>/experiments?api-version=2021-03-01-preview \ +providers/Microsoft.MachineLearningServices/workspaces/<YOUR-WORKSPACE-NAME>/experiments?api-version=2022-05-01 \ -H "Authorization:Bearer <YOUR-ACCESS-TOKEN>" ``` Similarly, to retrieve registered models in your workspace, send: ```bash curl https://<REGIONAL-API-SERVER>/modelmanagement/v1.0/subscriptions/<YOUR-SUBSCRIPTION-ID>/resourceGroups/<YOUR-RESOURCE-GROUP>/\-providers/Microsoft.MachineLearningServices/workspaces/<YOUR-WORKSPACE-NAME>/models?api-version=2021-03-01-preview \ +providers/Microsoft.MachineLearningServices/workspaces/<YOUR-WORKSPACE-NAME>/models?api-version=2022-05-01 \ -H "Authorization:Bearer <YOUR-ACCESS-TOKEN>" ``` Training and running ML models require compute resources. You can list the compu ```bash curl https://management.azure.com/subscriptions/<YOUR-SUBSCRIPTION-ID>/resourceGroups/<YOUR-RESOURCE-GROUP>/\-providers/Microsoft.MachineLearningServices/workspaces/<YOUR-WORKSPACE-NAME>/computes?api-version=2021-03-01-preview \ +providers/Microsoft.MachineLearningServices/workspaces/<YOUR-WORKSPACE-NAME>/computes?api-version=2022-05-01 \ -H "Authorization:Bearer <YOUR-ACCESS-TOKEN>" ``` To create or overwrite a named compute resource, you'll use a PUT request. In th ```bash curl -X PUT \- 'https://management.azure.com/subscriptions/<YOUR-SUBSCRIPTION-ID>/resourceGroups/<YOUR-RESOURCE-GROUP>/providers/Microsoft.MachineLearningServices/workspaces/<YOUR-WORKSPACE-NAME>/computes/<YOUR-COMPUTE-NAME>?api-version=2021-03-01-preview' \ + 'https://management.azure.com/subscriptions/<YOUR-SUBSCRIPTION-ID>/resourceGroups/<YOUR-RESOURCE-GROUP>/providers/Microsoft.MachineLearningServices/workspaces/<YOUR-WORKSPACE-NAME>/computes/<YOUR-COMPUTE-NAME>?api-version=2022-05-01' \ -H 'Authorization:Bearer <YOUR-ACCESS-TOKEN>' \ -H 'Content-Type: application/json' \ -d '{ To create a workspace, PUT a call similar to the following to `management.azure. ```bash curl -X PUT \ 'https://management.azure.com/subscriptions/<YOUR-SUBSCRIPTION-ID>/resourceGroups/<YOUR-RESOURCE-GROUP>\-/providers/Microsoft.MachineLearningServices/workspaces/<YOUR-NEW-WORKSPACE-NAME>?api-version=2021-03-01-preview' \ +/providers/Microsoft.MachineLearningServices/workspaces/<YOUR-NEW-WORKSPACE-NAME>?api-version=2022-05-01' \ -H 'Authorization: Bearer <YOUR-ACCESS-TOKEN>' \ -H 'Content-Type: application/json' \ -d '{ When creating workspace, you can specify a user-assigned managed identity that w ```bash curl -X PUT \ 'https://management.azure.com/subscriptions/<YOUR-SUBSCRIPTION-ID>/resourceGroups/<YOUR-RESOURCE-GROUP>\-/providers/Microsoft.MachineLearningServices/workspaces/<YOUR-NEW-WORKSPACE-NAME>?api-version=2021-03-01-preview' \ +/providers/Microsoft.MachineLearningServices/workspaces/<YOUR-NEW-WORKSPACE-NAME>?api-version=2022-05-01' \ -H 'Authorization: Bearer <YOUR-ACCESS-TOKEN>' \ -H 'Content-Type: application/json' \ -d '{ To create a workspaces that uses a user-assigned managed identity and customer-m ```bash curl -X PUT \ 'https://management.azure.com/subscriptions/<YOUR-SUBSCRIPTION-ID>/resourceGroups/<YOUR-RESOURCE-GROUP>\-/providers/Microsoft.MachineLearningServices/workspaces/<YOUR-NEW-WORKSPACE-NAME>?api-version=2021-03-01-preview' \ +/providers/Microsoft.MachineLearningServices/workspaces/<YOUR-NEW-WORKSPACE-NAME>?api-version=2022-05-01' \ -H 'Authorization: Bearer <YOUR-ACCESS-TOKEN>' \ -H 'Content-Type: application/json' \ -d '{ Some, but not all, resources support the DELETE verb. Check the [API Reference]( ```bash curl -X DELETE \-'https://<REGIONAL-API-SERVER>/modelmanagement/v1.0/subscriptions/<YOUR-SUBSCRIPTION-ID>/resourceGroups/<YOUR-RESOURCE-GROUP>/providers/Microsoft.MachineLearningServices/workspaces/<YOUR-WORKSPACE-NAME>/models/<YOUR-MODEL-ID>?api-version=2021-03-01-preview' \ +'https://<REGIONAL-API-SERVER>/modelmanagement/v1.0/subscriptions/<YOUR-SUBSCRIPTION-ID>/resourceGroups/<YOUR-RESOURCE-GROUP>/providers/Microsoft.MachineLearningServices/workspaces/<YOUR-WORKSPACE-NAME>/models/<YOUR-MODEL-ID>?api-version=2022-05-01' \ -H 'Authorization:Bearer <YOUR-ACCESS-TOKEN>' ``` |
| machine-learning | How To Network Security Overview | https://github.com/MicrosoftDocs/azure-docs/commits/main/articles/machine-learning/how-to-network-security-overview.md | Secure Azure Machine Learning workspace resources and compute environments using > * [Secure the workspace resources](how-to-secure-workspace-vnet.md) > * [Secure the training environment](how-to-secure-training-vnet.md) > * For securing inference, see the following documents:-> * If using CLI v1 or SDK v1 - [Secure inference environment](how-to-secure-inferencing-vnet.md) +> * If using CLI v1 or SDK v1 - [Secure inference environment](./v1/how-to-secure-inferencing-vnet.md) > * If using CLI v2 or SDK v2 - [Network isolation for managed online endpoints](how-to-secure-online-endpoint.md) > * [Enable studio functionality](how-to-enable-studio-virtual-network.md) > * [Use custom DNS](how-to-custom-dns.md) You have two options for AKS clusters in a virtual network: **Private AKS clusters** have a control plane, which can only be accessed through private IPs. Private AKS clusters must be attached after the cluster is created. -For detailed instructions on how to add default and private clusters, see [Secure an inferencing environment](how-to-secure-inferencing-vnet.md). +For detailed instructions on how to add default and private clusters, see [Secure an inferencing environment](./v1/how-to-secure-inferencing-vnet.md). Regardless default AKS cluster or private AKS cluster used, if your AKS cluster is behind of VNET, your workspace and its associate resources (storage, key vault, and ACR) must have private endpoints or service endpoints in the same VNET as the AKS cluster. This article is part of a series on securing an Azure Machine Learning workflow. * [Secure the workspace resources](how-to-secure-workspace-vnet.md) * [Secure the training environment](how-to-secure-training-vnet.md) * For securing inference, see the following documents:- * If using CLI v1 or SDK v1 - [Secure inference environment](how-to-secure-inferencing-vnet.md) + * If using CLI v1 or SDK v1 - [Secure inference environment](./v1/how-to-secure-inferencing-vnet.md) * If using CLI v2 or SDK v2 - [Network isolation for managed online endpoints](how-to-secure-online-endpoint.md) * [Enable studio functionality](how-to-enable-studio-virtual-network.md) * [Use custom DNS](how-to-custom-dns.md) |
| machine-learning | How To Secure Training Vnet | https://github.com/MicrosoftDocs/azure-docs/commits/main/articles/machine-learning/how-to-secure-training-vnet.md | In this article, you learn how to secure training environments with a virtual ne > * [Virtual network overview](how-to-network-security-overview.md) > * [Secure the workspace resources](how-to-secure-workspace-vnet.md) > * For securing inference, see the following documents:-> * If using CLI v1 or SDK v1 - [Secure inference environment](how-to-secure-inferencing-vnet.md) +> * If using CLI v1 or SDK v1 - [Secure inference environment](./v1/how-to-secure-inferencing-vnet.md) > * If using CLI v2 or SDK v2 - [Network isolation for managed online endpoints](how-to-secure-online-endpoint.md) > * [Enable studio functionality](how-to-enable-studio-virtual-network.md) > * [Use custom DNS](how-to-custom-dns.md) This article is part of a series on securing an Azure Machine Learning workflow. * [Virtual network overview](how-to-network-security-overview.md) * [Secure the workspace resources](how-to-secure-workspace-vnet.md) * For securing inference, see the following documents:- * If using CLI v1 or SDK v1 - [Secure inference environment](how-to-secure-inferencing-vnet.md) + * If using CLI v1 or SDK v1 - [Secure inference environment](./v1/how-to-secure-inferencing-vnet.md) * If using CLI v2 or SDK v2 - [Network isolation for managed online endpoints](how-to-secure-online-endpoint.md) * [Enable studio functionality](how-to-enable-studio-virtual-network.md) * [Use custom DNS](how-to-custom-dns.md) |
| machine-learning | How To Secure Workspace Vnet | https://github.com/MicrosoftDocs/azure-docs/commits/main/articles/machine-learning/how-to-secure-workspace-vnet.md | In this article, you learn how to secure an Azure Machine Learning workspace and > * [Virtual network overview](how-to-network-security-overview.md) > * [Secure the training environment](how-to-secure-training-vnet.md) > * For securing inference, see the following documents:-> * If using CLI v1 or SDK v1 - [Secure inference environment](how-to-secure-inferencing-vnet.md) +> * If using CLI v1 or SDK v1 - [Secure inference environment](./v1/how-to-secure-inferencing-vnet.md) > * If using CLI v2 or SDK v2 - [Network isolation for managed online endpoints](how-to-secure-online-endpoint.md) > * [Enable studio functionality](how-to-enable-studio-virtual-network.md) > * [Use custom DNS](how-to-custom-dns.md) This article is part of a series on securing an Azure Machine Learning workflow. * [Secure the training environment](how-to-secure-training-vnet.md) * [Secure online endpoints (inference)](how-to-secure-online-endpoint.md) * For securing inference, see the following documents:- * If using CLI v1 or SDK v1 - [Secure inference environment](how-to-secure-inferencing-vnet.md) + * If using CLI v1 or SDK v1 - [Secure inference environment](./v1/how-to-secure-inferencing-vnet.md) * If using CLI v2 or SDK v2 - [Network isolation for managed online endpoints](how-to-secure-online-endpoint.md) * [Enable studio functionality](how-to-enable-studio-virtual-network.md) * [Use custom DNS](how-to-custom-dns.md) |
| machine-learning | How To Track Monitor Analyze Runs | https://github.com/MicrosoftDocs/azure-docs/commits/main/articles/machine-learning/how-to-track-monitor-analyze-runs.md | This article shows how to do the following tasks: > * If you're looking for information on monitoring training jobs from the CLI or SDK v2, see [Track experiments with MLflow and CLI v2](how-to-use-mlflow-cli-runs.md). > * If you're looking for information on monitoring the Azure Machine Learning service and associated Azure services, see [How to monitor Azure Machine Learning](monitor-azure-machine-learning.md). >-> If you're looking for information on monitoring models deployed as web services, see [Collect model data](how-to-enable-data-collection.md) and [Monitor with Application Insights](how-to-enable-app-insights.md)F. +> If you're looking for information on monitoring models deployed as web services, see [Collect model data](how-to-enable-data-collection.md) and [Monitor with Application Insights](how-to-enable-app-insights.md). ## Prerequisites To cancel a job in the studio, using the following steps: 1. See [how to create and manage log alerts using Azure Monitor](../azure-monitor/alerts/alerts-log.md). -## Example notebooks --The following notebooks demonstrate the concepts in this article: --* To learn more about the logging APIs, see the [logging API notebook](https://github.com/Azure/MachineLearningNotebooks/blob/master/how-to-use-azureml/track-and-monitor-experiments/logging-api/logging-api.ipynb). --* For more information about managing jobs with the Azure Machine Learning SDK, see the [manage jobs notebook](https://github.com/Azure/MachineLearningNotebooks/blob/master/how-to-use-azureml/track-and-monitor-experiments/manage-runs/manage-runs.ipynb). ## Next steps |
| machine-learning | How To Train With Rest | https://github.com/MicrosoftDocs/azure-docs/commits/main/articles/machine-learning/how-to-train-with-rest.md | Administrative REST requests a [service principal authentication token](how-to-m TOKEN=$(az account get-access-token --query accessToken -o tsv) ``` -The service provider uses the `api-version` argument to ensure compatibility. The `api-version` argument varies from service to service. The current Azure Machine Learning API version is `2022-02-01-preview`. Set the API version as a variable to accommodate future versions: +The service provider uses the `api-version` argument to ensure compatibility. The `api-version` argument varies from service to service. Set the API version as a variable to accommodate future versions: -```bash -API_VERSION="2022-02-01-preview" -``` ### Compute |
| machine-learning | Tutorial 1St Experiment Bring Data | https://github.com/MicrosoftDocs/azure-docs/commits/main/articles/machine-learning/tutorial-1st-experiment-bring-data.md | -This tutorial shows you how to upload and use your own data to train machine learning models in Azure Machine Learning. This tutorial is *part 3 of a three-part tutorial series*. +This tutorial shows you how to upload and use your own data to train machine learning models in Azure Machine Learning. This tutorial is *part 3 of a three-part tutorial series*. -In [Part 2: Train a model](tutorial-1st-experiment-sdk-train.md), you trained a model in the cloud, using sample data from `PyTorch`. You also downloaded that data through the `torchvision.datasets.CIFAR10` method in the PyTorch API. In this tutorial, you'll use the downloaded data to learn the workflow for working with your own data in Azure Machine Learning. +In [Part 2: Train a model](tutorial-1st-experiment-sdk-train.md), you trained a model in the cloud, using sample data from `PyTorch`. You also downloaded that data through the `torchvision.datasets.CIFAR10` method in the PyTorch API. In this tutorial, you'll use the downloaded data to learn the workflow for working with your own data in Azure Machine Learning. In this tutorial, you: > [!div class="checklist"]+> > * Upload data to Azure. > * Create a control script.-> * Understand the new Azure Machine Learning concepts (passing parameters, datasets, datastores). +> * Understand the new Azure Machine Learning concepts (passing parameters, data inputs). > * Submit and run your training script. > * View your code output in the cloud. ## Prerequisites -You'll need the data that was downloaded in the previous tutorial. Make sure you have completed these steps: +You'll need the data that was downloaded in the previous tutorial. Make sure you have completed these steps: -1. [Create the training script](tutorial-1st-experiment-sdk-train.md#create-training-scripts). +1. [Create the training script](tutorial-1st-experiment-sdk-train.md#create-training-scripts). 1. [Test locally](tutorial-1st-experiment-sdk-train.md#test-local). ## Adjust the training script By now you have your training script (get-started/src/train.py) running in Azure Our training script is currently set to download the CIFAR10 dataset on each run. The following Python code has been adjusted to read the data from a directory. ->[!NOTE] +> [!NOTE] > The use of `argparse` parameterizes the script. 1. Open *train.py* and replace it with this code: - ```python + ```python import os import argparse import torch Our training script is currently set to download the CIFAR10 dataset on each run import torchvision import torchvision.transforms as transforms from model import Net- from azureml.core import Run - run = Run.get_context() + import mlflow + if __name__ == "__main__": parser = argparse.ArgumentParser() parser.add_argument( Our training script is currently set to download the CIFAR10 dataset on each run running_loss += loss.item() if i % 2000 == 1999: loss = running_loss / 2000- run.log('loss', loss) # log loss metric to AML + mlflow.log_metric('loss', loss) print(f'epoch={epoch + 1}, batch={i + 1:5}: loss {loss:.2f}') running_loss = 0.0 print('Finished Training')- ``` + ``` -1. **Save** the file. Close the tab if you wish. +1. **Save** the file. Close the tab if you wish. ### Understanding the code changes optimizer = optim.SGD( ) ``` - ## <a name="upload"></a> Upload the data to Azure To run this script in Azure Machine Learning, you need to make your training data available in Azure. Your Azure Machine Learning workspace comes equipped with a _default_ datastore. This is an Azure Blob Storage account where you can store your training data. ->[!NOTE] -> Azure Machine Learning allows you to connect other cloud-based datastores that store your data. For more details, see the [datastores documentation](./concept-data.md). --1. Create a new Python control script in the **get-started** folder (make sure it is in **get-started**, *not* in the **/src** folder). Name the script *upload-data.py* and copy this code into the file: - - ```python - # upload-data.py - from azureml.core import Workspace - from azureml.core import Dataset - from azureml.data.datapath import DataPath - - ws = Workspace.from_config() - datastore = ws.get_default_datastore() - Dataset.File.upload_directory(src_dir='data', - target=DataPath(datastore, "datasets/cifar10") - ) - ``` -- The `target_path` value specifies the path on the datastore where the CIFAR10 data will be uploaded. -- >[!TIP] - > While you're using Azure Machine Learning to upload the data, you can use [Azure Storage Explorer](https://azure.microsoft.com/features/storage-explorer/) to upload ad hoc files. If you need an ETL tool, you can use [Azure Data Factory](../data-factory/introduction.md) to ingest your data into Azure. --2. Select **Save and run script in terminal** to run the *upload-data.py* script. -- You should see the following standard output: +> [!NOTE] +> Azure Machine Learning allows you to connect other cloud-based storages that store your data. For more details, see the [data documentation](./concept-data.md). - ```txt - Uploading ./data\cifar-10-batches-py\data_batch_2 - Uploaded ./data\cifar-10-batches-py\data_batch_2, 4 files out of an estimated total of 9 - . - . - Uploading ./data\cifar-10-batches-py\data_batch_5 - Uploaded ./data\cifar-10-batches-py\data_batch_5, 9 files out of an estimated total of 9 - Uploaded 9 files - ``` +There is no additional step needed for uploading data, the control script will define and upload the CIFAR10 training data. ## <a name="control-script"></a> Create a control script As you've done previously, create a new Python control script called *run-pytorc ```python # run-pytorch-data.py+from azure.ai.ml import MLClient, command, Input +from azure.identity import DefaultAzureCredential +from azure.ai.ml.entities import Environment +from azure.ai.ml import command, Input +from azure.ai.ml.entities import Data +from azure.ai.ml.constants import AssetTypes from azureml.core import Workspace-from azureml.core import Experiment -from azureml.core import Environment -from azureml.core import ScriptRunConfig -from azureml.core import Dataset if __name__ == "__main__":+ # get details of the current Azure ML workspace ws = Workspace.from_config()- datastore = ws.get_default_datastore() - dataset = Dataset.File.from_files(path=(datastore, 'datasets/cifar10')) -- experiment = Experiment(workspace=ws, name='day1-experiment-data') -- config = ScriptRunConfig( - source_directory='./src', - script='train.py', - compute_target='cpu-cluster', - arguments=[ - '--data_path', dataset.as_named_input('input').as_mount(), - '--learning_rate', 0.003, - '--momentum', 0.92], - ) - # set up pytorch environment - env = Environment.from_conda_specification( - name='pytorch-env', - file_path='pytorch-env.yml' + # default authentication flow for Azure applications + default_azure_credential = DefaultAzureCredential() + subscription_id = ws.subscription_id + resource_group = ws.resource_group + workspace = ws.name ++ # client class to interact with Azure ML services and resources, e.g. workspaces, jobs, models and so on. + ml_client = MLClient( + default_azure_credential, + subscription_id, + resource_group, + workspace) ++ # the key here should match the key passed to the command + my_job_inputs = { + "data_path": Input(type=AssetTypes.URI_FOLDER, path="./data") + } ++ env_name = "pytorch-env" + env_docker_image = Environment( + image="pytorch/pytorch:latest", + name=env_name, + conda_file="pytorch-env.yml", + ) + ml_client.environments.create_or_update(env_docker_image) ++ # target name of compute where job will be executed + computeName="cpu-cluster" + job = command( + code="./src", + # the parameter will match the training script argument name + # inputs.data_path key should match the dictionary key + command="python train.py --data_path ${{inputs.data_path}}", + inputs=my_job_inputs, + environment=f"{env_name}@latest", + compute=computeName, + display_name="day1-experiment-data", )- config.run_config.environment = env - run = experiment.submit(config) - aml_url = run.get_portal_url() - print("Submitted to compute cluster. Click link below") - print("") - print(aml_url) + returned_job = ml_client.create_or_update(job) + aml_url = returned_job.studio_url + print("Monitor your job at", aml_url) ``` > [!TIP]-> If you used a different name when you created your compute cluster, make sure to adjust the name in the code `compute_target='cpu-cluster'` as well. +> If you used a different name when you created your compute cluster, make sure to adjust the name in the code `computeName='cpu-cluster'` as well. ### Understand the code changes -The control script is similar to the one from [part 3 of this series](tutorial-1st-experiment-sdk-train.md), with the following new lines: +The control script is similar to the one from [part 2 of this series](tutorial-1st-experiment-sdk-train.md), with the following new lines: :::row::: :::column span="":::- `dataset = Dataset.File.from_files( ... )` + `my_job_inputs = { "data_path": Input(type=AssetTypes.URI_FOLDER, path="./data")}` :::column-end::: :::column span="2":::- A [dataset](/python/api/azureml-core/azureml.core.dataset.dataset) is used to reference the data you uploaded to Azure Blob Storage. Datasets are an abstraction layer on top of your data that are designed to improve reliability and trustworthiness. + An [Input](/python/api/azure-ai-ml/azure.ai.ml.input) is used to reference inputs to your job. These can encompass data, either uploaded as part of the job or references to previously registered data assets. URI\*FOLDER tells that the reference points to a folder of data. The data will be mounted by default to the compute for the job. :::column-end::: :::row-end::: :::row::: :::column span="":::- `config = ScriptRunConfig(...)` + `command="python train.py --data_path ${{inputs.data_path}}"` :::column-end::: :::column span="2":::- [ScriptRunConfig](/python/api/azureml-core/azureml.core.scriptrunconfig) is modified to include a list of arguments that will be passed into `train.py`. The `dataset.as_named_input('input').as_mount()` argument means the specified directory will be _mounted_ to the compute target. + `--data_path` matches the argument defined in the updated training script. `${{inputs.data_path}}` passes the input defined by the input dictionary, and the keys must match. :::column-end::: :::row-end::: -## <a name="submit-to-cloud"></a> Submit the run to Azure Machine Learning +## <a name="submit-to-cloud"></a> Submit the job to Azure Machine Learning -Select **Save and run script in terminal** to run the *run-pytorch-data.py* script. This run will train the model on the compute cluster using the data you uploaded. +Select **Save and run script in terminal** to run the *run-pytorch-data.py* script. This job will train the model on the compute cluster using the data you uploaded. This code will print a URL to the experiment in the Azure Machine Learning studio. If you go to that link, you'll be able to see your code running. [!INCLUDE [amlinclude-info](../../includes/machine-learning-py38-ignore.md)] - ### <a name="inspect-log"></a> Inspect the log file In the studio, go to the experiment job (by selecting the previous URL output) followed by **Outputs + logs**. Select the `std_log.txt` file. Scroll down through the log file until you see the following output: ```txt-Processing 'input'. -Processing dataset FileDataset -{ - "source": [ - "('workspaceblobstore', 'datasets/cifar10')" - ], - "definition": [ - "GetDatastoreFiles" - ], - "registration": { - "id": "XXXXX", - "name": null, - "version": null, - "workspace": "Workspace.create(name='XXXX', subscription_id='XXXX', resource_group='X')" - } -} -Mounting input to /tmp/tmp9kituvp3. -Mounted input to /tmp/tmp9kituvp3 as folder. -Exit __enter__ of DatasetContextManager -Entering Job History Context Manager. -Current directory: /mnt/batch/tasks/shared/LS_root/jobs/dsvm-aml/azureml/tutorial-session-3_1600171983_763c5381/mounts/workspaceblobstore/azureml/tutorial-session-3_1600171983_763c5381 -Preparing to call script [ train.py ] with arguments: ['--data_path', '$input', '--learning_rate', '0.003', '--momentum', '0.92'] -After variable expansion, calling script [ train.py ] with arguments: ['--data_path', '/tmp/tmp9kituvp3', '--learning_rate', '0.003', '--momentum', '0.92'] --Script type = None ===== DATA =====-DATA PATH: /tmp/tmp9kituvp3 +DATA PATH: /mnt/azureml/cr/j/xxxxxxxxxxxxxxxxxxxxxxxxxxxxxxxx/cap/data-capability/wd/INPUT_data_path LIST FILES IN DATA PATH...-['cifar-10-batches-py', 'cifar-10-python.tar.gz'] +['.amlignore', 'cifar-10-batches-py', 'cifar-10-python.tar.gz'] +================ +epoch=1, batch= 2000: loss 2.20 +epoch=1, batch= 4000: loss 1.90 +epoch=1, batch= 6000: loss 1.70 +epoch=1, batch= 8000: loss 1.58 +epoch=1, batch=10000: loss 1.54 +epoch=1, batch=12000: loss 1.48 +epoch=2, batch= 2000: loss 1.41 +epoch=2, batch= 4000: loss 1.38 +epoch=2, batch= 6000: loss 1.33 +epoch=2, batch= 8000: loss 1.30 +epoch=2, batch=10000: loss 1.29 +epoch=2, batch=12000: loss 1.25 +Finished Training + ``` Notice: -- Azure Machine Learning has mounted Blob Storage to the compute cluster automatically for you.-- The ``dataset.as_named_input('input').as_mount()`` used in the control script resolves to the mount point.-+- Azure Machine Learning has mounted Blob Storage to the compute cluster automatically for you, passing the mount point into `--data_path`. Compared to the previous job, there is no on the fly data download. +- The `inputs=my_job_inputs` used in the control script resolves to the mount point. ## Clean up resources If you're not going to use it now, stop the compute instance: 1. Select the compute instance in the list. 1. On the top toolbar, select **Stop**. - ### Delete all resources [!INCLUDE [aml-delete-resource-group](../../includes/aml-delete-resource-group.md)] |
| machine-learning | Tutorial 1St Experiment Hello World | https://github.com/MicrosoftDocs/azure-docs/commits/main/articles/machine-learning/tutorial-1st-experiment-hello-world.md | Title: 'Tutorial: Get started with a Python script' + Title: "Tutorial: Get started with a Python script" description: Get started with your first Python script in Azure Machine Learning. This is part 1 of a three-part getting-started series. In this tutorial, you will: - Complete [Quickstart: Set up your workspace to get started with Azure Machine Learning](quickstart-create-resources.md) to create a workspace, compute instance, and compute cluster to use in this tutorial series. +- The Azure Machine Learning Python SDK v2 (preview) installed. ++ To install the SDK you can either, + * Create a compute instance, which automatically installs the SDK and is pre-configured for ML workflows. For more information, see [Create and manage an Azure Machine Learning compute instance](how-to-create-manage-compute-instance.md). ++ * Use the following commands to install Azure ML Python SDK v2: + * Uninstall previous preview version: + ```python + pip uninstall azure-ai-ml + ``` + * Install the Azure ML Python SDK v2: + ```python + pip install azure-ai-ml + ``` + ## Create and run a Python script -This tutorial will use the compute instance as your development computer. First create a few folders and the script: +This tutorial will use the compute instance as your development computer. First create a few folders and the script: 1. Sign in to the [Azure Machine Learning studio](https://ml.azure.com) and select your workspace if prompted. 1. On the left, select **Notebooks** This tutorial will use the compute instance as your development computer. First 1. Name the folder **get-started**. 1. To the right of the folder name, use the **...** to create another folder under **get-started**. :::image type="content" source="media/tutorial-1st-experiment-hello-world/create-sub-folder.png" alt-text="Screenshot shows create a subfolder menu.":::-1. Name the new folder **src**. Use the **Edit location** link if the file location is not correct. -1. To the right of the **src** folder, use the **...** to create a new file in the **src** folder. +1. Name the new folder **src**. Use the **Edit location** link if the file location is not correct. +1. To the right of the **src** folder, use the **...** to create a new file in the **src** folder. 1. Name your file *hello.py*. Switch the **File type** to *Python (*.py)*. Copy this code into your file: Copy this code into your file: print("Hello world!") ``` -Your project folder structure will now look like: +Your project folder structure will now look like: :::image type="content" source="media/tutorial-1st-experiment-hello-world/directory-structure.png" alt-text="Folder structure shows hello.py in src subfolder."::: - ### <a name="test"></a>Test your script -You can run your code locally, which in this case means on the compute instance. Running code locally has the benefit of interactive debugging of code. +You can run your code locally, which in this case means on the compute instance. Running code locally has the benefit of interactive debugging of code. -If you have previously stopped your compute instance, start it now with the **Start compute** tool to the right of the compute dropdown. Wait about a minute for state to change to *Running*. +If you have previously stopped your compute instance, start it now with the **Start compute** tool to the right of the compute dropdown. Wait about a minute for state to change to *Running*. :::image type="content" source="media/tutorial-1st-experiment-hello-world/start-compute.png" alt-text="Screenshot shows starting the compute instance if it is stopped"::: You'll see the output of the script in the terminal window that opens. Close the ## <a name="control-script"></a> Create a control script -A *control script* allows you to run your `hello.py` script on different compute resources. You use the control script to control how and where your machine learning code is run. +A *control script* allows you to run your `hello.py` script on different compute resources. You use the control script to control how and where your machine learning code is run. -Select the **...** at the end of **get-started** folder to create a new file. Create a Python file called *run-hello.py* and copy/paste the following code into that file: +Select the **...** at the end of **get-started** folder to create a new file. Create a Python file called *run-hello.py* and copy/paste the following code into that file: ```python # get-started/run-hello.py-from azureml.core import Workspace, Experiment, Environment, ScriptRunConfig +from azure.ai.ml import MLClient, command, Input +from azure.identity import DefaultAzureCredential +from azureml.core import Workspace +# get details of the current Azure ML workspace ws = Workspace.from_config()-experiment = Experiment(workspace=ws, name='day1-experiment-hello') -config = ScriptRunConfig(source_directory='./src', script='hello.py', compute_target='cpu-cluster') --run = experiment.submit(config) -aml_url = run.get_portal_url() -print(aml_url) +# default authentication flow for Azure applications +default_azure_credential = DefaultAzureCredential() +subscription_id = ws.subscription_id +resource_group = ws.resource_group +workspace = ws.name ++# client class to interact with Azure ML services and resources, e.g. workspaces, jobs, models and so on. +ml_client = MLClient( + default_azure_credential, + subscription_id, + resource_group, + workspace) ++# target name of compute where job will be executed +computeName="cpu-cluster" +job = command( + code="./src", + command="python hello.py", + environment="AzureML-sklearn-0.24-ubuntu18.04-py37-cpu@latest", + compute=computeName, + display_name="hello-world-example", +) ++returned_job = ml_client.create_or_update(job) +aml_url = returned_job.studio_url +print("Monitor your job at", aml_url) ``` > [!TIP]-> If you used a different name when you created your compute cluster, make sure to adjust the name in the code `compute_target='cpu-cluster'` as well. +> If you used a different name when you created your compute cluster, make sure to adjust the name in the code `computeName='cpu-cluster'` as well. ### Understand the code Here's a description of how the control script works: :::row::: :::column span="":::- `ws = Workspace.from_config()` - :::column-end::: - :::column span="2"::: - [Workspace](/python/api/azureml-core/azureml.core.workspace.workspace) connects to your Azure Machine Learning workspace, so that you can communicate with your Azure Machine Learning resources. - :::column-end::: - :::column span=""::: - `experiment = Experiment( ... )` + `ml_client = MLClient(DefaultAzureCredential(), subscription_id, resource_group, workspace)` :::column-end::: :::column span="2":::- [Experiment](/python/api/azureml-core/azureml.core.experiment.experiment) provides a simple way to organize multiple jobs under a single name. Later you can see how experiments make it easy to compare metrics between dozens of jobs. + [MLClient](/python/api/azure-ai-ml/azure.ai.ml.mlclient) manages your Azure Machine Learning workspace and it's assets and resources. :::column-end::: :::row-end::: :::row::: :::column span="":::- `config = ScriptRunConfig( ... )` + `job = command(...)` :::column-end::: :::column span="2":::- [ScriptRunConfig](/python/api/azureml-core/azureml.core.scriptrunconfig) wraps your `hello.py` code and passes it to your workspace. As the name suggests, you can use this class to _configure_ how you want your _script_ to _run_ in Azure Machine Learning. It also specifies what compute target the script will run on. In this code, the target is the compute cluster that you created in the [setup tutorial](./quickstart-create-resources.md). + [command](/python/api/azure-ai-ml/azure.ai.ml#azure-ai-ml-command) provides a simple way to construct a standalone command job or one as part of a dsl.pipeline. :::column-end::: :::row-end::: :::row::: :::column span="":::- `run = experiment.submit(config)` + `returned_job = ml_client.create_or_update(job)` :::column-end::: :::column span="2":::- Submits your script. This submission is called a [run](/python/api/azureml-core/azureml.core.run%28class%29). A job encapsulates a single execution of your code. Use a job to monitor the script progress, capture the output, analyze the results, visualize metrics, and more. + Submits your script. This submission is called a [job](/python/api/azure-ai-ml/azure.ai.ml.entities.job). A job encapsulates a single execution of your code. Use a job to monitor the script progress, capture the output, analyze the results, visualize metrics, and more. :::column-end::: :::row-end::: :::row::: :::column span="":::- `aml_url = run.get_portal_url()` + `aml_url = returned_job.studio_url` :::column-end::: :::column span="2":::- The `run` object provides a handle on the execution of your code. Monitor its progress from the Azure Machine Learning studio with the URL that's printed from the Python script. + The `job` object provides a handle on the execution of your code. Monitor its progress from the Azure Machine Learning studio with the URL that's printed from the Python script. :::column-end::: :::row-end::: - ## <a name="submit"></a> Submit and run your code in the cloud 1. Select **Save and run script in terminal** to run your control script, which in turn runs `hello.py` on the compute cluster that you created in the [setup tutorial](quickstart-create-resources.md). -1. In the terminal, you may be asked to sign in to authenticate. Copy the code and follow the link to complete this step. +1. In the terminal, you may be asked to sign in to authenticate. Copy the code and follow the link to complete this step. 1. Once you're authenticated, you'll see a link in the terminal. Select the link to view the job. - [!INCLUDE [amlinclude-info](../../includes/machine-learning-py38-ignore.md)] + [!INCLUDE [amlinclude-info](../../includes/machine-learning-py38-ignore.md)] ## View the output Here's a description of how the control script works: ## <a name="monitor"></a>Monitor your code in the cloud in the studio The output from your script will contain a link to the studio that looks something like this:-`https://ml.azure.com/experiments/hello-world/runs/<run-id>?wsid=/subscriptions/<subscription-id>/resourcegroups/<resource-group>/workspaces/<workspace-name>`. +`https://ml.azure.com/runs/<run-id>?wsid=/subscriptions/<subscription-id>/resourcegroups/<resource-group>/workspaces/<workspace-name>`. -Follow the link. At first, you'll see a status of **Queued** or **Preparing**. The very first run will take 5-10 minutes to complete. This is because the following occurs: +Follow the link. At first, you'll see a status of **Queued** or **Preparing**. The very first run will take 5-10 minutes to complete. This is because the following occurs: * A docker image is built in the cloud * The compute cluster is resized from 0 to 1 node-* The docker image is downloaded to the compute. +* The docker image is downloaded to the compute. Subsequent jobs are much quicker (~15 seconds) as the docker image is cached on the compute. You can test this by resubmitting the code below after the first job has completed. -Wait about 10 minutes. You'll see a message that the job has completed. Then use **Refresh** to see the status change to *Completed*. Once the job completes, go to the **Outputs + logs** tab. There you can see a `std_log.txt` file that looks like this: +Wait about 10 minutes. You'll see a message that the run has completed. Then use **Refresh** to see the status change to _Completed_. Once the job completes, go to the **Outputs + logs** tab. ++The `std_log.txt` file contains the standard output from a run. This file can be useful when you're debugging remote runs in the cloud. ```txt- 1: [2020-08-04T22:15:44.407305] Entering context manager injector. - 2: [context_manager_injector.py] Command line Options: Namespace(inject=['ProjectPythonPath:context_managers.ProjectPythonPath', 'RunHistory:context_managers.RunHistory', 'TrackUserError:context_managers.TrackUserError', 'UserExceptions:context_managers.UserExceptions'], invocation=['hello.py']) - 3: Starting the daemon thread to refresh tokens in background for process with pid = 31263 - 4: Entering Job History Context Manager. - 5: Preparing to call script [ hello.py ] with arguments: [] - 6: After variable expansion, calling script [ hello.py ] with arguments: [] - 7: - 8: Hello world! - 9: Starting the daemon thread to refresh tokens in background for process with pid = 31263 -10: -11: -12: The experiment completed successfully. Finalizing job... -13: Logging experiment finalizing status in history service. -14: [2020-08-04T22:15:46.541334] TimeoutHandler __init__ -15: [2020-08-04T22:15:46.541396] TimeoutHandler __enter__ -16: Cleaning up all outstanding Job operations, waiting 300.0 seconds -17: 1 items cleaning up... -18: Cleanup took 0.1812913417816162 seconds -19: [2020-08-04T22:15:47.040203] TimeoutHandler __exit__ +hello world ``` -On line 8, you see the "Hello world!" output. --The `70_driver_log.txt` file contains the standard output from a job. This file can be useful when you're debugging remote jobs in the cloud. -- ## Next steps In this tutorial, you took a simple "Hello world!" script and ran it on Azure. You saw how to connect to your Azure Machine Learning workspace, create an experiment, and submit your `hello.py` code to the cloud. In the next tutorial, you build on these learnings by running something more int > [!div class="nextstepaction"] > [Tutorial: Train a model](tutorial-1st-experiment-sdk-train.md) ->[!NOTE] +> [!NOTE] > If you want to finish the tutorial series here and not progress to the next step, remember to [clean up your resources](tutorial-1st-experiment-bring-data.md#clean-up-resources). |
| machine-learning | Tutorial 1St Experiment Sdk Train | https://github.com/MicrosoftDocs/azure-docs/commits/main/articles/machine-learning/tutorial-1st-experiment-sdk-train.md | -This tutorial shows you how to train a machine learning model in Azure Machine Learning. This tutorial is *part 2 of a three-part tutorial series*. +This tutorial shows you how to train a machine learning model in Azure Machine Learning. This tutorial is _part 2 of a three-part tutorial series_. - In [Part 1: Run "Hello world!"](tutorial-1st-experiment-hello-world.md) of the series, you learned how to use a control script to run a job in the cloud. +In [Part 1: Run "Hello world!"](tutorial-1st-experiment-hello-world.md) of the series, you learned how to use a control script to run a job in the cloud. In this tutorial, you take the next step by submitting a script that trains a machine learning model. This example will help you understand how Azure Machine Learning eases consistent behavior between local debugging and remote runs. The training code is taken from [this introductory example](https://pytorch.org/ x = self.fc3(x) return x ```-1. On the toolbar, select **Save** to save the file. Close the tab if you wish. ++1. On the toolbar, select **Save** to save the file. Close the tab if you wish. 1. Next, define the training script, also in the **src** subfolder. This script downloads the CIFAR10 dataset by using PyTorch `torchvision.dataset` APIs, sets up the network defined in *model.py*, and trains it for two epochs by using standard SGD and cross-entropy loss. The training code is taken from [this introductory example](https://pytorch.org/ :::image type="content" source="media/tutorial-1st-experiment-sdk-train/directory-structure.png" alt-text="Directory structure shows train.py in src subdirectory"::: - ## <a name="test-local"></a> Test locally Select **Save and run script in terminal** to run the *train.py* script directly on the compute instance. -After the script completes, select **Refresh** above the file folders. You'll see the new data folder called **get-started/data** Expand this folder to view the downloaded data. +After the script completes, select **Refresh** above the file folders. You'll see the new data folder called **get-started/data** Expand this folder to view the downloaded data. :::image type="content" source="media/tutorial-1st-experiment-hello-world/directory-with-data.png" alt-text="Screenshot of folders shows new data folder created by running the file locally."::: ## Create a Python environment -Azure Machine Learning provides the concept of an [environment](/python/api/azureml-core/azureml.core.environment.environment) to represent a reproducible, versioned Python environment for running experiments. It's easy to create an environment from a local Conda or pip environment. +Azure Machine Learning provides the concept of an [environment](/python/api/azureml-core/azureml.core.environment.environment) to represent a reproducible, versioned Python environment for running experiments. It's easy to create an environment from a local Conda or pip environment. First you'll create a file with the package dependencies. 1. Create a new file in the **get-started** folder called `pytorch-env.yml`:- + ```yml name: pytorch-env channels: - defaults - pytorch dependencies:- - python=3.6.2 + - python=3.8.5 - pytorch - torchvision ``` Create a new Python file in the **get-started** folder called `run-pytorch.py`: ```python # run-pytorch.py+from azure.ai.ml import MLClient, command, Input +from azure.identity import DefaultAzureCredential +from azure.ai.ml.entities import Environment from azureml.core import Workspace-from azureml.core import Experiment -from azureml.core import Environment -from azureml.core import ScriptRunConfig if __name__ == "__main__":+ # get details of the current Azure ML workspace ws = Workspace.from_config()- experiment = Experiment(workspace=ws, name='day1-experiment-train') - config = ScriptRunConfig(source_directory='./src', - script='train.py', - compute_target='cpu-cluster') -- # set up pytorch environment - env = Environment.from_conda_specification( - name='pytorch-env', - file_path='pytorch-env.yml' - ) - config.run_config.environment = env - run = experiment.submit(config) + # default authentication flow for Azure applications + default_azure_credential = DefaultAzureCredential() + subscription_id = ws.subscription_id + resource_group = ws.resource_group + workspace = ws.name ++ # client class to interact with Azure ML services and resources, e.g. workspaces, jobs, models and so on. + ml_client = MLClient( + default_azure_credential, + subscription_id, + resource_group, + workspace) ++ env_name = "pytorch-env" + env_docker_image = Environment( + image="pytorch/pytorch:latest", + name=env_name, + conda_file="pytorch-env.yml", + ) + ml_client.environments.create_or_update(env_docker_image) ++ # target name of compute where job will be executed + computeName="cpu-cluster" + job = command( + code="./src", + command="python train.py", + environment=f"{env_name}@latest", + compute=computeName, + display_name="day1-experiment-train", + ) - aml_url = run.get_portal_url() - print(aml_url) + returned_job = ml_client.create_or_update(job) + aml_url = returned_job.studio_url + print("Monitor your job at", aml_url) ``` > [!TIP]-> If you used a different name when you created your compute cluster, make sure to adjust the name in the code `compute_target='cpu-cluster'` as well. +> If you used a different name when you created your compute cluster, make sure to adjust the name in the code `computeName='cpu-cluster'` as well. ### Understand the code changes :::row::: :::column span="":::- `env = ...` + `env_docker_image = ...` :::column-end::: :::column span="2":::- References the dependency file you created above. + Creates the custom environment against the pytorch base image, with additional conda file to install. :::column-end::: :::row-end::: :::row::: :::column span="":::- `config.run_config.environment = env` + `environment=f"{env_name}@latest"` :::column-end::: :::column span="2":::- Adds the environment to [ScriptRunConfig](/python/api/azureml-core/azureml.core.scriptrunconfig). + Adds the environment to [command](/python/api/azure-ai-ml/azure.ai.ml#azure-ai-ml-command). :::column-end::: :::row-end::: -## <a name="submit"></a> Submit the run to Azure Machine Learning +## <a name="submit"></a> Submit the job to Azure Machine Learning 1. Select **Save and run script in terminal** to run the *run-pytorch.py* script. 1. You'll see a link in the terminal window that opens. Select the link to view the job. - [!INCLUDE [amlinclude-info](../../includes/machine-learning-py38-ignore.md)] + [!INCLUDE [amlinclude-info](../../includes/machine-learning-py38-ignore.md)] ### View the output -1. In the page that opens, you'll see the job status. The first time you run this script, Azure Machine Learning will build a new Docker image from your PyTorch environment. The whole job might around 10 minutes to complete. This image will be reused in future jobs to make them run much quicker. +1. In the page that opens, you'll see the job status. The first time you run this script, Azure Machine Learning will build a new Docker image from your PyTorch environment. The whole job might around 10 minutes to complete. This image will be reused in future jobs to make them job much quicker. 1. You can see view Docker build logs in the Azure Machine Learning studio. Select the **Outputs + logs** tab, and then select **20_image_build_log.txt**. 1. When the status of the job is **Completed**, select **Output + logs**. 1. Select **std_log.txt** to view the output of your job. if __name__ == "__main__": ```txt Downloading https://www.cs.toronto.edu/~kriz/cifar-10-python.tar.gz to ../data/cifar-10-python.tar.gz Extracting ../data/cifar-10-python.tar.gz to ../data-epoch=1, batch= 2000: loss 2.19 -epoch=1, batch= 4000: loss 1.82 -epoch=1, batch= 6000: loss 1.66 -... -epoch=2, batch= 8000: loss 1.51 -epoch=2, batch=10000: loss 1.49 -epoch=2, batch=12000: loss 1.46 +epoch=1, batch= 2000: loss 2.30 +epoch=1, batch= 4000: loss 2.17 +epoch=1, batch= 6000: loss 1.99 +epoch=1, batch= 8000: loss 1.87 +epoch=1, batch=10000: loss 1.72 +epoch=1, batch=12000: loss 1.63 +epoch=2, batch= 2000: loss 1.54 +epoch=2, batch= 4000: loss 1.53 +epoch=2, batch= 6000: loss 1.50 +epoch=2, batch= 8000: loss 1.46 +epoch=2, batch=10000: loss 1.44 +epoch=2, batch=12000: loss 1.41 Finished Training+ ``` If you see an error `Your total snapshot size exceeds the limit`, the **data** folder is located in the `source_directory` value used in `ScriptRunConfig`. -Select the **...** at the end of the folder, then select **Move** to move **data** to the **get-started** folder. -+Select the **...** at the end of the folder, then select **Move** to move **data** to the **get-started** folder. ## <a name="log"></a> Log training metrics -Now that you have a model training in Azure Machine Learning, start tracking some performance metrics. +Now that you have a model training script in Azure Machine Learning, let's start tracking some performance metrics. -The current training script prints metrics to the terminal. Azure Machine Learning provides a mechanism for logging metrics with more functionality. By adding a few lines of code, you gain the ability to visualize metrics in the studio and to compare metrics between multiple jobs. +The current training script prints metrics to the terminal. Azure Machine Learning supports logging and tracking experiments using [MLflow tracking](https://www.mlflow.org/docs/latest/tracking.html). By adding a few lines of code, you gain the ability to visualize metrics in the studio and to compare metrics between multiple jobs. ### Modify *train.py* to include logging 1. Modify your *train.py* script to include two more lines of code:- + ```python import torch import torch.optim as optim import torchvision import torchvision.transforms as transforms from model import Net- from azureml.core import Run - - - # ADDITIONAL CODE: get run from the current context - run = Run.get_context() - + import mlflow +++ # ADDITIONAL CODE: OPTIONAL: turn on autolog + # mlflow.autolog() + # download CIFAR 10 data trainset = torchvision.datasets.CIFAR10( root='./data', The current training script prints metrics to the terminal. Azure Machine Learni shuffle=True, num_workers=2 )- - ++ if __name__ == "__main__": # define convolutional network net = Net() The current training script prints metrics to the terminal. Azure Machine Learni if i % 2000 == 1999: loss = running_loss / 2000 # ADDITIONAL CODE: log loss metric to AML- run.log('loss', loss) + mlflow.log_metric('loss', loss) print(f'epoch={epoch + 1}, batch={i + 1:5}: loss {loss:.2f}') running_loss = 0.0 print('Finished Training') The current training script prints metrics to the terminal. Azure Machine Learni #### Understand the additional two lines of code -In *train.py*, you access the run object from _within_ the training script itself by using the `Run.get_context()` method and use it to log metrics: - ```python-# ADDITIONAL CODE: get run from the current context -run = Run.get_context() +# ADDITIONAL CODE: OPTIONAL: turn on autolog +mlflow.autolog() +``` -... +With Azure Machine Learning and MLFlow, users can log metrics, model parameters and model artifacts automatically when training a model. ++```python # ADDITIONAL CODE: log loss metric to AML-run.log('loss', loss) +mlflow.log_metric('loss', loss) ``` +You can log individual metrics as well. + Metrics in Azure Machine Learning are: -- Organized by experiment and run, so it's easy to keep track of and-compare metrics. +- Organized by experiment and job, so it's easy to keep track of and compare metrics. - Equipped with a UI so you can visualize training performance in the studio. - Designed to scale, so you keep these benefits even as you run hundreds of experiments. channels: - defaults - pytorch dependencies:- - python=3.6.2 + - python=3.8.5 - pytorch - torchvision - pip - pip:- - azureml-sdk + - mlflow + - azureml-mlflow ``` -Make sure you save this file before you submit the run. +Make sure you save this file before you submit the job. -### <a name="submit-again"></a> Submit the run to Azure Machine Learning +### <a name="submit-again"></a> Submit the job to Azure Machine Learning -Select the tab for the *run-pytorch.py* script, then select **Save and run script in terminal** to re-run the *run-pytorch.py* script. Make sure you've saved your changes to `pytorch-env.yml` first. +Select the tab for the *run-pytorch.py* script, then select **Save and run script in terminal** to re-run the *run-pytorch.py* script. Make sure you've saved your changes to `pytorch-env.yml` first. -This time when you visit the studio, go to the **Metrics** tab where you can now see live updates on the model training loss! It may take a 1 to 2 minutes before the training begins. +This time when you visit the studio, go to the **Metrics** tab where you can now see live updates on the model training loss! It may take a 1 to 2 minutes before the training begins. :::image type="content" source="media/tutorial-1st-experiment-sdk-train/logging-metrics.png" alt-text="Training loss graph on the Metrics tab."::: In the next session, you'll see how to work with data in Azure Machine Learning > [!div class="nextstepaction"] > [Tutorial: Bring your own data](tutorial-1st-experiment-bring-data.md) ->[!NOTE] +> [!NOTE] > If you want to finish the tutorial series here and not progress to the next step, remember to [clean up your resources](tutorial-1st-experiment-bring-data.md#clean-up-resources). |
| machine-learning | Tutorial Create Secure Workspace | https://github.com/MicrosoftDocs/azure-docs/commits/main/articles/machine-learning/tutorial-create-secure-workspace.md | In this tutorial, you accomplish the following tasks: ## Limitations -The steps in this article put Azure Container Registry behind the VNet. In this configuration, you can't deploy models to Azure Container Instances inside the VNet. For more information, see [Secure the inference environment](how-to-secure-inferencing-vnet.md). +The steps in this article put Azure Container Registry behind the VNet. In this configuration, you can't deploy models to Azure Container Instances inside the VNet. For more information, see [Secure the inference environment](./v1/how-to-secure-inferencing-vnet.md). > [!TIP] > As an alternative to Azure Container Instances, try Azure Machine Learning managed online endpoints. For more information, see [Enable network isolation for managed online endpoints (preview)](how-to-secure-online-endpoint.md). When Azure Container Registry is behind the virtual network, Azure Machine Learn ## Use the workspace > [!IMPORTANT]-> The steps in this article put Azure Container Registry behind the VNet. In this configuration, you cannot deploy a model to Azure Container Instances inside the VNet. We do not recommend using Azure Container Instances with Azure Machine Learning in a virtual network. For more information, see [Secure the inference environment](how-to-secure-inferencing-vnet.md). +> The steps in this article put Azure Container Registry behind the VNet. In this configuration, you cannot deploy a model to Azure Container Instances inside the VNet. We do not recommend using Azure Container Instances with Azure Machine Learning in a virtual network. For more information, see [Secure the inference environment](./v1/how-to-secure-inferencing-vnet.md). > > As an alternative to Azure Container Instances, try Azure Machine Learning managed online endpoints. For more information, see [Enable network isolation for managed online endpoints (preview)](how-to-secure-online-endpoint.md). |
| machine-learning | How To Create Attach Kubernetes | https://github.com/MicrosoftDocs/azure-docs/commits/main/articles/machine-learning/v1/how-to-create-attach-kubernetes.md | + + Title: Create and attach Azure Kubernetes Service ++description: 'Learn how to create a new Azure Kubernetes Service cluster through Azure Machine Learning, or how to attach an existing AKS cluster to your workspace.' ++++++++ Last updated : 04/21/2022+++# Create and attach an Azure Kubernetes Service cluster ++> [!div class="op_single_selector" title1="Select the version of Azure Machine Learning SDK or CLI extension you are using:"] +> * [v1](how-to-create-attach-kubernetes.md) +> * [v2 (current version)](../how-to-attach-kubernetes-anywhere.md) ++Azure Machine Learning can deploy trained machine learning models to Azure Kubernetes Service. However, you must first either __create__ an Azure Kubernetes Service (AKS) cluster from your Azure ML workspace, or __attach__ an existing AKS cluster. This article provides information on both creating and attaching a cluster. ++## Prerequisites ++- An Azure Machine Learning workspace. For more information, see [Create an Azure Machine Learning workspace](../how-to-manage-workspace.md). ++- The [Azure CLI extension for Machine Learning service](reference-azure-machine-learning-cli.md), [Azure Machine Learning Python SDK](/python/api/overview/azure/ml/intro), or the [Azure Machine Learning Visual Studio Code extension](../how-to-setup-vs-code.md). ++- If you plan on using an Azure Virtual Network to secure communication between your Azure ML workspace and the AKS cluster, your workspace and its associated resources (storage, key vault, Azure Container Registry) must have private endpoints or service endpoints in the same VNET as AKS cluster's VNET. Please follow tutorial [create a secure workspace](../tutorial-create-secure-workspace.md) to add those private endpoints or service endpoints to your VNET. ++## Limitations ++- If you need a **Standard Load Balancer(SLB)** deployed in your cluster instead of a Basic Load Balancer(BLB), create a cluster in the AKS portal/CLI/SDK and then **attach** it to the AzureML workspace. ++- If you have an Azure Policy that restricts the creation of Public IP addresses, then AKS cluster creation will fail. AKS requires a Public IP for [egress traffic](../../aks/limit-egress-traffic.md). The egress traffic article also provides guidance to lock down egress traffic from the cluster through the Public IP, except for a few fully qualified domain names. There are 2 ways to enable a Public IP: + - The cluster can use the Public IP created by default with the BLB or SLB, Or + - The cluster can be created without a Public IP and then a Public IP is configured with a firewall with a user defined route. For more information, see [Customize cluster egress with a user-defined-route](../../aks/egress-outboundtype.md). + + The AzureML control plane does not talk to this Public IP. It talks to the AKS control plane for deployments. ++- To attach an AKS cluster, the service principal/user performing the operation must be assigned the __Owner or contributor__ Azure role-based access control (Azure RBAC) role on the Azure resource group that contains the cluster. The service principal/user must also be assigned [Azure Kubernetes Service Cluster Admin Role](../../role-based-access-control/built-in-roles.md#azure-kubernetes-service-cluster-admin-role) on the cluster. ++- If you **attach** an AKS cluster, which has an [Authorized IP range enabled to access the API server](../../aks/api-server-authorized-ip-ranges.md), enable the AzureML control plane IP ranges for the AKS cluster. The AzureML control plane is deployed across paired regions and deploys inference pods on the AKS cluster. Without access to the API server, the inference pods cannot be deployed. Use the [IP ranges](https://www.microsoft.com/download/confirmation.aspx?id=56519) for both the [paired regions](../../availability-zones/cross-region-replication-azure.md) when enabling the IP ranges in an AKS cluster. ++ Authorized IP ranges only works with Standard Load Balancer. ++- If you want to use a private AKS cluster (using Azure Private Link), you must create the cluster first, and then **attach** it to the workspace. For more information, see [Create a private Azure Kubernetes Service cluster](../../aks/private-clusters.md). ++- Using a [public fully qualified domain name (FQDN) with a private AKS cluster](../../aks/private-clusters.md) is __not supported__ with Azure Machine learning. ++- The compute name for the AKS cluster MUST be unique within your Azure ML workspace. It can include letters, digits and dashes. It must start with a letter, end with a letter or digit, and be between 3 and 24 characters in length. + + - If you want to deploy models to **GPU** nodes or **FPGA** nodes (or any specific SKU), then you must create a cluster with the specific SKU. There is no support for creating a secondary node pool in an existing cluster and deploying models in the secondary node pool. + +- When creating or attaching a cluster, you can select whether to create the cluster for __dev-test__ or __production__. If you want to create an AKS cluster for __development__, __validation__, and __testing__ instead of production, set the __cluster purpose__ to __dev-test__. If you do not specify the cluster purpose, a __production__ cluster is created. ++ > [!IMPORTANT] + > A __dev-test__ cluster is not suitable for production level traffic and may increase inference times. Dev/test clusters also do not guarantee fault tolerance. ++- When creating or attaching a cluster, if the cluster will be used for __production__, then it must contain at least __3 nodes__. For a __dev-test__ cluster, it must contain at least 1 node. ++- The Azure Machine Learning SDK does not provide support scaling an AKS cluster. To scale the nodes in the cluster, use the UI for your AKS cluster in the Azure Machine Learning studio. You can only change the node count, not the VM size of the cluster. For more information on scaling the nodes in an AKS cluster, see the following articles: ++ - [Manually scale the node count in an AKS cluster](../../aks/scale-cluster.md) + - [Set up cluster autoscaler in AKS](../../aks/cluster-autoscaler.md) ++- __Do not directly update the cluster by using a YAML configuration__. While Azure Kubernetes Services supports updates via YAML configuration, Azure Machine Learning deployments will override your changes. The only two YAML fields that will not overwritten are __request limits__ and __cpu and memory__. ++- Creating an AKS cluster using the Azure Machine Learning studio UI, SDK, or CLI extension is __not__ idempotent. Attempting to create the resource again will result in an error that a cluster with the same name already exists. + + - Using an Azure Resource Manager template and the [Microsoft.MachineLearningServices/workspaces/computes](/azure/templates/microsoft.machinelearningservices/2019-11-01/workspaces/computes) resource to create an AKS cluster is also __not__ idempotent. If you attempt to use the template again to update an already existing resource, you will receive the same error. ++## Azure Kubernetes Service version ++Azure Kubernetes Service allows you to create a cluster using a variety of Kubernetes versions. For more information on available versions, see [supported Kubernetes versions in Azure Kubernetes Service](../../aks/supported-kubernetes-versions.md). ++When **creating** an Azure Kubernetes Service cluster using one of the following methods, you *do not have a choice in the version* of the cluster that is created: ++* Azure Machine Learning studio, or the Azure Machine Learning section of the Azure portal. +* Machine Learning extension for Azure CLI. +* Azure Machine Learning SDK. ++These methods of creating an AKS cluster use the __default__ version of the cluster. *The default version changes over time* as new Kubernetes versions become available. ++When **attaching** an existing AKS cluster, we support all currently supported AKS versions. ++> [!IMPORTANT] +> Azure Kubernetes Service uses [Blobfuse FlexVolume driver](https://github.com/Azure/kubernetes-volume-drivers/blob/master/flexvolume/blobfuse/README.md) for the versions <=1.16 and [Blob CSI driver](https://github.com/kubernetes-sigs/blob-csi-driver/blob/master/README.md) for the versions >=1.17. +> Therefore, it is important to re-deploy or [update the web service](../how-to-deploy-update-web-service.md) after cluster upgrade in order to deploy to correct blobfuse method for the cluster version. ++> [!NOTE] +> There may be edge cases where you have an older cluster that is no longer supported. In this case, the attach operation will return an error and list the currently supported versions. +> +> You can attach **preview** versions. Preview functionality is provided without a service level agreement, and it's not recommended for production workloads. Certain features might not be supported or might have constrained capabilities. Support for using preview versions may be limited. For more information, see [Supplemental Terms of Use for Microsoft Azure Previews](https://azure.microsoft.com/support/legal/preview-supplemental-terms/). ++### Available and default versions ++To find the available and default AKS versions, use the [Azure CLI](/cli/azure/install-azure-cli) command [az aks get-versions](/cli/azure/aks#az-aks-get-versions). For example, the following command returns the versions available in the West US region: ++```azurecli-interactive +az aks get-versions -l westus -o table +``` ++The output of this command is similar to the following text: ++```text +KubernetesVersion Upgrades +- - +1.18.6(preview) None available +1.18.4(preview) 1.18.6(preview) +1.17.9 1.18.4(preview), 1.18.6(preview) +1.17.7 1.17.9, 1.18.4(preview), 1.18.6(preview) +1.16.13 1.17.7, 1.17.9 +1.16.10 1.16.13, 1.17.7, 1.17.9 +1.15.12 1.16.10, 1.16.13 +1.15.11 1.15.12, 1.16.10, 1.16.13 +``` ++To find the default version that is used when **creating** a cluster through Azure Machine Learning, you can use the `--query` parameter to select the default version: ++```azurecli-interactive +az aks get-versions -l westus --query "orchestrators[?default == `true`].orchestratorVersion" -o table +``` ++The output of this command is similar to the following text: ++```text +Result +-- +1.16.13 +``` ++If you'd like to **programmatically check the available versions**, use the Container Service Client - List Orchestrators REST API. To find the available versions, look at the entries where `orchestratorType` is `Kubernetes`. The associated `orchestrationVersion` entries contain the available versions that can be **attached** to your workspace. ++To find the default version that is used when **creating** a cluster through Azure Machine Learning, find the entry where `orchestratorType` is `Kubernetes` and `default` is `true`. The associated `orchestratorVersion` value is the default version. The following JSON snippet shows an example entry: ++```json +... + { + "orchestratorType": "Kubernetes", + "orchestratorVersion": "1.16.13", + "default": true, + "upgrades": [ + { + "orchestratorType": "", + "orchestratorVersion": "1.17.7", + "isPreview": false + } + ] + }, +... +``` ++## Create a new AKS cluster ++**Time estimate**: Approximately 10 minutes. ++Creating or attaching an AKS cluster is a one time process for your workspace. You can reuse this cluster for multiple deployments. If you delete the cluster or the resource group that contains it, you must create a new cluster the next time you need to deploy. You can have multiple AKS clusters attached to your workspace. ++The following example demonstrates how to create a new AKS cluster using the SDK and CLI: ++# [Python](#tab/python) +++```python +from azureml.core.compute import AksCompute, ComputeTarget ++# Use the default configuration (you can also provide parameters to customize this). +# For example, to create a dev/test cluster, use: +# prov_config = AksCompute.provisioning_configuration(cluster_purpose = AksCompute.ClusterPurpose.DEV_TEST) +prov_config = AksCompute.provisioning_configuration() ++# Example configuration to use an existing virtual network +# prov_config.vnet_name = "mynetwork" +# prov_config.vnet_resourcegroup_name = "mygroup" +# prov_config.subnet_name = "default" +# prov_config.service_cidr = "10.0.0.0/16" +# prov_config.dns_service_ip = "10.0.0.10" +# prov_config.docker_bridge_cidr = "172.17.0.1/16" ++aks_name = 'myaks' +# Create the cluster +aks_target = ComputeTarget.create(workspace = ws, + name = aks_name, + provisioning_configuration = prov_config) ++# Wait for the create process to complete +aks_target.wait_for_completion(show_output = True) +``` ++For more information on the classes, methods, and parameters used in this example, see the following reference documents: ++* [AksCompute.ClusterPurpose](/python/api/azureml-core/azureml.core.compute.aks.akscompute.clusterpurpose) +* [AksCompute.provisioning_configuration](/python/api/azureml-core/azureml.core.compute.akscompute#provisioning-configuration-agent-count-none--vm-size-none--ssl-cname-none--ssl-cert-pem-file-none--ssl-key-pem-file-none--location-none--vnet-resourcegroup-name-none--vnet-name-none--subnet-name-none--service-cidr-none--dns-service-ip-none--docker-bridge-cidr-none--cluster-purpose-none--load-balancer-type-none--load-balancer-subnet-none-) +* [ComputeTarget.create](/python/api/azureml-core/azureml.core.compute.computetarget#create-workspace--name--provisioning-configuration-) +* [ComputeTarget.wait_for_completion](/python/api/azureml-core/azureml.core.compute.computetarget#wait-for-completion-show-output-false-) ++# [Azure CLI](#tab/azure-cli) +++```azurecli +az ml computetarget create aks -n myaks +``` ++For more information, see the [az ml computetarget create aks](/cli/azure/ml(v1)/computetarget/create#az-ml-computetarget-create-aks) reference. ++# [Portal](#tab/azure-portal) ++For information on creating an AKS cluster in the portal, see [Create compute targets in Azure Machine Learning studio](../how-to-create-attach-compute-studio.md#inference-clusters). ++++## Attach an existing AKS cluster ++**Time estimate:** Approximately 5 minutes. ++If you already have AKS cluster in your Azure subscription, you can use it with your workspace. ++> [!TIP] +> The existing AKS cluster can be in a Azure region other than your Azure Machine Learning workspace. +++> [!WARNING] +> Do not create multiple, simultaneous attachments to the same AKS cluster from your workspace. For example, attaching one AKS cluster to a workspace using two different names. Each new attachment will break the previous existing attachment(s). +> +> If you want to re-attach an AKS cluster, for example to change TLS or other cluster configuration setting, you must first remove the existing attachment by using [AksCompute.detach()](/python/api/azureml-core/azureml.core.compute.akscompute#detach--). ++For more information on creating an AKS cluster using the Azure CLI or portal, see the following articles: ++* [Create an AKS cluster (CLI)](/cli/azure/aks?bc=%2fazure%2fbread%2ftoc.json&toc=%2fazure%2faks%2fTOC.json#az-aks-create) +* [Create an AKS cluster (portal)](../../aks/learn/quick-kubernetes-deploy-portal.md) +* [Create an AKS cluster (ARM Template on Azure Quickstart templates)](https://github.com/Azure/azure-quickstart-templates/tree/master/quickstarts/microsoft.containerinstance/aks-azml-targetcompute) ++The following example demonstrates how to attach an existing AKS cluster to your workspace: ++# [Python](#tab/python) +++```python +from azureml.core.compute import AksCompute, ComputeTarget +# Set the resource group that contains the AKS cluster and the cluster name +resource_group = 'myresourcegroup' +cluster_name = 'myexistingcluster' ++# Attach the cluster to your workgroup. If the cluster has less than 12 virtual CPUs, use the following instead: +# attach_config = AksCompute.attach_configuration(resource_group = resource_group, +# cluster_name = cluster_name, +# cluster_purpose = AksCompute.ClusterPurpose.DEV_TEST) +attach_config = AksCompute.attach_configuration(resource_group = resource_group, + cluster_name = cluster_name) +aks_target = ComputeTarget.attach(ws, 'myaks', attach_config) ++# Wait for the attach process to complete +aks_target.wait_for_completion(show_output = True) +``` ++For more information on the classes, methods, and parameters used in this example, see the following reference documents: ++* [AksCompute.attach_configuration()](/python/api/azureml-core/azureml.core.compute.akscompute#attach-configuration-resource-group-none--cluster-name-none--resource-id-none--cluster-purpose-none-) +* [AksCompute.ClusterPurpose](/python/api/azureml-core/azureml.core.compute.aks.akscompute.clusterpurpose) +* [AksCompute.attach](/python/api/azureml-core/azureml.core.compute.computetarget#attach-workspace--name--attach-configuration-) ++# [Azure CLI](#tab/azure-cli) +++To attach an existing cluster using the CLI, you need to get the resource ID of the existing cluster. To get this value, use the following command. Replace `myexistingcluster` with the name of your AKS cluster. Replace `myresourcegroup` with the resource group that contains the cluster: ++```azurecli +az aks show -n myexistingcluster -g myresourcegroup --query id +``` ++This command returns a value similar to the following text: ++```text +/subscriptions/{GUID}/resourcegroups/{myresourcegroup}/providers/Microsoft.ContainerService/managedClusters/{myexistingcluster} +``` ++To attach the existing cluster to your workspace, use the following command. Replace `aksresourceid` with the value returned by the previous command. Replace `myresourcegroup` with the resource group that contains your workspace. Replace `myworkspace` with your workspace name. ++```azurecli +az ml computetarget attach aks -n myaks -i aksresourceid -g myresourcegroup -w myworkspace +``` ++For more information, see the [az ml computetarget attach aks](/cli/azure/ml(v1)/computetarget/attach#az-ml-computetarget-attach-aks) reference. ++# [Portal](#tab/azure-portal) ++For information on attaching an AKS cluster in the portal, see [Create compute targets in Azure Machine Learning studio](../how-to-create-attach-compute-studio.md#inference-clusters). ++++## Create or attach an AKS cluster with TLS termination +When you [create or attach an AKS cluster](how-to-create-attach-kubernetes.md), you can enable TLS termination with **[AksCompute.provisioning_configuration()](/python/api/azureml-core/azureml.core.compute.akscompute#provisioning-configuration-agent-count-none--vm-size-none--ssl-cname-none--ssl-cert-pem-file-none--ssl-key-pem-file-none--location-none--vnet-resourcegroup-name-none--vnet-name-none--subnet-name-none--service-cidr-none--dns-service-ip-none--docker-bridge-cidr-none--cluster-purpose-none--load-balancer-type-none--load-balancer-subnet-none-)** and **[AksCompute.attach_configuration()](/python/api/azureml-core/azureml.core.compute.akscompute#attach-configuration-resource-group-none--cluster-name-none--resource-id-none--cluster-purpose-none-)** configuration objects. Both methods return a configuration object that has an **enable_ssl** method, and you can use **enable_ssl** method to enable TLS. ++Following example shows how to enable TLS termination with automatic TLS certificate generation and configuration by using Microsoft certificate under the hood. +++```python + from azureml.core.compute import AksCompute, ComputeTarget + + # Enable TLS termination when you create an AKS cluster by using provisioning_config object enable_ssl method ++ # Leaf domain label generates a name using the formula + # "<leaf-domain-label>######.<azure-region>.cloudapp.azure.com" + # where "######" is a random series of characters + provisioning_config.enable_ssl(leaf_domain_label = "contoso") + + # Enable TLS termination when you attach an AKS cluster by using attach_config object enable_ssl method ++ # Leaf domain label generates a name using the formula + # "<leaf-domain-label>######.<azure-region>.cloudapp.azure.com" + # where "######" is a random series of characters + attach_config.enable_ssl(leaf_domain_label = "contoso") +++``` +Following example shows how to enable TLS termination with custom certificate and custom domain name. With custom domain and certificate, you must update your DNS record to point to the IP address of scoring endpoint, please see [Update your DNS](../how-to-secure-web-service.md#update-your-dns) +++```python + from azureml.core.compute import AksCompute, ComputeTarget ++ # Enable TLS termination with custom certificate and custom domain when creating an AKS cluster + + provisioning_config.enable_ssl(ssl_cert_pem_file="cert.pem", + ssl_key_pem_file="key.pem", ssl_cname="www.contoso.com") + + # Enable TLS termination with custom certificate and custom domain when attaching an AKS cluster ++ attach_config.enable_ssl(ssl_cert_pem_file="cert.pem", + ssl_key_pem_file="key.pem", ssl_cname="www.contoso.com") +++``` +>[!NOTE] +> For more information about how to secure model deployment on AKS cluster, please see [use TLS to secure a web service through Azure Machine Learning](../how-to-secure-web-service.md) ++## Create or attach an AKS cluster to use Internal Load Balancer with private IP ++When you create or attach an AKS cluster, you can configure the cluster to use an Internal Load Balancer. With an Internal Load Balancer, scoring endpoints for your deployments to AKS will use a private IP within the virtual network. Following code snippets show how to configure an Internal Load Balancer for an AKS cluster. ++# [Create](#tab/akscreate) +++To create an AKS cluster that uses an Internal Load Balancer, use the `load_balancer_type` and `load_balancer_subnet` parameters: ++```python +from azureml.core.compute.aks import AksUpdateConfiguration +from azureml.core.compute import AksCompute, ComputeTarget ++# Change to the name of the subnet that contains AKS +subnet_name = "default" +# When you create an AKS cluster, you can specify Internal Load Balancer to be created with provisioning_config object +provisioning_config = AksCompute.provisioning_configuration(load_balancer_type = 'InternalLoadBalancer', load_balancer_subnet = subnet_name) ++# Create the cluster +aks_target = ComputeTarget.create(workspace = ws, + name = aks_name, + provisioning_configuration = provisioning_config) ++# Wait for the create process to complete +aks_target.wait_for_completion(show_output = True) +``` ++# [Attach](#tab/aksattach) +++To attach an AKS cluster and use an internal load balancer (no public IP for the cluster), use the `load_balancer_type` and `load_balancer_subnet` parameters: ++```python +from azureml.core.compute import AksCompute, ComputeTarget +# Set the resource group that contains the AKS cluster and the cluster name +resource_group = 'myresourcegroup' +cluster_name = 'myexistingcluster' +# Change to the name of the subnet that contains AKS +subnet_name = "default" ++# Attach the cluster to your workgroup. If the cluster has less than 12 virtual CPUs, use the following instead: +# attach_config = AksCompute.attach_configuration(resource_group = resource_group, +# cluster_name = cluster_name, +# cluster_purpose = AksCompute.ClusterPurpose.DEV_TEST) +attach_config = AksCompute.attach_configuration(resource_group = resource_group, + cluster_name = cluster_name, + load_balancer_type = 'InternalLoadBalancer', + load_balancer_subnet = subnet_name) +aks_target = ComputeTarget.attach(ws, 'myaks', attach_config) ++# Wait for the attach process to complete +aks_target.wait_for_completion(show_output = True) +``` ++++>[!IMPORTANT] +> If your AKS cluster is configured with an Internal Load Balancer, using a Microsoft provided certificate is not supported and you must use [custom certificate to enable TLS](../how-to-secure-web-service.md#deploy-on-azure-kubernetes-service). ++>[!NOTE] +> For more information about how to secure inferencing environment, please see [Secure an Azure Machine Learning Inferencing Environment](how-to-secure-inferencing-vnet.md) ++## Detach an AKS cluster ++To detach a cluster from your workspace, use one of the following methods: ++> [!WARNING] +> Using the Azure Machine Learning studio, SDK, or the Azure CLI extension for machine learning to detach an AKS cluster **does not delete the AKS cluster**. To delete the cluster, see [Use the Azure CLI with AKS](../../aks/learn/quick-kubernetes-deploy-cli.md#delete-the-cluster). ++# [Python](#tab/python) +++```python +aks_target.detach() +``` ++# [Azure CLI](#tab/azure-cli) +++To detach the existing cluster to your workspace, use the following command. Replace `myaks` with the name that the AKS cluster is attached to your workspace as. Replace `myresourcegroup` with the resource group that contains your workspace. Replace `myworkspace` with your workspace name. ++```azurecli +az ml computetarget detach -n myaks -g myresourcegroup -w myworkspace +``` ++# [Portal](#tab/azure-portal) ++In Azure Machine Learning studio, select __Compute__, __Inference clusters__, and the cluster you wish to remove. Use the __Detach__ link to detach the cluster. ++++## Troubleshooting +### Update the cluster ++Updates to Azure Machine Learning components installed in an Azure Kubernetes Service cluster must be manually applied. ++You can apply these updates by detaching the cluster from the Azure Machine Learning workspace and reattaching the cluster to the workspace. +++```python +compute_target = ComputeTarget(workspace=ws, name=clusterWorkspaceName) +compute_target.detach() +compute_target.wait_for_completion(show_output=True) +``` ++Before you can re-attach the cluster to your workspace, you need to first delete any `azureml-fe` related resources. If there is no active service in the cluster, you can delete your `azureml-fe` related resources with the following code. ++```shell +kubectl delete sa azureml-fe +kubectl delete clusterrole azureml-fe-role +kubectl delete clusterrolebinding azureml-fe-binding +kubectl delete svc azureml-fe +kubectl delete svc azureml-fe-int-http +kubectl delete deploy azureml-fe +kubectl delete secret azuremlfessl +kubectl delete cm azuremlfeconfig +``` ++If TLS is enabled in the cluster, you will need to supply the TLS/SSL certificate and private key when reattaching the cluster. +++```python +attach_config = AksCompute.attach_configuration(resource_group=resourceGroup, cluster_name=kubernetesClusterName) ++# If SSL is enabled. +attach_config.enable_ssl( + ssl_cert_pem_file="cert.pem", + ssl_key_pem_file="key.pem", + ssl_cname=sslCname) ++attach_config.validate_configuration() ++compute_target = ComputeTarget.attach(workspace=ws, name=args.clusterWorkspaceName, attach_configuration=attach_config) +compute_target.wait_for_completion(show_output=True) +``` ++If you no longer have the TLS/SSL certificate and private key, or you are using a certificate generated by Azure Machine Learning, you can retrieve the files prior to detaching the cluster by connecting to the cluster using `kubectl` and retrieving the secret `azuremlfessl`. ++```bash +kubectl get secret/azuremlfessl -o yaml +``` ++> [!NOTE] +> Kubernetes stores the secrets in Base64-encoded format. You will need to Base64-decode the `cert.pem` and `key.pem` components of the secrets prior to providing them to `attach_config.enable_ssl`. ++### Webservice failures ++Many webservice failures in AKS can be debugged by connecting to the cluster using `kubectl`. You can get the `kubeconfig.json` for an AKS cluster by running +++```azurecli-interactive +az aks get-credentials -g <rg> -n <aks cluster name> +``` ++### Delete azureml-fe related resources ++After detaching cluster, if there is none active service in cluster, please delete the `azureml-fe` related resources before attaching again: ++```shell +kubectl delete sa azureml-fe +kubectl delete clusterrole azureml-fe-role +kubectl delete clusterrolebinding azureml-fe-binding +kubectl delete svc azureml-fe +kubectl delete svc azureml-fe-int-http +kubectl delete deploy azureml-fe +kubectl delete secret azuremlfessl +kubectl delete cm azuremlfeconfig +``` ++### Load balancers should not have public IPs ++When trying to create or attach an AKS cluster, you may receive a message that the request has been denied because "Load Balancers should not have public IPs". This message is returned when an administrator has applied a policy that prevents using an AKS cluster with a public IP address. ++To resolve this problem, create/attach the cluster by using the `load_balancer_type` and `load_balancer_subnet` parameters. For more information, see [Internal Load Balancer (private IP)](#create-or-attach-an-aks-cluster-to-use-internal-load-balancer-with-private-ip). ++## Next steps ++* [Use Azure RBAC for Kubernetes authorization](../../aks/manage-azure-rbac.md) +* [How and where to deploy a model](how-to-deploy-and-where.md) |
| machine-learning | How To Deploy And Where | https://github.com/MicrosoftDocs/azure-docs/commits/main/articles/machine-learning/v1/how-to-deploy-and-where.md | + + Title: Deploy machine learning models ++description: 'Learn how and where to deploy machine learning models. Deploy to Azure Container Instances, Azure Kubernetes Service, and FPGA.' ++++++ Last updated : 07/28/2022+++adobe-target: true ++++# Deploy machine learning models to Azure +++Learn how to deploy your machine learning or deep learning model as a web service in the Azure cloud. +++## Workflow for deploying a model ++The workflow is similar no matter where you deploy your model: ++1. Register the model. +1. Prepare an entry script. +1. Prepare an inference configuration. +1. Deploy the model locally to ensure everything works. +1. Choose a compute target. +1. Deploy the model to the cloud. +1. Test the resulting web service. ++For more information on the concepts involved in the machine learning deployment workflow, see [Manage, deploy, and monitor models with Azure Machine Learning](concept-model-management-and-deployment.md). ++## Prerequisites ++# [Azure CLI](#tab/azcli) ++++- An Azure Machine Learning workspace. For more information, see [Create workspace resources](../quickstart-create-resources.md). +- A model. The examples in this article use a pre-trained model. +- A machine that can run Docker, such as a [compute instance](../how-to-create-manage-compute-instance.md). ++# [Python](#tab/python) ++- An Azure Machine Learning workspace. For more information, see [Create workspace resources](../quickstart-create-resources.md). +- A model. The examples in this article use a pre-trained model. +- The [Azure Machine Learning software development kit (SDK) for Python](/python/api/overview/azure/ml/intro). +- A machine that can run Docker, such as a [compute instance](../how-to-create-manage-compute-instance.md). +++## Connect to your workspace ++# [Azure CLI](#tab/azcli) +++To see the workspaces that you have access to, use the following commands: ++```azurecli-interactive +az login +az account set -s <subscription> +az ml workspace list --resource-group=<resource-group> +``` ++# [Python](#tab/python) +++```python +from azureml.core import Workspace +ws = Workspace(subscription_id="<subscription_id>", + resource_group="<resource_group>", + workspace_name="<workspace_name>") +``` ++For more information on using the SDK to connect to a workspace, see the [Azure Machine Learning SDK for Python](/python/api/overview/azure/ml/intro#workspace) documentation. +++++## <a id="registermodel"></a> Register the model ++A typical situation for a deployed machine learning service is that you need the following components: + ++ Resources representing the specific model that you want deployed (for example: a pytorch model file).++ Code that you will be running in the service, that executes the model on a given input.++Azure Machine Learnings allows you to separate the deployment into two separate components, so that you can keep the same code, but merely update the model. We define the mechanism by which you upload a model _separately_ from your code as "registering the model". ++When you register a model, we upload the model to the cloud (in your workspace's default storage account) and then mount it to the same compute where your webservice is running. ++The following examples demonstrate how to register a model. +++# [Azure CLI](#tab/azcli) +++The following commands download a model and then register it with your Azure Machine Learning workspace: ++```azurecli-interactive +wget https://aka.ms/bidaf-9-model -O model.onnx --show-progress +az ml model register -n bidaf_onnx \ + -p ./model.onnx \ + -g <resource-group> \ + -w <workspace-name> +``` ++Set `-p` to the path of a folder or a file that you want to register. ++For more information on `az ml model register`, see the [reference documentation](/cli/azure/ml(v1)/model). ++### Register a model from an Azure ML training job ++If you need to register a model that was created previously through an Azure Machine Learning training job, you can specify the experiment, run, and path to the model: ++```azurecli-interactive +az ml model register -n bidaf_onnx --asset-path outputs/model.onnx --experiment-name myexperiment --run-id myrunid --tag area=qna +``` ++The `--asset-path` parameter refers to the cloud location of the model. In this example, the path of a single file is used. To include multiple files in the model registration, set `--asset-path` to the path of a folder that contains the files. ++For more information on `az ml model register`, see the [reference documentation](/cli/azure/ml(v1)/model). ++# [Python](#tab/python) ++### Register a model from a local file ++You can register a model by providing the local path of the model. You can provide the path of either a folder or a single file on your local machine. +<!-- pyhton nb call --> +[!Notebook-python[] (~/azureml-examples-main/python-sdk/tutorials/deploy-local/1.deploy-local.ipynb?name=register-model-from-local-file-code)] +++To include multiple files in the model registration, set `model_path` to the path of a folder that contains the files. ++For more information, see the documentation for the [Model class](/python/api/azureml-core/azureml.core.model.model). +++### Register a model from an Azure ML training job ++ When you use the SDK to train a model, you can receive either a [Run](/python/api/azureml-core/azureml.core.run.run) object or an [AutoMLRun](/python/api/azureml-train-automl-client/azureml.train.automl.run.automlrun) object, depending on how you trained the model. Each object can be used to register a model created by an experiment run. ++ + Register a model from an `azureml.core.Run` object: + + [!INCLUDE [sdk v1](../../../includes/machine-learning-sdk-v1.md)] ++ ```python + model = run.register_model(model_name='bidaf_onnx', + tags={'area': 'qna'}, + model_path='outputs/model.onnx') + print(model.name, model.id, model.version, sep='\t') + ``` ++ The `model_path` parameter refers to the cloud location of the model. In this example, the path of a single file is used. To include multiple files in the model registration, set `model_path` to the path of a folder that contains the files. For more information, see the [Run.register_model](/python/api/azureml-core/azureml.core.run.run#register-model-model-name--model-path-none--tags-none--properties-none--model-framework-none--model-framework-version-none--description-none--datasets-none--sample-input-dataset-none--sample-output-dataset-none--resource-configuration-none-kwargs-) documentation. ++ + Register a model from an `azureml.train.automl.run.AutoMLRun` object: ++ [!INCLUDE [sdk v1](../../../includes/machine-learning-sdk-v1.md)] ++ ```python + description = 'My AutoML Model' + model = run.register_model(description = description, + tags={'area': 'qna'}) ++ print(run.model_id) + ``` ++ In this example, the `metric` and `iteration` parameters aren't specified, so the iteration with the best primary metric will be registered. The `model_id` value returned from the run is used instead of a model name. ++ For more information, see the [AutoMLRun.register_model](/python/api/azureml-train-automl-client/azureml.train.automl.run.automlrun#register-model-model-name-none--description-none--tags-none--iteration-none--metric-none-) documentation. ++ To deploy a registered model from an `AutoMLRun`, we recommend doing so via the [one-click deploy button in Azure Machine Learning studio](../how-to-use-automated-ml-for-ml-models.md#deploy-your-model). ++++## Define a dummy entry script ++The entry script receives data submitted to a deployed web service and passes it to the model. It then returns the model's response to the client. *The script is specific to your model*. The entry script must understand the data that the model expects and returns. ++The two things you need to accomplish in your entry script are: ++1. Loading your model (using a function called `init()`) +1. Running your model on input data (using a function called `run()`) ++For your initial deployment, use a dummy entry script that prints the data it receives. +++Save this file as `echo_score.py` inside of a directory called `source_dir`. This dummy script returns the data you send to it, so it doesn't use the model. But it is useful for testing that the scoring script is running. ++## Define an inference configuration ++An inference configuration describes the Docker container and files to use when initializing your web service. All of the files within your source directory, including subdirectories, will be zipped up and uploaded to the cloud when you deploy your web service. ++The inference configuration below specifies that the machine learning deployment will use the file `echo_score.py` in the `./source_dir` directory to process incoming requests and that it will use the Docker image with the Python packages specified in the `project_environment` environment. ++You can use any [Azure Machine Learning inference curated environments](../concept-prebuilt-docker-images-inference.md#list-of-prebuilt-docker-images-for-inference) as the base Docker image when creating your project environment. We will install the required dependencies on top and store the resulting Docker image into the repository that is associated with your workspace. ++> [!NOTE] +> Azure machine learning [inference source directory](/python/api/azureml-core/azureml.core.model.inferenceconfig?view=azure-ml-py#constructor&preserve-view=true) upload does not respect **.gitignore** or **.amlignore** ++# [Azure CLI](#tab/azcli) +++A minimal inference configuration can be written as: +++Save this file with the name `dummyinferenceconfig.json`. +++[See this article](reference-azure-machine-learning-cli.md#inference-configuration-schema) for a more thorough discussion of inference configurations. ++# [Python](#tab/python) ++The following example demonstrates how to create a minimal environment with no pip dependencies, using the dummy scoring script you defined above. ++[!Notebook-python[] (~/azureml-examples-main/python-sdk/tutorials/deploy-local/1.deploy-local.ipynb?name=inference-configuration-code)] ++For more information on environments, see [Create and manage environments for training and deployment](../how-to-use-environments.md). ++For more information on inference configuration, see the [InferenceConfig](/python/api/azureml-core/azureml.core.model.inferenceconfig) class documentation. +++++## Define a deployment configuration ++A deployment configuration specifies the amount of memory and cores your webservice needs in order to run. It also provides configuration details of the underlying webservice. For example, a deployment configuration lets you specify that your service needs 2 gigabytes of memory, 2 CPU cores, 1 GPU core, and that you want to enable autoscaling. ++The options available for a deployment configuration differ depending on the compute target you choose. In a local deployment, all you can specify is which port your webservice will be served on. ++# [Azure CLI](#tab/azcli) ++++For more information, see the [deployment schema](reference-azure-machine-learning-cli.md#deployment-configuration-schema). ++# [Python](#tab/python) ++The following Python demonstrates how to create a local deployment configuration: ++[!Notebook-python[] (~/azureml-examples-main/python-sdk/tutorials/deploy-local/1.deploy-local.ipynb?name=deployment-configuration-code)] ++++## Deploy your machine learning model ++You are now ready to deploy your model. ++# [Azure CLI](#tab/azcli) +++Replace `bidaf_onnx:1` with the name of your model and its version number. ++```azurecli-interactive +az ml model deploy -n myservice \ + -m bidaf_onnx:1 \ + --overwrite \ + --ic dummyinferenceconfig.json \ + --dc deploymentconfig.json \ + -g <resource-group> \ + -w <workspace-name> +``` ++# [Python](#tab/python) +++[!Notebook-python[] (~/azureml-examples-main/python-sdk/tutorials/deploy-local/1.deploy-local.ipynb?name=deploy-model-code)] ++[!Notebook-python[] (~/azureml-examples-main/python-sdk/tutorials/deploy-local/1.deploy-local.ipynb?name=deploy-model-print-logs)] ++For more information, see the documentation for [Model.deploy()](/python/api/azureml-core/azureml.core.model.model#deploy-workspace--name--models--inference-config-none--deployment-config-none--deployment-target-none--overwrite-false-) and [Webservice](/python/api/azureml-core/azureml.core.webservice.webservice). ++++## Call into your model ++Let's check that your echo model deployed successfully. You should be able to do a simple liveness request, as well as a scoring request: ++# [Azure CLI](#tab/azcli) +++```azurecli-interactive +curl -v http://localhost:32267 +curl -v -X POST -H "content-type:application/json" \ + -d '{"query": "What color is the fox", "context": "The quick brown fox jumped over the lazy dog."}' \ + http://localhost:32267/score +``` ++# [Python](#tab/python) +<!-- python nb call --> +[!Notebook-python[] (~/azureml-examples-main/python-sdk/tutorials/deploy-local/1.deploy-local.ipynb?name=call-into-model-code)] ++++## Define an entry script ++Now it's time to actually load your model. First, modify your entry script: ++++Save this file as `score.py` inside of `source_dir`. ++Notice the use of the `AZUREML_MODEL_DIR` environment variable to locate your registered model. Now that you've added some pip packages. ++# [Azure CLI](#tab/azcli) ++++Save this file as `inferenceconfig.json` ++# [Python](#tab/python) +++```python +env = Environment(name='myenv') +python_packages = ['nltk', 'numpy', 'onnxruntime'] +for package in python_packages: + env.python.conda_dependencies.add_pip_package(package) ++inference_config = InferenceConfig(environment=env, source_directory='./source_dir', entry_script='./score.py') +``` ++For more information, see the documentation for [LocalWebservice](/python/api/azureml-core/azureml.core.webservice.local.localwebservice), [Model.deploy()](/python/api/azureml-core/azureml.core.model.model#deploy-workspace--name--models--inference-config-none--deployment-config-none--deployment-target-none--overwrite-false-), and [Webservice](/python/api/azureml-core/azureml.core.webservice.webservice). ++++## Deploy again and call your service ++Deploy your service again: ++# [Azure CLI](#tab/azcli) +++Replace `bidaf_onnx:1` with the name of your model and its version number. ++```azurecli-interactive +az ml model deploy -n myservice \ + -m bidaf_onnx:1 \ + --overwrite \ + --ic inferenceconfig.json \ + --dc deploymentconfig.json \ + -g <resource-group> \ + -w <workspace-name> +``` ++# [Python](#tab/python) ++[!Notebook-python[] (~/azureml-examples-main/python-sdk/tutorials/deploy-local/1.deploy-local.ipynb?name=re-deploy-model-code)] ++[!Notebook-python[] (~/azureml-examples-main/python-sdk/tutorials/deploy-local/1.deploy-local.ipynb?name=re-deploy-model-print-logs)] ++For more information, see the documentation for [Model.deploy()](/python/api/azureml-core/azureml.core.model.model#deploy-workspace--name--models--inference-config-none--deployment-config-none--deployment-target-none--overwrite-false-) and [Webservice](/python/api/azureml-core/azureml.core.webservice.webservice). +++Then ensure you can send a post request to the service: ++# [Azure CLI](#tab/azcli) +++```azurecli-interactive +curl -v -X POST -H "content-type:application/json" \ + -d '{"query": "What color is the fox", "context": "The quick brown fox jumped over the lazy dog."}' \ + http://localhost:32267/score +``` ++# [Python](#tab/python) ++[!Notebook-python[] (~/azureml-examples-main/python-sdk/tutorials/deploy-local/1.deploy-local.ipynb?name=send-post-request-code)] ++++## Choose a compute target +++## Deploy to cloud ++Once you've confirmed your service works locally and chosen a remote compute target, you are ready to deploy to the cloud. ++Change your deploy configuration to correspond to the compute target you've chosen, in this case Azure Container Instances: ++# [Azure CLI](#tab/azcli) +++The options available for a deployment configuration differ depending on the compute target you choose. +++Save this file as `re-deploymentconfig.json`. ++For more information, see [this reference](reference-azure-machine-learning-cli.md#deployment-configuration-schema). ++# [Python](#tab/python) ++[!Notebook-python[] (~/azureml-examples-main/python-sdk/tutorials/deploy-local/1.deploy-local.ipynb?name=deploy-model-on-cloud-code)] ++++Deploy your service again: +++# [Azure CLI](#tab/azcli) +++Replace `bidaf_onnx:1` with the name of your model and its version number. ++```azurecli-interactive +az ml model deploy -n myservice \ + -m bidaf_onnx:1 \ + --overwrite \ + --ic inferenceconfig.json \ + --dc re-deploymentconfig.json \ + -g <resource-group> \ + -w <workspace-name> +``` ++To view the service logs, use the following command: ++```azurecli-interactive +az ml service get-logs -n myservice \ + -g <resource-group> \ + -w <workspace-name> +``` ++# [Python](#tab/python) +++[!Notebook-python[] (~/azureml-examples-main/python-sdk/tutorials/deploy-local/1.deploy-local.ipynb?name=re-deploy-service-code)] ++[!Notebook-python[] (~/azureml-examples-main/python-sdk/tutorials/deploy-local/1.deploy-local.ipynb?name=re-deploy-service-print-logs)] ++For more information, see the documentation for [Model.deploy()](/python/api/azureml-core/azureml.core.model.model#deploy-workspace--name--models--inference-config-none--deployment-config-none--deployment-target-none--overwrite-false-) and [Webservice](/python/api/azureml-core/azureml.core.webservice.webservice). +++++## Call your remote webservice ++When you deploy remotely, you may have key authentication enabled. The example below shows how to get your service key with Python in order to make an inference request. ++[!Notebook-python[] (~/azureml-examples-main/python-sdk/tutorials/deploy-local/1.deploy-local.ipynb?name=call-remote-web-service-code)] ++[!Notebook-python[] (~/azureml-examples-main/python-sdk/tutorials/deploy-local/1.deploy-local.ipynb?name=call-remote-webservice-print-logs)] ++++See the article on [client applications to consume web services](../how-to-consume-web-service.md) for more example clients in other languages. ++ [!INCLUDE [Email Notification Include](../../../includes/machine-learning-email-notifications.md)] ++### Understanding service state ++During model deployment, you may see the service state change while it fully deploys. ++The following table describes the different service states: ++| Webservice state | Description | Final state? +| -- | -- | -- | +| Transitioning | The service is in the process of deployment. | No | +| Unhealthy | The service has deployed but is currently unreachable. | No | +| Unschedulable | The service cannot be deployed at this time due to lack of resources. | No | +| Failed | The service has failed to deploy due to an error or crash. | Yes | +| Healthy | The service is healthy and the endpoint is available. | Yes | ++> [!TIP] +> When deploying, Docker images for compute targets are built and loaded from Azure Container Registry (ACR). By default, Azure Machine Learning creates an ACR that uses the *basic* service tier. Changing the ACR for your workspace to standard or premium tier may reduce the time it takes to build and deploy images to your compute targets. For more information, see [Azure Container Registry service tiers](../../container-registry/container-registry-skus.md). ++> [!NOTE] +> If you are deploying a model to Azure Kubernetes Service (AKS), we advise you enable [Azure Monitor](../../azure-monitor/containers/container-insights-enable-existing-clusters.md) for that cluster. This will help you understand overall cluster health and resource usage. You might also find the following resources useful: +> +> * [Check for Resource Health events impacting your AKS cluster](../../aks/aks-resource-health.md) +> * [Azure Kubernetes Service Diagnostics](../../aks/concepts-diagnostics.md) +> +> If you are trying to deploy a model to an unhealthy or overloaded cluster, it is expected to experience issues. If you need help troubleshooting AKS cluster problems please contact AKS Support. ++## Delete resources ++# [Azure CLI](#tab/azcli) ++++[!Notebook-python[] (~/azureml-examples-main/python-sdk/tutorials/deploy-local/2.deploy-local-cli.ipynb?name=delete-resource-code)] ++```azurecli-interactive +az ml service delete -n myservice +az ml service delete -n myaciservice +az ml model delete --model-id=<MODEL_ID> +``` ++To delete a deployed webservice, use `az ml service delete <name of webservice>`. ++To delete a registered model from your workspace, use `az ml model delete <model id>` ++Read more about [deleting a webservice](/cli/azure/ml(v1)/computetarget/create#az-ml-service-delete) and [deleting a model](/cli/azure/ml/model#az-ml-model-delete). ++# [Python](#tab/python) ++[!Notebook-python[] (~/azureml-examples-main/python-sdk/tutorials/deploy-local/1.deploy-local.ipynb?name=delete-resource-code)] ++To delete a deployed web service, use `service.delete()`. +To delete a registered model, use `model.delete()`. ++For more information, see the documentation for [WebService.delete()](/python/api/azureml-core/azureml.core.webservice%28class%29#delete--) and [Model.delete()](/python/api/azureml-core/azureml.core.model.model#delete--). ++++## Next steps ++* [Troubleshoot a failed deployment](../how-to-troubleshoot-deployment.md) +* [Update web service](../how-to-deploy-update-web-service.md) +* [One click deployment for automated ML runs in the Azure Machine Learning studio](../how-to-use-automated-ml-for-ml-models.md#deploy-your-model) +* [Use TLS to secure a web service through Azure Machine Learning](../how-to-secure-web-service.md) +* [Monitor your Azure Machine Learning models with Application Insights](../how-to-enable-app-insights.md) +* [Create event alerts and triggers for model deployments](../how-to-use-event-grid.md) |
| machine-learning | How To Deploy Azure Kubernetes Service | https://github.com/MicrosoftDocs/azure-docs/commits/main/articles/machine-learning/v1/how-to-deploy-azure-kubernetes-service.md | Microsoft Defender for Cloud provides unified security management and advanced t ## Next steps * [Use Azure RBAC for Kubernetes authorization](../../aks/manage-azure-rbac.md)-* [Secure inferencing environment with Azure Virtual Network](../how-to-secure-inferencing-vnet.md) +* [Secure inferencing environment with Azure Virtual Network](how-to-secure-inferencing-vnet.md) * [How to deploy a model using a custom Docker image](../how-to-deploy-custom-container.md) * [Deployment troubleshooting](../how-to-troubleshoot-deployment.md) * [Update web service](../how-to-deploy-update-web-service.md) |
| machine-learning | How To Deploy Update Web Service | https://github.com/MicrosoftDocs/azure-docs/commits/main/articles/machine-learning/v1/how-to-deploy-update-web-service.md | ++ + Title: Update deployed web services ++description: Learn how to refresh a web service that is already deployed in Azure Machine Learning. You can update settings such as model, environment, and entry script. +++++ Last updated : 07/28/2022++++# Update a deployed web service (v1) +++In this article, you learn how to update a web service that was deployed with Azure Machine Learning. ++## Prerequisites ++- This article assumes you have already deployed a web service with Azure Machine Learning. If you need to learn how to deploy a web service, [follow these steps](how-to-deploy-and-where.md). +- The code snippets in this article assume that the `ws` variable has already been initialized to your workspace by using the [Workflow()](/python/api/azureml-core/azureml.core.workspace.workspace#constructor) constructor or loading a saved configuration with [Workspace.from_config()](/python/api/azureml-core/azureml.core.workspace.workspace#azureml-core-workspace-workspace-from-config). The following snippet demonstrates how to use the constructor: ++ [!INCLUDE [sdk v1](../../../includes/machine-learning-sdk-v1.md)] ++ ```python + from azureml.core import Workspace + ws = Workspace(subscription_id="mysubscriptionid", + resource_group="myresourcegroup", + workspace_name="myworkspace") + ``` ++## Update web service ++To update a web service, use the `update` method. You can update the web service to use a new model, a new entry script, or new dependencies that can be specified in an inference configuration. For more information, see the documentation for [Webservice.update](/python/api/azureml-core/azureml.core.webservice.webservice.webservice#update--args-). ++See [AKS Service Update Method.](/python/api/azureml-core/azureml.core.webservice.akswebservice#update-image-none--autoscale-enabled-none--autoscale-min-replicas-none--autoscale-max-replicas-none--autoscale-refresh-seconds-none--autoscale-target-utilization-none--collect-model-data-none--auth-enabled-none--cpu-cores-none--memory-gb-none--enable-app-insights-none--scoring-timeout-ms-none--replica-max-concurrent-requests-none--max-request-wait-time-none--num-replicas-none--tags-none--properties-none--description-none--models-none--inference-config-none--gpu-cores-none--period-seconds-none--initial-delay-seconds-none--timeout-seconds-none--success-threshold-none--failure-threshold-none--namespace-none--token-auth-enabled-none-) ++See [ACI Service Update Method.](/python/api/azureml-core/azureml.core.webservice.aci.aciwebservice#update-image-none--tags-none--properties-none--description-none--auth-enabled-none--ssl-enabled-none--ssl-cert-pem-file-none--ssl-key-pem-file-none--ssl-cname-none--enable-app-insights-none--models-none--inference-config-none-) ++> [!IMPORTANT] +> When you create a new version of a model, you must manually update each service that you want to use it. +> +> You can not use the SDK to update a web service published from the Azure Machine Learning designer. ++> [!IMPORTANT] +> Azure Kubernetes Service uses [Blobfuse FlexVolume driver](https://github.com/Azure/kubernetes-volume-drivers/blob/master/flexvolume/blobfuse/README.md) for the versions <=1.16 and [Blob CSI driver](https://github.com/kubernetes-sigs/blob-csi-driver/blob/master/README.md) for the versions >=1.17. +> +> Therefore, it is important to re-deploy or update the web service after cluster upgrade in order to deploy to correct blobfuse method for the cluster version. ++> [!NOTE] +> When an operation is already in progress, any new operation on that same web service will respond with 409 conflict error. For example, If create or update web service operation is in progress and if you trigger a new Delete operation it will throw an error. ++**Using the SDK** ++The following code shows how to use the SDK to update the model, environment, and entry script for a web service: +++```python +from azureml.core import Environment +from azureml.core.webservice import Webservice +from azureml.core.model import Model, InferenceConfig ++# Register new model. +new_model = Model.register(model_path="outputs/sklearn_mnist_model.pkl", + model_name="sklearn_mnist", + tags={"key": "0.1"}, + description="test", + workspace=ws) ++# Use version 3 of the environment. +deploy_env = Environment.get(workspace=ws,name="myenv",version="3") +inference_config = InferenceConfig(entry_script="score.py", + environment=deploy_env) ++service_name = 'myservice' +# Retrieve existing service. +service = Webservice(name=service_name, workspace=ws) ++++# Update to new model(s). +service.update(models=[new_model], inference_config=inference_config) +service.wait_for_deployment(show_output=True) +print(service.state) +print(service.get_logs()) +``` ++**Using the CLI** ++You can also update a web service by using the ML CLI. The following example demonstrates registering a new model and then updating a web service to use the new model: +++```azurecli +``` ++> [!TIP] +> In this example, a JSON document is used to pass the model information from the registration command into the update command. +> +> To update the service to use a new entry script or environment, create an [inference configuration file](reference-azure-machine-learning-cli.md#inference-configuration-schema) and specify it with the `ic` parameter. ++For more information, see the [az ml service update](/cli/azure/ml(v1)/service#az-ml-v1--service-update) documentation. ++## Next steps ++* [Troubleshoot a failed deployment](../how-to-troubleshoot-deployment.md) +* [Create client applications to consume web services](../how-to-consume-web-service.md) +* [How to deploy a model using a custom Docker image](../how-to-deploy-custom-container.md) +* [Use TLS to secure a web service through Azure Machine Learning](how-to-secure-web-service.md) +* [Monitor your Azure Machine Learning models with Application Insights](../how-to-enable-app-insights.md) +* [Collect data for models in production](../how-to-enable-data-collection.md) +* [Create event alerts and triggers for model deployments](../how-to-use-event-grid.md) |
| machine-learning | How To Secure Inferencing Vnet | https://github.com/MicrosoftDocs/azure-docs/commits/main/articles/machine-learning/v1/how-to-secure-inferencing-vnet.md | + + Title: Secure inferencing environments with virtual networks ++description: Use an isolated Azure Virtual Network to secure your Azure Machine Learning inferencing environment. +++++++ Last updated : 07/28/2022++++# Secure an Azure Machine Learning inferencing environment with virtual networks +++In this article, you learn how to secure inferencing environments with a virtual network in Azure Machine Learning. ++> [!TIP] +> This article is part of a series on securing an Azure Machine Learning workflow. See the other articles in this series: +> +> * [Virtual network overview](../how-to-network-security-overview.md) +> * [Secure the workspace resources](../how-to-secure-workspace-vnet.md) +> * [Secure the training environment](../how-to-secure-training-vnet.md) +> * [Enable studio functionality](../how-to-enable-studio-virtual-network.md) +> * [Use custom DNS](../how-to-custom-dns.md) +> * [Use a firewall](../how-to-access-azureml-behind-firewall.md) +> +> For a tutorial on creating a secure workspace, see [Tutorial: Create a secure workspace](../tutorial-create-secure-workspace.md) or [Tutorial: Create a secure workspace using a template](../tutorial-create-secure-workspace-template.md). ++In this article you learn how to secure the following inferencing resources in a virtual network: +> [!div class="checklist"] +> - Default Azure Kubernetes Service (AKS) cluster +> - Private AKS cluster +> - AKS cluster with private link ++## Prerequisites +++ Read the [Network security overview](../how-to-network-security-overview.md) article to understand common virtual network scenarios and overall virtual network architecture.+++ An existing virtual network and subnet to use with your compute resources.+++ To deploy resources into a virtual network or subnet, your user account must have permissions to the following actions in Azure role-based access control (Azure RBAC):++ - "Microsoft.Network/virtualNetworks/join/action" on the virtual network resource. + - "Microsoft.Network/virtualNetworks/subnet/join/action" on the subnet resource. ++ For more information on Azure RBAC with networking, see the [Networking built-in roles](../../role-based-access-control/built-in-roles.md#networking) ++## Limitations ++### Azure Container Instances ++When your Azure Machine Learning workspace is configured with a private endpoint, deploying to Azure Container Instances in a VNet is not supported. Instead, consider using a [Managed online endpoint with network isolation](../how-to-secure-online-endpoint.md). ++### Azure Kubernetes Service ++* If your AKS cluster is behind of a VNET, your workspace and its associated resources (storage, key vault, Azure Container Registry) must have private endpoints or service endpoints in the same VNET as AKS cluster's VNET. Please read tutorial [create a secure workspace](../tutorial-create-secure-workspace.md) to add those private endpoints or service endpoints to your VNET. +* If your workspace has a __private endpoint__, the Azure Kubernetes Service cluster must be in the same Azure region as the workspace. +* Using a [public fully qualified domain name (FQDN) with a private AKS cluster](../../aks/private-clusters.md) is __not supported__ with Azure Machine learning. ++<a id="aksvnet"></a> ++## Azure Kubernetes Service ++> [!IMPORTANT] +> To use an AKS cluster in a virtual network, first follow the prerequisites in [Configure advanced networking in Azure Kubernetes Service (AKS)](../../aks/configure-azure-cni.md#prerequisites). +++To add AKS in a virtual network to your workspace, use the following steps: ++1. Sign in to [Azure Machine Learning studio](https://ml.azure.com/), and then select your subscription and workspace. +1. Select __Compute__ on the left, __Inference clusters__ from the center, and then select __+ New__. ++ :::image type="content" source="./media/how-to-secure-inferencing-vnet/create-inference.png" alt-text="Screenshot of create inference cluster dialog."::: ++1. From the __Create inference cluster__ dialog, select __Create new__ and the VM size to use for the cluster. Finally, select __Next__. ++ :::image type="content" source="./media/how-to-secure-inferencing-vnet/create-inference-vm.png" alt-text="Screenshot of VM settings."::: ++1. From the __Configure Settings__ section, enter a __Compute name__, select the __Cluster Purpose__, __Number of nodes__, and then select __Advanced__ to display the network settings. In the __Configure virtual network__ area, set the following values: ++ * Set the __Virtual network__ to use. ++ > [!TIP] + > If your workspace uses a private endpoint to connect to the virtual network, the __Virtual network__ selection field is greyed out. ++ * Set the __Subnet__ to create the cluster in. + * In the __Kubernetes Service address range__ field, enter the Kubernetes service address range. This address range uses a Classless Inter-Domain Routing (CIDR) notation IP range to define the IP addresses that are available for the cluster. It must not overlap with any subnet IP ranges (for example, 10.0.0.0/16). + * In the __Kubernetes DNS service IP address__ field, enter the Kubernetes DNS service IP address. This IP address is assigned to the Kubernetes DNS service. It must be within the Kubernetes service address range (for example, 10.0.0.10). + * In the __Docker bridge address__ field, enter the Docker bridge address. This IP address is assigned to Docker Bridge. It must not be in any subnet IP ranges, or the Kubernetes service address range (for example, 172.18.0.1/16). ++ :::image type="content" source="./media/how-to-secure-inferencing-vnet/create-inference-settings.png" alt-text="Screenshot of configure network settings."::: ++1. When you deploy a model as a web service to AKS, a scoring endpoint is created to handle inferencing requests. Make sure that the network security group (NSG) that controls the virtual network has an inbound security rule enabled for the IP address of the scoring endpoint if you want to call it from outside the virtual network. ++ To find the IP address of the scoring endpoint, look at the scoring URI for the deployed service. For information on viewing the scoring URI, see [Consume a model deployed as a web service](../how-to-consume-web-service.md#connection-information). ++ > [!IMPORTANT] + > Keep the default outbound rules for the NSG. For more information, see the default security rules in [Security groups](../../virtual-network/network-security-groups-overview.md#default-security-rules). ++ ](./media/how-to-secure-inferencing-vnet/aks-vnet-inbound-nsg-scoring.png#lightbox) ++ > [!IMPORTANT] + > The IP address shown in the image for the scoring endpoint will be different for your deployments. While the same IP is shared by all deployments to one AKS cluster, each AKS cluster will have a different IP address. ++You can also use the Azure Machine Learning SDK to add Azure Kubernetes Service in a virtual network. If you already have an AKS cluster in a virtual network, attach it to the workspace as described in [How to deploy to AKS](how-to-deploy-and-where.md). The following code creates a new AKS instance in the `default` subnet of a virtual network named `mynetwork`: +++```python +from azureml.core.compute import ComputeTarget, AksCompute ++# Create the compute configuration and set virtual network information +config = AksCompute.provisioning_configuration(location="eastus2") +config.vnet_resourcegroup_name = "mygroup" +config.vnet_name = "mynetwork" +config.subnet_name = "default" +config.service_cidr = "10.0.0.0/16" +config.dns_service_ip = "10.0.0.10" +config.docker_bridge_cidr = "172.17.0.1/16" ++# Create the compute target +aks_target = ComputeTarget.create(workspace=ws, + name="myaks", + provisioning_configuration=config) +``` ++When the creation process is completed, you can run inference, or model scoring, on an AKS cluster behind a virtual network. For more information, see [How to deploy to AKS](how-to-deploy-and-where.md). ++For more information on using Role-Based Access Control with Kubernetes, see [Use Azure RBAC for Kubernetes authorization](../../aks/manage-azure-rbac.md). ++## Network contributor role ++> [!IMPORTANT] +> If you create or attach an AKS cluster by providing a virtual network you previously created, you must grant the service principal (SP) or managed identity for your AKS cluster the _Network Contributor_ role to the resource group that contains the virtual network. +> +> To add the identity as network contributor, use the following steps: ++1. To find the service principal or managed identity ID for AKS, use the following Azure CLI commands. Replace `<aks-cluster-name>` with the name of the cluster. Replace `<resource-group-name>` with the name of the resource group that _contains the AKS cluster_: ++ ```azurecli-interactive + az aks show -n <aks-cluster-name> --resource-group <resource-group-name> --query servicePrincipalProfile.clientId + ``` ++ If this command returns a value of `msi`, use the following command to identify the principal ID for the managed identity: ++ ```azurecli-interactive + az aks show -n <aks-cluster-name> --resource-group <resource-group-name> --query identity.principalId + ``` ++1. To find the ID of the resource group that contains your virtual network, use the following command. Replace `<resource-group-name>` with the name of the resource group that _contains the virtual network_: ++ ```azurecli-interactive + az group show -n <resource-group-name> --query id + ``` ++1. To add the service principal or managed identity as a network contributor, use the following command. Replace `<SP-or-managed-identity>` with the ID returned for the service principal or managed identity. Replace `<resource-group-id>` with the ID returned for the resource group that contains the virtual network: ++ ```azurecli-interactive + az role assignment create --assignee <SP-or-managed-identity> --role 'Network Contributor' --scope <resource-group-id> + ``` +For more information on using the internal load balancer with AKS, see [Use internal load balancer with Azure Kubernetes Service](../../aks/internal-lb.md). ++## Secure VNet traffic ++There are two approaches to isolate traffic to and from the AKS cluster to the virtual network: ++* __Private AKS cluster__: This approach uses Azure Private Link to secure communications with the cluster for deployment/management operations. +* __Internal AKS load balancer__: This approach configures the endpoint for your deployments to AKS to use a private IP within the virtual network. ++### Private AKS cluster ++By default, AKS clusters have a control plane, or API server, with public IP addresses. You can configure AKS to use a private control plane by creating a private AKS cluster. For more information, see [Create a private Azure Kubernetes Service cluster](../../aks/private-clusters.md). ++After you create the private AKS cluster, [attach the cluster to the virtual network](how-to-create-attach-kubernetes.md) to use with Azure Machine Learning. ++### Internal AKS load balancer ++By default, AKS deployments use a [public load balancer](../../aks/load-balancer-standard.md). In this section, you learn how to configure AKS to use an internal load balancer. An internal (or private) load balancer is used where only private IPs are allowed as frontend. Internal load balancers are used to load balance traffic inside a virtual network ++A private load balancer is enabled by configuring AKS to use an _internal load balancer_. ++#### Enable private load balancer ++> [!IMPORTANT] +> You cannot enable private IP when creating the Azure Kubernetes Service cluster in Azure Machine Learning studio. You can create one with an internal load balancer when using the Python SDK or Azure CLI extension for machine learning. ++The following examples demonstrate how to __create a new AKS cluster with a private IP/internal load balancer__ using the SDK and CLI: ++# [Python](#tab/python) +++```python +import azureml.core +from azureml.core.compute import AksCompute, ComputeTarget ++# Verify that cluster does not exist already +try: + aks_target = AksCompute(workspace=ws, name=aks_cluster_name) + print("Found existing aks cluster") ++except: + print("Creating new aks cluster") ++ # Subnet to use for AKS + subnet_name = "default" + # Create AKS configuration + prov_config=AksCompute.provisioning_configuration(load_balancer_type="InternalLoadBalancer") + # Set info for existing virtual network to create the cluster in + prov_config.vnet_resourcegroup_name = "myvnetresourcegroup" + prov_config.vnet_name = "myvnetname" + prov_config.service_cidr = "10.0.0.0/16" + prov_config.dns_service_ip = "10.0.0.10" + prov_config.subnet_name = subnet_name + prov_config.load_balancer_subnet = subnet_name + prov_config.docker_bridge_cidr = "172.17.0.1/16" ++ # Create compute target + aks_target = ComputeTarget.create(workspace = ws, name = "myaks", provisioning_configuration = prov_config) + # Wait for the operation to complete + aks_target.wait_for_completion(show_output = True) +``` ++# [Azure CLI](#tab/azure-cli) ++```azurecli +az ml computetarget create aks -n myaks --load-balancer-type InternalLoadBalancer +``` ++To upgrade an existing AKS cluster to use an internal load balancer, use the following command: ++```azurecli +az ml computetarget update aks \ + -n myaks \ + --load-balancer-subnet mysubnet \ + --load-balancer-type InternalLoadBalancer \ + --workspace-name myworkspace \ + -g myresourcegroup +``` +++For more information, see the [az ml computetarget create aks](/cli/azure/ml(v1)/computetarget/create#az-ml-computetarget-create-aks) and [az ml computetarget update aks](/cli/azure/ml(v1)/computetarget/update#az-ml-computetarget-update-aks) reference. ++++When __attaching an existing cluster__ to your workspace, use the `load_balancer_type` and `load_balancer_subnet` parameters of [AksCompute.attach_configuration()](/python/api/azureml-core/azureml.core.compute.aks.akscompute#azureml-core-compute-aks-akscompute-attach-configuration) to configure the load balancer. ++For information on attaching a cluster, see [Attach an existing AKS cluster](how-to-create-attach-kubernetes.md). ++## Limit outbound connectivity from the virtual network ++If you don't want to use the default outbound rules and you do want to limit the outbound access of your virtual network, you must allow access to Azure Container Registry. For example, make sure that your Network Security Groups (NSG) contains a rule that allows access to the __AzureContainerRegistry.RegionName__ service tag where `{RegionName} is the name of an Azure region. ++## Next steps ++This article is part of a series on securing an Azure Machine Learning workflow. See the other articles in this series: ++* [Virtual network overview](../how-to-network-security-overview.md) +* [Secure the workspace resources](../how-to-secure-workspace-vnet.md) +* [Secure the training environment](../how-to-secure-training-vnet.md) +* [Enable studio functionality](../how-to-enable-studio-virtual-network.md) +* [Use custom DNS](../how-to-custom-dns.md) +* [Use a firewall](../how-to-access-azureml-behind-firewall.md) |
| machine-learning | How To Secure Web Service | https://github.com/MicrosoftDocs/azure-docs/commits/main/articles/machine-learning/v1/how-to-secure-web-service.md | + + Title: Secure web services using TLS ++description: Learn how to enable HTTPS with TLS version 1.2 to secure a web service that's deployed through Azure Machine Learning. +++++ Last updated : 07/28/2022+++++# Use TLS to secure a web service through Azure Machine Learning +++This article shows you how to secure a web service that's deployed through Azure Machine Learning. ++You use [HTTPS](https://en.wikipedia.org/wiki/HTTPS) to restrict access to web services and secure the data that clients submit. HTTPS helps secure communications between a client and a web service by encrypting communications between the two. Encryption uses [Transport Layer Security (TLS)](https://en.wikipedia.org/wiki/Transport_Layer_Security). TLS is sometimes still referred to as *Secure Sockets Layer* (SSL), which was the predecessor of TLS. ++> [!TIP] +> The Azure Machine Learning SDK uses the term "SSL" for properties that are related to secure communications. This doesn't mean that your web service doesn't use *TLS*. SSL is just a more commonly recognized term. +> +> Specifically, web services deployed through Azure Machine Learning support TLS version 1.2 for AKS and ACI. For ACI deployments, if you are on older TLS version, we recommend re-deploying to get the latest TLS version. +> +> TLS version 1.3 for Azure Machine Learning - AKS Inference is unsupported. ++TLS and SSL both rely on *digital certificates*, which help with encryption and identity verification. For more information on how digital certificates work, see the Wikipedia topic [Public key infrastructure](https://en.wikipedia.org/wiki/Public_key_infrastructure). ++> [!WARNING] +> If you don't use HTTPS for your web service, data that's sent to and from the service might be visible to others on the internet. +> +> HTTPS also enables the client to verify the authenticity of the server that it's connecting to. This feature protects clients against [man-in-the-middle](https://en.wikipedia.org/wiki/Man-in-the-middle_attack) attacks. ++This is the general process to secure a web service: ++1. Get a domain name. ++2. Get a digital certificate. ++3. Deploy or update the web service with TLS enabled. ++4. Update your DNS to point to the web service. ++> [!IMPORTANT] +> If you're deploying to Azure Kubernetes Service (AKS), you can purchase your own certificate or use a certificate that's provided by Microsoft. If you use a certificate from Microsoft, you don't need to get a domain name or TLS/SSL certificate. For more information, see the [Enable TLS and deploy](#enable) section of this article. ++There are slight differences when you secure across [deployment targets](how-to-deploy-and-where.md). ++## Get a domain name ++If you don't already own a domain name, purchase one from a *domain name registrar*. The process and price differ among registrars. The registrar provides tools to manage the domain name. You use these tools to map a fully qualified domain name (FQDN) (such as www\.contoso.com) to the IP address that hosts your web service. ++## Get a TLS/SSL certificate ++There are many ways to get an TLS/SSL certificate (digital certificate). The most common is to purchase one from a *certificate authority* (CA). Regardless of where you get the certificate, you need the following files: ++* A **certificate**. The certificate must contain the full certificate chain, and it must be "PEM-encoded." +* A **key**. The key must also be PEM-encoded. ++When you request a certificate, you must provide the FQDN of the address that you plan to use for the web service (for example, www\.contoso.com). The address that's stamped into the certificate and the address that the clients use are compared to verify the identity of the web service. If those addresses don't match, the client gets an error message. ++> [!TIP] +> If the certificate authority can't provide the certificate and key as PEM-encoded files, you can use a utility such as [OpenSSL](https://www.openssl.org/) to change the format. ++> [!WARNING] +> Use *self-signed* certificates only for development. Don't use them in production environments. Self-signed certificates can cause problems in your client applications. For more information, see the documentation for the network libraries that your client application uses. ++## <a id="enable"></a> Enable TLS and deploy ++**For AKS deployment**, you can enable TLS termination when you [create or attach an AKS cluster](how-to-create-attach-kubernetes.md) in AzureML workspace. At AKS model deployment time, you can disable TLS termination with deployment configuration object, otherwise all AKS model deployment by default will have TLS termination enabled at AKS cluster create or attach time. ++For ACI deployment, you can enable TLS termination at model deployment time with deployment configuration object. +++### Deploy on Azure Kubernetes Service ++ > [!NOTE] + > The information in this section also applies when you deploy a secure web service for the designer. If you aren't familiar with using the Python SDK, see [What is the Azure Machine Learning SDK for Python?](/python/api/overview/azure/ml/intro). ++When you [create or attach an AKS cluster](how-to-create-attach-kubernetes.md) in AzureML workspace, you can enable TLS termination with **[AksCompute.provisioning_configuration()](/python/api/azureml-core/azureml.core.compute.akscompute#provisioning-configuration-agent-count-none--vm-size-none--ssl-cname-none--ssl-cert-pem-file-none--ssl-key-pem-file-none--location-none--vnet-resourcegroup-name-none--vnet-name-none--subnet-name-none--service-cidr-none--dns-service-ip-none--docker-bridge-cidr-none--cluster-purpose-none--load-balancer-type-none--load-balancer-subnet-none-)** and **[AksCompute.attach_configuration()](/python/api/azureml-core/azureml.core.compute.akscompute#attach-configuration-resource-group-none--cluster-name-none--resource-id-none--cluster-purpose-none-)** configuration objects. Both methods return a configuration object that has an **enable_ssl** method, and you can use **enable_ssl** method to enable TLS. ++You can enable TLS either with Microsoft certificate or a custom certificate purchased from CA. ++* **When you use a certificate from Microsoft**, you must use the *leaf_domain_label* parameter. This parameter generates the DNS name for the service. For example, a value of "contoso" creates a domain name of "contoso\<six-random-characters>.\<azureregion>.cloudapp.azure.com", where \<azureregion> is the region that contains the service. Optionally, you can use the *overwrite_existing_domain* parameter to overwrite the existing *leaf_domain_label*. The following example demonstrates how to create a configuration that enables an TLS with Microsoft certificate: ++ ```python + from azureml.core.compute import AksCompute ++ # Config used to create a new AKS cluster and enable TLS + provisioning_config = AksCompute.provisioning_configuration() ++ # Leaf domain label generates a name using the formula + # "<leaf-domain-label>######.<azure-region>.cloudapp.azure.com" + # where "######" is a random series of characters + provisioning_config.enable_ssl(leaf_domain_label = "contoso") +++ # Config used to attach an existing AKS cluster to your workspace and enable TLS + attach_config = AksCompute.attach_configuration(resource_group = resource_group, + cluster_name = cluster_name) ++ # Leaf domain label generates a name using the formula + # "<leaf-domain-label>######.<azure-region>.cloudapp.azure.com" + # where "######" is a random series of characters + attach_config.enable_ssl(leaf_domain_label = "contoso") + ``` + > [!IMPORTANT] + > When you use a certificate from Microsoft, you don't need to purchase your own certificate or domain name. ++* **When you use a custom certificate that you purchased**, you use the *ssl_cert_pem_file*, *ssl_key_pem_file*, and *ssl_cname* parameters. The following example demonstrates how to use .pem files to create a configuration that uses a TLS/SSL certificate that you purchased: + + ```python + from azureml.core.compute import AksCompute ++ # Config used to create a new AKS cluster and enable TLS + provisioning_config = AksCompute.provisioning_configuration() + provisioning_config.enable_ssl(ssl_cert_pem_file="cert.pem", + ssl_key_pem_file="key.pem", ssl_cname="www.contoso.com") ++ # Config used to attach an existing AKS cluster to your workspace and enable SSL + attach_config = AksCompute.attach_configuration(resource_group = resource_group, + cluster_name = cluster_name) + attach_config.enable_ssl(ssl_cert_pem_file="cert.pem", + ssl_key_pem_file="key.pem", ssl_cname="www.contoso.com") + ``` ++For more information about *enable_ssl*, see [AksProvisioningConfiguration.enable_ssl()](/python/api/azureml-core/azureml.core.compute.aks.aksprovisioningconfiguration#enable-ssl-ssl-cname-none--ssl-cert-pem-file-none--ssl-key-pem-file-none--leaf-domain-label-none--overwrite-existing-domain-false-) and [AksAttachConfiguration.enable_ssl()](/python/api/azureml-core/azureml.core.compute.aks.aksattachconfiguration#enable-ssl-ssl-cname-none--ssl-cert-pem-file-none--ssl-key-pem-file-none--leaf-domain-label-none--overwrite-existing-domain-false-). ++### Deploy on Azure Container Instances ++When you deploy to Azure Container Instances, you provide values for TLS-related parameters, as the following code snippet shows: ++```python +from azureml.core.webservice import AciWebservice ++aci_config = AciWebservice.deploy_configuration( + ssl_enabled=True, ssl_cert_pem_file="cert.pem", ssl_key_pem_file="key.pem", ssl_cname="www.contoso.com") +``` ++For more information, see [AciWebservice.deploy_configuration()](/python/api/azureml-core/azureml.core.webservice.aciwebservice#deploy-configuration-cpu-cores-none--memory-gb-none--tags-none--properties-none--description-none--location-none--auth-enabled-none--ssl-enabled-none--enable-app-insights-none--ssl-cert-pem-file-none--ssl-key-pem-file-none--ssl-cname-none--dns-name-label-none--primary-key-none--secondary-key-none--collect-model-data-none--cmk-vault-base-url-none--cmk-key-name-none--cmk-key-version-none-). ++## Update your DNS ++For either AKS deployment with custom certificate or ACI deployment, you must update your DNS record to point to the IP address of scoring endpoint. ++> [!IMPORTANT] +> When you use a certificate from Microsoft for AKS deployment, you don't need to manually update the DNS value for the cluster. The value should be set automatically. ++You can follow following steps to update DNS record for your custom domain name: +1. Get scoring endpoint IP address from scoring endpoint URI, which is usually in the format of `http://104.214.29.152:80/api/v1/service/<service-name>/score`. In this example, the IP address is 104.214.29.152. +1. Use the tools from your domain name registrar to update the DNS record for your domain name. The record maps the FQDN (for example, www\.contoso.com) to the IP address. The record must point to the IP address of scoring endpoint. ++ > [!TIP] + > Microsoft does is not responsible for updating the DNS for your custom DNS name or certificate. You must update it with your domain name registrar. ++1. After DNS record update, you can validate DNS resolution using *nslookup custom-domain-name* command. If DNS record is correctly updated, the custom domain name will point to the IP address of scoring endpoint. ++ There can be a delay of minutes or hours before clients can resolve the domain name, depending on the registrar and the "time to live" (TTL) that's configured for the domain name. ++For more information on DNS resolution with Azure Machine Learning, see [How to use your workspace with a custom DNS server](../how-to-custom-dns.md). +## Update the TLS/SSL certificate ++TLS/SSL certificates expire and must be renewed. Typically this happens every year. Use the information in the following sections to update and renew your certificate for models deployed to Azure Kubernetes Service: ++### Update a Microsoft generated certificate ++If the certificate was originally generated by Microsoft (when using the *leaf_domain_label* to create the service), **it will automatically renew** when needed. If you want to manually renew it, use one of the following examples to update the certificate: ++> [!IMPORTANT] +> * If the existing certificate is still valid, use `renew=True` (SDK) or `--ssl-renew` (CLI) to force the configuration to renew it. For example, if the existing certificate is still valid for 10 days and you don't use `renew=True`, the certificate may not be renewed. +> * When the service was originally deployed, the `leaf_domain_label` is used to create a DNS name using the pattern `<leaf-domain-label>######.<azure-region>.cloudapp.azure.com`. To preserve the existing name (including the 6 digits originally generated), use the original `leaf_domain_label` value. Do not include the 6 digits that were generated. ++**Use the SDK** ++```python +from azureml.core.compute import AksCompute +from azureml.core.compute.aks import AksUpdateConfiguration +from azureml.core.compute.aks import SslConfiguration ++# Get the existing cluster +aks_target = AksCompute(ws, clustername) ++# Update the existing certificate by referencing the leaf domain label +ssl_configuration = SslConfiguration(leaf_domain_label="myaks", overwrite_existing_domain=True, renew=True) +update_config = AksUpdateConfiguration(ssl_configuration) +aks_target.update(update_config) +``` ++**Use the CLI** +++```azurecli +az ml computetarget update aks -g "myresourcegroup" -w "myresourceworkspace" -n "myaks" --ssl-leaf-domain-label "myaks" --ssl-overwrite-domain True --ssl-renew +``` ++For more information, see the following reference docs: ++* [SslConfiguration](/python/api/azureml-core/azureml.core.compute.aks.sslconfiguration) +* [AksUpdateConfiguration](/python/api/azureml-core/azureml.core.compute.aks.aksupdateconfiguration) ++### Update custom certificate ++If the certificate was originally generated by a certificate authority, use the following steps: ++1. Use the documentation provided by the certificate authority to renew the certificate. This process creates new certificate files. ++1. Use either the SDK or CLI to update the service with the new certificate: ++ **Use the SDK** ++ ```python + from azureml.core.compute import AksCompute + from azureml.core.compute.aks import AksUpdateConfiguration + from azureml.core.compute.aks import SslConfiguration + + # Read the certificate file + def get_content(file_name): + with open(file_name, 'r') as f: + return f.read() ++ # Get the existing cluster + aks_target = AksCompute(ws, clustername) + + # Update cluster with custom certificate + ssl_configuration = SslConfiguration(cname="myaks", cert=get_content('cert.pem'), key=get_content('key.pem')) + update_config = AksUpdateConfiguration(ssl_configuration) + aks_target.update(update_config) + ``` ++ **Use the CLI** ++ [!INCLUDE [cli v1](../../../includes/machine-learning-cli-v1.md)] ++ ```azurecli + az ml computetarget update aks -g "myresourcegroup" -w "myresourceworkspace" -n "myaks" --ssl-cname "myaks"--ssl-cert-file "cert.pem" --ssl-key-file "key.pem" + ``` ++For more information, see the following reference docs: ++* [SslConfiguration](/python/api/azureml-core/azureml.core.compute.aks.sslconfiguration) +* [AksUpdateConfiguration](/python/api/azureml-core/azureml.core.compute.aks.aksupdateconfiguration) ++## Disable TLS ++To disable TLS for a model deployed to Azure Kubernetes Service, create an `SslConfiguration` with `status="Disabled"`, then perform an update: ++```python +from azureml.core.compute import AksCompute +from azureml.core.compute.aks import AksUpdateConfiguration +from azureml.core.compute.aks import SslConfiguration ++# Get the existing cluster +aks_target = AksCompute(ws, clustername) ++# Disable TLS +ssl_configuration = SslConfiguration(status="Disabled") +update_config = AksUpdateConfiguration(ssl_configuration) +aks_target.update(update_config) +``` ++## Next steps +Learn how to: ++ [Consume a machine learning model deployed as a web service](../how-to-consume-web-service.md)++ [Virtual network isolation and privacy overview](../how-to-network-security-overview.md)++ [How to use your workspace with a custom DNS server](../how-to-custom-dns.md) |
| remote-rendering | Create An Account | https://github.com/MicrosoftDocs/azure-docs/commits/main/articles/remote-rendering/how-tos/create-an-account.md | The steps in this paragraph have to be performed for each storage account that s > If your Remote Rendering account is not listed, refer to this [troubleshoot section](../resources/troubleshoot.md#cant-link-storage-account-to-arr-account). > [!IMPORTANT]-> Azure role assignments are cached by Azure Storage, so there may be a delay of up to 30 minutes between when you grant access to your remote rendering account and when it can be used to access your storage account. See the [Azure role-based access control (Azure RBAC) documentation](../../role-based-access-control/troubleshooting.md#role-assignment-changes-are-not-being-detected) for details. +> Azure role assignments are cached by Azure Storage, so there may be a delay of up to 30 minutes between when you grant access to your remote rendering account and when it can be used to access your storage account. See the [Azure role-based access control (Azure RBAC) documentation](../../role-based-access-control/troubleshooting.md#symptomrole-assignment-changes-are-not-being-detected) for details. ## Next steps |
| role-based-access-control | Best Practices | https://github.com/MicrosoftDocs/azure-docs/commits/main/articles/role-based-access-control/best-practices.md | For more information, see [What is Azure AD Privileged Identity Management?](../ ## Assign roles to groups, not users -To make role assignments more manageable, avoid assigning roles directly to users. Instead, assign roles to groups. Assigning roles to groups instead of users also helps minimize the number of role assignments, which has a [limit of role assignments per subscription](troubleshooting.md#azure-role-assignments-limit). +To make role assignments more manageable, avoid assigning roles directly to users. Instead, assign roles to groups. Assigning roles to groups instead of users also helps minimize the number of role assignments, which has a [limit of role assignments per subscription](troubleshooting.md#limits). ## Assign roles using the unique role ID instead of the role name |
| role-based-access-control | Conditions Format | https://github.com/MicrosoftDocs/azure-docs/commits/main/articles/role-based-access-control/conditions-format.md | To use principal attributes, you must have **all** of the following: For more information about custom security attributes, see: - [Allow read access to blobs based on tags and custom security attributes](conditions-custom-security-attributes.md)-- [Principal does not appear in Attribute source when adding a condition](conditions-troubleshoot.md#symptomprincipal-does-not-appear-in-attribute-source-when-adding-a-condition)+- [Principal does not appear in Attribute source](conditions-troubleshoot.md#symptomprincipal-does-not-appear-in-attribute-source) - [Add or deactivate custom security attributes in Azure AD](../active-directory/fundamentals/custom-security-attributes-add.md) ## Function operators |
| role-based-access-control | Conditions Prerequisites | https://github.com/MicrosoftDocs/azure-docs/commits/main/articles/role-based-access-control/conditions-prerequisites.md | To use principal attributes ([custom security attributes in Azure AD](../active- For more information about custom security attributes, see: -- [Principal does not appear in Attribute source when adding a condition](conditions-troubleshoot.md#symptomprincipal-does-not-appear-in-attribute-source-when-adding-a-condition)+- [Principal does not appear in Attribute source](conditions-troubleshoot.md#symptomprincipal-does-not-appear-in-attribute-source) - [Add or deactivate custom security attributes in Azure AD](../active-directory/fundamentals/custom-security-attributes-add.md) ## Next steps |
| role-based-access-control | Conditions Troubleshoot | https://github.com/MicrosoftDocs/azure-docs/commits/main/articles/role-based-access-control/conditions-troubleshoot.md | -## Symptom - Condition is not enforced +## General issues ++### Symptom - Condition is not enforced **Cause 1** When you add a condition to a role assignment, it can take up to 5 minutes for t Wait for 5 minutes and test the condition again. -## Symptom - Condition is not valid error when adding a condition +### Symptom - Condition is not valid error when adding a condition When you try to add a role assignment with a condition, you get an error similar to: Your condition is not formatted correctly. Fix any [condition format or syntax](conditions-format.md) issues. Alternatively, add the condition using the [visual editor in the Azure portal](conditions-role-assignments-portal.md). -## Symptom - Principal does not appear in Attribute source when adding a condition +## Issues in the visual editor ++### Symptom - Principal does not appear in Attribute source When you try to add a role assignment with a condition, **Principal** does not appear in the **Attribute source** list. You don't meet the prerequisites. To use principal attributes, you must have **a 1. Open **Azure Active Directory** > **Custom security attributes** to see if custom security attributes have been defined and which ones you have access to. If you don't see any custom security attributes, ask your Azure AD administrator to add an attribute set that you can manage. For more information, see [Manage access to custom security attributes in Azure AD](../active-directory/fundamentals/custom-security-attributes-manage.md) and [Add or deactivate custom security attributes in Azure AD](../active-directory/fundamentals/custom-security-attributes-add.md). -## Symptom - Principal does not appear in Attribute source when adding a condition using PIM +### Symptom - Principal does not appear in Attribute source when using PIM When you try to add a role assignment with a condition using [Azure AD Privileged Identity Management (PIM)](../active-directory/privileged-identity-management/pim-configure.md), **Principal** does not appear in the **Attribute source** list. When you try to add a role assignment with a condition using [Azure AD Privilege PIM currently does not support using the principal attribute in a role assignment condition. -## Symptom - Resource attribute is not valid error when adding a condition using Azure PowerShell +## Error messages in visual editor -When you try to add a role assignment with a condition using Azure PowerShell, you get an error similar to: +### Symptom - Condition not recognized -``` -New-AzRoleAssignment : Resource attribute -Microsoft.Storage/storageAccounts/blobServices/containers/blobs/tags:Project<$> is not valid. -``` +After using the code editor, you switch to the visual editor and get a message similar to the following: ++`The current expression cannot be recognized. Switch to the code editor to edit the expression or delete the expression and add a new one.` **Cause** -If your condition includes a dollar sign ($), you must prefix it with a backtick (\`). +Updates were made to the condition that the visual editor is not able to parse. **Solution** -Add a backtick (\`) before each dollar sign. The following shows an example. For more information about rules for quotation marks in PowerShell, see [About Quoting Rules](/powershell/module/microsoft.powershell.core/about/about_quoting_rules). +Fix any [condition format or syntax](conditions-format.md) issues. Alternatively, you can delete the condition and try again. -```azurepowershell -$condition = "((!(ActionMatches{'Microsoft.Storage/storageAccounts/blobServices/containers/blobs/read'} AND NOT SubOperationMatches{'Blob.List'})) OR (@Resource[Microsoft.Storage/storageAccounts/blobServices/containers/blobs/tags:Project<`$key_case_sensitive`$>] StringEquals 'Cascade'))" -``` +### Symptom - Attribute does not apply error for previously saved condition -## Symptom - Resource attribute is not valid error when adding a condition using Azure CLI +When you open a previously saved condition in the visual editor, you get the following message: -When you try to add a role assignment with a condition using Azure CLI, you get an error similar to: +`Attribute does not apply for the selected actions. Select a different set of actions.` -``` -Resource attribute Microsoft.Storage/storageAccounts/blobServices/containers/blobs/tags:Project<$> is not valid. -``` +**Cause** ++In May 2022, the Read a blob action was changed from the following format: ++`!(ActionMatches{'Microsoft.Storage/storageAccounts/blobServices/containers/blobs/read'})` ++To exclude the `Blob.List` suboperation: ++`!(ActionMatches{'Microsoft.Storage/storageAccounts/blobServices/containers/blobs/read'} AND NOT SubOperationMatches{'Blob.List'})` ++If you created a condition with the Read a blob action prior to May 2022, you might see this error message in the visual editor. ++**Solution** ++Open the **Select an action** pane and reselect the **Read a blob** action. ++### Symptom - Attribute does not apply error ++When you select one or more actions in the visual editor with an existing expression, you get the following message and the previously selected attribute is removed: ++`Attribute does not apply for the selected actions. Select a different set of actions.` **Cause** -If your condition includes a dollar sign ($), you must prefix it with a backslash (\\). +The previously selected attribute no longer applies to the currently selected actions. ++**Solution 1** ++In the **Add action** section, select an action that applies to the selected attribute. For a list of storage actions that each storage attribute supports, see [Actions and attributes for Azure role assignment conditions in Azure Storage (preview)](../storage/common/storage-auth-abac-attributes.md). ++**Solution 2** ++In the **Build expression** section, select an attribute that applies to the currently selected actions. For a list of storage attributes that each storage action supports, see [Actions and attributes for Azure role assignment conditions in Azure Storage (preview)](../storage/common/storage-auth-abac-attributes.md). ++### Symptom - Attribute does not apply in this context warning ++When you make edits in the code editor and then switch to the visual editor, you get the following message and the previously selected attribute is removed: ++`Attribute does not apply in this context. Use a different role assignment scope or remove the expression.` ++**Cause** ++The specified attribute is not available in the current scope, such as using `Version ID` in a storage account with hierarchical namespace enabled. **Solution** -Add a backslash (\\) before each dollar sign. The following shows an example. For more information about rules for quotation marks in Bash, see [Double Quotes](https://www.gnu.org/software/bash/manual/html_node/Double-Quotes.html). +If you want to use the currently specified attribute, create the role assignment condition at a different scope, such as resource group scope. Or remove and re-create the expression using the currently selected actions. -```azurecli -condition="((!(ActionMatches{'Microsoft.Storage/storageAccounts/blobServices/containers/blobs/read'} AND NOT SubOperationMatches{'Blob.List'})) OR (@Resource[Microsoft.Storage/storageAccounts/blobServices/containers/blobs/tags:Project<\$key_case_sensitive\$>] StringEquals 'Cascade'))" -``` +### Symptom - Attribute is not recognized error -## Symptom - Error when assigning a condition string to a variable in Bash +When you make edits in the code editor and then switch to the visual editor, you get the following message and the previously selected attribute is removed: -When you try to assign a condition string to a variable in Bash, you get the `bash: !: event not found` message. +`Attribute is not recognized. Select a valid attribute or remove the expression.` **Cause** -In Bash, if history expansion is enabled, you might see the message `bash: !: event not found` because of the exclamation point (!). +The specified attribute is not recognized, possibly because of a typo. **Solution** -Disable history expansion with the command `set +H`. To re-enable history expansion, use `set -H`. +In the code editor, fix the typo. Or remove the existing expression and use the visual editor to select an attribute. -## Symptom - Unrecognized arguments error when adding a condition using Azure CLI +### Symptom - Attribute value is invalid error -When you try to add a role assignment with a condition using Azure CLI, you get an error similar to: +When you make edits in the code editor and then switch to the visual editor, you get the following message and the previously selected attribute is removed: -`az: error: unrecognized arguments: --description {description} --condition {condition} --condition-version 2.0` +`Attribute value is invalid. Select another attribute or value.` **Cause** -You are likely using an earlier version of Azure CLI that does not support role assignment condition parameters. +The right side of the expression contains an attribute or value that is not valid. **Solution** -Update to the latest version of Azure CLI (2.18 or later). For more information, see [Install the Azure CLI](/cli/azure/install-azure-cli). +Use the visual editor to select an attribute or specify a value. -## Symptom - Condition not recognized in visual editor +### Symptom - No actions selected error -After using the code editor, you switch to the visual editor and get a message similar to the following: +When you remove all of the actions in the visual editor, you get the following message: -`The current expression cannot be recognized. Switch to the code editor to edit the expression or delete the expression and add a new one.` +`No actions selected. Select one or more actions to edit expressions.` **Cause** -Updates were made to the condition that the visual editor is not able to parse. +There is an existing expression, but no actions have been selected as a target. **Solution** -Fix any [condition format or syntax](conditions-format.md) issues. Alternatively, you can delete the condition and try again. +In the **Add action** section, add one or more actions that the expression should target. -## Symptom - Error when copying and pasting a condition +## Error messages in Azure PowerShell ++### Symptom - Resource attribute is not valid error ++When you try to add a role assignment with a condition using Azure PowerShell, you get an error similar to: ++``` +New-AzRoleAssignment : Resource attribute +Microsoft.Storage/storageAccounts/blobServices/containers/blobs/tags:Project<$> is not valid. +``` ++**Cause** ++If your condition includes a dollar sign ($), you must prefix it with a backtick (\`). ++**Solution** ++Add a backtick (\`) before each dollar sign. The following shows an example. For more information about rules for quotation marks in PowerShell, see [About Quoting Rules](/powershell/module/microsoft.powershell.core/about/about_quoting_rules). ++```azurepowershell +$condition = "((!(ActionMatches{'Microsoft.Storage/storageAccounts/blobServices/containers/blobs/read'} AND NOT SubOperationMatches{'Blob.List'})) OR (@Resource[Microsoft.Storage/storageAccounts/blobServices/containers/blobs/tags:Project<`$key_case_sensitive`$>] StringEquals 'Cascade'))" +``` ++### Symptom - Error when copying and pasting a condition **Cause** If you use PowerShell and copy a condition from a document, it might include spe If you copied a condition from a rich text editor and you are certain the condition is correct, delete all spaces and returns and then add back the relevant spaces. Alternatively, use a plain text editor or a code editor, such as Visual Studio Code. -## Symptom - Attribute does not apply error in visual editor for previously saved condition +## Error messages in Azure CLI -When you open a previously saved condition in the visual editor, you get the following message: +### Symptom - Resource attribute is not valid error -`Attribute does not apply for the selected actions. Select a different set of actions.` +When you try to add a role assignment with a condition using Azure CLI, you get an error similar to: ++``` +Resource attribute Microsoft.Storage/storageAccounts/blobServices/containers/blobs/tags:Project<$> is not valid. +``` **Cause** -In May 2022, the Read a blob action was changed from the following format: +If your condition includes a dollar sign ($), you must prefix it with a backslash (\\). -`!(ActionMatches{'Microsoft.Storage/storageAccounts/blobServices/containers/blobs/read'})` +**Solution** -To exclude the `Blob.List` suboperation: +Add a backslash (\\) before each dollar sign. The following shows an example. For more information about rules for quotation marks in Bash, see [Double Quotes](https://www.gnu.org/software/bash/manual/html_node/Double-Quotes.html). -`!(ActionMatches{'Microsoft.Storage/storageAccounts/blobServices/containers/blobs/read'} AND NOT SubOperationMatches{'Blob.List'})` +```azurecli +condition="((!(ActionMatches{'Microsoft.Storage/storageAccounts/blobServices/containers/blobs/read'} AND NOT SubOperationMatches{'Blob.List'})) OR (@Resource[Microsoft.Storage/storageAccounts/blobServices/containers/blobs/tags:Project<\$key_case_sensitive\$>] StringEquals 'Cascade'))" +``` -If you created a condition with the Read a blob action prior to May 2022, you might see this error message in the visual editor. +### Symptom - Unrecognized arguments error ++When you try to add a role assignment with a condition using Azure CLI, you get an error similar to: ++`az: error: unrecognized arguments: --description {description} --condition {condition} --condition-version 2.0` ++**Cause** ++You are likely using an earlier version of Azure CLI that does not support role assignment condition parameters. **Solution** -Open the **Select an action** pane and reselect the **Read a blob** action. +Update to the latest version of Azure CLI (2.18 or later). For more information, see [Install the Azure CLI](/cli/azure/install-azure-cli). ++### Symptom - Error when assigning a condition string to a variable in Bash ++When you try to assign a condition string to a variable in Bash, you get the `bash: !: event not found` message. ++**Cause** ++In Bash, if history expansion is enabled, you might see the message `bash: !: event not found` because of the exclamation point (!). ++**Solution** ++Disable history expansion with the command `set +H`. To re-enable history expansion, use `set -H`. ## Next steps |
| role-based-access-control | Role Assignments List Portal | https://github.com/MicrosoftDocs/azure-docs/commits/main/articles/role-based-access-control/role-assignments-list-portal.md | You can list role assignments for system-assigned and user-assigned managed iden You can have up to **2000** role assignments in each subscription. This limit includes role assignments at the subscription, resource group, and resource scopes. To help you keep track of this limit, the **Role assignments** tab includes a chart that lists the number of role assignments for the current subscription. -The role assignments limit for a subscription is currently being increased. For more information, see [Troubleshoot Azure RBAC](troubleshooting.md#azure-role-assignments-limit). +The role assignments limit for a subscription is currently being increased. For more information, see [Troubleshoot Azure RBAC](troubleshooting.md#limits).  -If you are getting close to the maximum number and you try to add more role assignments, you'll see a warning in the **Add role assignment** pane. For ways that you can reduce the number of role assignments, see [Troubleshoot Azure RBAC](troubleshooting.md#azure-role-assignments-limit). +If you are getting close to the maximum number and you try to add more role assignments, you'll see a warning in the **Add role assignment** pane. For ways that you can reduce the number of role assignments, see [Troubleshoot Azure RBAC](troubleshooting.md#limits).  |
| role-based-access-control | Role Assignments Remove | https://github.com/MicrosoftDocs/azure-docs/commits/main/articles/role-based-access-control/role-assignments-remove.md | PS C:\> Remove-AzRoleAssignment -SignInName alain@example.com ` -Scope "/providers/Microsoft.Management/managementGroups/marketing-group" ``` -If you get the error message: "The provided information does not map to a role assignment", make sure that you also specify the `-Scope` or `-ResourceGroupName` parameters. For more information, see [Troubleshoot Azure RBAC](troubleshooting.md#role-assignments-with-identity-not-found). +If you get the error message: "The provided information does not map to a role assignment", make sure that you also specify the `-Scope` or `-ResourceGroupName` parameters. For more information, see [Troubleshoot Azure RBAC](troubleshooting.md#symptomrole-assignments-with-identity-not-found). ## Azure CLI |
| role-based-access-control | Role Assignments Steps | https://github.com/MicrosoftDocs/azure-docs/commits/main/articles/role-based-access-control/role-assignments-steps.md | If you are using a service principal to assign roles, you might get the error "I Once you know the security principal, role, and scope, you can assign the role. You can assign roles using the Azure portal, Azure PowerShell, Azure CLI, Azure SDKs, or REST APIs. -You can have up to **2000** role assignments in each subscription. This limit includes role assignments at the subscription, resource group, and resource scopes. You can have up to **500** role assignments in each management group. The role assignments limit for a subscription is currently being increased. For more information, see [Troubleshoot Azure RBAC](troubleshooting.md#azure-role-assignments-limit). +You can have up to **2000** role assignments in each subscription. This limit includes role assignments at the subscription, resource group, and resource scopes. You can have up to **500** role assignments in each management group. The role assignments limit for a subscription is currently being increased. For more information, see [Troubleshoot Azure RBAC](troubleshooting.md#limits). Check out the following articles for detailed steps for how to assign roles. |
| role-based-access-control | Troubleshooting | https://github.com/MicrosoftDocs/azure-docs/commits/main/articles/role-based-access-control/troubleshooting.md | -This article answers some common questions about Azure role-based access control (Azure RBAC), so that you know what to expect when using the roles and can troubleshoot access problems. +This article describes some common solutions for issues related to Azure role-based access control (Azure RBAC). -## Azure role assignments limit +## Limits -Azure supports up to **2000** role assignments per subscription. This limit includes role assignments at the subscription, resource group, and resource scopes, but not at the management group scope. If you get the error message "No more role assignments can be created (code: RoleAssignmentLimitExceeded)" when you try to assign a role, try to reduce the number of role assignments in the subscription. +### Symptom - No more role assignments can be created ++When you try to assign a role, you get the following error message: ++`No more role assignments can be created (code: RoleAssignmentLimitExceeded)` ++**Cause** ++Azure supports up to **2000** role assignments per subscription. This limit includes role assignments at the subscription, resource group, and resource scopes, but not at the management group scope. > [!NOTE] > Starting November 2021, the role assignments limit for all Azure subscriptions is being automatically increased from **2000** to **4000**. There is no action that you need to take for your subscription. The limit increase will take several months. -If you are getting close to this limit, here are some ways that you can reduce the number of role assignments: +**Solution** ++Try to reduce the number of role assignments in the subscription. Here are some ways that you can reduce the number of role assignments: - Add users to groups and assign roles to the groups instead. - Combine multiple built-in roles with a custom role. $ras = Get-AzRoleAssignment -Scope $scope | Where-Object {$_.scope.StartsWith($s $ras.Count ``` -## Azure role assignments limit for management groups +### Symptom - No more role assignments can be created at management group scope ++You are unable to assign a role at management group scope. ++**Cause** Azure supports up to **500** role assignments per management group. This limit is different than the role assignments limit per subscription. > [!NOTE] > The **500** role assignments limit per management group is fixed and cannot be increased. -## Problems with Azure role assignments --- If you are unable to assign a role in the Azure portal on **Access control (IAM)** because the **Add** > **Add role assignment** option is disabled or because you get the permissions error "The client with object id does not have authorization to perform action", check that you are currently signed in with a user that is assigned a role that has the `Microsoft.Authorization/roleAssignments/write` permission such as [Owner](built-in-roles.md#owner) or [User Access Administrator](built-in-roles.md#user-access-administrator) at the scope you are trying to assign the role.-- If you are using a service principal to assign roles, you might get the error "Insufficient privileges to complete the operation." For example, let's say that you have a service principal that has been assigned the Owner role and you try to create the following role assignment as the service principal using Azure CLI:+**Solution** - ```azurecli - az login --service-principal --username "SPNid" --password "password" --tenant "tenantid" - az role assignment create --assignee "userupn" --role "Contributor" --scope "/subscriptions/{subscriptionId}/resourceGroups/{resourceGroupName}" - ``` +Try to reduce the number of role assignments in the management group. - If you get the error "Insufficient privileges to complete the operation", it is likely because Azure CLI is attempting to look up the assignee identity in Azure AD and the service principal cannot read Azure AD by default. +## Azure role assignments - There are two ways to potentially resolve this error. The first way is to assign the [Directory Readers](../active-directory/roles/permissions-reference.md#directory-readers) role to the service principal so that it can read data in the directory. +### Symptom - Unable to assign a role - The second way to resolve this error is to create the role assignment by using the `--assignee-object-id` parameter instead of `--assignee`. By using `--assignee-object-id`, Azure CLI will skip the Azure AD lookup. You will need to get the object ID of the user, group, or application that you want to assign the role to. For more information, see [Assign Azure roles using Azure CLI](role-assignments-cli.md#assign-a-role-for-a-new-service-principal-at-a-resource-group-scope). +You are unable to assign a role in the Azure portal on **Access control (IAM)** because the **Add** > **Add role assignment** option is disabled or because you get the following permissions error: - ```azurecli - az role assignment create --assignee-object-id 11111111-1111-1111-1111-111111111111 --role "Contributor" --scope "/subscriptions/{subscriptionId}/resourceGroups/{resourceGroupName}" - ``` +`The client with object id does not have authorization to perform action` -- If you create a new service principal and immediately try to assign a role to that service principal, that role assignment can fail in some cases.+**Cause** - To address this scenario, you should set the `principalType` property to `ServicePrincipal` when creating the role assignment. You must also set the `apiVersion` of the role assignment to `2018-09-01-preview` or later. For more information, see [Assign Azure roles to a new service principal using the REST API](role-assignments-rest.md#new-service-principal) or [Assign Azure roles to a new service principal using Azure Resource Manager templates](role-assignments-template.md#new-service-principal) +You are currently signed in with a user that does not have permission to assign roles at the selected scope. -- If you attempt to remove the last Owner role assignment for a subscription, you might see the error "Cannot delete the last RBAC admin assignment." Removing the last Owner role assignment for a subscription is not supported to avoid orphaning the subscription. If you want to cancel your subscription, see [Cancel your Azure subscription](../cost-management-billing/manage/cancel-azure-subscription.md).+**Solution** - You are allowed to remove the last Owner (or User Access Administrator) role assignment at subscription scope, if you are the Global Administrator for the tenant. In this case, there is no constraint for deletion. However, if the call comes from some other principal, then you won't be able to remove the last Owner role assignment at subscription scope. +Check that you are currently signed in with a user that is assigned a role that has the `Microsoft.Authorization/roleAssignments/write` permission such as [Owner](built-in-roles.md#owner) or [User Access Administrator](built-in-roles.md#user-access-administrator) at the scope you are trying to assign the role. -## Problems with custom roles +### Symptom - Unable to assign a role using a service principal with Azure CLI -- If you need steps for how to create a custom role, see the custom role tutorials using the [Azure portal](custom-roles-portal.md), [Azure PowerShell](tutorial-custom-role-powershell.md), or [Azure CLI](tutorial-custom-role-cli.md).-- If you are unable to update an existing custom role, check that you are currently signed in with a user that is assigned a role that has the `Microsoft.Authorization/roleDefinition/write` permission such as [Owner](built-in-roles.md#owner) or [User Access Administrator](built-in-roles.md#user-access-administrator).-- If you are unable to delete a custom role and get the error message "There are existing role assignments referencing role (code: RoleDefinitionHasAssignments)", then there are role assignments still using the custom role. Remove those role assignments and try to delete the custom role again.-- If you get the error message "Role definition limit exceeded. No more role definitions can be created (code: RoleDefinitionLimitExceeded)" when you try to create a new custom role, delete any custom roles that aren't being used. Azure supports up to **5000** custom roles in a directory. (For Azure Germany and Azure China 21Vianet, the limit is 2000 custom roles.)-- If you get an error similar to "The client has permission to perform action 'Microsoft.Authorization/roleDefinitions/write' on scope '/subscriptions/{subscriptionid}', however the linked subscription was not found" when you try to update a custom role, check whether one or more [assignable scopes](role-definitions.md#assignablescopes) have been deleted in the directory. If the scope was deleted, then create a support ticket as there is no self-service solution available at this time.-- When you attempt to create or update a custom role, you get an error similar to "The client '<clientName>' with object id '<objectId>' has permission to perform action 'Microsoft.Authorization/roleDefinitions/write' on scope '/subscriptions/<subscriptionId>'; however, it does not have permission to perform action 'Microsoft.Authorization/roleDefinitions/write' on the linked scope(s)'/subscriptions/<subscriptionId1>,/subscriptions/<subscriptionId2>,/subscriptions/<subscriptionId3>' or the linked scope(s)are invalid". This error usually indicates that you do not have permissions to one or more of the [assignable scopes](role-definitions.md#assignablescopes) in the custom role. You can try the following:- - Review [Who can create, delete, update, or view a custom role](custom-roles.md#who-can-create-delete-update-or-view-a-custom-role) and check that you have permissions to create or update the custom role for all assignable scopes. - - If you don't have permissions, ask your administrator to assign you a role that has the `Microsoft.Authorization/roleDefinitions/write` action, such as [Owner](built-in-roles.md#owner) or [User Access Administrator](built-in-roles.md#user-access-administrator), at the scope of the assignable scope. - - Check that all the assignable scopes in the custom role are valid. If not, remove any invalid assignable scopes. +You are using a service principal to assign roles with Azure CLI and you get the following error: -## Custom roles and management groups +`Insufficient privileges to complete the operation` -- You can only define one management group in `AssignableScopes` of a custom role. Adding a management group to `AssignableScopes` is currently in preview.-- Custom roles with `DataActions` cannot be assigned at the management group scope.-- Azure Resource Manager doesn't validate the management group's existence in the role definition's assignable scope.-- For more information about custom roles and management groups, see [Organize your resources with Azure management groups](../governance/management-groups/overview.md#azure-custom-role-definition-and-assignment).+For example, let's say that you have a service principal that has been assigned the Owner role and you try to create the following role assignment as the service principal using Azure CLI: -## Transferring a subscription to a different directory +```azurecli +az login --service-principal --username "SPNid" --password "password" --tenant "tenantid" +az role assignment create --assignee "userupn" --role "Contributor" --scope "/subscriptions/{subscriptionId}/resourceGroups/{resourceGroupName}" +``` -- If you need steps for how to transfer a subscription to a different Azure AD directory, see [Transfer an Azure subscription to a different Azure AD directory](transfer-subscription.md).-- If you transfer a subscription to a different Azure AD directory, all role assignments are **permanently** deleted from the source Azure AD directory and are not migrated to the target Azure AD directory. You must re-create your role assignments in the target directory. You also have to manually recreate managed identities for Azure resources. For more information, see [FAQs and known issues with managed identities](../active-directory/managed-identities-azure-resources/known-issues.md).-- If you are an Azure AD Global Administrator and you don't have access to a subscription after it was transferred between directories, use the **Access management for Azure resources** toggle to temporarily [elevate your access](elevate-access-global-admin.md) to get access to the subscription.+**Cause** -## Issues with service admins or co-admins +It is likely Azure CLI is attempting to look up the assignee identity in Azure AD and the service principal cannot read Azure AD by default. -- If you are having issues with Service administrator or Co-administrators, see [Add or change Azure subscription administrators](../cost-management-billing/manage/add-change-subscription-administrator.md) and [Classic subscription administrator roles, Azure roles, and Azure AD roles](rbac-and-directory-admin-roles.md).+**Solution** -## Access denied or permission errors +There are two ways to potentially resolve this error. The first way is to assign the [Directory Readers](../active-directory/roles/permissions-reference.md#directory-readers) role to the service principal so that it can read data in the directory. -- If you get the permissions error "The client with object id does not have authorization to perform action over scope (code: AuthorizationFailed)" when you try to create a resource, check that you are currently signed in with a user that is assigned a role that has write permission to the resource at the selected scope. For example, to manage virtual machines in a resource group, you should have the [Virtual Machine Contributor](built-in-roles.md#virtual-machine-contributor) role on the resource group (or parent scope). For a list of the permissions for each built-in role, see [Azure built-in roles](built-in-roles.md).-- If you get the permissions error "You don't have permission to create a support request" when you try to create or update a support ticket, check that you are currently signed in with a user that is assigned a role that has the `Microsoft.Support/supportTickets/write` permission, such as [Support Request Contributor](built-in-roles.md#support-request-contributor).+The second way to resolve this error is to create the role assignment by using the `--assignee-object-id` parameter instead of `--assignee`. By using `--assignee-object-id`, Azure CLI will skip the Azure AD lookup. You will need to get the object ID of the user, group, or application that you want to assign the role to. For more information, see [Assign Azure roles using Azure CLI](role-assignments-cli.md#assign-a-role-for-a-new-service-principal-at-a-resource-group-scope). -## Move resources with role assignments +```azurecli +az role assignment create --assignee-object-id 11111111-1111-1111-1111-111111111111 --role "Contributor" --scope "/subscriptions/{subscriptionId}/resourceGroups/{resourceGroupName}" +``` -If you move a resource that has an Azure role assigned directly to the resource (or a child resource), the role assignment is not moved and becomes orphaned. After the move, you must re-create the role assignment. Eventually, the orphaned role assignment will be automatically removed, but it is a best practice to remove the role assignment before moving the resource. +### Symptom - Assigning a role sometimes fails with REST API or ARM templates -For information about how to move resources, see [Move resources to a new resource group or subscription](../azure-resource-manager/management/move-resource-group-and-subscription.md). +You create a new service principal and immediately try to assign a role to that service principal and the role assignment sometimes fails. -## Role assignments with identity not found +**Cause** -In the list of role assignments for the Azure portal, you might notice that the security principal (user, group, service principal, or managed identity) is listed as **Identity not found** with an **Unknown** type. +The reason is likely a replication delay. The service principal is created in one region; however, the role assignment might occur in a different region that hasn't replicated the service principal yet. - +**Solution** -The identity might not be found for two reasons: +Set the `principalType` property to `ServicePrincipal` when creating the role assignment. You must also set the `apiVersion` of the role assignment to `2018-09-01-preview` or later. For more information, see [Assign Azure roles to a new service principal using the REST API](role-assignments-rest.md#new-service-principal) or [Assign Azure roles to a new service principal using Azure Resource Manager templates](role-assignments-template.md#new-service-principal). -- You recently invited a user when creating a role assignment-- You deleted a security principal that had a role assignment+### Symptom - Role assignments with identity not found -If you recently invited a user when creating a role assignment, this security principal might still be in the replication process across regions. If so, wait a few moments and refresh the role assignments list. +In the list of role assignments for the Azure portal, you notice that the security principal (user, group, service principal, or managed identity) is listed as **Identity not found** with an **Unknown** type. -However, if this security principal is not a recently invited user, it might be a deleted security principal. If you assign a role to a security principal and then you later delete that security principal without first removing the role assignment, the security principal will be listed as **Identity not found** and an **Unknown** type. + If you list this role assignment using Azure PowerShell, you might see an empty `DisplayName` and `SignInName`, or a value for `ObjectType` of `Unknown`. For example, [Get-AzRoleAssignment](/powershell/module/az.resources/get-azroleassignment) returns a role assignment that is similar to the following output: Similarly, if you list this role assignment using Azure CLI, you might see an em } ``` +**Cause 1** ++You recently invited a user when creating a role assignment and this security principal is still in the replication process across regions. ++**Solution 1** ++Wait a few moments and refresh the role assignments list. ++**Cause 2** ++You deleted a security principal that had a role assignment. If you assign a role to a security principal and then you later delete that security principal without first removing the role assignment, the security principal will be listed as **Identity not found** and an **Unknown** type. ++**Solution 2** + It isn't a problem to leave these role assignments where the security principal has been deleted. If you like, you can remove these role assignments using steps that are similar to other role assignments. For information about how to remove role assignments, see [Remove Azure role assignments](role-assignments-remove.md). -In PowerShell, if you try to remove the role assignments using the object ID and role definition name, and more than one role assignment matches your parameters, you will get the error message: "The provided information does not map to a role assignment". The following output shows an example of the error message: +In PowerShell, if you try to remove the role assignments using the object ID and role definition name, and more than one role assignment matches your parameters, you will get the error message: `The provided information does not map to a role assignment`. The following output shows an example of the error message: ``` PS C:\> Remove-AzRoleAssignment -ObjectId 33333333-3333-3333-3333-333333333333 -RoleDefinitionName "Storage Blob Data Contributor" If you get this error message, make sure you also specify the `-Scope` or `-Reso PS C:\> Remove-AzRoleAssignment -ObjectId 33333333-3333-3333-3333-333333333333 -RoleDefinitionName "Storage Blob Data Contributor" - Scope /subscriptions/11111111-1111-1111-1111-111111111111 ``` -## Role assignment changes are not being detected +### Symptom - Cannot delete the last Owner role assignment ++You attempt to remove the last Owner role assignment for a subscription and you see the following error: ++`Cannot delete the last RBAC admin assignment` ++**Cause** ++Removing the last Owner role assignment for a subscription is not supported to avoid orphaning the subscription. ++**Solution** ++If you want to cancel your subscription, see [Cancel your Azure subscription](../cost-management-billing/manage/cancel-azure-subscription.md). ++You are allowed to remove the last Owner (or User Access Administrator) role assignment at subscription scope, if you are the Global Administrator for the tenant. In this case, there is no constraint for deletion. However, if the call comes from some other principal, then you won't be able to remove the last Owner role assignment at subscription scope. ++### Symptom - Role assignment is not moved after moving a resource ++**Cause** ++If you move a resource that has an Azure role assigned directly to the resource (or a child resource), the role assignment is not moved and becomes orphaned. -Azure Resource Manager sometimes caches configurations and data to improve performance. When you assign roles or remove role assignments, it can take up to 30 minutes for changes to take effect. If you are using the Azure portal, Azure PowerShell, or Azure CLI, you can force a refresh of your role assignment changes by signing out and signing in. If you are making role assignment changes with REST API calls, you can force a refresh by refreshing your access token. +**Solution** ++After you move a resource, you must re-create the role assignment. Eventually, the orphaned role assignment will be automatically removed, but it is a best practice to remove the role assignment before moving the resource. For information about how to move resources, see [Move resources to a new resource group or subscription](../azure-resource-manager/management/move-resource-group-and-subscription.md). ++### Symptom - Role assignment changes are not being detected ++You recently added or updated a role assignment, but the changes are not being detected. ++**Cause** ++Azure Resource Manager sometimes caches configurations and data to improve performance. When you assign roles or remove role assignments, it can take up to 30 minutes for changes to take effect. ++**Solution** ++If you are using the Azure portal, Azure PowerShell, or Azure CLI, you can force a refresh of your role assignment changes by signing out and signing in. If you are making role assignment changes with REST API calls, you can force a refresh by refreshing your access token. If you are add or remove a role assignment at management group scope and the role has `DataActions`, the access on the data plane might not be updated for several hours. This applies only to management group scope and the data plane. -## Web app features that require write access +## Custom roles ++### Symptom - Unable to update a custom role ++You are unable to update an existing custom role. ++**Cause** ++You are currently signed in with a user that does not have permission to update custom roles. ++**Solution** ++Check that you are currently signed in with a user that is assigned a role that has the `Microsoft.Authorization/roleDefinition/write` permission such as [Owner](built-in-roles.md#owner) or [User Access Administrator](built-in-roles.md#user-access-administrator). ++### Symptom - Unable to create or update a custom role ++When you try to create or update a custom role, you get an error similar to following: ++`The client '<clientName>' with object id '<objectId>' has permission to perform action 'Microsoft.Authorization/roleDefinitions/write' on scope '/subscriptions/<subscriptionId>'; however, it does not have permission to perform action 'Microsoft.Authorization/roleDefinitions/write' on the linked scope(s)'/subscriptions/<subscriptionId1>,/subscriptions/<subscriptionId2>,/subscriptions/<subscriptionId3>' or the linked scope(s)are invalid` ++**Cause** ++This error usually indicates that you do not have permissions to one or more of the [assignable scopes](role-definitions.md#assignablescopes) in the custom role. ++**Solution** ++Try the following: ++- Review [Who can create, delete, update, or view a custom role](custom-roles.md#who-can-create-delete-update-or-view-a-custom-role) and check that you have permissions to create or update the custom role for all assignable scopes. +- If you don't have permissions, ask your administrator to assign you a role that has the `Microsoft.Authorization/roleDefinitions/write` action, such as [Owner](built-in-roles.md#owner) or [User Access Administrator](built-in-roles.md#user-access-administrator), at the scope of the assignable scope. +- Check that all the assignable scopes in the custom role are valid. If not, remove any invalid assignable scopes. ++For more information, see the custom role tutorials using the [Azure portal](custom-roles-portal.md), [Azure PowerShell](tutorial-custom-role-powershell.md), or [Azure CLI](tutorial-custom-role-cli.md). ++### Symptom - Unable to delete a custom role ++You are unable to delete a custom role and get the following error message: ++`There are existing role assignments referencing role (code: RoleDefinitionHasAssignments)` ++**Cause** ++There are role assignments still using the custom role. ++**Solution** ++Remove those role assignments and try to delete the custom role again. ++### Symptom - Unable to add more than one management group as assignable scope ++When you try to create or update a custom role, you can't add more than one management group as assignable scope. -If you grant a user read-only access to a single web app, some features are disabled that you might not expect. The following management capabilities require **write** access to a web app (either Contributor or Owner), and aren't available in any read-only scenario. +**Cause** ++You can only define one management group in `AssignableScopes` of a custom role. Adding a management group to `AssignableScopes` is currently in preview. ++**Solution** ++Define one management group in `AssignableScopes` of your custom role. For more information about custom roles and management groups, see [Organize your resources with Azure management groups](../governance/management-groups/overview.md#azure-custom-role-definition-and-assignment). ++### Symptom - Unable to add data actions to custom role ++When you try to create or update a custom role, you can't add data actions or you see the following message: ++`You cannot add data action permissions when you have a management group as an assignable scope` ++**Cause** ++You are trying to create a custom role with data actions and a management group as assignable scope. Custom roles with `DataActions` cannot be assigned at the management group scope. ++**Solution** ++Create the custom role with one or more subscriptions as the assignable scope. For more information about custom roles and management groups, see [Organize your resources with Azure management groups](../governance/management-groups/overview.md#azure-custom-role-definition-and-assignment). ++### Symptom - No more role definitions can be created ++When you try to create a new custom role, you get the following message: ++`Role definition limit exceeded. No more role definitions can be created (code: RoleDefinitionLimitExceeded)` ++**Cause** ++Azure supports up to **5000** custom roles in a directory. (For Azure Germany and Azure China 21Vianet, the limit is 2000 custom roles.) ++**Solution** ++Try to reduce the number of custom roles. ++## Access denied or permission errors ++### Symptom - Authorization failed ++When you try to create a resource, you get the following error message: ++`The client with object id does not have authorization to perform action over scope (code: AuthorizationFailed)` ++**Cause** ++You are currently signed in with a user that does not have write permission to the resource at the selected scope. ++**Solution** ++Check that you are currently signed in with a user that is assigned a role that has write permission to the resource at the selected scope. For example, to manage virtual machines in a resource group, you should have the [Virtual Machine Contributor](built-in-roles.md#virtual-machine-contributor) role on the resource group (or parent scope). For a list of the permissions for each built-in role, see [Azure built-in roles](built-in-roles.md). ++### Symptom - Unable to create a support request ++When you try to create or update a support ticket, you get the following error message: ++`You don't have permission to create a support request` ++**Cause** ++You are currently signed in with a user that does not have permission to the create support requests. ++**Solution** ++Check that you are currently signed in with a user that is assigned a role that has the `Microsoft.Support/supportTickets/write` permission, such as [Support Request Contributor](built-in-roles.md#support-request-contributor). ++## Azure features are disabled ++### Symptom - Some web app features are disabled ++A user has read access to a web app and some features are disabled. ++**Cause** ++If you grant a user read access to a web app, some features are disabled that you might not expect. The following management capabilities require write access to a web app and aren't available in any read-only scenario. * Commands (like start, stop, etc.) * Changing settings like general configuration, scale settings, backup settings, and monitoring settings If you grant a user read-only access to a single web app, some features are disa * Web tests * Virtual network (only visible to a reader if a virtual network has previously been configured by a user with write access). -If you can't access any of these tiles, you need to ask your administrator for Contributor access to the web app. +**Solution** ++Assign the [Contributor](built-in-roles.md#contributor) or another [Azure built-in role](built-in-roles.md) with write permissions for the web app. -## Web app resources that require write access +### Symptom - Some web app resources are disabled ++A user has write access to a web app and some features are disabled. ++**Cause** Web apps are complicated by the presence of a few different resources that interplay. Here is a typical resource group with a couple of websites: Web apps are complicated by the presence of a few different resources that inter As a result, if you grant someone access to just the web app, much of the functionality on the website blade in the Azure portal is disabled. -These items require **write** access to the **App Service plan** that corresponds to your website: +These items require write access to theApp Service plan that corresponds to your website: * Viewing the web app's pricing tier (Free or Standard) * Scale configuration (number of instances, virtual machine size, autoscale settings) These items require **write** access to the whole **Resource group** that contai * Application insights components * Web tests -## Virtual machine features that require write access +**Solution** ++Assign an [Azure built-in role](built-in-roles.md) with write permissions for the app service plan or resource group. ++### Symptom - Some virtual machine features are disabled ++A user has access to a virtual machine and some features are disabled. ++**Cause** Similar to web apps, some features on the virtual machine blade require write access to the virtual machine, or to other resources in the resource group. Virtual machines are related to Domain names, virtual networks, storage accounts, and alert rules. -These items require **write** access to the **Virtual machine**: +These items require write access to the virtual machine: * Endpoints * IP addresses * Disks * Extensions -These require **write** access to both the **Virtual machine**, and the **Resource group** (along with the Domain name) that it is in: +These require write access to both the virtual machine, and the resource group (along with the Domain name) that it is in: * Availability set * Load balanced set These require **write** access to both the **Virtual machine**, and the **Resour If you can't access any of these tiles, ask your administrator for Contributor access to the Resource group. -## Azure Functions and write access +**Solution** ++Assign an [Azure built-in role](built-in-roles.md) with write permissions for the virtual machine or resource group. ++### Symptom - Some function app features are disabled ++A user has access to a function app and some features are disabled. For example, they can click the **Platform features** tab and then click **All settings** to view some settings related to a function app (similar to a web app), but they can't modify any of these settings. ++**Cause** Some features of [Azure Functions](../azure-functions/functions-overview.md) require write access. For example, if a user is assigned the [Reader](built-in-roles.md#reader) role, they will not be able to view the functions within a function app. The portal will display **(No access)**.  -A reader can click the **Platform features** tab and then click **All settings** to view some settings related to a function app (similar to a web app), but they can't modify any of these settings. To access these features, you will need the [Contributor](built-in-roles.md#contributor) role. +**Solution** ++Assign an [Azure built-in role](built-in-roles.md) with write permissions for the function app or resource group. ++## Transferring a subscription to a different directory ++### Symptom - All role assignments are deleted after transferring a subscription ++**Cause** ++When you transfer an Azure subscription to a different Azure AD directory, all role assignments are **permanently** deleted from the source Azure AD directory and are not migrated to the target Azure AD directory. ++**Solution** ++You must re-create your role assignments in the target directory. You also have to manually recreate managed identities for Azure resources. For more information, see [Transfer an Azure subscription to a different Azure AD directory](transfer-subscription.md) and [FAQs and known issues with managed identities](../active-directory/managed-identities-azure-resources/known-issues.md). ++### Symptom - Unable to access subscription after transferring a subscription ++**Solution** ++If you are an Azure AD Global Administrator and you don't have access to a subscription after it was transferred between directories, use the **Access management for Azure resources** toggle to temporarily [elevate your access](elevate-access-global-admin.md) to get access to the subscription. ++## Classic subscription administrators ++If you are having issues with Service administrator or Co-administrators, see [Add or change Azure subscription administrators](../cost-management-billing/manage/add-change-subscription-administrator.md) and [Classic subscription administrator roles, Azure roles, and Azure AD roles](rbac-and-directory-admin-roles.md). ## Next steps |
| search | Search Howto Managed Identities Data Sources | https://github.com/MicrosoftDocs/azure-docs/commits/main/articles/search/search-howto-managed-identities-data-sources.md | An indexer creates, uses, and remembers the container used for the cached enrich ```json "cache": {- "id": "{object-id}", "enableReprocessing": true,- "storageConnectionString": "ResourceId=/subscriptions/{subscription-ID}/resourceGroups/{resource-group-name}/providers/Microsoft.Storage/storageAccounts/storage-account-name};" + "storageConnectionString": "ResourceId=/subscriptions/{subscription-ID}/resourceGroups/{resource-group-name}/providers/Microsoft.Storage/storageAccounts/{storage-account-name};" }, ``` |
| security | Feature Availability | https://github.com/MicrosoftDocs/azure-docs/commits/main/articles/security/fundamentals/feature-availability.md | The following tables display the current Microsoft Sentinel feature availability | - [Threat Intelligence - TAXII data connector](../../sentinel/understand-threat-intelligence.md) | GA | GA | | - [Threat Intelligence Platform data connector](../../sentinel/understand-threat-intelligence.md) | Public Preview | Not Available | | - [Threat Intelligence Research Blade](https://techcommunity.microsoft.com/t5/azure-sentinel/what-s-new-threat-intelligence-menu-item-in-public-preview/ba-p/1646597) | GA | GA |+| - [Add indicators in bulk to threat intelligence by file](../../sentinel/indicators-bulk-file-import.md) | Public Preview | Not Available | | - [URL Detonation](https://techcommunity.microsoft.com/t5/azure-sentinel/using-the-new-built-in-url-detonation-in-azure-sentinel/ba-p/996229) | Public Preview | Not Available | | - [Threat Intelligence workbook](/azure/architecture/example-scenario/data/sentinel-threat-intelligence) | GA | GA | | - [GeoLocation and WhoIs data enrichment](../../sentinel/work-with-threat-indicators.md) | Public Preview | Not Available | |
| sentinel | Indicators Bulk File Import | https://github.com/MicrosoftDocs/azure-docs/commits/main/articles/sentinel/indicators-bulk-file-import.md | Phishing,"demo, csv",MDTI article - Franken-Phish domainname,Entity appears in M ### JSON template structure -1. There is only one JSON template for all indicator types. +1. There is only one JSON template for all indicator types. The JSON template is based on STIX 2.1 format. 1. The `pattern` element supports indicator types of: file, ipv4-addr, ipv6-addr, domain-name, url, user-account, email-addr, and windows-registry-key types. Here's an example ipv4-addr indicator using the JSON template. "type": "indicator", "id": "indicator--dbc48d87-b5e9-4380-85ae-e1184abf5ff4", "spec_version": "2.1",- "pattern": "([ipv4-addr:value = '198.168.100.5' ] AND [ipv4-addr:value = '198.168.100.10']) WITHIN 300 SECONDS", + "pattern": "[ipv4-addr:value = '198.168.100.5']", "pattern_type": "stix", "created": "2022-07-27T12:00:00.000Z", "modified": "2022-07-27T12:00:00.000Z", Here's an example ipv4-addr indicator using the JSON template. This article has shown you how to manually bolster your threat intelligence by importing indicators gathered in flat files. Check out these links to learn how indicators power other analytics in Microsoft Sentinel. - [Work with threat indicators in Microsoft Sentinel](work-with-threat-indicators.md) - [Threat indicators for cyber threat intelligence in Microsoft Sentinel](/azure/architecture/example-scenario/dat)-- [Detect threats quickly with near-real-time (NRT) analytics rules in Microsoft Sentinel](near-real-time-rules.md)+- [Detect threats quickly with near-real-time (NRT) analytics rules in Microsoft Sentinel](near-real-time-rules.md) |
| sentinel | Monitor Data Connector Health | https://github.com/MicrosoftDocs/azure-docs/commits/main/articles/sentinel/monitor-data-connector-health.md | Title: Monitor the health of your Microsoft Sentinel data connectors | Microsoft Docs + Title: Monitor the health of your Microsoft Sentinel data connectors description: Use the SentinelHealth data table and the Health Monitoring workbook to keep track of your data connectors' connectivity and performance.-++ Previously updated : 12/30/2021- Last updated : 07/28/2022+ - # Monitor the health of your data connectors - After you've configured and connected your Microsoft Sentinel workspace to your data connectors, you'll want to monitor your connector health, viewing any service or data source issues, such as authentication, throttling, and more. You also might like to configure notifications for health drifts for relevant stakeholders who can take action. For example, configure email messages, Microsoft Teams messages, new tickets in your ticketing system, and so on. This article describes how to use the following features, which allow you to kee - **Data connectors health monitoring workbook**. This workbook provides additional monitors, detects anomalies, and gives insight regarding the workspaceΓÇÖs data ingestion status. You can use the workbookΓÇÖs logic to monitor the general health of the ingested data, and to build custom views and rule-based alerts. -- ***SentinelHealth* data table**. (Public preview) Provides insights on health drifts, such as latest failure events per connector, or connectors with changes from success to failure states, which you can use to create alerts and other automated actions.-- > [!NOTE] - > The *SentinelHealth* data table is currently supported only for [selected data connectors](#supported-data-connectors). - > +- ***SentinelHealth* data table**. (Public preview) Provides insights on health drifts, such as latest failure events per connector, or connectors with changes from success to failure states, which you can use to create alerts and other automated actions. The *SentinelHealth* data table is currently supported only for [selected data connectors](#supported-data-connectors). +> [!IMPORTANT] +> +> The *SentinelHealth* data table is currently in **PREVIEW**. See the [Supplemental Terms of Use for Microsoft Azure Previews](https://azure.microsoft.com/support/legal/preview-supplemental-terms/) for additional legal terms that apply to Azure features that are in beta, preview, or otherwise not yet released into general availability. +> ## Use the health monitoring workbook There are three tabbed sections in this workbook: ## Use the SentinelHealth data table (Public preview) -To get data connector health data from the *SentinelHealth* data table, you must first [turn on the Microsoft Sentinel health feature](#turn-on-microsoft-sentinel-health-for-your-workspace) for your workspace. +To get data connector health data from the *SentinelHealth* data table, you must first turn on the Microsoft Sentinel health feature for your workspace. For more information, see [Turn on health monitoring for Microsoft Sentinel](monitor-sentinel-health.md). Once the health feature is turned on, the *SentinelHealth* data table is created at the first success or failure event generated for your data connectors. -> [!TIP] -> To configure the retention time for your health events, see the [Configure data retention and archive policies in Azure Monitor Logs](../azure-monitor/logs/data-retention-archive.md). -> --> [!IMPORTANT] -> -> The SentinelHealth data table is currently in **PREVIEW**. See the [Supplemental Terms of Use for Microsoft Azure Previews](https://azure.microsoft.com/support/legal/preview-supplemental-terms/) for additional legal terms that apply to Azure features that are in beta, preview, or otherwise not yet released into general availability. -> - ### Supported data connectors The *SentinelHealth* data table is currently supported only for the following data connectors: The *SentinelHealth* data table is currently supported only for the following da - [Threat Intelligence - TAXII](connect-threat-intelligence-taxii.md) - [Threat Intelligence Platforms](connect-threat-intelligence-tip.md) -### Turn on Microsoft Sentinel health for your workspace --1. In Microsoft Sentinel, under the **Configuration** menu on the left, select **Settings** and expand the **Health** section. --1. Select **Configure Diagnostic Settings** and create a new diagnostic setting. -- - In the **Diagnostic setting name** field, enter a meaningful name for your setting. -- - In the **Category details** column, select **DataConnectors**. -- - Under **Destination details**, select **Send to Log Analytics workspace**, and select your subscription and workspace from the dropdown menus. --1. Select **Save** to save your new setting. --The *SentinelHealth* data table is created at the first success or failure event generated for your data connectors. ---### Access the *SentinelHealth* table --In the Microsoft Sentinel **Logs** page, run a query on the *SentinelHealth* table. For example: --```kusto -SentinelHealth - | take 20 -``` - ### Understanding SentinelHealth table events The following types of health events are logged in the *SentinelHealth* table: For more information, see [Azure Monitor alerts overview](../azure-monitor/alert ### SentinelHealth table columns schema -The following table describes the columns and data generated in the *SentinelHealth* data table: +The following table describes the columns and data generated in the SentinelHealth data table for data connectors: | ColumnName | ColumnType | Description| | -- | -- | | The following table describes the columns and data generated in the *SentinelHea | **ExtendedProperties** | Dynamic (json) | A JSON bag that varies by the [OperationName](#operationname) value and the [Status](#status) of the event: <br><br>- For `Data fetch status change` events with a success indicator, the bag contains a ΓÇÿDestinationTableΓÇÖ property to indicate where data from this connector is expected to land. For failures, the contents vary depending on the failure type. | | **Type** | String | `SentinelHealth` | - ## Next steps Learn how to [onboard your data to Microsoft Sentinel](quickstart-onboard.md), [connect data sources](connect-data-sources.md), and [get visibility into your data, and potential threats](get-visibility.md). |
| sentinel | Monitor Sentinel Health | https://github.com/MicrosoftDocs/azure-docs/commits/main/articles/sentinel/monitor-sentinel-health.md | + + Title: Turn on health monitoring in Microsoft Sentinel +description: Monitor supported data connectors by using the SentinelHealth data table. + Last updated : 7/28/2022++++++# Turn on health monitoring for Microsoft Sentinel (preview) ++Monitor the health of supported data connectors by turning on health monitoring in Microsoft Sentinel. Get insights on health drifts, such as the latest failure events, or changes from success to failure states. Use this information to create alerts and other automated actions. ++To get health data from the *SentinelHealth* data table, you must first turn on the Microsoft Sentinel health feature for your workspace. ++When the health feature is turned on, the *SentinelHealth* data table is created at the first success or failure event generated for supported data connectors. ++To configure the retention time for your health events, see [Configure data retention and archive policies in Azure Monitor Logs](../azure-monitor/logs/data-retention-archive.md). ++> [!IMPORTANT] +> +> The *SentinelHealth* data table is currently in **PREVIEW**. See the [Supplemental Terms of Use for Microsoft Azure Previews](https://azure.microsoft.com/support/legal/preview-supplemental-terms/) for additional legal terms that apply to Azure features that are in beta, preview, or otherwise not yet released into general availability. +> ++## Turn on health monitoring for your workspace ++1. In Microsoft Sentinel, under the **Configuration** menu on the left, select **Settings** and expand the **Health** section. ++1. Select **Configure Diagnostic Settings** and create a new diagnostic setting. ++ - In the **Diagnostic setting name** field, enter a meaningful name for your setting. ++ - In the **Category details** column, select the appropriate category like **Data Connector**. ++ - Under **Destination details**, select **Send to Log Analytics workspace**, and select your subscription and workspace from the dropdown menus. ++1. Select **Save** to save your new setting. ++The *SentinelHealth* data table is created at the first success or failure event generated for supported resources. ++## Access the *SentinelHealth* table ++In the Microsoft Sentinel **Logs** page, run a query on the *SentinelHealth* table. For example: ++```kusto +SentinelHealth + | take 20 +``` ++## Next steps ++[Monitor the health of your Microsoft Sentinel data connectors](monitor-data-connector-health.md) |
| sentinel | Collect Sap Hana Audit Logs | https://github.com/MicrosoftDocs/azure-docs/commits/main/articles/sentinel/sap/collect-sap-hana-audit-logs.md | If you have SAP HANA database audit logs configured with Syslog, you'll also nee 1. Make sure that the SAP HANA audit log trail is configured to use Syslog, as described in *SAP Note 0002624117*, which is accessible from the [SAP Launchpad support site](https://launchpad.support.sap.com/#/notes/0002624117). For more information, see: - - [SAP HANA Audit Trail - Best Practice](https://archive.sap.com/documents/docs/DOC-51098) + - [SAP HANA Audit Trail - Best Practice](https://help.sap.com/docs/SAP_HANA_PLATFORM/b3ee5778bc2e4a089d3299b82ec762a7/35eb4e567d53456088755b8131b7ed1d.html?version=2.0.03) - [Recommendations for Auditing](https://help.sap.com/viewer/742945a940f240f4a2a0e39f93d3e2d4/2.0.05/en-US/5c34ecd355e44aa9af3b3e6de4bbf5c1.html) 1. Check your operating system Syslog files for any relevant HANA database events. |
| sentinel | Whats New | https://github.com/MicrosoftDocs/azure-docs/commits/main/articles/sentinel/whats-new.md | For more information, see: ### Data connector health enhancements (Public preview) -Azure Sentinel now provides the ability to enhance your data connector health monitoring with a new *SentinelHealth* table. The *SentinelHealth* table is created after you [turn on the Azure Sentinel health feature](monitor-data-connector-health.md#turn-on-microsoft-sentinel-health-for-your-workspace) in your Azure Sentinel workspace, at the first success or failure health event generated. +Azure Sentinel now provides the ability to enhance your data connector health monitoring with a new *SentinelHealth* table. The *SentinelHealth* table is created after you [turn on the Azure Sentinel health feature](monitor-sentinel-health.md) in your Azure Sentinel workspace, at the first success or failure health event generated. For more information, see [Monitor the health of your data connectors with this Azure Sentinel workbook](monitor-data-connector-health.md). |
| sentinel | Work With Threat Indicators | https://github.com/MicrosoftDocs/azure-docs/commits/main/articles/sentinel/work-with-threat-indicators.md | According to the default settings, each time the rule runs on its schedule, any In Microsoft Sentinel, the alerts generated from analytics rules also generate security incidents, which can be found in **Incidents** under **Threat Management** on the Microsoft Sentinel menu. Incidents are what your security operations teams will triage and investigate to determine the appropriate response actions. You can find detailed information in this [Tutorial: Investigate incidents with Microsoft Sentinel](./investigate-cases.md). -IMPORTANT: Microsoft Sentinel refreshes indicators every 14 days to make sure they are available for matching purposes through the analytic rules. +IMPORTANT: Microsoft Sentinel refreshes indicators every 12 days to make sure they are available for matching purposes through the analytic rules. ## Detect threats using matching analytics (Public preview) |
| service-bus-messaging | Service Bus Auto Forwarding | https://github.com/MicrosoftDocs/azure-docs/commits/main/articles/service-bus-messaging/service-bus-auto-forwarding.md | Title: Auto-forwarding Azure Service Bus messaging entities description: This article describes how to chain an Azure Service Bus queue or subscription to another queue or topic. Previously updated : 05/31/2022 Last updated : 07/27/2022 You can also use autoforwarding to decouple message senders from receivers. For If Alice goes on vacation, her personal queue, rather than the ERP topic, fills up. In this scenario, because a sales representative hasn't received any messages, none of the ERP topics ever reach quota. > [!NOTE]-> When autoforwarding is setup, the value for AutoDeleteOnIdle on **both the Source and the Destination** is automatically set to the maximum value of the data type. +> When autoforwarding is setup, the value for `AutoDeleteOnIdle` on the source entity is automatically set to the maximum value of the data type. > -> - On the Source side, autoforwarding acts as a receive operation. So the source which has autoforwarding setup is never really "idle". -> - On the destination side, this is done to ensure that there is always a destination to forward the message to. +> - On the source side, autoforwarding acts as a receive operation, so the source that has autoforwarding enabled is never really "idle" and hence it won't be automatically deleted. +> - Autoforwarding doesn't make any changes to the destination entity. If `AutoDeleteOnIdle` is enabled on destination entity, the entity is automatically deleted if it's inactive for the specified idle interval. We recommend that you don't enable `AutoDeleteOnIdle` on the destination entity because if the destination entity is deleted, the souce entity will continually see exceptions when trying to forward messages that destination. ## Autoforwarding considerations |
| static-web-apps | Front End Frameworks | https://github.com/MicrosoftDocs/azure-docs/commits/main/articles/static-web-apps/front-end-frameworks.md | The intent of the table columns is explained by the following items: | Framework | App artifact location | Custom build command | |--|--|--| | [Alpine.js](https://github.com/alpinejs/alpine/) | `/` | n/a <sup>2</sup> |-| [Angular](https://angular.io/) | `dist/<APP_NAME>` | `npm run build -- --configuration production` | +| [Angular](https://angular.io/) | `dist/<APP_NAME>` <br><br>If you do not include an `<APP_NAME>`, remove the trailing slash. | `npm run build -- --configuration production` | | [Angular Universal](https://angular.io/guide/universal) | `dist/<APP_NAME>/browser` | `npm run prerender` | | [Astro](https://astro.build) | `dist` | n/a | | [Aurelia](https://aurelia.io/) | `dist` | n/a | |
| static-web-apps | Functions Bring Your Own | https://github.com/MicrosoftDocs/azure-docs/commits/main/articles/static-web-apps/functions-bring-your-own.md | Before you associate an existing Functions app, you first need to adjust to conf 1. Open your Static Web Apps instance in the [Azure portal](https://portal.azure.com). -1. From the _Settings_ menu, select **Functions**. +1. From the _Settings_ menu, select **APIs**. -1. From the _Environment_ dropdown, select **Production**. +1. From the _Production_ row, select **Link** to open the *Link new Backend* window. -1. Next to the _Functions type_ label, select **Link to a Function app**. + Enter the following settings. -1. From the _Subscription_ dropdown, select your Azure subscription name. --1. From the _Function App_ dropdown, select the name of the existing Functions app you want to link to your static web app. + | Setting | Value | + |--|--| + | Backed resource type | Select **Function App**. | + | Subscription | Select your Azure subscription name. | + | Resource name | Select the Azure Functions app name. | 1. Select the **Link** button. - :::image type="content" source="media/functions-bring-your-own/azure-static-web-apps-link-existing-functions-app.png" alt-text="Link an existing Functions app"::: +The Azure Functions app is now mapped to the `/api` route of your static web app. > [!IMPORTANT] > Make sure to set the `api_location` value to an empty string (`""`) in the [workflow configuration](./build-configuration.md) file before you link an existing Functions application. |
| storage | Storage Feature Support In Storage Accounts | https://github.com/MicrosoftDocs/azure-docs/commits/main/articles/storage/blobs/storage-feature-support-in-storage-accounts.md | The items that appear in these tables will change over time as support continues | [Customer-provided keys (encryption)](encryption-customer-provided-keys.md) |  |  |  |  | | [Data redundancy options](../common/storage-redundancy.md?toc=/azure/storage/blobs/toc.json) |  |  |  |  | | [Encryption scopes](encryption-scope-overview.md) |  |  |  |  |-| [Immutable storage](immutable-storage-overview.md) |  |  <sup>2</sup> |  <sup>2</sup> |  <sup>2</sup> | +| [Immutable storage](immutable-storage-overview.md) |  |  <sup>2</sup> |  |  <sup>2</sup> | | [Last access time tracking for lifecycle management](lifecycle-management-overview.md#move-data-based-on-last-accessed-time) |  |  |  |  | | [Lifecycle management policies (delete blob)](./lifecycle-management-overview.md) |  |  |  |  | | [Lifecycle management policies (tiering)](./lifecycle-management-overview.md) |  |  |  |  | The items that appear in these tables will change over time as support continues | [Customer-provided keys (encryption)](encryption-customer-provided-keys.md) |  |  |  |  | | [Data redundancy options](../common/storage-redundancy.md?toc=/azure/storage/blobs/toc.json) |  |  |  |  | | [Encryption scopes](encryption-scope-overview.md) |  |  |  |  |-| [Immutable storage](immutable-storage-overview.md) |  |  <sup>2</sup> |  <sup>2</sup> |  <sup>2</sup> | +| [Immutable storage](immutable-storage-overview.md) |  |  <sup>2</sup> |  |  <sup>2</sup> | | [Last access time tracking for lifecycle management](lifecycle-management-overview.md#move-data-based-on-last-accessed-time) |  |  |  |  | | [Lifecycle management policies (delete blob)](./lifecycle-management-overview.md) |  |  |  |  | | [Lifecycle management policies (tiering)](./lifecycle-management-overview.md) |  |  |  |  | |
| storage | Storage Use Azcopy Troubleshoot | https://github.com/MicrosoftDocs/azure-docs/commits/main/articles/storage/common/storage-use-azcopy-troubleshoot.md | If the exit code is `1-error`, then examine the log file. Once you understand th If the exit code is `2-panic`, then check the log file exists. If the file doesn't exist, file a bug or reach out to support. +If the exit code is any other non-zero exit code, it may be an exit code from the system. For example, OOMKilled. Check your operating system documentation for special exit codes. + ## 403 errors It's common to encounter 403 errors. Sometimes they're benign and don't result in failed transfer. For example, in AzCopy logs, you might see that a HEAD request received 403 errors. Those errors appear when AzCopy checks whether a resource is public. In most cases, you can ignore those instances. |
| storage | Storage Files Monitoring Reference | https://github.com/MicrosoftDocs/azure-docs/commits/main/articles/storage/files/storage-files-monitoring-reference.md | This table shows [Azure Files metrics](../../azure-monitor/essentials/metrics-su | Metric | Description | | - | -- |-| FileCapacity | The amount of File storage used by the storage account. <br/><br/> Unit: Bytes <br/> Aggregation Type: Average <br/> Value example: 1024 | -| FileCount | The number of files in the storage account. <br/><br/> Unit: Count <br/> Aggregation Type: Average <br/> Value example: 1024 | +| FileCapacity | The amount of File storage used by the storage account. <br/><br/> Unit: Bytes <br/> Aggregation Type: Average <br/> Dimensions: FileShare, Tier <br/> Value example: 1024 | +| FileCount | The number of files in the storage account. <br/><br/> Unit: Count <br/> Aggregation Type: Average <br/> Dimensions: FileShare, Tier <br/> Value example: 1024 | | FileShareCapacityQuota | The upper limit on the amount of storage that can be used by Azure Files Service in bytes. <br/><br/> Unit: Bytes <br/> Aggregation Type: Average <br/> Value example: 1024| | FileShareCount | The number of file shares in the storage account. <br/><br/> Unit: Count <br/> Aggregation Type: Average <br/> Value example: 1024 | | FileShareProvisionedIOPS | The number of provisioned IOPS on a file share. This metric is applicable to premium file storage only. <br/><br/> Unit: CountPerSecond <br/> Aggregation Type: Average | |
| synapse-analytics | 7 Beyond Data Warehouse Migration | https://github.com/MicrosoftDocs/azure-docs/commits/main/articles/synapse-analytics/migration-guides/netezza/7-beyond-data-warehouse-migration.md | A key reason to migrate your existing data warehouse to Azure Synapse Analytics - [Azure HDInsight](../../../hdinsight/index.yml) to process large amounts of data, and to join big data with Azure Synapse data by creating a logical data warehouse using PolyBase. -- [Azure Event Hubs](../../../event-hubs/event-hubs-about.md), [Azure Stream Analytics](../../../stream-analytics/stream-analytics-introduction.md), and [Apache Kafka](/azure/databricks/spark/latest/structured-streaming/kafka) to integrate live streaming data from Azure Synapse.+- [Azure Event Hubs](../../../event-hubs/event-hubs-about.md), [Azure Stream Analytics](../../../stream-analytics/stream-analytics-introduction.md), and [Apache Kafka](/azure/databricks/structured-streaming/kafka) to integrate live streaming data from Azure Synapse. The growth of big data has led to an acute demand for [machine learning](../../machine-learning/what-is-machine-learning.md) to enable custom-built, trained machine learning models for use in Azure Synapse. Machine learning models enable in-database analytics to run at scale in batch, on an event-driven basis and on-demand. The ability to take advantage of in-database analytics in Azure Synapse from multiple BI tools and applications also guarantees consistent predictions and recommendations. By migrating your data warehouse to Azure Synapse, you can take advantage of the ## Next steps -To learn about migrating to a dedicated SQL pool, see [Migrate a data warehouse to a dedicated SQL pool in Azure Synapse Analytics](../migrate-to-synapse-analytics-guide.md). +To learn about migrating to a dedicated SQL pool, see [Migrate a data warehouse to a dedicated SQL pool in Azure Synapse Analytics](../migrate-to-synapse-analytics-guide.md). |
| synapse-analytics | 7 Beyond Data Warehouse Migration | https://github.com/MicrosoftDocs/azure-docs/commits/main/articles/synapse-analytics/migration-guides/teradata/7-beyond-data-warehouse-migration.md | A key reason to migrate your existing data warehouse to Azure Synapse Analytics - [Azure HDInsight](../../../hdinsight/index.yml) to process large amounts of data, and to join big data with Azure Synapse data by creating a logical data warehouse using PolyBase. -- [Azure Event Hubs](../../../event-hubs/event-hubs-about.md), [Azure Stream Analytics](../../../stream-analytics/stream-analytics-introduction.md), and [Apache Kafka](/azure/databricks/spark/latest/structured-streaming/kafka) to integrate live streaming data from Azure Synapse.+- [Azure Event Hubs](../../../event-hubs/event-hubs-about.md), [Azure Stream Analytics](../../../stream-analytics/stream-analytics-introduction.md), and [Apache Kafka](/azure/databricks/structured-streaming/kafka) to integrate live streaming data from Azure Synapse. The growth of big data has led to an acute demand for [machine learning](../../machine-learning/what-is-machine-learning.md) to enable custom-built, trained machine learning models for use in Azure Synapse. Machine learning models enable in-database analytics to run at scale in batch, on an event-driven basis and on-demand. The ability to take advantage of in-database analytics in Azure Synapse from multiple BI tools and applications also guarantees consistent predictions and recommendations. By migrating your data warehouse to Azure Synapse, you can take advantage of the ## Next steps -To learn about migrating to a dedicated SQL pool, see [Migrate a data warehouse to a dedicated SQL pool in Azure Synapse Analytics](../migrate-to-synapse-analytics-guide.md). +To learn about migrating to a dedicated SQL pool, see [Migrate a data warehouse to a dedicated SQL pool in Azure Synapse Analytics](../migrate-to-synapse-analytics-guide.md). |
| synapse-analytics | Synapse Service Identity | https://github.com/MicrosoftDocs/azure-docs/commits/main/articles/synapse-analytics/synapse-service-identity.md | + + Title: Managed identity ++description: Learn about using managed identities in Azure Synapse. ++++ Last updated : 01/27/2022+++++# Managed identity for Azure Synapse ++This article helps you understand managed identity (formerly known as Managed Service Identity/MSI) and how it works in Azure Synapse. +++## Overview ++Managed identities eliminate the need to manage credentials. Managed identities provide an identity for the service instance when connecting to resources that support Azure Active Directory (Azure AD) authentication. For example, the service can use a managed identity to access resources like [Azure Key Vault](../key-vault/general/overview.md), where data admins can securely store credentials or access storage accounts. The service uses the managed identity to obtain Azure AD tokens. ++There are two types of supported managed identities: ++- **System-assigned:** You can enable a managed identity directly on a service instance. When you allow a system-assigned managed identity during the creation of the service, an identity is created in Azure AD tied to that service instance's lifecycle. By design, only that Azure resource can use this identity to request tokens from Azure AD. So when the resource is deleted, Azure automatically deletes the identity for you. Azure Synapse Analytics requires that a system-assigned managed identity must be created along with the Synapse workspace. +- **User-assigned:** You may also create a managed identity as a standalone Azure resource. You can [create a user-assigned managed identity](../active-directory/managed-identities-azure-resources/how-to-manage-ua-identity-portal.md) and assign it to one or more instances of a Synapse workspace. In user-assigned managed identities, the identity is managed separately from the resources that use it. ++Managed identity provides the below benefits: ++- [Store credential in Azure Key Vault](../data-factory/store-credentials-in-key-vault.md), in which case-managed identity is used for Azure Key Vault authentication. +- Access data stores or computes using managed identity authentication, including Azure Blob storage, Azure Data Explorer, Azure Data Lake Storage Gen1, Azure Data Lake Storage Gen2, Azure SQL Database, Azure SQL Managed Instance, Azure Synapse Analytics, REST, Databricks activity, Web activity, and more. Check the connector and activity articles for details. +- Managed identity is also used to encrypt/decrypt data and metadata using the customer-managed key stored in Azure Key Vault, providing double encryption. ++## System-assigned managed identity ++>[!NOTE] +> System-assigned managed identity is also referred to as 'Managed identity' elsewhere in the documentation and in the Synapse Studio UI for backward compatibility purpose. We will explicitly mention 'User-assigned managed identity' when referring to it. ++### <a name="generate-managed-identity"></a> Generate system-assigned managed identity ++System-assigned managed identity is generated as follows: ++- When creating a Synapse workspace through **Azure portal or PowerShell**, managed identity will always be created automatically. +- When creating a workspace through **SDK**, managed identity will be created only if you specify Identity = new ManagedIdentity" in the Synapse workspace object for creation." See example in [.NET Quickstart - Create data factory](../data-factory/quickstart-create-data-factory-dot-net.md#create-a-data-factory). +- When creating Synapse workspace through **REST API**, managed identity will be created only if you specify "identity" section in request body. See example in [REST quickstart - create data factory](../data-factory/quickstart-create-data-factory-rest-api.md#create-a-data-factory). ++If you find your service instance doesn't have a managed identity associated following [retrieve managed identity](#retrieve-managed-identity) instruction, you can explicitly generate one by updating it with identity initiator programmatically: ++- [Generate managed identity using PowerShell](#generate-system-assigned-managed-identity-using-powershell) +- [Generate managed identity using REST API](#generate-system-assigned-managed-identity-using-rest-api) +- [Generate managed identity using an Azure Resource Manager template](#generate-system-assigned-managed-identity-using-an-azure-resource-manager-template) +- [Generate managed identity using SDK](#generate-system-assigned-managed-identity-using-sdk) ++>[!NOTE] +> +>- Managed identity cannot be modified. Updating a service instance which already has a managed identity won't have any impact, and the managed identity is kept unchanged. +>- If you update a service instance which already has a managed identity without specifying the "identity" parameter in the factory or workspace objects or without specifying "identity" section in REST request body, you will get an error. +>- When you delete a service instance, the associated managed identity will be deleted along. ++#### Generate system-assigned managed identity using PowerShell ++Call **New-AzSynapseWorkspace** command, then you see "Identity" fields being newly generated: ++```powershell +PS C:\> $creds = New-Object System.Management.Automation.PSCredential ("ContosoUser", $password) +PS C:\> New-AzSynapseWorkspace -ResourceGroupName <resourceGroupName> -Name <workspaceName> -Location <region> -DefaultDataLakeStorageAccountName <storageAccountName> -DefaultDataLakeStorageFileSystem <fileSystemName> -SqlAdministratorLoginCredential $creds ++DefaultDataLakeStorage : Microsoft.Azure.Commands.Synapse.Models.PSDataLakeStorageAccountDetails +ProvisioningState : Succeeded +SqlAdministratorLogin : ContosoUser +VirtualNetworkProfile : +Identity : Microsoft.Azure.Commands.Synapse.Models.PSManagedIdentity +ManagedVirtualNetwork : +PrivateEndpointConnections : {} +WorkspaceUID : <workspaceUid> +ExtraProperties : {[WorkspaceType, Normal], [IsScopeEnabled, False]} +ManagedVirtualNetworkSettings : +Encryption : Microsoft.Azure.Commands.Synapse.Models.PSEncryptionDetails +WorkspaceRepositoryConfiguration : +Tags : +TagsTable : +Location : <region> +Id : /subscriptions/<subsID>/resourceGroups/<resourceGroupName>/providers/ + Microsoft.Synapse/workspaces/<workspaceName> +Name : <workspaceName> +Type : Microsoft.Synapse/workspaces +``` ++#### Generate system-assigned managed identity using REST API ++> [!NOTE] +> If you attempt to update a service instance that already has a managed identity without either specifying the **identity** parameter in the workspace object or providing an **identity** section in the REST request body, you will get an error. ++Call the API below with the "identity" section in the request body: ++``` +PATCH https://management.azure.com/subscriptions/{subscriptionId}/resourceGroups/{resourceGroupName}/providers/Microsoft.Synapse/workspaces/{workspaceName}?api-version=2018-06-01 +``` ++**Request body**: add "identity": { "type": "SystemAssigned" }. ++```json +{ + "name": "<workspaceName>", + "location": "<region>", + "properties": {}, + "identity": { + "type": "SystemAssigned" + } +} +``` ++**Response**: managed identity is created automatically, and "identity" section is populated accordingly. ++```json +{ + "name": "<workspaceName>", + "tags": {}, + "properties": { + "provisioningState": "Succeeded", + "loggingStorageAccountKey": "**********", + "createTime": "2021-09-26T04:10:01.1135678Z", + "version": "2018-06-01" + }, + "identity": { + "type": "SystemAssigned", + "principalId": "765ad4ab-XXXX-XXXX-XXXX-51ed985819dc", + "tenantId": "72f988bf-XXXX-XXXX-XXXX-2d7cd011db47" + }, + "id": "/subscriptions/<subscriptionId>/resourceGroups/<resourceGroupName>/providers/Microsoft.Synapse/workspaces/<workspaceName>", + "type": "Microsoft.Synapse/workspaces", + "location": "<region>" +} +``` ++#### Generate system-assigned managed identity using an Azure Resource Manager template ++**Template**: add "identity": { "type": "SystemAssigned" }. ++```json +{ + "contentVersion": "1.0.0.0", + "$schema": "https://schema.management.azure.com/schemas/2019-04-01/deploymentTemplate.json#", + "resources": [{ + "name": "<workspaceName>", + "apiVersion": "2018-06-01", + "type": "Microsoft.Synapse/workspaces", + "location": "<region>", + "identity": { + "type": "SystemAssigned" + } + }] +} +``` ++#### Generate system-assigned managed identity using SDK ++```csharp +Workspace workspace = new Workspace +{ + Identity = new ManagedIdentity + { + Type = ResourceIdentityType.SystemAssigned + }, + DefaultDataLakeStorage = new DataLakeStorageAccountDetails + { + AccountUrl = <defaultDataLakeStorageAccountUrl>, + Filesystem = <DefaultDataLakeStorageFilesystem> + }, + SqlAdministratorLogin = <SqlAdministratorLoginCredentialUserName> + SqlAdministratorLoginPassword = <SqlAdministratorLoginCredentialPassword>, + Location = <region> +}; +client.Workspaces.CreateOrUpdate(resourceGroupName, workspaceName, workspace); +``` ++### <a name="retrieve-managed-identity"></a> Retrieve system-assigned managed identity ++You can retrieve the managed identity from Azure portal or programmatically. The following sections show some samples. ++>[!TIP] +> If you don't see the managed identity, [generate managed identity](#generate-managed-identity) by updating your service instance. ++#### Retrieve system-assigned managed identity using Azure portal ++You can find the managed identity information from Azure portal -> your Synapse workspace -> Properties. +++- Managed Identity Object ID ++The managed identity information will also show up when you create linked service, which supports managed identity authentication, like Azure Blob, Azure Data Lake Storage, Azure Key Vault, etc. ++To grant permissions, follow these steps. For detailed steps, see [Assign Azure roles using the Azure portal](../role-based-access-control/role-assignments-portal.md). ++1. Select **Access control (IAM)**. ++1. Select **Add** > **Add role assignment**. ++ :::image type="content" source="../../includes/role-based-access-control/media/add-role-assignment-menu-generic.png" alt-text="Screenshot that shows Access control (IAM) page with Add role assignment menu open."::: ++1. On the **Members** tab, select **Managed identity**, and then select **Select members**. ++1. Select your Azure subscription. ++1. Under **System-assigned managed identity**, select **Synapse workspace**, and then select a workspace. You can also use the object ID or workspace name (as the managed-identity name) to find this identity. To get the managed identity's application ID, use PowerShell. ++1. On the **Review + assign** tab, select **Review + assign** to assign the role. ++#### Retrieve system-assigned managed identity using PowerShell ++The managed identity principal ID and tenant ID will be returned when you get a specific service instance as follows. Use the **PrincipalId** to grant access: ++```powershell +PS C:\> (Get-AzSynapseWorkspace -ResourceGroupName <resourceGroupName> -Name <workspaceName>).Identity ++IdentityType PrincipalId TenantId + -- -- +SystemAssigned cadadb30-XXXX-XXXX-XXXX-ef3500e2ff05 72f988bf-XXXX-XXXX-XXXX-2d7cd011db47 +``` ++You can get the application ID by copying above principal ID, then running below Azure Active Directory command with principal ID as parameter. ++```powershell +PS C:\> Get-AzADServicePrincipal -ObjectId cadadb30-XXXX-XXXX-XXXX-ef3500e2ff05 ++ServicePrincipalNames : {76f668b3-XXXX-XXXX-XXXX-1b3348c75e02, https://identity.azure.net/P86P8g6nt1QxfPJx22om8MOooMf/Ag0Qf/nnREppHkU=} +ApplicationId : 76f668b3-XXXX-XXXX-XXXX-1b3348c75e02 +DisplayName : <workspaceName> +Id : cadadb30-XXXX-XXXX-XXXX-ef3500e2ff05 +Type : ServicePrincipal +``` ++#### Retrieve managed identity using REST API ++The managed identity principal ID and tenant ID will be returned when you get a specific service instance as follows. ++Call below API in the request: ++``` +GET https://management.azure.com/subscriptions/{subscriptionId}/resourceGroups/{resourceGroupName}/providers/Microsoft.Synapse/workspaces/{workspaceName}?api-version=2018-06-01 +``` ++**Response**: You will get response like shown in below example. The "identity" section is populated accordingly. ++```json +{ + "properties": { + "defaultDataLakeStorage": { + "accountUrl": "https://exampledatalakeaccount.dfs.core.windows.net", + "filesystem": "examplefilesystem" + }, + "encryption": { + "doubleEncryptionEnabled": false + }, + "provisioningState": "Succeeded", + "connectivityEndpoints": { + "web": "https://web.azuresynapse.net?workspace=%2fsubscriptions%2{subscriptionId}%2fresourceGroups%2f{resourceGroupName}%2fproviders%2fMicrosoft.Synapse%2fworkspaces%2f{workspaceName}", + "dev": "https://{workspaceName}.dev.azuresynapse.net", + "sqlOnDemand": "{workspaceName}-ondemand.sql.azuresynapse.net", + "sql": "{workspaceName}.sql.azuresynapse.net" + }, + "managedResourceGroupName": "synapseworkspace-managedrg-f77f7cf2-XXXX-XXXX-XXXX-c4cb7ac3cf4f", + "sqlAdministratorLogin": "sqladminuser", + "privateEndpointConnections": [], + "workspaceUID": "e56f5773-XXXX-XXXX-XXXX-a0dc107af9ea", + "extraProperties": { + "WorkspaceType": "Normal", + "IsScopeEnabled": false + }, + "publicNetworkAccess": "Enabled", + "cspWorkspaceAdminProperties": { + "initialWorkspaceAdminObjectId": "3746a407-XXXX-XXXX-XXXX-842b6cf1fbcc" + }, + "trustedServiceBypassEnabled": false + }, + "type": "Microsoft.Synapse/workspaces", + "id": "/subscriptions/{subscriptionId}/resourceGroups/{resourceGroupName}/providers/Microsoft.Synapse/workspaces/{workspaceName}", + "location": "eastus", + "name": "{workspaceName}", + "identity": { + "type": "SystemAssigned", + "tenantId": "72f988bf-XXXX-XXXX-XXXX-2d7cd011db47", + "principalId": "cadadb30-XXXX-XXXX-XXXX-ef3500e2ff05" + }, + "tags": {} +} +``` ++> [!TIP] +> To retrieve the managed identity from an ARM template, add an **outputs** section in the ARM JSON: ++```json +{ + "outputs":{ + "managedIdentityObjectId":{ + "type":"string", + "value":"[reference(resourceId('Microsoft.Synapse/workspaces', parameters('<workspaceName>')), '2018-06-01', 'Full').identity.principalId]" + } + } +} +``` ++### Execute Azure Synapse Spark Notebooks with system assigned managed identity ++You can easily execute Synapse Spark Notebooks with the system assigned managed identity (or workspace managed identity) by enabling *Run as managed identity* from the *Configure session* menu. To execute Spark Notebooks with workspace managed identity, users need to have following RBAC roles: +- Synapse Compute Operator on the workspace or selected Spark pool +- Synapse Credential User on the workspace managed identity ++ ++ ++ ++## User-assigned managed identity ++You can create, delete, manage user-assigned managed identities in Azure Active Directory. For more details refer to [Create, list, delete, or assign a role to a user-assigned managed identity using the Azure portal](../active-directory/managed-identities-azure-resources/how-to-manage-ua-identity-portal.md). ++In order to use a user-assigned managed identity, you must first [create credentials](../data-factory/credentials.md) in your service instance for the UAMI. ++## Next steps +- [Create credentials](../data-factory/credentials.md). ++See the following topics that introduce when and how to use managed identity: ++- [Store credential in Azure Key Vault](../data-factory/store-credentials-in-key-vault.md). +- [Copy data from/to Azure Data Lake Store using managed identities for Azure resources authentication](../data-factory/connector-azure-data-lake-store.md). ++See [Managed Identities for Azure Resources Overview](../active-directory/managed-identities-azure-resources/overview.md) for more background on managed identities for Azure resources, on which managed identity in Azure Synapse is based. |
| virtual-desktop | Configure Device Redirections | https://github.com/MicrosoftDocs/azure-docs/commits/main/articles/virtual-desktop/configure-device-redirections.md | Set the following RDP property to configure COM port redirection: ### USB redirection +>[!IMPORTANT] +>To redirect a mass storage USB device connected to your local computer to the remote session host, you'll need to configure the **Drive/storage redirection** RDP property. Enabling the **USB redirection** RDP property by itself won't work. For more information, see [Local drive redirection](#local-drive-redirection). + First, set the following RDP property to enable USB device redirection: - `usbdevicestoredirect:s:*` enables USB device redirection. |
| virtual-machine-scale-sets | Virtual Machine Scale Sets Automatic Upgrade | https://github.com/MicrosoftDocs/azure-docs/commits/main/articles/virtual-machine-scale-sets/virtual-machine-scale-sets-automatic-upgrade.md | The following platform SKUs are currently supported (and more are added periodic | Publisher | OS Offer | Sku | |-||--|-| Canonical | UbuntuServer | 18.04-LTS | -| Canonical | UbuntuServer | 18.04-LTS-Gen2 | -| Canonical | UbuntuServer | 20.04-LTS | -| Canonical | UbuntuServer | 20.04-LTS-Gen2 | +| Canonical | UbuntuServer | 18.04-LTS | +| Canonical | 0001-com-ubuntu-server-focal | 20.04-LTS | +| Canonical | 0001-com-ubuntu-server-focal | 20.04-LTS-Gen2 | | MicrosoftCblMariner | Cbl-Mariner | cbl-mariner-1 | | MicrosoftCblMariner | Cbl-Mariner | 1-Gen2 | | MicrosoftCblMariner | Cbl-Mariner | cbl-mariner-2 | MicrosoftCblMariner | Cbl-Mariner | cbl-mariner-2-Gen2 | MicrosoftWindowsServer | WindowsServer | 2012-R2-Datacenter | | MicrosoftWindowsServer | WindowsServer | 2016-Datacenter |-| MicrosoftWindowsServer | WindowsServer | 2016-Datacenter-gensecond | | MicrosoftWindowsServer | WindowsServer | 2016-Datacenter-gs | | MicrosoftWindowsServer | WindowsServer | 2016-Datacenter-smalldisk | | MicrosoftWindowsServer | WindowsServer | 2016-Datacenter-with-Containers | The following platform SKUs are currently supported (and more are added periodic | MicrosoftWindowsServer | WindowsServer | 2019-Datacenter-gensecond | | MicrosoftWindowsServer | WindowsServer | 2019-Datacenter-gs | | MicrosoftWindowsServer | WindowsServer | 2019-Datacenter-smalldisk |-| MicrosoftWindowsServer | WindowsServer | 2019-Datacenter-with-Containers | -| MicrosoftWindowsServer | WindowsServer | 2012-R2-Datacenter | +| MicrosoftWindowsServer | WindowsServer | 2019-Datacenter-with-Containers | | MicrosoftWindowsServer | WindowsServer | 2019-Datacenter-with-containers-gs | | MicrosoftWindowsServer | WindowsServer | 2022-Datacenter | | MicrosoftWindowsServer | WindowsServer | 2022-Datacenter-smalldisk | The following platform SKUs are currently supported (and more are added periodic | MicrosoftWindowsServer | WindowsServer | 2022-Datacenter-core | | MicrosoftWindowsServer | WindowsServer | 2022-Datacenter-core-smalldisk | | MicrosoftWindowsServer | WindowsServer | 2022-Datacenter-g2 |-| MicrosoftWindowsServer | WindowsServer | 2022-Datacenter-smalldisk-g2 | ## Requirements for configuring automatic OS image upgrade |
| virtual-machines | Image Builder Overview | https://github.com/MicrosoftDocs/azure-docs/commits/main/articles/virtual-machines/image-builder-overview.md | The VM Image Builder service is available in the following regions: To access the Azure VM Image Builder public preview in the Fairfax regions (USGov Arizona and USGov Virginia), you must register the *Microsoft.VirtualMachineImages/FairfaxPublicPreview* feature. To do so, run the following command: +### [Azure PowerShell](#tab/azure-powershell) ++```powershell +Register-AzProviderPreviewFeature -ProviderNamespace Microsoft.VirtualMachineImages -Name FairfaxPublicPreview +``` ++### [Azure CLI](#tab/azure-cli) + ```azurecli-interactive az feature register --namespace Microsoft.VirtualMachineImages --name FairfaxPublicPreview ``` + ## OS support |
| virtual-machines | Expand Disks | https://github.com/MicrosoftDocs/azure-docs/commits/main/articles/virtual-machines/linux/expand-disks.md | |
| virtual-machines | Image Builder Json | https://github.com/MicrosoftDocs/azure-docs/commits/main/articles/virtual-machines/linux/image-builder-json.md | This is the basic template format: ```json { "type": "Microsoft.VirtualMachineImages/imageTemplates",- "apiVersion": "2021-10-01", + "apiVersion": "2022-02-14", "location": "<region>", "tags": { "<name>": "<value>", This is the basic template format: ## Type and API version -The `type` is the resource type, which must be `"Microsoft.VirtualMachineImages/imageTemplates"`. The `apiVersion` will change over time as the API changes, but should be `"2021-10-01"` for now. +The `type` is the resource type, which must be `"Microsoft.VirtualMachineImages/imageTemplates"`. The `apiVersion` will change over time as the API changes, but should be `"2022-02-14"` for now. ```json "type": "Microsoft.VirtualMachineImages/imageTemplates",-"apiVersion": "2021-10-01", +"apiVersion": "2022-02-14", ``` ## Location |
| virtual-machines | Run Command Managed | https://github.com/MicrosoftDocs/azure-docs/commits/main/articles/virtual-machines/linux/run-command-managed.md | To deploy scripts sequentially, use a deployment template, specifying a `depends ```json { - "type": "Microsoft.Compute/virtualMachines/runCommands", - "name": "secondRunCommand", - "apiVersion": "2019-12-01", - "location": "[parameters('location')]", - "dependsOn": <full resourceID of the previous other Run Command>, - "properties": { - "source": {  - "script": "echo Hello World!"  - }, - "timeoutInSeconds": 60  + "type":"Microsoft.Compute/virtualMachines/runCommands", + "name":"secondRunCommand", + "apiVersion":"2019-12-01", + "location":"[parameters('location')]", + "dependsOn":<full resourceID of the previous other Run Command>, + "properties":{ + "source":{ + "script":"echo Hello World!" + }, + "timeoutInSeconds":60 }-} +} ``` ### Execute multiple Run Commands sequentially |
| virtual-machines | Expand Os Disk | https://github.com/MicrosoftDocs/azure-docs/commits/main/articles/virtual-machines/windows/expand-os-disk.md | When you create a new virtual machine (VM) in a resource group by deploying an i - To migrate a physical PC or VM from on-premises with a larger OS drive. > [!IMPORTANT]-> Unless you use [Resize without downtime (preview)](#resize-without-downtime-preview), resizing an OS or data disk of an Azure VM requires the VM to be deallocated. +> Unless you use [Resize without downtime (preview)](#resize-without-downtime-preview), resizing a data disk requires the VM to be deallocated. > > Shrinking an existing disk isnΓÇÖt supported, and can potentially result in data loss. > |
| virtual-machines | Azure Monitor Alerts Portal | https://github.com/MicrosoftDocs/azure-docs/commits/main/articles/virtual-machines/workloads/sap/azure-monitor-alerts-portal.md | +#Customer intent: As a developer, I want to configure alerts in Azure Monitor for SAP solutions so that I can receive alerts and notifications about my SAP systems. # Configure alerts in Azure Monitor for SAP solutions in Azure portal (preview) [!INCLUDE [Azure Monitor for SAP solutions public preview notice](./includes/preview-azure-monitor.md)] -In this article, we'll walk through steps to configure alerts in Azure Monitor for SAP solutions (AMS). We'll configure alerts and notifications from the [Azure portal](https://azure.microsoft.com/features/azure-portal) using its browser-based interface. +In this how-to guide, you'll learn how to configure alerts in Azure Monitor for SAP solutions (AMS). You can configure alerts and notifications from the [Azure portal](https://azure.microsoft.com/features/azure-portal) using its browser-based interface. This content applies to both versions of the service, AMS and AMS (classic). ## Prerequisites -Deploy the Azure Monitor for SAP solutions resource with at least one provider. You can configure providers for: -- SAP Application (NetWeaver)-- SAP HANA-- Microsoft SQL server-- High-availability (pacemaker) cluster-- IBM Db2 --## Sign in to the portal --Sign in to the [Azure portal](https://portal.azure.com). +- An Azure subscription. +- A deployment of an AMS resource with at least one provider. You can configure providers for: + - The SAP application (NetWeaver) + - SAP HANA + - Microsoft SQL Server + - High availability (HA) Pacemaker clusters + - IBM Db2 ## Create an alert rule -1. In the Azure portal, browse and select your Azure Monitor for SAP solutions resource. Ensure you have at least one provider configured for this resource. -2. Navigate to workbooks of your choice. For example, SAP HANA and select a HANA instance. +1. Sign in to the [Azure portal](https://portal.azure.com). +1. In the Azure portal, browse and select your Azure Monitor for SAP solutions resource. Make sure you have at least one provider configured for this resource. +1. Navigate to the workbook you want to use. For example, SAP HANA. +1. Select a HANA instance. :::image type="content" source="./media/ams-alerts/ams-alert-1.png" alt-text="Screenshot showing placement of alert button." lightbox="./media/ams-alerts/ams-alert-1.png"::: -3. Select the **Alerts** button to view available **Alert Templates**. +1. Select the **Alerts** button to view available **Alert Templates**. :::image type="content" source="./media/ams-alerts/ams-alert-2.png" alt-text="Screenshot showing list of alert template." lightbox="./media/ams-alerts/ams-alert-2.png"::: -4. Select **Create rule** to configure an alert of your choice. -5. Enter **Alert threshold**, choose **Provider instance**, and choose or create **Action group** to configure notification setting. You can edit frequency and severity information per your requirements. -- >[!Tip] - > Learn more about [action groups](../../../azure-monitor/alerts/action-groups.md). +1. Select **Create rule** to configure an alert of your choice. +1. For **Alert threshold**, enter your alert threshold. +1. For **Provider instance**, select a provider instance. +1. For **Action group**, select or create an [action group](../../../azure-monitor/alerts/action-groups.md) to configure the notification setting. You can edit frequency and severity information according to your requirements. -7. Select **Enable alert rule**. +1. Select **Enable alert rule** to create the alert rule. :::image type="content" source="./media/ams-alerts/ams-alert-3.png" alt-text="Screenshot showing alert configuration page." lightbox="./media/ams-alerts/ams-alert-3.png"::: -7. Select **Deploy alert rule** to finish your alert rule configuration. You can choose to see the alert template by clicking **View template**. +1. Select **Deploy alert rule** to finish your alert rule configuration. You can choose to see the alert template by selecting **View template**. :::image type="content" source="./media/ams-alerts/ams-alert-4.png" alt-text="Screenshot showing final step of alert configuration." lightbox="./media/ams-alerts/ams-alert-4.png"::: -8. Navigate to **Alert rules** to view the newly created alert rule. When and if alerts are fired, you can view them under **Fired alerts**. +1. Navigate to **Alert rules** to view the newly created alert rule. When and if alerts are fired, you can view them under **Fired alerts**. - :::image type="content" source="./media/ams-alerts/ams-alert-5.png" alt-text="Screenshot showing result of alert cofiguration." lightbox="./media/ams-alerts/ams-alert-5.png"::: + :::image type="content" source="./media/ams-alerts/ams-alert-5.png" alt-text="Screenshot showing result of alert configuration." lightbox="./media/ams-alerts/ams-alert-5.png"::: ## Next steps |
| virtual-machines | Azure Monitor Providers | https://github.com/MicrosoftDocs/azure-docs/commits/main/articles/virtual-machines/workloads/sap/azure-monitor-providers.md | +#Customer intent: As a developer, I want to learn what providers are available for Azure Monitor for SAP solutions so that I can connect to these providers. # What are providers in Azure Monitor for SAP solutions? (preview) -This content applies to both versions of the service, AMS and AMS (classic). -In the context of Azure Monitor for SAP solutions, a *provider type* refers to a specific *provider*. For example, *SAP HANA*, which is configured for a specific component within the SAP landscape, like SAP HANA database. A provider contains the connection information for the corresponding component and helps to collect telemetry data from that component. One Azure Monitor for SAP solutions resource (also known as SAP monitor resource) can be configured with multiple providers of the same provider type or multiple providers of multiple provider types. - -You can choose to configure different provider types to enable data collection from the corresponding component in their SAP landscape. For example, you can configure one provider for SAP HANA provider type, another provider for high-availability cluster provider type, and so on. +In the context of *Azure Monitor for SAP solutions (AMS)*, a *provider* contains the connection information for a corresponding component and helps to collect data from there. There are multiple provider types. For example, an SAP HANA provider is configured for a specific component within the SAP landscape, like an SAP HANA database. You can configure an AMS resource (also known as SAP monitor resource) with multiple providers of the same type or multiple providers of multiple types. -You can also configure multiple providers of a specific provider type to reuse the same SAP monitor resource and associated managed group. For more information on managed resource groups, see [Manage Azure Resource Manager resource groups by using the Azure portal](../../../azure-resource-manager/management/manage-resource-groups-portal.md). +This content applies to both versions of the service, *AMS* and *AMS (classic)*. + +You can choose to configure different provider types for data collection from the corresponding component in their SAP landscape. For example, you can configure one provider for the SAP HANA provider type, another provider for high availability cluster provider type, and so on. -For public preview, the following provider types are supported: -- SAP NetWeaver-- SAP HANA-- Microsoft SQL Server-- High-availability cluster-- Operating system (OS)-- IBM Db2 (available with new version)+You can also configure multiple providers of a specific provider type to reuse the same SAP monitor resource and associated managed group. For more information, see [Manage Azure Resource Manager resource groups by using the Azure portal](../../../azure-resource-manager/management/manage-resource-groups-portal.md). -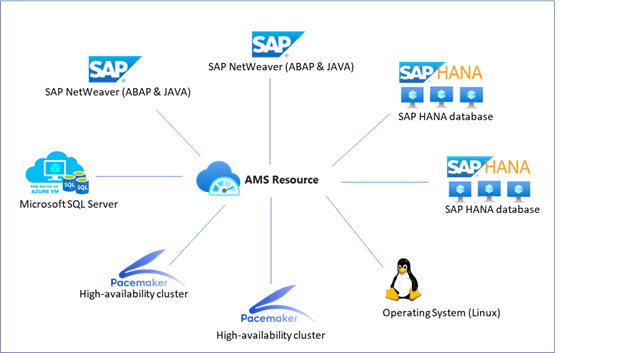 + -We recommend you configure at least one provider from the available provider types when deploying the SAP monitor resource. By configuring a provider, you start data collection from the corresponding component for which the provider is configured. +It's recommended to configure at least one provider when you deploy an AMS resource. By configuring a provider, you start data collection from the corresponding component for which the provider is configured. -If you don't configure any providers at the time of deploying SAP monitor resource, although the SAP monitor resource will be successfully deployed, no telemetry data will be collected. You can add providers after deployment through the SAP monitor resource within the Azure portal. You can add or delete providers from the SAP monitor resource at any time. +If you don't configure any providers at the time of deployment, the AMS resource is still deployed, but no data is collected. You can add providers after deployment through the SAP monitor resource within the Azure portal. You can add or delete providers from the SAP monitor resource at any time. ## Provider type: SAP NetWeaver -You can configure one or more providers of provider type SAP NetWeaver to enable data collection from SAP NetWeaver layer. AMS NetWeaver provider uses the existing [SAPControl Web service](https://www.sap.com/documents/2016/09/0a40e60d-8b7c-0010-82c7-eda71af511fa.html) interface to retrieve the appropriate telemetry information. +You can configure one or more providers of provider type SAP NetWeaver to enable data collection from SAP NetWeaver layer. AMS NetWeaver provider uses the existing [**SAPControl** Web service](https://www.sap.com/documents/2016/09/0a40e60d-8b7c-0010-82c7-eda71af511fa.html) interface to retrieve the appropriate information. For the current release, the following SOAP web methods are the standard, out-of-box methods invoked by AMS. -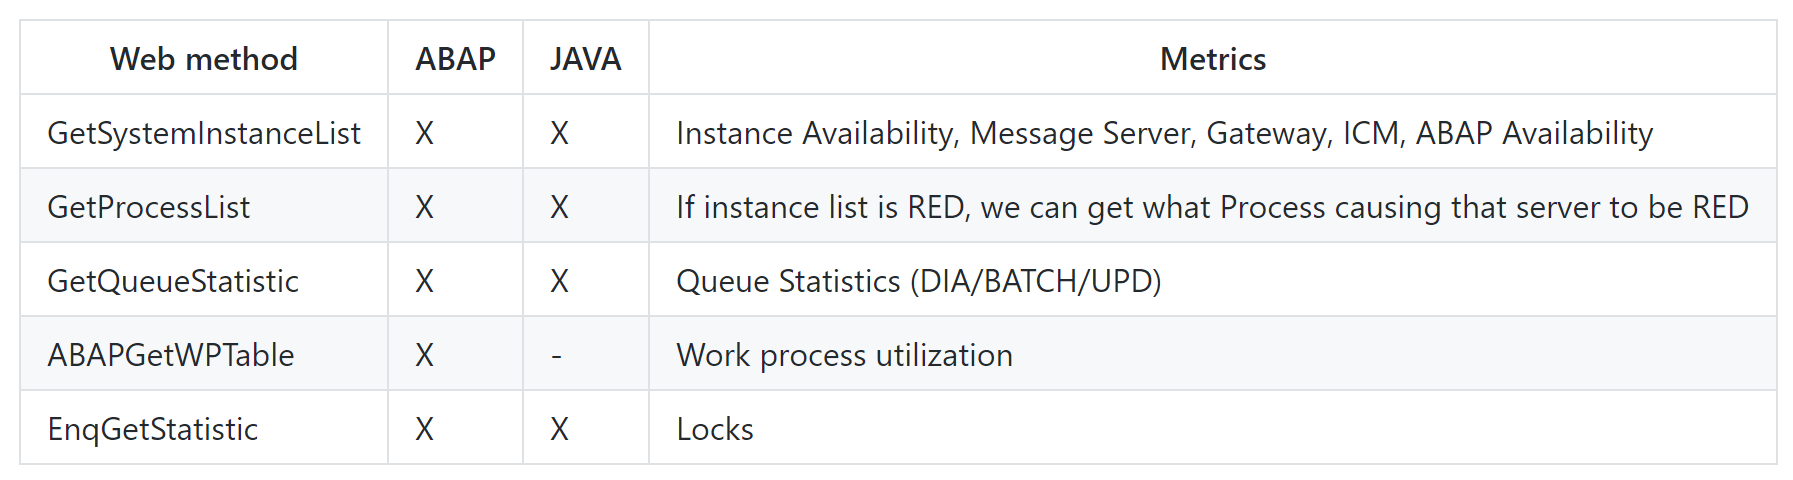 --In public preview, you can expect to see the following data with the SAP NetWeaver provider: --- SAP system and application server availability, including: instance process availability of dispatcher, ICM, gateway, message server, Enqueue Server, IGS Watchdog+| Web method | ABAP support | Java support | Metrics | +| - | | | - | +| **GetSystemInstanceList** | Yes | Yes | Instance availability, message server, gateway, ICM, ABAP availability | +| **GetProcessList** | Yes | Yes | If instance list is red, you can find what process caused the issue | +| **GetQueueStatistic** | Yes | Yes | Queue statistics (DIA, BATCH, UPD) | +| **ABAPGetWPTable** | Yes | No | Work process utilization | +| **EnqGetStatistic** | Yes | Yes | Locks | ++You can get the following data with the SAP NetWeaver provider: ++- SAP system and application server availability + - Instance process availability of dispatcher + - ICM + - Gateway + - Message server + - Enqueue Server + - IGS Watchdog - Work process usage statistics and trends - Enqueue Lock statistics and trends - Queue usage statistics and trends-- SMON Metrics (/SDF/SMON )-- SWNC Workload , Memory , Transaction, User , RFC Usage (St03n)-- Short Dumps (ST22)-- Object Lock (SM12)-- Failed Updates (SM13)-- System Logs Analysis(SM21)-- Batch Jobs Statistics(SM37)-- Outbound Queues(SMQ1)-- Inbound Queues(SMQ2)-- Transactional RFC(SM59)-- STMS Change Transport System Metrics(STMS)-- +- SMON Metrics (**/SDF/SMON**) +- SWNC Workload, Memory, Transaction, User, RFC Usage (St03n) +- Short Dumps (**ST22**) +- Object Lock (**SM12**) +- Failed Updates (**SM13**) +- System Logs Analysis (**SM21**) +- Batch Jobs Statistics (**SM37**) +- Outbound Queues (**SMQ1**) +- Inbound Queues (**SMQ2**) +- Transactional RFC (**SM59**) +- STMS Change Transport System Metrics (**STMS**) ++ ## Provider type: SAP HANA -You can configure one or more providers of provider type *SAP HANA* to enable data collection from SAP HANA database. The SAP HANA provider connects to the SAP HANA database over SQL port, pulls telemetry data from the database, and pushes it to the Log Analytics workspace in your subscription. The SAP HANA provider collects data every 1 minute from the SAP HANA database. +You can configure one or more providers of provider type *SAP HANA* to enable data collection from SAP HANA database. The SAP HANA provider connects to the SAP HANA database over SQL port, pulls data from the database, and pushes it to the Log Analytics workspace in your subscription. The SAP HANA provider collects data every 1 minute from the SAP HANA database. ++You can see the following data with the SAP HANA provider: -In public preview, you can expect to see the following data with the SAP HANA provider: - Underlying infrastructure usage - SAP HANA host status - SAP HANA system replication-- SAP HANA Backup telemetry data. +- SAP HANA Backup data Configuring the SAP HANA provider requires:-- The host IP address, +- The host IP address, - HANA SQL port number-- SYSTEMDB username and password+- **SYSTEMDB** username and password -We recommend you configure the SAP HANA provider against SYSTEMDB; however, more providers can be configured against other database tenants. +It's recommended to configure the SAP HANA provider against **SYSTEMDB**. However, more providers can be configured against other database tenants.  ## Provider type: Microsoft SQL server -You can configure one or more providers of provider type *Microsoft SQL Server* to enable data collection from [SQL Server on Virtual Machines](https://azure.microsoft.com/services/virtual-machines/sql-server/). The SQL Server provider connects to Microsoft SQL Server over the SQL port. It then pulls telemetry data from the database and pushes it to the Log Analytics workspace in your subscription. Configure SQL Server for SQL authentication and for signing in with the SQL Server username and password. Set the SAP database as the default database for the provider. The SQL Server provider collects data from every 60 seconds up to every hour from the SQL server. +You can configure one or more Microsoft SQL Server providers to enable data collection from [SQL Server on Virtual Machines](https://azure.microsoft.com/services/virtual-machines/sql-server/). The SQL Server provider connects to Microsoft SQL Server over the SQL port. It then pulls data from the database and pushes it to the Log Analytics workspace in your subscription. Configure SQL Server for SQL authentication and for signing in with the SQL Server username and password. Set the SAP database as the default database for the provider. The SQL Server provider collects data from every 60 seconds up to every hour from the SQL server. In public preview, you can expect to see the following data with SQL Server provider: - Underlying infrastructure usage Configuring Microsoft SQL Server provider requires:  ## Provider type: High-availability cluster-You can configure one or more providers of provider type *High-availability cluster* to enable data collection from Pacemaker cluster within the SAP landscape. The High-availability cluster provider connects to Pacemaker using the [ha_cluster_exporter](https://github.com/ClusterLabs/ha_cluster_exporter) for **SUSE** based clusters and by using [Performance co-pilot](https://access.redhat.com/articles/6139852) for **RHEL** based clusters. AMS then pulls telemetry data from the database and pushes it to Log Analytics workspace in your subscription. The High-availability cluster provider collects data every 60 seconds from Pacemaker. ++You can configure one or more providers of provider type *High-availability cluster* to enable data collection from Pacemaker cluster within the SAP landscape. The High-availability cluster provider connects to Pacemaker using the [ha_cluster_exporter](https://github.com/ClusterLabs/ha_cluster_exporter) for **SUSE** based clusters and by using [Performance co-pilot](https://access.redhat.com/articles/6139852) for **RHEL** based clusters. AMS then pulls data from the database and pushes it to Log Analytics workspace in your subscription. The High-availability cluster provider collects data every 60 seconds from Pacemaker. In public preview, you can expect to see the following data with the High-availability cluster provider: - Cluster status represented as a roll-up of node and resource status To configure a High-availability cluster provider, two primary steps are involve - **Hostname**. The Linux hostname of the virtual machine (VM). ## Provider type: OS (Linux)-You can configure one or more providers of provider type OS (Linux) to enable data collection from a BareMetal or VM node. The OS (Linux) provider connects to BareMetal or VM nodes using the [Node_Exporter](https://github.com/prometheus/node_exporter) endpoint. It then pulls telemetry data from the nodes and pushes it to Log Analytics workspace in your subscription. The OS (Linux) provider collects data every 60 seconds for most of the metrics from the nodes. ++You can configure one or more providers of provider type OS (Linux) to enable data collection from a BareMetal or VM node. The OS (Linux) provider connects to BareMetal or VM nodes using the [Node_Exporter](https://github.com/prometheus/node_exporter) endpoint. It then pulls data from the nodes and pushes it to Log Analytics workspace in your subscription. The OS (Linux) provider collects data every 60 seconds for most of the metrics from the nodes. In public preview, you can expect to see the following data with the OS (Linux) provider: - CPU usage, CPU usage by process In public preview, you can expect to see the following data with the OS (Linux) - Network usage, network inbound & outbound traffic details To configure an OS (Linux) provider, two primary steps are involved:+ 1. Install [Node_Exporter](https://github.com/prometheus/node_exporter) on each BareMetal or VM node. You have two options for installing [Node_exporter](https://github.com/prometheus/node_exporter): - For automated installation with Ansible, use [Node_Exporter](https://github.com/prometheus/node_exporter) on each BareMetal or VM node to install the OS (Linux) Provider. - Do a [manual installation](https://prometheus.io/docs/guides/node-exporter/). -2. Configure an OS (Linux) provider for each BareMetal or VM node instance in your environment. +1. Configure an OS (Linux) provider for each BareMetal or VM node instance in your environment. To configure the OS (Linux) provider, the following information is required: - - Name. A name for this provider. It should be unique for this Azure Monitor for SAP solutions instance. - - Node Exporter endpoint. Usually `http://<servername or ip address>:9100/metrics`. + - **Name**: a name for this provider, unique to the AMS instance. + - **Node Exporter endpoint**: usually `http://<servername or ip address>:9100/metrics`. -> [!NOTE] -> 9100 is a Port Exposed for Node_Exporter Endpoint. +Port 9100 is exposed for the **Node_Exporter** endpoint. > [!Warning]-> Ensure Node Exporter keeps running after node reboot. +> Make sure **Node-Exporter** keeps running after the node reboot. ## Provider type: IBM Db2 You can configure one or more IBM Db2 providers. The following data is available - Top 20 runtime and executions -- + ## Next steps Learn how to deploy Azure Monitor for SAP solutions from the Azure portal. |
| virtual-machines | Azure Monitor Sap Quickstart Powershell | https://github.com/MicrosoftDocs/azure-docs/commits/main/articles/virtual-machines/workloads/sap/azure-monitor-sap-quickstart-powershell.md | +# Customer intent: As a developer, I want to deploy Azure Monitor for SAP solutions with PowerShell so that I can create resources with PowerShell. -# Quickstart: Deploy Azure Monitor for SAP solutions with Azure PowerShell (preview) +# Quickstart: deploy Azure Monitor for SAP solutions with PowerShell (preview) [!INCLUDE [Azure Monitor for SAP solutions public preview notice](./includes/preview-azure-monitor.md)] -This article describes how you can create Azure Monitor for SAP solutions (AMS) resources using the -[Az.HanaOnAzure](/powershell/module/az.hanaonazure/#sap-hana-on-azure) PowerShell module. +Get started with Azure Monitor for SAP solutions (AMS) by using the +[Az.HanaOnAzure](/powershell/module/az.hanaonazure/#sap-hana-on-azure) PowerShell module to create AMS resources. You'll create a resource group, set up monitoring, and create a provider instance. This content only applies to the AMS (classic) version of the service.-> [!CAUTION] -> Azure Monitor for SAP solutions is currently in public preview. This preview version is provided without a service level agreement. It's not recommended for production workloads. Certain features might not be supported or might have constrained capabilities. For more information, see [Supplemental Terms of Use for Microsoft Azure Previews](https://azure.microsoft.com/support/legal/preview-supplemental-terms/). -## Requirements +## Prerequisites -If you don't have an Azure subscription, create a [free](https://azure.microsoft.com/free/) account before you begin. +- If you don't have an Azure subscription, create a [free](https://azure.microsoft.com/free/) account before you begin. -If you choose to use PowerShell locally, this article requires that you install the Az PowerShell module. You'll also need to connect to your Azure account using the [Connect-AzAccount](/powershell/module/az.accounts/connect-azaccount) cmdlet. For more information about installing the Az PowerShell module, see [Install Azure PowerShell](/powershell/azure/install-az-ps). Alternately, you can choose to use Cloud Shell. For more information on Cloud Shell, see [Overview of Azure Cloud Shell](../../../cloud-shell/overview.md). +- If you choose to use PowerShell locally, this article requires that you install the Az PowerShell module. You'll also need to connect to your Azure account using the [Connect-AzAccount](/powershell/module/az.accounts/connect-azaccount) cmdlet. For more information about installing the Az PowerShell module, see [Install Azure PowerShell](/powershell/azure/install-az-ps). Alternately, you can use [Azure Cloud Shell](../../../cloud-shell/overview.md). -> [!IMPORTANT] -> While the **Az.HanaOnAzure** PowerShell module is in preview, you must install it separately using the `Install-Module` cmdlet. Once this PowerShell module becomes generally available, it becomes part of future Az PowerShell module releases and available natively from within Azure Cloud Shell. +- While the **Az.HanaOnAzure** PowerShell module is in preview, you must install it separately using the `Install-Module` cmdlet. Once this PowerShell module becomes generally available, it becomes part of future Az PowerShell module releases and available natively from within Azure Cloud Shell. -```azurepowershell-interactive -Install-Module -Name Az.HanaOnAzure -``` + ```azurepowershell-interactive + Install-Module -Name Az.HanaOnAzure + ``` -If you have multiple Azure subscriptions, choose the appropriate subscription in which the resources should be billed. Select a specific subscription using the +- If you have multiple Azure subscriptions, choose the appropriate subscription in which the resources should be billed. Select a specific subscription using the [Set-AzContext](/powershell/module/az.accounts/set-azcontext) cmdlet. -```azurepowershell-interactive -Set-AzContext -SubscriptionId 00000000-0000-0000-0000-000000000000 -``` + ```azurepowershell-interactive + Set-AzContext -SubscriptionId 00000000-0000-0000-0000-000000000000 + ``` ## Create a resource group |
| virtual-machines | Azure Monitor Sap Quickstart | https://github.com/MicrosoftDocs/azure-docs/commits/main/articles/virtual-machines/workloads/sap/azure-monitor-sap-quickstart.md | Title: Deploy Azure Monitor for SAP solutions with the Azure portal (preview) description: Learn how to use a browser method for deploying Azure Monitor for SAP solutions. -+ Last updated 07/21/2022+# Customer intent: As a developer, I want to deploy Azure Monitor for SAP solutions in the Azure portal so that I can configure providers. -# Deploy Azure Monitor for SAP solutions by using the Azure portal (preview) +# Quickstart: deploy Azure Monitor for SAP solutions in Azure portal (preview) [!INCLUDE [Azure Monitor for SAP solutions public preview notice](./includes/preview-azure-monitor.md)] -In this article, we'll walk through deploying Azure Monitor for SAP solutions (AMS) from the [Azure portal](https://azure.microsoft.com/features/azure-portal). Using the portal's browser-based interface, we'll deploy AMS and configure providers. +Get started with Azure Monitor for SAP solutions (AMS) by using the [Azure portal](https://azure.microsoft.com/features/azure-portal) to deploy AMS resources and configure providers. This content applies to both versions of the service, AMS and AMS (classic).-## Sign in to the portal -Sign in to the [Azure portal](https://portal.azure.com). +## Prerequisites -## Create a monitoring resource +If you don't have an Azure subscription, create a [free](https://azure.microsoft.com/free/) account before you begin. -###### For Azure Monitor for SAP solutions +## Create AMS monitoring resource ++1. Sign in to the [Azure portal](https://portal.azure.com). 1. In Azure **Search**, select **Azure Monitor for SAP solutions**. Sign in to the [Azure portal](https://portal.azure.com). -2. On the **Basics** tab, provide the required values. If applicable, you can use an existing Log Analytics workspace. +1. On the **Basics** tab, provide the required values. If applicable, you can use an existing Log Analytics workspace.  -###### For Azure Monitor for SAP solutions (classic) +## Create AMS (classic) monitoring resource ++1. Sign in to the [Azure portal](https://portal.azure.com). 1. In Azure **Marketplace** or **Search**, select **Azure Monitor for SAP solutions (classic)**.  -2. On the **Basics** tab, provide the required values. If applicable, you can use an existing Log Analytics workspace. +1. On the **Basics** tab, provide the required values. If applicable, you can use an existing Log Analytics workspace. :::image type="content" source="./media/azure-monitor-sap/azure-monitor-quickstart-2.png" alt-text="Screenshot that shows configuration options on the Basics tab." lightbox="./media/azure-monitor-sap/azure-monitor-quickstart-2.png"::: |
| virtual-machines | Configure Db 2 Azure Monitor Sap Solutions | https://github.com/MicrosoftDocs/azure-docs/commits/main/articles/virtual-machines/workloads/sap/configure-db-2-azure-monitor-sap-solutions.md | description: This article provides details to configure an IBM DB2 provider for - Previously updated : 07/21/2022+ Last updated : 07/28/2022 -+#Customer intent: As a developer, I want to create an IBM Db2 provider so that I can monitor the resource through Azure Monitor for SAP solutions. -- # Create IBM Db2 provider for Azure Monitor for SAP solutions (preview) [!INCLUDE [Azure Monitor for SAP solutions public preview notice](./includes/preview-azure-monitor.md)] -This article explains how to create an IBM Db2 provider for Azure Monitor for SAP solutions (AMS) through the Azure portal. This content applies only to AMS, not the AMS (classic) version. +In this how-to guide, you'll learn how to create an IBM Db2 provider for Azure Monitor for SAP solutions (AMS) through the Azure portal. This content applies only to AMS, not the AMS (classic) version. +## Prerequisites ++- An Azure subscription. +- An existing AMS resource. To create an AMS resource, see the [quickstart for the Azure portal](azure-monitor-sap-quickstart.md) or the [quickstart for PowerShell](azure-monitor-sap-quickstart-powershell.md). ++## Create IBM Db2 provider To create the IBM Db2 provider for AMS: To create the IBM Db2 provider for AMS: 1. Save your changes. 1. Configure more providers for each instance of the database. +## Next steps ++> [!div class="nextstepaction"] +> [Learn about AMS provider types](azure-monitor-providers.md) |
| virtual-machines | Configure Ha Cluster Azure Monitor Sap Solutions | https://github.com/MicrosoftDocs/azure-docs/commits/main/articles/virtual-machines/workloads/sap/configure-ha-cluster-azure-monitor-sap-solutions.md | description: Learn how to configure High Availability (HA) Pacemaker cluster pro - Previously updated : 07/21/2022+ Last updated : 07/28/2022 -+#Customer intent: As a developer, I want to create a High Availability Pacemaker cluster so I can use the resource with Azure Monitor for SAP solutions. - # Create High Availability cluster provider for Azure Monitor for SAP solutions (preview) [!INCLUDE [Azure Monitor for SAP solutions public preview notice](./includes/preview-azure-monitor.md)] -This article explains how to create a High Availability (HA) Pacemaker cluster provider for Azure Monitor for SAP solutions (AMS). This content applies to both AMS and AMS (classic) versions. +In this how-to guide, you'll learn to create a High Availability (HA) Pacemaker cluster provider for Azure Monitor for SAP solutions (AMS). You'll install the HA agent, then create the provider for AMS. ++This content applies to both AMS and AMS (classic) versions. ++## Prerequisites ++- An Azure subscription. +- An existing AMS resource. To create an AMS resource, see the [quickstart for the Azure portal](azure-monitor-sap-quickstart.md) or the [quickstart for PowerShell](azure-monitor-sap-quickstart-powershell.md). ## Install HA agent For RHEL-based pacemaker clusters, also install [PMProxy](https://access.redhat. 1. In the resource's menu, under **Settings**, select **Providers**. 1. Select **Add** to add a new provider. +  +1. For **Type**, select **High-availability cluster (Pacemaker)**. +1. Configure providers for each node of the cluster by entering the endpoint URL for **HA Cluster Exporter Endpoint**. + 1. For SUSE-based clusters, enter `http://<'IP address'> :9664/metrics`. - -+  -6. For **Type**, select **High-availability cluster (Pacemaker)**. -1. Configure providers for each node of the cluster by entering the endpoint URL for **HA Cluster Exporter Endpoint**. - 1. For SUSE-based clusters, enter `http://<'IP address'> :9664/metrics`. + 1. For RHEL-based clusters, enter `http://<'IP address'>:44322/metrics?names=ha_cluster`.++  ++ 1. Enter the system identifiers, host names, and cluster names. For the system identifier, enter a unique SAP system identifier for each cluster. For the hostname, the value refers to an actual hostname in the VM. Use `hostname -s` for SUSE- and RHEL-based clusters.+ 1. Select **Add provider** to save.-1. Continue to add more providers as needed. -1. Select **Review + create** to review the settings. -1. Select **Create** to finish creating the resource. -###### For SUSE based cluster +1. Continue to add more providers as needed. +1. Select **Review + create** to review the settings. - +1. Select **Create** to finish creating the resource. -###### For RHEL based cluster +## Next steps - +> [!div class="nextstepaction"] +> [Learn about AMS provider types](azure-monitor-providers.md) |
| virtual-machines | Configure Hana Azure Monitor Sap Solutions | https://github.com/MicrosoftDocs/azure-docs/commits/main/articles/virtual-machines/workloads/sap/configure-hana-azure-monitor-sap-solutions.md | description: Learn how to configure the SAP HANA provider for Azure Monitor for - Previously updated : 07/21/2022+ Last updated : 07/28/2022 -+#Customer intent: As a developer, I want to create an SAP HANA provider so that I can use the resource with Azure Monitor for SAP solutions. -This article explains how to configure the SAP HANA provider for Azure Monitor for SAP solutions (AMS) through the Azure portal. There are instructions to set up the [current version](#configure-ams) and the [classic version](#configure-ams-classic) of AMS. +In this how-to guide, you'll learn to configure an SAP HANA provider for Azure Monitor for SAP solutions (AMS) through the Azure portal. There are instructions to set up the [current version](#configure-ams) and the [classic version](#configure-ams-classic) of AMS. ++## Prerequisites ++- An Azure subscription. +- An existing AMS resource. To create an AMS resource, see the [quickstart for the Azure portal](azure-monitor-sap-quickstart.md) or the [quickstart for PowerShell](azure-monitor-sap-quickstart-powershell.md). ## Configure AMS This article explains how to configure the SAP HANA provider for Azure Monitor f 1. On the AMS service page, select **Create**. 1. On the AMS creation page, enter your basic resource information on the **Basics** tab. 1. On the **Providers** tab:- * Select **Add provider**. - * On the creation pane, for **Type**, select **SAP HANA**. --  --- * For **IP address**, enter the IP address or hostname of the server that runs the SAP HANA instance that you want to monitor. If you're using a hostname, make sure there is connectivity within the virtual network. - * For **Database tenant**, enter the HANA database that you want to connect to. It's recommended to use **SYSTEMDB**, because tenant databases don't have all monitoring views. For legacy single-container HANA 1.0 instances, leave this field blank. - * For **Instance number**, enter the instance number of the database (0-99). The SQL port is automatically determined based on the instance number. - * For **Database username**, enter the dedicated SAP HANA database user. This user needs the **MONITORING** or **BACKUP CATALOG READ** role assignment. For non-production SAP HANA instances, use **SYSTEM** instead. - * For **Database password**, enter the password for the database username. You can either enter the password directly or use a secret inside Azure Key Vault. + 1. Select **Add provider**. + 1. On the creation pane, for **Type**, select **SAP HANA**. +  + 1. For **IP address**, enter the IP address or hostname of the server that runs the SAP HANA instance that you want to monitor. If you're using a hostname, make sure there is connectivity within the virtual network. + 1. For **Database tenant**, enter the HANA database that you want to connect to. It's recommended to use **SYSTEMDB**, because tenant databases don't have all monitoring views. For legacy single-container HANA 1.0 instances, leave this field blank. + 1. For **Instance number**, enter the instance number of the database (0-99). The SQL port is automatically determined based on the instance number. + 1. For **Database username**, enter the dedicated SAP HANA database user. This user needs the **MONITORING** or **BACKUP CATALOG READ** role assignment. For non-production SAP HANA instances, use **SYSTEM** instead. + 1. For **Database password**, enter the password for the database username. You can either enter the password directly or use a secret inside Azure Key Vault. 1. Save your changes to the AMS resource. ## Configure AMS (classic) - To configure the SAP HANA provider for AMS (classic): 1. Sign in to the [Azure portal](https://portal.azure.com). To configure the SAP HANA provider for AMS (classic): 1. On the AMS (classic) service page, select **Create**. 1. On the creation page's **Basics** tab, enter the basic information for your AMS instance. 1. On the **Providers** tab, add the providers that you want to configure. You can add multiple providers during creation. You can also add more providers after you deploy the AMS resource. For each provider:- * Select **Add provider**. - * For **Type**, select **SAP HANA**. Make sure that you configure an SAP HANA provider for the main node. - * For **IP address**, enter the private IP address for the HANA server. - * For **Database tenant**, enter the name of the tenant that you want to use. You can choose any tenant. However, it's recommended to use **SYSTEMDB**, because this tenant has more monitoring areas. - * For **SQL port**, enter the port number for your HANA database. The format begins with 3, includes the instance number, and ends in 13. For example, 30013 is the SQL port for the instance 001. - * For **Database username**, enter the username that you want to use. Make sure the database user has **monitoring** and **catalog read** role assignments. - * Select **Add provider** to finish adding the provider. -+ 1. Select **Add provider**. + 1. For **Type**, select **SAP HANA**. Make sure that you configure an SAP HANA provider for the main node. + 1. For **IP address**, enter the private IP address for the HANA server. + 1. For **Database tenant**, enter the name of the tenant that you want to use. You can choose any tenant. However, it's recommended to use **SYSTEMDB**, because this tenant has more monitoring areas. + 1. For **SQL port**, enter the port number for your HANA database. The format begins with 3, includes the instance number, and ends in 13. For example, 30013 is the SQL port for the instance 001. + 1. For **Database username**, enter the username that you want to use. Make sure the database user has **monitoring** and **catalog read** role assignments. + 1. Select **Add provider** to finish adding the provider. 1. Select **Review + create** to review and validate your configuration.-1. Select **Create** to finish creating the AMS resource. +1. Select **Create** to finish creating the AMS resource. ++## Next steps ++> [!div class="nextstepaction"] +> [Learn about AMS provider types](azure-monitor-providers.md) |
| virtual-machines | Configure Linux Os Azure Monitor Sap Solutions | https://github.com/MicrosoftDocs/azure-docs/commits/main/articles/virtual-machines/workloads/sap/configure-linux-os-azure-monitor-sap-solutions.md | description: This article explains how to configure a Linux OS provider for Azur - Previously updated : 07/21/2022+ Last updated : 07/28/2022 -+#Customer intent: As a developer, I want to configure a Linux provider so that I can use Azure Monitor for SAP solutions for monitoring. # Configure Linux provider for Azure Monitor for SAP solutions (preview) [!INCLUDE [Azure Monitor for SAP solutions public preview notice](./includes/preview-azure-monitor.md)] -This article explains how you can create a Linux OS provider for Azure Monitor for SAP solutions (AMS) resources. This content applies to both versions of the service, AMS and AMS (classic). +In this how-to guide, you'll learn to create a Linux OS provider for *Azure Monitor for SAP solutions (AMS)* resources. ++This content applies to both versions of the service, *AMS* and *AMS (classic)*. +## Prerequisites +- An Azure subscription. +- An existing AMS resource. To create an AMS resource, see the [quickstart for the Azure portal](azure-monitor-sap-quickstart.md) or the [quickstart for PowerShell](azure-monitor-sap-quickstart-powershell.md). +- Install [node exporter version 1.3.0](https://prometheus.io/download/#node_exporter) in each SAP host that you want to monitor, either BareMetal or Azure virtual machine (Azure VM). For more information, see [the node exporter GitHub repository](https://github.com/prometheus/node_exporter). -Before you begin, install [node exporter version 1.3.0](https://prometheus.io/download/#node_exporter) in each SAP host (BareMetal or virtual machine) that you want to monitor. For more information, see [the node exporter GitHub repository](https://github.com/prometheus/node_exporter). +## Create Linux provider 1. Sign in to the [Azure portal](https://portal.azure.com). 1. Go to the AMS or AMS (classic) service. Before you begin, install [node exporter version 1.3.0](https://prometheus.io/do 1. Select **Add provider** to save your changes. 1. Continue to add more providers as needed. 1. Select **Review + create** to review the settings.-1. Select **Create** to finish creating the resource. +1. Select **Create** to finish creating the resource. ++## Next steps ++> [!div class="nextstepaction"] +> [Learn about AMS provider types](azure-monitor-providers.md) |
| virtual-machines | Configure Netweaver Azure Monitor Sap Solutions | https://github.com/MicrosoftDocs/azure-docs/commits/main/articles/virtual-machines/workloads/sap/configure-netweaver-azure-monitor-sap-solutions.md | +#Customer intent: As a developer, I want to configure a SAP NetWeaver provider so that I can use Azure Monitor for SAP solutions. -This article explains how to configure SAP NetWeaver for use with Azure Monitor for SAP solutions (AMS). You can use SAP NetWeaver with both versions of the service, AMS and AMS (classic). -The SAP start service provides multiple services, including monitoring the SAP system. AMS and AMS (classic) use **SAPControl**, which is a SOAP web service interface that exposes these capabilities. The **SAPControl** interface [differentiates between protected and unprotected web service methods](https://wiki.scn.sap.com/wiki/display/SI/Protected+web+methods+of+sapstartsrv). It's necessary to unprotect some methods to use AMS with NetWeaver. +In this how-to guide, you'll learn to configure the SAP NetWeaver provider for use with *Azure Monitor for SAP solutions (AMS)*. You can use SAP NetWeaver with both versions of the service, *AMS* and *AMS (classic)*. ++The SAP start service provides multiple services, including monitoring the SAP system. Both versions of AMS use **SAPControl**, which is a SOAP web service interface that exposes these capabilities. The **SAPControl** interface [differentiates between protected and unprotected web service methods](https://wiki.scn.sap.com/wiki/display/SI/Protected+web+methods+of+sapstartsrv). It's necessary to unprotect some methods to use AMS with NetWeaver. ++## Prerequisites ++- An Azure subscription. +- An existing AMS resource. To create an AMS resource, see the [quickstart for the Azure portal](azure-monitor-sap-quickstart.md) or the [quickstart for PowerShell](azure-monitor-sap-quickstart-powershell.md). ## Configure NetWeaver for AMS +To configure the NetWeaver provider for the current AMS version, you'll need to: ++1. [Unprotect methods for metrics](#unprotect-methods-for-metrics) +1. [Check that the rules have updated properly](#check-updated-rules) +1. [Set up RFC metrics](#set-up-rfc-metrics) +1. [Add the NetWeaver provider](#add-netweaver-provider) ### Unprotect methods for metrics To fetch specific metrics, you need to unprotect some methods in each SAP system 1. Execute transaction **RZ10**. -1. Select the appropriate profile (`_DEFAULT.PFL_`). +1. Select the appropriate profile (*DEFAULT.PFL*). 1. Select **Extended Maintenance** > **Change**. 1. Select the profile parameter `service/protectedwebmethods`. -1. Modify the following: -- `service/protectedwebmethods` +1. Change the value to: - `SDEFAULT -GetQueueStatistic -ABAPGetWPTable -EnqGetStatistic -GetProcessList` + ```text + SDEFAULT -GetQueueStatistic -ABAPGetWPTable -EnqGetStatistic -GetProcessList + ``` 1. Select **Copy**. To fetch specific metrics, you need to unprotect some methods in each SAP system 1. On Linux systems, use the following commands to restart the host. Replace `<instance number` with your SAP system's instance number. - `RestartService` + ```bash + RestartService + ``` - `sapcontrol -nr <instance number> -function RestartService` + ```bash + sapcontrol -nr <instance number> -function RestartService + ``` You must restart the **SAPStartSRV** service on each instance of your SAP system to unprotect the **SAPControl** web methods. The read-only SOAP API is required for the NetWeaver provider to fetch metric data from your SAP system. If you don't unprotect these methods, there will be empty or missing visualizations in the NetWeaver metric workbook. After you restart the SAP service, check that your updated rules are applied to 1. Run the following command. Replace `<instance number>` with your system's instance number. - `sapcontrol -nr <instance number>; -function ParameterValue service/protectedwebmethods` + ```bash + sapcontrol -nr <instance number>; -function ParameterValue service/protectedwebmethods + ``` 1. Log in as another user. 1. Run the following command. Again, replace `<instance number>` with your system's instance number. Also replace `<admin user>` with your administrator username, and `<admin password>` with the password. - `sapcontrol -nr <instance number> -function ParameterValue service/protectedwebmethods -user "<admin user>" "<admin password>"` --1. Review the output, which should look like the following sample output: -- + ```bash + sapcontrol -nr <instance number> -function ParameterValue service/protectedwebmethods -user "<admin user>" "<admin password>" + ``` +1. Review the output. -Repeat these steps for each instance profile. +1. Repeat the previous steps for each instance profile. To validate the rules, run a test query against the web methods. Replace the `<hostname>` with your hostname, `<instance number>` with your SAP instance number, and the method name with the appropriate method. Enable **SMON** to monitor the system performance. 1. Turn on daily monitoring. For instructions, see [SAP Note 2651881](https://userapps.support.sap.com/sap/support/knowledge/en/2651881). 1. It's recommended to schedule **SDF/SMON** as a background job in your target SAP client each minute. Log in to SAP and use **TCODE /SDF/SMON** to configure the setting. - Enable SAP Internet Communication Framework (ICF): 1. Log in to the SAP system. It's also recommended to check that you enabled the ICF ports. 1. Right-click the ping service and choose **Test Service**. SAP starts your default browser. 1. Navigate to the ping service using the configured port. 1. If the port can't be reached, or the test fails, open the port in the SAP VM.- 1. For Linux, run the following commands. Replace `<your port>` with your configured port. - `sudo firewall-cmd --permanent --zone=public --add-port=<your port>/TCP ` +1. For Linux, run the following commands. Replace `<your port>` with your configured port. ++ ```bash + sudo firewall-cmd --permanent --zone=public --add-port=<your port>/TCP + ``` - `sudo firewall-cmd --reload ` + ```bash + sudo firewall-cmd --reload + ``` - 1. For Windows, open Windows Defender Firewall from the Start menu. Select **Advanced settings** in the side menu, then select **Inbound Rules**. To open a port, select **New Rule**. Add your port and set the protocol to TCP. +1. For Windows, open Windows Defender Firewall from the Start menu. Select **Advanced settings** in the side menu, then select **Inbound Rules**. To open a port, select **New Rule**. Add your port and set the protocol to TCP. ### Add NetWeaver provider Make sure that host file entries are provided for all hostnames that the command ## Configure NetWeaver for AMS (classic) +To configure the NetWeaver provider for the AMS (classic) version: ++1. [Unprotect some methods](#unprotect-methods) +1. [Restart the SAP start service](#restart-sap-start-service) +1. [Check that your settings have been updated properly](#validate-changes) +1. [Install the NetWeaver provider through the Azure portal](#install-netweaver-provider) ++### Unprotect methods To fetch specific metrics, you need to unprotect some methods for the current release. Follow these steps for each SAP system: 1. Open an SAP GUI connection to the SAP server.-2. Sign in by using an administrative account. -3. Execute transaction RZ10. -4. Select the appropriate profile (*DEFAULT.PFL*). -5. Select **Extended Maintenance** > **Change**. -6. Select the profile parameter "service/protectedwebmethods" and modify to have the following value, then click Copy: -- ```service/protectedwebmethods instruction - SDEFAULT -GetQueueStatistic -ABAPGetWPTable -EnqGetStatistic -GetProcessList +1. Sign in with an administrative account. +1. Execute transaction **RZ10**. +1. Select the appropriate profile (*DEFAULT.PFL*). +1. Select **Extended Maintenance** > **Change**. +1. Select the profile parameter `service/protectedwebmethods`. +1. Change the value to `SDEFAULT -GetQueueStatistic -ABAPGetWPTable -EnqGetStatistic -GetProcessList`. +1. Select **Copy**. +1. Go back and select **Profile** > **Save**. -7. Go back and select **Profile** > **Save**. -8. After saving the changes for this parameter, restart the SAPStartSRV service on each of the instances in the SAP system. (Restarting the services will not restart the SAP system; it will only restart the SAPStartSRV service (in Windows) or daemon process (in Unix/Linux)). +### Restart SAP start service - 8a. On Windows systems, this can be done in a single window using the SAP Microsoft Management Console (MMC) / SAP Management Console(MC). Right-click on each instance and choose All Tasks -> Restart Service. +After updating the parameter, restart the **SAPStartSRV** service on each of the instances in the SAP system. Restarting the services doesn't restart the SAP system. Only the **SAPStartSRV** service (in Windows) or daemon process (in Unix/Linux) is restarted. +You must restart **SAPStartSRV** on each instance of the SAP system for the SAPControl web methods to be unprotected. These read-only SOAP API are required for the NetWeaver provider to fetch metric data from the SAP system. Failure to unprotect these methods leads to empty or missing visualizations on the NetWeaver metric workbook. +On Windows, open the SAP Microsoft Management Console (MMC) / SAP Management Console (MC). Right-click on each instance and select **All Tasks** > **Restart Service**. -  + +On Linux, run the command `sapcontrol -nr <NN> -function RestartService`. Replace `<NN>` with the SAP instance number to restart the host. - 8b. On Linux systems, use the below command where NN is the SAP instance number to restart the host which is logged into. - - ```RestartService - sapcontrol -nr <NN> -function RestartService - ``` -9. Once the SAP service is restarted, check to ensure the updated web method protection exclusion rules have been applied for each instance by running the following command: +## Validate changes -**Logged as \<sidadm\>** - `sapcontrol -nr <NN> -function ParameterValue service/protectedwebmethods` +After the SAP service restarts, check that the updated web method protection exclusion rules have been applied for each instance. Run one of the following commands. Again, replace `<NN>` with the SAP instance number. -**Logged as different user** - `sapcontrol -nr <NN> -function ParameterValue service/protectedwebmethods -user "<adminUser>" "<adminPassword>"` +- If you're logged in as `<sidadm\>`, run `sapcontrol -nr <NN> -function ParameterValue service/protectedwebmethods`. - The output should look like :- -  +- If you're logged in as another user, run `sapcontrol -nr <NN> -function ParameterValue service/protectedwebmethods -user "<adminUser>" "<adminPassword>"`. -10. To conclude and validate, run a test query against web methods to validate (replace the hostname , instance number and, method name ) - - Use the below PowerShell script -- ```Powershell command to test unprotect method - $SAPHostName = "<hostname>" - $InstanceNumber = "<instancenumber>" - $Function = "ABAPGetWPTable" - [System.Net.ServicePointManager]::ServerCertificateValidationCallback = {$true} - $sapcntrluri = "https://" + $SAPHostName + ":5" + $InstanceNumber + "14/?wsdl" - $sapcntrl = New-WebServiceProxy -uri $sapcntrluri -namespace WebServiceProxy -class sapcntrl - $FunctionObject = New-Object ($sapcntrl.GetType().NameSpace + ".$Function") - $sapcntrl.$Function($FunctionObject) - ``` -11. **Repeat Steps 3-10 for each instance profile**. +To validate your settings, run a test query against web methods. Replace the hostname, instance number, and method name with the appropriate values. ->[!Important] ->It is critical that the sapstartsrv service is restarted on each instance of the SAP system for the SAPControl web methods to be unprotected. These read-only SOAP API are required for the NetWeaver provider to fetch metric data from the SAP System and failure to unprotect these methods will lead to empty or missing visualizations on the NetWeaver metric workbook. +```powershell +$SAPHostName = "<hostname>" +$InstanceNumber = "<instance-number>" +$Function = "ABAPGetWPTable" +[System.Net.ServicePointManager]::ServerCertificateValidationCallback = {$true} +$sapcntrluri = "https://" + $SAPHostName + ":5" + $InstanceNumber + "14/?wsdl" +$sapcntrl = New-WebServiceProxy -uri $sapcntrluri -namespace WebServiceProxy -class sapcntrl +$FunctionObject = New-Object ($sapcntrl.GetType().NameSpace + ".$Function") +$sapcntrl.$Function($FunctionObject) +``` ++Repeat the previous steps for each instance profile. ->[!Tip] -> Use an access control list (ACL) to filter the access to a server port. For more information, see [this SAP note](https://launchpad.support.sap.com/#/notes/1495075). +You can use an access control list (ACL) to filter the access to a server port. For more information, see [SAP note 1495075](https://launchpad.support.sap.com/#/notes/1495075). -To install the NetWeaver provider in the Azure portal: +### Install NetWeaver provider -1. Make sure you've completed the earlier steps and restarted the server. +To install the NetWeaver provider in the Azure portal: 1. Sign in to the Azure portal. To install the NetWeaver provider in the Azure portal: 1. Select **Create** to finish creating the resource. --If the SAP application servers (VMs) are part of a network domain, such as an Azure Active Directory (Azure AD) managed domain, you must provide the corresponding subdomain. The AMS collector VM exists inside the virtual network, and isn't joined to the domain. AMS can't resolve the hostname of instances inside the SAP system unless the hostname is an FQDN. If you don't provide the subdomain, there will be missing or incomplete visualizations in the NetWeaver workbook. +If the SAP application servers (VMs) are part of a network domain, such as an Azure Active Directory (Azure AD) managed domain, you must provide the corresponding subdomain. The AMS collector VM exists inside the virtual network, and isn't joined to the domain. AMS can't resolve the hostname of instances inside the SAP system unless the hostname is an FQDN. If you don't provide the subdomain, there can be missing or incomplete visualizations in the NetWeaver workbook. For example, if the hostname of the SAP system has an FQDN of `myhost.mycompany.contoso.com`: For example, if the hostname of the SAP system has an FQDN of `myhost.mycompany. When the NetWeaver provider invokes the **GetSystemInstanceList** API on the SAP system, SAP returns the hostnames of all instances in the system. The collect VM uses this list to make more API calls to fetch metrics for each instances features. For example, ABAP, J2EE, MESSAGESERVER, ENQUE, ENQREP, and more. If you specify the subdomain, the collect VM uses the subdomain to build the FQDN of each instance in the system. Don't specify an IP address for the hostname if your SAP system is part of network domain.++## Next steps ++> [!div class="nextstepaction"] +> [Learn about AMS provider types](azure-monitor-providers.md) |
| virtual-machines | Configure Sql Server Azure Monitor Sap Solutions | https://github.com/MicrosoftDocs/azure-docs/commits/main/articles/virtual-machines/workloads/sap/configure-sql-server-azure-monitor-sap-solutions.md | Title: Configure SQL Server for Azure Monitor for SAP solutions (preview) -description: Learn how to configure SQL Server for Azure Monitor for SAP solutions (AMS). + Title: Configure Microsoft SQL Server provider for Azure Monitor for SAP solutions (preview) +description: Learn how to configure a Microsoft SQL Server provider for use with Azure Monitor for SAP solutions (AMS). Previously updated : 07/21/2022 Last updated : 07/28/2022 -+#Customer intent: As a developer, I want to configure a Microsoft SQL Server provider so that I can use Azure Monitor for SAP solutions for monitoring. # Configure SQL Server for Azure Monitor for SAP solutions (preview) [!INCLUDE [Azure Monitor for SAP solutions public preview notice](./includes/preview-azure-monitor.md)] -This article explains how to configure the Microsoft SQL server provider for Azure Monitor for SAP solutions (AMS) through the Azure portal. +In this how-to guide, you'll learn to configure a Microsoft SQL Server provider for Azure Monitor for SAP solutions (AMS) through the Azure portal. ++## Prerequisites ++- An Azure subscription. +- An existing AMS resource. To create an AMS resource, see the [quickstart for the Azure portal](azure-monitor-sap-quickstart.md) or the [quickstart for PowerShell](azure-monitor-sap-quickstart-powershell.md). ## Open Windows port To install the provider from AMS: 1. Select **Review + create** to complete the deployment. +## Next steps ++> [!div class="nextstepaction"] +> [Learn about AMS provider types](azure-monitor-providers.md) |
| virtual-machines | Create Network Azure Monitor Sap Solutions | https://github.com/MicrosoftDocs/azure-docs/commits/main/articles/virtual-machines/workloads/sap/create-network-azure-monitor-sap-solutions.md | Title: Set up network for Azure Monitor for SAP solutions (preview) -description: This article provides details to consider network setup while setting up Azure monitor for SAP solutions. +description: Learn how to set up an Azure virtual network for use with Azure Monitor for SAP solutions. - Previously updated : 07/21/2022+ Last updated : 07/28/2022 -+#Customer intent: As a developer, I want to set up an Azure virtual network so that I can use Azure Monitor for SAP solutions. # Set up network for Azure monitor for SAP solutions (preview) [!INCLUDE [Azure Monitor for SAP solutions public preview notice](./includes/preview-azure-monitor.md)] -Before you can deploy Azure Monitor for SAP solutions (AMS), you need to configure an Azure virtual network with all necessary settings. +In this how-to guide, you'll learn how to configure an Azure virtual network so that you can deploy *Azure Monitor for SAP solutions (AMS)*. You'll learn to [create a new subnet](#create-new-subnet) for use with Azure Functions for both versions of the product, *AMS* and *AMS (classic)*. Then, if you're using the current version of AMS, you'll learn to [set up outbound internet access](#configure-outbound-internet-access) to the SAP environment that you want to monitor. -## Configure new subnet +## Create new subnet +> [!NOTE] +> This section applies to both AMS and AMS (classic). -> [!IMPORTANT] -> The following steps apply to both *current* and *classic* versions of AMS. +Azure Functions is the data collection engine for AMS. You'll need to create a new subnet to host Azure Functions. -Create a [new subnet with an **IPv4/28** block or larger](../../../azure-functions/functions-networking-options.md#subnets). Then, make sure there's network connectivity between the new subnet and any target systems that you want to monitor. +[Create a new subnet](../../../azure-functions/functions-networking-options.md#subnets) with an **IPv4/28** block or larger. -You'll use this new subnet to host Azure Functions, which is the telemetry collection engine for AMS. For more information, see how to [integrate your app with an Azure virtual network](../../../app-service/overview-vnet-integration.md). +For more information, see how to [integrate your app with an Azure virtual network](../../../app-service/overview-vnet-integration.md). ## Configure outbound internet access > [!IMPORTANT]-> The following steps only apply to the *current* version of AMS, and not the *classic* version. +> This section only applies to the current version of AMS. If you're using AMS (classic), skip this section. --In many use cases, you might choose to restrict or block outbound internet access to your SAP network environment. However, AMS requires network connectivity between the [subnet that you configured](#configure-new-subnet) and the systems that you want to monitor. Before you deploy an AMS resource, you need to configure outbound internet access or the deployment will fail. +In many use cases, you might choose to restrict or block outbound internet access to your SAP network environment. However, AMS requires network connectivity between the [subnet that you configured](#create-new-subnet) and the systems that you want to monitor. Before you deploy an AMS resource, you need to configure outbound internet access, or the deployment will fail. There are multiple methods to address restricted or blocked outbound internet access. Choose the method that works best for your use case: There are multiple methods to address restricted or blocked outbound internet ac - [Use service tags with a network security group (NSG) in your virtual network](#use-service-tags) - [Use a private endpoint for your subnet](#use-private-endpoint) - ### Use Route All -**Route All** is a [standard feature of virtual network integration](../../../azure-functions/functions-networking-options.md#virtual-network-integration) in Azure Functions, which is deployed as part of AMS. Enabling or disabling this setting only impacts traffic from Azure Functions. This setting doesn't impact any other incoming or outgoing traffic within your virtual network. +**Route All** is a [standard feature of virtual network integration](../../../azure-functions/functions-networking-options.md#virtual-network-integration) in Azure Functions, which is deployed as part of AMS. Enabling or disabling this setting only affects traffic from Azure Functions. This setting doesn't affect any other incoming or outgoing traffic within your virtual network. You can configure the **Route All** setting when you create an AMS resource through the Azure portal. If your SAP environment doesn't allow outbound internet access, disable **Route All**. If your SAP environment allows outbound internet access, keep the default setting to enable **Route All**. -> [!NOTE] -> You can only use this option before you deploy an AMS resource. It's not possible to change the **Route All** setting after you create the AMS resource. +You can only use this option before you deploy an AMS resource. It's not possible to change the **Route All** setting after you create the AMS resource. ### Use service tags If you use NSGs, you can create AMS-related [virtual network service tags](../../../virtual-network/service-tags-overview.md) to allow appropriate traffic flow for your deployment. A service tag represents a group of IP address prefixes from a given Azure service. -> [!NOTE] -> You can use this option after you've deployed an AMS resource. +You can use this option after you've deployed an AMS resource. 1. Find the subnet associated with your AMS managed resource group: 1. Sign in to the [Azure portal](https://portal.azure.com). If you use NSGs, you can create AMS-related [virtual network service tags](../.. | **Priority** | **Name** | **Port** | **Protocol** | **Source** | **Destination** | **Action** | |--|--|-|--||-||-| 450 | allow_monitor | 443 | TCP | | AzureMonitor | Allow | -| 501 | allow_keyVault | 443 | TCP | | AzureKeyVault | Allow | +| 450 | allow_monitor | 443 | TCP | | Azure Monitor | Allow | +| 501 | allow_keyVault | 443 | TCP | | Azure Key Vault | Allow | | 550 | allow_storage | 443 | TCP | | Storage | Allow |-| 600 | allow_azure_controlplane | 443 | Any | | AzureResourceManager | Allow | +| 600 | allow_azure_controlplane | 443 | Any | | Azure Resource Manager | Allow | | 660 | deny_internet | Any | Any | Any | Internet | Deny | - AMS subnet IP refers to Ip of subnet associated with AMS resource - - +The AMS subnet IP address refers to the IP of the subnet associated with your AMS resource. To find the subnet, go to the AMS resource in the Azure portal. On the **Overview** page, review the **vNet/subnet** value. For the rules that you create, **allow_vnet** must have a lower priority than **deny_internet**. All other rules also need to have a lower priority than **allow_vnet**. However, the remaining order of these other rules is interchangeable. ### Use private endpoint-You can enable a private endpoint by creating a new subnet in the same virtual network as the system that you want to monitor. No other resources can use this subnet, so it's not possible to use the same subnet as Azure Functions for your private endpoint. -To create a private endpoint for AMS: +You can enable a private endpoint by creating a new subnet in the same virtual network as the system that you want to monitor. No other resources can use this subnet. It's not possible to use the same subnet as Azure Functions for your private endpoint. ++To create a private endpoint for AMS: 1. [Create a new subnet](../../../virtual-network/virtual-network-manage-subnet.md#add-a-subnet) in the same virtual network as the SAP system that you're monitoring. 1. In the Azure portal, go to your AMS resource. 1. On the **Overview** page for the AMS resource, select the **Managed resource group**.-A private endpoint connection needs to be created for the following resources inside the managed resource group: - 1. Key-vault, - 2. Storage-account, and - 3. Log-analytics workspace +1. Create a private endpoint connection for the following resources inside the managed resource group. + 1. [Azure Key Vault resources](#create-key-vault-endpoint) + 2. [Azure Storage resources](#create-storage-endpoint) + 3. [Azure Log Analytics workspaces](#create-log-analytics-endpoint) - - -###### Key Vault +#### Create key vault endpoint -Only 1 private endpoint is required for all the key vault resources (secrets, certificates, and keys). Once a private endpoint is created for key vault, the vault resources cannot be accessed from systems outside the given vnet. +You only need one private endpoint for all the Azure Key Vault resources (secrets, certificates, and keys). Once a private endpoint is created for key vault, the vault resources can't be accessed from systems outside the given vnet. 1. On the key vault resource's menu, under **Settings**, select **Networking**. 1. Select the **Private endpoint connections** tab. 1. Select **Create** to open the endpoint creation page. 1. On the **Basics** tab, enter or select all required information.-1. On the **Resource** tab, enter or select all required information. For the key vault resource, there's only one sub-resource available, the vault. +1. On the **Resource** tab, enter or select all required information. For the key vault resource, there's only one subresource available, the vault. 1. On the **Virtual Network** tab, select the virtual network and the subnet that you created specifically for the endpoint. It's not possible to use the same subnet as the Azure Functions app. 1. On the **DNS** tab, for **Integrate with private DNS zone**, select **Yes**. If necessary, add tags. 1. Select **Review + create** to create the private endpoint. Only 1 private endpoint is required for all the key vault resources (secrets, ce 1. For **Allow access from**, select **Allow public access from all networks**. 1. Select **Apply** to save the changes. -### Create storage endpoint +#### Create storage endpoint It's necessary to create a separate private endpoint for each Azure Storage account resource, including the queue, table, storage blob, and file. If you create a private endpoint for the storage queue, it's not possible to access the resource from systems outside of the virtual networking, including the Azure portal. However, other resources in the same storage account are accessible. -Repeat the following process for each type of storage sub-resource (table, queue, blob, and file): +Repeat the following process for each type of storage subresource (table, queue, blob, and file): 1. On the storage account's menu, under **Settings**, select **Networking**. 1. Select the **Private endpoint connections** tab. 1. Select **Create** to open the endpoint creation page. 1. On the **Basics** tab, enter or select all required information.-1. On the **Resource** tab, enter or select all required information. For the **Target sub-resource**, select one of the sub-resource types (table, queue, blob, or file). +1. On the **Resource** tab, enter or select all required information. For the **Target sub-resource**, select one of the subresource types (table, queue, blob, or file). 1. On the **Virtual Network** tab, select the virtual network and the subnet that you created specifically for the endpoint. It's not possible to use the same subnet as the Azure Functions app. 1. On the **DNS** tab, for **Integrate with private DNS zone**, select **Yes**. If necessary, add tags. 1. Select **Review + create** to create the private endpoint. Repeat the following process for each type of storage sub-resource (table, queue 1. For **Allow access from**, select **Allow public access from all networks**. 1. Select **Apply** to save the changes. -### Create log analytics endpoint +#### Create log analytics endpoint It's not possible to create a private endpoint directly for a Log Analytics workspace. To enable a private endpoint for this resource, you can connect the resource to an [Azure Monitor Private Link Scope (AMPLS)](../../../azure-monitor/logs/private-link-security.md). Then, you can create a private endpoint for the AMPLS resource. If possible, create the private endpoint before you allow any system to access the Log Analytics workspace through a public endpoint. Otherwise, you'll need to restart the Function App before you can access the Log Analytics workspace through the private endpoint. +Select a scope for the private endpoint: + 1. Go to the Log Analytics workspace in the Azure portal. 1. In the resource menu, under **Settings**, select **Network isolation**. 1. Select **Add** to create a new AMPLS setting. 1. Select the appropriate scope for the endpoint. Then, select **Apply**.-To enable private endpoint for Azure Monitor Private Link Scope, go to Private Endpoint connections tab under configure. -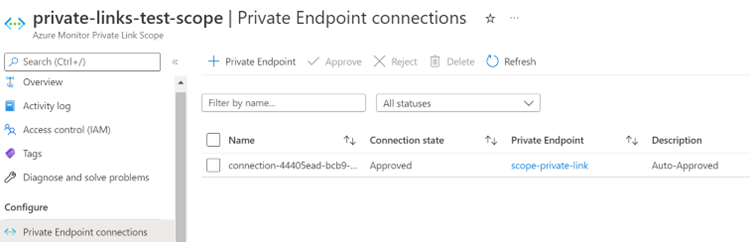 -1. Select the **Private endpoint connections** tab. -1. Select **Create** to open the endpoint creation page. +Create the private endpoint: ++1. Go to the AMPLS resource in the Azure portal. +1. In the resource menu, under **Configure**, select **Private Endpoint connections**. +1. Select **Private Endpoint** to create a new endpoint. 1. On the **Basics** tab, enter or select all required information. 1. On the **Resource** tab, enter or select all required information. 1. On the **Virtual Network** tab, select the virtual network and the subnet that you created specifically for the endpoint. It's not possible to use the same subnet as the Azure Functions app. 1. On the **DNS** tab, for **Integrate with private DNS zone**, select **Yes**. If necessary, add tags. 1. Select **Review + create** to create the private endpoint.++Configure the scope: + 1. Go to the Log Analytics workspace in the Azure portal. 1. In the resource's menu, under **Settings**, select **Network Isolation**. 1. Under **Virtual networks access configuration**: If you enable a private endpoint after any system accessed the Log Analytics wor 1. On the managed resource group's page, select the **Function App**. 1. On the Function App's **Overview** page, select **Restart**. -Next, find and note important IP address ranges. +Find and note important IP address ranges: 1. Find the AMS resource's IP address range. 1. Go to the AMS resource in the Azure portal. Next, find and note important IP address ranges. 1. On the **Overview** page, note the **Private endpoint** in the resource group. 1. In the resource group's menu, under **Settings**, select **DNS configuration**. 1. On the **DNS configuration** page, note the **IP addresses** for the private endpoint. +1. Find the subnet for the log analytics private endpoint. + 1. Go to the private endpoint created for the AMPLS resource. + 2. On the private endpoint's menu, under **Settings**, select **DNS configuration**. + 3. On the **DNS configuration** page, note the associated IP addresses. + 4. Go to the AMS resource in the Azure portal. + 5. On the **Overview** page, select the **vNet/subnet** to go to that resource. + 6. On the virtual network page, select the subnet that you used to create the AMS resource. - 1. For Log analytics private endpoint: Go to the private endpoint created for Azure Monitor Private Link Scope resource. - -  --1. On the private endpoint's menu, under **Settings**, select **DNS configuration**. -1. On the **DNS configuration** page, note the associated IP addresses. -1. Go to the AMS resource in the Azure portal. -1. On the **Overview** page, select the **vNet/subnet** to go to that resource. -1. On the virtual network page, select the subnet that you used to create the AMS resource. +Add outbound security rules: 1. Go to the NSG resource in the Azure portal. 1. In the NSG menu, under **Settings**, select **Outbound security rules**.-The below image contains the required security rules for AMS resource to work. - -+1. Add the following required security rules. + + | Priority | Description | + | -- | - | + | 550 | Allow the source IP for making calls to source system to be monitored. | + | 600 | Allow the source IP for making calls Azure Resource Manager service tag. | + | 650 | Allow the source IP to access key-vault resource using private endpoint IP. | + | 700 | Allow the source IP to access storage-account resources using private endpoint IP. (Include IPs for each of storage account sub resources: table, queue, file, and blob) | + | 800 | Allow the source IP to access log-analytics workspace resource using private endpoint IP. | + +## Next steps -| Priority | Description | -| -- | - | -| 550 | Allow the source IP for making calls to source system to be monitored. | -| 600 | Allow the source IP for making calls AzureResourceManager service tag. | -| 650 | Allow the source IP to access key-vault resource using private endpoint IP. | -| 700 | Allow the source IP to access storage-account resources using private endpoint IP. (Include IPs for each of storage account sub resources: table, queue, file, and blob) | -| 800 | Allow the source IP to access log-analytics workspace resource using private endpoint IP. | +- [Quickstart: set up AMS through the Azure portal](azure-monitor-sap-quickstart.md) +- [Quickstart: set up AMS with PowerShell](azure-monitor-sap-quickstart-powershell.md) |
| virtual-machines | Monitor Sap On Azure Reference | https://github.com/MicrosoftDocs/azure-docs/commits/main/articles/virtual-machines/workloads/sap/monitor-sap-on-azure-reference.md | |
| virtual-machines | Monitor Sap On Azure | https://github.com/MicrosoftDocs/azure-docs/commits/main/articles/virtual-machines/workloads/sap/monitor-sap-on-azure.md | Title: What is Azure Monitor for SAP solutions? (preview) -description: Start here to learn how to monitor SAP on Azure. +description: Learn about how to monitor your SAP resources on Azure for availability, performance, and operation. Previously updated : 07/21/2022 Last updated : 07/28/2022 -+#Customer intent: As a developer, I want to learn how to monitor my SAP resources on Azure so that I can better understand their availability, performance, and operation. # What is Azure Monitor for SAP solutions? (preview) [!INCLUDE [Azure Monitor for SAP solutions public preview notice](./includes/preview-azure-monitor.md)] -When you have critical applications and business processes relying on Azure resources, you'll want to monitor those resources for their availability, performance, and operation. --This article describes how to monitor SAP running on Azure using Azure Monitor for SAP solutions. Azure Monitor for SAP solutions uses specific parts of the [Azure Monitor](../../../azure-monitor/overview.md) infrastructure. +When you have critical SAP applications and business processes that rely on Azure resources, you might want to monitor those resources for availability, performance, and operation. *Azure Monitor for SAP solutions (AMS)* is an Azure-native monitoring product for SAP landscapes that run on Azure. AMS uses specific parts of the [Azure Monitor](../../../azure-monitor/overview.md) infrastructure. You can use AMS with both [SAP on Azure Virtual Machines (Azure VMs)](./hana-get-started.md) and [SAP on Azure Large Instances](./hana-overview-architecture.md). -> [!NOTE] -> There are currently two versions of Azure Monitor for SAP solutions. Old one is Azure Monitor for SAP solutions (classic) and new one is Azure Monitor for SAP solutions. This article will talk about both the versions. +There are currently two versions of this product, *AMS* and *AMS (classic)*. -## Overview +## What can you monitor? -Azure Monitor for SAP solutions is an Azure-native monitoring product for anyone running their SAP landscapes on Azure. It works with both [SAP on Azure Virtual Machines](./hana-get-started.md) and [SAP on Azure Large Instances](./hana-overview-architecture.md). +You can use AMS to collect data from Azure infrastructure and databases in one central location. Then, you can visually correlate the data for faster troubleshooting. -With Azure Monitor for SAP solutions, you can collect telemetry data from Azure infrastructure and databases in one central location and visually correlate the data for faster troubleshooting. +To monitor different components of an SAP landscape (such as Azure VMs, high-availability clusters, SAP HANA databases, SAP NetWeaver, etc.), add the corresponding *[provider](./azure-monitor-providers.md)*. For more information, see [how to deploy AMS through the Azure portal](azure-monitor-sap-quickstart.md). -You can monitor different components of an SAP landscape, such as Azure virtual machines (VMs), high-availability cluster, SAP HANA database, SAP NetWeaver, and so on, by adding the corresponding **provider** for that component. For more information, see [Deploy Azure Monitor for SAP solutions by using the Azure portal](azure-monitor-sap-quickstart.md). +The following table provides a quick comparison of the AMS (classic) and AMS. -The following table provides a quick comparison of the Azure Monitor for SAP solutions (classic) and Azure Monitor for SAP solutions. --| Azure Monitor for SAP solutions | Azure Monitor for SAP solutions (classic) | +| AMS | AMS (classic) | | - | -- | | Azure Functions-based collector architecture | VM-based collector architecture | | Support for Microsoft SQL Server, SAP HANA, and IBM Db2 databases | Support for Microsoft SQL Server, and SAP HANA databases | -Azure Monitor for SAP solutions uses the [Azure Monitor](../../../azure-monitor/overview.md) capabilities of [Log Analytics](../../../azure-monitor/logs/log-analytics-overview.md) and [Workbooks](../../../azure-monitor/visualize/workbooks-overview.md). With it, you can: +AMS uses the [Azure Monitor](../../../azure-monitor/overview.md) capabilities of [Log Analytics](../../../azure-monitor/logs/log-analytics-overview.md) and [Workbooks](../../../azure-monitor/visualize/workbooks-overview.md). With it, you can: -- Create [custom visualizations](../../../azure-monitor/visualize/workbooks-overview.md) by editing the default Workbooks provided by Azure Monitor for SAP solutions. +- Create [custom visualizations](../../../azure-monitor/visualize/workbooks-overview.md) by editing the default workbooks provided by AMS. - Write [custom queries](../../../azure-monitor/logs/log-analytics-tutorial.md). - Create [custom alerts](../../../azure-monitor/alerts/alerts-log.md) by using Azure Log Analytics workspace. - Take advantage of the [flexible retention period](../../../azure-monitor/logs/data-retention-archive.md) in Azure Monitor Logs/Log Analytics. - Connect monitoring data with your ticketing system. -## What data does Azure Monitor for SAP solutions collect? +## What data is collected? ++AMS doesn't collect Azure Monitor metrics or resource log data, like some other Azure resources do. Instead, AMS sends custom logs directly to the Azure Monitor Logs system. There, you can then use the built-in features of Log Analytics. -Azure Monitor for SAP solutions doesn't collect Azure Monitor metrics or resource log data as does many other Azure resources. Instead, it sends custom logs directly to the Azure Monitor Logs system, where you can then use the built-in features of Log Analytics. +Data collection in AMS depends on the providers that you configure. During public preview, the following data is collected. -Data collection in Azure Monitor for SAP solutions depends on the providers that you configure. During public preview, the following data is collected. +### Pacemaker cluster data ++High availability (HA) Pacemaker cluster data includes: -High-availability Pacemaker cluster telemetry: - Node, resource, and STONITH block device (SBD) status - Pacemaker location constraints - Quorum votes and ring status-- [Others](https://github.com/ClusterLabs/ha_cluster_exporter/blob/master/doc/metrics.md) -SAP HANA telemetry: +Also see the [metrics specification](https://github.com/ClusterLabs/ha_cluster_exporter/blob/master/doc/metrics.md) for `ha_cluster_exporter`. ++### SAP HANA data ++SAP HANA data includes: + - CPU, memory, disk, and network use - HANA system replication (HSR) - HANA backup SAP HANA telemetry: - Top tables - File system use -Microsoft SQL server telemetry: +### Microsoft SQL Server data ++Microsoft SQL server data includes: + - CPU, memory, disk use - Hostname, SQL instance name, SAP system ID - Batch requests, compilations, and Page Life Expectancy over time Microsoft SQL server telemetry: - Problems recorded in the SQL Server error log - Blocking processes and SQL wait statistics over time -Operating system telemetry (Linux): +### OS (Linux) data ++OS (Linux) data includes: + - CPU use, fork's count, running and blocked processes - Memory use and distribution among used, cached, buffered - Swap use, paging, and swap rate Operating system telemetry (Linux): - Ongoing I/O count, persistent memory read/write bytes - Network packets in/out, network bytes in/out -SAP NetWeaver telemetry: +### SAP NetWeaver data -- SAP system and application server availability, including: instance process availability of dispatcher, ICM, gateway, message server, Enqueue Server, IGS Watchdog+SAP NetWeaver data includes: ++- SAP system and application server availability, including instance process availability of: + - Dispatcher + - ICM + - Gateway + - Message server + - Enqueue Server + - IGS Watchdog - Work process usage statistics and trends-- Enqueue Lock statistics and trends+- Enqueue lock statistics and trends - Queue usage statistics and trends-- SMON Metrics (/SDF/SMON )-- SWNC Workload , Memory , Transaction, User , RFC Usage (St03n)-- Short Dumps (ST22)-- Object Lock (SM12)-- Failed Updates (SM13)-- System Logs Analysis(SM21)-- Batch Jobs Statistics(SM37)-- Outbound Queues(SMQ1)-- Inbound Queues(SMQ2)-- Transactional RFC(SM59)-- STMS Change Transport System Metrics(STMS)--IBM Db2 telemetry: -- DB availability-- Number of Connections, Logical and Physical Reads-- Waits and Current Locks-- Top 20 Runtime and Executions---## Data sharing with Microsoft +- SMON metrics (**/SDF/SMON**) +- SWNC workload, memory, transaction, user, RFC usage (**St03n**) +- Short dumps (**ST22**) +- Object lock (**SM12**) +- Failed updates (**SM13**) +- System logs analysis (**SM21**) +- Batch jobs statistics (**SM37**) +- Outbound queues (**SMQ1**) +- Inbound queues (**SMQ2**) +- Transactional RFC (**SM59**) +- STMS change transport system metrics (**STMS**) ++### IBM Db2 data ++IBM Db2 data includes: -> [!NOTE] -> This feature is only applicable for Azure Monitor for SAP solutions (classic) version. +- DB availability +- Number of connections, logical and physical reads +- Waits and current locks +- Top 20 runtime and executions -Azure Monitor for SAP solutions collects system metadata to provide improved support for SAP on Azure. No PII/EUII is collected. +## What is the architecture? -You can enable data sharing with Microsoft when you create Azure Monitor for SAP solutions resource by choosing *Share* from the drop-down. We recommend that you enable data sharing. Data sharing gives Microsoft support and engineering teams information about your environment, which helps us provide better support for your mission-critical SAP on Azure solution. +There are separate explanations for the [AMS architecture](#ams-architecture) and the [AMS (classic) architecture](#ams-classic-architecture). -## Architecture overview -> [!Note] -> This content would apply to both versions. +Some important points about the architecture include: -### Azure Monitor for SAP solutions +- The architecture is **multi-instance**. You can monitor multiple instances of a given component type across multiple SAP systems (SID) within a virtual network with a single resource of AMS. For example, you can monitor HANA databases, high availability (HA) clusters, Microsoft SQL server, SAP NetWeaver, etc. +- The architecture is **multi-provider**. The architecture diagram shows the SAP HANA provider as an example. Similarly, you can configure more providers for corresponding components to collect data from those components. For example, HANA DB, HA cluster, Microsoft SQL server, and SAP NetWeaver. +- The architecture has an **extensible query framework**. Write [SQL queries to collect data in JSON](https://github.com/Azure/AzureMonitorForSAPSolutions/blob/master/sapmon/content/SapHana.json). Easily add more SQL queries to collect other data. -The following diagram shows, at a high level, how Azure Monitor for SAP solutions collects telemetry from the SAP HANA database. The architecture is the same whether SAP HANA is deployed on Azure VMs or Azure Large Instances. - +### AMS architecture +The following diagram shows, at a high level, how AMS collects data from the SAP HANA database. The architecture is the same if SAP HANA is deployed on Azure VMs or Azure Large Instances. + Diagram of the new AMS architecture. The customer connects to the AMS resource through the Azure portal. There's a managed resource group containing Log Analytics, Azure Functions, Key Vault, and Storage queue. The Azure function connects to the providers. Providers include SAP NetWeaver (ABAP and JAVA), SAP HANA, Microsoft SQL Server, IBM Db2, Pacemaker clusters, and Linux OS. The key components of the architecture are: -- The **Azure portal**, which is where you can access the marketplace and the AMS (classic) service.-- The **AMS (classic) resource**, where you can view monitoring telemetry.-- The **managed resource group**, which is deployed automatically as part of the AMS resource's deployment. The resources inside the managed resource group help to collect telemetry. Key resources include:- - An **Azure Functions resource** that hosts the monitoring code, which is the logic that collects telemetry from the source systems and transfers the data to the monitoring framework. - - An **[Azure Key Vault resource](../../../key-vault/general/basic-concepts.md)**, which securely holds the SAP HANA database credentials and stores information about [providers](./azure-monitor-providers.md). - - The **Log Analytics workspace**, which is the destination for storing telemetry data. Optionally, you can choose to use an existing workspace in the same subscription as your AMS resource at deployment. +- The **Azure portal**, where you access the AMS service. +- The **AMS resource**, where you view monitoring data. +- The **managed resource group**, which is deployed automatically as part of the AMS resource's deployment. The resources inside the managed resource group help to collect data. Key resources include: + - An **Azure Functions resource** that hosts the monitoring code. This logic collects data from the source systems and transfers the data to the monitoring framework. + - An **[Azure Key Vault resource](../../../key-vault/general/basic-concepts.md)**, which securely holds the SAP HANA database credentials and stores information about providers. + - The **Log Analytics workspace**, which is the destination for storing data. Optionally, you can choose to use an existing workspace in the same subscription as your AMS resource at deployment. - [Azure Workbooks](../../../azure-monitor/visualize/workbooks-overview.md) provides customizable visualization of the telemetry in Log Analytics. To automatically refresh your workbooks or visualizations, pin the items to the Azure dashboard. The maximum refresh frequency is every 30 minutes. +[Azure Workbooks](../../../azure-monitor/visualize/workbooks-overview.md) provides customizable visualization of the data in Log Analytics. To automatically refresh your workbooks or visualizations, pin the items to the Azure dashboard. The maximum refresh frequency is every 30 minutes. - You can also use Kusto query language (KQL) to [run log queries](../../../azure-monitor/logs/log-query-overview.md) against the raw tables inside the Log Analytics workspace. -+You can also use Kusto Query Language (KQL) to [run log queries](../../../azure-monitor/logs/log-query-overview.md) against the raw tables inside the Log Analytics workspace. -### Azure Monitor for SAP solutions (classic) +### AMS (classic) architecture -The following diagram shows, at a high level, how Azure Monitor for SAP solutions (classic) collects telemetry from the SAP HANA database. The architecture is the same whether SAP HANA is deployed on Azure VMs or Azure Large Instances. +The following diagram shows, at a high level, how AMS (classic) collects data from the SAP HANA database. The architecture is the same if SAP HANA is deployed on Azure VMs or Azure Large Instances. -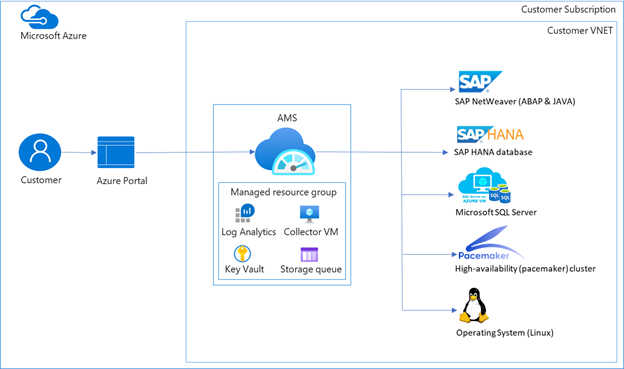 + Diagram of the AMS (classic) architecture. The customer connects to the AMS resource through the Azure portal. There's a managed resource group containing Log Analytics, Azure Functions, Key Vault, and Storage queue. The Azure function connects to the providers. Providers include SAP NetWeaver (ABAP and JAVA), SAP HANA, Microsoft SQL Server, Pacemaker clusters, and Linux OS. The key components of the architecture are:-- **Azure portal** ΓÇô Your starting point. You can navigate to marketplace within Azure portal and discover Azure Monitor for SAP solutions.-- **Azure Monitor for SAP solutions resource** - A landing place for you to view monitoring telemetry.-- **Managed resource group** ΓÇô Deployed automatically as part of the Azure Monitor for SAP solutions resource deployment. The resources deployed within managed resource group help with collection of telemetry. Key resources deployed and their purposes are:- - **Azure virtual machine**: Also known as *collector VM*, it's a Standard_B2ms VM. The main purpose of this VM is to host the *monitoring payload*. Monitoring payload refers to the logic of collecting telemetry from the source systems and transferring the data to the monitoring framework. In the preceding diagram, the monitoring payload contains the logic to connect to SAP HANA database over SQL port. - - **[Azure Key Vault](../../../key-vault/general/basic-concepts.md)**: This resource is deployed to securely hold SAP HANA database credentials and to store information about [providers](./azure-monitor-providers.md). - - **Log Analytics Workspace**: The destination where the telemetry data is stored. - - Visualization is built on top of telemetry in Log Analytics using [Azure Workbooks](../../../azure-monitor/visualize/workbooks-overview.md). You can customize visualization. You can also pin your Workbooks or specific visualization within Workbooks to Azure dashboard for autorefresh. The maximum frequency for refresh is every 30 minutes. - - You can use your existing workspace within the same subscription as SAP monitor resource by choosing this option at deployment. - - You can use Kusto query language (KQL) to run [queries](../../../azure-monitor/logs/log-query-overview.md) against the raw tables inside Log Analytics workspace. Look at *Custom Logs*. --> [!Note] -> You are responsible for patching and maintaining the VM, deployed in the managed resource group. -> [!Tip] -> You can use an existing Log Analytics workspace for telemetry collection if it's deployed within the same Azure subscription as the resource for Azure Monitor for SAP solutions. --### Architecture highlights --Here are the key highlights of the architecture: - +- The **Azure portal**, which is your starting point. You can navigate to marketplace within the Azure portal and discover AMS. +- The **AMS resource**, which is the landing place for you to view monitoring data. +- **Managed resource group**, which is deployed automatically as part of the AMS resource's deployment. The resources deployed within the managed resource group help with the collection of data. Key resources deployed and their purposes are: + - **Azure VM**, also known as the *collector VM*, which is a **Standard_B2ms** VM. The main purpose of this VM is to host the *monitoring payload*. The monitoring payload is the logic of collecting data from the source systems and transferring the data to the monitoring framework. In the architecture diagram, the monitoring payload contains the logic to connect to the SAP HANA database over the SQL port. You're responsible for patching and maintaining the VM. + - **[Azure Key Vault](../../../key-vault/general/basic-concepts.md)**: which is deployed to securely hold SAP HANA database credentials and to store information about providers. + - **Log Analytics Workspace**, which is the destination where the data is stored. + - Visualization is built on top of data in Log Analytics using [Azure Workbooks](../../../azure-monitor/visualize/workbooks-overview.md). You can customize visualization. You can also pin your Workbooks or specific visualization within Workbooks to Azure dashboard for auto-refresh. The maximum frequency for refresh is every 30 minutes. + - You can use your existing workspace within the same subscription as SAP monitor resource by choosing this option at deployment. + - You can use KQL to run [queries](../../../azure-monitor/logs/log-query-overview.md) against the raw tables inside the Log Analytics workspace. Look at **Custom Logs**. + - You can use an existing Log Analytics workspace for data collection if it's deployed within the same Azure subscription as the resource for AMS. -## Analyzing metrics +## Can you analyze metrics? -Azure Monitor for SAP solutions doesn't support metrics. +AMS doesn't support metrics. -## Analyzing logs +### Analyze logs -Azure Monitor for SAP solutions doesn't support resource logs or activity logs. For a list of the tables used by Azure Monitor Logs that can be queried by Log Analytics, see [Monitor SAP on Azure data reference](monitor-sap-on-azure-reference.md#azure-monitor-logs-tables). +AMS doesn't support resource logs or activity logs. For a list of the tables used by Azure Monitor Logs that can be queried by Log Analytics, see [the data reference for monitoring SAP on Azure](monitor-sap-on-azure-reference.md#azure-monitor-logs-tables). -### Sample Kusto queries +### Make Kusto queries -> [!IMPORTANT] -> When you select **Logs** from the Azure Monitor for SAP solutions menu, Log Analytics is opened with the query scope set to the current Azure Monitor for SAP solutions. This means that log queries will only include data from that resource. If you want to run a query that includes data from other accounts or data from other Azure services, select **Logs** from the **Azure Monitor** menu. See [Log query scope and time range in Azure Monitor Log Analytics](../../../azure-monitor/logs/scope.md) for details. +When you select **Logs** from the AMS menu, Log Analytics is opened with the query scope set to the current AMS. Log queries only include data from that resource. To run a query that includes data from other accounts or data from other Azure services, select **Logs** from the **Azure Monitor** menu. For more information, see [Log query scope and time range in Azure Monitor Log Analytics](../../../azure-monitor/logs/scope.md) for details. -You can use Kusto queries to help you monitor your Monitor SAP on Azure resources. Here's a sample query that gives you data from a custom log for a specified time range. You specify the time range and the number of rows. In this example, you'll get five rows of data for your selected time range. +You can use Kusto queries to help you monitor your AMS resources. The following sample query gives you data from a custom log for a specified time range. You can specify the time range and the number of rows. In this example, you'll get five rows of data for your selected time range. -```Kusto +```kusto custom log name | take 5- ``` -## Alerts +## How do you get alerts? -Azure Monitor alerts proactively notify you when important conditions are found in your monitoring data. They allow you to identify and address issues in your system before your customers notice them. +Azure Monitor alerts proactively notify you when important conditions are found in your monitoring data. You can then identify and address issues in your system before your customers notice them. -You can configure alerts in Azure Monitor for SAP solutions from the Azure portal. For more information, see [Configure Alerts in Azure Monitor for SAP solutions by using the Azure portal](azure-monitor-alerts-portal.md). +You can configure alerts in AMS from the Azure portal. For more information, see [how to configure alerts in AMS with the Azure portal](azure-monitor-alerts-portal.md). -## Create Azure Monitor for SAP solutions resources +### How can you create AMS resources? -You have several options to deploy Azure Monitor for SAP solutions and configure providers: -- You can deploy Azure Monitor for SAP solutions right from the Azure portal. For more information, see [Deploy Azure Monitor for SAP solutions by using the Azure portal](azure-monitor-sap-quickstart.md).-- Use Azure PowerShell. For more information, see [Deploy Azure Monitor for SAP solutions with Azure PowerShell](azure-monitor-sap-quickstart-powershell.md).-- Use the CLI extension. For more information, see the [SAP HANA Command Module](https://github.com/Azure/azure-hanaonazure-cli-extension#sapmonitor) (applicable for only Azure Monitor for SAP solutions (classic) version)+You have several options to deploy AMS and configure providers: ++- [Deploy AMS directly from the Azure portal](azure-monitor-sap-quickstart.md) +- [Deploy AMS with Azure PowerShell](azure-monitor-sap-quickstart-powershell.md) +- [Deploy AMS (classic) using the Azure Command-Line Interface (Azure CLI)](https://github.com/Azure/azure-hanaonazure-cli-extension#sapmonitor). ++## What is the pricing? ++AMS is a free product (no license fee). You're responsible for paying the cost of the underlying components in the managed resource group. You're also responsible for consumption costs associated with data use and retention. For more information, see standard Azure pricing documents: -## Pricing -Azure Monitor for SAP solutions is a free product (no license fee). You're responsible for paying the cost of the underlying components in the managed resource group. You're also responsible for consumption costs associated with data use and retention. For more information, see standard Azure pricing documents: - [Azure Functions Pricing](https://azure.microsoft.com/pricing/details/functions/#pricing)-- [Azure VM pricing (applicable to Azure Monitor for SAP solutions (classic))](https://azure.microsoft.com/pricing/details/virtual-machines/linux/)+- [Azure VM pricing (applicable to AMS (classic))](https://azure.microsoft.com/pricing/details/virtual-machines/linux/) - [Azure Key vault pricing](https://azure.microsoft.com/pricing/details/key-vault/) - [Azure storage account pricing](https://azure.microsoft.com/pricing/details/storage/queues/) - [Azure Log Analytics and alerts pricing](https://azure.microsoft.com/pricing/details/monitor/) +## How do you enable data sharing with Microsoft? ++> [!NOTE] +> The following content only applies to the AMS (classic) version. ++AMS collects system metadata to provide improved support for SAP on Azure. No PII/EUII is collected. ++You can enable data sharing with Microsoft when you create AMS resource by choosing *Share* from the drop-down. We recommend that you enable data sharing. Data sharing gives Microsoft support and engineering teams information about your environment, which helps us provide better support for your mission-critical SAP on Azure solution. + ## Next steps -- For a list of custom logs relevant to Azure Monitor for SAP solutions and information on related data types, see [Monitor SAP on Azure data reference](monitor-sap-on-azure-reference.md).-- For information on providers available for Azure Monitor for SAP solutions, see [Azure monitor for SAP Solutions providers](azure-monitor-providers.md).+- For a list of custom logs relevant to AMS and information on related data types, see [Monitor SAP on Azure data reference](monitor-sap-on-azure-reference.md). +- For information on providers available for AMS, see [AMS providers](azure-monitor-providers.md). |
| virtual-network | Default Outbound Access | https://github.com/MicrosoftDocs/azure-docs/commits/main/articles/virtual-network/ip-services/default-outbound-access.md | There are multiple ways to turn off default outbound access: * Associate a standard load balancer with outbound rules configured. - * Associate a public IP to the virtual machine's network interface. + * Associate a public IP to any of the virtual machine's network interfaces (if there are multiple network interfaces, having a single one with a public IP will prevent default outbound access for the virtual machine). 2. Use Flexible orchestration mode for virtual machine scale sets. |
| virtual-wan | Point To Site Vpn Client Cert Mac | https://github.com/MicrosoftDocs/azure-docs/commits/main/articles/virtual-wan/point-to-site-vpn-client-cert-mac.md | + + Title: 'Configure P2S User VPN clients -certificate authentication - macOS and iOS' ++description: Learn how to configure the VPN client for Virtual WAN User VPN configurations that use certificate authentication and IKEv2 or OpenVPN tunnel. This article applies to macOS and iOS. +++ Last updated : 07/27/2022++++# Configure User VPN P2S clients - certificate authentication - macOS and iOS ++This article helps you connect to Azure Virtual WAN from a macOS or iOS operating system over User VPN P2S for configurations that use Certificate Authentication. To connect from an iOS or macOS operating system over an OpenVPN tunnel, you use an OpenVPN client. To connect from a macOS operating system over an IKEv2 tunnel, you use the VPN client that is natively installed on your Mac. ++## Before you begin ++* Make sure you've completed the necessary configuration steps in the [Tutorial: Create a P2S User VPN connection using Azure Virtual WAN](virtual-wan-point-to-site-portal.md). ++* **Generate VPN client configuration files:** The VPN client configuration files that you generate are specific to the Virtual WAN User VPN profile that you download. Virtual WAN has two different types of configuration profiles: WAN-level (global), and hub-level. If there are any changes to the P2S VPN configuration after you generate the files, or you change to a different profile type, you need to generate new VPN client configuration files and apply the new configuration to all of the VPN clients that you want to connect. See [Generate User VPN client configuration files](about-vpn-profile-download.md). ++* **Obtain certificates:** The sections below require certificates. Make sure you have both the client certificate and the root server certificate information. For more information, see [Generate and export certificates](certificates-point-to-site.md) for more information. ++## <a name="ikev2-macOS"></a>IKEv2 - native client - macOS steps ++After you generate and download the VPN client configuration package, unzip it to view the folders. When you configure macOS native clients, you use the files in the **Generic** folder. The Generic folder is present if IKEv2 was configured on the gateway. You can find all of the information that you need to configure the native VPN client in the **Generic** folder. If you don't see the Generic folder, make sure IKEv2 is one of the tunnel types, then download the configuration package again. ++The **Generic** folder contains the following files. ++* **VpnSettings.xml**, which contains important settings like server address and tunnel type. +* **VpnServerRoot.cer**, which contains the root certificate required to validate the Azure VPN gateway during P2S connection setup. ++Use the following steps to configure the native VPN client on Mac for certificate authentication. These steps must be completed on every Mac that you want to connect to Azure. ++### Install certificates ++#### Root certificate ++1. Copy to the root certificate file - **VpnServerRoot.cer** - to your Mac. Double-click the certificate. Depending on your operating system, the certificate will either automatically install, or you'll see the **Add Certificates** page. +1. If you see the **Add Certificates** page, for **Keychain:** click the arrows and select **login** from the dropdown. +1. Click **Add** to import the file. ++#### Client certificate ++The client certificate is used for authentication and is required. Typically, you can just click the client certificate to install. For more information about how to install a client certificate, see [Install a client certificate](install-client-certificates.md). ++#### Verify certificate install ++Verify that both the client and the root certificate are installed. ++1. Open **Keychain Access**. +1. Go to the **Certificates** tab. +1. Verify that both the client and the root certificate are installed. + +### Configure VPN client profile ++1. Go to **System Preferences -> Network**. On the Network page, click **'+'** to create a new VPN client connection profile for a P2S connection to the Azure virtual network. ++ :::image type="content" source="./media/point-to-site-vpn-client-cert-mac/mac/new.png" alt-text="Screenshot shows the Network window to click on +." lightbox="./media/point-to-site-vpn-client-cert-mac/mac/new.png"::: ++1. On the **Select the interface** page, click the arrows next to **Interface:**. From the dropdown, click **VPN**. ++ :::image type="content" source="./media/point-to-site-vpn-client-cert-mac/mac/vpn.png" alt-text="Screenshot shows the Network window with the option to select an interface, VPN is selected." lightbox="./media/point-to-site-vpn-client-cert-mac/mac/vpn.png"::: ++1. For **VPN Type**, from the dropdown, click **IKEv2**. In the **Service Name** field, specify a friendly name for the profile, then click **Create**. ++ :::image type="content" source="./media/point-to-site-vpn-client-cert-mac/mac/service-name.png" alt-text="Screenshot shows the Network window with the option to select an interface, select VPN type, and enter a service name." lightbox="./media/point-to-site-vpn-client-cert-mac/mac/service-name.png"::: ++1. Go to the VPN client profile that you downloaded. In the **Generic** folder, open the **VpnSettings.xml** file using a text editor. In the example, you can see that this VPN client profile connects to a WAN-level User VPN profile and that the VpnTypes are IKEv2 and OpenVPN. Even though there are two VPN types listed, this VPN client will connect over IKEv2. Copy the **VpnServer** tag value. ++ :::image type="content" source="./media/point-to-site-vpn-client-cert-mac/mac/vpn-server.png" alt-text="Screenshot shows the VpnSettings.xml file open with the VpnServer tag highlighted." lightbox="./media/point-to-site-vpn-client-cert-mac/mac/vpn-server.png"::: ++1. Paste the **VpnServer** tag value in both the **Server Address** and **Remote ID** fields of the profile. Leave **Local ID** blank. Then, click **Authentication Settings...**. ++ :::image type="content" source="./media/point-to-site-vpn-client-cert-mac/mac/server-address.png" alt-text="Screenshot shows server info pasted to fields." lightbox="./media/point-to-site-vpn-client-cert-mac/mac/server-address.png"::: ++### Configure authentication settings ++#### Big Sur and later ++1. On the **Authentication Settings** page, for the Authentication settings field, click the arrows to select **Certificate**. ++ :::image type="content" source="./media/point-to-site-vpn-client-cert-mac/monterey/certificate.png" alt-text="Screenshot shows authentication settings with certificate selected." lightbox="./media/point-to-site-vpn-client-cert-mac/monterey/certificate.png"::: ++1. Click **Select** to open the **Choose An Identity** page. ++ :::image type="content" source="./media/point-to-site-vpn-client-cert-mac/monterey/select.png" alt-text="Screenshot to click Select." lightbox="./media/point-to-site-vpn-client-cert-mac/monterey/select.png"::: ++1. The **Choose An Identity** page displays a list of certificates for you to choose from. If youΓÇÖre unsure which certificate to use, you can select **Show Certificate** to see more information about each certificate. Click the proper certificate, then click **Continue**. ++ :::image type="content" source="./media/point-to-site-vpn-client-cert-mac/monterey/choose-identity.png" alt-text="Screenshot shows certificate properties." lightbox="./media/point-to-site-vpn-client-cert-mac/monterey/choose-identity.png"::: ++1. On the **Authentication Settings** page, verify that the correct certificate is shown, then click **OK**. ++ :::image type="content" source="./media/point-to-site-vpn-client-cert-mac/monterey/verify.png" alt-text="Screenshot shows the Choose An Identity dialog box where you can select the proper certificate." lightbox="./media/point-to-site-vpn-client-cert-mac/monterey/verify.png"::: ++#### Catalina ++If you're using Catalina, use these authentication settings steps: ++1. For **Authentication Settings** choose **None**. ++1. Click **Certificate**, click **Select** and click the correct client certificate that you installed earlier. Then, click **OK**. ++### Specify certificate ++1. In the **Local ID** field, specify the name of the certificate. In this example, itΓÇÖs **P2SChildCertMac**. ++ :::image type="content" source="./media/point-to-site-vpn-client-cert-mac/monterey/local-id.png" alt-text="Screenshot shows local ID value." lightbox="./media/point-to-site-vpn-client-cert-mac/monterey/local-id.png"::: ++1. Click **Apply** to save all changes. ++### Connect ++1. Click **Connect** to start the P2S connection to the Azure virtual network. You may need to enter your "login" keychain password. ++ :::image type="content" source="./media/point-to-site-vpn-client-cert-mac/mac/select-connect.png" alt-text="Screenshot shows connect button." lightbox="./media/point-to-site-vpn-client-cert-mac/mac/select-connect.png"::: ++1. Once the connection has been established, the status shows as **Connected** and you can view the IP address that was pulled from the VPN client address pool. ++ :::image type="content" source="./media/point-to-site-vpn-client-cert-mac/mac/connected.png" alt-text="Screenshot shows Connected." lightbox="./media/point-to-site-vpn-client-cert-mac/mac/connected.png"::: ++## <a name="openvpn-macOS"></a>OpenVPN Client - macOS steps ++The following example uses **TunnelBlick**. +++## <a name="OpenVPN-iOS"></a>OpenVPN Client - iOS steps ++The following example uses **OpenVPN Connect** from the App store. +++## Next steps ++[Tutorial: Create a P2S User VPN connection using Azure Virtual WAN](virtual-wan-point-to-site-portal.md). |
| vpn-gateway | Point To Site Vpn Client Cert Mac | https://github.com/MicrosoftDocs/azure-docs/commits/main/articles/vpn-gateway/point-to-site-vpn-client-cert-mac.md | You can generate client configuration files using PowerShell, or by using the Az ### <a name="view"></a>View files -Unzip the file to view the following folders. --* **WindowsAmd64** and **WindowsX86**, which contain the Windows 32-bit and 64-bit installer packages, respectively. The **WindowsAmd64** installer package is for all supported 64-bit Windows clients, not just Amd. -* **Generic**, which contains general information used to create your own VPN client configuration. The Generic folder is provided if IKEv2 or SSTP+IKEv2 was configured on the gateway. If only SSTP is configured, then the Generic folder isnΓÇÖt present. --To connect to Azure, you manually configure the native IKEv2 VPN client. Azure doesnΓÇÖt provide a *mobileconfig* file. You can find all of the information that you need for configuration in the **Generic** folder. --If you don't see the Generic folder, check the following items, then generate the zip file again. +Unzip the file to view the folders. When you configure macOS native clients, you use the files in the **Generic** folder. The Generic folder is present if IKEv2 was configured on the gateway. You can find all of the information that you need to configure the native VPN client in the **Generic** folder. If you don't see the Generic folder, check the following items, then generate the zip file again. * Check the tunnel type for your configuration. It's likely that IKEv2 wasnΓÇÖt selected as a tunnel type. * On the VPN gateway, verify that the SKU isnΓÇÖt Basic. The VPN Gateway Basic SKU doesnΓÇÖt support IKEv2. Then, select IKEv2 and generate the zip file again to retrieve the Generic folder. |