| Service | Microsoft Docs article | Related commit history on GitHub | Change details |
|---|---|---|---|
| active-directory-b2c | Javascript And Page Layout | https://github.com/MicrosoftDocs/azure-docs/commits/main/articles/active-directory-b2c/javascript-and-page-layout.md | function addTermsOfUseLink() { In the code, replace `termsOfUseUrl` with the link to your terms of use agreement. For your directory, create a new user attribute called **termsOfUse** and then include **termsOfUse** as a user attribute. +Alternatively, you can add a link at the bottom of self-asserted pages, without using of JavaScript. Use the following localization: ++```xml +<LocalizedResources Id="api.localaccountsignup.en"> + <LocalizedStrings> + <!-- The following elements will display a link at the bottom of the page. --> + <LocalizedString ElementType="UxElement" StringId="disclaimer_link_1_text">Terms of use</LocalizedString> + <LocalizedString ElementType="UxElement" StringId="disclaimer_link_1_url">termsOfUseUrl</LocalizedString> + </LocalizedStrings> +</LocalizedResources> +``` ++Replace `termsOfUseUrl` with the link to your organization's privacy policy and terms of use. ++ ## Next steps Find more information about how to [Customize the user interface of your application in Azure Active Directory B2C](customize-ui-with-html.md). |
| active-directory-b2c | Localization String Ids | https://github.com/MicrosoftDocs/azure-docs/commits/main/articles/active-directory-b2c/localization-string-ids.md | The following are the IDs for a content definition with an ID of `api.localaccou | **ver_intro_msg** | Verification is necessary. Please click Send button. | | **ver_input** | Verification code | +### Sign-up and self-asserted pages disclaimer links ++The following `UxElement` string IDs will display disclaimer link(s) at the bottom of the self-asserted page. These links are not displayed by default unless specified in the localized strings. ++| ID | Example value | +| | - | +| **disclaimer_msg_intro** | By providing your phone number, you consent to receiving a one-time passcode sent by text message to help you sign into {insert your application name}. Standard messsage and data rates may apply. | +| **disclaimer_link_1_text** | Privacy Statement | +| **disclaimer_link_1_url** | {insert your privacy statement URL} | +| **disclaimer_link_2_text** | Terms and Conditions | +| **disclaimer_link_2_url** | {insert your terms and conditions URL} | + ### Sign-up and self-asserted pages error messages | ID | Default value | The following example shows the use of some of the user interface elements in th <LocalizedString ElementType="UxElement" StringId="ver_input">Verification code</LocalizedString> <LocalizedString ElementType="UxElement" StringId="ver_intro_msg">Verification is necessary. Please click Send button.</LocalizedString> <LocalizedString ElementType="UxElement" StringId="ver_success_msg">E-mail address verified. You can now continue.</LocalizedString>+ <!-- The following elements will display a message and two links at the bottom of the page. + For policies that you intend to show to users in the United States, we suggest displaying the following text. Replace the content of the disclaimer_link_X_url elements with links to your organization's privacy statement and terms and conditions. + Uncomment any of these lines to display them. --> + <!-- <LocalizedString ElementType="UxElement" StringId="disclaimer_msg_intro">By providing your phone number, you consent to receiving a one-time passcode sent by text message to help you sign into {insert your application name}. Standard messsage and data rates may apply.</LocalizedString> --> + <!-- <LocalizedString ElementType="UxElement" StringId="disclaimer_link_1_text">Privacy Statement</LocalizedString> + <LocalizedString ElementType="UxElement" StringId="disclaimer_link_1_url">{insert your privacy statement URL}</LocalizedString> --> + <!-- <LocalizedString ElementType="UxElement" StringId="disclaimer_link_2_text">Terms and Conditions</LocalizedString> + <LocalizedString ElementType="UxElement" StringId="disclaimer_link_2_url">{insert your terms and conditions URL}</LocalizedString> --> <LocalizedString ElementType="ErrorMessage" StringId="ServiceThrottled">There are too many requests at this moment. Please wait for some time and try again.</LocalizedString> <LocalizedString ElementType="ErrorMessage" StringId="UserMessageIfClaimNotVerified">Claim not verified: {0}</LocalizedString> <LocalizedString ElementType="ErrorMessage" StringId="UserMessageIfClaimsPrincipalAlreadyExists">A user with the specified ID already exists. Please choose a different one.</LocalizedString> |
| active-directory-b2c | Phone Factor Technical Profile | https://github.com/MicrosoftDocs/azure-docs/commits/main/articles/active-directory-b2c/phone-factor-technical-profile.md | The **CryptographicKeys** element is not used. | ManualPhoneNumberEntryAllowed| No | Specify whether or not a user is allowed to manually enter a phone number. Possible values: `true`, or `false` (default).| | setting.authenticationMode | No | The method to validate the phone number. Possible values: `sms`, `phone`, or `mixed` (default).| | setting.autodial| No| Specify whether the technical profile should auto dial or auto send an SMS. Possible values: `true`, or `false` (default). Auto dial requires the `setting.authenticationMode` metadata be set to `sms`, or `phone`. The input claims collection must have a single phone number. |+| setting.autosubmit | No | Specifies whether the technical profile should auto submit the one-time password entry form. Possible values are `true` (default), or `false`. When auto-submit is turned off, the user needs to select a button to progress the journey. | ### UI elements |
| active-directory | Partner Driven Integrations | https://github.com/MicrosoftDocs/azure-docs/commits/main/articles/active-directory/app-provisioning/partner-driven-integrations.md | If you have built a SCIM Gateway and would like to add it to this list, follow t 1. Review the Azure AD SCIM [documentation](use-scim-to-provision-users-and-groups.md) to understand the Azure AD SCIM implementation. 1. Test compatibility between the Azure AD SCIM client and your SCIM gateway. 1. Click the pencil at the top of this document to edit the article-1. Once you're redirected to Github, click the pencil at the top of the article to start making changes +1. Once you're redirected to GitHub, click the pencil at the top of the article to start making changes 1. Make changes in the article using the Markdown language and create a pull request. Make sure to provide a description for the pull request. 1. An admin of the repository will review and merge your changes so that others can view them. |
| active-directory | Howto Authentication Passwordless Phone | https://github.com/MicrosoftDocs/azure-docs/commits/main/articles/active-directory/authentication/howto-authentication-passwordless-phone.md | Microsoft Authenticator can be used to sign in to any Azure AD account without u This authentication technology can be used on any device platform, including mobile. This technology can also be used with any app or website that integrates with Microsoft Authentication Libraries. People who enabled phone sign-in from Microsoft Authenticator see a message that asks them to tap a number in their app. No username or password is asked for. To complete the sign-in process in the app, a user must next take the following actions: People who enabled phone sign-in from Microsoft Authenticator see a message that 1. Choose **Approve**. 1. Provide their PIN or biometric. +## Multiple accounts on iOS (preview) ++You can enable passwordless phone sign-in for multiple accounts in Microsoft Authenticator on any supported iOS device. Consultants, students, and others with multiple accounts in Azure AD can add each account to Microsoft Authenticator and use passwordless phone sign-in for all of them from the same iOS device. ++Previously, admins might not require passwordless sign-in for users with multiple accounts because it requires them to carry more devices for sign-in. By removing the limitation of one user sign-in from a device, admins can more confidently encourage users to register passwordless phone sign-in and use it as their default sign-in method. ++The Azure AD accounts can be in the same tenant or different tenants. Guest accounts aren't supported for multiple account sign-in from one device. ++>[!NOTE] +>Multiple accounts on iOS is currently in public preview. Some features might not be supported or have limited capabilities. For more information about previews, see [Supplemental Terms of Use for Microsoft Azure Previews](https://azure.microsoft.com/support/legal/preview-supplemental-terms/). + ## Prerequisites To use passwordless phone sign-in with Microsoft Authenticator, the following prerequisites must be met: - Recommended: Azure AD Multi-Factor Authentication, with push notifications allowed as a verification method. Push notifications to your smartphone or tablet help the Authenticator app to prevent unauthorized access to accounts and stop fraudulent transactions. The Authenticator app automatically generates codes when set up to do push notifications so a user has a backup sign-in method even if their device doesn't have connectivity. - Latest version of Microsoft Authenticator installed on devices running iOS 12.0 or greater, or Android 6.0 or greater.-- The device that runs Microsoft Authenticator must be registered to an individual user. We're actively working to enable multiple accounts on Android. +- For Android, the device that runs Microsoft Authenticator must be registered to an individual user. We're actively working to enable multiple accounts on Android. +- For iOS, the device must be registered with each tenant where it's used to sign in. For example, the following device must be registered with Contoso and Wingtiptoys to allow all accounts to sign in: + - balas@contoso.com + - balas@wingtiptoys.com and bsandhu@wingtiptoys +- For iOS, we recommend enabling the option in Microsoft Authenticator to allow Microsoft to gather usage data. It's not enabled by default. To enable it in Microsoft Authenticator, go to **Settings** > **Usage Data**. + + :::image type="content" border="true" source="./media/howto-authentication-passwordless-phone/telemetry.png" alt-text="Screenshot of Usage Data in Microsoft Authenticator."::: To use passwordless authentication in Azure AD, first enable the combined registration experience, then enable users for the passwordless method. An end user can be enabled for multifactor authentication (MFA) through an on-pr If the user attempts to upgrade multiple installations (5+) of Microsoft Authenticator with the passwordless phone sign-in credential, this change might result in an error. -### Device registration --Before you can create this new strong credential, there are prerequisites. One prerequisite is that the device on which Microsoft Authenticator is installed must be registered within the Azure AD tenant to an individual user. --Currently, a device can only be enabled for passwordless sign-in in a single tenant. This limit means that only one work or school account in Microsoft Authenticator can be enabled for phone sign-in. --> [!NOTE] -> Device registration is not the same as device management or mobile device management (MDM). Device registration only associates a device ID and a user ID together, in the Azure AD directory. ## Next steps To learn about Azure AD authentication and passwordless methods, see the followi - [Learn how passwordless authentication works](concept-authentication-passwordless.md) - [Learn about device registration](../devices/overview.md)-- [Learn about Azure AD Multi-Factor Authentication](../authentication/howto-mfa-getstarted.md)+- [Learn about Azure AD Multi-Factor Authentication](../authentication/howto-mfa-getstarted.md) |
| active-directory | How To Create Group Based Permissions | https://github.com/MicrosoftDocs/azure-docs/commits/main/articles/active-directory/cloud-infrastructure-entitlement-management/how-to-create-group-based-permissions.md | -[!NOTE] The Permissions Management Administrator for all authorization systems will be able to create the new group based permissions. +> [!NOTE] +> The Permissions Management Administrator for all authorization systems will be able to create the new group based permissions. ## Select administrative permissions settings for a group |
| active-directory | Concept Conditional Access Cloud Apps | https://github.com/MicrosoftDocs/azure-docs/commits/main/articles/active-directory/conditional-access/concept-conditional-access-cloud-apps.md | The following key applications are included in the Office 365 client app: - OneDrive - Power Apps - Power Automate-- Security & Compliance Center+- Security & compliance portal - SharePoint Online - Skype for Business Online - Skype and Teams Tenant Admin API A complete list of all services included can be found in the article [Apps inclu ### Microsoft Azure Management -The Microsoft Azure Management application includes multiple services. -- - Azure portal - - Microsoft Entra admin center - - Azure Resource Manager provider - - Classic deployment model APIs - - Azure PowerShell - - Azure CLI - - Azure DevOps - - Azure Data Factory portal - - Azure Event Hubs - - Azure Service Bus - - [Azure SQL Database](/azure/azure-sql/database/conditional-access-configure) - - SQL Managed Instance - - Azure Synapse - - Visual Studio subscriptions administrator portal +When Conditional Access policy is targeted to the Microsoft Azure Management application, within the Conditional Access policy app picker the policy will be enforced for tokens issued to application IDs of a set of services closely bound to the portal. ++- Azure Resource Manager +- Azure portal, which also covers the Microsoft Entra admin center +- Azure Data Lake +- Application Insights API +- Log Analytics API ++Because the policy is applied to the Azure management portal and API, services, or clients with an Azure API service dependency, can indirectly be impacted. For example: ++- Classic deployment model APIs +- Azure PowerShell +- Azure CLI +- Azure DevOps +- Azure Data Factory portal +- Azure Event Hubs +- Azure Service Bus +- [Azure SQL Database](/azure/azure-sql/database/conditional-access-configure) +- SQL Managed Instance +- Azure Synapse +- Visual Studio subscriptions administrator portal > [!NOTE] > The Microsoft Azure Management application applies to [Azure PowerShell](/powershell/azure/what-is-azure-powershell), which calls the [Azure Resource Manager API](../../azure-resource-manager/management/overview.md). It does not apply to [Azure AD PowerShell](/powershell/azure/active-directory/overview), which calls the [Microsoft Graph API](/graph/overview). For more information on how to set up a sample policy for Microsoft Azure Management, see [Conditional Access: Require MFA for Azure management](howto-conditional-access-policy-azure-management.md). ->[!NOTE] ->For Azure Government, you should target the Azure Government Cloud Management API application. +> [!TIP] +> For Azure Government, you should target the Azure Government Cloud Management API application. ### Other applications Administrators can add any Azure AD registered application to Conditional Access > [!NOTE] > Since Conditional Access policy sets the requirements for accessing a service you are not able to apply it to a client (public/native) application. In other words, the policy is not set directly on a client (public/native) application, but is applied when a client calls a service. For example, a policy set on SharePoint service applies to the clients calling SharePoint. A policy set on Exchange applies to the attempt to access the email using Outlook client. That is why client (public/native) applications are not available for selection in the Cloud Apps picker and Conditional Access option is not available in the application settings for the client (public/native) application registered in your tenant. -Some applications don't appear in the picker at all. The only way to include these applications in a Conditional Access policy is to include **All apps**. +Some applications don't appear in the picker at all. The only way to include these applications in a Conditional Access policy is to includeΓÇ»**All cloud apps**. ++### All cloud apps ++Applying a Conditional Access policy to **All cloud apps** will result in the policy being enforced for all tokens issued to web sites and services. This option includes applications that aren't individually targetable in Conditional Access policy, such as Azure Active Directory. ++In some cases, an **All cloud apps** policy could inadvertently block user access. These cases are excluded from policy enforcement and include: ++- Services required to achieve the desired security posture. For example, device enrollment calls are excluded from compliant device policy targeted to All cloud apps. ++- Calls to Azure AD Graph and MS Graph, to access user profile, group membership and relationship information that is commonly used by applications excluded from policy. The excluded scopes are listed below. Consent is still required for apps to use these permissions. + - For native clients: + - Azure AD Graph: User.read + - MS Graph: User.read, People.read, and UserProfile.read + - For confidential / authenticated clients: + - Azure AD Graph: User.read, User.read.all, and User.readbasic.all + - MS Graph: User.read,User.read.all, User.read.All People.read, People.read.all, GroupMember.Read.All, Member.Read.Hidden, and UserProfile.read ## User actions |
| active-directory | Concept Conditional Access Grant | https://github.com/MicrosoftDocs/azure-docs/commits/main/articles/active-directory/conditional-access/concept-conditional-access-grant.md | Devices must be registered in Azure AD before they can be marked as compliant. M > [!NOTE] > On Windows 7, iOS, Android, macOS, and some third-party web browsers Azure AD identifies the device using a client certificate that is provisioned when the device is registered with Azure AD. When a user first signs in through the browser the user is prompted to select the certificate. The end user must select this certificate before they can continue to use the browser. +You can use the Microsoft Defender for Endpoint app along with the Approved Client app policy in Intune to set device compliance policy Conditional Access policies. There's no exclusion required for the Microsoft Defender for Endpoint app while setting up Conditional Access. Although Microsoft Defender for Endpoint on Android & iOS (App ID - dd47d17a-3194-4d86-bfd5-c6ae6f5651e3) isn't an approved app, it has permission to report device security posture. This permission enables the flow of compliance information to Conditional Access. + ### Require hybrid Azure AD joined device Organizations can choose to use the device identity as part of their Conditional Access policy. Organizations can require that devices are hybrid Azure AD joined using this checkbox. For more information about device identities, see the article [What is a device identity?](../devices/overview.md). |
| active-directory | Howto Conditional Access Policy Admin Mfa | https://github.com/MicrosoftDocs/azure-docs/commits/main/articles/active-directory/conditional-access/howto-conditional-access-policy-admin-mfa.md | -Microsoft recommends you require MFA on the following roles at a minimum: +Microsoft recommends you require MFA on the following roles at a minimum, based on [identity score recommendations](../fundamentals/identity-secure-score.md): - Global administrator - Application administrator |
| active-directory | Reference Aadsts Error Codes | https://github.com/MicrosoftDocs/azure-docs/commits/main/articles/active-directory/develop/reference-aadsts-error-codes.md | The `error` field has several possible values - review the protocol documentatio | AADSTS50178 | SessionControlNotSupportedForPassthroughUsers - Session control isn't supported for passthrough users. | | AADSTS50180 | WindowsIntegratedAuthMissing - Integrated Windows authentication is needed. Enable the tenant for Seamless SSO. | | AADSTS50187 | DeviceInformationNotProvided - The service failed to perform device authentication. |-| AADSTS50194 | Application '{appId}'({appName}) is n't configured as a multi-tenant application. Usage of the /common endpoint isn't supported for such applications created after '{time}'. Use a tenant-specific endpoint or configure the application to be multi-tenant. | +| AADSTS50194 | Application '{appId}'({appName}) isn't configured as a multi-tenant application. Usage of the /common endpoint isn't supported for such applications created after '{time}'. Use a tenant-specific endpoint or configure the application to be multi-tenant. | | AADSTS50196 | LoopDetected - A client loop has been detected. Check the appΓÇÖs logic to ensure that token caching is implemented, and that error conditions are handled correctly. The app has made too many of the same request in too short a period, indicating that it is in a faulty state or is abusively requesting tokens. | | AADSTS50197 | ConflictingIdentities - The user could not be found. Try signing in again. | | AADSTS50199 | CmsiInterrupt - For security reasons, user confirmation is required for this request. Because this is an "interaction_required" error, the client should do interactive auth. This occurs because a system webview has been used to request a token for a native application - the user must be prompted to ask if this was actually the app they meant to sign into. To avoid this prompt, the redirect URI should be part of the following safe list: <br />http://<br />https://<br />msauth://(iOS only)<br />msauthv2://(iOS only)<br />chrome-extension:// (desktop Chrome browser only) | |
| active-directory | Scenario Spa Sign In | https://github.com/MicrosoftDocs/azure-docs/commits/main/articles/active-directory/develop/scenario-spa-sign-in.md | Learn how to add sign-in to the code for your single-page application. Before you can get tokens to access APIs in your application, you need an authenticated user context. You can sign in users to your application in MSAL.js in two ways: -* [Pop-up window](#sign-in-with-a-pop-up-window), by using the `loginPopup` method -* [Redirect](#sign-in-with-redirect), by using the `loginRedirect` method +- [Pop-up window](#sign-in-with-a-pop-up-window), by using the `loginPopup` method +- [Redirect](#sign-in-with-redirect), by using the `loginRedirect` method You can also optionally pass the scopes of the APIs for which you need the user to consent at the time of sign-in. -> [!NOTE] -> If your application already has access to an authenticated user context or ID token, you can skip the login step and directly acquire tokens. For details, see [SSO with user hint](msal-js-sso.md#with-user-hint). +If your application already has access to an authenticated user context or ID token, you can skip the login step, and directly acquire tokens. For details, see [SSO with user hint](msal-js-sso.md#with-user-hint). ## Choosing between a pop-up or redirect experience The choice between a pop-up or redirect experience depends on your application flow: -* If you don't want users to move away from your main application page during authentication, we recommend the pop-up method. Because the authentication redirect happens in a pop-up window, the state of the main application is preserved. +- If you don't want users to move away from your main application page during authentication, we recommend the pop-up method. Because the authentication redirect happens in a pop-up window, the state of the main application is preserved. -* If users have browser constraints or policies where pop-up windows are disabled, you can use the redirect method. Use the redirect method with the Internet Explorer browser, because there are [known issues with pop-up windows on Internet Explorer](https://github.com/AzureAD/microsoft-authentication-library-for-js/blob/dev/lib/msal-browser/docs/internet-explorer.md#popups). +- If users have browser constraints or policies where pop-up windows are disabled, you can use the redirect method. Use the redirect method with the Internet Explorer browser, because there are [known issues with pop-up windows on Internet Explorer](https://github.com/AzureAD/microsoft-authentication-library-for-js/blob/dev/lib/msal-browser/docs/internet-explorer.md#popups). ## Sign-in with a pop-up window # [JavaScript (MSAL.js v2)](#tab/javascript2) ```javascript- const config = {- auth: { - clientId: 'your_app_id', - redirectUri: "your_app_redirect_uri", //defaults to application start page - postLogoutRedirectUri: "your_app_logout_redirect_uri" - } -} + auth: { + clientId: "your_app_id", + redirectUri: "your_app_redirect_uri", //defaults to application start page + postLogoutRedirectUri: "your_app_logout_redirect_uri", + }, +}; const loginRequest = {- scopes: ["User.ReadWrite"] -} + scopes: ["User.ReadWrite"], +}; let accountId = ""; const myMsal = new PublicClientApplication(config); -myMsal.loginPopup(loginRequest) - .then(function (loginResponse) { - accountId = loginResponse.account.homeAccountId; - // Display signed-in user content, call API, etc. - }).catch(function (error) { - //login failure - console.log(error); - }); +myMsal + .loginPopup(loginRequest) + .then(function (loginResponse) { + accountId = loginResponse.account.homeAccountId; + // Display signed-in user content, call API, etc. + }) + .catch(function (error) { + //login failure + console.log(error); + }); ``` # [JavaScript (MSAL.js v1)](#tab/javascript1) ```javascript- const config = {- auth: { - clientId: 'your_app_id', - redirectUri: "your_app_redirect_uri", //defaults to application start page - postLogoutRedirectUri: "your_app_logout_redirect_uri" - } -} + auth: { + clientId: "your_app_id", + redirectUri: "your_app_redirect_uri", //defaults to application start page + postLogoutRedirectUri: "your_app_logout_redirect_uri", + }, +}; const loginRequest = {- scopes: ["User.ReadWrite"] -} + scopes: ["User.ReadWrite"], +}; const myMsal = new UserAgentApplication(config); -myMsal.loginPopup(loginRequest) - .then(function (loginResponse) { - //login success - }).catch(function (error) { - //login failure - console.log(error); - }); +myMsal + .loginPopup(loginRequest) + .then(function (loginResponse) { + //login success + }) + .catch(function (error) { + //login failure + console.log(error); + }); ``` # [Angular (MSAL.js v2)](#tab/angular2) The MSAL Angular wrapper allows you to secure specific routes in your applicatio ```javascript // In app-routing.module.ts-import { NgModule } from '@angular/core'; -import { Routes, RouterModule } from '@angular/router'; -import { ProfileComponent } from './profile/profile.component'; -import { MsalGuard } from '@azure/msal-angular'; -import { HomeComponent } from './home/home.component'; +import { NgModule } from "@angular/core"; +import { Routes, RouterModule } from "@angular/router"; +import { ProfileComponent } from "./profile/profile.component"; +import { MsalGuard } from "@azure/msal-angular"; +import { HomeComponent } from "./home/home.component"; const routes: Routes = [- { - path: 'profile', - component: ProfileComponent, - canActivate: [ - MsalGuard - ] - }, - { - path: '', - component: HomeComponent - } + { + path: "profile", + component: ProfileComponent, + canActivate: [MsalGuard], + }, + { + path: "", + component: HomeComponent, + }, ]; @NgModule({- imports: [RouterModule.forRoot(routes, { useHash: false })], - exports: [RouterModule] + imports: [RouterModule.forRoot(routes, { useHash: false })], + exports: [RouterModule], })-export class AppRoutingModule { } +export class AppRoutingModule {} ``` For a pop-up window experience, set the `interactionType` configuration to `InteractionType.Popup` in the Guard configuration. You can also pass the scopes that require consent as follows: ```javascript // In app.module.ts-import { PublicClientApplication, InteractionType } from '@azure/msal-browser'; -import { MsalModule } from '@azure/msal-angular'; +import { PublicClientApplication, InteractionType } from "@azure/msal-browser"; +import { MsalModule } from "@azure/msal-angular"; @NgModule({- imports: [ - MsalModule.forRoot( new PublicClientApplication({ - auth: { - clientId: 'Enter_the_Application_Id_Here', - }, - cache: { - cacheLocation: 'localStorage', - storeAuthStateInCookie: isIE, - } - }), { - interactionType: InteractionType.Popup, // Msal Guard Configuration - authRequest: { - scopes: ['user.read'] - } - }, null) - ] + imports: [ + MsalModule.forRoot( + new PublicClientApplication({ + auth: { + clientId: "Enter_the_Application_Id_Here", + }, + cache: { + cacheLocation: "localStorage", + storeAuthStateInCookie: isIE, + }, + }), + { + interactionType: InteractionType.Popup, // Msal Guard Configuration + authRequest: { + scopes: ["user.read"], + }, + }, + null + ), + ], })-export class AppModule { } +export class AppModule {} ``` # [Angular (MSAL.js v1)](#tab/angular1)+ The MSAL Angular wrapper allows you to secure specific routes in your application by adding `MsalGuard` to the route definition. This guard will invoke the method to sign in when that route is accessed.+ ```javascript // In app-routing.module.ts-import { NgModule } from '@angular/core'; -import { Routes, RouterModule } from '@angular/router'; -import { ProfileComponent } from './profile/profile.component'; -import { MsalGuard } from '@azure/msal-angular'; -import { HomeComponent } from './home/home.component'; +import { NgModule } from "@angular/core"; +import { Routes, RouterModule } from "@angular/router"; +import { ProfileComponent } from "./profile/profile.component"; +import { MsalGuard } from "@azure/msal-angular"; +import { HomeComponent } from "./home/home.component"; const routes: Routes = [ {- path: 'profile', + path: "profile", component: ProfileComponent,- canActivate: [ - MsalGuard - ] + canActivate: [MsalGuard], }, {- path: '', - component: HomeComponent - } + path: "", + component: HomeComponent, + }, ]; @NgModule({ imports: [RouterModule.forRoot(routes, { useHash: false })],- exports: [RouterModule] + exports: [RouterModule], })-export class AppRoutingModule { } +export class AppRoutingModule {} ``` For a pop-up window experience, enable the `popUp` configuration option. You can also pass the scopes that require consent as follows: For a pop-up window experience, enable the `popUp` configuration option. You can # [React](#tab/react) -The MSAL React wrapper allows you to protect specific components by wrapping them in the `MsalAuthenticationTemplate` component. This component will invoke login if a user is not already signed in or render child components otherwise. +The MSAL React wrapper allows you to protect specific components by wrapping them in the `MsalAuthenticationTemplate` component. This component will invoke login if a user isn't already signed in or render child components otherwise. ```javascript import { InteractionType } from "@azure/msal-browser"; import { MsalAuthenticationTemplate, useMsal } from "@azure/msal-react"; function WelcomeUser() {- const { accounts } = useMsal(); - const username = accounts[0].username; + const { accounts } = useMsal(); + const username = accounts[0].username; - return <p>Welcome, {username}</p> + return <p>Welcome, {username}</p>; } // Remember that MsalProvider must be rendered somewhere higher up in the component tree function App() {- return ( - <MsalAuthenticationTemplate interactionType={InteractionType.Popup}> - <p>This will only render if a user is signed-in.</p> - <WelcomeUser /> - </MsalAuthenticationTemplate> - ) -}; + return ( + <MsalAuthenticationTemplate interactionType={InteractionType.Popup}> + <p>This will only render if a user is signed-in.</p> + <WelcomeUser /> + </MsalAuthenticationTemplate> + ); +} ``` You can also use the `@azure/msal-browser` APIs directly to invoke a login paired with the `AuthenticatedTemplate` and/or `UnauthenticatedTemplate` components to render specific contents to signed-in or signed-out users respectively. This is the recommended approach if you need to invoke login as a result of user interaction such as a button click. ```javascript-import { useMsal, AuthenticatedTemplate, UnauthenticatedTemplate } from "@azure/msal-react"; +import { + useMsal, + AuthenticatedTemplate, + UnauthenticatedTemplate, +} from "@azure/msal-react"; function signInClickHandler(instance) {- instance.loginPopup(); + instance.loginPopup(); } // SignInButton Component returns a button that invokes a popup login when clicked function SignInButton() {- // useMsal hook will return the PublicClientApplication instance you provided to MsalProvider - const { instance } = useMsal(); + // useMsal hook will return the PublicClientApplication instance you provided to MsalProvider + const { instance } = useMsal(); - return <button onClick={() => signInClickHandler(instance)}>Sign In</button> -}; + return <button onClick={() => signInClickHandler(instance)}>Sign In</button>; +} function WelcomeUser() {- const { accounts } = useMsal(); - const username = accounts[0].username; + const { accounts } = useMsal(); + const username = accounts[0].username; - return <p>Welcome, {username}</p> + return <p>Welcome, {username}</p>; } // Remember that MsalProvider must be rendered somewhere higher up in the component tree function App() {- return ( - <> - <AuthenticatedTemplate> - <p>This will only render if a user is signed-in.</p> - <WelcomeUser /> - </AuthenticatedTemplate> - <UnauthenticatedTemplate> - <p>This will only render if a user is not signed-in.</p> - <SignInButton /> - </UnauthenticatedTemplate> - </> - ) + return ( + <> + <AuthenticatedTemplate> + <p>This will only render if a user is signed-in.</p> + <WelcomeUser /> + </AuthenticatedTemplate> + <UnauthenticatedTemplate> + <p>This will only render if a user is not signed-in.</p> + <SignInButton /> + </UnauthenticatedTemplate> + </> + ); } ``` function App() { # [JavaScript (MSAL.js v2)](#tab/javascript2) ```javascript- const config = {- auth: { - clientId: 'your_app_id', - redirectUri: "your_app_redirect_uri", //defaults to application start page - postLogoutRedirectUri: "your_app_logout_redirect_uri" - } -} + auth: { + clientId: "your_app_id", + redirectUri: "your_app_redirect_uri", //defaults to application start page + postLogoutRedirectUri: "your_app_logout_redirect_uri", + }, +}; const loginRequest = {- scopes: ["User.ReadWrite"] -} + scopes: ["User.ReadWrite"], +}; let accountId = ""; const myMsal = new PublicClientApplication(config); function handleResponse(response) {- if (response !== null) { - accountId = response.account.homeAccountId; - // Display signed-in user content, call API, etc. - } else { - // In case multiple accounts exist, you can select - const currentAccounts = myMsal.getAllAccounts(); -- if (currentAccounts.length === 0) { - // no accounts signed-in, attempt to sign a user in - myMsal.loginRedirect(loginRequest); - } else if (currentAccounts.length > 1) { - // Add choose account code here - } else if (currentAccounts.length === 1) { - accountId = currentAccounts[0].homeAccountId; - } + if (response !== null) { + accountId = response.account.homeAccountId; + // Display signed-in user content, call API, etc. + } else { + // In case multiple accounts exist, you can select + const currentAccounts = myMsal.getAllAccounts(); ++ if (currentAccounts.length === 0) { + // no accounts signed-in, attempt to sign a user in + myMsal.loginRedirect(loginRequest); + } else if (currentAccounts.length > 1) { + // Add choose account code here + } else if (currentAccounts.length === 1) { + accountId = currentAccounts[0].homeAccountId; }+ } } myMsal.handleRedirectPromise().then(handleResponse); myMsal.handleRedirectPromise().then(handleResponse); The redirect methods don't return a promise because of the move away from the main app. To process and access the returned tokens, register success and error callbacks before you call the redirect methods. ```javascript- const config = {- auth: { - clientId: 'your_app_id', - redirectUri: "your_app_redirect_uri", //defaults to application start page - postLogoutRedirectUri: "your_app_logout_redirect_uri" - } -} + auth: { + clientId: "your_app_id", + redirectUri: "your_app_redirect_uri", //defaults to application start page + postLogoutRedirectUri: "your_app_logout_redirect_uri", + }, +}; const loginRequest = {- scopes: ["User.ReadWrite"] -} + scopes: ["User.ReadWrite"], +}; const myMsal = new UserAgentApplication(config); function authCallback(error, response) {- //handle redirect response + //handle redirect response } myMsal.handleRedirectCallback(authCallback); myMsal.loginRedirect(loginRequest); # [Angular (MSAL.js v2)](#tab/angular2) -The code here is the same as described earlier in the section about sign-in with a pop-up window, except that the `interactionType` is set to `InteractionType.Redirect` for the MsalGuard Configuration, and the `MsalRedirectComponent` is bootstrapped to handle redirects. +The code here's the same as described earlier in the section about sign-in with a pop-up window, except that the `interactionType` is set to `InteractionType.Redirect` for the MsalGuard Configuration, and the `MsalRedirectComponent` is bootstrapped to handle redirects. ```javascript // In app.module.ts-import { PublicClientApplication, InteractionType } from '@azure/msal-browser'; -import { MsalModule, MsalRedirectComponent } from '@azure/msal-angular'; +import { PublicClientApplication, InteractionType } from "@azure/msal-browser"; +import { MsalModule, MsalRedirectComponent } from "@azure/msal-angular"; @NgModule({- imports: [ - MsalModule.forRoot( new PublicClientApplication({ - auth: { - clientId: 'Enter_the_Application_Id_Here', - }, - cache: { - cacheLocation: 'localStorage', - storeAuthStateInCookie: isIE, - } - }), { - interactionType: InteractionType.Redirect, // Msal Guard Configuration - authRequest: { - scopes: ['user.read'] - } - }, null) - ], - bootstrap: [AppComponent, MsalRedirectComponent] + imports: [ + MsalModule.forRoot( + new PublicClientApplication({ + auth: { + clientId: "Enter_the_Application_Id_Here", + }, + cache: { + cacheLocation: "localStorage", + storeAuthStateInCookie: isIE, + }, + }), + { + interactionType: InteractionType.Redirect, // Msal Guard Configuration + authRequest: { + scopes: ["user.read"], + }, + }, + null + ), + ], + bootstrap: [AppComponent, MsalRedirectComponent], })-export class AppModule { } +export class AppModule {} ``` # [Angular (MSAL.js v1)](#tab/angular1) -The code here is the same as described earlier in the section about sign-in with a pop-up window. The default flow is redirect. +The code here's the same as described earlier in the section about sign-in with a pop-up window. The default flow is redirect. # [React](#tab/react) -The MSAL React wrapper allows you to protect specific components by wrapping them in the `MsalAuthenticationTemplate` component. This component will invoke login if a user is not already signed in or render child components otherwise. +The MSAL React wrapper allows you to protect specific components by wrapping them in the `MsalAuthenticationTemplate` component. This component will invoke login if a user isn't already signed in or render child components otherwise. ```javascript import { InteractionType } from "@azure/msal-browser"; import { MsalAuthenticationTemplate, useMsal } from "@azure/msal-react"; function WelcomeUser() {- const { accounts } = useMsal(); - const username = accounts[0].username; + const { accounts } = useMsal(); + const username = accounts[0].username; - return <p>Welcome, {username}</p> + return <p>Welcome, {username}</p>; } // Remember that MsalProvider must be rendered somewhere higher up in the component tree function App() {- return ( - <MsalAuthenticationTemplate interactionType={InteractionType.Redirect}> - <p>This will only render if a user is signed-in.</p> - <WelcomeUser /> - </MsalAuthenticationTemplate> - ) -}; + return ( + <MsalAuthenticationTemplate interactionType={InteractionType.Redirect}> + <p>This will only render if a user is signed-in.</p> + <WelcomeUser /> + </MsalAuthenticationTemplate> + ); +} ``` You can also use the `@azure/msal-browser` APIs directly to invoke a login paired with the `AuthenticatedTemplate` and/or `UnauthenticatedTemplate` components to render specific contents to signed-in or signed-out users respectively. This is the recommended approach if you need to invoke login as a result of user interaction such as a button click. ```javascript-import { useMsal, AuthenticatedTemplate, UnauthenticatedTemplate } from "@azure/msal-react"; +import { + useMsal, + AuthenticatedTemplate, + UnauthenticatedTemplate, +} from "@azure/msal-react"; function signInClickHandler(instance) {- instance.loginRedirect(); + instance.loginRedirect(); } // SignInButton Component returns a button that invokes a popup login when clicked function SignInButton() {- // useMsal hook will return the PublicClientApplication instance you provided to MsalProvider - const { instance } = useMsal(); + // useMsal hook will return the PublicClientApplication instance you provided to MsalProvider + const { instance } = useMsal(); - return <button onClick={() => signInClickHandler(instance)}>Sign In</button> -}; + return <button onClick={() => signInClickHandler(instance)}>Sign In</button>; +} function WelcomeUser() {- const { accounts } = useMsal(); - const username = accounts[0].username; + const { accounts } = useMsal(); + const username = accounts[0].username; - return <p>Welcome, {username}</p> + return <p>Welcome, {username}</p>; } // Remember that MsalProvider must be rendered somewhere higher up in the component tree function App() {- return ( - <> - <AuthenticatedTemplate> - <p>This will only render if a user is signed-in.</p> - <WelcomeUser /> - </AuthenticatedTemplate> - <UnauthenticatedTemplate> - <p>This will only render if a user is not signed-in.</p> - <SignInButton /> - </UnauthenticatedTemplate> - </> - ) + return ( + <> + <AuthenticatedTemplate> + <p>This will only render if a user is signed-in.</p> + <WelcomeUser /> + </AuthenticatedTemplate> + <UnauthenticatedTemplate> + <p>This will only render if a user is not signed-in.</p> + <SignInButton /> + </UnauthenticatedTemplate> + </> + ); } ``` You can also configure `logoutPopup` to redirect the main window to a different ```javascript const config = {- auth: { - clientId: 'your_app_id', - redirectUri: "your_app_redirect_uri", // defaults to application start page - postLogoutRedirectUri: "your_app_logout_redirect_uri" - } -} + auth: { + clientId: "your_app_id", + redirectUri: "your_app_redirect_uri", // defaults to application start page + postLogoutRedirectUri: "your_app_logout_redirect_uri", + }, +}; const myMsal = new PublicClientApplication(config); // you can select which account application should sign out const logoutRequest = {- account: myMsal.getAccountByHomeId(homeAccountId), - mainWindowRedirectUri: "your_app_main_window_redirect_uri" -} + account: myMsal.getAccountByHomeId(homeAccountId), + mainWindowRedirectUri: "your_app_main_window_redirect_uri", +}; await myMsal.logoutPopup(logoutRequest); ```+ # [JavaScript (MSAL.js v1)](#tab/javascript1) -Signing out with a pop-up window is not supported in MSAL.js v1 +Signing out with a pop-up window isn't supported in MSAL.js v1 # [Angular (MSAL.js v2)](#tab/angular2) logout() { # [Angular (MSAL.js v1)](#tab/angular1) -Signing out with a pop-up window is not supported in MSAL Angular v1 +Signing out with a pop-up window isn't supported in MSAL Angular v1 # [React](#tab/react) ```javascript-import { useMsal, AuthenticatedTemplate, UnauthenticatedTemplate } from "@azure/msal-react"; +import { + useMsal, + AuthenticatedTemplate, + UnauthenticatedTemplate, +} from "@azure/msal-react"; function signOutClickHandler(instance) {- const logoutRequest = { - account: instance.getAccountByHomeId(homeAccountId), - mainWindowRedirectUri: "your_app_main_window_redirect_uri", - postLogoutRedirectUri: "your_app_logout_redirect_uri" - } - instance.logoutPopup(logoutRequest); + const logoutRequest = { + account: instance.getAccountByHomeId(homeAccountId), + mainWindowRedirectUri: "your_app_main_window_redirect_uri", + postLogoutRedirectUri: "your_app_logout_redirect_uri", + }; + instance.logoutPopup(logoutRequest); } // SignOutButton Component returns a button that invokes a popup logout when clicked function SignOutButton() {- // useMsal hook will return the PublicClientApplication instance you provided to MsalProvider - const { instance } = useMsal(); + // useMsal hook will return the PublicClientApplication instance you provided to MsalProvider + const { instance } = useMsal(); - return <button onClick={() => signOutClickHandler(instance)}>Sign Out</button> -}; + return ( + <button onClick={() => signOutClickHandler(instance)}>Sign Out</button> + ); +} // Remember that MsalProvider must be rendered somewhere higher up in the component tree function App() {- return ( - <> - <AuthenticatedTemplate> - <p>This will only render if a user is signed-in.</p> - <SignOutButton /> - </AuthenticatedTemplate> - <UnauthenticatedTemplate> - <p>This will only render if a user is not signed-in.</p> - </UnauthenticatedTemplate> - </> - ) + return ( + <> + <AuthenticatedTemplate> + <p>This will only render if a user is signed-in.</p> + <SignOutButton /> + </AuthenticatedTemplate> + <UnauthenticatedTemplate> + <p>This will only render if a user is not signed-in.</p> + </UnauthenticatedTemplate> + </> + ); } ``` function App() { ## Sign-out with a redirect -MSAL.js provides a `logout` method in v1, and `logoutRedirect` method in v2, that clears the cache in browser storage and redirects the window to the Azure Active Directory (Azure AD) sign-out page. After sign-out, Azure AD redirects back to the page that invoked logout by default. +MSAL.js provides a `logout` method in v1, and `logoutRedirect` method in v2 that clears the cache in browser storage and redirects the window to the Azure AD sign-out page. After sign-out, Azure AD redirects back to the page that invoked logout by default. You can configure the URI to which it should redirect after sign-out by setting `postLogoutRedirectUri`. This URI should be registered as a redirect URI in your application registration. You can configure the URI to which it should redirect after sign-out by setting ```javascript const config = {- auth: { - clientId: 'your_app_id', - redirectUri: "your_app_redirect_uri", //defaults to application start page - postLogoutRedirectUri: "your_app_logout_redirect_uri" - } -} + auth: { + clientId: "your_app_id", + redirectUri: "your_app_redirect_uri", //defaults to application start page + postLogoutRedirectUri: "your_app_logout_redirect_uri", + }, +}; const myMsal = new PublicClientApplication(config); // you can select which account application should sign out const logoutRequest = {- account: myMsal.getAccountByHomeId(homeAccountId) -} + account: myMsal.getAccountByHomeId(homeAccountId), +}; myMsal.logoutRedirect(logoutRequest); ``` myMsal.logoutRedirect(logoutRequest); ```javascript const config = {- auth: { - clientId: 'your_app_id', - redirectUri: "your_app_redirect_uri", //defaults to application start page - postLogoutRedirectUri: "your_app_logout_redirect_uri" - } -} + auth: { + clientId: "your_app_id", + redirectUri: "your_app_redirect_uri", //defaults to application start page + postLogoutRedirectUri: "your_app_logout_redirect_uri", + }, +}; const myMsal = new UserAgentApplication(config); this.authService.logout(); # [React](#tab/react) ```javascript-import { useMsal, AuthenticatedTemplate, UnauthenticatedTemplate } from "@azure/msal-react"; +import { + useMsal, + AuthenticatedTemplate, + UnauthenticatedTemplate, +} from "@azure/msal-react"; function signOutClickHandler(instance) {- const logoutRequest = { - account: instance.getAccountByHomeId(homeAccountId), - postLogoutRedirectUri: "your_app_logout_redirect_uri" - } - instance.logoutRedirect(logoutRequest); + const logoutRequest = { + account: instance.getAccountByHomeId(homeAccountId), + postLogoutRedirectUri: "your_app_logout_redirect_uri", + }; + instance.logoutRedirect(logoutRequest); } // SignOutButton Component returns a button that invokes a redirect logout when clicked function SignOutButton() {- // useMsal hook will return the PublicClientApplication instance you provided to MsalProvider - const { instance } = useMsal(); + // useMsal hook will return the PublicClientApplication instance you provided to MsalProvider + const { instance } = useMsal(); - return <button onClick={() => signOutClickHandler(instance)}>Sign Out</button> -}; + return ( + <button onClick={() => signOutClickHandler(instance)}>Sign Out</button> + ); +} // Remember that MsalProvider must be rendered somewhere higher up in the component tree function App() {- return ( - <> - <AuthenticatedTemplate> - <p>This will only render if a user is signed-in.</p> - <SignOutButton /> - </AuthenticatedTemplate> - <UnauthenticatedTemplate> - <p>This will only render if a user is not signed-in.</p> - </UnauthenticatedTemplate> - </> - ) + return ( + <> + <AuthenticatedTemplate> + <p>This will only render if a user is signed-in.</p> + <SignOutButton /> + </AuthenticatedTemplate> + <UnauthenticatedTemplate> + <p>This will only render if a user is not signed-in.</p> + </UnauthenticatedTemplate> + </> + ); } ``` |
| active-directory | Road To The Cloud Introduction | https://github.com/MicrosoftDocs/azure-docs/commits/main/articles/active-directory/fundamentals/road-to-the-cloud-introduction.md | -This content provides guidance to move: +Some organizations set goals to remove AD, and their on-premises IT footprint. Others take advantage of some cloud-based capabilities to reduce the AD footprint, but not to completely remove their on-premises environments. This content provides guidance to move: * **From** - Active Directory (AD) and other non-cloud based services, either hosted on-premises or Infrastructure-as-a-Service (IaaS), that provide identity management (IDM), identity and access management (IAM) and device management. This content provides guidance to move: >[!NOTE] > In this content, when we refer to AD, we are referring to Windows Server Active Directory Domain Services. -Some organizations set goals to remove AD, and their on-premises IT footprint. Others set goals to take advantage of some cloud-based capabilities, but not to completely remove their on-premises or IaaS environments. Transformation must be aligned with and achieve business objectives including increased productivity, reduced costs and complexity, and improved security posture. To better understand the costs vs. value of moving to the cloud, see [Forrester TEI for Microsoft Azure Active Directory](https://www.microsoft.com/security/business/forrester-tei-study) and other TEI reports and [Cloud economics](https://azure.microsoft.com/overview/cloud-economics/). +Transformation must be aligned with and achieve business objectives including increased productivity, reduced costs and complexity, and improved security posture. To better understand the costs vs. value of moving to the cloud, see [Forrester TEI for Microsoft Azure Active Directory](https://www.microsoft.com/security/business/forrester-tei-study) and other TEI reports and [Cloud economics](https://azure.microsoft.com/overview/cloud-economics/). ## Next steps |
| active-directory | Create Access Review | https://github.com/MicrosoftDocs/azure-docs/commits/main/articles/active-directory/governance/create-access-review.md | Title: Create an access review of groups and applications - Azure AD description: Learn how to create an access review of group members or application access in Azure Active Directory. -+ editor: markwahl-msft na Previously updated : 03/22/2022 Last updated : 07/18/2022 If you are reviewing access to an application, then before creating the review, 1. Use the **At end of review, send notification to** option to send notifications to other users or groups with completion updates. This feature allows for stakeholders other than the review creator to be updated on the progress of the review. To use this feature, choose **Select User(s) or Group(s)** and add another user or group for which you want to receive the status of completion. -1. In the **Enable review decision helpers** section, choose whether you want your reviewer to receive recommendations during the review process. When enabled, users who have signed in during the previous 30-day period are recommended for approval. Users who haven't signed in during the past 30 days are recommended for denial. This 30-day interval is irrespective of whether the sign-ins were interactive or not. The last sign-in date for the specified user will also display along with the recommendation. +1. In the **Enable review decision helpers** section choose whether you want your reviewer to receive recommendations during the review process: + 1. If you select **No sign-in within 30 days**, users who have signed in during the previous 30-day period are recommended for approval. Users who haven't signed in during the past 30 days are recommended for denial. This 30-day interval is irrespective of whether the sign-ins were interactive or not. The last sign-in date for the specified user will also display along with the recommendation. + 1. If you select **Peer outlier**, approvers will be recommended to keep or deny access to users based on the access the users' peers have. If a user doesn't have the same access as their peers, the system will recommend that the reviewer deny them access. > [!NOTE] > If you create an access review based on applications, your recommendations are based on the 30-day interval period depending on when the user last signed in to the application rather than the tenant. -  +  1. In the **Advanced settings** section, you can choose the following: |
| active-directory | Perform Access Review | https://github.com/MicrosoftDocs/azure-docs/commits/main/articles/active-directory/governance/perform-access-review.md | Title: Review access to groups & applications in access reviews - Azure AD description: Learn how to review access of group members or application access in Azure Active Directory access reviews. -+ editor: markwahl-msft na Previously updated : 2/18/2022 Last updated : 7/18/2022 There are two ways that you can approve or deny access: ### Review access based on recommendations -To make access reviews easier and faster for you, we also provide recommendations that you can accept with a single click. The recommendations are generated based on the user's sign-in activity. +To make access reviews easier and faster for you, we also provide recommendations that you can accept with a single click. There are two ways recommendations are generated for the reviewer. One method the system uses to create recommendations is by the user's sign-in activity. If a user has been inactive for 30 days or more, the reviewer will be recommended to deny access. The other method is based on the access the user's peers have. If the user doesn't have the same access as their peers, the reviewer will be recommended to deny that user access. ++If you have **No sign-in within 30 days** or **Peer outlier** enabled, follow the steps below to accept recommendations: 1. Select one or more users and then Click **Accept recommendations**. |
| active-directory | Review Recommendations Group Access Reviews | https://github.com/MicrosoftDocs/azure-docs/commits/main/articles/active-directory/governance/review-recommendations-group-access-reviews.md | + + Title: Review recommendations for Access reviews - Azure AD +description: Learn how to review access of group members with review recommendations in Azure Active Directory access reviews. ++++editor: markwahl-msft +++ na ++ Last updated : 7/18/2022++++++# Review recommendations for Access reviews ++Decision makers who review users' access and perform access reviews can use system based recommendations to help them decide whether to continue their access or deny their access to resources. For more information about how to use review recommendations, see [Enable decision helpers](create-access-review.md#next-settings). ++## Prerequisites + +- Azure AD Premium P2 + +For more information, see [License requirements](access-reviews-overview.md#license-requirements). ++## Peer outlier recommendations +If review decision helpers are enabled by the creator of the access review, reviewers can receive peer outlier recommendations for reviews of group access reviews. ++Peer analysis recommendation detects users with outlier access to a group, based on reporting-structure similarity with other group members. The outlier recommendation relies on a scoring mechanism which is calculated by computing the userΓÇÖs average distance to the remaining users in the group. ++A *peer* in an organizationΓÇÖs chart is defined as two or more users who share similar characteristics in the organization's reporting structure. Users who are very distant from all the other group members based on their organization's chart, are considered a ΓÇ£peer outlierΓÇ¥ in a group. ++> [!NOTE] +> Currently, this feature is only available for uses in your directory. Use of the peer outlier recommendations is not supported for guest users. +++The following image has an example of an organization's reporting structure in a cosmetics company: ++ ++Based on the reporting structure in the example image, members outside of a division that is under a group review, would be denied access by the system if the peer outlier recommendation was taken by the reviewer. ++For example, Phil who works within the Personal care division is in a group with Debby, Irwin, and Emily who all work within the Cosmetics division. The group is called *Fresh Skin*. If an Access Review for the group Fresh Skin is performed, based on the reporting structure and distance away from the other group members, Phil would be considered an outlier. The system will create a **Deny** recommendation in the group access review. ++## Next Steps +- [Create an access review](create-access-review.md) +- [Review access to groups or applications](perform-access-review.md) + |
| active-directory | Tutorial Govern Monitor | https://github.com/MicrosoftDocs/azure-docs/commits/main/articles/active-directory/manage-apps/tutorial-govern-monitor.md | To create an access review: ### Start the access review -After you've specified the settings for an access review, select **Start**. The access review appears in your list with an indicator of its status. +The access review starts in a few minutes and it appears in your list with an indicator of its status. By default, Azure AD sends an email to reviewers shortly after the review starts. If you choose not to have Azure AD send the email, be sure to inform the reviewers that an access review is waiting for them to complete. You can show them the instructions for how to review access to groups or applications. If your review is for guests to review their own access, show them the instructions for how to review access for themselves to groups or applications. If you've assigned guests as reviewers and they haven't accepted their invitation to the tenant, they won't receive an email from access reviews. They must first accept the invitation before they can begin reviewing. +### View the status of an access review ++You can track the progress of access reviews as they are completed. + +1. Go to **Azure Active Directory**, and then select **Identity Governance**. +1. In the left menu, select **Access reviews**. +1. In the list, select the access review you created. +1. On the **Overview** page, check the progress of the access review. ++The **Results** page provides information on each user under review in the instance, including the ability to Stop, Reset, and Download results. To learn more, check out the [Complete an access review of groups and applications in Azure AD access reviews](../governance/complete-access-review.md) article. + ## Access the audit logs report The audit logs report combines several reports around application activities into a single view for context-based reporting. For more information, see [Audit logs in Azure Active Directory](../reports-monitoring/concept-audit-logs.md). After about 15 minutes, verify that events are streamed to your Log Analytics wo Advance to the next article to learn how to... > [!div class="nextstepaction"]-> [Manage consent to applications and evaluate consent requests](manage-consent-requests.md) +> [Manage consent to applications and evaluate consent requests](manage-consent-requests.md) |
| active-directory | Permissions Reference | https://github.com/MicrosoftDocs/azure-docs/commits/main/articles/active-directory/roles/permissions-reference.md | Users with this role can't change the credentials or reset MFA for members and o > | | | > | microsoft.directory/users/authenticationMethods/create | Create authentication methods for users | > | microsoft.directory/users/authenticationMethods/delete | Delete authentication methods for users |-> | microsoft.directory/users/authenticationMethods/standard/read | Read standard properties of authentication methods for users | +> | microsoft.directory/users/authenticationMethods/standard/restrictedRead | Read standard properties of authentication methods that do not include personally identifiable information for users | > | microsoft.directory/users/authenticationMethods/basic/update | Update basic properties of authentication methods for users |-> | microsoft.directory/deletedItems.users/restore | Restore soft deleted users to original state | -> | microsoft.directory/users/delete | Delete users | -> | microsoft.directory/users/disable | Disable users | -> | microsoft.directory/users/enable | Enable users | > | microsoft.directory/users/invalidateAllRefreshTokens | Force sign-out by invalidating user refresh tokens |-> | microsoft.directory/users/restore | Restore deleted users | -> | microsoft.directory/users/basic/update | Update basic properties on users | -> | microsoft.directory/users/manager/update | Update manager for users | > | microsoft.directory/users/password/update | Reset passwords for all users |-> | microsoft.directory/users/userPrincipalName/update | Update User Principal Name of users | > | microsoft.azure.serviceHealth/allEntities/allTasks | Read and configure Azure Service Health | > | microsoft.azure.supportTickets/allEntities/allTasks | Create and manage Azure support tickets | > | microsoft.office365.serviceHealth/allEntities/allTasks | Read and configure Service Health in the Microsoft 365 admin center | Users with this role have read access to recipients and write access to the attr > | Actions | Description | > | | | > | microsoft.office365.exchange/allRecipients/allProperties/allTasks | Create and delete all recipients, and read and update all properties of recipients in Exchange Online |-> | microsoft.office365.exchange/messageTracking/allProperties/allTasks | Manage all tasks in message tracking in Exchange Online | > | microsoft.office365.exchange/migration/allProperties/allTasks | Manage all tasks related to migration of recipients in Exchange Online | ## External ID User Flow Administrator Do not use. This role has been deprecated and will be removed from Azure AD in t > | microsoft.directory/contacts/delete | Delete contacts | > | microsoft.directory/contacts/basic/update | Update basic properties on contacts | > | microsoft.directory/deletedItems.groups/restore | Restore soft deleted groups to original state |+> | microsoft.directory/deletedItems.users/delete | Permanently delete users, which can no longer be restored | > | microsoft.directory/deletedItems.users/restore | Restore soft deleted users to original state | > | microsoft.directory/groups/create | Create Security groups and Microsoft 365 groups, excluding role-assignable groups | > | microsoft.directory/groups/delete | Delete Security groups and Microsoft 365 groups, excluding role-assignable groups | Do not use. This role has been deprecated and will be removed from Azure AD in t > | microsoft.directory/contacts/delete | Delete contacts | > | microsoft.directory/contacts/basic/update | Update basic properties on contacts | > | microsoft.directory/deletedItems.groups/restore | Restore soft deleted groups to original state |+> | microsoft.directory/deletedItems.users/delete | Permanently delete users, which can no longer be restored | > | microsoft.directory/deletedItems.users/restore | Restore soft deleted users to original state | > | microsoft.directory/domains/allProperties/allTasks | Create and delete domains, and read and update all properties | > | microsoft.directory/groups/create | Create Security groups and Microsoft 365 groups, excluding role-assignable groups | The [Authentication Administrator](#authentication-administrator) role has permi The [Authentication Policy Administrator](#authentication-policy-administrator) role has permissions to set the tenant's authentication method policy that determines which methods each user can register and use. | Role | Manage user's auth methods | Manage per-user MFA | Manage MFA settings | Manage auth method policy | Manage password protection policy | Update sensitive attributes |-| - | - | - | - | - | - | - | +| - | - | - | - | - | - | - | | Authentication Administrator | Yes for some users (see above) | Yes for some users (see above) | No | No | No | Yes for some users (see above) | | Privileged Authentication Administrator| Yes for all users | Yes for all users | No | No | No | Yes for all users | | Authentication Policy Administrator | No | No | Yes | Yes | Yes | No | The [Authentication Policy Administrator](#authentication-policy-administrator) > | microsoft.directory/users/authenticationMethods/delete | Delete authentication methods for users | > | microsoft.directory/users/authenticationMethods/standard/read | Read standard properties of authentication methods for users | > | microsoft.directory/users/authenticationMethods/basic/update | Update basic properties of authentication methods for users |-> | microsoft.directory/deletedItems.users/restore | Restore soft deleted users to original state | -> | microsoft.directory/users/delete | Delete users | -> | microsoft.directory/users/disable | Disable users | -> | microsoft.directory/users/enable | Enable users | > | microsoft.directory/users/invalidateAllRefreshTokens | Force sign-out by invalidating user refresh tokens |-> | microsoft.directory/users/restore | Restore deleted users | -> | microsoft.directory/users/basic/update | Update basic properties on users | -> | microsoft.directory/users/manager/update | Update manager for users | > | microsoft.directory/users/password/update | Reset passwords for all users |-> | microsoft.directory/users/userPrincipalName/update | Update User Principal Name of users | > | microsoft.azure.serviceHealth/allEntities/allTasks | Read and configure Azure Service Health | > | microsoft.azure.supportTickets/allEntities/allTasks | Create and manage Azure support tickets | > | microsoft.office365.serviceHealth/allEntities/allTasks | Read and configure Service Health in the Microsoft 365 admin center | Users with this role can't change the credentials or reset MFA for members and o > | microsoft.directory/accessReviews/definitions.groups/create | Create access reviews for membership in Security and Microsoft 365 groups. | > | microsoft.directory/accessReviews/definitions.groups/delete | Delete access reviews for membership in Security and Microsoft 365 groups. | > | microsoft.directory/accessReviews/definitions.groups/allProperties/read | Read all properties of access reviews for membership in Security and Microsoft 365 groups, including role-assignable groups. |-> | microsoft.directory/users/authenticationMethods/create | Create authentication methods for users | -> | microsoft.directory/users/authenticationMethods/delete | Delete authentication methods for users | -> | microsoft.directory/users/authenticationMethods/standard/read | Read standard properties of authentication methods for users | -> | microsoft.directory/users/authenticationMethods/basic/update | Update basic properties of authentication methods for users | > | microsoft.directory/contacts/create | Create contacts | > | microsoft.directory/contacts/delete | Delete contacts | > | microsoft.directory/contacts/basic/update | Update basic properties on contacts | > | microsoft.directory/deletedItems.groups/restore | Restore soft deleted groups to original state |-> | microsoft.directory/deletedItems.users/restore | Restore soft deleted users to original state | > | microsoft.directory/entitlementManagement/allProperties/allTasks | Create and delete resources, and read and update all properties in Azure AD entitlement management | > | microsoft.directory/groups/assignLicense | Assign product licenses to groups for group-based licensing | > | microsoft.directory/groups/create | Create Security groups and Microsoft 365 groups, excluding role-assignable groups | |
| active-directory | Amms Tutorial | https://github.com/MicrosoftDocs/azure-docs/commits/main/articles/active-directory/saas-apps/amms-tutorial.md | Title: 'Tutorial: Azure Active Directory integration with AMMS | Microsoft Docs' + Title: 'Tutorial: Azure AD SSO integration with AMMS' description: Learn how to configure single sign-on between Azure Active Directory and AMMS. -# Tutorial: Azure Active Directory integration with AMMS +# Tutorial: Azure AD SSO integration with AMMS -In this tutorial, you learn how to integrate AMMS with Azure Active Directory (Azure AD). -Integrating AMMS with Azure AD provides you with the following benefits: +In this tutorial, you'll learn how to integrate AMMS with Azure Active Directory (Azure AD). When you integrate AMMS with Azure AD, you can: -* You can control in Azure AD who has access to AMMS. -* You can enable your users to be automatically signed-in to AMMS (Single Sign-On) with their Azure AD accounts. -* You can manage your accounts in one central location - the Azure portal. --If you want to know more details about SaaS app integration with Azure AD, see [What is application access and single sign-on with Azure Active Directory](../manage-apps/what-is-single-sign-on.md). -If you don't have an Azure subscription, [create a free account](https://azure.microsoft.com/free/) before you begin. +* Control in Azure AD who has access to AMMS. +* Enable your users to be automatically signed-in to AMMS with their Azure AD accounts. +* Manage your accounts in one central location - the Azure portal. ## Prerequisites To configure Azure AD integration with AMMS, you need the following items: -* An Azure AD subscription. If you don't have an Azure AD environment, you can get a [free account](https://azure.microsoft.com/free/) -* AMMS single sign-on enabled subscription +* An Azure AD subscription. If you don't have an Azure AD environment, you can get a [free account](https://azure.microsoft.com/free/). +* AMMS single sign-on enabled subscription. +* Along with Cloud Application Administrator, Application Administrator can also add or manage applications in Azure AD. +For more information, see [Azure built-in roles](../roles/permissions-reference.md). ## Scenario description In this tutorial, you configure and test Azure AD single sign-on in a test environment. -* AMMS supports **SP** initiated SSO +* AMMS supports **SP** initiated SSO. -## Adding AMMS from the gallery +## Add AMMS from the gallery To configure the integration of AMMS into Azure AD, you need to add AMMS from the gallery to your list of managed SaaS apps. -**To add AMMS from the gallery, perform the following steps:** --1. In the **[Azure portal](https://portal.azure.com)**, on the left navigation panel, click **Azure Active Directory** icon. --  --2. Navigate to **Enterprise Applications** and then select the **All Applications** option. --  --3. To add new application, click **New application** button on the top of dialog. --  --4. In the search box, type **AMMS**, select **AMMS** from result panel then click **Add** button to add the application. --  --## Configure and test Azure AD single sign-on +1. Sign in to the Azure portal using either a work or school account, or a personal Microsoft account. +1. On the left navigation pane, select the **Azure Active Directory** service. +1. Navigate to **Enterprise Applications** and then select **All Applications**. +1. To add new application, select **New application**. +1. In the **Add from the gallery** section, type **AMMS** in the search box. +1. Select **AMMS** from results panel and then add the app. Wait a few seconds while the app is added to your tenant. -In this section, you configure and test Azure AD single sign-on with AMMS based on a test user called **Britta Simon**. -For single sign-on to work, a link relationship between an Azure AD user and the related user in AMMS needs to be established. +## Configure and test Azure AD SSO for AMMS -To configure and test Azure AD single sign-on with AMMS, you need to complete the following building blocks: +Configure and test Azure AD SSO with AMMS using a test user called **B.Simon**. For SSO to work, you need to establish a link relationship between an Azure AD user and the related user in AMMS. -1. **[Configure Azure AD Single Sign-On](#configure-azure-ad-single-sign-on)** - to enable your users to use this feature. -2. **[Configure AMMS Single Sign-On](#configure-amms-single-sign-on)** - to configure the Single Sign-On settings on application side. -3. **[Create an Azure AD test user](#create-an-azure-ad-test-user)** - to test Azure AD single sign-on with Britta Simon. -4. **[Assign the Azure AD test user](#assign-the-azure-ad-test-user)** - to enable Britta Simon to use Azure AD single sign-on. -5. **[Create AMMS test user](#create-amms-test-user)** - to have a counterpart of Britta Simon in AMMS that is linked to the Azure AD representation of user. -6. **[Test single sign-on](#test-single-sign-on)** - to verify whether the configuration works. +To configure and test Azure AD SSO with AMMS, perform the following steps: -### Configure Azure AD single sign-on +1. **[Configure Azure AD SSO](#configure-azure-ad-sso)** - to enable your users to use this feature. + 1. **[Create an Azure AD test user](#create-an-azure-ad-test-user)** - to test Azure AD single sign-on with B.Simon. + 1. **[Assign the Azure AD test user](#assign-the-azure-ad-test-user)** - to enable B.Simon to use Azure AD single sign-on. +1. **[Configure AMMS SSO](#configure-amms-sso)** - to configure the single sign-on settings on application side. + 1. **[Create AMMS test user](#create-amms-test-user)** - to have a counterpart of B.Simon in AMMS that is linked to the Azure AD representation of user. +1. **[Test SSO](#test-sso)** - to verify whether the configuration works. -In this section, you enable Azure AD single sign-on in the Azure portal. +## Configure Azure AD SSO -To configure Azure AD single sign-on with AMMS, perform the following steps: +Follow these steps to enable Azure AD SSO in the Azure portal. -1. In the [Azure portal](https://portal.azure.com/), on the **AMMS** application integration page, select **Single sign-on**. +1. In the Azure portal, on the **AMMS** application integration page, find the **Manage** section and select **single sign-on**. +1. On the **Select a single sign-on method** page, select **SAML**. +1. On the **Set up single sign-on with SAML** page, click the pencil icon for **Basic SAML Configuration** to edit the settings. -  +  -2. On the **Select a Single sign-on method** dialog, select **SAML/WS-Fed** mode to enable single sign-on. +1. On the **Basic SAML Configuration** section, perform the following steps: -  --3. On the **Set up Single Sign-On with SAML** page, click **Edit** icon to open **Basic SAML Configuration** dialog. --  --4. On the **Basic SAML Configuration** section, perform the following steps: --  + a. In the **Identifier (Entity ID)** text box, type a value using the following pattern: + `<SUBDOMAIN>.microwestcloud.com/amms` - a. In the **Sign on URL** text box, type a URL using the following pattern: + b. In the **Sign on URL** text box, type a URL using the following pattern: `https://<SUBDOMAIN>.microwestcloud.com/amms/pages/login.aspx` - b. In the **Identifier (Entity ID)** text box, type a URL using the following pattern: - `<SUBDOMAIN>.microwestcloud.com/amms` - > [!NOTE]- > These values are not real. Update these values with the actual Sign on URL and Identifier. Contact [AMMS Client support team](mailto:techsupport@microwestsoftware.com) to get these values. You can also refer to the patterns shown in the **Basic SAML Configuration** section in the Azure portal. + > These values are not real. Update these values with the actual Identifier and Sign on URL. Contact [AMMS Client support team](mailto:techsupport@microwestsoftware.com) to get these values. You can also refer to the patterns shown in the **Basic SAML Configuration** section in the Azure portal. 5. On the **Set up Single Sign-On with SAML** page, In the **SAML Signing Certificate** section, click copy button to copy **App Federation Metadata Url** and save it on your computer. -  --### Configure AMMS Single Sign-On --To configure single sign-on on **AMMS** side, you need to send the **App Federation Metadata Url** to [AMMS support team](mailto:techsupport@microwestsoftware.com). They set this setting to have the SAML SSO connection set properly on both sides. +  ### Create an Azure AD test user -The objective of this section is to create a test user in the Azure portal called Britta Simon. --1. In the Azure portal, in the left pane, select **Azure Active Directory**, select **Users**, and then select **All users**. --  --2. Select **New user** at the top of the screen. --  --3. In the User properties, perform the following steps. --  -- a. In the **Name** field enter **BrittaSimon**. - - b. In the **User name** field type `brittasimon@yourcompanydomain.extension`. For example, BrittaSimon@contoso.com -- c. Select **Show password** check box, and then write down the value that's displayed in the Password box. +In this section, you'll create a test user in the Azure portal called B.Simon. - d. Click **Create**. +1. From the left pane in the Azure portal, select **Azure Active Directory**, select **Users**, and then select **All users**. +1. Select **New user** at the top of the screen. +1. In the **User** properties, follow these steps: + 1. In the **Name** field, enter `B.Simon`. + 1. In the **User name** field, enter the username@companydomain.extension. For example, `B.Simon@contoso.com`. + 1. Select the **Show password** check box, and then write down the value that's displayed in the **Password** box. + 1. Click **Create**. ### Assign the Azure AD test user -In this section, you enable Britta Simon to use Azure single sign-on by granting access to AMMS. +In this section, you'll enable B.Simon to use Azure single sign-on by granting access to AMMS. -1. In the Azure portal, select **Enterprise Applications**, select **All applications**, then select **AMMS**. +1. In the Azure portal, select **Enterprise Applications**, and then select **All applications**. +1. In the applications list, select **AMMS**. +1. In the app's overview page, find the **Manage** section and select **Users and groups**. +1. Select **Add user**, then select **Users and groups** in the **Add Assignment** dialog. +1. In the **Users and groups** dialog, select **B.Simon** from the Users list, then click the **Select** button at the bottom of the screen. +1. If you're expecting any role value in the SAML assertion, in the **Select Role** dialog, select the appropriate role for the user from the list and then click the **Select** button at the bottom of the screen. +1. In the **Add Assignment** dialog, click the **Assign** button. -  +## Configure AMMS SSO -2. In the applications list, select **AMMS**. --  --3. In the menu on the left, select **Users and groups**. --  --4. Click the **Add user** button, then select **Users and groups** in the **Add Assignment** dialog. --  --5. In the **Users and groups** dialog select **Britta Simon** in the Users list, then click the **Select** button at the bottom of the screen. --6. If you are expecting any role value in the SAML assertion then in the **Select Role** dialog select the appropriate role for the user from the list, then click the **Select** button at the bottom of the screen. --7. In the **Add Assignment** dialog click the **Assign** button. +To configure single sign-on on **AMMS** side, you need to send the **App Federation Metadata Url** to [AMMS support team](mailto:techsupport@microwestsoftware.com). They set this setting to have the SAML SSO connection set properly on both sides. ### Create AMMS test user In this section, you create a user called Britta Simon in AMMS. Work with [AMMS support team](mailto:techsupport@microwestsoftware.com) to add the users in the AMMS platform. Users must be created and activated before you use single sign-on. -### Test single sign-on +## Test SSO -In this section, you test your Azure AD single sign-on configuration using the Access Panel. +In this section, you test your Azure AD single sign-on configuration with following options. -When you click the AMMS tile in the Access Panel, you should be automatically signed in to the AMMS for which you set up SSO. For more information about the Access Panel, see [Introduction to the Access Panel](https://support.microsoft.com/account-billing/sign-in-and-start-apps-from-the-my-apps-portal-2f3b1bae-0e5a-4a86-a33e-876fbd2a4510). +* Click on **Test this application** in Azure portal. This will redirect to AMMS Sign-on URL where you can initiate the login flow. -## Additional Resources +* Go to AMMS Sign-on URL directly and initiate the login flow from there. -- [List of Tutorials on How to Integrate SaaS Apps with Azure Active Directory](./tutorial-list.md)+* You can use Microsoft My Apps. When you click the AMMS tile in the My Apps, this will redirect to AMMS Sign-on URL. For more information about the My Apps, see [Introduction to the My Apps](../user-help/my-apps-portal-end-user-access.md). -- [What is application access and single sign-on with Azure Active Directory?](../manage-apps/what-is-single-sign-on.md)+## Next steps -- [What is Conditional Access in Azure Active Directory?](../conditional-access/overview.md)+Once you configure AMMS you can enforce session control, which protects exfiltration and infiltration of your organization’s sensitive data in real time. Session control extends from Conditional Access. [Learn how to enforce session control with Microsoft Cloud App Security](/cloud-app-security/proxy-deployment-aad). |
| active-directory | Change Process Management Tutorial | https://github.com/MicrosoftDocs/azure-docs/commits/main/articles/active-directory/saas-apps/change-process-management-tutorial.md | -# Tutorial: Azure Active Directory single sign-on (SSO) integration with Change Process Management +# Tutorial: Azure AD SSO integration with Change Process Management In this tutorial, you'll learn how to integrate Change Process Management with Azure Active Directory (Azure AD). When you integrate Change Process Management with Azure AD, you can: In this tutorial, you'll learn how to integrate Change Process Management with A * Enable your users to be automatically signed in to Change Process Management with their Azure AD accounts. * Manage your accounts in one central location: the Azure portal. -To learn more about SaaS app integration with Azure AD, see [Single sign-on to applications in Azure Active Directory](../manage-apps/what-is-single-sign-on.md). - ## Prerequisites To get started, you need the following items: * An Azure AD subscription. If you don't have a subscription, you can get a [free account](https://azure.microsoft.com/free/). * A Change Process Management subscription with single sign-on (SSO) enabled.+* Along with Cloud Application Administrator, Application Administrator can also add or manage applications in Azure AD. +For more information, see [Azure built-in roles](../roles/permissions-reference.md). -## Tutorial description +## Scenario description In this tutorial, you'll configure and test Azure AD SSO in a test environment. Change Process Management supports IDP-initiated SSO. -After you configure Change Process Management, you can enforce session control, which protects exfiltration and infiltration of your organization's sensitive data in real time. Session controls extend from Conditional Access. [Learn how to enforce session control with Microsoft Defender for Cloud Apps](/cloud-app-security/proxy-deployment-any-app). - ## Add Change Process Management from the gallery To configure the integration of Change Process Management into Azure AD, you need to add Change Process Management from the gallery to your list of managed SaaS apps. -1. Sign in to the [Azure portal](https://portal.azure.com) with a work or school account or with a personal Microsoft account. +1. Sign in to the Azure portal with a work or school account or with a personal Microsoft account. 1. In the left pane, select **Azure Active Directory**. 1. Go to **Enterprise applications** and then select **All Applications**. 1. To add an application, select **New application**. To configure and test Azure AD SSO with Change Process Management, you'll take t Follow these steps to enable Azure AD SSO in the Azure portal. -1. In the [Azure portal](https://portal.azure.com/), on the **Change Process Management** application integration page, in the **Manage** section, select **single sign-on**. +1. In the Azure portal, on the **Change Process Management** application integration page, in the **Manage** section, select **single sign-on**. 1. On the **Select a single sign-on method** page, select **SAML**. 1. On the **Set up Single Sign-On with SAML** page, select the pencil button for **Basic SAML Configuration** to edit the settings: -  +  -1. On the **Set up Single Sign-On with SAML** page, take these steps: +1. On the **Basic SAML Configuration** section, perform the following steps: - a. In the **Identifier** box, enter a URL in the following pattern: + a. In the **Identifier** box, type a URL using the following pattern: `https://<hostname>:8443/` - b. In the **Reply URL** box, enter a URL in the following pattern: + b. In the **Reply URL** box, type a URL using the following pattern: `https://<hostname>:8443/changepilot/saml/sso` > [!NOTE] Follow these steps to enable Azure AD SSO in the Azure portal. 1. On the **Set up Single Sign-On with SAML** page, in the **SAML Signing Certificate** section, select the **Download** link for **Certificate (Base64)** to download the certificate and save it on your computer: -  +  1. In the **Set up Change Process Management** section, copy the appropriate URL or URLs, based on your requirements: -  +  ### Create an Azure AD test user In this section, you'll enable B.Simon to use Azure single sign-on by granting t 1. In the Azure portal, select **Enterprise applications**, and then select **All applications**. 1. In the applications list, select **Change Process Management**. 1. In the app's overview page, in the **Manage** section, select **Users and groups**:--  - 1. Select **Add user**, and then select **Users and groups** in the **Add Assignment** dialog box.--  - 1. In the **Users and groups** dialog box, select **B.Simon** in the **Users** list, and then click the **Select** button at the bottom of the screen. 1. If you're expecting any role value in the SAML assertion, in the **Select Role** dialog box, select the appropriate role for the user from the list and then click the **Select** button at the bottom of the screen. 1. In the **Add Assignment** dialog box, select **Assign**. In this section, you'll enable B.Simon to use Azure single sign-on by granting t To configure single sign-on on the Change Process Management side, you need to send the downloaded Base64 certificate and the appropriate URLs that you copied from the Azure portal to the [Change Process Management support team](mailto:support@realtech-us.com). They configure the SAML SSO connection to be correct on both sides. ### Create a Change Process Management test user- Work with the [Change Process Management support team](mailto:support@realtech-us.com) to add a user named B.Simon in Change Process Management. Users must be created and activated before you use single sign-on. -## Test SSO --In this section, you'll test your Azure AD SSO configuration by using Access Panel. --When you select the Change Process Management tile in Access Panel, you should be automatically signed in to the Change Process Management instance for which you set up SSO. For more information about Access Panel, see [Introduction to Access Panel](https://support.microsoft.com/account-billing/sign-in-and-start-apps-from-the-my-apps-portal-2f3b1bae-0e5a-4a86-a33e-876fbd2a4510). +Work with the [Change Process Management support team](mailto:support@realtech-us.com) to add a user named B.Simon in Change Process Management. Users must be created and activated before you use single sign-on. -## Additional resources --- [Tutorials on how to integrate SaaS apps with Azure Active Directory](./tutorial-list.md)+## Test SSO -- [What is application access and single sign-on with Azure Active Directory?](../manage-apps/what-is-single-sign-on.md)+In this section, you test your Azure AD single sign-on configuration with following options. -- [What is Conditional Access in Azure Active Directory?](../conditional-access/overview.md)+* Click on Test this application in Azure portal and you should be automatically signed in to the Change Process Management for which you set up the SSO. -- [Try Change Process Management with Azure AD](https://aad.portal.azure.com/)+* You can use Microsoft My Apps. When you click the Change Process Management tile in the My Apps, you should be automatically signed in to the Change Process Management for which you set up the SSO. For more information about the My Apps, see [Introduction to the My Apps](../user-help/my-apps-portal-end-user-access.md). -- [What is session control in Microsoft Defender for Cloud Apps?](/cloud-app-security/proxy-intro-aad)+## Next steps -- [How to protect Change Process Management with advanced visibility and controls](/cloud-app-security/proxy-intro-aad)+Once you configure Change Process Management you can enforce session control, which protects exfiltration and infiltration of your organization’s sensitive data in real time. Session control extends from Conditional Access. [Learn how to enforce session control with Microsoft Cloud App Security](/cloud-app-security/proxy-deployment-aad). |
| active-directory | Halosys Tutorial | https://github.com/MicrosoftDocs/azure-docs/commits/main/articles/active-directory/saas-apps/halosys-tutorial.md | Title: 'Tutorial: Azure Active Directory integration with Halosys | Microsoft Docs' + Title: 'Tutorial: Azure AD SSO integration with Halosys' description: Learn how to configure single sign-on between Azure Active Directory and Halosys. -# Tutorial: Azure Active Directory integration with Halosys +# Tutorial: Azure AD SSO integration with Halosys -In this tutorial, you learn how to integrate Halosys with Azure Active Directory (Azure AD). -Integrating Halosys with Azure AD provides you with the following benefits: +In this tutorial, you'll learn how to integrate Halosys with Azure Active Directory (Azure AD). When you integrate Halosys with Azure AD, you can: -* You can control in Azure AD who has access to Halosys. -* You can enable your users to be automatically signed-in to Halosys (Single Sign-On) with their Azure AD accounts. -* You can manage your accounts in one central location - the Azure portal. --If you want to know more details about SaaS app integration with Azure AD, see [What is application access and single sign-on with Azure Active Directory](../manage-apps/what-is-single-sign-on.md). -If you don't have an Azure subscription, [create a free account](https://azure.microsoft.com/free/) before you begin. +* Control in Azure AD who has access to Halosys. +* Enable your users to be automatically signed-in to Halosys with their Azure AD accounts. +* Manage your accounts in one central location - the Azure portal. ## Prerequisites -To configure Azure AD integration with Halosys, you need the following items: +To get started, you need the following items: -* An Azure AD subscription. If you don't have an Azure AD environment, you can get one-month trial [here](https://azure.microsoft.com/pricing/free-trial/) -* Halosys single sign-on enabled subscription +* An Azure AD subscription. If you don't have a subscription, you can get a [free account](https://azure.microsoft.com/free/). +* Halosys single sign-on (SSO) enabled subscription. +* Along with Cloud Application Administrator, Application Administrator can also add or manage applications in Azure AD. +For more information, see [Azure built-in roles](../roles/permissions-reference.md). ## Scenario description In this tutorial, you configure and test Azure AD single sign-on in a test environment. -* Halosys supports **IDP** initiated SSO +* Halosys supports **IDP** initiated SSO. -## Adding Halosys from the gallery +## Add Halosys from the gallery To configure the integration of Halosys into Azure AD, you need to add Halosys from the gallery to your list of managed SaaS apps. -**To add Halosys from the gallery, perform the following steps:** --1. In the **[Azure portal](https://portal.azure.com)**, on the left navigation panel, click **Azure Active Directory** icon. --  --2. Navigate to **Enterprise Applications** and then select the **All Applications** option. --  --3. To add new application, click **New application** button on the top of dialog. --  --4. In the search box, type **Halosys**, select **Halosys** from result panel then click **Add** button to add the application. --  --## Configure and test Azure AD single sign-on +1. Sign in to the Azure portal using either a work or school account, or a personal Microsoft account. +1. On the left navigation pane, select the **Azure Active Directory** service. +1. Navigate to **Enterprise Applications** and then select **All Applications**. +1. To add new application, select **New application**. +1. In the **Add from the gallery** section, type **Halosys** in the search box. +1. Select **Halosys** from results panel and then add the app. Wait a few seconds while the app is added to your tenant. -In this section, you configure and test Azure AD single sign-on with Halosys based on a test user called **Britta Simon**. -For single sign-on to work, a link relationship between an Azure AD user and the related user in Halosys needs to be established. +## Configure and test Azure AD SSO for Halosys -To configure and test Azure AD single sign-on with Halosys, you need to complete the following building blocks: +Configure and test Azure AD SSO with Halosys using a test user called **B.Simon**. For SSO to work, you need to establish a link relationship between an Azure AD user and the related user in Halosys. -1. **[Configure Azure AD Single Sign-On](#configure-azure-ad-single-sign-on)** - to enable your users to use this feature. -2. **[Configure Halosys Single Sign-On](#configure-halosys-single-sign-on)** - to configure the Single Sign-On settings on application side. -3. **[Create an Azure AD test user](#create-an-azure-ad-test-user)** - to test Azure AD single sign-on with Britta Simon. -4. **[Assign the Azure AD test user](#assign-the-azure-ad-test-user)** - to enable Britta Simon to use Azure AD single sign-on. -5. **[Create Halosys test user](#create-halosys-test-user)** - to have a counterpart of Britta Simon in Halosys that is linked to the Azure AD representation of user. -6. **[Test single sign-on](#test-single-sign-on)** - to verify whether the configuration works. +To configure and test Azure AD SSO with Halosys, perform the following steps: -### Configure Azure AD single sign-on +1. **[Configure Azure AD SSO](#configure-azure-ad-sso)** - to enable your users to use this feature. + 1. **[Create an Azure AD test user](#create-an-azure-ad-test-user)** - to test Azure AD single sign-on with B.Simon. + 1. **[Assign the Azure AD test user](#assign-the-azure-ad-test-user)** - to enable B.Simon to use Azure AD single sign-on. +1. **[Configure Halosys SSO](#configure-halosys-sso)** - to configure the single sign-on settings on application side. + 1. **[Create Halosys test user](#create-halosys-test-user)** - to have a counterpart of B.Simon in Halosys that is linked to the Azure AD representation of user. +1. **[Test SSO](#test-sso)** - to verify whether the configuration works. -In this section, you enable Azure AD single sign-on in the Azure portal. +## Configure Azure AD SSO -To configure Azure AD single sign-on with Halosys, perform the following steps: +Follow these steps to enable Azure AD SSO in the Azure portal. -1. In the [Azure portal](https://portal.azure.com/), on the **Halosys** application integration page, select **Single sign-on**. +1. In the Azure portal, on the **Halosys** application integration page, find the **Manage** section and select **single sign-on**. +1. On the **Select a single sign-on method** page, select **SAML**. +1. On the **Set up single sign-on with SAML** page, click the pencil icon for **Basic SAML Configuration** to edit the settings. -  +  -2. On the **Select a Single sign-on method** dialog, select **SAML/WS-Fed** mode to enable single sign-on. --  --3. On the **Set up Single Sign-On with SAML** page, click **Edit** icon to open **Basic SAML Configuration** dialog. --  --4. On the **Set up Single Sign-On with SAML** page, perform the following steps: --  +1. On the **Basic SAML Configuration** section, perform the following steps: a. In the **Identifier** text box, type a URL using the following pattern: `https://<company-name>.halosys.com` To configure Azure AD single sign-on with Halosys, perform the following steps: > [!NOTE] > These values are not real. Update these values with the actual Identifier and Reply URL. Contact [Halosys Client support team](https://www.sonata-software.com/form/contact) to get these values. You can also refer to the patterns shown in the **Basic SAML Configuration** section in the Azure portal. -5. On the **Set up Single Sign-On with SAML** page, in the **SAML Signing Certificate** section, click **Download** to download the **Federation Metadata XML** from the given options as per your requirement and save it on your computer. +1. On the **Set up Single Sign-On with SAML** page, in the **SAML Signing Certificate** section, click **Download** to download the **Federation Metadata XML** from the given options as per your requirement and save it on your computer. -  +  -6. On the **Set up Halosys** section, copy the appropriate URL(s) as per your requirement. +1. On the **Set up Halosys** section, copy the appropriate URL(s) as per your requirement. -  -- a. Login URL -- b. Azure Ad Identifier -- c. Logout URL --### Configure Halosys Single Sign-On --To configure single sign-on on **Halosys** side, you need to send the downloaded **Federation Metadata XML** and appropriate copied URLs from Azure portal to [Halosys support team](https://www.sonata-software.com/form/contact). They set this setting to have the SAML SSO connection set properly on both sides. +  ### Create an Azure AD test user -The objective of this section is to create a test user in the Azure portal called Britta Simon. --1. In the Azure portal, in the left pane, select **Azure Active Directory**, select **Users**, and then select **All users**. --  --2. Select **New user** at the top of the screen. --  +In this section, you'll create a test user in the Azure portal called B.Simon. -3. In the User properties, perform the following steps. --  -- a. In the **Name** field enter **BrittaSimon**. - - b. In the **User name** field type **brittasimon\@yourcompanydomain.extension** - For example, BrittaSimon@contoso.com -- c. Select **Show password** check box, and then write down the value that's displayed in the Password box. -- d. Click **Create**. +1. From the left pane in the Azure portal, select **Azure Active Directory**, select **Users**, and then select **All users**. +1. Select **New user** at the top of the screen. +1. In the **User** properties, follow these steps: + 1. In the **Name** field, enter `B.Simon`. + 1. In the **User name** field, enter the username@companydomain.extension. For example, `B.Simon@contoso.com`. + 1. Select the **Show password** check box, and then write down the value that's displayed in the **Password** box. + 1. Click **Create**. ### Assign the Azure AD test user -In this section, you enable Britta Simon to use Azure single sign-on by granting access to Halosys. --1. In the Azure portal, select **Enterprise Applications**, select **All applications**, then select **Halosys**. +In this section, you'll enable B.Simon to use Azure single sign-on by granting access to Halosys. -  +1. In the Azure portal, select **Enterprise Applications**, and then select **All applications**. +1. In the applications list, select **Halosys**. +1. In the app's overview page, find the **Manage** section and select **Users and groups**. +1. Select **Add user**, then select **Users and groups** in the **Add Assignment** dialog. +1. In the **Users and groups** dialog, select **B.Simon** from the Users list, then click the **Select** button at the bottom of the screen. +1. If you're expecting any role value in the SAML assertion, in the **Select Role** dialog, select the appropriate role for the user from the list and then click the **Select** button at the bottom of the screen. +1. In the **Add Assignment** dialog, click the **Assign** button. -2. In the applications list, select **Halosys**. +## Configure Halosys SSO -  --3. In the menu on the left, select **Users and groups**. --  --4. Click the **Add user** button, then select **Users and groups** in the **Add Assignment** dialog. --  --5. In the **Users and groups** dialog select **Britta Simon** in the Users list, then click the **Select** button at the bottom of the screen. --6. If you are expecting any role value in the SAML assertion then in the **Select Role** dialog select the appropriate role for the user from the list, then click the **Select** button at the bottom of the screen. --7. In the **Add Assignment** dialog click the **Assign** button. +To configure single sign-on on **Halosys** side, you need to send the downloaded **Federation Metadata XML** and appropriate copied URLs from Azure portal to [Halosys support team](https://www.sonata-software.com/form/contact). They set this setting to have the SAML SSO connection set properly on both sides. ### Create Halosys test user In this section, you create a user called Britta Simon in Halosys. Work with [Halosys support team](https://www.sonata-software.com/form/contact) to add the users in the Halosys platform. Users must be created and activated before you use single sign-on. -### Test single sign-on --In this section, you test your Azure AD single sign-on configuration using the Access Panel. +## Test SSO -When you click the Halosys tile in the Access Panel, you should be automatically signed in to the Halosys for which you set up SSO. For more information about the Access Panel, see [Introduction to the Access Panel](https://support.microsoft.com/account-billing/sign-in-and-start-apps-from-the-my-apps-portal-2f3b1bae-0e5a-4a86-a33e-876fbd2a4510). +In this section, you test your Azure AD single sign-on configuration with following options. -## Additional Resources +* Click on Test this application in Azure portal and you should be automatically signed in to the Halosys for which you set up the SSO. -- [List of Tutorials on How to Integrate SaaS Apps with Azure Active Directory](./tutorial-list.md)+* You can use Microsoft My Apps. When you click the Halosys tile in the My Apps, you should be automatically signed in to the Halosys for which you set up the SSO. For more information about the My Apps, see [Introduction to the My Apps](../user-help/my-apps-portal-end-user-access.md). -- [What is application access and single sign-on with Azure Active Directory?](../manage-apps/what-is-single-sign-on.md)+## Next steps -- [What is Conditional Access in Azure Active Directory?](../conditional-access/overview.md)+Once you configure Halosys you can enforce session control, which protects exfiltration and infiltration of your organization’s sensitive data in real time. Session control extends from Conditional Access. [Learn how to enforce session control with Microsoft Cloud App Security](/cloud-app-security/proxy-deployment-aad). |
| active-directory | Sap Hana Cloud Platform Identity Authentication Tutorial | https://github.com/MicrosoftDocs/azure-docs/commits/main/articles/active-directory/saas-apps/sap-hana-cloud-platform-identity-authentication-tutorial.md | Follow these steps to enable Azure AD SSO in the Azure portal. `https://<IAS-tenant-id>.accounts.ondemand.com/saml2/idp/acs/<IAS-tenant-id>.accounts.ondemand.com` > [!NOTE]- > These values are not real. Update these values with the actual Identifier and Reply URL. Contact the [SAP Cloud Identity Services Client support team](https://cloudplatform.sap.com/capabilities/security/trustcenter.html) to get these values. If you don't understand Identifier value, read the SAP Cloud Identity Services documentation about [Tenant SAML 2.0 configuration](https://help.hana.ondemand.com/cloud_identity/frameset.htm?e81a19b0067f4646982d7200a8dab3ca.html). + > These values are not real. Update these values with the actual Identifier and Reply URL. Contact the [SAP Cloud Identity Services Client support team](https://cloudplatform.sap.com/capabilities/security/trustcenter.html) to get these values. If you don't understand Identifier value, read the SAP Cloud Identity Services documentation about [Tenant SAML 2.0 configuration](https://help.sap.com/docs/IDENTITY_AUTHENTICATION/6d6d63354d1242d185ab4830fc04feb1/e81a19b0067f4646982d7200a8dab3ca.html). + 5. Click **Set additional URLs** and perform the following step if you wish to configure the application in **SP**-initiated mode: |
| active-directory | Tableau Online Provisioning Tutorial | https://github.com/MicrosoftDocs/azure-docs/commits/main/articles/active-directory/saas-apps/tableau-online-provisioning-tutorial.md | This operation starts the initial synchronization cycle of all users and groups In June 2022, Tableau released a SCIM 2.0 connector. Completing the steps below will update applications configured to use the Tableau API endpoint to the use the SCIM 2.0 endpoint. These steps will remove any customizations previously made to the Tableau Cloud application, including: -* Authentication details +* Authentication details (credentials used for provisioning, NOT the credentials used for SSO) * Scoping filters * Custom attribute mappings >[!Note] |
| active-directory | Yuhu Property Management Platform Tutorial | https://github.com/MicrosoftDocs/azure-docs/commits/main/articles/active-directory/saas-apps/yuhu-property-management-platform-tutorial.md | Title: 'Tutorial: Azure Active Directory single sign-on (SSO) integration with Yuhu Property Management Platform | Microsoft Docs' + Title: 'Tutorial: Azure AD SSO integration with Yuhu Property Management Platform' description: Learn how to configure single sign-on between Azure Active Directory and Yuhu Property Management Platform. -# Tutorial: Azure Active Directory single sign-on (SSO) integration with Yuhu Property Management Platform +# Tutorial: Azure AD SSO integration with Yuhu Property Management Platform In this tutorial, you'll learn how to integrate Yuhu Property Management Platform with Azure Active Directory (Azure AD). When you integrate Yuhu Property Management Platform with Azure AD, you can: In this tutorial, you'll learn how to integrate Yuhu Property Management Platfor * Enable your users to be automatically signed-in to Yuhu Property Management Platform with their Azure AD accounts. * Manage your accounts in one central location - the Azure portal. -To learn more about SaaS app integration with Azure AD, see [What is application access and single sign-on with Azure Active Directory](../manage-apps/what-is-single-sign-on.md). - ## Prerequisites To get started, you need the following items: * An Azure AD subscription. If you don't have a subscription, you can get a [free account](https://azure.microsoft.com/free/). * Yuhu Property Management Platform single sign-on (SSO) enabled subscription.+* Along with Cloud Application Administrator, Application Administrator can also add or manage applications in Azure AD. +For more information, see [Azure built-in roles](../roles/permissions-reference.md). ## Scenario description In this tutorial, you configure and test Azure AD SSO in a test environment. -* Yuhu Property Management Platform supports **SP** initiated SSO +* Yuhu Property Management Platform supports **SP** initiated SSO. -## Adding Yuhu Property Management Platform from the gallery +## Add Yuhu Property Management Platform from the gallery To configure the integration of Yuhu Property Management Platform into Azure AD, you need to add Yuhu Property Management Platform from the gallery to your list of managed SaaS apps. -1. Sign in to the [Azure portal](https://portal.azure.com) using either a work or school account, or a personal Microsoft account. +1. Sign in to the Azure portal using either a work or school account, or a personal Microsoft account. 1. On the left navigation pane, select the **Azure Active Directory** service. 1. Navigate to **Enterprise Applications** and then select **All Applications**. 1. To add new application, select **New application**. 1. In the **Add from the gallery** section, type **Yuhu Property Management Platform** in the search box. 1. Select **Yuhu Property Management Platform** from results panel and then add the app. Wait a few seconds while the app is added to your tenant. -## Configure and test Azure AD single sign-on for Yuhu Property Management Platform +## Configure and test Azure AD SSO for Yuhu Property Management Platform Configure and test Azure AD SSO with Yuhu Property Management Platform using a test user called **B.Simon**. For SSO to work, you need to establish a link relationship between an Azure AD user and the related user in Yuhu Property Management Platform. -To configure and test Azure AD SSO with Yuhu Property Management Platform, complete the following building blocks: +To configure and test Azure AD SSO with Yuhu Property Management Platform, perform the following steps: 1. **[Configure Azure AD SSO](#configure-azure-ad-sso)** - to enable your users to use this feature.- * **[Create an Azure AD test user](#create-an-azure-ad-test-user)** - to test Azure AD single sign-on with B.Simon. - * **[Assign the Azure AD test user](#assign-the-azure-ad-test-user)** - to enable B.Simon to use Azure AD single sign-on. + 1. **[Create an Azure AD test user](#create-an-azure-ad-test-user)** - to test Azure AD single sign-on with B.Simon. + 1. **[Assign the Azure AD test user](#assign-the-azure-ad-test-user)** - to enable B.Simon to use Azure AD single sign-on. 1. **[Configure Yuhu Property Management Platform SSO](#configure-yuhu-property-management-platform-sso)** - to configure the single sign-on settings on application side.- * **[Create Yuhu Property Management Platform test user](#create-yuhu-property-management-platform-test-user)** - to have a counterpart of B.Simon in Yuhu Property Management Platform that is linked to the Azure AD representation of user. + 1. **[Create Yuhu Property Management Platform test user](#create-yuhu-property-management-platform-test-user)** - to have a counterpart of B.Simon in Yuhu Property Management Platform that is linked to the Azure AD representation of user. 1. **[Test SSO](#test-sso)** - to verify whether the configuration works. ## Configure Azure AD SSO Follow these steps to enable Azure AD SSO in the Azure portal. -1. In the [Azure portal](https://portal.azure.com/), on the **Yuhu Property Management Platform** application integration page, find the **Manage** section and select **single sign-on**. +1. In the Azure portal, on the **Yuhu Property Management Platform** application integration page, find the **Manage** section and select **single sign-on**. 1. On the **Select a single sign-on method** page, select **SAML**.-1. On the **Set up single sign-on with SAML** page, click the edit/pen icon for **Basic SAML Configuration** to edit the settings. --  +1. On the **Set up single sign-on with SAML** page, click the pencil icon for **Basic SAML Configuration** to edit the settings. -1. On the **Basic SAML Configuration** section, enter the values for the following fields: +  - a. In the **Sign on URL** text box, type a URL using the following pattern: - `https://<SUBDOMAIN>.yuhu.io/companies` +1. On the **Basic SAML Configuration** section, perform the following steps: - b. In the **Identifier (Entity ID)** text box, type a URL using the following pattern: + a. In the **Identifier (Entity ID)** text box, type a value using the following pattern: `yuhu-<ID>` + b. In the **Sign on URL** text box, type a URL using the following pattern: + `https://<SUBDOMAIN>.yuhu.io/companies` + > [!NOTE]- > These values are not real. Update these values with the actual Sign on URL and Identifier. Contact [Yuhu Property Management Platform Client support team](mailto:hello@yuhu.io) to get these values. You can also refer to the patterns shown in the **Basic SAML Configuration** section in the Azure portal. + > These values are not real. Update these values with the actual Identifier and Sign on URL. Contact [Yuhu Property Management Platform Client support team](mailto:hello@yuhu.io) to get these values. You can also refer to the patterns shown in the **Basic SAML Configuration** section in the Azure portal. 1. Yuhu Property Management Platform application expects the SAML assertions in a specific format, which requires you to add custom attribute mappings to your SAML token attributes configuration. The following screenshot shows the list of default attributes. -  +  1. In addition to above, Yuhu Property Management Platform application expects few more attributes to be passed back in SAML response which are shown below. These attributes are also pre populated but you can review them as per your requirements. Follow these steps to enable Azure AD SSO in the Azure portal. 1. On the **Set up single sign-on with SAML** page, in the **SAML Signing Certificate** section, find **Certificate (Raw)** and select **Download** to download the certificate and save it on your computer. -  +  1. On the **Set up Yuhu Property Management Platform** section, copy the appropriate URL(s) based on your requirement. -  +  ### Create an Azure AD test user In this section, you'll enable B.Simon to use Azure single sign-on by granting a 1. In the Azure portal, select **Enterprise Applications**, and then select **All applications**. 1. In the applications list, select **Yuhu Property Management Platform**. 1. In the app's overview page, find the **Manage** section and select **Users and groups**.--  - 1. Select **Add user**, then select **Users and groups** in the **Add Assignment** dialog.--  - 1. In the **Users and groups** dialog, select **B.Simon** from the Users list, then click the **Select** button at the bottom of the screen. 1. If you're expecting any role value in the SAML assertion, in the **Select Role** dialog, select the appropriate role for the user from the list and then click the **Select** button at the bottom of the screen. 1. In the **Add Assignment** dialog, click the **Assign** button. In this section, you create a user called B.Simon in Yuhu Property Management Pl ## Test SSO -In this section, you test your Azure AD single sign-on configuration using the Access Panel. --When you click the Yuhu Property Management Platform tile in the Access Panel, you should be automatically signed in to the Yuhu Property Management Platform for which you set up SSO. For more information about the Access Panel, see [Introduction to the Access Panel](https://support.microsoft.com/account-billing/sign-in-and-start-apps-from-the-my-apps-portal-2f3b1bae-0e5a-4a86-a33e-876fbd2a4510). +In this section, you test your Azure AD single sign-on configuration with following options. -## Additional resources +* Click on **Test this application** in Azure portal. This will redirect to Yuhu Property Management Platform Sign-on URL where you can initiate the login flow. -- [ List of Tutorials on How to Integrate SaaS Apps with Azure Active Directory ](./tutorial-list.md)+* Go to Yuhu Property Management Platform Sign-on URL directly and initiate the login flow from there. -- [What is application access and single sign-on with Azure Active Directory? ](../manage-apps/what-is-single-sign-on.md)+* You can use Microsoft My Apps. When you click the Yuhu Property Management Platform tile in the My Apps, this will redirect to Yuhu Property Management Platform Sign-on URL. For more information about the My Apps, see [Introduction to the My Apps](../user-help/my-apps-portal-end-user-access.md). -- [What is conditional access in Azure Active Directory?](../conditional-access/overview.md)+## Next steps -- [Try Yuhu Property Management Platform with Azure AD](https://aad.portal.azure.com/)+Once you configure Yuhu Property Management Platform you can enforce session control, which protects exfiltration and infiltration of your organizationΓÇÖs sensitive data in real time. Session control extends from Conditional Access. [Learn how to enforce session control with Microsoft Cloud App Security](/cloud-app-security/proxy-deployment-aad). |
| aks | Cluster Configuration | https://github.com/MicrosoftDocs/azure-docs/commits/main/articles/aks/cluster-configuration.md | AKS supports Ubuntu 18.04 as the default node operating system (OS) in general a ## Container runtime configuration -A container runtime is software that executes containers and manages container images on a node. The runtime helps abstract away sys-calls or operating system (OS) specific functionality to run containers on Linux or Windows. For Linux node pools, `containerd` is used for node pools using Kubernetes version 1.19 and greater. For Windows Server 2019 node pools, `containerd` is generally available and can be used in node pools using Kubernetes 1.20 and greater, but Docker is still used by default. +A container runtime is software that executes containers and manages container images on a node. The runtime helps abstract away sys-calls or operating system (OS) specific functionality to run containers on Linux or Windows. For Linux node pools, `containerd` is used for node pools using Kubernetes version 1.19 and greater. For Windows Server 2019 node pools, `containerd` is generally available and is used by default in Kubernetes 1.23 and greater. Docker is no longer supported as of September 2022. For more information about this deprecation, see the [AKS release notes][aks-release-notes]. [`Containerd`](https://containerd.io/) is an [OCI](https://opencontainers.org/) (Open Container Initiative) compliant core container runtime that provides the minimum set of required functionality to execute containers and manage images on a node. It was [donated](https://www.cncf.io/announcement/2017/03/29/containerd-joins-cloud-native-computing-foundation/) to the Cloud Native Compute Foundation (CNCF) in March of 2017. The current Moby (upstream Docker) version that AKS uses already leverages and is built on top of `containerd`, as shown above. By using `containerd` for AKS nodes, pod startup latency improves and node resou `Containerd` works on every GA version of Kubernetes in AKS, and in every upstream kubernetes version above v1.19, and supports all Kubernetes and AKS features. > [!IMPORTANT]-> Clusters with Linux node pools created on Kubernetes v1.19 or greater default to `containerd` for its container runtime. Clusters with node pools on a earlier supported Kubernetes versions receive Docker for their container runtime. Linux node pools will be updated to `containerd` once the node pool Kubernetes version is updated to a version that supports `containerd`. You can still use Docker node pools and clusters on older supported versions until those fall off support. +> Clusters with Linux node pools created on Kubernetes v1.19 or greater default to `containerd` for its container runtime. Clusters with node pools on a earlier supported Kubernetes versions receive Docker for their container runtime. Linux node pools will be updated to `containerd` once the node pool Kubernetes version is updated to a version that supports `containerd`. You can still use Docker node pools and clusters on versions below 1.23, but Docker is no longer supported as of September 2022. > -> Using `containerd` with Windows Server 2019 node pools is generally available, although the default for node pools created on Kubernetes v1.22 and earlier is still Docker. For more details, see [Add a Windows Server node pool with `containerd`][/learn/aks-add-np-containerd]. +> Using `containerd` with Windows Server 2019 node pools is generally available, and is used by default in Kubernetes 1.23 and greater. For more details, see [Add a Windows Server node pool with `containerd`][/learn/aks-add-np-containerd]. > > It is highly recommended to test your workloads on AKS node pools with `containerd` prior to using clusters with a Kubernetes version that supports `containerd` for your node pools. az aks show -n aks -g myResourceGroup --query "oidcIssuerProfile.issuerUrl" -ots - Read more about [Ephemeral OS disks](../virtual-machines/ephemeral-os-disks.md). +<!-- LINKS - external --> +[aks-release-notes]: https://github.com/Azure/AKS/releases + <!-- LINKS - internal --> [azure-cli-install]: /cli/azure/install-azure-cli [az-feature-register]: /cli/azure/feature#az_feature_register |
| aks | Concepts Clusters Workloads | https://github.com/MicrosoftDocs/azure-docs/commits/main/articles/aks/concepts-clusters-workloads.md | The Azure VM size for your nodes defines the storage CPUs, memory, size, and typ In AKS, the VM image for your cluster's nodes is based on Ubuntu Linux or Windows Server 2019. When you create an AKS cluster or scale out the number of nodes, the Azure platform automatically creates and configures the requested number of VMs. Agent nodes are billed as standard VMs, so any VM size discounts (including [Azure reservations][reservation-discounts]) are automatically applied. +For managed disks, the default disk size and performance will be assigned according to the selected VM SKU and vCPU count. For more information, see [Default OS disk sizing](cluster-configuration.md#default-os-disk-sizing). + If you need advanced configuration and control on your Kubernetes node container runtime and OS, you can deploy a self-managed cluster using [Cluster API Provider Azure][cluster-api-provider-azure]. ### Resource reservations |
| aks | Quick Windows Container Deploy Cli | https://github.com/MicrosoftDocs/azure-docs/commits/main/articles/aks/learn/quick-windows-container-deploy-cli.md | Beginning in Kubernetes version 1.20 and greater, you can specify `containerd` a Use the `az aks nodepool add` command to add a node pool that can run Windows Server containers with the `containerd` runtime. > [!NOTE]-> If you do not specify the *WindowsContainerRuntime=containerd* custom header, the node pool will use Docker as the container runtime. +> If you do not specify the *WindowsContainerRuntime=containerd* custom header, the node pool will still use `containerd` as the container runtime by default. ```azurecli-interactive az aks nodepool add \ az aks upgrade \ The above command upgrades all Windows Server node pools in the *myAKSCluster* to use the `containerd` runtime. > [!NOTE]-> After upgrading all existing Windows Server node pools to use the `containerd` runtime, Docker will still be the default runtime when adding new Windows Server node pools. +> When running the upgrade command, the `--kubernetes-version` specified must be a higher version than the node pool's current version. ## Connect to the cluster |
| aks | Limit Egress Traffic | https://github.com/MicrosoftDocs/azure-docs/commits/main/articles/aks/limit-egress-traffic.md | description: Learn what ports and addresses are required to control egress traff Previously updated : 06/27/2022 Last updated : 07/05/2022 #Customer intent: As an cluster operator, I want to restrict egress traffic for nodes to only access defined ports and addresses and improve cluster security. You'll define the outbound type to use the UDR that already exists on the subnet > > The AKS feature for [**API server authorized IP ranges**](api-server-authorized-ip-ranges.md) can be added to limit API server access to only the firewall's public endpoint. The authorized IP ranges feature is denoted in the diagram as optional. When enabling the authorized IP range feature to limit API server access, your developer tools must use a jumpbox from the firewall's virtual network or you must add all developer endpoints to the authorized IP range. +#### Create an AKS cluster with system-assigned identities ++> [!NOTE] +> AKS will create a system-assigned kubelet identity in the Node resource group if you do not [specify your own kubelet managed identity][Use a pre-created kubelet managed identity]. ++You can create an AKS cluster using a system-assigned managed identity by running the following CLI command. + ```azurecli az aks create -g $RG -n $AKSNAME -l $LOC \ --node-count 3 \ az aks create -g $RG -n $AKSNAME -l $LOC \ > [!NOTE] > For creating and using your own VNet and route table where the resources are outside of the worker node resource group, the CLI will add the role assignment automatically. If you are using an ARM template or other client, you need to use the Principal ID of the cluster managed identity to perform a [role assignment.][add role to identity] > -> If you are not using the CLI but using your own VNet or route table which are outside of the worker node resource group, it's recommended to use [user-assigned control plane identity][Bring your own control plane managed identity]. For system-assigned control plane identity, we cannot get the identity ID before creating cluster, which causes delay for role assignment to take effect. +> If you are not using the CLI but using your own VNet or route table which are outside of the worker node resource group, it's recommended to use [user-assigned control plane identity][Create an AKS cluster with user-assigned identities]. For system-assigned control plane identity, we cannot get the identity ID before creating cluster, which causes delay for role assignment to take effect. +#### Create an AKS cluster with user-assigned identities ++##### Create user-assigned managed identities ++If you don't have a control plane managed identity, you can create by running the following [az identity create][az-identity-create] command: ++```azurecli-interactive +az identity create --name myIdentity --resource-group myResourceGroup +``` ++The output should resemble the following: ++```output +{ + "clientId": "<client-id>", + "clientSecretUrl": "<clientSecretUrl>", + "id": "/subscriptions/<subscriptionid>/resourcegroups/myResourceGroup/providers/Microsoft.ManagedIdentity/userAssignedIdentities/myIdentity", + "location": "westus2", + "name": "myIdentity", + "principalId": "<principal-id>", + "resourceGroup": "myResourceGroup", + "tags": {}, + "tenantId": "<tenant-id>", + "type": "Microsoft.ManagedIdentity/userAssignedIdentities" +} +``` ++If you don't have a kubelet managed identity, you can create one by running the following [az identity create][az-identity-create] command: ++```azurecli-interactive +az identity create --name myKubeletIdentity --resource-group myResourceGroup +``` ++The output should resemble the following: ++```output +{ + "clientId": "<client-id>", + "clientSecretUrl": "<clientSecretUrl>", + "id": "/subscriptions/<subscriptionid>/resourcegroups/myResourceGroup/providers/Microsoft.ManagedIdentity/userAssignedIdentities/myKubeletIdentity", + "location": "westus2", + "name": "myKubeletIdentity", + "principalId": "<principal-id>", + "resourceGroup": "myResourceGroup", + "tags": {}, + "tenantId": "<tenant-id>", + "type": "Microsoft.ManagedIdentity/userAssignedIdentities" +} +``` ++##### Create an AKS cluster with user-assigned identities ++Now you can use the following command to create your AKS cluster with your existing identities in the subnet. Provide the control plane identity resource ID via `assign-identity` and the kubelet managed identity via `assign-kubelet-identity`: ++```azurecli +az aks create -g $RG -n $AKSNAME -l $LOC \ + --node-count 3 \ + --network-plugin $PLUGIN \ + --outbound-type userDefinedRouting \ + --vnet-subnet-id $SUBNETID \ + --api-server-authorized-ip-ranges $FWPUBLIC_IP + --enable-managed-identity \ + --assign-identity <identity-resource-id> \ + --assign-kubelet-identity <kubelet-identity-resource-id> +``` ++> [!NOTE] +> For creating and using your own VNet and route table where the resources are outside of the worker node resource group, the CLI will add the role assignment automatically. If you are using an ARM template or other client, you need to use the Principal ID of the cluster managed identity to perform a [role assignment.][add role to identity] ### Enable developer access to the API server If you want to restrict how pods communicate between themselves and East-West tr [aks-faq]: faq.md [aks-private-clusters]: private-clusters.md [add role to identity]: use-managed-identity.md#add-role-assignment-for-control-plane-identity-[Bring your own control plane managed identity]: use-managed-identity.md#bring-your-own-control-plane-managed-identity +[Create an AKS cluster with user-assigned identities]: limit-egress-traffic.md#create-an-aks-cluster-with-user-assigned-identities +[Use a pre-created kubelet managed identity]: use-managed-identity.md#use-a-pre-created-kubelet-managed-identity +[az-identity-create]: /cli/azure/identity#az_identity_create +[az-aks-get-credentials]: /cli/azure/aks#az_aks_get_credentials |
| aks | Operator Best Practices Storage | https://github.com/MicrosoftDocs/azure-docs/commits/main/articles/aks/operator-best-practices-storage.md | In this example, the *Standard_DS2_v2* offers twice as many attached disks, and Work with your application development team to understand their storage capacity and performance needs. Choose the appropriate VM size for the AKS nodes to meet or exceed their performance needs. Regularly baseline applications to adjust VM size as needed. +> [!NOTE] +> By default, disk size and performance for managed disks is assigned according to the selected VM SKU and vCPU count. Default OS disk sizing is only used on new clusters or node pools when Ephemeral OS disks are not supported and a default OS disk size is not specified. For more information, see [Default OS disk sizing](cluster-configuration.md#default-os-disk-sizing). + For more information about available VM sizes, see [Sizes for Linux virtual machines in Azure][vm-sizes]. ++ ## Dynamically provision volumes > **Best practice guidance** |
| aks | Web App Routing | https://github.com/MicrosoftDocs/azure-docs/commits/main/articles/aks/web-app-routing.md | The Web Application Routing solution makes it easy to access applications that a ## Web Application Routing solution overview -The add-on deploys four components: an [nginx ingress controller][nginx], [Secrets Store CSI Driver][csi-driver], [Open Service Mesh (OSM)][osm], and [External-DNS][external-dns] controller. +The add-on deploys two components: an [nginx ingress controller][nginx], and [External-DNS][external-dns] controller. - **Nginx ingress Controller**: The ingress controller exposed to the internet. - **External-DNS controller**: Watches for Kubernetes Ingress resources and creates DNS A records in the cluster-specific DNS zone.-- **CSI driver**: Connector used to communicate with keyvault to retrieve SSL certificates for ingress controller.-- **OSM**: A lightweight, extensible, cloud native service mesh that allows users to uniformly manage, secure, and get out-of-the-box observability features for highly dynamic microservice environments. ## Prerequisites az extension update --name aks-preview ### Install the `osm` CLI -Since Web Application Routing uses OSM internally to secure intranet communication, we need to set up the `osm` CLI. This command-line tool contains everything needed to install and configure Open Service Mesh. The binary is available on the [OSM GitHub releases page][osm-release]. +Since Web Application Routing uses OSM internally to secure intranet communication, we need to set up the `osm` CLI. This command-line tool contains everything needed to configure and manage Open Service Mesh. The latest binaries are available on the [OSM GitHub releases page][osm-release]. -## Deploy Web Application Routing with the Azure CLI +### Import certificate to Azure Keyvault -The Web Application Routing routing add-on can be enabled with the Azure CLI when deploying an AKS cluster. To do so, use the [az aks create][az-aks-create] command with the `--enable-addons` argument. +```bash +openssl pkcs12 -export -in aks-ingress-tls.crt -inkey aks-ingress-tls.key -out aks-ingress-tls.pfx +# skip Password prompt +``` ```azurecli-az aks create --resource-group myResourceGroup --name myAKSCluster --enable-addons web_application_routing +az keyvault certificate import --vault-name <MY_KEYVAULT> -n <KEYVAULT-CERTIFICATE-NAME> -f aks-ingress-tls.pfx ``` -> [!TIP] -> If you want to enable multiple add-ons, provide them as a comma-separated list. For example, to enable Web Application Routing routing and monitoring, use the format `--enable-addons web_application_routing,monitoring`. +## Deploy Web Application Routing with the Azure CLI ++The Web Application Routing routing add-on can be enabled with the Azure CLI when deploying an AKS cluster. To do so, use the [az aks create][az-aks-create] command with the `--enable-addons` argument. However, since Web Application routing depends on the OSM addon to secure intranet communication and the Azure Keyvault Secret Provider to retrieve certificates, we must enable them at the same time. ++```azurecli +az aks create --resource-group myResourceGroup --name myAKSCluster --enable-addons azure-keyvault-secrets-provider,open-service-mesh,web_application_routing --generate-ssh-keys +``` You can also enable Web Application Routing on an existing AKS cluster using the [az aks enable-addons][az-aks-enable-addons] command. To enable Web Application Routing on an existing cluster, add the `--addons` parameter and specify *web_application_routing* as shown in the following example: ```azurecli-az aks enable-addons --resource-group myResourceGroup --name myAKSCluster --addons web_application_routing +az aks enable-addons --resource-group myResourceGroup --name myAKSCluster --addons azure-keyvault-secrets-provider,open-service-mesh,web_application_routing ``` ## Connect to your AKS cluster Copy the identity's object ID: ### Grant access to Azure Key Vault -Obtain the vault URI for your Azure Key Vault: --```azurecli -az keyvault show --resource-group myResourceGroup --name myapp-contoso -``` - Grant `GET` permissions for Web Application Routing to retrieve certificates from Azure Key Vault: ```azurecli-az keyvault set-policy --name myapp-contoso --object-id <WEB_APP_ROUTING_MSI_OBJECT_ID> --secret-permissions get --certificate-permissions get +az keyvault set-policy --name myapp-contoso --object-id <WEB_APP_ROUTING_MSI_OBJECT_ID> --secret-permissions get --certificate-permissions get ``` ## Use Web Application Routing The Web Application Routing solution may only be triggered on service resources ```yaml annotations: kubernetes.azure.com/ingress-host: myapp.contoso.com- kubernetes.azure.com/tls-cert-keyvault-uri: myapp-contoso.vault.azure.net/certificates/keyvault-certificate-name/keyvault-certificate-name-revision + kubernetes.azure.com/tls-cert-keyvault-uri: https://<MY-KEYVAULT>.vault.azure.net/certificates/<KEYVAULT-CERTIFICATE-NAME>/<KEYVAULT-CERTIFICATE-REVISION> ``` -These annotations in the service manifest would direct Web Application Routing to create an ingress servicing `myapp.contoso.com` connected to the keyvault `myapp-contoso` and will retrieve the `keyvault-certificate-name` with `keyvault-certificate-name-revision` +These annotations in the service manifest would direct Web Application Routing to create an ingress servicing `myapp.contoso.com` connected to the keyvault `<MY-KEYVAULT>` and will retrieve the `<KEYVAULT-CERTIFICATE-NAME>` with `<KEYVAULT-CERTIFICATE-REVISION>`. To obtain the certificate URI within your keyvault run: ++```azurecli +az keyvault certificate show --vault-name <MY_KEYVAULT> --name <KEYVAULT-CERTIFICATE-NAME> -o jsonc | jq .id +``` -Create a file named **samples-web-app-routing.yaml** and copy in the following YAML. On line 29-31, update `<MY_HOSTNAME>` with your DNS host name and `<MY_KEYVAULT_URI>` with the full certficicate vault URI. +Create a file named **samples-web-app-routing.yaml** and copy in the following YAML. On line 29-31, update `<MY_HOSTNAME>` with your DNS host name and `<MY_KEYVAULT_CERTIFICATE_URI>` with the ID returned from keyvault. ```yaml apiVersion: apps/v1 metadata: name: aks-helloworld annotations: kubernetes.azure.com/ingress-host: <MY_HOSTNAME>- kubernetes.azure.com/tls-cert-keyvault-uri: <MY_KEYVAULT_URI> + kubernetes.azure.com/tls-cert-keyvault-uri: <MY_KEYVAULT_CERTIFICATE_URI> spec: type: ClusterIP ports: service/aks-helloworld created ## Verify the managed ingress was created ```bash-$ kubectl get ingress -n hello-web-app-routing +kubectl get ingress -n hello-web-app-routing ++NAME CLASS HOSTS ADDRESS PORTS AGE +aks-helloworld webapprouting.kubernetes.azure.com myapp.contoso.com 20.51.92.19 80, 443 4m ``` -Open a web browser to *<MY_HOSTNAME>*, for example *myapp.contoso.com* and verify you see the demo application. The application may take a few minutes to appear. +## Configure external DNS to point to cluster ++Now that Web Application Routing is configured within our cluster and we have the external IP address, we can configure our DNS servers to reflect this. As soon as the DNS updates have propagated, open a web browser to *<MY_HOSTNAME>*, for example *myapp.contoso.com* and verify you see the demo application. The application may take a few minutes to appear. ## Remove Web Application Routing kubectl delete namespace hello-web-app-routing The Web Application Routing add-on can be removed using the Azure CLI. To do so run the following command, substituting your AKS cluster and resource group name. ```azurecli-az aks disable-addons --addons web_application_routing --name myAKSCluster --resource-group myResourceGroup --no-wait +az aks disable-addons --addons azure-keyvault-secrets-provider,open-service-mesh,web_application_routing --name myAKSCluster --resource-group myResourceGroup ``` When the Web Application Routing add-on is disabled, some Kubernetes resources may remain in the cluster. These resources include *configMaps* and *secrets*, and are created in the *app-routing-system* namespace. To maintain a clean cluster, you may want to remove these resources. |
| api-management | Api Management Access Restriction Policies | https://github.com/MicrosoftDocs/azure-docs/commits/main/articles/api-management/api-management-access-restriction-policies.md | To understand the difference between rate limits and quotas, [see Rate limits an | name | The name of the API or operation for which the quota applies. | Yes | N/A | | bandwidth | The maximum total number of kilobytes allowed during the time interval specified in the `renewal-period`. | Either `calls`, `bandwidth`, or both together must be specified. | N/A | | calls | The maximum total number of calls allowed during the time interval specified in the `renewal-period`. | Either `calls`, `bandwidth`, or both together must be specified. | N/A |-| renewal-period | The time period in seconds after which the quota resets. When it's set to `0` the period is set to infinite.| Yes | N/A | +| renewal-period | The length in seconds of the fixed window after which the quota resets. The start of each period is calculated relative to the start time of the subscription. When `renewal-period` is set to `0`, the period is set to infinite.| Yes | N/A | ### Usage In the following example, the quota is keyed by the caller IP address. | calls | The maximum total number of calls allowed during the time interval specified in the `renewal-period`. | Either `calls`, `bandwidth`, or both together must be specified. | N/A | | counter-key | The key to use for the quota policy. For each key value, a single counter is used for all scopes at which the policy is configured. | Yes | N/A | | increment-condition | The boolean expression specifying if the request should be counted towards the quota (`true`) | No | N/A |-| renewal-period | The time period in seconds after which the quota resets. When it's set to `0` the period is set to infinite. | Yes | N/A | +| renewal-period | The length in seconds of the fixed window after which the quota resets. The start of each period is calculated relative to `first-perdiod-start`. When `renewal-period` is set to `0`, the period is set to infinite. | Yes | N/A | | first-period-start | The starting date and time for quota renewal periods, in the following format: `yyyy-MM-ddTHH:mm:ssZ` as specified by the ISO 8601 standard. | No | `0001-01-01T00:00:00Z` | > [!NOTE] |
| api-management | Api Management Api Import Restrictions | https://github.com/MicrosoftDocs/azure-docs/commits/main/articles/api-management/api-management-api-import-restrictions.md | Title: Restrictions and details of API formats support -description: Details of known issues and restrictions on Open API, WSDL, and WADL formats support in Azure API Management. +description: Details of known issues and restrictions on OpenAPI, WSDL, and WADL formats support in Azure API Management. documentationcenter: '' If you prefer a different behavior, you can either: * Manually change via form-based editor, or * Remove the "required" attribute from the OpenAPI definition, thus not converting them to template parameters. +For GET, HEAD, and OPTIONS operations, API Management discards a request body parameter if defined in the OpenAPI specification. + ## <a name="open-api"> </a>OpenAPI/Swagger import limitations If you receive errors while importing your OpenAPI document, make sure you've validated it beforehand by either: |
| api-management | Api Management Howto Aad B2c | https://github.com/MicrosoftDocs/azure-docs/commits/main/articles/api-management/api-management-howto-aad-b2c.md | Azure Active Directory B2C is a cloud identity management solution for consumer- In this tutorial, you'll learn the configuration required in your API Management service to integrate with Azure Active Directory B2C. As noted later in this article, if you are using the deprecated legacy developer portal, some steps will differ. +> [!IMPORTANT] +> * This article has been updated with steps to configure an Azure AD B2C app using the Microsoft Authentication Library ([MSAL](../active-directory/develop/msal-overview.md)) v2.0. +> * If you previously configured an Azure AD B2C app for user sign-in using the Azure AD Authentication Library (ADAL), we recommend that you [migrate to MSAL](#migrate-to-msal). + For information about enabling access to the developer portal by using classic Azure Active Directory, see [How to authorize developer accounts using Azure Active Directory](api-management-howto-aad.md). ## Prerequisites In this section, you'll create a user flow in your Azure Active Directory B2C te 1. In a separate [Azure portal](https://portal.azure.com) tab, navigate to your API Management instance. 1. Under **Developer portal**, select **Identities** > **+ Add**.-1. In the **Add identity provider** page, select **Azure Active Directory B2C**. +1. In the **Add identity provider** page, select **Azure Active Directory B2C**. Once selected, you'll be able to enter other necessary information. + * In the **Client library** dropdown, select **MSAL**. + * To add other settings, see steps later in the article. 1. In the **Add identity provider** window, copy the **Redirect URL**. :::image type="content" source="media/api-management-howto-aad-b2c/b2c-identity-provider-redirect-url.png" alt-text="Copy redirect URL"::: In this section, you'll create a user flow in your Azure Active Directory B2C te 1. In the **Register an application** page, enter your application's registration information. * In the **Name** section, enter an application name of your choosing. * In the **Supported account types** section, select **Accounts in any identity provider or organizational directory (for authenticating users with user flows)**. For more information, see [Register an application](../active-directory/develop/quickstart-register-app.md#register-an-application).- * In **Redirect URI**, enter the Redirect URL your copied from your API Management instance. + * In **Redirect URI**, select **Single-page application (SPA)** and paste the redirect URL you saved from a previous step. * In **Permissions**, select **Grant admin consent to openid and offline_access permissions.** * Select **Register** to create the application. In this section, you'll create a user flow in your Azure Active Directory B2C te :::image type="content" source="media/api-management-howto-aad-b2c/add-identity-provider.png" alt-text="Active Directory B2c identity provider configuration"::: 1. After you've specified the desired configuration, select **Add**.+1. Republish the developer portal for the Azure AD B2C configuration to take effect. In the left menu, under **Developer portal**, select **Portal overview** > **Publish**. After the changes are saved, developers will be able to create new accounts and sign in to the developer portal by using Azure Active Directory B2C. +## Migrate to MSAL ++If you previously configured an Azure AD B2C app for user sign-in using the ADAL, you can use the portal to migrate the app to MSAL and update the identity provider in API Management. ++### Update Azure AD B2C app for MSAL compatibility ++For steps, see [Switch redirect URIs to the single-page application type](../active-directory/develop/migrate-spa-implicit-to-auth-code.md#switch-redirect-uris-to-spa-platform). ++### Update identity provider configuration ++1. In the left menu of your API Management instance, under **Developer portal**, select **Identities**. +1. Select **Azure Active Directory B2C** from the list. +1. In the **Client library** dropdown, select **MSAL**. +1. Select **Update**. +1. [Republish your developer portal](api-management-howto-developer-portal-customize.md#publish-from-the-azure-portal). ++ ## Developer portal - add Azure Active Directory B2C account authentication > [!IMPORTANT] The **Sign-up form: OAuth** widget represents a form used for signing up with OA * [Azure Active Directory B2C overview] * [Azure Active Directory B2C: Extensible policy framework]+* Learn more about [MSAL](../active-directory/develop/msal-overview.md) and [migrating to MSAL v2](../active-directory/develop/msal-migration.md) * [Use a Microsoft account as an identity provider in Azure Active Directory B2C] * [Use a Google account as an identity provider in Azure Active Directory B2C] * [Use a LinkedIn account as an identity provider in Azure Active Directory B2C] |
| api-management | Api Management Howto Aad | https://github.com/MicrosoftDocs/azure-docs/commits/main/articles/api-management/api-management-howto-aad.md | description: Learn how to enable user sign-in to the API Management developer po Previously updated : 05/20/2022 Last updated : 07/12/2022 In this article, you'll learn how to: > * Enable access to the developer portal for users from Azure Active Directory (Azure AD). > * Manage groups of Azure AD users by adding external groups that contain the users. +> [!IMPORTANT] +> * This article has been updated with steps to configure an Azure AD app using the Microsoft Authentication Library ([MSAL](../active-directory/develop/msal-overview.md)). +> * If you previously configured an Azure AD app for user sign-in using the Azure AD Authentication Library (ADAL), we recommend that you [migrate to MSAL](#migrate-to-msal). + ## Prerequisites - Complete the [Create an Azure API Management instance](get-started-create-service-instance.md) quickstart. After the Azure AD provider is enabled: 1. In the left menu of your API Management instance, under **Developer portal**, select **Identities**. 1. Select **+Add** from the top to open the **Add identity provider** pane to the right.-1. Under **Type**, select **Azure Active Directory** from the drop-down menu. - * Once selected, you'll be able to enter other necessary information. - * Information includes **Client ID** and **Client secret**. - * See more information about these controls later in the article. +1. Under **Type**, select **Azure Active Directory** from the drop-down menu. Once selected, you'll be able to enter other necessary information. + * In the **Client library** dropdown, select **MSAL**. + * To add **Client ID** and **Client secret**, see steps later in the article. 1. Save the **Redirect URL** for later. :::image type="content" source="media/api-management-howto-aad/api-management-with-aad001.png" alt-text="Screenshot of adding identity provider in Azure portal."::: After the Azure AD provider is enabled: 1. Select **New registration**. On the **Register an application** page, set the values as follows: * Set **Name** to a meaningful name such as *developer-portal*- * Set **Supported account types** to **Accounts in this organizational directory only**. - * In **Redirect URI**, select **Web** and paste the redirect URL you saved from a previous step. + * Set **Supported account types** to **Accounts in any organizational directory**. + * In **Redirect URI**, select **Single-page application (SPA)** and paste the redirect URL you saved from a previous step. * Select **Register**. 1. After you've registered the application, copy the **Application (client) ID** from the **Overview** page. 1. Switch to the browser tab with your API Management instance. 1. In the **Add identity provider** window, paste the **Application (client) ID** value into the **Client ID** box.-1. Switch to the browser tab with the App Registration. +1. Switch to the browser tab with the App registration. 1. Select the appropriate app registration. 1. Under the **Manage** section of the side menu, select **Certificates & secrets**. 1. From the **Certificates & secrets** page, select the **New client secret** button under **Client secrets**. After the Azure AD provider is enabled: * Optionally configure other sign-in settings by selecting **Identities** > **Settings**. For example, you might want to redirect anonymous users to the sign-in page. * Republish the developer portal after any configuration change. +## Migrate to MSAL ++If you previously configured an Azure AD app for user sign-in using the ADAL, you can use the portal to migrate the app to MSAL and update the identity provider in API Management. ++### Update Azure AD app for MSAL compatibility ++For steps, see [Switch redirect URIs to the single-page application type](../active-directory/develop/migrate-spa-implicit-to-auth-code.md#switch-redirect-uris-to-spa-platform). ++### Update identity provider configuration ++1. In the left menu of your API Management instance, under **Developer portal**, select **Identities**. +1. Select **Azure Active Directory** from the list. +1. In the **Client library** dropdown, select **MSAL**. +1. Select **Update**. +1. [Republish your developer portal](api-management-howto-developer-portal-customize.md#publish-from-the-azure-portal). ++ ## Add an external Azure AD group Now that you've enabled access for users in an Azure AD tenant, you can: Follow these steps to grant: 1. Update the first 3 lines of the following Azure CLI script to match your environment and run it. ```azurecli- $subId = "Your Azure subscription ID" #e.g. "1fb8fadf-03a3-4253-8993-65391f432d3a" - $tenantId = "Your Azure AD Tenant or Organization ID" #e.g. 0e054eb4-e5d0-43b8-ba1e-d7b5156f6da8" - $appObjectID = "Application Object ID that has been registered in AAD" #e.g. "2215b54a-df84-453f-b4db-ae079c0d2619" + $subId = "Your Azure subscription ID" # Example: "1fb8fadf-03a3-4253-8993-65391f432d3a" + $tenantId = "Your Azure AD Tenant or Organization ID" # Example: 0e054eb4-e5d0-43b8-ba1e-d7b5156f6da8" + $appObjectID = "Application Object ID that has been registered in AAD" # Example: "2215b54a-df84-453f-b4db-ae079c0d2619" #Login and Set the Subscription az login az account set --subscription $subId Your user is now signed in to the developer portal for your API Management servi ## Next Steps -- Learn how to [Protect your web API backend in API Management by using OAuth 2.0 authorization with Azure AD](./api-management-howto-protect-backend-with-aad.md) - Learn more about [Azure Active Directory and OAuth2.0](../active-directory/develop/authentication-vs-authorization.md).-- Check out more [videos](https://azure.microsoft.com/documentation/videos/index/?services=api-management) about API Management.-- For other ways to secure your back-end service, see [Mutual Certificate authentication](./api-management-howto-mutual-certificates.md).+- Learn more about [MSAL](../active-directory/develop/msal-overview.md) and [migrating to MSAL](../active-directory/develop/msal-migration.md). - [Create an API Management service instance](./get-started-create-service-instance.md). - [Manage your first API](./import-and-publish.md). |
| app-service | Quickstart Ruby | https://github.com/MicrosoftDocs/azure-docs/commits/main/articles/app-service/quickstart-ruby.md | This quickstart shows how to deploy a Ruby on Rails app to App Service on Linux  >[!NOTE]- > This should take you to the new fork. Your fork URL will look something like this: https://github.com/YOUR_GITHUB_ACCOUNT_NAME/ruby-docs-hello-world + > This should take you to the new fork. Your fork URL will look something like this: `https://github.com/YOUR_GITHUB_ACCOUNT_NAME/ruby-docs-hello-world` |
| application-gateway | Rewrite Http Headers Url | https://github.com/MicrosoftDocs/azure-docs/commits/main/articles/application-gateway/rewrite-http-headers-url.md | With URL rewrite capability in Application Gateway, you can: * Rewrite the host name, path and query string of the request URL -* Choose to rewrite the URL of all requests on a listener or only those requests which match one or more of the conditions you set. These conditions are based on the request and response properties (request, header, response header and server variables). +* Choose to rewrite the URL of all requests on a listener or only those requests which match one or more of the conditions you set. These conditions are based on the request properties (request header and server variables). * Choose to route the request (select the backend pool) based on either the original URL or the rewritten URL |
| applied-ai-services | Form Recognizer Studio Overview | https://github.com/MicrosoftDocs/azure-docs/commits/main/articles/applied-ai-services/form-recognizer/form-recognizer-studio-overview.md | + + Title: What is Form Recognizer Studio? ++description: Learn how to set up and use Form Recognizer Studio to test features of Azure Form Recognizer on the web. +++++ Last updated : 07/18/2022++recommendations: false +++<!-- markdownlint-disable MD033 --> +# What is Form Recognizer Studio? ++>[!NOTE] +> Form Recognizer Studio is currently in public preview. Some features may not be supported or have limited capabilities. ++Form Recognizer Studio is an online tool to visually explore, understand, train, and integrate features from the Form Recognizer service into your applications. The studio provides a platform for you to experiment with the different Form Recognizer models and sample their returned data in an interactive manner without the need to write code. ++The studio supports all Form Recognizer v3.0 models and v2.1 models with labeled data. Refer to the [REST API migration guide](v3-migration-guide.md) for detailed information about migrating from v2.1 to v3.0. ++## Get started using Form Recognizer Studio ++1. To use Form Recognizer Studio, you'll need the following assets: ++ * **Azure subscription** - [Create one for free](https://azure.microsoft.com/free/cognitive-services/). ++ * **Cognitive Services or Form Recognizer resource**. Once you have your Azure subscription, create a [single-service](https://portal.azure.com/#create/Microsoft.CognitiveServicesFormRecognizer) or [multi-service](https://portal.azure.com/#create/Microsoft.CognitiveServicesAllInOne) resource, in the Azure portal to get your key and endpoint. Use the free pricing tier (`F0`) to try the service, and upgrade later to a paid tier for production. ++ > [!TIP] + > + > * Create a Cognitive Services (multi-service) resource if you plan to access multiple cognitive services under a single endpoint and key. + > * Create a single-service resource for Form Recognizer access only. Please note that you'll need a single-service resource if you intend to use [Azure Active Directory authentication](../../active-directory/authentication/overview-authentication.md). ++1. Navigate to the [Form Recognizer Studio](https://formrecognizer.appliedai.azure.com/). If it's your first time logging in, a popup window will appear prompting you to configure your service resource. You have two options: ++ **a. Access by Resource**. ++ * Choose your existing subscription. + * Select an existing resource group within your subscription or create a new one. + * Select your existing Form Recognizer or Cognitive services resource. ++ :::image type="content" source="media/studio/welcome-to-studio.png" alt-text="Screenshot of the configure service resource window."::: ++ **b. Access by API endpoint and key**. ++ * Retrieve your endpoint and key from the Azure portal. + * Go to the overview page for your resource and select **Keys and Endpoint** from the left navigation bar. + * Enter the values in the appropriate fields. ++ :::image type="content" source="media/containers/keys-and-endpoint.png" alt-text="Screenshot: keys and endpoint location in the Azure portal."::: ++1. Once you've completed configuring your resource, you'll be able to try the different models offered by Form Recognizer Studio. From the front page, select any Form Recognizer model to try using with a no-code approach. ++ :::image type="content" source="media/studio/form-recognizer-studio-front.png" alt-text="Screenshot of Form Recognizer Studio front page."::: ++1. After you've tried Form Recognizer Studio, use the [**C#**](quickstarts/try-v3-csharp-sdk.md), [**Java**](quickstarts/try-v3-java-sdk.md), [**JavaScript**](quickstarts/try-v3-javascript-sdk.md) or [**Python**](quickstarts/try-v3-python-sdk.md) client libraries or the [**REST API**](quickstarts/try-v3-rest-api.md) to get started incorporating Form Recognizer models into your own applications. ++ To learn more about each model, *see* the concepts pages. ++ | Model type| Models | + |--|--| + |Document analysis models| <ul><li>[**Read model**](concept-read.md)</li><li>[**Layout model**](concept-layout.md)</li><li>[**General document model**](concept-general-document.md)</li></ul>.</br></br> + |**Prebuilt models**|<ul><li>[**W-2 form model**](concept-w2.md)</li><li>[**Invoice model**](concept-invoice.md)</li><li>[**Receipt model**](concept-receipt.md)</li><li>[**ID document model**](concept-id-document.md)</li><li>[**Business card model**](concept-business-card.md)</li></ul> + |Custom models|<ul><li>[**Custom model**](concept-custom.md)</li><ul><li>[**Template model**](concept-custom-template.md)</li><li>[**Neural model**](concept-custom-template.md)</li></ul><li>[**Composed model**](concept-model-overview.md)</li></ul> ++### Manage your resource ++ To view resource details such as name and pricing tier, select the **Settings** icon in the top-right corner of the Form Recognizer Studio home page and select the **Resource** tab. If you have access to other resources, you can switch resources as well. +++With Form Recognizer, you can quickly automate your data processing in applications and workflows, easily enhance data-driven strategies, and skillfully enrich document search capabilities. ++## Next steps ++* Visit [Form Recognizer Studio](https://formrecognizer.appliedai.azure.com/studio) to begin using the models presented by the service. ++* For more information on Form Recognizer capabilities, see [Azure Form Recognizer overview](overview.md). |
| applied-ai-services | Try Sample Label Tool | https://github.com/MicrosoftDocs/azure-docs/commits/main/articles/applied-ai-services/form-recognizer/quickstarts/try-sample-label-tool.md | Choose the Train icon on the left pane to open the Training page. Then select th :::image type="content" source="../media/analyze.png" alt-text="Training view."::: -That's it! You've learned how to use the Form Recognizer sample tool for Form Recognizer prebuilt, layout and custom models. You've also learned to analyze a custom form with manually labeled data. Now you can try a Form Recognizer client library SDK or REST API. +That's it! You've learned how to use the Form Recognizer sample tool for Form Recognizer prebuilt, layout and custom models. You've also learned to analyze a custom form with manually labeled data. ## Next steps -> [!div class="nextstepaction"] -> [Explore Form Recognizer client library SDK and REST API quickstart](../quickstarts/get-started-sdk-rest-api.md) +>[!div class="nextstepaction"] +> [**Form Recognizer Studio**](https://formrecognizer.appliedai.azure.com/studio) |
| applied-ai-services | Try V3 Csharp Sdk | https://github.com/MicrosoftDocs/azure-docs/commits/main/articles/applied-ai-services/form-recognizer/quickstarts/try-v3-csharp-sdk.md | To view the entire output, visit the Azure samples repository on GitHub to view That's it, congratulations! -In this quickstart, you used the Form Recognizer C# SDK to analyze various forms and documents in different ways. Next, explore the reference documentation to learn about Form Recognizer API in more depth. +In this quickstart, you used the Form Recognizer C# SDK to analyze various forms and documents in different ways. Next, explore the Form Recognizer Studio and reference documentation to learn about Form Recognizer API in more depth. ## Next steps -> [!div class="nextstepaction"] -> [Form Recognizer REST API v3.0 (preview)](https://westus.dev.cognitive.microsoft.com/docs/services/form-recognizer-api-2022-06-30-preview/operations/AnalyzeDocument) +>[!div class="nextstepaction"] +> [**Form Recognizer Studio**](https://formrecognizer.appliedai.azure.com/studio) > [!div class="nextstepaction"]-> [Form Recognizer .NET/C# reference library](https://azuresdkdocs.blob.core.windows.net/$web/dotnet/Azure.AI.FormRecognizer/4.0.0-beta.4/https://docsupdatetracker.net/index.html) +> [Form Recognizer REST API v3.0 (preview)](https://westus.dev.cognitive.microsoft.com/docs/services/form-recognizer-api-2022-06-30-preview/operations/AnalyzeDocument) |
| applied-ai-services | Try V3 Java Sdk | https://github.com/MicrosoftDocs/azure-docs/commits/main/articles/applied-ai-services/form-recognizer/quickstarts/try-v3-java-sdk.md | In this quickstart, you used the Form Recognizer Java SDK to analyze various for ## Next steps -> [!div class="nextstepaction"] -> [Form Recognizer REST API v3.0 (preview)](https://westus.dev.cognitive.microsoft.com/docs/services/form-recognizer-api-2022-06-30-preview/operations/AnalyzeDocument) +>[!div class="nextstepaction"] +> [**Form Recognizer Studio**](https://formrecognizer.appliedai.azure.com/studio) > [!div class="nextstepaction"]-> [Form Recognizer Java reference library](https://azuresdkdocs.blob.core.windows.net/$web/java/azure-ai-formrecognizer/4.0.0-beta.5/https://docsupdatetracker.net/index.html) +> [Form Recognizer REST API v3.0 (preview)](https://westus.dev.cognitive.microsoft.com/docs/services/form-recognizer-api-2022-06-30-preview/operations/AnalyzeDocument) |
| applied-ai-services | Try V3 Javascript Sdk | https://github.com/MicrosoftDocs/azure-docs/commits/main/articles/applied-ai-services/form-recognizer/quickstarts/try-v3-javascript-sdk.md | To view the entire output, visit the Azure samples repository on GitHub to view That's it, congratulations! -In this quickstart, you used the Form Recognizer JavaScript SDK to analyze various forms in different ways. Next, explore the reference documentation to learn moe about Form Recognizer v3.0 API. +In this quickstart, you used the Form Recognizer JavaScript SDK to analyze various forms in different ways. Next, explore the Form Recognizer Studio and reference documentation to learn moe about Form Recognizer v3.0 API. ## Next steps -> [!div class="nextstepaction"] -> [Form Recognizer REST API v3.0 (preview)](https://westus.dev.cognitive.microsoft.com/docs/services/form-recognizer-api-2022-06-30-preview/operations/AnalyzeDocument) +>[!div class="nextstepaction"] +> [**Form Recognizer Studio**](https://formrecognizer.appliedai.azure.com/studio) > [!div class="nextstepaction"]-> [Form Recognizer JavaScript reference library](https://azuresdkdocs.blob.core.windows.net/$web/javascript/azure-ai-form-recognizer/4.0.0-beta.4/https://docsupdatetracker.net/index.html) +> [Form Recognizer REST API v3.0 (preview)](https://westus.dev.cognitive.microsoft.com/docs/services/form-recognizer-api-2022-06-30-preview/operations/AnalyzeDocument) |
| applied-ai-services | Try V3 Python Sdk | https://github.com/MicrosoftDocs/azure-docs/commits/main/articles/applied-ai-services/form-recognizer/quickstarts/try-v3-python-sdk.md | To view the entire output, visit the Azure samples repository on GitHub to view That's it, congratulations! -In this quickstart, you used the Form Recognizer Python SDK to analyze various forms in different ways. Next, explore the reference documentation to learn more about Form Recognizer v3.0 API. +In this quickstart, you used the Form Recognizer Python SDK to analyze various forms in different ways. Next, explore the Form Recognizer Studio and reference documentation to learn more about Form Recognizer v3.0 API. ## Next steps -> [!div class="nextstepaction"] -> [Form Recognizer REST API v3.0 (preview)](https://westus.dev.cognitive.microsoft.com/docs/services/form-recognizer-api-2022-06-30-preview/operations/AnalyzeDocument) +>[!div class="nextstepaction"] +> [**Form Recognizer Studio**](https://formrecognizer.appliedai.azure.com/studio) > [!div class="nextstepaction"]-> [Form Recognizer Python reference library](https://azuresdkdocs.blob.core.windows.net/$web/python/azure-ai-formrecognizer/3.2.0b5/https://docsupdatetracker.net/index.html) +> [Form Recognizer REST API v3.0 (preview)](https://westus.dev.cognitive.microsoft.com/docs/services/form-recognizer-api-2022-06-30-preview/operations/AnalyzeDocument) |
| applied-ai-services | Try V3 Rest Api | https://github.com/MicrosoftDocs/azure-docs/commits/main/articles/applied-ai-services/form-recognizer/quickstarts/try-v3-rest-api.md | The prebuilt models extract pre-defined sets of document fields. See [Model data ## Next steps -In this quickstart, you used the Form Recognizer REST API preview (v3.0) to analyze forms in different ways. Next, further explore the latest reference documentation to learn more about the Form Recognizer API. +In this quickstart, you used the Form Recognizer REST API preview (v3.0) to analyze forms in different ways. Next, further explore the Form Recognizer Studio and latest reference documentation to learn more about the Form Recognizer API. ++>[!div class="nextstepaction"] +> [**Form Recognizer Studio**](https://formrecognizer.appliedai.azure.com/studio) > [!div class="nextstepaction"] > [REST API preview (v3.0) reference documentation](https://westus.dev.cognitive.microsoft.com/docs/services/form-recognizer-api-v3-0-preview-2/operations/AnalyzeDocument) |
| azure-arc | Resource Sync | https://github.com/MicrosoftDocs/azure-docs/commits/main/articles/azure-arc/data/resource-sync.md | https://management.azure.com/subscriptions/{{subscription}}/resourcegroups/{{res ## Limitations -- Resource sync rule does not hydrate Azure Arc Data controller. The Azure Arc Data controller must be deployed via ARM API. +- Resource sync rule does not project Azure Arc Data controller. The Azure Arc Data controller must be deployed via ARM API. - Resource sync only applies to the data services such as Arc enabled SQL managed instance, post deployment of Data controller. -- Resource sync rule does not hydrate Azure Arc enabled PostgreSQL-- Resource sync rule does not hydrate Azure Arc Active Directory connector-- Resource sync rule does not hydrate Azure Arc Instance Failover Groups+- Resource sync rule does not project Azure Arc enabled PostgreSQL +- Resource sync rule does not project Azure Arc Active Directory connector +- Resource sync rule does not project Azure Arc Instance Failover Groups ## Next steps -[Create Azure Arc-enabled data controller using Kubernetes tools](create-data-controller-using-kubernetes-native-tools.md) +[Create Azure Arc data controller in direct connectivity mode using CLI](create-data-controller-direct-cli.md) + |
| azure-fluid-relay | Service Limits | https://github.com/MicrosoftDocs/azure-docs/commits/main/articles/azure-fluid-relay/reference/service-limits.md | This article outlines known limitations of Azure Fluid Relay. ## Distributed Data Structures -The Azure Fluid Relay doesn't support [experimental distributed data structures (DDSes)](https://fluidframework.com/docs/data-structures/experimental/). These include but are not limited to DDS packages with the `@fluid-experimental` package namespace. +The Azure Fluid Relay doesn't support [experimental distributed data structures (DDSes)](https://fluidframework.com/docs/data-structures/overview). These include but are not limited to DDS packages with the `@fluid-experimental` package namespace. ## Fluid sessions |
| azure-functions | Create First Function Cli Csharp Ieux | https://github.com/MicrosoftDocs/azure-docs/commits/main/articles/azure-functions/create-first-function-cli-csharp-ieux.md | - Title: "Create a C# function from the command line - Azure Functions" -description: "Learn how to create a C# function from the command line, then publish the local project to serverless hosting in Azure Functions." Previously updated : 10/03/2020------# Quickstart: Create a C# function in Azure from the command line --> [!div class="op_single_selector" title1="Select your function language: "] -> - [C#](create-first-function-cli-csharp-ieux.md) -> - [Java](create-first-function-cli-java.md) -> - [JavaScript](create-first-function-cli-node.md) -> - [PowerShell](create-first-function-cli-powershell.md) -> - [Python](create-first-function-cli-python.md) -> - [TypeScript](create-first-function-cli-typescript.md) --In this article, you use command-line tools to create a C# class library-based function that responds to HTTP requests. After testing the code locally, you deploy it to the <abbr title="A runtime computing environment in which all the details of the server are transparent to application developers, which simplifies the process of deploying and managing code.">serverless</abbr> environment of <abbr title="Azure's service that provides a low-cost serverless computing environment for applications.">Azure Functions</abbr>. --Completing this quickstart incurs a small cost of a few USD cents or less in your Azure account. --There is also a [Visual Studio Code-based version](create-first-function-vs-code-csharp.md) of this article. --## 1. Prepare your environment --+ Get an Azure <abbr title="The profile that maintains billing information for Azure usage.">account</abbr> with an active <abbr title="The basic organizational structure in which you manage resources on Azure, typically associated with an individual or department within an organization.">subscription</abbr>. [Create an account for free](https://azure.microsoft.com/free/?ref=microsoft.com&utm_source=microsoft.com&utm_medium=docs&utm_campaign=visualstudio). --+ Install [.NET Core 3.1 SDK](https://dotnet.microsoft.com/download) --+ Install [Azure Functions Core Tools](functions-run-local.md#v2) version 3.x. --+ Either the <abbr title="A set of cross-platform command line tools for working with Azure resources from your local development computer, as an alternative to using the Azure portal.">Azure CLI</abbr> or <abbr title="A PowerShell module that provides commands for working with Azure resources from your local development computer, as an alternative to using the Azure portal.">Azure PowerShell</abbr> for creating Azure resources: -- + [Azure CLI](/cli/azure/install-azure-cli) version 2.4 or later. -- + The Azure [Az PowerShell module](/powershell/azure/install-az-ps) version 5.9.0 or later. ----### 2. Verify prerequisites --Verify your prerequisites, which depend on whether you are using the Azure CLI or Azure PowerShell for creating Azure resources: --# [Azure CLI](#tab/azure-cli) --+ In a terminal or command window, run `func --version` to check that the <abbr title="The set of command line tools for working with Azure Functions on your local computer.">Azure Functions Core Tools</abbr> are version 3.x. --+ **Run** `az --version` to check that the Azure CLI version is 2.4 or later. --+ **Run** `az login` to sign in to Azure and verify an active subscription. --+ **Run** `dotnet --list-sdks` to check that .NET Core SDK version 3.1.x is installed --# [Azure PowerShell](#tab/azure-powershell) --+**Run** `func --version` to check that the Azure Functions Core Tools are version 3.x. --+ **Run** `(Get-Module -ListAvailable Az).Version` and verify version 5.0 or later. --+ **Run** `Connect-AzAccount` to sign in to Azure and verify an active subscription. --+ **Run** `dotnet --list-sdks` to check that .NET Core SDK version 3.1.x is installed ----## 3. Create a local function project --In this section, you create a local <abbr title="A logical container for one or more individual functions that can be deployed and managed together.">Azure Functions project</abbr> in C#. Each function in the project responds to a specific <abbr title="An event that invokes the functionΓÇÖs code, such as an HTTP request, a queue message, or a specific time.">trigger</abbr>. --1. Run the `func init` command to create a functions project in a folder named *LocalFunctionProj* with the specified runtime: -- ```csharp - func init LocalFunctionProj --dotnet - ``` --1. **Run** 'cd LocalFunctionProj' to navigate to the <abbr title="This folder contains various files for the project, including configurations files named local.settings.json and host.json. Because local.settings.json can contain secrets downloaded from Azure, the file is excluded from source control by default in the .gitignore file.">project folder</abbr>. -- ```console - cd LocalFunctionProj - ``` - <br/> --1. Add a function to your project by using the following command: -- ```console - func new --name HttpExample --template "HTTP trigger" --authlevel "anonymous" - ``` - The `--name` argument is the unique name of your function (HttpExample). -- The `--template` argument specifies the function's trigger (HTTP). --- <br/> - <details> - <summary><strong>Optional: Code for HttpExample.cs</strong></summary> -- *HttpExample.cs* contains a `Run` method that receives request data in the `req` variable is an [HttpRequest](/dotnet/api/microsoft.aspnetcore.http.httprequest) that's decorated with the **HttpTriggerAttribute**, which defines the trigger behavior. -- :::code language="csharp" source="~/functions-docs-csharp/http-trigger-template/HttpExample.cs"::: -- The return object is an [ActionResult](/dotnet/api/microsoft.aspnetcore.mvc.actionresult) that returns a response message as either an [OkObjectResult](/dotnet/api/microsoft.aspnetcore.mvc.okobjectresult) (200) or a [BadRequestObjectResult](/dotnet/api/microsoft.aspnetcore.mvc.badrequestobjectresult) (400). To learn more, see [Azure Functions HTTP triggers and bindings](./functions-bindings-http-webhook.md?tabs=csharp). - </details> --<br/> ----## 4. Run the function locally --1. Run your function by starting the local Azure Functions runtime host from the *LocalFunctionProj* folder: -- ``` - func start - ``` -- Toward the end of the output, the following lines should appear: -- <pre class="is-monospace is-size-small has-padding-medium has-background-tertiary has-text-tertiary-invert"> - ... -- Now listening on: http://0.0.0.0:7071 - Application started. Press Ctrl+C to shut down. -- Http Functions: -- HttpExample: [GET,POST] http://localhost:7071/api/HttpExample - ... -- </pre> -- <br/> - <details> - <summary><strong>I don't see HttpExample in the output</strong></summary> -- If HttpExample doesn't appear, you likely started the host from outside the root folder of the project. In that case, use <kbd>Ctrl+C</kbd> to stop the host, navigate to the project's root folder, and run the previous command again. - </details> --1. Copy the URL of your **HttpExample** function from this output to a browser and append the query string **?name=<YOUR_NAME>**, making the full URL like **http://localhost:7071/api/HttpExample?name=Functions**. The browser should display a message like **Hello Functions**: --  ---1. Select <kbd>Ctrl+C</kbd> and choose <kbd>y</kbd> to stop the functions host. --<br/> ----## 5. Create supporting Azure resources for your function --Before you can deploy your function code to Azure, you need to create a <abbr title="A logical container for related Azure resources that you can manage as a unit.">resource group</abbr>, a <abbr title="An account that contains all your Azure storage data objects. The storage account provides a unique namespace for your storage data.">storage account</abbr>, and a <abbr title="The cloud resource that hosts serverless functions in Azure, which provides the underlying compute environment in which functions run.">function app</abbr> by using the following commands: --1. If you haven't done so already, sign in to Azure: -- # [Azure CLI](#tab/azure-cli) - ```azurecli - az login - ``` --- # [Azure PowerShell](#tab/azure-powershell) - ```azurepowershell - Connect-AzAccount - ``` --- --1. Create a resource group named `AzureFunctionsQuickstart-rg` in the `westeurope` region. -- # [Azure CLI](#tab/azure-cli) -- ```azurecli - az group create --name AzureFunctionsQuickstart-rg --location westeurope - ``` -- The [az group create](/cli/azure/group#az-group-create) command creates a resource group. You generally create your resource group and resources in a <abbr title="A geographical reference to a specific Azure datacenter in which resources are allocated.">region</abbr> near you, using an available region returned from the `az account list-locations` command. -- # [Azure PowerShell](#tab/azure-powershell) -- ```azurepowershell - New-AzResourceGroup -Name AzureFunctionsQuickstart-rg -Location westeurope - ``` --- -- You can't host Linux and Windows apps in the same resource group. If you have an existing resource group named `AzureFunctionsQuickstart-rg` with a Windows function app or web app, you must use a different resource group. --1. Create a general-purpose Azure Storage account in your resource group and region: -- # [Azure CLI](#tab/azure-cli) -- ```azurecli - az storage account create --name <STORAGE_NAME> --location westeurope --resource-group AzureFunctionsQuickstart-rg --sku Standard_LRS - ``` --- # [Azure PowerShell](#tab/azure-powershell) -- ```azurepowershell - New-AzStorageAccount -ResourceGroupName AzureFunctionsQuickstart-rg -Name <STORAGE_NAME> -SkuName Standard_LRS -Location westeurope - ``` --- -- Replace `<STORAGE_NAME>` with a name that is appropriate to you and <abbr title="The name must be unique across all storage accounts used by all Azure customers globally. For example, you can use a combination of your personal or company name, application name, and a numeric identifier, as in contosobizappstorage20">unique in Azure Storage</abbr>. Names must contain three to 24 characters numbers and lowercase letters only. `Standard_LRS` specifies a general-purpose account, which is [supported by Functions](storage-considerations.md#storage-account-requirements). ---1. Create the function app in Azure. -**Replace** '<STORAGE_NAME>** with name in previous step. -**Replace** '<APP_NAME>' with a globally unique name. -- # [Azure CLI](#tab/azure-cli) -- ```azurecli - az functionapp create --resource-group AzureFunctionsQuickstart-rg --consumption-plan-location westeurope --runtime dotnet --functions-version 3 --name <APP_NAME> --storage-account <STORAGE_NAME> - ``` --- # [Azure PowerShell](#tab/azure-powershell) -- ```azurepowershell - New-AzFunctionApp -Name <APP_NAME> -ResourceGroupName AzureFunctionsQuickstart-rg -StorageAccount <STORAGE_NAME> -Runtime dotnet -FunctionsVersion 3 -Location 'West Europe' - ``` --- -- Replace `<STORAGE_NAME>` with the name of the account you used in the previous step. -- Replace `<APP_NAME>` with a <abbr title="A name that must be unique across all Azure customers globally. For example, you can use a combination of your personal or organization name, application name, and a numeric identifier, as in contoso-bizapp-func-20.">unique name</abbr>. The `<APP_NAME>` is also the default DNS domain for the function app. -- <br/> - <details> - <summary><strong>What is the cost of the resources provisioned on Azure?</strong></summary> -- This command creates a function app running in your specified language runtime under the [Azure Functions Consumption plan](consumption-plan.md), which is free for the amount of usage you incur here. The command also provisions an associated Azure Application Insights instance in the same resource group, with which you can monitor your function app and view logs. For more information, see [Monitor Azure Functions](functions-monitoring.md). The instance incurs no costs until you activate it. - </details> --<br/> ----## 6. Deploy the function project to Azure ---**Copy** ' func azure funtionapp publish <APP_NAME> into your terminal -**Replace** `<APP_NAME>` with the name of your app. -**Run** --```console -func azure functionapp publish <APP_NAME> -``` --The `publish` command shows results similar to the following output (truncated for simplicity): --<pre class="is-monospace is-size-small has-padding-medium has-background-tertiary has-text-tertiary-invert"> -... --Getting site publishing info... -Creating archive for current directory... -Performing remote build for functions project. --... --Deployment successful. -Remote build succeeded! -Syncing triggers... -Functions in msdocs-azurefunctions-qs: - HttpExample - [httpTrigger] - Invoke url: https://msdocs-azurefunctions-qs.azurewebsites.net/api/httpexample -</pre> --<br/> ----## 7. Invoke the function on Azure --Copy the complete **Invoke URL** shown in the output of the `publish` command into a browser address bar. **Append** the query parameter **&name=Functions**. -- --<br/> ----## 8. Clean up resources --If you continue to the [next step](#next-steps) and add an Azure Storage queue output <abbr title="A declarative connection between a function and other resources. An input binding provides data to the function; an output binding provides data from the function to other resources.">binding</abbr>, keep all your resources in place as you'll build on what you've already done. --Otherwise, use the following command to delete the resource group and all its contained resources to avoid incurring further costs. --# [Azure CLI](#tab/azure-cli) --```azurecli -az group delete --name AzureFunctionsQuickstart-rg -``` --# [Azure PowerShell](#tab/azure-powershell) --```azurepowershell -Remove-AzResourceGroup -Name AzureFunctionsQuickstart-rg -``` ----<br/> ----## Next steps --> [!div class="nextstepaction"] -> [Connect to an Azure Storage queue](functions-add-output-binding-storage-queue-cli.md?pivots=programming-language-csharp) |
| azure-functions | Create First Function Cli Java Uiex | https://github.com/MicrosoftDocs/azure-docs/commits/main/articles/azure-functions/create-first-function-cli-java-uiex.md | - Title: Create a Java function from the command line - Azure Functions -description: Learn how to create a Java function from the command line, then publish the local project to serverless hosting in Azure Functions. Previously updated : 11/03/2020------# Quickstart: Create a Java function in Azure from the command line --> [!div class="op_single_selector" title1="Select your function language: "] -> - [Java](create-first-function-cli-java.md) -> - [Python](create-first-function-cli-python.md) -> - [C#](create-first-function-cli-csharp.md) -> - [JavaScript](create-first-function-cli-node.md) -> - [PowerShell](create-first-function-cli-powershell.md) -> - [TypeScript](create-first-function-cli-typescript.md) --Use command-line tools to create a Java function that responds to HTTP requests. Test the code locally, then deploy it to the serverless environment of Azure Functions. --Completing this quickstart incurs a small cost of a few USD cents or less in your <abbr title="The profile that maintains billing information for Azure usage.">Azure account</abbr>. --If Maven is not your preferred development tool, check out our similar tutorials for Java developers using [Gradle](./functions-create-first-java-gradle.md), [IntelliJ IDEA](/azure/developer/jav). --## 1. Prepare your environment --Before you begin, you must have the following: --+ An Azure account with an active <abbr title="The basic organizational structure in which you manage resources in Azure, typically associated with an individual or department within an organization.">subscription</abbr>. [Create an account for free](https://azure.microsoft.com/free/?ref=microsoft.com&utm_source=microsoft.com&utm_medium=docs&utm_campaign=visualstudio). --+ The [Azure Functions Core Tools](functions-run-local.md#v2) version 3.x. --+ The [Azure CLI](/cli/azure/install-azure-cli) version 2.4 or later. --+ The [Java Developer Kit](/azure/developer/java/fundamentals/java-support-on-azure), version 8 or 11. The `JAVA_HOME` environment variable must be set to the install location of the correct version of the JDK. --+ [Apache Maven](https://maven.apache.org), version 3.0 or above. --### Prerequisite check --+ In a terminal or command window, run `func --version` to check that the <abbr title="The set of command line tools for working with Azure Functions on your local computer.">Azure Functions Core Tools</abbr> are version 3.x. --+ Run `az --version` to check that the Azure CLI version is 2.4 or later. --+ Run `az login` to sign in to Azure and verify an active subscription. --<br> -<hr/> --## 2. Create a local function project --In Azure Functions, a function project is a container for one or more individual functions that each responds to a specific <abbr title="The type of event that invokes the functionΓÇÖs code, such as an HTTP request, a queue message, or a specific time.">trigger</abbr>. All functions in a project share the same local and hosting configurations. In this section, you create a function project that contains a single function. --1. In an empty folder, run the following command to generate the Functions project from a [Maven archetype](https://maven.apache.org/guides/introduction/introduction-to-archetypes.html). -- # [Bash](#tab/bash) -- ```bash - mvn archetype:generate -DarchetypeGroupId=com.microsoft.azure -DarchetypeArtifactId=azure-functions-archetype -DjavaVersion=8 - ``` -- # [PowerShell](#tab/powershell) -- ```powershell - mvn archetype:generate "-DarchetypeGroupId=com.microsoft.azure" "-DarchetypeArtifactId=azure-functions-archetype" "-DjavaVersion=8" - ``` -- # [Cmd](#tab/cmd) -- ```cmd - mvn archetype:generate "-DarchetypeGroupId=com.microsoft.azure" "-DarchetypeArtifactId=azure-functions-archetype" "-DjavaVersion=8" - ``` -- -- <br/> - <details> - <summary><strong>To run functions on Java 11</strong></summary> -- Use `-DjavaVersion=11` if you want your functions to run on Java 11. To learn more, see [Java versions](functions-reference-java.md#java-versions). - </details> --1. Maven asks you for values needed to finish generating the project on deployment. - Provide the following values when prompted: -- | Prompt | Value | Description | - | | -- | -- | - | **groupId** | `com.fabrikam` | A value that uniquely identifies your project across all projects, following the [package naming rules](https://docs.oracle.com/javase/specs/jls/se6/html/packages.html#7.7) for Java. | - | **artifactId** | `fabrikam-functions` | A value that is the name of the jar, without a version number. | - | **version** | `1.0-SNAPSHOT` | Choose the default value. | - | **package** | `com.fabrikam` | A value that is the Java package for the generated function code. Use the default. | --1. Type `Y` or press Enter to confirm. -- Maven creates the project files in a new folder with a name of _artifactId_, which in this example is `fabrikam-functions`. --1. Navigate into the project folder: -- ```console - cd fabrikam-functions - ``` --<br/> -<details> -<summary><strong>What's created in the LocalFunctionProj folder?</strong></summary> --This folder contains various files for the project, such as *Function.java*, *FunctionTest.java*, and *pom.xml*. There are also configurations files named -[local.settings.json](functions-develop-local.md#local-settings-file) and -[host.json](functions-host-json.md). Because *local.settings.json* can contain secrets -downloaded from Azure, the file is excluded from source control by default in the *.gitignore* -file. -</details> --<br/> -<details> -<summary><strong>Code for Function.java</strong></summary> --*Function.java* contains a `run` method that receives request data in the `request` variable is an [HttpRequestMessage](/java/api/com.microsoft.azure.functions.httprequestmessage) that's decorated with the [HttpTrigger](/java/api/com.microsoft.azure.functions.annotation.httptrigger) annotation, which defines the trigger behavior. ---The response message is generated by the [HttpResponseMessage.Builder](/java/api/com.microsoft.azure.functions.httpresponsemessage.builder) API. --The archetype also generates a unit test for your function. When you change your function to add bindings or add new functions to the project, you'll also need to modify the tests in the *FunctionTest.java* file. -</details> --<br/> -<details> -<summary><strong>Code for pom.xml</strong></summary> --Settings for the Azure resources created to host your app are defined in the **configuration** element of the plugin with a **groupId** of `com.microsoft.azure` in the generated *pom.xml* file. For example, the configuration element below instructs a Maven-based deployment to create a function app in the `java-functions-group` resource group in the `westus` <abbr title="A geographical reference to a specific Azure datacenter in which resources are allocated.">region</abbr>. The function app itself runs on Windows hosted in the `java-functions-app-service-plan` plan, which by default is a serverless Consumption plan. ---You can change these settings to control how resources are created in Azure, such as by changing `runtime.os` from `windows` to `linux` before initial deployment. For a complete list of settings supported by the Maven plug-in, see the [configuration details](https://github.com/microsoft/azure-maven-plugins/wiki/Azure-Functions:-Configuration-Details). -</details> --<br> -<hr/> --## 3. Run the function locally --1. **Run your function** by starting the local Azure Functions runtime host from the *LocalFunctionProj* folder: -- ```console - mvn clean package - mvn azure-functions:run - ``` -- Toward the end of the output, the following lines should appear: -- <pre class="is-monospace is-size-small has-padding-medium has-background-tertiary has-text-tertiary-invert"> - ... -- Now listening on: http://0.0.0.0:7071 - Application started. Press Ctrl+C to shut down. -- Http Functions: -- HttpExample: [GET,POST] http://localhost:7071/api/HttpExample - ... - </pre> -- If HttpExample doesn't appear as shown above, you likely started the host from outside the root folder of the project. In that case, use <kbd>Ctrl+C</kbd> to stop the host, navigate to the project's root folder, and run the previous command again. --1. **Copy the URL** of your `HttpExample` function from this output to a browser and append the query string `?name=<YOUR_NAME>`, making the full URL like `http://localhost:7071/api/HttpExample?name=Functions`. The browser should display a message like `Hello Functions`: --  -- The terminal in which you started your project also shows log output as you make requests. --1. When you're done, use <kbd>Ctrl+C</kbd> and choose <kbd>y</kbd> to stop the functions host. --<br> -<hr/> --## 4. Deploy the function project to Azure --A function app and related resources are created in Azure when you first deploy your functions project. Settings for the Azure resources created to host your app are defined in the *pom.xml* file. In this article, you'll accept the defaults. --<br/> -<details> -<summary><strong>To create a function app running on Linux</strong></summary> --To create a function app running on Linux instead of Windows, change the `runtime.os` element in the *pom.xml* file from `windows` to `linux`. Running Linux in a consumption plan is supported in [these regions](https://github.com/Azure/azure-functions-host/wiki/Linux-Consumption-Regions). You can't have apps that run on Linux and apps that run on Windows in the same resource group. -</details> --1. Before you can deploy, sign in to your Azure subscription using either Azure CLI or Azure PowerShell. -- # [Azure CLI](#tab/azure-cli) - ```azurecli - az login - ``` -- The [az login](/cli/azure/reference-index#az-login) command signs you into your Azure account. -- # [Azure PowerShell](#tab/azure-powershell) - ```azurepowershell - Connect-AzAccount - ``` -- The [Connect-AzAccount](/powershell/module/az.accounts/connect-azaccount) cmdlet signs you into your Azure account. -- --1. Use the following command to deploy your project to a new function app. -- ```console - mvn azure-functions:deploy - ``` -- The deployment packages the project files and deploys them to the new function app using [zip deployment](functions-deployment-technologies.md#zip-deploy). The code runs from the deployment package in Azure. --<br/> -<details> -<summary><strong>What's created in Azure?</strong></summary> --+ Resource group. Named as _java-functions-group_. -+ Storage account. Required by Functions. The name is generated randomly based on Storage account name requirements. -+ Hosting plan. Serverless hosting for your function app in the _westus_ region. The name is _java-functions-app-service-plan_. -+ Function app. A function app is the deployment and execution unit for your functions. The name is randomly generated based on your _artifactId_, appended with a randomly generated number. -</details> --<br> -<hr/> --## 5. Invoke the function on Azure --Because your function uses an HTTP trigger, you **invoke it by making an HTTP request to its URL** in the browser or with a tool like <abbr title="A command line tool for generating HTTP requests to a URL; see https://curl.se/">curl</abbr>. --# [Browser](#tab/browser) --Copy the complete **Invoke URL** shown in the output of the `publish` command into a browser address bar, appending the query parameter `&name=Functions`. The browser should display similar output as when you ran the function locally. -- --# [curl](#tab/curl) --Run [`curl`](https://curl.haxx.se/) with the **Invoke URL**, appending the parameter `&name=Functions`. The output of the command should be the text, "Hello Functions." -- -----<br> -<hr/> --## 6. Clean up resources --If you continue to the [next step](#next-steps) and add an Azure Storage <abbr title="In Azure Storage, a means to associate a function with a storage queue, so that it can create messages on the queue.">queue output binding</abbr>, keep all your resources in place as you'll build on what you've already done. --Otherwise, use the following command to delete the resource group and all its contained resources to avoid incurring further costs. -- # [Azure CLI](#tab/azure-cli) --```azurecli -az group delete --name java-functions-group -``` --# [Azure PowerShell](#tab/azure-powershell) --```azurepowershell -Remove-AzResourceGroup -Name java-functions-group -``` ----<br> -<hr/> --## Next steps --> [!div class="nextstepaction"] -> [Connect to an Azure Storage queue](functions-add-output-binding-storage-queue-cli.md?pivots=programming-language-java) |
| azure-functions | Create First Function Cli Python Uiex | https://github.com/MicrosoftDocs/azure-docs/commits/main/articles/azure-functions/create-first-function-cli-python-uiex.md | - Title: Create a Python function from the command line for Azure Functions -description: Learn how to create a Python function from the command line and publish the local project to serverless hosting in Azure Functions. Previously updated : 11/03/2020------# Quickstart: Create a Python function in Azure from the command line --> [!div class="op_single_selector" title1="Select your function language: "] -> - [Python](create-first-function-cli-python.md) -> - [C#](create-first-function-cli-csharp.md) -> - [Java](create-first-function-cli-java.md) -> - [JavaScript](create-first-function-cli-node.md) -> - [PowerShell](create-first-function-cli-powershell.md) -> - [TypeScript](create-first-function-cli-typescript.md) --In this article, you use command-line tools to create a Python function that responds to HTTP requests. After testing the code locally, you deploy it to the <abbr title="A runtime computing environment in which all the details of the server are transparent to application developers, which simplifies the process of deploying and managing code.">serverless</abbr> environment of <abbr title="An Azure service that provides a low-cost serverless computing environment for applications.">Azure Functions</abbr>. --Completing this quickstart incurs a small cost of a few USD cents or less in your Azure account. --There is also a [Visual Studio Code-based version](create-first-function-vs-code-python.md) of this article. --## 1. Configure your environment --Before you begin, you must have the following: --+ An Azure <abbr title="The profile that maintains billing information for Azure usage.">account</abbr> with an active <abbr title="The basic organizational structure in which you manage resources in Azure, typically associated with an individual or department within an organization.">subscription</abbr>. [Create an account for free](https://azure.microsoft.com/free/?ref=microsoft.com&utm_source=microsoft.com&utm_medium=docs&utm_campaign=visualstudio). --+ The [Azure Functions Core Tools](functions-run-local.md#v2) version 3.x. --+ Either the <abbr title="A set of cross-platform command line tools for working with Azure resources from your local development computer, as an alternative to using the Azure portal.">Azure CLI</abbr> or <abbr title="A PowerShell module that provides commands for working with Azure resources from your local development computer, as an alternative to using the Azure portal.">Azure PowerShell</abbr> for creating Azure resources: -- + [Azure CLI](/cli/azure/install-azure-cli) version 2.4 or later. -- + The Azure [Az PowerShell module](/powershell/azure/install-az-ps) version 5.9.0 or later. --+ [Python 3.8 (64-bit)](https://www.python.org/downloads/release/python-382/), [Python 3.7 (64-bit)](https://www.python.org/downloads/release/python-375/), [Python 3.6 (64-bit)](https://www.python.org/downloads/release/python-368/), which are all supported by version 3.x of Azure Functions. --### 1.1 Prerequisite check --Verify your prerequisites, which depend on whether you are using the Azure CLI or Azure PowerShell for creating Azure resources: --# [Azure CLI](#tab/azure-cli) --+ In a terminal or command window, run `func --version` to check that the <abbr title="The set of command line tools for working with Azure Functions on your local computer.">Azure Functions Core Tools</abbr> are version 3.x. --+ Run `az --version` to check that the Azure CLI version is 2.4 or later. --+ Run `az login` to sign in to Azure and verify an active subscription. --+ Run `python --version` (Linux/macOS) or `py --version` (Windows) to check your Python version reports 3.8.x, 3.7.x or 3.6.x. --# [Azure PowerShell](#tab/azure-powershell) --+ In a terminal or command window, run `func --version` to check that the <abbr title="The set of command line tools for working with Azure Functions on your local computer.">Azure Functions Core Tools</abbr> are version 3.x. --+ Run `(Get-Module -ListAvailable Az).Version` and verify version 5.0 or later. --+ Run `Connect-AzAccount` to sign in to Azure and verify an active subscription. --+ Run `python --version` (Linux/macOS) or `py --version` (Windows) to check your Python version reports 3.8.x, 3.7.x or 3.6.x. ----<br/> ----## 2. <a name="create-venv"></a>Create and activate a virtual environment --In a suitable folder, run the following commands to create and activate a virtual environment named `.venv`. Be sure to use Python 3.8, 3.7 or 3.6, which are supported by Azure Functions. --# [bash](#tab/bash) --```bash -python -m venv .venv -``` --```bash -source .venv/bin/activate -``` --If Python didn't install the venv package on your Linux distribution, run the following command: --```bash -sudo apt-get install python3-venv -``` --# [PowerShell](#tab/powershell) --```powershell -py -m venv .venv -``` --```powershell -.venv\scripts\activate -``` --# [Cmd](#tab/cmd) --```cmd -py -m venv .venv -``` --```cmd -.venv\scripts\activate -``` ----You run all subsequent commands in this activated virtual environment. --<br/> ----## 3. Create a local function project --In this section, you create a local <abbr title="A logical container for one or more individual functions that can be deployed and managed together.">Azure Functions project</abbr> in Python. Each function in the project responds to a specific <abbr title="The type of event that invokes the functionΓÇÖs code, such as an HTTP request, a queue message, or a specific time.">trigger</abbr>. --1. Run the `func init` command to create a functions project in a folder named *LocalFunctionProj* with the specified runtime: -- ```console - func init LocalFunctionProj --python - ``` --1. Navigate into the project folder: -- ```console - cd LocalFunctionProj - ``` -- <br/> - <details> - <summary><strong>What's created in the LocalFunctionProj folder?</strong></summary> -- This folder contains various files for the project, including configurations files named [local.settings.json](functions-develop-local.md#local-settings-file) and [host.json](functions-host-json.md). Because *local.settings.json* can contain secrets downloaded from Azure, the file is excluded from source control by default in the *.gitignore* file. - </details> --1. Add a function to your project by using the following command: -- ```console - func new --name HttpExample --template "HTTP trigger" --authlevel "anonymous" - ``` - The `--name` argument is the unique name of your function (HttpExample). -- The `--template` argument specifies the function's trigger (HTTP). -- `func new` creates a subfolder matching the function name that contains an *\_\_init\_\_.py* file with the function's code and a configuration file named *function.json*. -- <br/> - <details> - <summary><strong>Code for __init__.py</strong></summary> -- *\_\_init\_\_.py* contains a `main()` Python function that's triggered according to the configuration in *function.json*. -- :::code language="python" source="~/functions-quickstart-templates/Functions.Templates/Templates/HttpTrigger-Python/__init__.py"::: -- For an HTTP trigger, the function receives request data in the variable `req` as defined in *function.json*. `req` is an instance of the [azure.functions.HttpRequest class](/python/api/azure-functions/azure.functions.httprequest). The return object, defined as `$return` in *function.json*, is an instance of [azure.functions.HttpResponse class](/python/api/azure-functions/azure.functions.httpresponse). To learn more, see [Azure Functions HTTP triggers and bindings](./functions-bindings-http-webhook.md?tabs=python). - </details> -- <br/> - <details> - <summary><strong>Code for function.json</strong></summary> -- *function.json* is a configuration file that defines the <abbr title="Declarative connections between a function and other resources. An input binding provides data to the function; an output binding provides data from the function to other resources.">input and output bindings</abbr> for the function, including the trigger type. -- You can change `scriptFile` to invoke a different Python file if desired. -- :::code language="json" source="~/functions-quickstart-templates/Functions.Templates/Templates/HttpTrigger-Python/function.json"::: -- Each binding requires a direction, a type, and a unique name. The HTTP trigger has an input binding of type [`httpTrigger`](functions-bindings-http-webhook-trigger.md) and output binding of type [`http`](functions-bindings-http-webhook-output.md). - </details> --<br/> ----## 4. Run the function locally --1. Run your function by starting the local Azure Functions runtime host from the *LocalFunctionProj* folder: -- ``` - func start - ``` -- Toward the end of the output, the following lines should appear: -- <pre class="is-monospace is-size-small has-padding-medium has-background-tertiary has-text-tertiary-invert"> - ... -- Now listening on: http://0.0.0.0:7071 - Application started. Press Ctrl+C to shut down. -- Http Functions: -- HttpExample: [GET,POST] http://localhost:7071/api/HttpExample - ... -- </pre> -- <br/> - <details> - <summary><strong>I don't see HttpExample in the output</strong></summary> -- If HttpExample doesn't appear, you likely started the host from outside the root folder of the project. In that case, use <kbd>Ctrl+C</kbd> to stop the host, navigate to the project's root folder, and run the previous command again. - </details> --1. Copy the URL of your **HttpExample** function from this output to a browser and append the query string **?name=<YOUR_NAME>**, making the full URL like **http://localhost:7071/api/HttpExample?name=Functions**. The browser should display a message like **Hello Functions**: --  --1. The terminal in which you started your project also shows log output as you make requests. --1. When you're done, use <kbd>Ctrl+C</kbd> and choose <kbd>y</kbd> to stop the functions host. --<br/> ----## 5. Create supporting Azure resources for your function --Before you can deploy your function code to Azure, you need to create a <abbr title="A logical container for related Azure resources that you can manage as a unit.">resource group</abbr>, a <abbr title="An account that contains all your Azure storage data objects. The storage account provides a unique namespace for your storage data.">storage account</abbr>, and a <abbr title="The cloud resource that hosts serverless functions in Azure, which provides the underlying compute environment in which functions run.">function app</abbr> by using the following commands: --1. If you haven't done so already, sign in to Azure: -- # [Azure CLI](#tab/azure-cli) - ```azurecli - az login - ``` -- The [az login](/cli/azure/reference-index#az-login) command signs you into your Azure account. -- # [Azure PowerShell](#tab/azure-powershell) - ```azurepowershell - Connect-AzAccount - ``` -- The [Connect-AzAccount](/powershell/module/az.accounts/connect-azaccount) cmdlet signs you into your Azure account. -- --1. Create a resource group named `AzureFunctionsQuickstart-rg` in the `westeurope` region. -- # [Azure CLI](#tab/azure-cli) -- ```azurecli - az group create --name AzureFunctionsQuickstart-rg --location westeurope - ``` -- The [az group create](/cli/azure/group#az-group-create) command creates a resource group. You generally create your resource group and resources in a <abbr title="A geographical reference to a specific Azure datacenter in which resources are allocated.">region</abbr> near you, using an available region returned from the `az account list-locations` command. -- # [Azure PowerShell](#tab/azure-powershell) -- ```azurepowershell - New-AzResourceGroup -Name AzureFunctionsQuickstart-rg -Location westeurope - ``` -- The [New-AzResourceGroup](/powershell/module/az.resources/new-azresourcegroup) command creates a resource group. You generally create your resource group and resources in a region near you, using an available region returned from the [Get-AzLocation](/powershell/module/az.resources/get-azlocation) cmdlet. -- -- You can't host Linux and Windows apps in the same resource group. If you have an existing resource group named `AzureFunctionsQuickstart-rg` with a Windows function app or web app, you must use a different resource group. --1. Create a general-purpose Azure Storage account in your resource group and region: -- # [Azure CLI](#tab/azure-cli) -- ```azurecli - az storage account create --name <STORAGE_NAME> --location westeurope --resource-group AzureFunctionsQuickstart-rg --sku Standard_LRS - ``` -- The [az storage account create](/cli/azure/storage/account#az-storage-account-create) command creates the storage account. -- # [Azure PowerShell](#tab/azure-powershell) -- ```azurepowershell - New-AzStorageAccount -ResourceGroupName AzureFunctionsQuickstart-rg -Name <STORAGE_NAME> -SkuName Standard_LRS -Location westeurope - ``` -- The [New-AzStorageAccount](/powershell/module/az.storage/new-azstorageaccount) cmdlet creates the storage account. -- -- Replace `<STORAGE_NAME>` with a name that is appropriate to you and <abbr title="The name must be unique across all storage accounts used by all Azure customers globally. For example, you can use a combination of your personal or company name, application name, and a numeric identifier, as in contosobizappstorage20.">unique in Azure Storage</abbr>. Names must contain three to 24 characters numbers and lowercase letters only. `Standard_LRS` specifies a general-purpose account, which is [supported by Functions](storage-considerations.md#storage-account-requirements). -- The storage account incurs only a few cents (USD) for this quickstart. --1. Create the function app in Azure: -- # [Azure CLI](#tab/azure-cli) -- ```azurecli - az functionapp create --resource-group AzureFunctionsQuickstart-rg --consumption-plan-location westeurope --runtime python --runtime-version 3.8 --functions-version 3 --name <APP_NAME> --storage-account <STORAGE_NAME> --os-type linux - ``` -- The [az functionapp create](/cli/azure/functionapp#az-functionapp-create) command creates the function app in Azure. If you are using Python 3.7 or 3.6, change `--runtime-version` to `3.7` or `3.6`, respectively. -- # [Azure PowerShell](#tab/azure-powershell) -- ```azurepowershell - New-AzFunctionApp -Name <APP_NAME> -ResourceGroupName AzureFunctionsQuickstart-rg -StorageAccount <STORAGE_NAME> -FunctionsVersion 3 -RuntimeVersion 3.8 -Runtime python -Location 'West Europe' - ``` -- The [New-AzFunctionApp](/powershell/module/az.functions/new-azfunctionapp) cmdlet creates the function app in Azure. If you're using Python 3.7 or 3.6, change `-RuntimeVersion` to `3.7` or `3.6`, respectively. -- -- Replace `<STORAGE_NAME>` with the name of the account you used in the previous step. -- Replace `<APP_NAME>` with a <abbr title="A name that must be unique across all Azure customers globally. For example, you can use a combination of your personal or organization name, application name, and a numeric identifier, as in contoso-bizapp-func-20.">globally unique name appropriate to you</abbr>. The `<APP_NAME>` is also the default DNS domain for the function app. -- <br/> - <details> - <summary><strong>What is the cost of the resources provisioned on Azure?</strong></summary> -- This command creates a function app running in your specified language runtime under the [Azure Functions Consumption Plan](functions-scale.md#overview-of-plans), which is free for the amount of usage you incur here. The command also provisions an associated Azure Application Insights instance in the same resource group, with which you can monitor your function app and view logs. For more information, see [Monitor Azure Functions](functions-monitoring.md). The instance incurs no costs until you activate it. - </details> --<br/> ----## 6. Deploy the function project to Azure --After you've successfully created your function app in Azure, you're now ready to **deploy your local functions project** by using the [func azure functionapp publish](functions-run-local.md#project-file-deployment) command. --In the following example, replace `<APP_NAME>` with the name of your app. --```console -func azure functionapp publish <APP_NAME> -``` --The `publish` command shows results similar to the following output (truncated for simplicity): --<pre class="is-monospace is-size-small has-padding-medium has-background-tertiary has-text-tertiary-invert"> -... --Getting site publishing info... -Creating archive for current directory... -Performing remote build for functions project. --... --Deployment successful. -Remote build succeeded! -Syncing triggers... -Functions in msdocs-azurefunctions-qs: - HttpExample - [httpTrigger] - Invoke url: https://msdocs-azurefunctions-qs.azurewebsites.net/api/httpexample -</pre> --<br/> ----## 7. Invoke the function on Azure --Because your function uses an HTTP trigger, you invoke it by making an HTTP request to its URL in the browser or with a tool like <abbr title="A command line tool for generating HTTP requests to a URL; see https://curl.se/">curl</abbr>. --# [Browser](#tab/browser) --Copy the complete **Invoke URL** shown in the output of the `publish` command into a browser address bar, appending the query parameter **&name=Functions**. The browser should display similar output as when you ran the function locally. -- --# [curl](#tab/curl) --Run [`curl`](https://curl.haxx.se/) with the **Invoke URL**, appending the parameter **&name=Functions**. The output of the command should be the text, "Hello Functions." -- ----### 7.1 View real-time streaming logs --Run the following command to view near real-time [streaming logs](functions-run-local.md#enable-streaming-logs) in Application Insights in the Azure portal: --```console -func azure functionapp logstream <APP_NAME> --browser -``` --Replace `<APP_NAME>` with the name of your function app. --In a separate terminal window or in the browser, call the remote function again. A verbose log of the function execution in Azure is shown in the terminal. --<br/> ----## 8. Clean up resources --If you continue to the [next step](#next-steps) and add an <abbr title="A means to associate a function with a storage queue, so that it can create messages on the queue. ">Azure Storage queue output binding</abbr>, keep all your resources in place as you'll build on what you've already done. --Otherwise, use the following command to delete the resource group and all its contained resources to avoid incurring further costs. -- # [Azure CLI](#tab/azure-cli) --```azurecli -az group delete --name AzureFunctionsQuickstart-rg -``` --# [Azure PowerShell](#tab/azure-powershell) --```azurepowershell -Remove-AzResourceGroup -Name AzureFunctionsQuickstart-rg -``` --<br/> ----## Next steps --> [!div class="nextstepaction"] -> [Connect to an Azure Storage queue](functions-add-output-binding-storage-queue-cli.md?pivots=programming-language-python) --[Having issues? Let us know.](https://aka.ms/python-functions-qs-survey) |
| azure-functions | Create First Function Vs Code Csharp Ieux | https://github.com/MicrosoftDocs/azure-docs/commits/main/articles/azure-functions/create-first-function-vs-code-csharp-ieux.md | - Title: "Create a C# function using Visual Studio Code - Azure Functions" -description: "Learn how to create a C# function, then publish the local project to serverless hosting in Azure Functions using the Azure Functions extension in Visual Studio Code. " - Previously updated : 11/03/2020-----# Quickstart: Create a C# function in Azure using Visual Studio Code --> [!div class="op_single_selector" title1="Select your function language: "] -> - [C#](create-first-function-vs-code-csharp.md) -> - [Java](create-first-function-vs-code-java.md) -> - [JavaScript](create-first-function-vs-code-node.md) -> - [PowerShell](create-first-function-vs-code-powershell.md) -> - [Python](create-first-function-vs-code-python.md) -> - [TypeScript](create-first-function-vs-code-typescript.md) -> - [Other (Go/Rust)](create-first-function-vs-code-other.md) --In this article, you use Visual Studio Code to create a C# class library-based function that responds to HTTP requests. After testing the code locally, you deploy it to the <abbr title="A runtime computing environment in which all the details of the server are transparent to application developers, simplifying the process of deploying and managing code.">serverless</abbr> environment of <abbr title="Azure's service that provides a low-cost serverless computing environment for applications.">Azure Functions</abbr>. --Completing this quickstart incurs a small cost of a few USD cents or less in your Azure account. --There's also a [CLI-based version](create-first-function-cli-csharp.md) of this article. - -## 1. Configure your environment --Before you get started, make sure you have the following requirements in place: --+ An Azure <abbr title="The profile that maintains billing information for Azure usage.">account</abbr> with an active <abbr title="The basic organizational structure in which you manage resources in Azure, typically associated with an individual or department within an organization.">subscription</abbr>. [Create an account for free](https://azure.microsoft.com/free/?ref=microsoft.com&utm_source=microsoft.com&utm_medium=docs&utm_campaign=visualstudio). --+ The [Azure Functions Core Tools](functions-run-local.md#install-the-azure-functions-core-tools) version 3.x. --+ [Visual Studio Code](https://code.visualstudio.com/) on one of the [supported platforms](https://code.visualstudio.com/docs/supporting/requirements#_platforms). --+ The [C# extension](https://marketplace.visualstudio.com/items?itemName=ms-dotnettools.csharp) for Visual Studio Code. --+ The [Azure Functions extension](https://marketplace.visualstudio.com/items?itemName=ms-azuretools.vscode-azurefunctions) for Visual Studio Code. --## <a name="create-an-azure-functions-project"></a>2. Create your local project --In this section, you use Visual Studio Code to create a local <abbr title="A logical container for one or more individual functions that can be deployed and managed together.">Azure Functions project</abbr> in C#. Later in this article, you'll publish your function code to Azure. --1. Choose the Azure icon in the <abbr title="The vertical group of icons on the left side of the Visual Studio Code window.">Activity bar</abbr>, then in the **Azure: Functions** area, select the **Create new project...** icon. --  --1. Choose a directory location for your project workspace and choose **Select**. -- > [!NOTE] - > These steps were designed to be completed outside of a workspace. In this case, do not select a project folder that is part of a workspace. --1. Provide the following information at the prompts: -- + **Select a language for your function project**: Choose `C#`. -- + **Select a template for your project's first function**: Choose `HTTP trigger`. -- + **Provide a function name**: Type `HttpExample`. -- + **Provide a namespace**: Type `My.Functions`. -- + **Authorization level**: Choose `Anonymous`, which enables anyone to call your function endpoint. To learn about authorization levels, see [Authorization keys](functions-bindings-http-webhook-trigger.md#authorization-keys). -- + **Select how you would like to open your project**: Choose `Add to workspace`. --1. Using this information, Visual Studio Code generates an Azure Functions project with an HTTP <abbr title="The type of event that invokes the functionΓÇÖs code, such as an HTTP request, a queue message, or a specific time.">trigger</abbr>. You can view the local project files in the Explorer. To learn more about files that are created, see [Generated project files](functions-develop-vs-code.md#generated-project-files). ---After you've verified that the function runs correctly on your local computer, it's time to use Visual Studio Code to publish the project directly to Azure. ---## 5. Publish the project to Azure --In this section, you create a function app and related resources in your Azure subscription and then deploy your code. --> [!IMPORTANT] -> Publishing to an existing function app overwrites the content of that app in Azure. --1. Choose the Azure icon in the Activity bar, then in the **Azure: Functions** area, choose the **Deploy to function app...** button. -- --1. Provide the following information at the prompts: -- + **Select folder**: Choose a folder from your workspace or browse to one that contains your function app. You won't see this if you already have a valid function app opened. -- + **Select subscription**: Choose the subscription to use. You won't see this if you only have one subscription. -- + **Select Function App in Azure**: Choose `+ Create new Function App`. (Don't choose the `Advanced` option, which isn't covered in this article.) -- + **Enter a globally unique name for the function app**: Type a name that is valid in a URL path. The name you type is validated to make sure that it's <abbr title="The name must be unique across all Functions projects used by all Azure customers globally. Typically, you use a combination of your personal or company name, application name, and a numeric identifier, as in contoso-bizapp-func-20">unique in Azure Functions</abbr>. -- + **Select a location for new resources**: For better performance, choose a [region](https://azure.microsoft.com/regions/) near you. -- The extension shows the status of individual resources as they are being created in Azure in the notification area. -- :::image type="content" source="../../includes/media/functions-publish-project-vscode/resource-notification.png" alt-text="Notification of Azure resource creation"::: --1. When completed, the following Azure resources are created in your subscription, using names based on your function app name: -- + A **resource group**, which is a logical container for related resources. - + A standard **Azure Storage account**, which maintains state and other information about your projects. - + A **consumption plan**, which defines the underlying host for your serverless function app. - + A **function app**, which provides the environment for executing your function code. A function app lets you group functions as a logical unit for easier management, deployment, and sharing of resources within the same hosting plan. - + An **Application Insights instance** connected to the function app, which tracks usage of your serverless function. -- A notification is displayed after your function app is created and the deployment package is applied. -- > [!TIP] - > By default, the Azure resources required by your function app are created based on the function app name you provide. By default, they are also created in the same new resource group with the function app. If you want to either customize the names of these resources or reuse existing resources, you need to instead [publish the project with advanced create options](functions-develop-vs-code.md#enable-publishing-with-advanced-create-options). ---1. Select **View Output** in this notification to view the creation and deployment results, including the Azure resources that you created. If you miss the notification, select the bell icon in the lower right corner to see it again. --  --## 6. Run the function in Azure --1. Back in the **Azure: Functions** area in the side bar, expand your subscription, your new function app, and **Functions**. Right-click (Windows) or <kbd>Ctrl -</kbd> click (macOS) the `HttpExample` function and choose **Execute Function Now...**. -- :::image type="content" source="../../includes/media/functions-vs-code-run-remote/execute-function-now.png" alt-text="Execute function now in Azure from Visual Studio Code"::: --1. In **Enter request body** you see the request message body value of `{ "name": "Azure" }`. -- Press Enter to send this request message to your function. --1. When the function executes in Azure and returns a response, a notification is raised in Visual Studio Code. --## 5. Clean up resources --When you continue to the [next step](#next-steps) and add an <abbr title="A means to associate a function with a storage queue, so that it can create messages on the queue.">Azure Storage queue output binding</abbr> to your function, you'll need to keep all your resources in place to build on what you've already done. --Otherwise, you can use the following steps to delete the function app and its related resources to avoid incurring any further costs. ---To learn more about Functions costs, see [Estimating Consumption plan costs](functions-consumption-costs.md). --## Next steps --You have used Visual Studio Code to create a function app with a simple HTTP-triggered function. In the next article, you expand that function by adding an output <abbr title="A declarative connection between a function and other resources. An input binding provides data to the function; an output binding provides data from the function to other resources.">binding</abbr>. This binding writes the string from the HTTP request to a message in an Azure Queue Storage queue. --> [!div class="nextstepaction"] -> [Connect to an Azure Storage queue](functions-add-output-binding-storage-queue-vs-code.md?pivots=programming-language-csharp) --[Azure Functions Core Tools]: functions-run-local.md -[Azure Functions extension for Visual Studio Code]: https://marketplace.visualstudio.com/items?itemName=ms-azuretools.vscode-azurefunctions |
| azure-functions | Create First Function Vs Code Java Uiex | https://github.com/MicrosoftDocs/azure-docs/commits/main/articles/azure-functions/create-first-function-vs-code-java-uiex.md | - Title: Create a Java function using Visual Studio Code - Azure Functions -description: Learn how to create a Java function, then publish the local project to serverless hosting in Azure Functions using the Azure Functions extension in Visual Studio Code. - Previously updated : 11/03/2020-----# Quickstart: Create a Java function in Azure using Visual Studio Code ---Use Visual Studio Code to create a Java function that responds to HTTP requests. Test the code locally, then deploy it to the serverless environment of Azure Functions. --Completing this quickstart incurs a small cost of a few USD cents or less in your <abbr title="The profile that maintains billing information for Azure usage.">Azure account</abbr>. --If Visual Studio Code isn't your preferred development tool, check out our similar tutorials for Java developers using [Maven](create-first-function-cli-java.md), [Gradle](./functions-create-first-java-gradle.md) and [IntelliJ IDEA](/azure/developer/java/toolkit-for-intellij/quickstart-functions). --## 1. Prepare your environment --Before you get started, make sure you have the following requirements in place: --+ An Azure account with an active <abbr title="The basic organizational structure in which you manage resources in Azure, typically associated with an individual or department within an organization.">subscription</abbr>. [Create an account for free](https://azure.microsoft.com/free/?ref=microsoft.com&utm_source=microsoft.com&utm_medium=docs&utm_campaign=visualstudio). --+ The [Java Developer Kit](/azure/developer/java/fundamentals/java-support-on-azure), version 8 or 11. --+ [Apache Maven](https://maven.apache.org), version 3.0 or above. --+ [Visual Studio Code](https://code.visualstudio.com/) on one of the [supported platforms](https://code.visualstudio.com/docs/supporting/requirements#_platforms). --+ The [Java extension pack](https://marketplace.visualstudio.com/items?itemName=vscjava.vscode-java-pack) --+ The [Azure Functions extension](https://marketplace.visualstudio.com/items?itemName=ms-azuretools.vscode-azurefunctions) for Visual Studio Code. --<br/> -<hr/> --## 2. <a name="create-an-azure-functions-project"></a>Create your local Functions project --1. Choose the Azure icon in the **Activity bar**, then in the **Azure: Functions** area, select the **Create new project...** icon. --  --1. **Choose a directory location** for your project workspace then choose **Select**. --1. Provide the following information at the prompts: -- + **Select a language for your function project**: Choose `Java`. -- + **Select a version of Java**: Choose `Java 8` or `Java 11`, the Java version on which your functions run in Azure. Choose a Java version that you've verified locally. -- + **Provide a group ID**: Choose `com.function`. -- + **Provide an artifact ID**: Choose `myFunction`. -- + **Provide a version**: Choose `1.0-SNAPSHOT`. -- + **Provide a package name**: Choose `com.function`. -- + **Provide an app name**: Choose `myFunction-12345`. -- + **Authorization level**: Choose `Anonymous`, which enables anyone to call your function endpoint. -- + **Select how you would like to open your project**: Choose `Add to workspace`. --<br/> --<details> -<summary><strong>Can't create a function project?</strong></summary> --The most common issues to resolve when creating a local Functions project are: -* You do not have the Azure Functions extension installed. -</details> --<br/> -<hr/> --## 3. Run the function locally --1. Press <kbd>F5</kbd> to start the function app project. --1. In the **Terminal**, see the URL endpoint of your function running locally. --  --1. With Core Tools running, go to the **Azure: Functions** area. Under **Functions**, expand **Local Project** > **Functions**. Right-click (Windows) or <kbd>Ctrl -</kbd> click (macOS) the `HttpExample` function and choose **Execute Function Now...**. -- :::image type="content" source="../../includes/media/functions-run-function-test-local-vs-code/execute-function-now.png" alt-text="Execute function now from Visual Studio Code"::: --1. In **Enter request body** you see the request message body value of `{ "name": "Azure" }`. Press <kbd>Enter</kbd> to send this request message to your function. --1. When the function executes locally and returns a response, a notification is raised in Visual Studio Code. Information about the function execution is shown in **Terminal** panel. --1. Press <kbd>Ctrl + C</kbd> to stop Core Tools and disconnect the debugger. --<br/> --<details> -<summary><strong>Can't run the function locally?</strong></summary> --The most common issues to resolve when running a local Functions project are: -* You do not have the Core Tools installed. -* If you have trouble running on Windows, make sure that the default terminal shell for Visual Studio Code isn't set to WSL Bash. -</details> --<br/> -<hr/> --## 4. Sign in to Azure --To publish your app, sign in to Azure. If you're already signed in, go to the next section. --1. Choose the Azure icon in the Activity bar, then in the **Azure: Functions** area, choose **Sign in to Azure...**. --  --1. When prompted in the browser, **choose your Azure account** and **sign in** using your Azure account credentials. --1. After you've successfully signed in, close the new browser window and go back to Visual Studio Code. --<br/> -<hr/> --## 5. Publish the project to Azure --Your first deployment of your code includes creating a Function resource in your Azure subscription. --1. Choose the Azure icon in the Activity bar, then in the **Azure: Functions** area, choose the **Deploy to function app...** button. --  --1. Provide the following information at the prompts: -- + **Select folder**: Choose the folder that contains your function app. -- + **Select subscription**: Choose the subscription to use. You won't see this if you only have one subscription. -- + **Select Function App in Azure**: Choose `Create new Function App`. -- + **Enter a globally unique name for the function app**: Type a name that is unique across Azure in a URL path. The name you type is validated to ensure global uniqueness. -- - **Select a location for new resources**: For better performance, choose a [region](https://azure.microsoft.com/regions/) near you. --1. A notification is displayed after your function app is created and the deployment package is applied. Select **View Output** to see the creation and deployment results. --  --<br/> --<details> -<summary><strong>Can't publish the function?</strong></summary> --This section created the Azure resources and deployed your local code to the Function app. If that didn't succeed: --* Review the Output for error information. The bell icon in the lower right corner is another way to view the output. -* Did you publish to an existing function app? That action overwrites the content of that app in Azure. -</details> --<br/> --<details> -<summary><strong>What resources were created?</strong></summary> --When completed, the following Azure resources are created in your subscription, using names based on your function app name: --* **Resource group**: A resource group is a logical container for related resources in the same region. -* **Azure Storage account**: A Storage resource maintains state and other information about your project. -* **Consumption plan**: A consumption plan defines the underlying host for your serverless function app. -* **Function app**: A function app provides the environment for executing your function code and group functions as a logical unit. -* **Application Insights**: Application Insights tracks usage of your serverless function. --</details> --<br/> -<hr/> --## 6. Run the function in Azure --1. Back in the **Azure: Functions** area in the side bar, expand your subscription, your new function app, and **Functions**. Right-click (Windows) or <kbd>Ctrl -</kbd> click (macOS) the `HttpExample` function and choose **Execute Function Now...**. -- :::image type="content" source="../../includes/media/functions-vs-code-run-remote/execute-function-now.png" alt-text="Execute function now in Azure from Visual Studio Code"::: --1. In **Enter request body** you see the request message body value of `{ "name": "Azure" }`. Press Enter to send this request message to your function. --1. When the function executes in Azure and returns a response, a notification is raised in Visual Studio Code. --<br/> -<hr/> --## 7. Clean up resources --If you don't plan to continue to the [next step](#next-steps), delete the function app and its resources to avoid incurring any further costs. --1. In Visual Studio Code, select the Azure icon in the Activity bar, then select the Functions area in the side bar. -1. Select the function app, then right-click and select **Delete Function app...**. --<br/> -<hr/> --## Next steps --Expand the function by adding an <abbr title="In Azure Storage, a means to associate a function with a storage queue, so that it can create messages on the queue.">output binding</abbr>. This binding writes the string from the HTTP request to a message in an Azure Queue Storage queue. --> [!div class="nextstepaction"] -> [Connect to an Azure Storage queue](functions-add-output-binding-storage-queue-vs-code.md?pivots=programming-language-java) |
| azure-functions | Create First Function Vs Code Python Uiex | https://github.com/MicrosoftDocs/azure-docs/commits/main/articles/azure-functions/create-first-function-vs-code-python-uiex.md | - Title: Create a Python function using Visual Studio Code - Azure Functions -description: Learn how to create a Python function, then publish the local project to serverless hosting in Azure Functions using the Azure Functions extension in Visual Studio Code. - Previously updated : 11/04/2020-----# Quickstart: Create a function in Azure with Python using Visual Studio Code --> [!div class="op_single_selector" title1="Select your function language: "] -> - [Python](create-first-function-vs-code-python.md) -> - [C#](create-first-function-vs-code-csharp.md) -> - [Java](create-first-function-vs-code-java.md) -> - [JavaScript](create-first-function-vs-code-node.md) -> - [PowerShell](create-first-function-vs-code-powershell.md) -> - [TypeScript](create-first-function-vs-code-typescript.md) -> - [Other (Go/Rust)](create-first-function-vs-code-other.md) --In this article, you use Visual Studio Code to create a Python function that responds to HTTP requests. After testing the code locally, you deploy it to the <abbr title="A runtime computing environment in which all the details of the server are transparent to application developers, which simplifies the process of deploying and managing code.">serverless</abbr> environment of <abbr title="An Azure service that provides a low-cost serverless computing environment for applications.">Azure Functions</abbr>. --Completing this quickstart incurs a small cost of a few USD cents or less in your Azure account. --There's also a [CLI-based version](create-first-function-cli-python.md) of this article. --## 1. Prepare your environment --Before you get started, make sure you have the following requirements in place: --+ An Azure <abbr title="The profile that maintains billing information for Azure usage.">account</abbr> with an active <abbr title="The basic organizational structure in which you manage resources in Azure, typically associated with an individual or department within an organization.">subscription</abbr>. [Create an account for free](https://azure.microsoft.com/free/?ref=microsoft.com&utm_source=microsoft.com&utm_medium=docs&utm_campaign=visualstudio). --+ The [Azure Functions Core Tools](functions-run-local.md#install-the-azure-functions-core-tools) version 3.x. --+ [Python 3.8](https://www.python.org/downloads/release/python-381/), [Python 3.7](https://www.python.org/downloads/release/python-375/), [Python 3.6](https://www.python.org/downloads/release/python-368/) are supported by Azure Functions (x64). --+ [Visual Studio Code](https://code.visualstudio.com/) on one of the [supported platforms](https://code.visualstudio.com/docs/supporting/requirements#_platforms). --+ The [Python extension](https://marketplace.visualstudio.com/items?itemName=ms-python.python) for Visual Studio Code. --+ The [Azure Functions extension](https://marketplace.visualstudio.com/items?itemName=ms-azuretools.vscode-azurefunctions) for Visual Studio Code. --<hr/> -<br/> --## 2. <a name="create-an-azure-functions-project"></a>Create your local project --1. Choose the Azure icon in the <abbr title="The vertical group of icons on the left side of the Visual Studio Code window.">Activity bar</abbr>, then in the **Azure: Functions** area, select the **Create new project...** icon. --  --1. Choose a directory location for your project workspace and choose **Select**. It is recommended that you create a new folder or choose an empty folder as the project workspace. -- > [!NOTE] - > These steps were designed to be completed outside of a workspace. In this case, do not select a project folder that is part of a workspace. --1. Provide the following information at the prompts: -- + **Select a language for your function project**: Choose `Python`. -- + **Select a Python alias to create a virtual environment**: Choose the location of your Python interpreter. If the location isn't shown, type in the full path to your Python binary. -- + **Select a template for your project's first function**: Choose `HTTP trigger`. -- + **Provide a function name**: Type `HttpExample`. -- + **Authorization level**: Choose `Anonymous`, which enables anyone to call your function endpoint. To learn about authorization levels, see [Authorization keys](functions-bindings-http-webhook-trigger.md#authorization-keys). -- + **Select how you would like to open your project**: Choose `Add to workspace`. --<br/> -<details> -<summary><strong>Can't create a function project?</strong></summary> --The most common issues to resolve when creating a local Functions project are: -* You do not have the Azure Functions extension installed. -</details> --<hr/> -<br/> --## Run the function locally --1. Press <kbd>F5</kbd> to start the function app project. --1. In the **Terminal** panel, see the URL endpoint of your function running locally. --  ---1. With Core Tools running, go to the **Azure: Functions** area. Under **Functions**, expand **Local Project** > **Functions**. Right-click (Windows) or <kbd>Ctrl -</kbd> click (macOS) the `HttpExample` function and choose **Execute Function Now...**. -- :::image type="content" source="../../includes/media/functions-run-function-test-local-vs-code/execute-function-now.png" alt-text="Execute function now from Visual Studio Code"::: --1. In **Enter request body** you see the request message body value of `{ "name": "Azure" }`. Press Enter to send this request message to your function. --1. When the function executes locally and returns a response, a notification is raised in Visual Studio Code. Information about the function execution is shown in **Terminal** panel. --1. Press <kbd>Ctrl + C</kbd> to stop Core Tools and disconnect the debugger. --<br/> -<details> -<summary><strong>Can't run the function locally?</strong></summary> --The most common issues to resolve when running a local Functions project are: -* You do not have the Core Tools installed. -* If you have trouble running on Windows, make sure that the default terminal shell for Visual Studio Code isn't set to **WSL Bash**. -</details> --<hr/> -<br/> --## 4. Sign in to Azure --To publish your app, sign in to Azure. If you're already signed in, go to the next section. --1. Choose the Azure icon in the Activity bar, then in the **Azure: Functions** area, choose **Sign in to Azure...**. --  --1. When prompted in the browser, **choose your Azure account** and **sign in** using your Azure account credentials. --1. After you've successfully signed in, close the new browser window and go back to Visual Studio Code. --<hr/> -<br/> --## 5. Publish the project to Azure --Your first deployment of your code includes creating a Function resource in your Azure subscription. --1. Choose the Azure icon in the Activity bar, then in the **Azure: Functions** area, choose the **Deploy to function app...** button. --  --1. Provide the following information at the prompts: -- + **Select folder**: Choose the folder that contains your function app. -- + **Select subscription**: Choose the subscription to use. You won't see this if you only have one subscription. -- + **Select Function App in Azure**: Choose `+ Create new Function App`. -- + **Enter a globally unique name for the function app**: Type a name that is valid in a URL path. The name you type is validated to make sure that it's <abbr title="The name must be unique across all Azure customers globally. For example, you can use a combination of your personal or organization name, application name, and a numeric identifier, as in contoso-bizapp-func-20.">unique across Azure</abbr>. -- + **Select a runtime**: Choose the version of Python you've been running on locally. You can use the `python --version` command to check your version. -- + **Select a location for new resources**: For better performance, choose a [region](https://azure.microsoft.com/regions/) near you. -- The extension shows the status of individual resources as they are being created in Azure in the notification area. -- :::image type="content" source="../../includes/media/functions-publish-project-vscode/resource-notification.png" alt-text="Notification of Azure resource creation"::: --1. A notification is displayed after your function app is created and the deployment package is applied. Select **View Output** to view the creation and deployment results. --  --<br/> -<details> -<summary><strong>Can't publish the function?</strong></summary> --This section created the Azure resources and deployed your local code to the Function app. If that didn't succeed: --* Review the Output for error information. The bell icon in the lower right corner is another way to view the output. -* Did you publish to an existing function app? That action overwrites the content of that app in Azure. -</details> ---<br/> -<details> -<summary><strong>What resources were created?</strong></summary> --When completed, the following Azure resources are created in your subscription, using names based on your function app name: -* **Resource group**: A resource group is a logical container for related resources in the same region. -* **Azure Storage account**: A Storage resource maintains state and other information about your project. -* **Consumption plan**: A consumption plan defines the underlying host for your serverless function app. -* **Function app**: A function app provides the environment for executing your function code and group functions as a logical unit. -* **Application Insights**: Application Insights tracks usage of your serverless function. --</details> --<hr/> -<br/> --## 6. Run the function in Azure --1. Back in the **Azure: Functions** side bar, expand the new function app. -1. Expand **Functions**, then right-click (Windows) or <kbd>Ctrl -</kbd> click (macOS) the `HttpExample` function and choose **Execute Function Now...**. -- :::image type="content" source="../../includes/media/functions-vs-code-run-remote/execute-function-now.png" alt-text="Execute function now in Azure from Visual Studio Code"::: --1. In **Enter request body** you see the request message body value of `{ "name": "Azure" }`. -- Press Enter to send this request message to your function. --1. When the function executes in Azure and returns a response, a notification is raised in Visual Studio Code. --## 7. Clean up resources --When you continue to the [next step](#next-steps) and add an <abbr title="A means to associate a function with a storage queue, so that it can create messages on the queue.">Azure Storage queue output binding</abbr> to your function, you'll need to keep all your resources in place to build on what you've already done. --Otherwise, you can use the following steps to delete the function app and its related resources to avoid incurring any further costs. ---To learn more about Functions costs, see [Estimating Consumption plan costs](functions-consumption-costs.md). --## Next steps --Expand that function by adding an output <abbr title="A declarative connection between a function and other resources. An input binding provides data to the function; an output binding provides data from the function to other resources.">binding</abbr>. This binding writes the string from the HTTP request to a message in an Azure Queue Storage queue. --> [!div class="nextstepaction"] -> [Connect to an Azure Storage queue](functions-add-output-binding-storage-queue-vs-code.md?pivots=programming-language-python) --[Having issues? Let us know.](https://aka.ms/python-functions-qs-survey) --[Azure Functions Core Tools]: functions-run-local.md -[Azure Functions extension for Visual Studio Code]: https://marketplace.visualstudio.com/items?itemName=ms-azuretools.vscode-azurefunctions |
| azure-functions | Functions Create First Function Resource Manager | https://github.com/MicrosoftDocs/azure-docs/commits/main/articles/azure-functions/functions-create-first-function-resource-manager.md | Title: Create your first function using Azure Resource Manager templates description: Create and deploy to Azure a simple HTTP triggered serverless function by using an Azure Resource Manager template (ARM template). Previously updated : 06/22/2022 Last updated : 07/19/2022 The following four Azure resources are created by this template: ## Deploy the template +The following scripts are designed for and tested in [Azure Cloud Shell](../cloud-shell/overview.md). Choose **Try It** to open a Cloud Shell instance right in your browser. + # [Azure CLI](#tab/azure-cli) ```azurecli-interactive read -p "Enter a resource group name that is used for generating resource names:" resourceGroupName && az deployment group create --resource-group $resourceGroupName --template-uri $ echo "Press [ENTER] to continue ..." && read ```-# [PowerShell](#tab/powershell) +# [Azure PowerShell](#tab/azure-powershell) ```powershell-interactive $resourceGroupName = Read-Host -Prompt "Enter a resource group name that is used for generating resource names" If you continue to the next step and add an Azure Storage queue output binding, Otherwise, use the following command to delete the resource group and all its contained resources to avoid incurring further costs. -# [CLI](#tab/CLI) +# [Azure CLI](#tab/azure-cli) ```azurecli-interactive az group delete --name <RESOURCE_GROUP_NAME> ``` -# [PowerShell](#tab/PowerShell) +# [Azure PowerShell](#tab/azure-powershell) ```azurepowershell-interactive Remove-AzResourceGroup -Name <RESOURCE_GROUP_NAME> |
| azure-monitor | Azure Monitor Agent Data Collection Endpoint | https://github.com/MicrosoftDocs/azure-docs/commits/main/articles/azure-monitor/agents/azure-monitor-agent-data-collection-endpoint.md | description: Use data collection endpoints to uniquely configure ingestion setti Previously updated : 3/16/2022 Last updated : 06/06/2022 -# Using data collection endpoints with Azure Monitor agent -[Data Collection Endpoints (DCEs)](../essentials/data-collection-endpoint-overview.md) allow you to uniquely configure ingestion settings for your machines, giving you greater control over your networking requirements. +# Enable network isolation for the Azure Monitor Agent +By default, Azure Monitor agent will connect to a public endpoint to connect to your Azure Monitor environment. You can enable network isolation for your agents by creating [data collection endpoints](../essentials/data-collection-endpoint-overview.md) and adding them to your [Azure Monitor Private Link Scopes (AMPLS)](../logs/private-link-configure.md#connect-azure-monitor-resources). + ## Create data collection endpoint-See [Data collection endpoints in Azure Monitor](../essentials/data-collection-endpoint-overview.md) for details on data collection endpoints and how to create them. +To use network isolation, you must create a data collection endpoint for each of your regions for agents to connect instead of the public endpoint. See [Create a data collection endpoint](../essentials/data-collection-endpoint-overview.md#create-data-collection-endpoint) for details on create a DCE. An agent can only connect to a DCE in the same region. If you have agents in multiple regions, then you must create a DCE in each one. -## Create endpoint association in Azure portal -Use **Data collection rules** in the portal to associate endpoints with a resource (e.g. a virtual machine) or a set of resources. Create a new rule or open an existing rule. In the **Resources** tab, click on the **Data collection endpoint** drop-down to associate an existing endpoint for your resource in the same region (or select multiple resources in the same region to bulk-assign an endpoint for them). Doing this creates an association per resource which links the endpoint to the resource. The Azure Monitor agent running on these resources will now start using the endpoint instead for uploading data to Azure Monitor. -[](../agents/media/data-collection-rule-azure-monitor-agent/data-collection-rule-virtual-machines-with-endpoint.png#lightbox) +## Create private link +With [Azure Private Link](../../private-link/private-link-overview.md), you can securely link Azure platform as a service (PaaS) resources to your virtual network by using private endpoints. An Azure Monitor Private Link connects a private endpoint to a set of Azure Monitor resources, defining the boundaries of your monitoring network. That set is called an Azure Monitor Private Link Scope (AMPLS). See [Configure your Private Link](../logs/private-link-configure.md) for details on creating and configuring your AMPLS. +## Add DCE to AMPLS +Add the data collection endpoints to a new or existing [Azure Monitor Private Link Scopes (AMPLS)](../logs/private-link-configure.md#connect-azure-monitor-resources) resource. This adds the DCE endpoints to your private DNS zone (see [how to validate](../logs/private-link-configure.md#review-and-validate-your-private-link-setup)) and allows communication via private links. You can do this from either the AMPLS resource or from within an existing DCE resource's 'Network Isolation' tab. > [!NOTE]-> The data collection endpoint should be created in the **same region** where your virtual machines exist. +> Other Azure Monitor resources like the Log Analytics workspace(s) configured in your data collection rules that you wish to send data to, must be part of this same AMPLS resource. +++For your data collection endpoint(s), ensure **Accept access from public networks not connected through a Private Link Scope** option is set to **No** under the 'Network Isolation' tab of your endpoint resource in Azure portal, as shown below. This ensures that public internet access is disabled, and network communication only happen via private links. +++++ Associate the data collection endpoints to the target resources by editing the data collection rule in Azure portal. From the **Resources** tab, select **Enable Data Collection Endpoints** and select a DCE for each virtual machine. See [Configure data collection for the Azure Monitor agent](../agents/data-collection-rule-azure-monitor-agent.md). ++ -## Create endpoint and association using REST API -> [!NOTE] -> The data collection endpoint should be created in the **same region** where your virtual machines exist. --1. Create data collection endpoint(s) using these [DCE REST APIs](/cli/azure/monitor/data-collection/endpoint). -2. Create association(s) to link the endpoint(s) to your target machines or resources, using these [DCRA REST APIs](/rest/api/monitor/datacollectionruleassociations/create#examples). ---## Sample data collection endpoint -The sample data collection endpoint below is for virtual machines with Azure Monitor agent, with public network access disabled so that agent only uses private links to communicate and send data to Azure Monitor/Log Analytics. --```json -{ - "id": "/subscriptions/xxxxxxxx-xxxx-xxxx-xxxx-xxxxxxxxxx/resourceGroups/myResourceGroup/providers/Microsoft.Insights/dataCollectionEndpoints/myCollectionEndpoint", - "name": "myCollectionEndpoint", - "type": "Microsoft.Insights/dataCollectionEndpoints", - "location": "eastus", - "tags": { - "tag1": "A", - "tag2": "B" - }, - "properties": { - "configurationAccess": { - "endpoint": "https://mycollectionendpoint-abcd.eastus-1.control.monitor.azure.com" - }, - "logsIngestion": { - "endpoint": "https://mycollectionendpoint-abcd.eastus-1.ingest.monitor.azure.com" - }, - "networkAcls": { - "publicNetworkAccess": "Disabled" - } - }, - "systemData": { - "createdBy": "user1", - "createdByType": "User", - "createdAt": "yyyy-mm-ddThh:mm:ss.sssssssZ", - "lastModifiedBy": "user2", - "lastModifiedByType": "User", - "lastModifiedAt": "yyyy-mm-ddThh:mm:ss.sssssssZ" - }, - "etag": "xxxxxxxx-xxxx-xxxx-xxxx-xxxxxxxxxxxx" -} -``` --## Enable network isolation for the Azure Monitor Agent -You can use data collection endpoints to enable the Azure Monitor agent to communicate to the internet via private links. To do so, you must: -1. Create data collection endpoint(s), at least one per region, as shown above -2. Add the data collection endpoints to a new or existing [Azure Monitor Private Link Scopes (AMPLS)](../logs/private-link-configure.md#connect-azure-monitor-resources) resource. This adds the DCE endpoints to your private DNS zone (see [how to validate](../logs/private-link-configure.md#review-and-validate-your-private-link-setup)) and allows communication via private links. You can do this from either the AMPLS resource or from within an existing DCE resource's 'Network Isolation' tab. - > [!NOTE] - > Other Azure Monitor resources like the Log Analytics workspace(s) configured in your data collection rules that you wish to send data to, must be part of this same AMPLS resource. -3. For your data collection endpoint(s), ensure **Accept access from public networks not connected through a Private Link Scope** option is set to **No** under the 'Network Isolation' tab of your endpoint resource in Azure portal, as shown below. This ensures that public internet access is disabled, and network communication only happen via private links. -4. Associate the data collection endpoints to the target resources, using the data collection rules experience in Azure portal. This results in the agent using the configured the data collection endpoint(s) for network communications. See [Configure data collection for the Azure Monitor agent](../agents/data-collection-rule-azure-monitor-agent.md). --  ## Next steps - [Associate endpoint to machines](../agents/data-collection-rule-azure-monitor-agent.md#create-data-collection-rule-and-association) |
| azure-monitor | Data Collection Rule Azure Monitor Agent | https://github.com/MicrosoftDocs/azure-docs/commits/main/articles/azure-monitor/agents/data-collection-rule-azure-monitor-agent.md | To collect data from virtual machines using the Azure Monitor agent, you'll: 1. Create [data collection rules (DCR)](../essentials/data-collection-rule-overview.md) that define which data Azure Monitor agent sends to which destinations. 1. Associate the data collection rule to specific virtual machines. - You can associate virtual machines to multiple data collection rules. This allows you to define each data collection rule to address a particular requirement, and associate the data collection rules to virtual machines based on the specific data you want to collect from each machine. +You can associate virtual machines to multiple data collection rules. This allows you to define each data collection rule to address a particular requirement, and associate the data collection rules to virtual machines based on the specific data you want to collect from each machine. ## Create data collection rule and association To send data to Log Analytics, create the data collection rule in the **same reg ### [Portal](#tab/portal) -1. From the **Monitor** menu, select **Data Collection Rules**. -1. Select **Create** to create a new Data Collection Rule and associations. +In the **Monitor** menu in the Azure portal, select **Data Collection Rules** from the **Settings** section. Click **Create** to create a new Data Collection Rule and assignment. - [](media/data-collection-rule-azure-monitor-agent/data-collection-rules-updated.png#lightbox) - -1. Provide a **Rule name** and specify a **Subscription**, **Resource Group**, **Region**, and **Platform Type**. +[](media/data-collection-rule-azure-monitor-agent/data-collection-rules-updated.png#lightbox) - **Region** specifies where the DCR will be created. The virtual machines and their associations can be in any subscription or resource group in the tenant. +Click **Create** to create a new rule and set of associations. Provide a **Rule name** and specify a **Subscription**, **Resource Group** and **Region**. This specifies where the DCR will be created. The virtual machines and their associations can be in any subscription or resource group in the tenant. +Additionally, choose the appropriate **Platform Type** which specifies the type of resources this rule can apply to. Custom will allow for both Windows and Linux types. This allows for pre-curated creation experiences with options scoped to the selected platform type. - **Platform Type** specifies the type of resources this rule can apply to. Custom allows for both Windows and Linux types. +[](media/data-collection-rule-azure-monitor-agent/data-collection-rule-basics-updated.png#lightbox) - [](media/data-collection-rule-azure-monitor-agent/data-collection-rule-basics-updated.png#lightbox) +In the **Resources** tab, add the resources (virtual machines, virtual machine scale sets, Arc for servers) that should have the Data Collection Rule applied. The Azure Monitor Agent will be installed on resources that don't already have it installed, and will enable Azure Managed Identity as well. -1. On the **Resources** tab, add the resources (virtual machines, virtual machine scale sets, Arc for servers) to which to associate the data collection rule. The portal will install Azure Monitor Agent on resources that don't already have it installed, and will also enable Azure Managed Identity. +> [!IMPORTANT] +> If you need network isolation using private links for collecting data using agents from your resources, then select **Enable Data Collection Endpoints** and select a DCE for each virtual machine. See [Enable network isolation for the Azure Monitor Agent](azure-monitor-agent-data-collection-endpoint.md) for details. - > [!IMPORTANT] - > The portal enables System-Assigned managed identity on the target resources, in addition to existing User-Assigned Identities (if any). For existing applications, unless you specify the User-Assigned identity in the request, the machine will default to using System-Assigned Identity instead. - If you need network isolation using private links, select existing endpoints from the same region for the respective resources, or [create a new endpoint](../essentials/data-collection-endpoint-overview.md). - [](media/data-collection-rule-azure-monitor-agent/data-collection-rule-virtual-machines-with-endpoint.png#lightbox) -1. On the **Collect and deliver** tab, select **Add data source** to add a data source and set a destination. -1. Select a **Data source type**. -1. Select which data you want to collect. For performance counters, you can select from a predefined set of objects and their sampling rate. For events, you can select from a set of logs and severity levels. +On the **Collect and deliver** tab, click **Add data source** to add a data source and destination set. Select a **Data source type**, and the corresponding details to select will be displayed. For performance counters, you can select from a predefined set of objects and their sampling rate. For events, you can select from a set of logs or facilities and the severity level. - [](media/data-collection-rule-azure-monitor-agent/data-collection-rule-data-source-basic-updated.png#lightbox) +[](media/data-collection-rule-azure-monitor-agent/data-collection-rule-data-source-basic-updated.png#lightbox) -1. Select **Custom** to collect logs and performance counters that are not [currently supported data sources](azure-monitor-agent-overview.md#data-sources-and-destinations) or to [filter events using XPath queries](#filter-events-using-xpath-queries). You can then specify an [XPath](https://www.w3schools.com/xml/xpath_syntax.asp) to collect any specific values. See [Sample DCR](data-collection-rule-sample-agent.md) for an example. - [](media/data-collection-rule-azure-monitor-agent/data-collection-rule-data-source-custom-updated.png#lightbox) +To specify other logs and performance counters from the [currently supported data sources](azure-monitor-agent-overview.md#data-sources-and-destinations) or to filter events using XPath queries, select **Custom**. You can then specify an [XPath ](https://www.w3schools.com/xml/xpath_syntax.asp) for any specific values to collect. See [Sample DCR](data-collection-rule-sample-agent.md) for an example. -1. On the **Destination** tab, add one or more destinations for the data source. You can select multiple destinations of the same or different types - for instance multiple Log Analytics workspaces (known as "multi-homing"). +[](media/data-collection-rule-azure-monitor-agent/data-collection-rule-data-source-custom-updated.png#lightbox) - You can send Windows event and Syslog data sources can to Azure Monitor Logs only. You can send performance counters to both Azure Monitor Metrics and Azure Monitor Logs. +On the **Destination** tab, add one or more destinations for the data source. You can select multiple destinations of same of different types, for instance multiple Log Analytics workspaces (i.e. "multi-homing"). Windows event and Syslog data sources can only send to Azure Monitor Logs. Performance counters can send to both Azure Monitor Metrics and Azure Monitor Logs. - [](media/data-collection-rule-azure-monitor-agent/data-collection-rule-destination.png#lightbox) +[](media/data-collection-rule-azure-monitor-agent/data-collection-rule-destination.png#lightbox) -1. Select **Add Data Source** and then **Review + create** to review the details of the data collection rule and association with the set of virtual machines. -1. Select **Create** to create the data collection rule. +Click **Add Data Source** and then **Review + create** to review the details of the data collection rule and association with the set of VMs. Click **Create** to create it. > [!NOTE]-> It might take up to 5 minutes for data to be sent to the destinations after you create the data collection rule and associations. +> After the data collection rule and associations have been created, it might take up to 5 minutes for data to be sent to the destinations. +## Create rule and association in Azure portal ++You can use the Azure portal to create a data collection rule and associate virtual machines in your subscription to that rule. The Azure Monitor agent will be automatically installed and a managed identity created for any virtual machines that don't already have it installed. ++> [!IMPORTANT] +> Creating a data collection rule using the portal also enables System-Assigned managed identity on the target resources, in addition to existing User-Assigned Identities (if any). For existing applications unless they specify the User-Assigned identity in the request, the machine will default to using System-Assigned Identity instead. [Learn More](../../active-directory/managed-identities-azure-resources/managed-identities-faq.md#what-identity-will-imds-default-to-if-dont-specify-the-identity-in-the-request) ++++> [!NOTE] +> If you wish to send data to Log Analytics, you must create the data collection rule in the **same region** where your Log Analytics workspace resides. The rule can be associated to machines in other supported region(s). +++## Limit data collection with custom XPath queries +Since you're charged for any data collected in a Log Analytics workspace, you should collect only the data that you require. Using basic configuration in the Azure portal, you only have limited ability to filter events to collect. For Application and System logs, this is all logs with a particular severity. For Security logs, this is all audit success or all audit failure logs. ++To specify additional filters, you must use Custom configuration and specify an XPath that filters out the events you don't. XPath entries are written in the form `LogName!XPathQuery`. For example, you may want to return only events from the Application event log with an event ID of 1035. The XPathQuery for these events would be `*[System[EventID=1035]]`. Since you want to retrieve the events from the Application event log, the XPath would be `Application!*[System[EventID=1035]]` ++### Extracting XPath queries from Windows Event Viewer +One of the ways to create XPath queries is to use Windows Event Viewer to extract XPath queries as shown below. ++* In step 5 when pasting over the 'Select Path' parameter value, you must append the log type category followed by '!' and then paste the copied value. ++[](media/data-collection-rule-azure-monitor-agent/data-collection-rule-extract-xpath.png#lightbox) ++See [XPath 1.0 limitations](/windows/win32/wes/consuming-events#xpath-10-limitations) for a list of limitations in the XPath supported by Windows event log. ++> [!TIP] +> You can use the PowerShell cmdlet `Get-WinEvent` with the `FilterXPath` parameter to test the validity of an XPathQuery locally on your machine first. The following script shows an example. +> +> ```powershell +> $XPath = '*[System[EventID=1035]]' +> Get-WinEvent -LogName 'Application' -FilterXPath $XPath +> ``` +> +> - **In the cmdlet above, the value for '-LogName' parameter is the initial part of the XPath query until the '!', while only the rest of the XPath query goes into the $XPath parameter.** +> - If events are returned, the query is valid. +> - If you receive the message *No events were found that match the specified selection criteria.*, the query may be valid, but there are no matching events on the local machine. +> - If you receive the message *The specified query is invalid* , the query syntax is invalid. ++The following table shows examples for filtering events using a custom XPath. ++| Description | XPath | +|:|:| +| Collect only System events with Event ID = 4648 | `System!*[System[EventID=4648]]` +| Collect Security Log events with Event ID = 4648 and a process name of consent.exe | `Security!*[System[(EventID=4648)]] and *[EventData[Data[@Name='ProcessName']='C:\Windows\System32\consent.exe']]` | +| Collect all Critical, Error, Warning, and Information events from the System event log except for Event ID = 6 (Driver loaded) | `System!*[System[(Level=1 or Level=2 or Level=3) and (EventID != 6)]]` | +| Collect all success and failure Security events except for Event ID 4624 (Successful logon) | `Security!*[System[(band(Keywords,13510798882111488)) and (EventID != 4624)]]` | +++## Create rule and association using REST API ++Follow the steps below to create a data collection rule and associations using the REST API. ++> [!NOTE] +> If you wish to send data to Log Analytics, you must create the data collection rule in the **same region** where your Log Analytics workspace resides. The rule can be associated to machines in other supported region(s). ### [API](#tab/api) 1. Create a DCR file using the JSON format shown in [Sample DCR](data-collection-rule-sample-agent.md). |
| azure-monitor | Data Collection Text Log | https://github.com/MicrosoftDocs/azure-docs/commits/main/articles/azure-monitor/agents/data-collection-text-log.md | ->[!IMPORTANT] -> This feature is currently in preview. You must submit a request for it to be enabled in your subscriptions at [Azure Monitor Logs: DCR-based Custom Logs Preview Signup](https://aka.ms/CustomLogsOnboard). ## Prerequisites To complete this procedure, you need the following: Use the **Tables - Update** API to create the table with the PowerShell code bel 1. Click the **Cloud Shell** button in the Azure portal and ensure the environment is set to **PowerShell**. - :::image type="content" source="../logs/media/tutorial-ingestion-time-transformations-api/open-cloud-shell.png" lightbox="../logs/media/tutorial-ingestion-time-transformations-api/open-cloud-shell.png" alt-text="Screenshot of opening Cloud Shell in the Azure portal."::: + :::image type="content" source="../logs/media/tutorial-workspace-transformations-api/open-cloud-shell.png" lightbox="../logs/media/tutorial-workspace-transformations-api/open-cloud-shell.png" alt-text="Screenshot of opening Cloud Shell in the Azure portal."::: 2. Copy the following PowerShell code and replace the **Path** parameter with the appropriate values for your workspace in the `Invoke-AzRestMethod` command. Paste it into the Cloud Shell prompt to run it. A [data collection endpoint (DCE)](../essentials/data-collection-endpoint-overvi 1. In the Azure portal's search box, type in *template* and then select **Deploy a custom template**. - :::image type="content" source="../logs/media/tutorial-ingestion-time-transformations-api/deploy-custom-template.png" lightbox="../logs/media/tutorial-ingestion-time-transformations-api/deploy-custom-template.png" alt-text="Screenshot that shows portal blade to deploy custom template."::: + :::image type="content" source="../logs/media/tutorial-workspace-transformations-api/deploy-custom-template.png" lightbox="../logs/media/tutorial-workspace-transformations-api/deploy-custom-template.png" alt-text="Screenshot that shows portal blade to deploy custom template."::: 2. Click **Build your own template in the editor**. - :::image type="content" source="../logs/media/tutorial-ingestion-time-transformations-api/build-custom-template.png" lightbox="../logs/media/tutorial-ingestion-time-transformations-api/build-custom-template.png" alt-text="Screenshot that shows portal blade to build template in the editor."::: + :::image type="content" source="../logs/media/tutorial-workspace-transformations-api/build-custom-template.png" lightbox="../logs/media/tutorial-workspace-transformations-api/build-custom-template.png" alt-text="Screenshot that shows portal blade to build template in the editor."::: 3. Paste the Resource Manager template below into the editor and then click **Save**. You don't need to modify this template since you will provide values for its parameters. - :::image type="content" source="../logs/media/tutorial-ingestion-time-transformations-api/edit-template.png" lightbox="../logs/media/tutorial-ingestion-time-transformations-api/edit-template.png" alt-text="Screenshot that shows portal blade to edit Resource Manager template."::: + :::image type="content" source="../logs/media/tutorial-workspace-transformations-api/edit-template.png" lightbox="../logs/media/tutorial-workspace-transformations-api/edit-template.png" alt-text="Screenshot that shows portal blade to edit Resource Manager template."::: ```json { A [data collection endpoint (DCE)](../essentials/data-collection-endpoint-overvi 4. On the **Custom deployment** screen, specify a **Subscription** and **Resource group** to store the data collection rule and then provide values a **Name** for the data collection endpoint. The **Location** should be the same location as the workspace. The **Region** will already be populated and is used for the location of the data collection endpoint. - :::image type="content" source="../logs/media/tutorial-ingestion-time-transformations-api/custom-deployment-values.png" lightbox="../logs/media/tutorial-ingestion-time-transformations-api/custom-deployment-values.png" alt-text="Screenshot that shows portal blade to edit custom deployment values for data collection endpoint."::: + :::image type="content" source="../logs/media/tutorial-workspace-transformations-api/custom-deployment-values.png" lightbox="../logs/media/tutorial-workspace-transformations-api/custom-deployment-values.png" alt-text="Screenshot that shows portal blade to edit custom deployment values for data collection endpoint."::: 5. Click **Review + create** and then **Create** when you review the details. 6. Once the DCE is created, select it so you can view its properties. Note the **Logs ingestion URI** since you'll need this in a later step. - :::image type="content" source="../logs/media/tutorial-custom-logs-api/data-collection-endpoint-overview.png" lightbox="../logs/media/tutorial-custom-logs-api/data-collection-endpoint-overview.png" alt-text="Screenshot that shows portal blade with details of data collection endpoint uri."::: + :::image type="content" source="../logs/media/tutorial-logs-ingestion-api/data-collection-endpoint-overview.png" lightbox="../logs/media/tutorial-logs-ingestion-api/data-collection-endpoint-overview.png" alt-text="Screenshot that shows portal blade with details of data collection endpoint uri."::: 7. Click **JSON View** to view other details for the DCE. Copy the **Resource ID** since you'll need this in a later step. - :::image type="content" source="../logs/media/tutorial-custom-logs-api/data-collection-endpoint-json.png" lightbox="../logs/media/tutorial-custom-logs-api/data-collection-endpoint-json.png" alt-text="Screenshot that shows JSON view for data collection endpoint with the resource ID."::: + :::image type="content" source="../logs/media/tutorial-logs-ingestion-api/data-collection-endpoint-json.png" lightbox="../logs/media/tutorial-logs-ingestion-api/data-collection-endpoint-json.png" alt-text="Screenshot that shows JSON view for data collection endpoint with the resource ID."::: ## Create data collection rule The [data collection rule (DCR)](../essentials/data-collection-rule-overview.md) 1. The data collection rule requires the resource ID of your workspace. Navigate to your workspace in the **Log Analytics workspaces** menu in the Azure portal. From the **Properties** page, copy the **Resource ID** and save it for later use. - :::image type="content" source="../logs/media/tutorial-custom-logs-api/workspace-resource-id.png" lightbox="../logs/media/tutorial-custom-logs-api/workspace-resource-id.png" alt-text="Screenshot showing workspace resource ID."::: + :::image type="content" source="../logs/media/tutorial-logs-ingestion-api/workspace-resource-id.png" lightbox="../logs/media/tutorial-logs-ingestion-api/workspace-resource-id.png" alt-text="Screenshot showing workspace resource ID."::: 1. In the Azure portal's search box, type in *template* and then select **Deploy a custom template**. - :::image type="content" source="../logs/media/tutorial-ingestion-time-transformations-api/deploy-custom-template.png" lightbox="../logs/media/tutorial-ingestion-time-transformations-api/deploy-custom-template.png" alt-text="Screenshot that shows portal blade to deploy custom template."::: + :::image type="content" source="../logs/media/tutorial-workspace-transformations-api/deploy-custom-template.png" lightbox="../logs/media/tutorial-workspace-transformations-api/deploy-custom-template.png" alt-text="Screenshot that shows portal blade to deploy custom template."::: 2. Click **Build your own template in the editor**. - :::image type="content" source="../logs/media/tutorial-ingestion-time-transformations-api/build-custom-template.png" lightbox="../logs/media/tutorial-ingestion-time-transformations-api/build-custom-template.png" alt-text="Screenshot that shows portal blade to build template in the editor."::: + :::image type="content" source="../logs/media/tutorial-workspace-transformations-api/build-custom-template.png" lightbox="../logs/media/tutorial-workspace-transformations-api/build-custom-template.png" alt-text="Screenshot that shows portal blade to build template in the editor."::: 3. Paste one of the Resource Manager templates below into the editor and then change the following values: - `streamDeclarations`: Defines the columns of the incoming data. This must match the structure of the log file. - `filePatterns`: Specifies the location and file pattern of the log files to collect. This defines a separate pattern for Windows and Linux agents.- - `transformKql`: Specifies a [transformation](../logs/../essentials/data-collection-rule-transformations.md) to apply to the incoming data before it's sent to the workspace. Data collection rules for Azure Monitor agent don't yet support transformations, so this value should currently be `source`. + - `transformKql`: Specifies a [transformation](../logs/../essentials//data-collection-transformations.md) to apply to the incoming data before it's sent to the workspace. Data collection rules for Azure Monitor agent don't yet support transformations, so this value should currently be `source`. 4. Click **Save**. - :::image type="content" source="../logs/media/tutorial-ingestion-time-transformations-api/edit-template.png" lightbox="../logs/media/tutorial-ingestion-time-transformations-api/edit-template.png" alt-text="Screenshot that shows portal blade to edit Resource Manager template."::: + :::image type="content" source="../logs/media/tutorial-workspace-transformations-api/edit-template.png" lightbox="../logs/media/tutorial-workspace-transformations-api/edit-template.png" alt-text="Screenshot that shows portal blade to edit Resource Manager template."::: **Data collection rule for text log** Open IIS log on the agent machine to verify logs are in W3C format. ### Share logs with Microsoft If everything is configured properly, but you're still not collecting log data, use the following procedure to collect diagnostics logs for Azure Monitor agent to share with the Azure Monitor group. -1. Open an elevated powershell window. +1. Open an elevated PowerShell window. 2. Change to directory `C:\Packages\Plugins\Microsoft.Azure.Monitor.AzureMonitorWindowsAgent\[version]\`. 3. Execute the script: `.\CollectAMALogs.ps1`. 4. Share the `AMAFiles.zip` file generated on the desktop. |
| azure-monitor | Data Sources Custom Logs | https://github.com/MicrosoftDocs/azure-docs/commits/main/articles/azure-monitor/agents/data-sources-custom-logs.md | -> [!IMPORTANT] -> This article describes collecting file based text logs using the Log Analytics agent. It should not be confused with the [custom logs API](../logs/custom-logs-overview.md) which allows you to send data to Azure Monitor Logs using a REST API. - The Custom Logs data source for the Log Analytics agent in Azure Monitor allows you to collect events from text files on both Windows and Linux computers. Many applications log information to text files instead of standard logging services such as Windows Event log or Syslog. Once collected, you can either parse the data into individual fields in your queries or extract the data during collection to individual fields. [!INCLUDE [Log Analytics agent deprecation](../../../includes/log-analytics-agent-deprecation.md)] |
| azure-monitor | Data Sources | https://github.com/MicrosoftDocs/azure-docs/commits/main/articles/azure-monitor/agents/data-sources.md | - Title: Sources of data in Azure Monitor | Microsoft Docs -description: Describes the data available to monitor the health and performance of your Azure resources and the applications running on them. --- Previously updated : 02/07/2022-----# Sources of monitoring data for Azure Monitor -Azure Monitor is based on a [common monitoring data platform](../data-platform.md) that includes [Logs](../logs/data-platform-logs.md) and [Metrics](../essentials/data-platform-metrics.md). Collecting data into this platform allows data from multiple resources to be analyzed together using a common set of tools in Azure Monitor. Monitoring data may also be sent to other locations to support certain scenarios, and some resources may write to other locations before they can be collected into Logs or Metrics. --This article describes the different sources of monitoring data collected by Azure Monitor in addition to the monitoring data created by Azure resources. Links are provided to detailed information on configuration required to collect this data to different locations. --## Application tiers --Sources of monitoring data from Azure applications can be organized into tiers, the highest tiers being your application itself and the lower tiers being components of Azure platform. The method of accessing data from each tier varies. The application tiers are summarized in the table below, and the sources of monitoring data in each tier are presented in the following sections. See [Monitoring data locations in Azure](../monitor-reference.md) for a description of each data location and how you can access its data. --- ---### Azure -The following table briefly describes the application tiers that are specific to Azure. Following the link for further details on each in the sections below. --| Tier | Description | Collection method | -|:|:|:| -| [Azure Tenant](#azure-tenant) | Data about the operation of tenant-level Azure services, such as Azure Active Directory. | View AAD data in portal or configure collection to Azure Monitor using a tenant diagnostic setting. | -| [Azure subscription](#azure-subscription) | Data related to the health and management of cross-resource services in your Azure subscription such as Resource Manager and Service Health. | View in portal or configure collection to Azure Monitor using a log profile. | -| [Azure resources](#azure-resources) | Data about the operation and performance of each Azure resource. | Metrics collected automatically, view in Metrics Explorer.<br>Configure diagnostic settings to collect logs in Azure Monitor.<br>Monitoring solutions and Insights available for more detailed monitoring for specific resource types. | --### Azure, other cloud, or on-premises -The following table briefly describes the application tiers that may be in Azure, another cloud, or on-premises. Following the link for further details on each in the sections below. --| Tier | Description | Collection method | -|:|:|:| -| [Operating system (guest)](#operating-system-guest) | Data about the operating system on compute resources. | Install Azure Monitor agent on virtual machines, scale sets and Arc-enabled servers to collect logs and metrics into Azure Monitor. | -| [Application Code](#application-code) | Data about the performance and functionality of the actual application and code, including performance traces, application logs, and user telemetry. | Instrument your code to collect data into Application Insights. | -| [Custom sources](#custom-sources) | Data from external services or other components or devices. | Collect log or metrics data into Azure Monitor from any REST client. | --## Azure tenant -Telemetry related to your Azure tenant is collected from tenant-wide services such as Azure Active Directory. -- --### Azure Active Directory Audit Logs -[Azure Active Directory reporting](../../active-directory/reports-monitoring/overview-reports.md) contains the history of sign-in activity and audit trail of changes made within a particular tenant. --| Destination | Description | Reference | -|:|:|:| -| Azure Monitor Logs | Configure Azure AD logs to be collected in Azure Monitor to analyze them with other monitoring data. | [Integrate Azure AD logs with Azure Monitor logs](../../active-directory/reports-monitoring/howto-integrate-activity-logs-with-log-analytics.md) | -| Azure Storage | Export Azure AD logs to Azure Storage for archiving. | [Tutorial: Archive Azure AD logs to an Azure storage account](../../active-directory/reports-monitoring/quickstart-azure-monitor-route-logs-to-storage-account.md) | -| Event Hub | Stream Azure AD logs to other locations using Event Hubs. | [Tutorial: Stream Azure Active Directory logs to an Azure event hub](../../active-directory/reports-monitoring/tutorial-azure-monitor-stream-logs-to-event-hub.md). | ----## Azure subscription -Telemetry related to the health and operation of your Azure subscription. -- --### Azure Activity log -The [Azure Activity log](../essentials/platform-logs-overview.md) includes service health records along with records on any configuration changes made to the resources in your Azure subscription. The Activity log is available to all Azure resources and represents their _external_ view. --| Destination | Description | Reference | -|:|:| -| Activity log | The Activity log is collected into its own data store that you can view from the Azure Monitor menu or use to create Activity log alerts. | [Query the Activity log in the Azure portal](../essentials/activity-log.md#view-the-activity-log) | -| Azure Monitor Logs | Configure Azure Monitor Logs to collect the Activity log to analyze it with other monitoring data. | [Collect and analyze Azure activity logs in Log Analytics workspace in Azure Monitor](../essentials/activity-log.md) | -| Azure Storage | Export the Activity log to Azure Storage for archiving. | [Archive Activity log](../essentials/resource-logs.md#send-to-azure-storage) | -| Event Hubs | Stream the Activity log to other locations using Event Hubs | [Stream Activity log to Event Hub](../essentials/resource-logs.md#send-to-azure-event-hubs). | --### Azure Service Health -[Azure Service Health](../../service-health/service-health-overview.md) provides information about the health of the Azure services in your subscription that your application and resources rely on. --| Destination | Description | Reference | -|:|:|:| -| Activity log<br>Azure Monitor Logs | Service Health records are stored in the Azure Activity log, so you can view them in the Azure portal or perform any other activities you can perform with the Activity log. | [View service health notifications by using the Azure portal](../../service-health/service-notifications.md) | ---## Azure resources -Metrics and resource logs provide information about the _internal_ operation of Azure resources. These are available for most Azure services, and monitoring solutions and insights collect additional data for particular services. -- ---### Platform metrics -Most Azure services will send [platform metrics](../essentials/data-platform-metrics.md) that reflect their performance and operation directly to the metrics database. The specific [metrics will vary for each type of resource](../essentials/metrics-supported.md). --| Destination | Description | Reference | -|:|:|:| -| Azure Monitor Metrics | Platform metrics will write to the Azure Monitor metrics database with no configuration. Access platform metrics from Metrics Explorer. | [Getting started with Azure Metrics Explorer](../essentials/metrics-getting-started.md)<br>[Supported metrics with Azure Monitor](../essentials/metrics-supported.md) | -| Azure Monitor Logs | Copy platform metrics to Logs for trending and other analysis using Log Analytics. | [Azure diagnostics direct to Log Analytics](../essentials/resource-logs.md#send-to-log-analytics-workspace) | -| Event Hubs | Stream metrics to other locations using Event Hubs. |[Stream Azure monitoring data to an event hub for consumption by an external tool](../essentials/stream-monitoring-data-event-hubs.md) | --### Resource logs -[Resource logs](../essentials/platform-logs-overview.md) provide insights into the _internal_ operation of an Azure resource. Resource logs are created automatically, but you must create a diagnostic setting to specify a destination for them to collected for each resource. --The configuration requirements and content of resource logs vary by resource type, and not all services yet create them. See [Supported services, schemas, and categories for Azure resource logs](../essentials/resource-logs-schema.md) for details on each service and links to detailed configuration procedures. If the service isn't listed in this article, then that service doesn't currently create resource logs. --| Destination | Description | Reference | -|:|:|:| -| Azure Monitor Logs | Send resource logs to Azure Monitor Logs for analysis with other collected log data. | [Collect Azure resource logs in Log Analytics workspace in Azure Monitor](../essentials/resource-logs.md#send-to-azure-storage) | -| Storage | Send resource logs to Azure Storage for archiving. | [Archive Azure resource logs](../essentials/resource-logs.md#send-to-log-analytics-workspace) | -| Event Hubs | Stream resource logs to other locations using Event Hubs. |[Stream Azure resource logs to an event hub](../essentials/resource-logs.md#send-to-azure-event-hubs) | --## Operating system (guest) -Compute resources in Azure, in other clouds, and on-premises have a guest operating system to monitor. With the installation of the Azure Monitor agent, you can gather telemetry from the guest into Azure Monitor to analyze it with the same monitoring tools as the Azure services themselves. -- --### Azure Monitor agent -[Install the Azure Monitor agent](./azure-monitor-agent-manage.md) for comprehensive monitoring and management of your Windows or Linux virtual machines, scale sets and Arc-enabled servers (resources in other clouds or on-premises with Azure Arc installed, at no additional cost). --| Destination | Description | Reference | -|:|:|:| -| Azure Monitor Logs | The Azure Monitor agent allows you to collect logs from data sources that you configure using [data collection rules](./data-collection-rule-azure-monitor-agent.md) or from monitoring solutions that provide additional insights into applications running on the machine. These can be sent to one or more Log Analytics workspaces. | [Data sources and destinations](./azure-monitor-agent-overview.md#data-sources-and-destinations) | -| Azure Monitor Metrics (preview) | The Azure Monitor agent allows you to collect performance counters and send them to Azure Monitor metrics database | [Data sources and destinations](./azure-monitor-agent-overview.md#data-sources-and-destinations) | --### Azure Diagnostic extension -Enabling the Azure Diagnostics extension for Azure Virtual machines allows you to collect logs and metrics from the guest operating system of Azure compute resources including Azure Cloud Service (classic) Web and Worker Roles, Virtual Machines, virtual machine scale sets, and Service Fabric. --| Destination | Description | Reference | -|:|:|:| -| Storage | Azure diagnostics extension always writes to an Azure Storage account. | [Install and configure Windows Azure diagnostics extension (WAD)](./diagnostics-extension-windows-install.md)<br>[Use Linux Diagnostic Extension to monitor metrics and logs](../../virtual-machines/extensions/diagnostics-linux.md) | -| Azure Monitor Metrics (preview) | When you configure the Diagnostics Extension to collect performance counters, they are written to the Azure Monitor metrics database. | [Send Guest OS metrics to the Azure Monitor metric store using a Resource Manager template for a Windows virtual machine](../essentials/collect-custom-metrics-guestos-resource-manager-vm.md) | -| Event Hubs | Configure the Diagnostics Extension to stream the data to other locations using Event Hubs. | [Streaming Azure Diagnostics data by using Event Hubs](./diagnostics-extension-stream-event-hubs.md)<br>[Use Linux Diagnostic Extension to monitor metrics and logs](../../virtual-machines/extensions/diagnostics-linux.md) | -| Application Insights Logs | Collect logs and performance counters from the compute resource supporting your application to be analyzed with other application data. | [Send Cloud Service, Virtual Machine, or Service Fabric diagnostic data to Application Insights](./diagnostics-extension-to-application-insights.md) | ---### VM insights -[VM insights](../vm/vminsights-overview.md) provides a customized monitoring experience for virtual machines providing features beyond core Azure Monitor functionality. It requires a Dependency Agent on Windows and Linux virtual machines that integrates with the Log Analytics agent to collect discovered data about processes running on the virtual machine and external process dependencies. --| Destination | Description | Reference | -|:|:|:| -| Azure Monitor Logs | Stores data about processes and dependencies on the agent. | [Using VM insights Map to understand application components](../vm/vminsights-maps.md) | ----## Application Code -Detailed application monitoring in Azure Monitor is done with [Application Insights](/azure/application-insights/) which collects data from applications running on a variety of platforms. The application can be running in Azure, another cloud, or on-premises. -- ---### Application data -When you enable Application Insights for an application by installing an instrumentation package, it collects metrics and logs related to the performance and operation of the application. Application Insights stores the data it collects in the same Azure Monitor data platform used by other data sources. It includes extensive tools for analyzing this data, but you can also analyze it with data from other sources using tools such as Metrics Explorer and Log Analytics. --| Destination | Description | Reference | -|:|:|:| -| Azure Monitor Logs | Operational data about your application including page views, application requests, exceptions, and traces. | [Analyze log data in Azure Monitor](../logs/log-query-overview.md) | -| | Dependency information between application components to support Application Map and telemetry correlation. | [Telemetry correlation in Application Insights](../app/correlation.md) <br> [Application Map](../app/app-map.md) | -| | Results of availability tests that test the availability and responsiveness of your application from different locations on the public Internet. | [Monitor availability and responsiveness of any web site](../app/monitor-web-app-availability.md) | -| Azure Monitor Metrics | Application Insights collects metrics describing the performance and operation of the application in addition to custom metrics that you define in your application into the Azure Monitor metrics database. | [Log-based and pre-aggregated metrics in Application Insights](../app/pre-aggregated-metrics-log-metrics.md)<br>[Application Insights API for custom events and metrics](../app/api-custom-events-metrics.md) | -| Azure Storage | Send application data to Azure Storage for archiving. | [Export telemetry from Application Insights](../app/export-telemetry.md) | -| | Details of availability tests are stored in Azure Storage. Use Application Insights in the Azure portal to download for local analysis. Results of availability tests are stored in Azure Monitor Logs. | [Monitor availability and responsiveness of any web site](../app/monitor-web-app-availability.md) | -| | Profiler trace data is stored in Azure Storage. Use Application Insights in the Azure portal to download for local analysis. | [Profile production applications in Azure with Application Insights](../app/profiler-overview.md) -| | Debug snapshot data that is captured for a subset of exceptions is stored in Azure Storage. Use Application Insights in the Azure portal to download for local analysis. | [How snapshots work](../app/snapshot-debugger.md#how-snapshots-work) | --## Monitoring Solutions and Insights -[Monitoring solutions](../insights/solutions.md) and [Insights](../monitor-reference.md) collect data to provide additional insights into the operation of a particular service or application. They may address resources in different application tiers and even multiple tiers. --### Monitoring solutions --| Destination | Description | Reference -|:|:|:| -| Azure Monitor Logs | Monitoring solutions collect data into Azure Monitor logs where it may be analyzed using the query language or [views](../visualize/view-designer.md) that are typically included in the solution. | [Data collection details for monitoring solutions in Azure](../monitor-reference.md) | ---### Container insights -[Container insights](../containers/container-insights-overview.md) provides a customized monitoring experience for [Azure Kubernetes Service (AKS)](../../aks/index.yml). It collects additional data about these resources described in the following table. --| Destination | Description | Reference | -|:|:|:| -| Azure Monitor Logs | Stores monitoring data for AKS including inventory, logs, and events. Metric data is also stored in Logs in order to leverage its analysis functionality in the portal. | [Understand AKS cluster performance with Container insights](../containers/container-insights-analyze.md) | -| Azure Monitor Metrics | Metric data is stored in the metric database to drive visualization and alerts. | [View container metrics in metrics explorer](../containers/container-insights-analyze.md#view-container-metrics-in-metrics-explorer) | -| Azure Kubernetes Service | Provides direct access to your Azure Kubernetes Service (AKS) container logs (stdout/stderror), events, and pod metrics in the portal. | [How to view Kubernetes logs, events, and pod metrics in real-time](../containers/container-insights-livedata-overview.md) | --### VM insights -[VM insights](../vm/vminsights-overview.md) provides a customized experience for monitoring virtual machines. A description of the data collected by VM insights is included in the [Operating System (guest)](#operating-system-guest) section above. --## Custom sources -In addition to the standard tiers of an application, you may need to monitor other resources that have telemetry that can't be collected with the other data sources. For these resources, write this data to either Metrics or Logs using an Azure Monitor API. -- --| Destination | Method | Description | Reference | -|:|:|:|:| -| Azure Monitor Logs | Data Collector API | Collect log data from any REST client and store in Log Analytics workspace. | [Send log data to Azure Monitor with the HTTP Data Collector API (public preview)](../logs/data-collector-api.md) | -| Azure Monitor Metrics | Custom Metrics API | Collect metric data from any REST client and store in Azure Monitor metrics database. | [Send custom metrics for an Azure resource to the Azure Monitor metric store by using a REST API](../essentials/metrics-store-custom-rest-api.md) | ---## Other services -Other services in Azure write data to the Azure Monitor data platform. This allows you to analyze data collected by these services with data collected by Azure Monitor and leverage the same analysis and visualization tools. --| Service | Destination | Description | Reference | -|:|:|:|:| -| [Microsoft Defender for Cloud](../../security-center/index.yml) | Azure Monitor Logs | Microsoft Defender for Cloud stores the security data it collects in a Log Analytics workspace which allows it to be analyzed with other log data collected by Azure Monitor. | [Data collection in Microsoft Defender for Cloud](../../security-center/security-center-enable-data-collection.md) | -| [Microsoft Sentinel](../../sentinel/index.yml) | Azure Monitor Logs | Microsoft Sentinel stores the data it collects from different data sources in a Log Analytics workspace which allows it to be analyzed with other log data collected by Azure Monitor. | [Connect data sources](../../sentinel/quickstart-onboard.md) | ---## Next steps --- Learn more about the [types of monitoring data collected by Azure Monitor](../data-platform.md) and how to view and analyze this data.-- List the [different locations where Azure resources store data](../monitor-reference.md) and how you can access it. |
| azure-monitor | Asp Net Core | https://github.com/MicrosoftDocs/azure-docs/commits/main/articles/azure-monitor/app/asp-net-core.md | If you want to disable telemetry conditionally and dynamically, you can resolve The preceding code sample prevents the sending of telemetry to Application Insights. It doesn't prevent any automatic collection modules from collecting telemetry. If you want to remove a particular auto collection module, see [remove the telemetry module](#configuring-or-removing-default-telemetrymodules). +## Frequently asked questions ++### Does Application Insights support ASP.NET Core 3.X? ++Yes. Update to [Application Insights SDK for ASP.NET Core](https://nuget.org/packages/Microsoft.ApplicationInsights.AspNetCore) version 2.8.0 or later. Earlier versions of the SDK don't support ASP.NET Core 3.X. ++Also, if you're [enabling server-side telemetry based on Visual Studio](#enable-application-insights-server-side-telemetry-visual-studio), update to the latest version of Visual Studio 2019 (16.3.0) to onboard. Earlier versions of Visual Studio don't support automatic onboarding for ASP.NET Core 3.X apps. ++### How can I track telemetry that's not automatically collected? ++Get an instance of `TelemetryClient` by using constructor injection, and call the required `TrackXXX()` method on it. We don't recommend creating new `TelemetryClient` or `TelemetryConfiguration` instances in an ASP.NET Core application. A singleton instance of `TelemetryClient` is already registered in the `DependencyInjection` container, which shares `TelemetryConfiguration` with rest of the telemetry. Creating a new `TelemetryClient` instance is recommended only if it needs a configuration that's separate from the rest of the telemetry. ++The following example shows how to track more telemetry from a controller. ++```csharp +using Microsoft.ApplicationInsights; ++public class HomeController : Controller +{ + private TelemetryClient telemetry; ++ // Use constructor injection to get a TelemetryClient instance. + public HomeController(TelemetryClient telemetry) + { + this.telemetry = telemetry; + } ++ public IActionResult Index() + { + // Call the required TrackXXX method. + this.telemetry.TrackEvent("HomePageRequested"); + return View(); + } +``` ++For more information about custom data reporting in Application Insights, see [Application Insights custom metrics API reference](./api-custom-events-metrics.md). A similar approach can be used for sending custom metrics to Application Insights using the [GetMetric API](./get-metric.md). ++### How do I customize ILogger logs collection? ++By default, only `Warning` logs and more severe logs are automatically captured. To change this behavior, explicitly override the logging configuration for the provider `ApplicationInsights` as shown below. +The following configuration allows ApplicationInsights to capture all `Information` logs and more severe logs. ++```json +{ + "Logging": { + "LogLevel": { + "Default": "Warning" + }, + "ApplicationInsights": { + "LogLevel": { + "Default": "Information" + } + } + } +} +``` ++It's important to note that the following example doesn't cause the ApplicationInsights provider to capture `Information` logs. It doesn't capture it because the SDK adds a default logging filter that instructs `ApplicationInsights` to capture only `Warning` logs and more severe logs. ApplicationInsights requires an explicit override. ++```json +{ + "Logging": { + "LogLevel": { + "Default": "Information" + } + } +} +``` ++For more information, see [ILogger configuration](ilogger.md#logging-level). ++### Some Visual Studio templates used the UseApplicationInsights() extension method on IWebHostBuilder to enable Application Insights. Is this usage still valid? ++The extension method `UseApplicationInsights()` is still supported, but it's marked as obsolete in Application Insights SDK version 2.8.0 and later. It will be removed in the next major version of the SDK. To enable Application Insights telemetry, we recommend using `AddApplicationInsightsTelemetry()` because it provides overloads to control some configuration. Also, in ASP.NET Core 3.X apps, `services.AddApplicationInsightsTelemetry()` is the only way to enable Application Insights. ++### I'm deploying my ASP.NET Core application to Web Apps. Should I still enable the Application Insights extension from Web Apps? ++If the SDK is installed at build time as shown in this article, you don't need to enable the [Application Insights extension](./azure-web-apps.md) from the App Service portal. If the extension is installed, it will back off when it detects the SDK is already added. If you enable Application Insights from the extension, you don't have to install and update the SDK. But if you enable Application Insights by following instructions in this article, you have more flexibility because: ++ * Application Insights telemetry will continue to work in: + * All operating systems, including Windows, Linux, and Mac. + * All publish modes, including self-contained or framework dependent. + * All target frameworks, including the full .NET Framework. + * All hosting options, including Web Apps, VMs, Linux, containers, Azure Kubernetes Service, and non-Azure hosting. + * All .NET Core versions including preview versions. + * You can see telemetry locally when you're debugging from Visual Studio. + * You can track more custom telemetry by using the `TrackXXX()` API. + * You have full control over the configuration. ++### Can I enable Application Insights monitoring by using tools like Azure Monitor Application Insights Agent (formerly Status Monitor v2)? ++ Yes. In [Application Insights Agent 2.0.0-beta1](https://www.powershellgallery.com/packages/Az.ApplicationMonitor/2.0.0-beta1) and later, ASP.NET Core applications hosted in IIS are supported. ++### Are all features supported if I run my application in Linux? ++Yes. Feature support for the SDK is the same in all platforms, with the following exceptions: ++* The SDK collects [Event Counters](./eventcounters.md) on Linux because [Performance Counters](./performance-counters.md) are only supported in Windows. Most metrics are the same. +* Although `ServerTelemetryChannel` is enabled by default, if the application is running in Linux or macOS, the channel doesn't automatically create a local storage folder to keep telemetry temporarily if there are network issues. Because of this limitation, telemetry is lost when there are temporary network or server issues. To work around this issue, configure a local folder for the channel: ++```csharp +using Microsoft.ApplicationInsights.Channel; +using Microsoft.ApplicationInsights.WindowsServer.TelemetryChannel; ++ public void ConfigureServices(IServiceCollection services) + { + // The following will configure the channel to use the given folder to temporarily + // store telemetry items during network or Application Insights server issues. + // User should ensure that the given folder already exists + // and that the application has read/write permissions. + services.AddSingleton(typeof(ITelemetryChannel), + new ServerTelemetryChannel () {StorageFolder = "/tmp/myfolder"}); + services.AddApplicationInsightsTelemetry(); + } +``` ++This limitation isn't applicable from version [2.15.0](https://www.nuget.org/packages/Microsoft.ApplicationInsights.AspNetCore/2.15.0) and later. ++### Is this SDK supported for the new .NET Core 3.X Worker Service template applications? ++This SDK requires `HttpContext`; therefore, it doesn't work in any non-HTTP applications, including the .NET Core 3.X Worker Service applications. To enable Application Insights in such applications using the newly released Microsoft.ApplicationInsights.WorkerService SDK, see [Application Insights for Worker Service applications (non-HTTP applications)](worker-service.md). + ## Open-source SDK * [Read and contribute to the code](https://github.com/microsoft/ApplicationInsights-dotnet). |
| azure-monitor | Usage Heart | https://github.com/MicrosoftDocs/azure-docs/commits/main/articles/azure-monitor/app/usage-heart.md | Happiness is a user-reported dimension that measures how users feel about the pr A common approach to measure happiness is to ask users a Customer Satisfaction (CSAT) question like *How satisfied are you with this product?*. Users' responses on a three or a five-point scale (for example, *no, maybe,* and *yes*) are aggregated to create a product-level score ranging from 1-5. Since user-initiated feedback tends to be negatively biased, HEART tracks happiness from surveys displayed to users at pre-defined intervals. -Common happiness metrics include values such as *Average Star Rating* and *Customer Satisfaction Score*. Send these values to Azure Monitor using one of the custom ingestion methods described in [Custom sources](../agents/data-sources.md#custom-sources). +Common happiness metrics include values such as *Average Star Rating* and *Customer Satisfaction Score*. Send these values to Azure Monitor using one of the custom ingestion methods described in [Custom sources](../data-sources.md#custom-sources). For more on editing workbook templates, refer to the [Azure Workbook templates]( ## Next steps - Set up the [Click Analytics Auto Collection Plugin](javascript-click-analytics-plugin.md) via npm.-- Check out the [GitHub Repository](https://github.com/microsoft/ApplicationInsights-JS/tree/master/extensions/applicationinsights-clickanalytics-js) and [NPM Package](https://www.npmjs.com/package/@microsoft/applicationinsights-clickanalytics-js) for the Click Analytics Auto Collection Plugin.+- Check out the [GitHub Repository](https://github.com/microsoft/ApplicationInsights-JS/tree/master/extensions/applicationinsights-clickanalytics-js) and [npm Package](https://www.npmjs.com/package/@microsoft/applicationinsights-clickanalytics-js) for the Click Analytics Auto Collection Plugin. - Use [Events Analysis in Usage Experience](usage-segmentation.md) to analyze top clicks and slice by available dimensions. - Find click data under content field within customDimensions attribute in CustomEvents table in [Log Analytics](../logs/log-analytics-tutorial.md#write-a-query). See [Sample App](https://go.microsoft.com/fwlink/?linkid=2152871) for more guidance. - Learn more about [Google's HEART framework](https://storage.googleapis.com/pub-tools-public-publication-data/pdf/36299.pdf). |
| azure-monitor | Autoscale Predictive | https://github.com/MicrosoftDocs/azure-docs/commits/main/articles/azure-monitor/autoscale/autoscale-predictive.md | Title: Use predictive autoscale to scale out before load demands in virtual machine scale sets (Preview) description: Details on the new predictive autoscale feature in Azure Monitor. Previously updated : 01/24/2022++ Last updated : 07/18/2022 |
| azure-monitor | Best Practices Cost | https://github.com/MicrosoftDocs/azure-docs/commits/main/articles/azure-monitor/best-practices-cost.md | You can save on data ingestion costs by configuring [certain tables](logs/basic- The decision whether to configure a table for Basic Logs is based on the following criteria: -- The table currently support Basic Logs.+- The table currently supports Basic Logs. - You don't require more than eight days of data retention for the table. - You only require basic queries of the data using a limited version of the query language.-- The cost savings for data ingestion over a month exceeds the expected cost for any expected queries+- The cost savings for data ingestion over a month exceed the expected cost for any expected queries See [Query Basic Logs in Azure Monitor (Preview)](.//logs/basic-logs-query.md) for details on query limitations and [Configure Basic Logs in Azure Monitor (Preview)](logs/basic-logs-configure.md) for more details about them. Virtual machines can vary significantly in the amount of data they collect, depe ### Use transformations to filter events-The bulk of data collection from virtual machines will be from Windows or Syslog events. While you can provide more filtering with the Azure Monitor agent, you still may be collecting records that provide little value. Use [transformations](essentials/data-collection-rule-transformations.md) to implement more granular filtering and also to filter data from columns that provide little value. For example, you might have a Windows event that's valuable for alerting, but it includes columns with redundant or excessive data. You can create a transformation that allows the event to be collected but removes this excessive data. +The bulk of data collection from virtual machines will be from Windows or Syslog events. While you can provide more filtering with the Azure Monitor agent, you still may be collecting records that provide little value. Use [transformations](essentials//data-collection-transformations.md) to implement more granular filtering and also to filter data from columns that provide little value. For example, you might have a Windows event that's valuable for alerting, but it includes columns with redundant or excessive data. You can create a transformation that allows the event to be collected but removes this excessive data. See the section below on filtering data with transformations for a summary on where to implement filtering and transformations for different data sources. ### Multi-homing agents You should be cautious with any configuration using multi-homed agents where a single virtual machine sends data to multiple workspaces since you may be incurring charges for the same data multiple times. If you do multi-home agents, ensure that you're sending unique data to each workspace. -You can also collect duplicate data with a single virtual machine running both the Azure Monitor agent and Log Analytics agent, even if they're both sending data to the same workspace. While the agents can coexist, each works independently without any knowledge of the other. You should continue to use the Log Analytics agent until you [migrate to the Azure Monitor agent](./agents/azure-monitor-agent-migration.md) rather than using both together unless you can ensure that each are collecting unique data. +You can also collect duplicate data with a single virtual machine running both the Azure Monitor agent and Log Analytics agent, even if they're both sending data to the same workspace. While the agents can coexist, each works independently without any knowledge of the other. You should continue to use the Log Analytics agent until you [migrate to the Azure Monitor agent](./agents/azure-monitor-agent-migration.md) rather than using both together unless you can ensure that each is collecting unique data. See [Analyze usage in Log Analytics workspace](logs/analyze-usage.md) for guidance on analyzing your collected data to ensure that you aren't collecting duplicate data for the same machine. There are multiple methods that you can use to limit the amount of data collecte ## Resource logs The data volume for [resource logs](essentials/resource-logs.md) varies significantly between services, so you should only collect the categories that are required. You may also not want to collect platform metrics from Azure resources since this data is already being collected in Metrics. Only configured your diagnostic data to collect metrics if you need metric data in the workspace for more complex analysis with log queries. -Diagnostic settings do not allow granular filtering of resource logs. You may require certain logs in a particular category but not others. In this case, use [ingestion-time transformations](logs/ingestion-time-transformations.md) on the workspace to filter logs that you don't require. You can also filter out the value of certain columns that you don't require to save additional cost. +Diagnostic settings do not allow granular filtering of resource logs. You may require certain logs in a particular category but not others. In this case, use [transformations](essentials/data-collection-transformations.md) on the workspace to filter logs that you don't require. You can also filter out the value of certain columns that you don't require to save additional cost. ## Other insights and services See the documentation for other services that store their data in a Log Analytics workspace for recommendations on optimizing their data usage. Following See the documentation for other services that store their data in a Log Analytic ## Filter data with transformations (preview)-[Data collection rule transformations in Azure Monitor](essentials/data-collection-rule-transformations.md) allow you to filter incoming data to reduce costs for data ingestion and retention. In addition to filtering records from the incoming data, you can filter out columns in the data, reducing its billable size as described in [Data size calculation](logs/cost-logs.md#data-size-calculation). +[Data collection rule transformations in Azure Monitor](essentials//data-collection-transformations.md) allow you to filter incoming data to reduce costs for data ingestion and retention. In addition to filtering records from the incoming data, you can filter out columns in the data, reducing its billable size as described in [Data size calculation](logs/cost-logs.md#data-size-calculation). Use ingestion-time transformations on the workspace to further filter data for workflows where you don't have granular control. For example, you can select categories in a [diagnostic setting](essentials/diagnostic-settings.md) to collect resource logs for a particular service, but that category might send a variety of records that you don't need. Create a transformation for the table that service uses to filter out records you don't want. The following table for methods to apply transformations to different workflows. | Azure Monitor agent | Azure tables | Collect data from standard sources such as Windows events, syslog, and performance data and send to Azure tables in Log Analytics workspace. | Use XPath in DCR to collect specific data from client machine. Ingestion-time transformations in agent DCR are not yet supported. | | Azure Monitor agent | Custom tables | Collecting data outside of standard data sources is not yet supported. | | | Log Analytics agent | Azure tables | Collect data from standard sources such as Windows events, syslog, and performance data and send to Azure tables in Log Analytics workspace. | Configure data collection on the workspace. Optionally, create ingestion-time transformation in the workspace DCR to filter records and columns. |-| Log Analytics agent | Custom tables | Configure [custom logs](agents/data-sources-custom-logs.md) on the workspace to collect file based text logs. | Configure ingestion-time transformation in the workspace DCR to filter or transform incoming data. You must first migrate the custom table to the new custom logs API. | -| Data Collector API | Custom tables | Use [Data Collector API](logs/data-collector-api.md) to send data to custom tables in the workspace using REST API. | Configure ingestion-time transformation in the workspace DCR to filter or transform incoming data. You must first migrate the custom table to the new custom logs API. | -| Custom Logs API | Custom tables<br>Azure tables | Use [Custom Logs API](logs/custom-logs-overview.md) to send data to custom tables in the workspace using REST API. | Configure ingestion-time transformation in the DCR for the custom log. | +| Log Analytics agent | Custom tables | Configure [custom logs](agents/data-sources-custom-logs.md) on the workspace to collect file based text logs. | Configure ingestion-time transformation in the workspace DCR to filter or transform incoming data. You must first migrate the custom table to the new logs ingestion API. | +| Data Collector API | Custom tables | Use [Data Collector API](logs/data-collector-api.md) to send data to custom tables in the workspace using REST API. | Configure ingestion-time transformation in the workspace DCR to filter or transform incoming data. You must first migrate the custom table to the new logs ingestion API. | +| Logs ingestion API | Custom tables<br>Azure tables | Use [Logs ingestion API](logs/logs-ingestion-api-overview.md) to send data to the workspace using REST API. | Configure ingestion-time transformation in the DCR for the custom log. | | Other data sources | Azure tables | Includes resource logs from diagnostic settings and other Azure Monitor features such as Application insights, Container insights and VM insights. | Configure ingestion-time transformation in the workspace DCR to filter or transform incoming data. | Once you've configured your environment and data collection for cost optimizatio ### Set a daily cap A [daily cap](logs/daily-cap.md) disables data collection in a Log Analytics workspace for the rest of the day once your configured limit is reached. This should not be used as a method to reduce costs, but rather as a preventative measure to ensure that you don't exceed a particular budget. Daily caps are typically used by organizations that are particularly cost conscious. -When data collection stops, you effectively have no monitoring of features and resources relying on that workspace. Rather than just relying on the daily cap alone, you can configure an alert rule to notify you when data collection reaches some level before the daily cap. This allows you address any increases before data collection shuts down, or even to temporarily disable collection for less critical resources. +When data collection stops, you effectively have no monitoring of features and resources relying on that workspace. Rather than just relying on the daily cap alone, you can configure an alert rule to notify you when data collection reaches some level before the daily cap. This allows you to address any increases before data collection shuts down, or even to temporarily disable collection for less critical resources. See [Set daily cap on Log Analytics workspace](logs/daily-cap.md) for details on how the daily cap works and how to configure one. ### Send alert when data collection is high-In order to avoid unexpected bills, you should be proactively notified any time you experience excessive usage. This allows you to address any potential anomalies before the end of your billing period. +In order to avoid unexpected bills, you should be proactively notified anytime you experience excessive usage. This allows you to address any potential anomalies before the end of your billing period. The following example is a [log alert rule](alerts/alerts-unified-log.md) that sends an alert if the billable data volume ingested in the last 24 hours was greater than 50 GB. Modify the **Alert Logic** to use a different threshold based on expected usage in your environment. You can also increase the frequency to check usage multiple times every day, but this will result in a higher charge for the alert rule. |
| azure-monitor | Container Insights Overview | https://github.com/MicrosoftDocs/azure-docs/commits/main/articles/azure-monitor/containers/container-insights-overview.md | Container insights is a feature designed to monitor the performance of container - Self-managed Kubernetes clusters hosted on [Azure Stack](/azure-stack/user/azure-stack-kubernetes-aks-engine-overview) or on-premises - [Azure Arc-enabled Kubernetes](../../azure-arc/kubernetes/overview.md) -Container insights supports clusters running the Linux and Windows Server 2019 operating system. The container runtimes it supports are Docker, Moby, and any CRI compatible runtime such as CRI-O and ContainerD. +Container insights supports clusters running the Linux and Windows Server 2019 operating system. The container runtimes it supports are Moby and any CRI compatible runtime such as CRI-O and ContainerD. Docker is no longer supported as a container runtime as of September 2022. For more information about this deprecation, see the [AKS release notes][aks-release-notes]. >[!NOTE] > Container insights support for Windows Server 2022 operating system in public preview. The main differences in monitoring a Windows Server cluster compared to a Linux ## Next steps To begin monitoring your Kubernetes cluster, review [How to enable Container insights](container-insights-onboard.md) to understand the requirements and available methods to enable monitoring.++<!-- LINKS - external --> +[aks-release-notes]: https://github.com/Azure/AKS/releases |
| azure-monitor | Continuous Monitoring | https://github.com/MicrosoftDocs/azure-docs/commits/main/articles/azure-monitor/continuous-monitoring.md | In order to gain observability across your entire environment, you need to enabl ## Enable monitoring for your entire infrastructure Applications are only as reliable as their underlying infrastructure. Having monitoring enabled across your entire infrastructure will help you achieve full observability and make it easier to discover a potential root cause when something fails. Azure Monitor helps you track the health and performance of your entire hybrid infrastructure including resources such as VMs, containers, storage, and network. -- You automatically get [platform metrics, activity logs and diagnostics logs](agents/data-sources.md) from most of your Azure resources with no configuration.+- You automatically get [platform metrics, activity logs and diagnostics logs](data-sources.md) from most of your Azure resources with no configuration. - Enable deeper monitoring for VMs with [VM insights](vm/vminsights-overview.md). - Enable deeper monitoring for AKS clusters with [Container insights](containers/container-insights-overview.md). - Add [monitoring solutions](./monitor-reference.md) for different applications and services in your environment. |
| azure-monitor | Data Platform | https://github.com/MicrosoftDocs/azure-docs/commits/main/articles/azure-monitor/data-platform.md | Title: Azure Monitor data platform | Microsoft Docs -description: Monitoring data collected by Azure Monitor is separated into metrics that are lightweight and capable of supporting near-real-time scenarios and logs that are used for advanced analysis. + Title: Azure Monitor data platform +description: Overview of the Azure Monitor data platform and collection of observability data. - na Last updated 04/05/2022- Today's complex computing environments run distributed applications that rely on [Azure Monitor](overview.md) collects and aggregates data from various sources into a common data platform where it can be used for analysis, visualization, and alerting. It provides a consistent experience on top of data from multiple sources. You can gain deep insights across all your monitored resources and even with data from other services that store their data in Azure Monitor. - + ## Observability data in Azure Monitor+Metrics, logs, and distributed traces are commonly referred to as the three pillars of observability. A monitoring tool must collect and analyze these three different kinds of data to provide sufficient observability of a monitored system. Observability can be achieved by correlating data from multiple pillars and aggregating data across the entire set of resources being monitored. Because Azure Monitor stores data from multiple sources together, the data can be correlated and analyzed by using a common set of tools. It also correlates data across multiple Azure subscriptions and tenants, in addition to hosting data for other services. -Metrics, logs, and distributed traces are commonly referred to as the three pillars of observability. A monitoring tool must collect and analyze these three different kinds of data to provide sufficient observability of a monitored system. -Observability can be achieved by correlating data from multiple pillars and aggregating data across the entire set of resources being monitored. Because Azure Monitor stores data from multiple sources together, the data can be correlated and analyzed by using a common set of tools. It also correlates data across multiple Azure subscriptions and tenants, in addition to hosting data for other services. +Azure resources generate a significant amount of monitoring data. Azure Monitor consolidates this data along with monitoring data from other sources into either a Metrics or Logs platform. Each is optimized for particular monitoring scenarios, and each supports different features in Azure Monitor. Features such as data analysis, visualizations, or alerting require you to understand the differences so that you can implement your required scenario in the most efficient and cost effective manner. Insights in Azure Monitor such as [Application Insights](app/app-insights-overview.md) or [Container insights](containers/container-insights-overview.md) have analysis tools that allow you to focus on the particular monitoring scenario without having to understand the differences between the two types of data. -Azure resources generate a significant amount of monitoring data. Azure Monitor consolidates this data along with monitoring data from other sources into either a Metrics or Logs platform. Each platform is optimized for particular monitoring scenarios, and each one supports different features in Azure Monitor. --Features such as data analysis, visualizations, or alerting require you to understand the differences so that you can implement your required scenario in the most efficient and cost-effective manner. Insights in Azure Monitor such as [Application Insights](app/app-insights-overview.md) or [VM insights](vm/vminsights-overview.md) have analysis tools that allow you to focus on the particular monitoring scenario without having to understand the differences between the two types of data. ### Metrics The following table compares metrics and logs in Azure Monitor. | Attribute | Metrics | Logs | |:|:|:|-| Benefits | Lightweight and capable of near-real-time scenarios such as alerting. Ideal for fast detection of issues. | Analyzed with rich query language. Ideal for deep analysis and identifying root cause. | -| Data | Numerical values only. | Text or numeric data. | -| Structure | Standard set of properties including sample time, resource being monitored, and numeric value. Some metrics include multiple dimensions for further definition. | Unique set of properties depending on the log type. | -| Collection | Collected at regular intervals. | Might be collected sporadically as events trigger a record to be created. | -| View in the Azure portal | Metrics Explorer. | Log Analytics. | -| Data sources include | Platform metrics collected from Azure resources.<br>Applications monitored by Application Insights.<br>Custom defined by application or API. | Application and resource logs.<br>Monitoring solutions.<br>Agents and VM extensions.<br>Application requests and exceptions.<br>Microsoft Defender for Cloud.<br>Data Collector API. | +| Benefits | Lightweight and capable of near-real time scenarios such as alerting. Ideal for fast detection of issues. | Analyzed with rich query language. Ideal for deep analysis and identifying root cause. | +| Data | Numerical values only | Text or numeric data | +| Structure | Standard set of properties including sample time, resource being monitored, a numeric value. Some metrics include multiple dimensions for further definition. | Unique set of properties depending on the log type. | +| Collection | Collected at regular intervals. | May be collected sporadically as events trigger a record to be created. | +| Analyze in Azure portal | Metrics Explorer | Log Analytics | +| Data sources include | Platform metrics collected from Azure resources<br>Applications monitored by Application Insights<br>Azure Monitor agent<br>Custom defined by application or API | Application and resource logs<br>Azure Monitor agent<br>Application requests and exceptions<br>Logs ingestion API<br>Azure Sentinel<br>Microsoft Defender for Cloud | ## Collect monitoring data--Different [sources of data for Azure Monitor](agents/data-sources.md) will write to either a Log Analytics workspace (Logs) or the Azure Monitor metrics database (Metrics) or both. Some sources will write directly to these data stores. Others might write to another location, such as Azure Storage, and require some configuration to populate logs or metrics. +Different [sources of data for Azure Monitor](data-sources.md) will write to either a Log Analytics workspace (Logs) or the Azure Monitor metrics database (Metrics) or both. Some sources will write directly to these data stores, while others may write to another location such as Azure storage and require some configuration to populate logs or metrics. For a listing of different data sources that populate each type, see [Metrics in Azure Monitor](essentials/data-platform-metrics.md) and [Logs in Azure Monitor](logs/data-platform-logs.md). In addition to using the tools in Azure to analyze monitoring data, you might ha Some sources can be configured to send data directly to an event hub while you can use another process, such as a logic app, to retrieve the required data. For more information, see [Stream Azure monitoring data to an event hub for consumption by an external tool](essentials/stream-monitoring-data-event-hubs.md). -## Next steps -- Read more about [metrics in Azure Monitor](essentials/data-platform-metrics.md).-- Read more about [logs in Azure Monitor](logs/data-platform-logs.md).-- Learn about the [monitoring data available](agents/data-sources.md) for different resources in Azure.++++## Next steps +- Read more about [Metrics in Azure Monitor](essentials/data-platform-metrics.md). +- Read more about [Logs in Azure Monitor](logs/data-platform-logs.md). +- Learn about the [monitoring data available](data-sources.md) for different resources in Azure. |
| azure-monitor | Data Sources | https://github.com/MicrosoftDocs/azure-docs/commits/main/articles/azure-monitor/data-sources.md | + + Title: Sources of data in Azure Monitor +description: Describes the data available to monitor the health and performance of your Azure resources and the applications running on them. +++ Last updated : 07/09/2022+++++# Sources of monitoring data for Azure Monitor +Azure Monitor is based on a [common monitoring data platform](data-platform.md) that includes [Logs](logs/data-platform-logs.md) and [Metrics](essentials/data-platform-metrics.md). This platform allows data from multiple resources to be analyzed together using a common set of tools in Azure Monitor. Monitoring data may also be sent to other locations to support certain scenarios, and some resources may write to other locations before they can be collected into Logs or Metrics. ++This article describes common sources of monitoring data collected by Azure Monitor in addition to the monitoring data created by Azure resources. Links are provided to detailed information on configuration required to collect this data to different locations. ++Some of these data sources use the [new data ingestion pipeline](essentials/data-collection.md) in Azure Monitor. This article will be updated as other data sources transition to this new data collection method. ++## Application tiers ++Sources of monitoring data from Azure applications can be organized into tiers, the highest tiers being your application itself and the lower tiers being components of Azure platform. The method of accessing data from each tier varies. The application tiers are summarized in the table below, and the sources of monitoring data in each tier are presented in the following sections. See [Monitoring data locations in Azure](monitor-reference.md) for a description of each data location and how you can access its data. +++++### Azure +The following table briefly describes the application tiers that are specific to Azure. Following the link for further details on each in the sections below. ++| Tier | Description | Collection method | +|:|:|:| +| [Azure Tenant](#azure-tenant) | Data about the operation of tenant-level Azure services, such as Azure Active Directory. | View Azure Active Directory data in portal or configure collection to Azure Monitor using a tenant diagnostic setting. | +| [Azure subscription](#azure-subscription) | Data related to the health and management of cross-resource services in your Azure subscription such as Resource Manager and Service Health. | View in portal or configure collection to Azure Monitor using a log profile. | +| [Azure resources](#azure-resources) | Data about the operation and performance of each Azure resource. | Metrics collected automatically, view in Metrics Explorer.<br>Configure diagnostic settings to collect logs in Azure Monitor.<br>Monitoring solutions and Insights available for more detailed monitoring for specific resource types. | ++### Azure, other cloud, or on-premises +The following table briefly describes the application tiers that may be in Azure, another cloud, or on-premises. Following the link for further details on each in the sections below. ++| Tier | Description | Collection method | +|:|:|:| +| [Operating system (guest)](#operating-system-guest) | Data about the operating system on compute resources. | Install Azure Monitor agent on virtual machines, scale sets and Arc-enabled servers to collect logs and metrics into Azure Monitor. | +| [Application Code](#application-code) | Data about the performance and functionality of the actual application and code, including performance traces, application logs, and user telemetry. | Instrument your code to collect data into Application Insights. | +| [Custom sources](#custom-sources) | Data from external services or other components or devices. | Collect log or metrics data into Azure Monitor from any REST client. | ++## Azure tenant +Telemetry related to your Azure tenant is collected from tenant-wide services such as Azure Active Directory. ++++### Azure Active Directory Audit Logs +[Azure Active Directory reporting](../active-directory/reports-monitoring/overview-reports.md) contains the history of sign-in activity and audit trail of changes made within a particular tenant. ++| Destination | Description | Reference | +|:|:|:| +| Azure Monitor Logs | Configure Azure AD logs to be collected in Azure Monitor to analyze them with other monitoring data. | [Integrate Azure AD logs with Azure Monitor logs](../active-directory/reports-monitoring/howto-integrate-activity-logs-with-log-analytics.md) | +| Azure Storage | Export Azure AD logs to Azure Storage for archiving. | [Tutorial: Archive Azure AD logs to an Azure storage account](../active-directory/reports-monitoring/quickstart-azure-monitor-route-logs-to-storage-account.md) | +| Event Hubs | Stream Azure AD logs to other locations using Event Hubs. | [Tutorial: Stream Azure Active Directory logs to an Azure event hub](../active-directory/reports-monitoring/tutorial-azure-monitor-stream-logs-to-event-hub.md). | ++++## Azure subscription +Telemetry related to the health and operation of your Azure subscription. +++### Azure Activity log +The [Azure Activity log](essentials/platform-logs-overview.md) includes service health records along with records on any configuration changes made to the resources in your Azure subscription. The Activity log is available to all Azure resources and represents their _external_ view. ++| Destination | Description | Reference | +|:|:|:| +| Activity log | The Activity log is collected into its own data store that you can view from the Azure Monitor menu or use to create Activity log alerts. | [Query the Activity log in the Azure portal](essentials/activity-log.md#view-the-activity-log) | +| Azure Monitor Logs | Configure Azure Monitor Logs to collect the Activity log to analyze it with other monitoring data. | [Collect and analyze Azure activity logs in Log Analytics workspace in Azure Monitor](essentials/activity-log.md) | +| Azure Storage | Export the Activity log to Azure Storage for archiving. | [Archive Activity log](essentials/resource-logs.md#send-to-azure-storage) | +| Event Hubs | Stream the Activity log to other locations using Event Hubs | [Stream Activity log to Event Hubs](essentials/resource-logs.md#send-to-azure-event-hubs). | ++### Azure Service Health +[Azure Service Health](../service-health/service-health-overview.md) provides information about the health of the Azure services in your subscription that your application and resources rely on. ++| Destination | Description | Reference | +|:|:|:| +| Activity log<br>Azure Monitor Logs | Service Health records are stored in the Azure Activity log, so you can view them in the Azure portal or perform any other activities you can perform with the Activity log. | [View service health notifications by using the Azure portal](../service-health/service-notifications.md) | +++## Azure resources +Metrics and resource logs provide information about the _internal_ operation of Azure resources. These are available for most Azure services, and monitoring solutions and insights collect additional data for particular services. ++++### Platform metrics +Most Azure services will send [platform metrics](essentials/data-platform-metrics.md) that reflect their performance and operation directly to the metrics database. The specific [metrics will vary for each type of resource](essentials/metrics-supported.md). ++| Destination | Description | Reference | +|:|:|:| +| Azure Monitor Metrics | Platform metrics will write to the Azure Monitor metrics database with no configuration. Access platform metrics from Metrics Explorer. | [Getting started with Azure Metrics Explorer](essentials/metrics-getting-started.md)<br>[Supported metrics with Azure Monitor](essentials/metrics-supported.md) | +| Azure Monitor Logs | Copy platform metrics to Logs for trending and other analysis using Log Analytics. | [Azure diagnostics direct to Log Analytics](essentials/resource-logs.md#send-to-log-analytics-workspace) | +| Event Hubs | Stream metrics to other locations using Event Hubs. |[Stream Azure monitoring data to an event hub for consumption by an external tool](essentials/stream-monitoring-data-event-hubs.md) | ++### Resource logs +[Resource logs](essentials/platform-logs-overview.md) provide insights into the _internal_ operation of an Azure resource. Resource logs are created automatically, but you must create a diagnostic setting to specify a destination for them to be collected for each resource. ++The configuration requirements and content of resource logs vary by resource type, and not all services yet create them. See [Supported services, schemas, and categories for Azure resource logs](essentials/resource-logs-schema.md) for details on each service and links to detailed configuration procedures. If the service isn't listed in this article, then that service doesn't currently create resource logs. ++| Destination | Description | Reference | +|:|:|:| +| Azure Monitor Logs | Send resource logs to Azure Monitor Logs for analysis with other collected log data. | [Collect Azure resource logs in Log Analytics workspace in Azure Monitor](essentials/resource-logs.md#send-to-azure-storage) | +| Storage | Send resource logs to Azure Storage for archiving. | [Archive Azure resource logs](essentials/resource-logs.md#send-to-log-analytics-workspace) | +| Event Hubs | Stream resource logs to other locations using Event Hubs. |[Stream Azure resource logs to an event hub](essentials/resource-logs.md#send-to-azure-event-hubs) | ++## Operating system (guest) +Compute resources in Azure, in other clouds, and on-premises have a guest operating system to monitor. With the installation of an agent, you can gather telemetry from the guest into Azure Monitor to analyze it with the same monitoring tools as the Azure services themselves. ++++### Azure Monitor agent +[Install the Azure Monitor agent](agents/azure-monitor-agent-manage.md) for comprehensive monitoring and management of your Windows or Linux virtual machines, scale sets and Arc-enabled servers. The Azure Monitor agent replaces the Log Analytics agent and Azure diagnostic extension. ++| Destination | Description | Reference | +|:|:|:| +| Azure Monitor Logs | The Azure Monitor agent allows you to collect logs from data sources that you configure using [data collection rules](agents/data-collection-rule-azure-monitor-agent.md) or from monitoring solutions that provide additional insights into applications running on the machine. These can be sent to one or more Log Analytics workspaces. | [Data sources and destinations](agents/azure-monitor-agent-overview.md#data-sources-and-destinations) | +| Azure Monitor Metrics (preview) | The Azure Monitor agent allows you to collect performance counters and send them to Azure Monitor metrics database | [Data sources and destinations](agents/azure-monitor-agent-overview.md#data-sources-and-destinations) | +++### Log Analytics agent +[Install the Log Analytics agent](agents/log-analytics-agent.md) for comprehensive monitoring and management of your Windows or Linux virtual machines. The virtual machine can be running in Azure, another cloud, or on-premises. The Log Analytics agent is still supported but has been replaced by the Azure Monitor agent. ++| Destination | Description | Reference | +|:|:|:| +| Azure Monitor Logs | The Log Analytics agent connects to Azure Monitor either directly or through System Center Operations Manager and allows you to collect data from data sources that you configure or from monitoring solutions that provide additional insights into applications running on the virtual machine. | [Agent data sources in Azure Monitor](agents/agent-data-sources.md)<br>[Connect Operations Manager to Azure Monitor](agents/om-agents.md) | ++### Azure diagnostic extension +Enabling the Azure diagnostics extension for Azure Virtual machines allows you to collect logs and metrics from the guest operating system of Azure compute resources including Azure Cloud Service (classic) Web and Worker Roles, Virtual Machines, virtual machine scale sets, and Service Fabric. ++| Destination | Description | Reference | +|:|:|:| +| Storage | Azure diagnostics extension always writes to an Azure Storage account. | [Install and configure Azure diagnostics extension (WAD)](agents/diagnostics-extension-windows-install.md)<br>[Use Linux Diagnostic Extension to monitor metrics and logs](../virtual-machines/extensions/diagnostics-linux.md) | +| Azure Monitor Metrics (preview) | When you configure the Diagnostics Extension to collect performance counters, they are written to the Azure Monitor metrics database. | [Send Guest OS metrics to the Azure Monitor metric store using a Resource Manager template for a Windows virtual machine](essentials/collect-custom-metrics-guestos-resource-manager-vm.md) | +| Event Hubs | Configure the Diagnostics Extension to stream the data to other locations using Event Hubs. | [Streaming Azure Diagnostics data by using Event Hubs](agents/diagnostics-extension-stream-event-hubs.md)<br>[Use Linux Diagnostic Extension to monitor metrics and logs](../virtual-machines/extensions/diagnostics-linux.md) | +| Application Insights Logs | Collect logs and performance counters from the compute resource supporting your application to be analyzed with other application data. | [Send Cloud Service, Virtual Machine, or Service Fabric diagnostic data to Application Insights](agents/diagnostics-extension-to-application-insights.md) | +++### VM insights +[VM insights](vm/vminsights-overview.md) provides a customized monitoring experience for virtual machines providing features beyond core Azure Monitor functionality. It requires a Dependency Agent on Windows and Linux virtual machines that integrates with the Log Analytics agent to collect discovered data about processes running on the virtual machine and external process dependencies. ++| Destination | Description | Reference | +|:|:|:| +| Azure Monitor Logs | Stores data about processes and dependencies on the agent. | [Using VM insights Map to understand application components](vm/vminsights-maps.md) | ++++## Application Code +Detailed application monitoring in Azure Monitor is done with [Application Insights](/azure/application-insights/) which collects data from applications running on a variety of platforms. The application can be running in Azure, another cloud, or on-premises. +++++### Application data +When you enable Application Insights for an application by installing an instrumentation package, it collects metrics and logs related to the performance and operation of the application. Application Insights stores the data it collects in the same Azure Monitor data platform used by other data sources. It includes extensive tools for analyzing this data, but you can also analyze it with data from other sources using tools such as Metrics Explorer and Log Analytics. ++| Destination | Description | Reference | +|:|:|:| +| Azure Monitor Logs | Operational data about your application including page views, application requests, exceptions, and traces. | [Analyze log data in Azure Monitor](logs/log-query-overview.md) | +| | Dependency information between application components to support Application Map and telemetry correlation. | [Telemetry correlation in Application Insights](app/correlation.md) <br> [Application Map](app/app-map.md) | +| | Results of availability tests that test the availability and responsiveness of your application from different locations on the public Internet. | [Monitor availability and responsiveness of any web site](app/monitor-web-app-availability.md) | +| Azure Monitor Metrics | Application Insights collects metrics describing the performance and operation of the application in addition to custom metrics that you define in your application into the Azure Monitor metrics database. | [Log-based and pre-aggregated metrics in Application Insights](app/pre-aggregated-metrics-log-metrics.md)<br>[Application Insights API for custom events and metrics](app/api-custom-events-metrics.md) | +| Azure Storage | Send application data to Azure Storage for archiving. | [Export telemetry from Application Insights](app/export-telemetry.md) | +| | Details of availability tests are stored in Azure Storage. Use Application Insights in the Azure portal to download for local analysis. Results of availability tests are stored in Azure Monitor Logs. | [Monitor availability and responsiveness of any web site](app/monitor-web-app-availability.md) | +| | Profiler trace data is stored in Azure Storage. Use Application Insights in the Azure portal to download for local analysis. | [Profile production applications in Azure with Application Insights](app/profiler-overview.md) +| | Debug snapshot data that is captured for a subset of exceptions is stored in Azure Storage. Use Application Insights in the Azure portal to download for local analysis. | [How snapshots work](app/snapshot-debugger.md#how-snapshots-work) | ++## Insights +[Insights](monitor-reference.md) collect data to provide additional insights into the operation of a particular service or application. They may address resources in different application tiers and even multiple tiers. +++### Container insights +[Container insights](containers/container-insights-overview.md) provides a customized monitoring experience for [Azure Kubernetes Service (AKS)](../aks/index.yml). It collects additional data about these resources described in the following table. ++| Destination | Description | Reference | +|:|:|:| +| Azure Monitor Logs | Stores monitoring data for AKS including inventory, logs, and events. Metric data is also stored in Logs in order to leverage its analysis functionality in the portal. | [Understand AKS cluster performance with Container insights](containers/container-insights-analyze.md) | +| Azure Monitor Metrics | Metric data is stored in the metric database to drive visualization and alerts. | [View container metrics in metrics explorer](containers/container-insights-analyze.md#view-container-metrics-in-metrics-explorer) | +| Azure Kubernetes Service | Provides direct access to your Azure Kubernetes Service (AKS) container logs (stdout/stderror), events, and pod metrics in the portal. | [How to view Kubernetes logs, events, and pod metrics in real-time](containers/container-insights-livedata-overview.md) | ++### VM insights +[VM insights](vm/vminsights-overview.md) provides a customized experience for monitoring virtual machines. A description of the data collected by VM insights is included in the [Operating System (guest)](#operating-system-guest) section above. ++## Custom sources +In addition to the standard tiers of an application, you may need to monitor other resources that have telemetry that can't be collected with the other data sources. For these resources, write this data to either Metrics or Logs using an Azure Monitor API. +++++| Destination | Method | Description | Reference | +|:|:|:|:| +| Azure Monitor Logs | Logs ingestion API | Collect log data from any REST client and store in Log Analytics workspace using a data collection rule. | [Logs ingestion API in Azure Monitor (preview)](logs/logs-ingestion-api-overview.md) | +| | Data Collector API | Collect log data from any REST client and store in Log Analytics workspace. | [Send log data to Azure Monitor with the HTTP Data Collector API (preview)](logs/data-collector-api.md) | +| Azure Monitor Metrics | Custom Metrics API | Collect metric data from any REST client and store in Azure Monitor metrics database. | [Send custom metrics for an Azure resource to the Azure Monitor metric store by using a REST API](essentials/metrics-store-custom-rest-api.md) | +++## Other services +Other services in Azure write data to the Azure Monitor data platform. This allows you to analyze data collected by these services with data collected by Azure Monitor and leverage the same analysis and visualization tools. ++| Service | Destination | Description | Reference | +|:|:|:|:| +| [Microsoft Defender for Cloud](../security-center/index.yml) | Azure Monitor Logs | Microsoft Defender for Cloud stores the security data it collects in a Log Analytics workspace which allows it to be analyzed with other log data collected by Azure Monitor. | [Data collection in Microsoft Defender for Cloud](../security-center/security-center-enable-data-collection.md) | +| [Microsoft Sentinel](../sentinel/index.yml) | Azure Monitor Logs | Microsoft Sentinel stores the data it collects from different data sources in a Log Analytics workspace which allows it to be analyzed with other log data collected by Azure Monitor. | [Connect data sources](../sentinel/quickstart-onboard.md) | +++## Next steps ++- Learn more about the [types of monitoring data collected by Azure Monitor](data-platform.md) and how to view and analyze this data. +- List the [different locations where Azure resources store data](monitor-reference.md) and how you can access it. |
| azure-monitor | Data Collection Endpoint Overview | https://github.com/MicrosoftDocs/azure-docs/commits/main/articles/azure-monitor/essentials/data-collection-endpoint-overview.md | ms.reviwer: nikeist # Data collection endpoints in Azure Monitor -Data Collection Endpoints (DCEs) allow you to uniquely configure ingestion settings for Azure Monitor. This article provides an overview of data collection endpoints including their contents and structure and how you can create and work with them. +Data Collection Endpoints (DCEs) provide a connection for certain data sources of Azure Monitor. This article provides an overview of data collection endpoints including their contents and structure and how you can create and work with them. -## Workflows that use DCEs -The following workflows currently use DCEs: +## Data sources that use DCEs +The following data sources currently use DCEs: -- [Azure Monitor agent](../agents/data-collection-rule-azure-monitor-agent.md)-- [Custom logs](../logs/custom-logs-overview.md)+- [Azure Monitor agent when network isolation is required](../agents/azure-monitor-agent-data-collection-endpoint.md) +- [Custom logs](../logs/logs-ingestion-api-overview.md) ## Components of a data collection endpoint A data collection endpoint includes the following components. | Component | Description | |:|:|-| Configuration access endpoint | The endpoint used to access the configuration service to fetch associated data collection rules (DCR). Example: `<unique-dce-identifier>.<regionname>.handler.control` | -| Logs ingestion endpoint | The endpoint used to ingest logs to Log Analytics workspace(s). Example: `<unique-dce-identifier>.<regionname>.ingest` | +| Configuration access endpoint | The endpoint used to access the configuration service to fetch associated data collection rules (DCR) for Azure Monitor agent.<br>Example: `<unique-dce-identifier>.<regionname>.handler.control` | +| Logs ingestion endpoint | The endpoint used to ingest logs to Log Analytics workspace(s).<br>Example: `<unique-dce-identifier>.<regionname>.ingest` | | Network Access Control Lists (ACLs) | Network access control rules for the endpoints A data collection endpoint includes the following components. Data collection endpoints are ARM resources created within specific regions. An endpoint in a given region can only be **associated with machines in the same region**, although you can have more than one endpoint within the same region as per your needs. ## Limitations-Data collection endpoints only support Log Analytics as a destination for collected data. [Custom Metrics (preview)](../essentials/metrics-custom-overview.md) collected and uploaded via the Azure Monitor Agent are not currently controlled by DCEs nor can they be configured over private links. +Data collection endpoints only support Log Analytics workspaces as a destination for collected data. [Custom Metrics (preview)](../essentials/metrics-custom-overview.md) collected and uploaded via the Azure Monitor Agent are not currently controlled by DCEs nor can they be configured over private links. ++## Create data collection endpoint ++> [!IMPORTANT] +> If agents will connect to your DCE, it must be created in the same region. If you have agents in different regions, then you'll need multiple DCEs. ++# [Azure portal](#tab/portal) -## Create endpoint in Azure portal 1. In the **Azure Monitor** menu in the Azure portal, select **Data Collection Endpoint** from the **Settings** section. Click **Create** to create a new Data Collection Rule and assignment. Data collection endpoints only support Log Analytics as a destination for collec 3. Click **Review + create** to review the details of the data collection endpoint. Click **Create** to create it. -## Create endpoint and association using REST API +# [REST API](#tab/restapi) -> [!NOTE] -> The data collection endpoint should be created in the **same region** where your virtual machines exist. -1. Create data collection endpoint(s) using these [DCE REST APIs](/cli/azure/monitor/data-collection/endpoint). -2. Create association(s) to link the endpoint(s) to your target machines or resources, using these [DCRA REST APIs](/rest/api/monitor/datacollectionruleassociations/create#examples). +Create data collection endpoint(s) using the [DCE REST APIs](/cli/azure/monitor/data-collection/endpoint). +Create associations between endpoints to your target machines or resources, using the [DCRA REST APIs](/rest/api/monitor/datacollectionruleassociations/create#examples). ++ ## Sample data collection endpoint-The sample data collection endpoint below is for virtual machines with Azure Monitor agent, with public network access disabled so that agent only uses private links to communicate and send data to Azure Monitor/Log Analytics. --```json -{ - "id": "/subscriptions/xxxxxxxx-xxxx-xxxx-xxxx-xxxxxxxxxx/resourceGroups/myResourceGroup/providers/Microsoft.Insights/dataCollectionEndpoints/myCollectionEndpoint", - "name": "myCollectionEndpoint", - "type": "Microsoft.Insights/dataCollectionEndpoints", - "location": "eastus", - "tags": { - "tag1": "A", - "tag2": "B" - }, - "properties": { - "configurationAccess": { - "endpoint": "https://mycollectionendpoint-abcd.eastus-1.control.monitor.azure.com" - }, - "logsIngestion": { - "endpoint": "https://mycollectionendpoint-abcd.eastus-1.ingest.monitor.azure.com" - }, - "networkAcls": { - "publicNetworkAccess": "Disabled" - } - }, - "systemData": { - "createdBy": "user1", - "createdByType": "User", - "createdAt": "yyyy-mm-ddThh:mm:ss.sssssssZ", - "lastModifiedBy": "user2", - "lastModifiedByType": "User", - "lastModifiedAt": "yyyy-mm-ddThh:mm:ss.sssssssZ" - }, - "etag": "xxxxxxxx-xxxx-xxxx-xxxx-xxxxxxxxxxxx" -} -``` +See [Sample data collection endpoint](data-collection-endpoint-sample.md) for a sample data collection endpoint. ## Next steps - [Associate endpoint to machines](../agents/data-collection-rule-azure-monitor-agent.md#create-data-collection-rule-and-association) |
| azure-monitor | Data Collection Endpoint Sample | https://github.com/MicrosoftDocs/azure-docs/commits/main/articles/azure-monitor/essentials/data-collection-endpoint-sample.md | + + Title: Sample data collection endpoint +description: Sample data collection endpoint below is for virtual machines with Azure Monitor agent + Last updated : 03/16/2022++++# Sample data collection endpoint +The sample data collection endpoint (DCE) below is for virtual machines with Azure Monitor agent, with public network access disabled so that agent only uses private links to communicate and send data to Azure Monitor/Log Analytics. ++## Sample DCE ++```json +{ + "id": "/subscriptions/xxxxxxxx-xxxx-xxxx-xxxx-xxxxxxxxxx/resourceGroups/myResourceGroup/providers/Microsoft.Insights/dataCollectionEndpoints/myCollectionEndpoint", + "name": "myCollectionEndpoint", + "type": "Microsoft.Insights/dataCollectionEndpoints", + "location": "eastus", + "tags": { + "tag1": "A", + "tag2": "B" + }, + "properties": { + "configurationAccess": { + "endpoint": "https://mycollectionendpoint-abcd.eastus-1.control.monitor.azure.com" + }, + "logsIngestion": { + "endpoint": "https://mycollectionendpoint-abcd.eastus-1.ingest.monitor.azure.com" + }, + "networkAcls": { + "publicNetworkAccess": "Disabled" + } + }, + "systemData": { + "createdBy": "user1", + "createdByType": "User", + "createdAt": "yyyy-mm-ddThh:mm:ss.sssssssZ", + "lastModifiedBy": "user2", + "lastModifiedByType": "User", + "lastModifiedAt": "yyyy-mm-ddThh:mm:ss.sssssssZ" + }, + "etag": "xxxxxxxx-xxxx-xxxx-xxxx-xxxxxxxxxxxx" +} +``` ++## Next steps +- [Read more about data collection endpoints](data-collection-endpoint-overview.md) |
| azure-monitor | Data Collection Rule Edit | https://github.com/MicrosoftDocs/azure-docs/commits/main/articles/azure-monitor/essentials/data-collection-rule-edit.md | While going through the wizard on the portal is the simplest way to set up the i In this tutorial, you will, first, set up ingestion of a custom log, then. you will modify the KQL transformation for your custom log to include additional filtering and apply the changes to your DCR. Finally, we are going to combine all editing operations into a single PowerShell script, which can be used to edit any DCR for any of the above mentioned reasons. ## Set up new custom log-Start by setting up a new custom log. Follow [Tutorial: Send custom logs to Azure Monitor Logs using the Azure portal (preview)]( ../logs/tutorial-custom-logs.md). Note the resource ID of the DCR created. +Start by setting up a new custom log. Follow [Tutorial: Send custom logs to Azure Monitor Logs using the Azure portal (preview)]( ../logs/tutorial-logs-ingestion-portal.md). Note the resource ID of the DCR created. ## Retrieve DCR content In order to update DCR, we are going to retrieve its content and save it as a file, which can be further edited. 1. Click the **Cloud Shell** button in the Azure portal and ensure the environment is set to **PowerShell**. - :::image type="content" source="../logs/media/tutorial-ingestion-time-transformations-api/open-cloud-shell.png" lightbox="../logs/media/tutorial-ingestion-time-transformations-api/open-cloud-shell.png" alt-text="Screenshot of opening cloud shell"::: + :::image type="content" source="../logs/media/tutorial-workspace-transformations-api/open-cloud-shell.png" lightbox="../logs/media/tutorial-workspace-transformations-api/open-cloud-shell.png" alt-text="Screenshot of opening cloud shell"::: 2. Execute the following commands to retrieve DCR content and save it to a file. Replace `<ResourceId>` with DCR ResourceID and `<FilePath>` with the name of the file to store DCR. |
| azure-monitor | Data Collection Rule Overview | https://github.com/MicrosoftDocs/azure-docs/commits/main/articles/azure-monitor/essentials/data-collection-rule-overview.md | Title: Data Collection Rules in Azure Monitor description: Overview of data collection rules (DCRs) in Azure Monitor including their contents and structure and how you can create and work with them. Previously updated : 04/26/2022 Last updated : 07/15/2022 -+ # Data collection rules in Azure Monitor -[Data Collection Rules (DCRs)](../essentials/data-collection-rule-overview.md) provide an [ETL](/azure/architecture/data-guide/relational-data/etl)-like pipeline in Azure Monitor, allowing you to define the way that data coming into Azure Monitor should be handled. Depending on the type of workflow, DCRs may specify where data should be sent and may filter or transform data before it's stored in Azure Monitor Logs. Some data collection rules will be created and managed by Azure Monitor, while you may create others to customize data collection for your particular requirements. This article describes DCRs including their contents and structure and how you can create and work with them. +Data Collection Rules (DCRs) define the [data collection process in Azure Monitor](../essentials/data-collection.md). DCRs specify what data should be collected, how to transform that data, and where to send that data. Some DCRs will be created and managed by Azure Monitor to collect a specific set of data to enable insights and visualizations. You may also create your own DCRs to define the set of data required for other scenarios. +++## View data collection rules +To view your data collection rules in the Azure portal, select **Data Collection Rules** from the **Monitor** menu. ++> [!NOTE] +> While this view shows all data collection rules in the specified subscriptions, clicking the **Create** button will create a data collection for Azure Monitor agent. Similarly, this page will only allow you to modify data collection rules for the Azure Monitor agent. See [Creating a data collection rule](#create-a-data-collection-rule) below for guidance on creating and updating data collection rules for other workflows. +++## Create a data collection rule +The following resources describe different scenarios for creating data collection rules. In some cases, the data collection rule may be created for you, while in others you may need to create and edit it yourself. ++| Scenario | Resources | Description | +|:|:|:| +| Azure Monitor agent | [Configure data collection for the Azure Monitor agent](../agents/data-collection-rule-azure-monitor-agent.md) | Use the Azure portal to create a data collection rule that specifies events and performance counters to collect from a machine with the Azure Monitor agent and then apply that rule to one or more virtual machines. The Azure Monitor agent will be installed on any machines that don't currently have it. | +| | [Use Azure Policy to install Azure Monitor agent and associate with DCR](../agents/azure-monitor-agent-manage.md#using-azure-policy) | Use Azure Policy to install the Azure Monitor agent and associate one or more data collection rules with any virtual machines or virtual machine scale sets as they're created in your subscription. +| Custom logs | [Configure custom logs using the Azure portal](../logs/tutorial-logs-ingestion-portal.md)<br>[Configure custom logs using Resource Manager templates and REST API](../logs/tutorial-logs-ingestion-api.md) | Send custom data using a REST API. The API call connects to a DCE and specifies a DCR to use. The DCR specifies the target table and potentially includes a transformation that filters and modifies the data before it's stored in a Log Analytics workspace. | +| Workspace transformation | [Configure ingestion-time transformations using the Azure portal](../logs/tutorial-workspace-transformations-portal.md)<br>[Configure ingestion-time transformations using Resource Manager templates and REST API](../logs/tutorial-workspace-transformations-api.md) | Create a transformation for any supported table in a Log Analytics workspace. The transformation is defined in a DCR that's then associated with the workspace and applied to any data sent to that table from a legacy workload that doesn't use a DCR. | ++## Work with data collection rules +See the following resources for working with data collection rules outside of the Azure portal. ++| Method | Resources | +|:|:| +| API | Directly edit the data collection rule in any JSON editor and then [install using the REST API](/rest/api/monitor/datacollectionrules). | +| CLI | Create DCR and associations with [Azure CLI](https://github.com/Azure/azure-cli-extensions/blob/master/src/monitor-control-service/README.md). | +| PowerShell | Work with DCR and associations with the following Azure PowerShell cmdlets.<br>[Get-AzDataCollectionRule](/powershell/module/az.monitor/get-azdatacollectionrule)<br>[New-AzDataCollectionRule](/powershell/module/az.monitor/new-azdatacollectionrule)<br>[Set-AzDataCollectionRule](/powershell/module/az.monitor/set-azdatacollectionrule)<br>[Update-AzDataCollectionRule](/powershell/module/az.monitor/update-azdatacollectionrule)<br>[Remove-AzDataCollectionRule](/powershell/module/az.monitor/remove-azdatacollectionrule)<br>[Get-AzDataCollectionRuleAssociation](/powershell/module/az.monitor/get-azdatacollectionruleassociation)<br>[New-AzDataCollectionRuleAssociation](/powershell/module/az.monitor/new-azdatacollectionruleassociation)<br>[Remove-AzDataCollectionRuleAssociation](/powershell/module/az.monitor/remove-azdatacollectionruleassociation) -## Types of data collection rules -There are currently two types of data collection rule in Azure Monitor: -- **Standard DCR**. Used with different workflows that send data to Azure Monitor. Workflows currently supported are [Azure Monitor agent](../agents/azure-monitor-agent-overview.md) and [custom logs (preview)](../logs/custom-logs-overview.md). -- **Workspace transformation DCR**. Used with a Log Analytics workspace to apply [ingestion-time transformations (preview)](../logs/ingestion-time-transformations.md) to workflows that don't currently support DCRs. ## Structure of a data collection rule-Data collection rules are formatted in JSON. While you may not need to interact with them directly, there are scenarios where you may need to directly edit a data collection rule. See [Data collection rule structure](data-collection-rule-structure.md) for a description of this structure and different elements. +Data collection rules are formatted in JSON. While you may not need to interact with them directly, there are scenarios where you may need to directly edit a data collection rule. See [Data collection rule structure](data-collection-rule-structure.md) for a description of this structure and the different elements used for different workflows. ## Permissions When using programmatic methods to create data collection rules and associations, you require the following permissions: When using programmatic methods to create data collection rules and associations ## Limits For limits that apply to each data collection rule, see [Azure Monitor service limits](../service-limits.md#data-collection-rules). -## Creating a data collection rule -The following articles describe different scenarios for creating data collection rules. In some cases, the data collection rule may be created for you, while in others you may need to create and edit it yourself. --| Workflow | Resources | -|:|:| -| Azure Monitor agent | [Configure data collection for the Azure Monitor agent](../agents/data-collection-rule-azure-monitor-agent.md)<br>[Use Azure Policy to install Azure Monitor agent and associate with DCR](../agents/azure-monitor-agent-manage.md#using-azure-policy) | -| Custom logs | [Configure custom logs using the Azure portal](../logs/tutorial-custom-logs.md)<br>[Configure custom logs using Resource Manager templates and REST API](../logs/tutorial-custom-logs-api.md) | -| Workspace transformation | [Configure ingestion-time transformations using the Azure portal](../logs/tutorial-ingestion-time-transformations.md)<br>[Configure ingestion-time transformations using Resource Manager templates and REST API](../logs/tutorial-ingestion-time-transformations-api.md) | ---## Programmatically work with DCRs -See the following resources for programmatically working with DCRs. -- Directly edit the data collection rule in JSON and [submit using the REST API](/rest/api/monitor/datacollectionrules).-- Create DCR and associations with [Azure CLI](https://github.com/Azure/azure-cli-extensions/blob/master/src/monitor-control-service/README.md).-- Create DCR and associations with Azure PowerShell.- - [Get-AzDataCollectionRule](https://github.com/Azure/azure-powershell/blob/master/src/Monitor/Monitor/help/Get-AzDataCollectionRule.md) - - [New-AzDataCollectionRule](https://github.com/Azure/azure-powershell/blob/master/src/Monitor/Monitor/help/New-AzDataCollectionRule.md) - - [Set-AzDataCollectionRule](https://github.com/Azure/azure-powershell/blob/master/src/Monitor/Monitor/help/Set-AzDataCollectionRule.md) - - [Update-AzDataCollectionRule](https://github.com/Azure/azure-powershell/blob/master/src/Monitor/Monitor/help/Update-AzDataCollectionRule.md) - - [Remove-AzDataCollectionRule](https://github.com/Azure/azure-powershell/blob/master/src/Monitor/Monitor/help/Remove-AzDataCollectionRule.md) - - [Get-AzDataCollectionRuleAssociation](https://github.com/Azure/azure-powershell/blob/master/src/Monitor/Monitor/help/Get-AzDataCollectionRuleAssociation.md) - - [New-AzDataCollectionRuleAssociation](https://github.com/Azure/azure-powershell/blob/master/src/Monitor/Monitor/help/New-AzDataCollectionRuleAssociation.md) - - [Remove-AzDataCollectionRuleAssociation](https://github.com/Azure/azure-powershell/blob/master/src/Monitor/Monitor/help/Remove-AzDataCollectionRuleAssociation.md) +## Supported regions +Data collection rules are available in all public regions where Log Analytics workspace are supported, as well as the Azure Government and China clouds. Air-gapped clouds are not yet supported. +**Single region data residency** is a preview feature to enable storing customer data in a single region and is currently only available in the Southeast Asia Region (Singapore) of the Asia Pacific Geo and Brazil South (Sao Paulo State) Region of Brazil Geo. Single region residency is enabled by default in these regions. ## Data resiliency and high availability-A rule gets created and stored in the region you specify, and is backed up to the [paired-region](../../availability-zones/cross-region-replication-azure.md#azure-cross-region-replication-pairings-for-all-geographies) within the same geography. The service is deployed to all three [availability zones](../../availability-zones/az-overview.md#availability-zones) within the region, making it a **zone-redundant service** which further adds to high availability. --## Supported regions -Data collection rules are stored regionally, and are available in all public regions where Log Analytics is supported, as well as the Azure Government and China clouds. Air-gapped clouds are not yet supported. --### Single region data residency -This is a preview feature to enable storing customer data in a single region is currently only available in the Southeast Asia Region (Singapore) of the Asia Pacific Geo and Brazil South (Sao Paulo State) Region of Brazil Geo. Single region residency is enabled by default in these regions. +A rule gets created and stored in a particular region and is backed up to the [paired-region](../../availability-zones/cross-region-replication-azure.md#azure-cross-region-replication-pairings-for-all-geographies) within the same geography. The service is deployed to all three [availability zones](../../availability-zones/az-overview.md#availability-zones) within the region, making it a **zone-redundant service** which further increases availability. ## Next steps - [Read about the detailed structure of a data collection rule.](data-collection-rule-structure.md)-- [Get details on transformations in a data collection rule.](data-collection-rule-transformations.md)+- [Get details on transformations in a data collection rule.](data-collection-transformations.md) |
| azure-monitor | Data Collection Rule Structure | https://github.com/MicrosoftDocs/azure-docs/commits/main/articles/azure-monitor/essentials/data-collection-rule-structure.md | description: Details on the structure of different kinds of data collection rule Previously updated : 02/22/2022 Last updated : 07/10/2022 ms.reviwer: nikeist ms.reviwer: nikeist # Structure of a data collection rule in Azure Monitor (preview)-[Data Collection Rules (DCRs)](data-collection-rule-overview.md) in Azure Monitor define the way that data coming into Azure Monitor should be handled. Some data collection rules will be created and managed by Azure Monitor, while you may create others to customize data collection for your particular requirements. This article describes the structure of DCRs for creating and editing data collection rules in those cases where you need to work with them directly. +[Data Collection Rules (DCRs)](data-collection-rule-overview.md) determine how to collect and process telemetry sent to Azure. Some data collection rules will be created and managed by Azure Monitor, while you may create others to customize data collection for your particular requirements. This article describes the structure of DCRs for creating and editing data collection rules in those cases where you need to work with them directly. ## Custom logs-A DCR for [custom logs](../logs/custom-logs-overview.md) contains the following sections: +A DCR for [custom logs](../logs/logs-ingestion-api-overview.md) contains the sections below. For a sample, see [Sample data collection rule - custom logs](../logs/data-collection-rule-sample-custom-logs.md). + ### streamDeclarations This section contains the declaration of all the different types of data that will be sent via the HTTP endpoint directly into Log Analytics. Each stream is an object whose key represents the stream name (Must begin with *Custom-*) and whose value is the full list of top-level properties that the JSON data that will be sent will contain. Note that the shape of the data you send to the endpoint doesn't need to match that of the destination table. Rather, the output of the transform that is applied on top of the input data needs to match the destination shape. The possible data types that can be assigned to the properties are `string`, `int`, `long`, `real`, `boolean`, `dynamic`, and `datetime`. This section contains a declaration of all the destinations where the data will This section ties the other sections together. Defines the following for each stream declared in the `streamDeclarations` section: - `destination` from the `destinations` section where the data will be sent. -- `transformKql` which is the [transformation](data-collection-rule-transformations.md) applied to the data that was sent in the input shape described in the `streamDeclarations` section to the shape of the target table.+- `transformKql` which is the [transformation](/data-collection-transformations.md) applied to the data that was sent in the input shape described in the `streamDeclarations` section to the shape of the target table. - `outputStream` section, which describes which table in the workspace specified under the `destination` property the data will be ingested into. The value of the outputStream will have the `Microsoft-[tableName]` shape when data is being ingested into a standard Log Analytics table, or `Custom-[tableName]` when ingesting data into a custom-created table. Only one destination is allowed per stream. ## Azure Monitor agent- A DCR for [Azure Monitor agent](../agents/data-collection-rule-azure-monitor-agent.md) contains the following sections: + A DCR for [Azure Monitor agent](../agents/data-collection-rule-azure-monitor-agent.md) contains the sections below. For a sample, see [Sample data collection rule - agent](../agents/data-collection-rule-sample-agent.md). -### Data sources +### dataSources Unique source of monitoring data with its own format and method of exposing its data. Examples of a data source include Windows event log, performance counters, and syslog. Each data source matches a particular data source type as described below. Each data source has a data source type. Each type defines a unique set of properties that must be specified for each data source. The data source types currently available are shown in the following table. Each data source has a data source type. Each type defines a unique set of prope ### Streams Unique handle that describes a set of data sources that will be transformed and schematized as one type. Each data source requires one or more streams, and one stream may be used by multiple data sources. All data sources in a stream share a common schema. Use multiple streams for example, when you want to send a particular data source to multiple tables in the same Log Analytics workspace. -### Destinations +### destinations Set of destinations where the data should be sent. Examples include Log Analytics workspace and Azure Monitor Metrics. Multiple destinations are allowed for multi-homing scenario. -### Data flows +### dataFlows Definition of which streams should be sent to which destinations. |
| azure-monitor | Data Collection Transformations Structure | https://github.com/MicrosoftDocs/azure-docs/commits/main/articles/azure-monitor/essentials/data-collection-transformations-structure.md | + + Title: KQL limitations in data collection transformations +description: Structure of transformation in Azure Monitor including limitations of KQL allowed in a transformation. + Last updated : 06/29/2022+ms.reviwer: nikeist ++++# Structure of transformation in Azure Monitor (preview) +[Transformations in Azure Monitor](/data-collection-transformations.md) allow you to filter or modify incoming data before it's stored in a Log Analytics workspace. They are implemented as a Kusto Query Language (KQL) statement in a [data collection rule (DCR)](data-collection-rule-overview.md). This article provides details on how this query is structured and limitations on the KQL language allowed. +++## Transformation structure +The KQL statement is applied individually to each entry in the data source. It must understand the format of the incoming data and create output in the structure of the target table. The input stream is represented by a virtual table named `source` with columns matching the input data stream definition. Following is a typical example of a transformation. This example includes the following functionality: ++- Filters the incoming data with a [where](/azure/data-explorer/kusto/query/whereoperator) statement +- Adds a new column using the [extend](/azure/data-explorer/kusto/query/extendoperator) operator +- Formats the output to match the columns of the target table using the [project](/azure/data-explorer/kusto/query/projectoperator) operator ++```kusto +source +| where severity == "Critical" +| extend Properties = parse_json(properties) +| project + TimeGenerated = todatetime(["time"]), + Category = category, + StatusDescription = StatusDescription, + EventName = name, + EventId = tostring(Properties.EventId) +``` ++## KQL limitations +Since the transformation is applied to each record individually, it can't use any KQL operators that act on multiple records. Only operators that take a single row as input and return no more than one row are supported. For example, [summarize](/azure/data-explorer/kusto/query/summarizeoperator) isn't supported since it summarizes multiple records. See [Supported KQL features](#supported-kql-features) for a complete list of supported features. ++++Transformations in a [data collection rule (DCR)](data-collection-rule-overview.md) allow you to filter or modify incoming data before it's stored in a Log Analytics workspace. This article describes how to build transformations in a DCR, including details and limitations of the Kusto Query Language (KQL) used for the transform statement. +++++## Inline reference table +The [datatable](/azure/data-explorer/kusto/query/datatableoperator?pivots=azuremonitor) operator isn't supported in the subset of KQL available to use in transformations. This operator would normally be used in KQL to define an inline query-time table. Use dynamic literals instead to work around this limitation. ++For example, the following statement isn't supported in a transformation: ++```kusto +let galaxy = datatable (country:string,entity:string)['ES','Spain','US','United States']; +source +| join kind=inner (galaxy) on $left.Location == $right.country +| extend Galaxy_CF = ['entity'] +``` ++You can instead use the following statement, which is supported and performs the same functionality: ++```kusto +let galaxyDictionary = parsejson('{"ES": "Spain","US": "United States"}'); +source +| extend Galaxy_CF = galaxyDictionary[Location] +``` ++### has operator +Transformations don't currently support [has](/azure/data-explorer/kusto/query/has-operator). Use [contains](/azure/data-explorer/kusto/query/contains-operator) which is supported and performs similar functionality. +++### Handling dynamic data +Consider the following input with [dynamic data](/azure/data-explorer/kusto/query/scalar-data-types/dynamic): ++```json +{ + "TimeGenerated" : "2021-11-07T09:13:06.570354Z", + "Message": "Houston, we have a problem", + "AdditionalContext": { + "Level": 2, + "DeviceID": "apollo13" + } +} +``` ++In order to access the properties in *AdditionalContext*, define it as dynamic-typed column in the input stream: ++```json +"columns": [ + { + "name": "TimeGenerated", + "type": "datetime" + }, + { + "name": "Message", + "type": "string" + }, + { + "name": "AdditionalContext", + "type": "dynamic" + } +] +``` ++The content of *AdditionalContext* column can now be parsed and used in the KQL transformation: ++```kusto +source +| extend parsedAdditionalContext = parse_json(AdditionalContext) +| extend Level = toint (parsedAdditionalContext.Level) +| extend DeviceId = tostring(parsedAdditionalContext.DeviceID) +``` ++### Dynamic literals +Use the [parse_json function](/azure/data-explorer/kusto/query/parsejsonfunction) to handle [dynamic literals](/azure/data-explorer/kusto/query/scalar-data-types/dynamic#dynamic-literals). ++For example, the following queries provide the same functionality: ++```kql +print d=dynamic({"a":123, "b":"hello", "c":[1,2,3], "d":{}}) +``` ++```kql +print d=parse_json('{"a":123, "b":"hello", "c":[1,2,3], "d":{}}') +``` ++## Supported KQL features ++### Supported statements ++#### let statement +The right-hand side of [let](/azure/data-explorer/kusto/query/letstatement) can be a scalar expression, a tabular expression or a user-defined function. Only user-defined functions with scalar arguments are supported. ++#### tabular expression statements +The only supported data sources for the KQL statement are as follows: ++- **source**, which represents the source data. For example: ++```kql +source +| where ActivityId == "383112e4-a7a8-4b94-a701-4266dfc18e41" +| project PreciseTimeStamp, Message +``` ++- [print](/azure/data-explorer/kusto/query/printoperator) operator, which always produces a single row. For example: + +```kusto +print x = 2 + 2, y = 5 | extend z = exp2(x) + exp2(y) +``` +++### Tabular operators +- [extend](/azure/data-explorer/kusto/query/extendoperator) +- [project](/azure/data-explorer/kusto/query/projectoperator) +- [print](/azure/data-explorer/kusto/query/printoperator) +- [where](/azure/data-explorer/kusto/query/whereoperator) +- [parse](/azure/data-explorer/kusto/query/parseoperator) +- [project-away](/azure/data-explorer/kusto/query/projectawayoperator) +- [project-rename](/azure/data-explorer/kusto/query/projectrenameoperator) +- [columnifexists]() (use columnifexists instead of column_ifexists) ++### Scalar operators ++#### Numerical operators +All [Numerical operators](/azure/data-explorer/kusto/query/numoperators) are supported. ++#### Datetime and Timespan arithmetic operators +All [Datetime and Timespan arithmetic operators](/azure/data-explorer/kusto/query/datetime-timespan-arithmetic) are supported. ++#### String operators +The following [String operators](/azure/data-explorer/kusto/query/datatypes-string-operators) are supported. ++- == +- != +- =~ +- !~ +- contains +- !contains +- contains_cs +- !contains_cs +- startswith +- !startswith +- startswith_cs +- !startswith_cs +- endswith +- !endswith +- endswith_cs +- !endswith_cs +- matches regex +- in +- !in ++#### Bitwise operators ++The following [Bitwise operators](/azure/data-explorer/kusto/query/binoperators) are supported. ++- binary_and() +- binary_or() +- binary_xor() +- binary_not() +- binary_shift_left() +- binary_shift_right() ++### Scalar functions ++#### Bitwise functions ++- [binary_and](/azure/data-explorer/kusto/query/binary-andfunction) +- [binary_or](/azure/data-explorer/kusto/query/binary-orfunction) +- [binary_not](/azure/data-explorer/kusto/query/binary-notfunction) +- [binary_shift_left](/azure/data-explorer/kusto/query/binary-shift-leftfunction) +- [binary_shift_right](/azure/data-explorer/kusto/query/binary-shift-rightfunction) +- [binary_xor](/azure/data-explorer/kusto/query/binary-xorfunction) ++#### Conversion functions ++- [tobool](/azure/data-explorer/kusto/query/toboolfunction) +- [todatetime](/azure/data-explorer/kusto/query/todatetimefunction) +- [todouble/toreal](/azure/data-explorer/kusto/query/todoublefunction) +- [toguid](/azure/data-explorer/kusto/query/toguidfunction) +- [toint](/azure/data-explorer/kusto/query/tointfunction) +- [tolong](/azure/data-explorer/kusto/query/tolongfunction) +- [tostring](/azure/data-explorer/kusto/query/tostringfunction) +- [totimespan](/azure/data-explorer/kusto/query/totimespanfunction) ++#### DateTime and TimeSpan functions ++- [ago](/azure/data-explorer/kusto/query/agofunction) +- [datetime_add](/azure/data-explorer/kusto/query/datetime-addfunction) +- [datetime_diff](/azure/data-explorer/kusto/query/datetime-difffunction) +- [datetime_part](/azure/data-explorer/kusto/query/datetime-partfunction) +- [dayofmonth](/azure/data-explorer/kusto/query/dayofmonthfunction) +- [dayofweek](/azure/data-explorer/kusto/query/dayofweekfunction) +- [dayofyear](/azure/data-explorer/kusto/query/dayofyearfunction) +- [endofday](/azure/data-explorer/kusto/query/endofdayfunction) +- [endofmonth](/azure/data-explorer/kusto/query/endofmonthfunction) +- [endofweek](/azure/data-explorer/kusto/query/endofweekfunction) +- [endofyear](/azure/data-explorer/kusto/query/endofyearfunction) +- [getmonth](/azure/data-explorer/kusto/query/getmonthfunction) +- [getyear](/azure/data-explorer/kusto/query/getyearfunction) +- [hourofday](/azure/data-explorer/kusto/query/hourofdayfunction) +- [make_datetime](/azure/data-explorer/kusto/query/make-datetimefunction) +- [make_timespan](/azure/data-explorer/kusto/query/make-timespanfunction) +- [now](/azure/data-explorer/kusto/query/nowfunction) +- [startofday](/azure/data-explorer/kusto/query/startofdayfunction) +- [startofmonth](/azure/data-explorer/kusto/query/startofmonthfunction) +- [startofweek](/azure/data-explorer/kusto/query/startofweekfunction) +- [startofyear](/azure/data-explorer/kusto/query/startofyearfunction) +- [todatetime](/azure/data-explorer/kusto/query/todatetimefunction) +- [totimespan](/azure/data-explorer/kusto/query/totimespanfunction) +- [weekofyear](/azure/data-explorer/kusto/query/weekofyearfunction) ++#### Dynamic and array functions ++- [array_concat](/azure/data-explorer/kusto/query/arrayconcatfunction) +- [array_length](/azure/data-explorer/kusto/query/arraylengthfunction) +- [pack_array](/azure/data-explorer/kusto/query/packarrayfunction) +- [pack](/azure/data-explorer/kusto/query/packfunction) +- [parse_json](/azure/data-explorer/kusto/query/parsejsonfunction) +- [parse_xml](/azure/data-explorer/kusto/query/parse-xmlfunction) +- [zip](/azure/data-explorer/kusto/query/zipfunction) ++#### Mathematical functions ++- [abs](/azure/data-explorer/kusto/query/abs-function) +- [bin/floor](/azure/data-explorer/kusto/query/binfunction) +- [ceiling](/azure/data-explorer/kusto/query/ceilingfunction) +- [exp](/azure/data-explorer/kusto/query/exp-function) +- [exp10](/azure/data-explorer/kusto/query/exp10-function) +- [exp2](/azure/data-explorer/kusto/query/exp2-function) +- [isfinite](/azure/data-explorer/kusto/query/isfinitefunction) +- [isinf](/azure/data-explorer/kusto/query/isinffunction) +- [isnan](/azure/data-explorer/kusto/query/isnanfunction) +- [log](/azure/data-explorer/kusto/query/log-function) +- [log10](/azure/data-explorer/kusto/query/log10-function) +- [log2](/azure/data-explorer/kusto/query/log2-function) +- [pow](/azure/data-explorer/kusto/query/powfunction) +- [round](/azure/data-explorer/kusto/query/roundfunction) +- [sign](/azure/data-explorer/kusto/query/signfunction) ++#### Conditional functions ++- [case](/azure/data-explorer/kusto/query/casefunction) +- [iif](/azure/data-explorer/kusto/query/iiffunction) +- [max_of](/azure/data-explorer/kusto/query/max-offunction) +- [min_of](/azure/data-explorer/kusto/query/min-offunction) ++#### String functions ++- [base64_encodestring](/azure/data-explorer/kusto/query/base64_encode_tostringfunction) (use base64_encodestring instead of base64_encode_tostring) +- [base64_decodestring](/azure/data-explorer/kusto/query/base64_decode_tostringfunction) (use base64_decodestring instead of base64_decode_tostring) +- [countof](/azure/data-explorer/kusto/query/countoffunction) +- [extract](/azure/data-explorer/kusto/query/extractfunction) +- [extract_all](/azure/data-explorer/kusto/query/extractallfunction) +- [indexof](/azure/data-explorer/kusto/query/indexoffunction) +- [isempty](/azure/data-explorer/kusto/query/isemptyfunction) +- [isnotempty](/azure/data-explorer/kusto/query/isnotemptyfunction) +- [parse_json](/azure/data-explorer/kusto/query/parsejsonfunction) +- [split](/azure/data-explorer/kusto/query/splitfunction) +- [strcat](/azure/data-explorer/kusto/query/strcatfunction) +- [strcat_delim](/azure/data-explorer/kusto/query/strcat-delimfunction) +- [strlen](/azure/data-explorer/kusto/query/strlenfunction) +- [substring](/azure/data-explorer/kusto/query/substringfunction) +- [tolower](/azure/data-explorer/kusto/query/tolowerfunction) +- [toupper](/azure/data-explorer/kusto/query/toupperfunction) +- [hash_sha256](/azure/data-explorer/kusto/query/sha256hashfunction) ++#### Type functions ++- [gettype](/azure/data-explorer/kusto/query/gettypefunction) +- [isnotnull](/azure/data-explorer/kusto/query/isnotnullfunction) +- [isnull](/azure/data-explorer/kusto/query/isnullfunction) ++### Identifier quoting +Use [Identifier quoting](/azure/data-explorer/kusto/query/schema-entities/entity-names?q=identifier#identifier-quoting) as required. +++++## Next steps ++- [Create a data collection rule](../agents/data-collection-rule-azure-monitor-agent.md) and an association to it from a virtual machine using the Azure Monitor agent. |
| azure-monitor | Data Collection Transformations | https://github.com/MicrosoftDocs/azure-docs/commits/main/articles/azure-monitor/essentials/data-collection-transformations.md | + + Title: Data collection transformations +description: Use transformations in a data collection rule in Azure Monitor to filter and modify incoming data. + Last updated : 06/29/2022+ms.reviwer: nikeist ++++# Data collection transformations in Azure Monitor (preview) +Transformations in Azure Monitor allow you to filter or modify incoming data before it's sent to a Log Analytics workspace. This article provides a basic description of transformations and how they are implemented. It provides links to other content for actually creating a transformation. ++## When to use transformations +Transformations are useful for a variety of scenarios, including those described below. ++### Reduce data costs +Since you're charged ingestion cost for any data sent to a Log Analytics workspace, you want to filter out any data that you don't require to reduce your costs. ++- **Remove entire rows.** For example, you might have a diagnostic setting to collect resource logs from a particular resource but not require all of the log entries that it generates. Create a transformation that filters out records that match a certain criteria. ++- **Remove a column from each row.** For example, your data may include columns with data that's redundant or has minimal value. Create a transformation that filters out columns that aren't required. ++- **Parse important data from a column.** You may have a table with valuable data buried in a particular column. Use a transformation to parse the valuable data into a new column and remove the original. +++### Remove sensitive data +You may have a data source that sends information you don't want stored for privacy or compliancy reasons. ++- **Filter sensitive information.** Filter out entire rows or just particular columns that contain sensitive information. + +- **Obfuscate sensitive information**. For example, you might replace digits with a common character in an IP address or telephone number. +++### Enrich data with additional or calculated information +Use a transformation to add information to data that provides business context or simplifies querying the data later. ++- **Add a column with additional information.** For example, you might add a column identifying whether an IP address in another column is internal or external. ++- **Add business specific information.** For example, you might add a column indicating a company division based on location information in other columns. ++## Supported tables +Transformations may be applied to the following tables in a Log Analytics workspace. ++- Any Azure table listed in [Tables that support time transformations in Azure Monitor Logs (preview)](../logs/tables-feature-support.md) +- Any custom table +++## How transformations work +Transformations are performed in Azure Monitor in the [data ingestion pipeline](../essentials/data-collection.md) after the data source delivers the data and before it's sent to the destination. The data source may perform its own filtering before sending data but then rely on the transformation for further manipulation for it's sent to the destination. ++Transformations are defined in a [data collection rule (DCR)](data-collection-rule-overview.md) and use a [Kusto Query Language (KQL) statement](data-collection-transformations-structure.md) that is applied individually to each entry in the incoming data. It must understand the format of the incoming data and create output in the structure expected by the destination. ++For example, a DCR that collects data from a virtual machine using Azure Monitor agent would specify particular data to collect from the client operating system. It could also include a transformation that would get applied to that data after it's sent to the data ingestion pipeline that further filters the data or adds a calculated column. This workflow is shown in the following diagram. +++Another example is data sent from a custom application using the [logs ingestion API](../logs/logs-ingestion-api-overview.md). In this case, the application sends the data to a [data collection endpoint](data-collection-endpoint-overview.md) and specifies a data collection rule in the REST API call. The DCR includes the transformation and the destination workspace and table. +++## Workspace transformation DCR +The workspace transformation DCR is a special DCR that's applied directly to a Log Analytics workspace. It includes default transformations for one more [supported tables](../logs/tables-feature-support.md). These transformations are applied to any data sent to these tables unless that data came from another DCR. ++For example, if you create a transformation in the workspace transformation DCR for the `Event` table, it would be applied to events collected by virtual machines running the [Log Analytics agent](../agents/log-analytics-agent.md) since this agent doesn't use a DCR. The transformation would be ignored by any data sent from the [Azure Monitor agent](../agents/azure-monitor-agent-overview.md) though since it uses a DCR and would be expected to provide its own transformation. ++A common use of the workspace transformation DCR is collection of [resource logs](resource-logs.md) which are configured with a [diagnostic setting](diagnostic-settings.md). This is shown in the example below. +++## Creating a transformation +There are multiple methods to create transformations depending on the data collection method. The following table lists guidance for different methods for creating transformations. ++| Type | Reference | +|:|:| +| Logs ingestion API with transformation | [Send data to Azure Monitor Logs using REST API (Azure portal)](../logs/tutorial-logs-ingestion-portal.md)<br>[Send data to Azure Monitor Logs using REST API (Resource Manager templates)](../logs/tutorial-logs-ingestion-api.md) | +| Transformation in workspace DCR | [Add workspace transformation to Azure Monitor Logs using the Azure portal (preview)](../logs/tutorial-workspace-transformations-portal.md)<br>[Add workspace transformation to Azure Monitor Logs using resource manager templates (preview)](../logs/tutorial-workspace-transformations-api.md) +++## Next steps ++- [Create a data collection rule](../agents/data-collection-rule-azure-monitor-agent.md) and an association to it from a virtual machine using the Azure Monitor agent. |
| azure-monitor | Data Collection | https://github.com/MicrosoftDocs/azure-docs/commits/main/articles/azure-monitor/essentials/data-collection.md | + + Title: Data collection in Azure Monitor +description: Monitoring data collected by Azure Monitor is separated into metrics that are lightweight and capable of supporting near real-time scenarios and logs that are used for advanced analysis. + Last updated : 07/10/2022+++# Data collection in Azure Monitor +Azure Monitor has a [common data platform](../data-platform.md) that consolidates data from a variety of sources. Currently, different sources of data for Azure Monitor use different methods to deliver their data, and each typically require different types of configuration. Get a description of the most common data sources at [Sources of monitoring data for Azure Monitor](../data-sources.md). ++Azure Monitor is implementing a new [ETL](/azure/architecture/data-guide/relational-data/etl)-like data collection pipeline that improves on legacy data collection methods. This process uses a common data ingestion pipeline for all data sources and provides a standard method of configuration that's more manageable and scalable than current methods. Specific advantages of the new data collection include the following: ++- Common set of destinations for different data sources. +- Ability to apply a transformation to filter or modify incoming data before it's stored. +- Consistent method for configuration of different data sources. +- Scalable configuration options supporting infrastructure as code and DevOps processes. ++When implementation is complete, all data collected by Azure Monitor will use the new data collection process and be managed by data collection rules. Currently, only certain data collection methods support the ingestion pipeline, and they may have limited configuration options. There's no difference between data collected with the new ingestion pipeline and data collected using other methods. The data is all stored together as [Logs](../logs/data-platform-logs.md) and [Metrics](data-platform-metrics.md), supporting Azure Monitor features such as log queries, alerts, and workbooks. The only difference is in the method of collection. +## Data collection rules +Azure Monitor data collection is configured using a [data collection rule (DCR)](data-collection-rule-overview.md). A DCR defines the details of a particular data collection scenario including what data should be collected, how to potentially transform that data, and where to send that data. A single DCR can be used with multiple monitored resources, giving you a consistent method to configure a variety of monitoring scenarios. In some cases, Azure Monitor will create and configure a DCR for you using options in the Azure portal. You may also directly edit DCRs to configure particular scenarios. ++See [Data collection rules in Azure Monitor](data-collection-rule-overview.md) for details on data collection rules including how to view and create them. ++## Transformations +One of the most valuable features of the new data collection process is [data transformations](data-collection-transformations.md), which allow you to apply a KQL query to incoming data to modify it before sending it to its destination. You might filter out unwanted data or modify existing data to improve your query or reporting capabilities. ++See [Data collection transformations in Azure Monitor (preview)](data-collection-transformations.md) For complete details on transformations including how to write transformation queries. +++## Data collection scenarios +The following sections describe the data collection scenarios that are currently supported using DCR and the new data ingestion pipeline. ++### Azure Monitor agent +The diagram below shows data collection for the [Azure Monitor agent](../agents/azure-monitor-agent-overview.md) running on a virtual machine. In this scenario, the DCR specifies events and performance data to collect from the agent machine, a transformation to filter and modify the data after its collected, and a Log Analytics workspace to send the transformed data. To implement this scenario, you create an association between the DCR and the agent. One agent can be associated with multiple DCRs, and one DCR can be associated with multiple agents. +++See [Collect data from virtual machines with the Azure Monitor agent](../agents/data-collection-rule-azure-monitor-agent.md) for details on creating a DCR for the Azure Monitor agent. ++### Log ingestion API +The diagram below shows data collection for the [Logs ingestion API](../logs/logs-ingestion-api-overview.md), which allows you to send data to a Log Analytics workspace from any REST client. In this scenario, the API call connects to a [data collection endpoint (DCE)](data-collection-endpoint-overview.md) and specifies a DCR to accept its incoming data. The DCR understands the structure of the incoming data, includes a transformation that ensures that the data is in the format of the target table, and specifies a workspace and table to send the transformed data. +++See [Logs ingestion API in Azure Monitor (Preview)](../logs/logs-ingestion-api-overview.md) for details on the Logs ingestion API. ++### Workspace transformation DCR +The diagram below shows data collection for [resource logs](resource-logs.md) using a [workspace transformation DCR](data-collection-transformations.md#workspace-transformation-dcr). This is a special DCR that's associated with a workspace and provides a default transformation for [supported tables](../logs/tables-feature-support.md). This transformation is applied to any data sent to the table that doesn't use another DCR. The example here shows resource logs using a diagnostic setting, but this same transformation could be applied to other data collection methods such as Log Analytics agent or Container insights. +++See [Workspace transformation DCR](data-collection-transformations.md#workspace-transformation-dcr) for details about workspace transformation DCRs and links to walkthroughs for creating them. ++## Next steps ++- Read more about [data collection rules](data-collection-rule-overview.md). +- Read more about [transformations](data-collection-transformations.md). + |
| azure-monitor | Data Platform Metrics | https://github.com/MicrosoftDocs/azure-docs/commits/main/articles/azure-monitor/essentials/data-platform-metrics.md | If you see a blank chart or your chart displays only part of metric data, verify - Learn more about the [Azure Monitor data platform](../data-platform.md). - Learn about [log data in Azure Monitor](../logs/data-platform-logs.md).-- Learn about the [monitoring data available](../agents/data-sources.md) for various resources in Azure.+- Learn about the [monitoring data available](../data-sources.md) for various resources in Azure. |
| azure-monitor | Stream Monitoring Data Event Hubs | https://github.com/MicrosoftDocs/azure-docs/commits/main/articles/azure-monitor/essentials/stream-monitoring-data-event-hubs.md | Before you configure streaming for any data source, you need to [create an Event * Outbound port 5671 and 5672 must typically be opened on the computer or VNET consuming data from the event hub. ## Monitoring data available-[Sources of monitoring data for Azure Monitor](../agents/data-sources.md) describes the data tiers for Azure applications and the kinds of data available for each. The following table lists each of these tiers and a description of how that data can be streamed to an event hub. Follow the links provided for further detail. +[Sources of monitoring data for Azure Monitor](../data-sources.md) describes the data tiers for Azure applications and the kinds of data available for each. The following table lists each of these tiers and a description of how that data can be streamed to an event hub. Follow the links provided for further detail. | Tier | Data | Method | |:|:|:|-| [Azure tenant](../agents/data-sources.md#azure-tenant) | Azure Active Directory audit logs | Configure a tenant diagnostic setting on your Azure AD tenant. See [Tutorial: Stream Azure Active Directory logs to an Azure event hub](../../active-directory/reports-monitoring/tutorial-azure-monitor-stream-logs-to-event-hub.md) for details. | -| [Azure subscription](../agents/data-sources.md#azure-subscription) | Azure Activity Log | Create a log profile to export Activity Log events to Event Hubs. See [Stream Azure platform logs to Azure Event Hubs](../essentials/resource-logs.md#send-to-azure-event-hubs) for details. | -| [Azure resources](../agents/data-sources.md#azure-resources) | Platform metrics<br> Resource logs |Both types of data are sent to an event hub using a resource diagnostic setting. See [Stream Azure resource logs to an event hub](../essentials/resource-logs.md#send-to-azure-event-hubs) for details. | -| [Operating system (guest)](../agents/data-sources.md#operating-system-guest) | Azure virtual machines | Install the [Azure Diagnostics Extension](../agents/diagnostics-extension-overview.md) on Windows and Linux virtual machines in Azure. See [Streaming Azure Diagnostics data in the hot path by using Event Hubs](../agents/diagnostics-extension-stream-event-hubs.md) for details on Windows VMs and [Use Linux Diagnostic Extension to monitor metrics and logs](../../virtual-machines/extensions/diagnostics-linux.md#protected-settings) for details on Linux VMs. | -| [Application code](../agents/data-sources.md#application-code) | Application Insights | Use diagnostic settings to stream to event hubs. This is only available with workspace-based Application Insights resources. For help setting up workspace-based Application Insights resources, see [Workspace-based Application Insights resources](../app/create-workspace-resource.md#workspace-based-application-insights-resources) and [Migrate to workspace-based Application Insights resources](../app/convert-classic-resource.md#migrate-to-workspace-based-application-insights-resources).| +| [Azure tenant](../data-sources.md#azure-tenant) | Azure Active Directory audit logs | Configure a tenant diagnostic setting on your Azure AD tenant. See [Tutorial: Stream Azure Active Directory logs to an Azure event hub](../../active-directory/reports-monitoring/tutorial-azure-monitor-stream-logs-to-event-hub.md) for details. | +| [Azure subscription](../data-sources.md#azure-subscription) | Azure Activity Log | Create a log profile to export Activity Log events to Event Hubs. See [Stream Azure platform logs to Azure Event Hubs](../essentials/resource-logs.md#send-to-azure-event-hubs) for details. | +| [Azure resources](../data-sources.md#azure-resources) | Platform metrics<br> Resource logs |Both types of data are sent to an event hub using a resource diagnostic setting. See [Stream Azure resource logs to an event hub](../essentials/resource-logs.md#send-to-azure-event-hubs) for details. | +| [Operating system (guest)](../data-sources.md#operating-system-guest) | Azure virtual machines | Install the [Azure Diagnostics Extension](../agents/diagnostics-extension-overview.md) on Windows and Linux virtual machines in Azure. See [Streaming Azure Diagnostics data in the hot path by using Event Hubs](../agents/diagnostics-extension-stream-event-hubs.md) for details on Windows VMs and [Use Linux Diagnostic Extension to monitor metrics and logs](../../virtual-machines/extensions/diagnostics-linux.md#protected-settings) for details on Linux VMs. | +| [Application code](../data-sources.md#application-code) | Application Insights | Use diagnostic settings to stream to event hubs. This is only available with workspace-based Application Insights resources. For help with setting up workspace-based Application Insights resources, see [Workspace-based Application Insights resources](../app/create-workspace-resource.md#workspace-based-application-insights-resources) and [Migrate to workspace-based Application Insights resources](../app/convert-classic-resource.md#migrate-to-workspace-based-application-insights-resources).| ## Manual streaming with Logic App For data that you can't directly stream to an event hub, you can write to Azure storage and then use a time-triggered Logic App that [pulls data from blob storage](../../connectors/connectors-create-api-azureblobstorage.md#add-action) and [pushes it as a message to the event hub](../../connectors/connectors-create-api-azure-event-hubs.md#add-action). Routing your monitoring data to an event hub with Azure Monitor enables you to e | Tool | Hosted in Azure | Description | |:|:| :|-| IBM QRadar | No | The Microsoft Azure DSM and Microsoft Azure Event Hub Protocol are available for download from [the IBM support website](https://www.ibm.com/support). | +| IBM QRadar | No | The Microsoft Azure DSM and Microsoft Azure Event Hubs Protocol are available for download from [the IBM support website](https://www.ibm.com/support). | | Splunk | No | [Splunk Add-on for Microsoft Cloud Services](https://splunkbase.splunk.com/app/3110/) is an open source project available in Splunkbase. <br><br> If you can't install an add-on in your Splunk instance, if for example you're using a proxy or running on Splunk Cloud, you can forward these events to the Splunk HTTP Event Collector using [Azure Function For Splunk](https://github.com/Microsoft/AzureFunctionforSplunkVS), which is triggered by new messages in the event hub. |-| SumoLogic | No | Instructions for setting up SumoLogic to consume data from an event hub are available at [Collect Logs for the Azure Audit App from Event Hub](https://help.sumologic.com/Send-Data/Applications-and-Other-Data-Sources/Azure-Audit/02Collect-Logs-for-Azure-Audit-from-Event-Hub). | -| ArcSight | No | The ArcSight Azure Event Hub smart connector is available as part of [the ArcSight smart connector collection](https://community.microfocus.com/cyberres/arcsight/f/arcsight-product-announcements/163662/announcing-general-availability-of-arcsight-smart-connectors-7-10-0-8114-0). | +| SumoLogic | No | Instructions for setting up SumoLogic to consume data from an event hub are available at [Collect Logs for the Azure Audit App from Event Hubs](https://help.sumologic.com/Send-Data/Applications-and-Other-Data-Sources/Azure-Audit/02Collect-Logs-for-Azure-Audit-from-Event-Hub). | +| ArcSight | No | The ArcSight Azure Event Hubs smart connector is available as part of [the ArcSight smart connector collection](https://community.microfocus.com/cyberres/arcsight/f/arcsight-product-announcements/163662/announcing-general-availability-of-arcsight-smart-connectors-7-10-0-8114-0). | | Syslog server | No | If you want to stream Azure Monitor data directly to a syslog server, you can use a [solution based on an Azure function](https://github.com/miguelangelopereira/azuremonitor2syslog/). | LogRhythm | No| Instructions to set up LogRhythm to collect logs from an event hub are available [here](https://logrhythm.com/six-tips-for-securing-your-azure-cloud-environment/). |Logz.io | Yes | For more information, see [Getting started with monitoring and logging using Logz.io for Java apps running on Azure](/azure/developer/java/fundamentals/java-get-started-with-logzio) |
| azure-monitor | Analyze Usage | https://github.com/MicrosoftDocs/azure-docs/commits/main/articles/azure-monitor/logs/analyze-usage.md | W3CIISLog - See [Azure Monitor Logs pricing details](cost-logs.md) for details on how charges are calculated for data in a Log Analytics workspace and different configuration options to reduce your charges. - See [Azure Monitor cost and usage](../usage-estimated-costs.md) for a description of the different types of Azure Monitor charges and how to analyze them on your Azure bill. - See [Azure Monitor best practices - Cost management](../best-practices-cost.md) for best practices on configuring and managing Azure Monitor to minimize your charges.-- See [Ingestion-time transformations in Azure Monitor Logs (preview)](ingestion-time-transformations.md) for details on using ingestion-time transformations to reduce the amount of data you collected in a Log Analytics workspace by filtering unwanted records and columns.+- See [Data collection transformations in Azure Monitor (preview)](../essentials/data-collection-transformations.md) for details on using transformations to reduce the amount of data you collected in a Log Analytics workspace by filtering unwanted records and columns. |
| azure-monitor | Azure Cli Log Analytics Workspace Sample | https://github.com/MicrosoftDocs/azure-docs/commits/main/articles/azure-monitor/logs/azure-cli-log-analytics-workspace-sample.md | For more information about tables, see [Data structure](./log-analytics-workspac ## Delete a table -You can delete [Custom Log](custom-logs-overview.md), [Search Results](search-jobs.md) and [Restored Logs](restore.md) tables. +You can delete [Custom Log](logs-ingestion-api-overview.md), [Search Results](search-jobs.md) and [Restored Logs](restore.md) tables. To delete a table, run the [az monitor log-analytics workspace table delete](/cli/azure/monitor/log-analytics/workspace/table#az-monitor-log-analytics-workspace-data-export-delete) command: |
| azure-monitor | Basic Logs Configure | https://github.com/MicrosoftDocs/azure-docs/commits/main/articles/azure-monitor/logs/basic-logs-configure.md | Setting a table's [log data plan](log-analytics-workspace-overview.md#log-data-p By default, all tables in your Log Analytics are Analytics tables, and available for query and alerts. You can currently configure the following tables for Basic Logs: -- All tables created with the [Data Collection Rule (DCR)-based custom logs API.](custom-logs-overview.md) +- All tables created with the [Data Collection Rule (DCR)-based logs ingestion API.](logs-ingestion-api-overview.md) - [ContainerLogV2](/azure/azure-monitor/reference/tables/containerlogv2), which [Container Insights](../containers/container-insights-overview.md) uses and which include verbose text-based log records. - [AppTraces](/azure/azure-monitor/reference/tables/apptraces), which contains freeform log records for application traces in Application Insights. |
| azure-monitor | Cost Logs | https://github.com/MicrosoftDocs/azure-docs/commits/main/articles/azure-monitor/logs/cost-logs.md | The default pricing for Log Analytics is a Pay-As-You-Go model that's based on i - The types of data collected from each monitored resource ## Data size calculation-Data volume is measured as the size of the data that will be stored in GB (10^9 bytes). The data size of a single record is calculated from a string representation of the columns that are stored in the Log Analytics workspace for that record, regardless of whether the data is sent from an agent or added during the ingestion process. This includes any custom columns added by the [custom logs API](custom-logs-overview.md), [ingestion-time transformations](ingestion-time-transformations.md), or [custom fields](custom-fields.md) that are added as data is collected and then stored in the workspace. +Data volume is measured as the size of the data that will be stored in GB (10^9 bytes). The data size of a single record is calculated from a string representation of the columns that are stored in the Log Analytics workspace for that record, regardless of whether the data is sent from an agent or added during the ingestion process. This includes any custom columns added by the [logs ingestion API](logs-ingestion-api-overview.md), [transformations](../essentials/data-collection-transformations.md), or [custom fields](custom-fields.md) that are added as data is collected and then stored in the workspace. >[!NOTE] >The billable data volume calculation is substantially smaller than the size of the entire incoming JSON-packaged event. On average across all event types, the billed size is about 25% less than the incoming data size. This can be up to 50% for small events. It is essential to understand this calculation of billed data size when estimating costs and comparing to other pricing models. See [Configure data retention and archive policies in Azure Monitor Logs](data-r Searching against Archived Logs uses [search jobs](search-jobs.md). Search jobs are asynchronous queries that fetch records into a new search table within your workspace for further analytics. Search jobs are billed by the number of GB of data scanned on each day that is accessed to perform the search. ## Log data restore-For situations in which older or archived logs need to be intensively queried with the full analyitics query capabilities, the [data restore](restore.md) feature is a powerful tool. The restore operation makes a specific time range of data in a table available in the hot cache for high-performance queries. You can later dismiss the data when you're done. Log data restore is billed by the amount of data restored, and by the time the restore is kept active. The minimal values billed for any data restore is 2 TB and 12 hours. Data restored of more than 2 TB and/or more than 12 hours in duration are billed on a pro-rated basis. +For situations in which older or archived logs need to be intensively queried with the full analytic query capabilities, the [data restore](restore.md) feature is a powerful tool. The restore operation makes a specific time range of data in a table available in the hot cache for high-performance queries. You can later dismiss the data when you're done. Log data restore is billed by the amount of data restored, and by the time the restore is kept active. The minimal values billed for any data restore are 2 TB and 12 hours. Data restored of more than 2 TB and/or more than 12 hours in duration are billed on a pro-rated basis. ## Log data export [Data export](logs-data-export.md) in Log Analytics workspace lets you continuously export data per selected tables in your workspace, to an Azure Storage Account or Azure Event Hubs as it arrives to Azure Monitor pipeline. Charges for the use of data export are based on the amount of data exported. The size of data exported is the number of bytes in the exported JSON formatted data. Telemetry from ping tests and multi-step tests is charged the same as data usage See [Application Insights legacy enterprise (per node) pricing tier](../app/legacy-pricing.md) for details about legacy tiers that are available to early adopters of Application Insights. ## Workspaces with Microsoft Sentinel-When Microsoft Sentinel is enabled in a Log Analytics workspace, all data collected in that workspace is subject to Sentinel charges in addition to Log Analytics charges. For this reason, you will often separate your security and operational data in different workspaces so that you don't incur [Sentinel charges](../../sentinel/billing.md) for operational data. There may be particular situations though where combining this data can actually result in a cost savings. This is typically when you aren't collecting enough security and operational data to each reach a commitment tier on their own, but the combined data is enough to reach a commitment tier. See **Combining your SOC and non-SOC data** in [Design your Microsoft Sentinel workspace architecture](../../sentinel/design-your-workspace-architecture.md#decision-tree) for details and a sample cost calculation. +When Microsoft Sentinel is enabled in a Log Analytics workspace, all data collected in that workspace is subject to Sentinel charges in addition to Log Analytics charges. For this reason, you will often separate your security and operational data in different workspaces so that you don't incur [Sentinel charges](../../sentinel/billing.md) for operational data. For some particular situations though, combining this data can actually result in a cost savings. This is typically when you aren't collecting enough security and operational data to each reach a commitment tier on their own, but the combined data is enough to reach a commitment tier. See **Combining your SOC and non-SOC data** in [Design your Microsoft Sentinel workspace architecture](../../sentinel/design-your-workspace-architecture.md#decision-tree) for details and a sample cost calculation. ## Workspaces with Microsoft Defender for Cloud [Microsoft Defender for Servers (part of Defender for Cloud)](../../security-center/index.yml) [bills by the number of monitored services](https://azure.microsoft.com/pricing/details/azure-defender/) and provides 500 MB/server/day data allocation that is applied to the following subset of [security data types](/azure/azure-monitor/reference/tables/tables-category#security): When Microsoft Sentinel is enabled in a Log Analytics workspace, all data collec The count of monitored servers is calculated on an hourly granularity. The daily data allocation contributions from each monitored server are aggregated at the workspace level. If the workspace is in the legacy Per Node pricing tier, the Microsoft Defender for Cloud and Log Analytics allocations are combined and applied jointly to all billable ingested data. ## Legacy pricing tiers-Subscriptions that contained a Log Analytics workspace or Application Insights resource on April 2, 2018, or are linked to an Enterprise Agreement that started before February 1, 2019 and is still active, will continue to have access to use the the following legacy pricing tiers: +Subscriptions that contained a Log Analytics workspace or Application Insights resource on April 2, 2018, or are linked to an Enterprise Agreement that started before February 1, 2019 and is still active, will continue to have access to use the following legacy pricing tiers: - Standalone (Per GB) - Per Node (OMS) |
| azure-monitor | Custom Logs Migrate | https://github.com/MicrosoftDocs/azure-docs/commits/main/articles/azure-monitor/logs/custom-logs-migrate.md | Title: Migrate from Data Collector API and custom fields-enabled tables to DCR-based custom logs -description: Steps that you must perform when migrating from Data Collector API and custom fields-enabled tables to DCR-based custom logs. + Title: Migrate from Data Collector API and custom fields-enabled tables to DCR-based custom log collection +description: Steps that you must perform when migrating from Data Collector API and custom fields-enabled tables to DCR-based custom log collection. Last updated 01/06/2022 -# Migrate from Data Collector API and custom fields-enabled tables to DCR-based custom logs -This article describes how to migrate from [Data Collector API](data-collector-api.md) or [custom fields](custom-fields.md) in Azure Monitor to [DCR-based custom logs](custom-logs-overview.md). It includes configuration required for tables in your Log Analytics workspace and applies to both [direct ingestion](custom-logs-overview.md) and [ingestion-time transformations](ingestion-time-transformations.md). +# Migrate from Data Collector API and custom fields-enabled tables to DCR-based custom log collection +This article describes how to migrate from [Data Collector API](data-collector-api.md) or [custom fields](custom-fields.md) in Azure Monitor to [DCR-based custom log collection](../essentials/data-collection-rule-overview.md). It includes configuration required for custom tables created in your Log Analytics workspace so that they can be used by [Logs ingestion API](logs-ingestion-api-overview.md) and [workspace transformations](../essentials/data-collection-transformations.md#workspace-transformation-dcr). > [!IMPORTANT]-> You do not need to follow this article if you are defining your DCR-based custom logs using the Azure Portal. This article only applies if you are using Resource Manager templates and the custom logs API. +> You do not need to follow this article if you are configuring your DCR-based custom logs [using the Azure Portal](tutorial-workspace-transformations-portal.md) since the configuration will be performed for you. This article only applies if you're configuring using Resource Manager templates APIs. ## Background-To use a table with the [direct ingestion](custom-logs-overview.md), and [ingestion-time transformations](ingestion-time-transformations.md), it must be configured to support these new features. When you complete the process described in this article, the following actions are taken: +To use a table with the [Logs ingestion API](logs-ingestion-api-overview.md) or with a [workspace transformation](../essentials/data-collection-transformations.md#workspace-transformation-dcr), it must be configured to support new features. When you complete the process described in this article, the following actions are taken: -- The table will be reconfigured to enable all DCR-based custom logs features. This includes DCR and DCE support and management with the new Tables control plane.+- The table is reconfigured to enable all DCR-based custom logs features. This includes DCR and DCE support and management with the new **Tables** control plane. - Any previously defined custom fields will stop populating. - The Data Collector API will continue to work but won't create any new columns. Data will only populate into any columns that was created prior to migration. - The schema and historic data is preserved and can be accessed the same way it was previously. To use a table with the [direct ingestion](custom-logs-overview.md), and [ingest ## Applicable scenarios This article is only applicable if all of the following criteria apply: -- You need to use the DCR-based custom logs functionality to send data to an existing table, preserving both schema and historical data in that table.-- The table in question was either created using the Data Collector API, or has custom fields defined in it -- You want to migrate using the custom logs API instead of the Azure portal.+- You're going to send data to the table using the [Logs ingestion API](logs-ingestion-api-overview.md) or configure a transformation for the table in the [workspace transformation DCR](../essentials/data-collection-transformations.md#workspace-transformation-dcr), preserving both schema and historical data in that table. +- The table was either created using the Data Collector API, or has custom fields defined in it. +- You want to migrate using the APIs instead of the Azure portal as described in [Send custom logs to Azure Monitor Logs using the Azure portal (preview)](tutorial-logs-ingestion-portal.md) or [Add transformation in workspace data collection rule using the Azure portal (preview)](tutorial-workspace-transformations-portal.md). -If all of these conditions aren't true, then you can use DCR-based custom logs without following the procedure described here. +If all of these conditions aren't true, then you can use DCR-based log collection without following the procedure described here. ## Migration procedure-If the table that you're targeting with DCR-based custom logs does indeed falls under the criteria described above, the following strategy is required for a graceful migration: +If the table that you're targeting with DCR-based log collection fits the criteria above, then you must perform the following steps: -1. Configure your data collection rule (DCR) following procedures at [Send custom logs to Azure Monitor Logs using Resource Manager templates (preview)](tutorial-custom-logs-api.md) or [Add ingestion-time transformation to Azure Monitor Logs using Resource Manager templates (preview)](tutorial-ingestion-time-transformations-api.md). +1. Configure your data collection rule (DCR) following procedures at [Send custom logs to Azure Monitor Logs using Resource Manager templates (preview)](tutorial-logs-ingestion-api.md) or [Add transformation in workspace data collection rule to Azure Monitor using resource manager templates (preview)](tutorial-workspace-transformations-api.md). -1. If using the DCR-based API, also [configure the data collection endpoint (DCE)](tutorial-custom-logs-api.md#create-data-collection-endpoint) and the agent or component that will be sending data to the API. +1. If using the Logs ingestion API, also [configure the data collection endpoint (DCE)](tutorial-logs-ingestion-api.md#create-data-collection-endpoint) and the agent or component that will be sending data to the API. 1. Issue the following API call against your table. This call is idempotent, so there will be no effect if the table has already been migrated. If the table that you're targeting with DCR-based custom logs does indeed falls POST /subscriptions/{subscriptionId}/resourcegroups/{resourceGroupName}/providers/microsoft.operationalinsights/workspaces/{workspaceName}/tables/{tableName}/migrate?api-version=2021-03-01-privatepreview ``` -1. Discontinue use of the Data Collector API and start using the new custom logs API. +1. Discontinue use of the Data Collector API and start using the new Logs ingestion API. ## Next steps -- [Walk through a tutorial sending custom logs using the Azure portal.](tutorial-custom-logs.md)-- [Walk through a tutorial sending custom logs using Resource Manager templates and REST API.](tutorial-custom-logs-api.md)+- [Walk through a tutorial sending custom logs using the Azure portal.](tutorial-logs-ingestion-portal.md) +- [Walk through a tutorial sending custom logs using Resource Manager templates and REST API.](tutorial-logs-ingestion-api.md) |
| azure-monitor | Data Collection Rule Sample Custom Logs | https://github.com/MicrosoftDocs/azure-docs/commits/main/articles/azure-monitor/logs/data-collection-rule-sample-custom-logs.md | Last updated 02/15/2022 # Sample data collection rule - custom logs-The sample [data collection rule](../essentials/data-collection-rule-overview.md) below is for use with [custom logs](../logs/custom-logs-overview.md). It has the following details: +The sample [data collection rule](../essentials/data-collection-rule-overview.md) below is for use with [custom logs](../logs/logs-ingestion-api-overview.md). It has the following details: - Sends data to a table called MyTable_CL in a workspace called my-workspace.-- Applies a [transformation](../essentials/data-collection-rule-transformations.md) to the incoming data.+- Applies a [transformation](../essentials//data-collection-transformations.md) to the incoming data. ## Sample DCR The sample [data collection rule](../essentials/data-collection-rule-overview.md ## Next steps -- [Walk through a tutorial on configuring custom logs using resource manager templates.](tutorial-custom-logs-api.md)+- [Walk through a tutorial on configuring custom logs using resource manager templates.](tutorial-logs-ingestion-api.md) - [Get details on the structure of data collection rules.](../essentials/data-collection-rule-structure.md)-- [Get an overview on custom logs](custom-logs-overview.md).+- [Get an overview on custom logs](logs-ingestion-api-overview.md). |
| azure-monitor | Data Platform Logs | https://github.com/MicrosoftDocs/azure-docs/commits/main/articles/azure-monitor/logs/data-platform-logs.md | This configuration will be different depending on the data source. For example: - [Create diagnostic settings](../essentials/diagnostic-settings.md) to send resource logs from Azure resources to the workspace. - [Enable VM insights](../vm/vminsights-enable-overview.md) to collect data from virtual machines. -- [Configure data sources on the workspace](../agents/data-sources.md) to collect more events and performance data.+- [Configure data sources on the workspace](../data-sources.md) to collect more events and performance data. > [!IMPORTANT] > Most data collection in Logs will incur ingestion and retention costs, so refer to [Azure Monitor pricing](https://azure.microsoft.com/pricing/details/monitor/) before enabling any data collection. The experience of using Log Analytics to work with Azure Monitor queries in the - Learn about [log queries](./log-query-overview.md) to retrieve and analyze data from a Log Analytics workspace. - Learn about [metrics in Azure Monitor](../essentials/data-platform-metrics.md).-- Learn about the [monitoring data available](../agents/data-sources.md) for various resources in Azure.+- Learn about the [monitoring data available](../data-sources.md) for various resources in Azure. |
| azure-monitor | Ingestion Time Transformations | https://github.com/MicrosoftDocs/azure-docs/commits/main/articles/azure-monitor/logs/ingestion-time-transformations.md | - Title: Overview of ingestion-time transformations in Azure Monitor Logs -description: This article describes ingestion-time transformations which allow you to filter and transform data before it's stored in a Log Analytics workspace in Azure Monitor. - Previously updated : 01/19/2022---# Ingestion-time transformations in Azure Monitor Logs (preview) -[Ingestion-time transformations](ingestion-time-transformations.md) allow you to manipulate incoming data before it's stored in a Log Analytics workspace. You can add data filtering, parsing and extraction, and control the structure of the data that gets ingested. ---## Basic operation -The transformation is a [KQL query](../essentials/data-collection-rule-transformations.md) that runs against the incoming data and modifies it before it's stored in the workspace. Transformations are defined separately for each table in the workspace. This article provides an overview of this feature and guidance for further details and samples. Configuration for ingestion-time transformation is stored in a workspace transformation DCR. You can either [create this DCR directly](tutorial-ingestion-time-transformations-api.md) or configure transformation [through the Azure portal](tutorial-ingestion-time-transformations.md). --## When to use ingestion-time transformations -Use ingestion-time transformation for the following scenarios: --**Reduce data ingestion cost.** You can create a transformation to filter data that you don't require from a particular workflow. You may also remove data that you don't require from specific columns, resulting in a lower amount of the data that you need to ingest and store. For example, you might have a diagnostic setting to collect resource logs from a particular resource but not require all of the log entries that it generates. Create a transformation that filters out records that match a certain criteria. --**Simplify query requirements.** You may have a table with valuable data buried in a particular column or data that needs some type of conversion each time it's queried. Create a transformation that parses this data into a custom column so that queries don't need to parse it. Remove extra data from the column that isn't required to decrease ingestion and retention costs. --## Supported workflows -Ingestion-time transformation is applied to any workflow that doesn't currently use a [data collection rule](../essentials/data-collection-rule-overview.md) to send data to a [supported table](tables-feature-support.md). Any transformation on a workspace will be ignored for these workflows. --The workflows that currently use data collection rules are as follows: --- [Azure Monitor agent](../agents/data-collection-rule-azure-monitor-agent.md)-- [Custom logs](../logs/custom-logs-overview.md)--## Supported tables -See [Supported tables for ingestion-time transformations](tables-feature-support.md) for a complete list of tables that support ingestion-time transformations. --## Configure ingestion-time transformation -See the following tutorials for a complete walkthrough of configuring ingestion-time transformation. --- [Azure portal](../logs/tutorial-ingestion-time-transformations.md)-- [Resource Manager templates and REST API](../logs/tutorial-ingestion-time-transformations-api.md)---## Limits --- Transformation queries use a subset of KQL. See [Supported KQL features](../essentials/data-collection-rule-transformations.md#supported-kql-features) for details.--## Next steps --- [Get details on transformation queries](../essentials/data-collection-rule-transformations.md)-- [Walk through configuration of ingestion-time transformation using the Azure portal](tutorial-ingestion-time-transformations.md)-- [Walk through configuration of ingestion-time transformation using Resource Manager templates and REST API](tutorial-ingestion-time-transformations.md) |
| azure-monitor | Log Analytics Workspace Overview | https://github.com/MicrosoftDocs/azure-docs/commits/main/articles/azure-monitor/logs/log-analytics-workspace-overview.md | The following table summarizes the two plans. For more information on Basic Logs | Retention | Configure retention from 30 days to 730 days. | Retention fixed at 8 days. | | Alerts | Supported. | Not supported. | -## Ingestion-time transformations +## Workspace transformation DCR -[Data collection rules (DCRs)](../essentials/data-collection-rule-overview.md) that define data coming into Azure Monitor can include transformations that allow you to filter and transform data before it's ingested into the workspace. Since all workflows don't yet support DCRs, each workspace can define ingestion-time transformations. For this reason, you can filter or transform data before it's stored. +[Data collection rules (DCRs)](../essentials/data-collection-rule-overview.md) that define data coming into Azure Monitor can include transformations that allow you to filter and transform data before it's ingested into the workspace. Since all data sources don't yet support DCRs, each workspace can have a [workspace transformation DCR](../essentials/data-collection-transformations.md#workspace-transformation-dcr). -[Ingestion-time transformations](ingestion-time-transformations.md) are defined for each table in a workspace and apply to all data sent to that table, even if sent from multiple sources. Ingestion-time transformations only apply to workflows that don't already use a DCR. For example, [Azure Monitor agent](../agents/azure-monitor-agent-overview.md) uses a DCR to define data collected from virtual machines. This data won't be subject to any ingestion-time transformations defined in the workspace. +[Transformations](../essentials/data-collection-transformations.md) in the workspace transformation DCR are defined for each table in a workspace and apply to all data sent to that table, even if sent from multiple sources. These transformations only apply to workflows that don't already use a DCR. For example, [Azure Monitor agent](../agents/azure-monitor-agent-overview.md) uses a DCR to define data collected from virtual machines. This data won't be subject to any ingestion-time transformations defined in the workspace. For example, you might have [diagnostic settings](../essentials/diagnostic-settings.md) that send [resource logs](../essentials/resource-logs.md) for different Azure resources to your workspace. You can create a transformation for the table that collects the resource logs that filters this data for only records that you want. This method saves you the ingestion cost for records you don't need. You might also want to extract important data from certain columns and store it in other columns in the workspace to support simpler queries. |
| azure-monitor | Logs Data Export | https://github.com/MicrosoftDocs/azure-docs/commits/main/articles/azure-monitor/logs/logs-data-export.md | Data export in Log Analytics workspace lets you continuously export data per sel ## Overview Data in Log Analytics is available for the retention period defined in your workspace, and used in various experiences provided in Azure Monitor and Azure services. There are cases where you need to use other tools: * Tamper protected store compliance ΓÇô data can't be altered in Log Analytics once ingested, but can be purged. Export to Storage Account set with [immutability policies](../../storage/blobs/immutable-policy-configure-version-scope.md) to keep data tamper protected.-* Integration with Azure services and other tools ΓÇô export to Event Hubs as it arrives and processed in Azure Monitor. +* Integration with Azure services and other tools ΓÇô export to Event Hubs as data arrives and is processed in Azure Monitor. * Keep audit and security data for very long time ΓÇô export to Storage Account in the workspace's region, or replicate data to other regions using any of the [Azure Storage redundancy options](../../storage/common/storage-redundancy.md#redundancy-in-a-secondary-region) including "GRS" and "GZRS". -After configuring data export rules in Log Analytics workspace, new data for tables in rules is exported from Azure Monitor pipeline to your Storage Account or Event Hubs as it arrives. +Once you've configured data export rules in Log Analytics workspace, new data for tables in rules is exported from Azure Monitor pipeline to your Storage Account or Event Hubs as it arrives. [](media/logs-data-export/data-export-overview.png#lightbox) Data is exported without a filter. For example, when you configure a data export ## Other export options Log Analytics workspace data export continuously exports data that is sent to your Log Analytics workspace. There are other options to export data for particular scenarios: -- Configure Diagnostic Settings in Azure resources. Logs is sent to destination directly and has lower latency compared to data export in Log Analytics.+- Configure Diagnostic Settings in Azure resources. Logs are sent to destination directly and has lower latency compared to data export in Log Analytics. - Schedule export of data based on a log query you define with the [Log Analytics query API](/rest/api/loganalytics/dataaccess/query/execute). Use services such as Azure Data Factory, Azure Functions, or Azure Logic App to orchestrate queries in your workspace and export data to a destination. This is similar to the data export feature, but allows you to export historical data from your workspace, using filters and aggregation. This method is subject to [log query limits](../service-limits.md#log-analytics-workspaces) and not intended for scale. See [Archive data from Log Analytics workspace to Azure Storage Account using Logic App](logs-export-logic-app.md). - One time export to local machine using PowerShell script. See [Invoke-AzOperationalInsightsQueryExport](https://www.powershellgallery.com/packages/Invoke-AzOperationalInsightsQueryExport). ## Limitations - All tables will be supported in export, but currently limited to those specified in the [supported tables](#supported-tables) section.-- Legacy custom log using the [HTTP Data Collector API](./data-collector-api.md) wonΓÇÖt be supported in export, while data for [DCR based custom logs](./custom-logs-overview.md) can be exported. +- Legacy custom log using the [HTTP Data Collector API](./data-collector-api.md) wonΓÇÖt be supported in export, while data for [DCR based custom logs](./logs-ingestion-api-overview.md) can be exported. - You can define up to 10 enabled rules in your workspace. More rules are allowed when disabled. - Destinations must be in the same region as the Log Analytics workspace. - Storage Account must be unique across rules in workspace. The Storage Account must be StorageV1 or above and in the same region as your wo Data is sent to Storage Accounts as it reaches Azure Monitor and exported to destinations located in workspace region. A container is created for each table in Storage Account, with the name *am-* followed by the name of the table. For example, the table *SecurityEvent* would send to a container named *am-SecurityEvent*. -Blobs are stored in 5-minute folders in path structure: *WorkspaceResourceId=/subscriptions/subscription-id/resourcegroups/\<resource-group\>/providers/microsoft.operationalinsights/workspaces/\<workspace\>/y=\<four-digit numeric year\>/m=\<two-digit numeric month\>/d=\<two-digit numeric day\>/h=\<two-digit 24-hour clock hour\>/m=\<two-digit 60-minute clock minute\>/PT05M.json*. Append blobs is limited to 50-K writes and could be reached, and more blobs will be added in folder as: PT05M_#.json*, where # is incremental blob count. +Blobs are stored in 5-minute folders in path structure: *WorkspaceResourceId=/subscriptions/subscription-id/resourcegroups/\<resource-group\>/providers/microsoft.operationalinsights/workspaces/\<workspace\>/y=\<four-digit numeric year\>/m=\<two-digit numeric month\>/d=\<two-digit numeric day\>/h=\<two-digit 24-hour clock hour\>/m=\<two-digit 60-minute clock minute\>/PT05M.json*. Appends to blobs are limited to 50-K writes. More blobs will be added in folder as: PT05M_#.json*, where # is incremental blob count. The format of blobs in Storage Account is in [JSON lines](../essentials/resource-logs-blob-format.md), where each record is delimited by a newline, with no outer records array and no commas between JSON records. You need to have 'write' permissions to both workspace and destination to config Don't use an existing Event Hubs that has, non-monitoring data to prevent reaching Event Hubs namespace ingress rate limit, failures, and latency. -Data is sent to your Event Hubs as it reaches Azure Monitor and exported to destinations located in workspace region. You can create multiple export rules to the same Event Hubs namespace by providing different `event hub name` in rule. When `event hub name` isn't provided, default Event Hubs are created for tables that you export with name: *am-* followed by the name of the table. For example, the table *SecurityEvent* would sent to an Event Hub named: *am-SecurityEvent*. The [number of supported Event Hubs in 'Basic' and 'Standard' namespaces tiers is 10](../../event-hubs/event-hubs-quotas.md#common-limits-for-all-tiers). When exporting more than 10 tables to these tiers, either split the tables between several export rules, to different Event Hubs namespaces, or provide an Event Hub name to export all tables to it. +Data is sent to your Event Hubs as it reaches Azure Monitor and exported to destinations located in workspace region. You can create multiple export rules to the same Event Hubs namespace by providing different `event hub name` in rule. When `event hub name` isn't provided, default Event Hubs is created for tables that you export with name: *am-* followed by the name of the table. For example, the table *SecurityEvent* would be sent to an Event Hubs named: *am-SecurityEvent*. The [number of supported Event Hubs in 'Basic' and 'Standard' namespaces tiers is 10](../../event-hubs/event-hubs-quotas.md#common-limits-for-all-tiers). When exporting more than 10 tables to these tiers, either split the tables between several export rules, to different Event Hubs namespaces, or provide an Event Hubs name to export all tables to it. > [!NOTE] > - 'Basic' Event Hubs namespace tier is limited ΓÇô it supports [lower event size](../../event-hubs/event-hubs-quotas.md#basic-vs-standard-vs-premium-vs-dedicated-tiers) and no [Auto-inflate](../../event-hubs/event-hubs-auto-inflate.md) option to automatically scale up and increase the number of throughput units. Since data volume to your workspace increases over time and consequence Event Hubs scaling is required, use 'Standard', 'Premium' or 'Dedicated' Event Hubs tiers with **Auto-inflate** feature enabled. See [Automatically scale up Azure Event Hubs throughput units](../../event-hubs/event-hubs-auto-inflate.md). If you have configured your Storage Account to allow access from selected networ | Scope | Metric Namespace | Metric | Aggregation | Threshold | |:|:|:|:|:|- | namespaces-name | Event Hub standard metrics | Incoming bytes | Sum | 80% of max ingress per alert evaluation period. For example, limit is 1 MB/s per unit ("TU" or "PU") and five units used. Threshold is 1200 MB per 5-minutes evaluation period | - | namespaces-name | Event Hub standard metrics | Incoming requests | Count | 80% of max events per alert evaluation period. For example, limit is 1000/s per unit ("TU" or ""PU") and five units used. Threshold is 1200000 per 5-minutes evaluation period | - | namespaces-name | Event Hub standard metrics | Quota Exceeded Errors | Count | Between 1% of request. For example, requests per 5-minute is 600000. Threshold is 6000 per 5-minute evaluation period | + | namespaces-name | Event Hubs standard metrics | Incoming bytes | Sum | 80% of max ingress per alert evaluation period. For example, limit is 1 MB/s per unit ("TU" or "PU") and five units used. Threshold is 1200 MB per 5-minutes evaluation period | + | namespaces-name | Event Hubs standard metrics | Incoming requests | Count | 80% of max events per alert evaluation period. For example, limit is 1000/s per unit ("TU" or ""PU") and five units used. Threshold is 1200000 per 5-minutes evaluation period | + | namespaces-name | Event Hubs standard metrics | Quota Exceeded Errors | Count | Between 1% of request. For example, requests per 5-minute is 600000. Threshold is 6000 per 5-minute evaluation period | 2. Alert remediation actions - Use separate Event Hubs namespace for export that isn't shared with non-monitoring data. Data export rule defines the destination and tables for which data is exported. > - You can include tables that aren't yet supported in export, and no data will be exported for these until the tables are supported. > - The legacy custom log wonΓÇÖt be supported in export. The next generation of custom log available in preview early 2022 can be exported. > - Export to Storage Account - a separate container is created in Storage Account for each table.-> - Export to Event Hubs - if Event Hub name isn't provided, a separate Event Hub is created for each table. The [number of supported Event Hubs in 'Basic' and 'Standard' namespaces tiers is 10](../../event-hubs/event-hubs-quotas.md#common-limits-for-all-tiers). When exporting more than 10 tables to these tiers, either split the tables between several export rules to different Event Hubs namespaces, or provide an Event Hub name in the rule to export all tables to it. +> - Export to Event Hubs - if Event Hubs name isn't provided, a separate Event Hubs is created for each table. The [number of supported Event Hubs in 'Basic' and 'Standard' namespaces tiers is 10](../../event-hubs/event-hubs-quotas.md#common-limits-for-all-tiers). When exporting more than 10 tables to these tiers, either split the tables between several export rules to different Event Hubs namespaces, or provide an Event Hubs name in the rule to export all tables to it. # [Azure portal](#tab/portal) $storageAccountResourceId = '/subscriptions/subscription-id/resourceGroups/resou New-AzOperationalInsightsDataExport -ResourceGroupName resourceGroupName -WorkspaceName workspaceName -DataExportName 'ruleName' -TableName 'SecurityEvent,Heartbeat' -ResourceId $storageAccountResourceId ``` -Use the following command to create a data export rule to a specific Event Hub using PowerShell. All tables are exported to the provided Event Hub name and can be filtered by "Type" field to separate tables. +Use the following command to create a data export rule to a specific Event Hubs using PowerShell. All tables are exported to the provided Event Hubs name and can be filtered by "Type" field to separate tables. ```powershell $eventHubResourceId = '/subscriptions/subscription-id/resourceGroups/resource-group-name/providers/Microsoft.EventHub/namespaces/namespaces-name/eventhubs/eventhub-name' New-AzOperationalInsightsDataExport -ResourceGroupName resourceGroupName -WorkspaceName workspaceName -DataExportName 'ruleName' -TableName 'SecurityEvent,Heartbeat' -ResourceId $eventHubResourceId -EventHubName EventhubName ``` -Use the following command to create a data export rule to an Event Hub using PowerShell. When specific Event Hub name isn't provided, a separate container is created for each table, up to the [number of Event Hubs supported in Event Hubs tier](../../event-hubs/event-hubs-quotas.md#common-limits-for-all-tiers). To export more tables, provide an Event Hub name in rule, or set another rule and export the remaining tables to another Event Hubs namespace. +Use the following command to create a data export rule to an Event Hubs using PowerShell. When specific Event Hubs name isn't provided, a separate container is created for each table, up to the [number of Event Hubs supported in Event Hubs tier](../../event-hubs/event-hubs-quotas.md#common-limits-for-all-tiers). To export more tables, provide an Event Hubs name in rule, or set another rule and export the remaining tables to another Event Hubs namespace. ```powershell $eventHubResourceId = '/subscriptions/subscription-id/resourceGroups/resource-group-name/providers/Microsoft.EventHub/namespaces/namespaces-name' $storageAccountResourceId = '/subscriptions/subscription-id/resourceGroups/resou az monitor log-analytics workspace data-export create --resource-group resourceGroupName --workspace-name workspaceName --name ruleName --tables SecurityEvent Heartbeat --destination $storageAccountResourceId ``` -Use the following command to create a data export rule to a specific Event Hub using CLI. All tables are exported to the provided Event Hub name and can be filtered by "Type" field to separate tables. +Use the following command to create a data export rule to a specific Event Hubs using CLI. All tables are exported to the provided Event Hubs name and can be filtered by "Type" field to separate tables. ```azurecli $eventHubResourceId = '/subscriptions/subscription-id/resourceGroups/resource-group-name/providers/Microsoft.EventHub/namespaces/namespaces-name/eventhubs/eventhub-name' az monitor log-analytics workspace data-export create --resource-group resourceGroupName --workspace-name workspaceName --name ruleName --tables SecurityEvent Heartbeat --destination $eventHubResourceId ``` -Use the following command to create a data export rule to an Event Hubs using CLI. When specific Event Hub name isn't provided, a separate container is created for each table up to the [number of supported Event Hubs for your Event Hubs tier](../../event-hubs/event-hubs-quotas.md#common-limits-for-all-tiers). If you have more tables to export, provide Event Hub name to export any number of tables, or set another rule to export the remaining tables to another Event Hubs namespace. +Use the following command to create a data export rule to an Event Hubs using CLI. When specific Event Hubs name isn't provided, a separate container is created for each table up to the [number of supported Event Hubs for your Event Hubs tier](../../event-hubs/event-hubs-quotas.md#common-limits-for-all-tiers). If you have more tables to export, provide Event Hubs name to export any number of tables, or set another rule to export the remaining tables to another Event Hubs namespace. ```azurecli $eventHubsNamespacesResourceId = '/subscriptions/subscription-id/resourceGroups/resource-group-name/providers/Microsoft.EventHub/namespaces/namespaces-name' Following is a sample body for the REST request for an Event Hubs. } ``` -Following is a sample body for the REST request for an Event Hubs where Event Hub name is provided. In this case, all exported data is sent to it. +Following is a sample body for the REST request for an Event Hubs where Event Hubs name is provided. In this case, all exported data is sent to it. ```json { Use the following command to create a data export rule to a Storage Account usin } ``` -Use the following command to create a data export rule to an Event Hubs using Resource Manager template. A separate Event Hub is created for each table. +Use the following command to create a data export rule to an Event Hubs using Resource Manager template. A separate Event Hubs is created for each table. ``` { Use the following command to create a data export rule to an Event Hubs using Re } ``` -Use the following command to create a data export rule to a specific Event Hub using Resource Manager template. All tables are exported to it. +Use the following command to create a data export rule to a specific Event Hubs using Resource Manager template. All tables are exported to it. ``` { |
| azure-monitor | Logs Ingestion Api Overview | https://github.com/MicrosoftDocs/azure-docs/commits/main/articles/azure-monitor/logs/logs-ingestion-api-overview.md | + + Title: Logs ingestion API in Azure Monitor (Preview) +description: Send data to Log Analytics workspace using REST API. + Last updated : 06/27/2022++++# Logs ingestion API in Azure Monitor (Preview) +The Logs ingestion API in Azure Monitor lets you send data to a Log Analytics workspace from any REST API client. This allows you to send data from virtually any source to [supported built-in tables](#supported-tables) or to custom tables that you create. You can even extend the schema of built-in tables with custom columns. ++> [!NOTE] +> The Logs ingestion API was previously referred to as the custom logs API. +++## Basic operation +Your application sends data to a [data collection endpoint](../essentials/data-collection-endpoint-overview.md) which is a unique connection point for your subscription. The payload of your API call includes the source data formatted in JSON. The call specifies a [data collection rule](../essentials/data-collection-rule-overview.md) that understands the format of the source data, potentially filters and transforms it for the target table, and then directs it to a specific table in a specific workspace. You can modify the target table and workspace by modifying the data collection rule without any change to the REST API call or source data. ++++> [!NOTE] +> See [Migrate from Data Collector API and custom fields-enabled tables to DCR-based custom logs](custom-logs-migrate.md) to migrate solutions from the [Data Collector API](data-collector-api.md). ++## Supported tables ++### Custom tables +Logs ingestion API can send data to any custom table that you create and to certain built-in tables in your Log Analytics workspace. The target table must exist before you can send data to it. ++### Built-in tables +Logs ingestion API can send data to the following built-in tables. Other tables may be added to this list as support for them is implemented. ++- [CommonSecurityLog](/azure/azure-monitor/reference/tables/commonsecuritylog) +- [SecurityEvents](/azure/azure-monitor/reference/tables/securityevent) +- [Syslog](/azure/azure-monitor/reference/tables/syslog) +- [WindowsEvents](/azure/azure-monitor/reference/tables/windowsevent) ++### Table limits ++* Custom tables must have the `_CL` suffix. +* Column names can consist of alphanumeric characters as well as the characters `_` and `-`. They must start with a letter. +* Columns extended on top of built-in tables must have the suffix `_CF`. Columns in a custom table do not need this suffix. +++## Authentication +Authentication for the logs ingestion API is performed at the data collection endpoint which uses standard Azure Resource Manager authentication. A common strategy is to use an Application ID and Application Key as described in [Tutorial: Add ingestion-time transformation to Azure Monitor Logs (preview)](tutorial-logs-ingestion-portal.md). ++## Source data +The source data sent by your application is formatted in JSON and must match the structure expected by the data collection rule. It doesn't necessarily need to match the structure of the target table since the DCR can include a [transformation](../essentials//data-collection-transformations.md) to convert the data to match the table's structure. ++## Data collection rule +[Data collection rules](../essentials/data-collection-rule-overview.md) define data collected by Azure Monitor and specify how and where that data should be sent or stored. The REST API call must specify a DCR to use. A single DCE can support multiple DCRs, so you can specify a different DCR for different sources and target tables. ++The DCR must understand the structure of the input data and the structure of the target table. If the two don't match, it can use a [transformation](../essentials/data-collection-transformations.md) to convert the source data to match the target table. You may also use the transformation to filter source data and perform any other calculations or conversions. ++## Sending data +To send data to Azure Monitor with the logs ingestion API, make a POST call to the data collection endpoint over HTTP. Details of the call are as follows: ++### Endpoint URI +The endpoint URI uses the following format, where the `Data Collection Endpoint` and `DCR Immutable ID` identify the DCE and DCR. `Stream Name` refers to the [stream](../essentials/data-collection-rule-structure.md#custom-logs) in the DCR that should handle the custom data. ++``` +{Data Collection Endpoint URI}/dataCollectionRules/{DCR Immutable ID}/streams/{Stream Name}?api-version=2021-11-01-preview +``` ++> [!NOTE] +> You can retrieve the immutable ID from the JSON view of the DCR. See [Collect information from DCR](tutorial-logs-ingestion-portal.md#collect-information-from-dcr). ++### Headers ++| Header | Required? | Value | Description | +|:|:|:|:| +| Authorization | Yes | Bearer {Bearer token obtained through the Client Credentials Flow} | | +| Content-Type | Yes | `application/json` | | +| Content-Encoding | No | `gzip` | Use the GZip compression scheme for performance optimization. | +| x-ms-client-request-id | No | String-formatted GUID | Request ID that can be used by Microsoft for any troubleshooting purposes. | ++### Body +The body of the call includes the custom data to be sent to Azure Monitor. The shape of the data must be a JSON object or array with a structure that matches the format expected by the stream in the DCR. ++## Sample call +For sample data and API call using the logs ingestion API, see either [Send custom logs to Azure Monitor Logs using the Azure portal (preview)](tutorial-logs-ingestion-portal.md) or [Send custom logs to Azure Monitor Logs using Resource Manager templates](tutorial-logs-ingestion-api.md) ++## Limits and restrictions +For limits related to Logs ingestion API, see [Azure Monitor service limits](../service-limits.md#logs-ingestion-api). ++ ++## Next steps ++- [Walk through a tutorial sending custom logs using the Azure portal.](tutorial-logs-ingestion-portal.md) +- [Walk through a tutorial sending custom logs using Resource Manager templates and REST API.](tutorial-logs-ingestion-api.md) |
| azure-monitor | Manage Access | https://github.com/MicrosoftDocs/azure-docs/commits/main/articles/azure-monitor/logs/manage-access.md | Grant access to all tables except the _SecurityAlert_ table: Custom logs are tables created from data sources such as [text logs](../agents/data-sources-custom-logs.md) and the [HTTP Data Collector API](data-collector-api.md). The easiest way to identify the type of log is by checking the tables listed under [Custom Logs in the log schema](./log-analytics-tutorial.md#view-table-information). > [!NOTE]-> Tables created by the [Custom Logs API](../essentials/../logs/custom-logs-overview.md) don't yet support table-level RBAC. +> Tables created by the [Logs ingestion API](../essentials/../logs/logs-ingestion-api-overview.md) don't yet support table-level RBAC. You can't grant access to individual custom log tables, but you can grant access to all custom logs. To create a role with access to all custom log tables, create a custom role by using the following actions: |
| azure-monitor | Tables Feature Support | https://github.com/MicrosoftDocs/azure-docs/commits/main/articles/azure-monitor/logs/tables-feature-support.md | Title: Tables that support ingestion-time transformations in Azure Monitor Logs description: Reference for tables that support ingestion-time transformations in Azure Monitor Logs (preview). na Previously updated : 02/22/2022 Last updated : 07/10/2022 -# Tables that support ingestion-time transformations in Azure Monitor Logs (preview) +# Tables that support transformations in Azure Monitor Logs (preview) -The following list identifies the tables in a [Log Analytics workspace](log-analytics-workspace-overview.md) that support [Ingest-time transformations](ingestion-time-transformations.md). +The following list identifies the tables in a [Log Analytics workspace](log-analytics-workspace-overview.md) that support [transformations](../essentials/data-collection-transformations.md). | Table | Limitations | |
| azure-monitor | Tutorial Logs Ingestion Api | https://github.com/MicrosoftDocs/azure-docs/commits/main/articles/azure-monitor/logs/tutorial-logs-ingestion-api.md | + + Title: Tutorial - Send data to Azure Monitor Logs using REST API (Resource Manager templates) +description: Tutorial on how to send data to a Log Analytics workspace in Azure Monitor using REST API. Resource Manager template version. + Last updated : 07/15/2022+++# Tutorial: Send data to Azure Monitor Logs using REST API (Resource Manager templates) +[Logs ingestion API (preview)](logs-ingestion-api-overview.md) in Azure Monitor allow you to send external data to a Log Analytics workspace with a REST API. This tutorial uses Resource Manager templates to walk through configuration of a new table and a sample application to send log data to Azure Monitor. ++> [!NOTE] +> This tutorial uses Resource Manager templates and REST API to configure custom logs. See [Tutorial: Send data to Azure Monitor Logs using REST API (Azure portal)](tutorial-logs-ingestion-portal.md) for a similar tutorial using the Azure portal. ++In this tutorial, you learn to: ++> [!div class="checklist"] +> * Create a custom table in a Log Analytics workspace +> * Create a data collection endpoint to receive data over HTTP +> * Create a data collection rule that transforms incoming data to match the schema of the target table +> * Create a sample application to send custom data to Azure Monitor +++> [!NOTE] +> This tutorial uses PowerShell from Azure Cloud Shell to make REST API calls using the Azure Monitor **Tables** API and the Azure portal to install Resource Manager templates. You can use any other method to make these calls. ++## Prerequisites +To complete this tutorial, you need the following: ++- Log Analytics workspace where you have at least [contributor rights](manage-access.md#azure-rbac) . +- [Permissions to create Data Collection Rule objects](../essentials/data-collection-rule-overview.md#permissions) in the workspace. ++## Collect workspace details +Start by gathering information that you'll need from your workspace. ++1. Navigate to your workspace in the **Log Analytics workspaces** menu in the Azure portal. From the **Properties** page, copy the **Resource ID** and save it for later use. ++ :::image type="content" source="media/tutorial-logs-ingestion-api/workspace-resource-id.png" lightbox="media/tutorial-logs-ingestion-api/workspace-resource-id.png" alt-text="Screenshot showing workspace resource ID."::: ++## Configure application +Start by registering an Azure Active Directory application to authenticate against the API. Any ARM authentication scheme is supported, but this will follow the [Client Credential Grant Flow scheme](../../active-directory/develop/v2-oauth2-client-creds-grant-flow.md) for this tutorial. ++1. From the **Azure Active Directory** menu in the Azure portal, select **App registrations** and then **New registration**. ++ :::image type="content" source="media/tutorial-logs-ingestion-portal/new-app-registration.png" lightbox="media/tutorial-logs-ingestion-portal/new-app-registration.png" alt-text="Screenshot showing app registration screen."::: ++2. Give the application a name and change the tenancy scope if the default is not appropriate for your environment. A **Redirect URI** isn't required. ++ :::image type="content" source="media/tutorial-logs-ingestion-portal/new-app-name.png" lightbox="media/tutorial-logs-ingestion-portal/new-app-name.png" alt-text="Screenshot showing app details."::: ++3. Once registered, you can view the details of the application. Note the **Application (client) ID** and the **Directory (tenant) ID**. You'll need these values later in the process. ++ :::image type="content" source="media/tutorial-logs-ingestion-portal/new-app-id.png" lightbox="media/tutorial-logs-ingestion-portal/new-app-id.png" alt-text="Screenshot showing app ID."::: ++4. You now need to generate an application client secret, which is similar to creating a password to use with a username. Select **Certificates & secrets** and then **New client secret**. Give the secret a name to identify its purpose and select an **Expires** duration. *1 year* is selected here although for a production implementation, you would follow best practices for a secret rotation procedure or use a more secure authentication mode such a certificate. ++ :::image type="content" source="media/tutorial-logs-ingestion-portal/new-app-secret.png" lightbox="media/tutorial-logs-ingestion-portal/new-app-secret.png" alt-text="Screenshot showing secret for new app."::: ++5. Click **Add** to save the secret and then note the **Value**. Ensure that you record this value since You can't recover it once you navigate away from this page. Use the same security measures as you would for safekeeping a password as it's the functional equivalent. ++ :::image type="content" source="media/tutorial-logs-ingestion-portal/new-app-secret-value.png" lightbox="media/tutorial-logs-ingestion-portal/new-app-secret-value.png" alt-text="Screenshot show secret value for new app."::: ++## Create new table in Log Analytics workspace +The custom table must be created before you can send data to it. The table for this tutorial will include three columns, as described in the schema below. The `name`, `type`, and `description` properties are mandatory for each column. The properties `isHidden` and `isDefaultDisplay` both default to `false` if not explicitly specified. Possible data types are `string`, `int`, `long`, `real`, `boolean`, `dateTime`, `guid`, and `dynamic`. ++Use the **Tables - Update** API to create the table with the PowerShell code below. ++> [!IMPORTANT] +> Custom tables must use a suffix of *_CL*. ++1. Click the **Cloud Shell** button in the Azure portal and ensure the environment is set to **PowerShell**. ++ :::image type="content" source="media/tutorial-workspace-transformations-api/open-cloud-shell.png" lightbox="media/tutorial-workspace-transformations-api/open-cloud-shell.png" alt-text="Screenshot of opening Cloud Shell"::: ++2. Copy the following PowerShell code and replace the **Path** parameter with the appropriate values for your workspace in the `Invoke-AzRestMethod` command. Paste it into the Cloud Shell prompt to run it. ++ ```PowerShell + $tableParams = @' + { + "properties": { + "schema": { + "name": "MyTable_CL", + "columns": [ + { + "name": "TimeGenerated", + "type": "datetime", + "description": "The time at which the data was generated" + }, + { + "name": "AdditionalContext", + "type": "dynamic", + "description": "Additional message properties" + }, + { + "name": "ExtendedColumn", + "type": "string", + "description": "An additional column extended at ingestion time" + } + ] + } + } + } + '@ ++ Invoke-AzRestMethod -Path "/subscriptions/{subscription}/resourcegroups/{resourcegroup}/providers/microsoft.operationalinsights/workspaces/{workspace}/tables/MyTable_CL?api-version=2021-12-01-preview" -Method PUT -payload $tableParams + ``` +++## Create data collection endpoint +A [data collection endpoint (DCE)](../essentials/data-collection-endpoint-overview.md) is required to accept the data being sent to Azure Monitor. Once you configure the DCE and link it to a data collection rule, you can send data over HTTP from your application. The DCE must be located in the same region as the Log Analytics Workspace where the data will be sent. ++1. In the Azure portal's search box, type in *template* and then select **Deploy a custom template**. ++ :::image type="content" source="media/tutorial-workspace-transformations-api/deploy-custom-template.png" lightbox="media/tutorial-workspace-transformations-api/deploy-custom-template.png" alt-text="Screenshot to deploy custom template."::: ++2. Click **Build your own template in the editor**. ++ :::image type="content" source="media/tutorial-workspace-transformations-api/build-custom-template.png" lightbox="media/tutorial-workspace-transformations-api/build-custom-template.png" alt-text="Screenshot to build template in the editor."::: ++3. Paste the Resource Manager template below into the editor and then click **Save**. You don't need to modify this template since you will provide values for its parameters. ++ :::image type="content" source="media/tutorial-workspace-transformations-api/edit-template.png" lightbox="media/tutorial-workspace-transformations-api/edit-template.png" alt-text="Screenshot to edit Resource Manager template."::: +++ ```json + { + "$schema": "https://schema.management.azure.com/schemas/2019-04-01/deploymentTemplate.json#", + "contentVersion": "1.0.0.0", + "parameters": { + "dataCollectionEndpointName": { + "type": "string", + "metadata": { + "description": "Specifies the name of the Data Collection Endpoint to create." + } + }, + "location": { + "type": "string", + "defaultValue": "westus2", + "allowedValues": [ + "westus2", + "eastus2", + "eastus2euap" + ], + "metadata": { + "description": "Specifies the location in which to create the Data Collection Endpoint." + } + } + }, + "resources": [ + { + "type": "Microsoft.Insights/dataCollectionEndpoints", + "name": "[parameters('dataCollectionEndpointName')]", + "location": "[parameters('location')]", + "apiVersion": "2021-04-01", + "properties": { + "networkAcls": { + "publicNetworkAccess": "Enabled" + } + } + } + ], + "outputs": { + "dataCollectionEndpointId": { + "type": "string", + "value": "[resourceId('Microsoft.Insights/dataCollectionEndpoints', parameters('dataCollectionEndpointName'))]" + } + } + } + ``` ++4. On the **Custom deployment** screen, specify a **Subscription** and **Resource group** to store the data collection rule and then provide values a **Name** for the data collection endpoint. The **Location** should be the same location as the workspace. The **Region** will already be populated and is used for the location of the data collection endpoint. ++ :::image type="content" source="media/tutorial-workspace-transformations-api/custom-deployment-values.png" lightbox="media/tutorial-workspace-transformations-api/custom-deployment-values.png" alt-text="Screenshot to edit custom deployment values."::: ++5. Click **Review + create** and then **Create** when you review the details. ++6. Once the DCE is created, select it so you can view its properties. Note the **Logs ingestion URI** since you'll need this in a later step. ++ :::image type="content" source="media/tutorial-logs-ingestion-api/data-collection-endpoint-overview.png" lightbox="media/tutorial-logs-ingestion-api/data-collection-endpoint-overview.png" alt-text="Screenshot for data collection endpoint uri."::: ++7. Click **JSON View** to view other details for the DCE. Copy the **Resource ID** since you'll need this in a later step. ++ :::image type="content" source="media/tutorial-logs-ingestion-api/data-collection-endpoint-json.png" lightbox="media/tutorial-logs-ingestion-api/data-collection-endpoint-json.png" alt-text="Screenshot for data collection endpoint resource ID."::: +++## Create data collection rule +The [data collection rule (DCR)](../essentials/data-collection-rule-overview.md) defines the schema of data that being sent to the HTTP endpoint, the transformation that will be applied to it, and the destination workspace and table the transformed data will be sent to. ++1. In the Azure portal's search box, type in *template* and then select **Deploy a custom template**. ++ :::image type="content" source="media/tutorial-workspace-transformations-api/deploy-custom-template.png" lightbox="media/tutorial-workspace-transformations-api/deploy-custom-template.png" alt-text="Screenshot to deploy custom template."::: ++2. Click **Build your own template in the editor**. ++ :::image type="content" source="media/tutorial-workspace-transformations-api/build-custom-template.png" lightbox="media/tutorial-workspace-transformations-api/build-custom-template.png" alt-text="Screenshot to build template in the editor."::: ++3. Paste the Resource Manager template below into the editor and then click **Save**. ++ :::image type="content" source="media/tutorial-workspace-transformations-api/edit-template.png" lightbox="media/tutorial-workspace-transformations-api/edit-template.png" alt-text="Screenshot to edit Resource Manager template."::: ++ Notice the following details in the DCR defined in this template: ++ - `dataCollectionEndpointId`: Resource ID of the data collection endpoint. + - `streamDeclarations`: Defines the columns of the incoming data. + - `destinations`: Specifies the destination workspace. + - `dataFlows`: Matches the stream with the destination workspace and specifies the transformation query and the destination table. ++ ```json + { + "$schema": "https://schema.management.azure.com/schemas/2019-04-01/deploymentTemplate.json#", + "contentVersion": "1.0.0.0", + "parameters": { + "dataCollectionRuleName": { + "type": "string", + "metadata": { + "description": "Specifies the name of the Data Collection Rule to create." + } + }, + "location": { + "type": "string", + "defaultValue": "westus2", + "allowedValues": [ + "westus2", + "eastus2", + "eastus2euap" + ], + "metadata": { + "description": "Specifies the location in which to create the Data Collection Rule." + } + }, + "workspaceResourceId": { + "type": "string", + "metadata": { + "description": "Specifies the Azure resource ID of the Log Analytics workspace to use." + } + }, + "endpointResourceId": { + "type": "string", + "metadata": { + "description": "Specifies the Azure resource ID of the Data Collection Endpoint to use." + } + } + }, + "resources": [ + { + "type": "Microsoft.Insights/dataCollectionRules", + "name": "[parameters('dataCollectionRuleName')]", + "location": "[parameters('location')]", + "apiVersion": "2021-09-01-preview", + "properties": { + "dataCollectionEndpointId": "[parameters('endpointResourceId')]", + "streamDeclarations": { + "Custom-MyTableRawData": { + "columns": [ + { + "name": "Time", + "type": "datetime" + }, + { + "name": "Computer", + "type": "string" + }, + { + "name": "AdditionalContext", + "type": "string" + } + ] + } + }, + "destinations": { + "logAnalytics": [ + { + "workspaceResourceId": "[parameters('workspaceResourceId')]", + "name": "clv2ws1" + } + ] + }, + "dataFlows": [ + { + "streams": [ + "Custom-MyTableRawData" + ], + "destinations": [ + "clv2ws1" + ], + "transformKql": "source | extend jsonContext = parse_json(AdditionalContext) | project TimeGenerated = Time, Computer, AdditionalContext = jsonContext, ExtendedColumn=tostring(jsonContext.CounterName)", + "outputStream": "Custom-MyTable_CL" + } + ] + } + } + ], + "outputs": { + "dataCollectionRuleId": { + "type": "string", + "value": "[resourceId('Microsoft.Insights/dataCollectionRules', parameters('dataCollectionRuleName'))]" + } + } + } + ``` ++4. On the **Custom deployment** screen, specify a **Subscription** and **Resource group** to store the data collection rule and then provide values defined in the template. This includes a **Name** for the data collection rule and the **Workspace Resource ID** that you collected in a previous step. The **Location** should be the same location as the workspace. The **Region** will already be populated and is used for the location of the data collection rule. ++ :::image type="content" source="media/tutorial-workspace-transformations-api/custom-deployment-values.png" lightbox="media/tutorial-workspace-transformations-api/custom-deployment-values.png" alt-text="Screenshot to edit custom deployment values."::: ++5. Click **Review + create** and then **Create** when you review the details. ++6. When the deployment is complete, expand the **Deployment details** box and click on your data collection rule to view its details. Click **JSON View**. ++ :::image type="content" source="media/tutorial-workspace-transformations-api/data-collection-rule-details.png" lightbox="media/tutorial-workspace-transformations-api/data-collection-rule-details.png" alt-text="Screenshot for data collection rule details."::: ++7. Copy the **Resource ID** for the data collection rule. You'll use this in the next step. ++ :::image type="content" source="media/tutorial-workspace-transformations-api/data-collection-rule-json-view.png" lightbox="media/tutorial-workspace-transformations-api/data-collection-rule-json-view.png" alt-text="Screenshot for data collection rule JSON view."::: ++ > [!NOTE] + > All of the properties of the DCR, such as the transformation, may not be displayed in the Azure portal even though the DCR was successfully created with those properties. +++## Assign permissions to DCR +Once the data collection rule has been created, the application needs to be given permission to it. This will allow any application using the correct application ID and application key to send data to the new DCE and DCR. ++1. From the DCR in the Azure portal, select **Access Control (IAM)** and then **Add role assignment**. ++ :::image type="content" source="media/tutorial-logs-ingestion-portal/add-role-assignment.png" lightbox="media/tutorial-logs-ingestion-portal/custom-log-create.png" alt-text="Screenshot for adding custom role assignment to DCR."::: ++2. Select **Monitoring Metrics Publisher** and click **Next**. You could instead create a custom action with the `Microsoft.Insights/Telemetry/Write` data action. ++ :::image type="content" source="media/tutorial-logs-ingestion-portal/add-role-assignment-select-role.png" lightbox="media/tutorial-logs-ingestion-portal/add-role-assignment-select-role.png" alt-text="Screenshot for selecting role for DCR role assignment."::: ++3. Select **User, group, or service principal** for **Assign access to** and click **Select members**. Select the application that you created and click **Select**. ++ :::image type="content" source="media/tutorial-logs-ingestion-portal/add-role-assignment-select-member.png" lightbox="media/tutorial-logs-ingestion-portal/add-role-assignment-select-member.png" alt-text="Screenshot for selecting members for DCR role assignment."::: +++4. Click **Review + assign** and verify the details before saving your role assignment. ++ :::image type="content" source="media/tutorial-logs-ingestion-portal/add-role-assignment-save.png" lightbox="media/tutorial-logs-ingestion-portal/add-role-assignment-save.png" alt-text="Screenshot for saving DCR role assignment."::: +++## Send sample data +The following PowerShell code sends data to the endpoint using HTTP REST fundamentals. ++> [!NOTE] +> This tutorial uses commands that require PowerShell v7.0 or later. Please make sure your local installation of PowerShell is up to date, or execute this script using the Azure CloudShell. ++1. Run the following PowerShell command which adds a required assembly for the script. ++ ```powershell + Add-Type -AssemblyName System.Web + ``` ++1. Replace the parameters in the *step 0* section with values from the resources that you just created. You may also want to replace the sample data in the *step 2* section with your own. ++ ```powershell + ################## + ### Step 0: set parameters required for the rest of the script + ################## + #information needed to authenticate to AAD and obtain a bearer token + $tenantId = "00000000-0000-0000-0000-000000000000"; #Tenant ID the data collection endpoint resides in + $appId = "00000000-0000-0000-0000-000000000000"; #Application ID created and granted permissions + $appSecret = "00000000000000000000000"; #Secret created for the application ++ #information needed to send data to the DCR endpoint + $dcrImmutableId = "dcr-000000000000000"; #the immutableId property of the DCR object + $dceEndpoint = "https://my-dcr-name.westus2-1.ingest.monitor.azure.com"; #the endpoint property of the Data Collection Endpoint object ++ ################## + ### Step 1: obtain a bearer token used later to authenticate against the DCE + ################## + $scope= [System.Web.HttpUtility]::UrlEncode("https://monitor.azure.com//.default") + $body = "client_id=$appId&scope=$scope&client_secret=$appSecret&grant_type=client_credentials"; + $headers = @{"Content-Type"="application/x-www-form-urlencoded"}; + $uri = "https://login.microsoftonline.com/$tenantId/oauth2/v2.0/token" ++ $bearerToken = (Invoke-RestMethod -Uri $uri -Method "Post" -Body $body -Headers $headers).access_token ++ ################## + ### Step 2: Load up some sample data. + ################## + $currentTime = Get-Date ([datetime]::UtcNow) -Format O + $staticData = @" + [ + { + "Time": "$currentTime", + "Computer": "Computer1", + "AdditionalContext": { + "InstanceName": "user1", + "TimeZone": "Pacific Time", + "Level": 4, + "CounterName": "AppMetric1", + "CounterValue": 15.3 + } + }, + { + "Time": "$currentTime", + "Computer": "Computer2", + "AdditionalContext": { + "InstanceName": "user2", + "TimeZone": "Central Time", + "Level": 3, + "CounterName": "AppMetric1", + "CounterValue": 23.5 + } + } + ] + "@; ++ ################## + ### Step 3: send the data to Log Analytics via the DCE. + ################## + $body = $staticData; + $headers = @{"Authorization"="Bearer $bearerToken";"Content-Type"="application/json"}; + $uri = "$dceEndpoint/dataCollectionRules/$dcrImmutableId/streams/Custom-MyTableRawData?api-version=2021-11-01-preview" ++ $uploadResponse = Invoke-RestMethod -Uri $uri -Method "Post" -Body $body -Headers $headers + ``` ++ > [!NOTE] + > If you receive an `Unable to find type [System.Web.HttpUtility].` error, run the last line in section 1 of the script for a fix and executely. Executing it uncommented as part of the script will not resolve the issue - the command must be executed separately. ++2. After executing this script, you should see a `HTTP - 204` response, and in just a few minutes, the data arrive to your Log Analytics workspace. ++## Troubleshooting +This section describes different error conditions you may receive and how to correct them. ++### Script returns error code 403 +Ensure that you have the correct permissions for your application to the DCR. You may also need to wait up to 30 minutes for permissions to propagate. ++### Script returns error code 413 or warning of `TimeoutExpired` with the message `ReadyBody_ClientConnectionAbort` in the response +The message is too large. The maximum message size is currently 1MB per call. ++### Script returns error code 429 +API limits have been exceeded. Refer to [service limits for Logs ingestion API](../service-limits.md#logs-ingestion-api) for details on the current limits. ++### Script returns error code 503 +Ensure that you have the correct permissions for your application to the DCR. You may also need to wait up to 30 minutes for permissions to propagate. ++### You don't receive an error, but data doesn't appear in the workspace +The data may take some time to be ingested, especially if this is the first time data is being sent to a particular table. It shouldn't take longer than 15 minutes. ++### IntelliSense in Log Analytics not recognizing new table +The cache that drives IntelliSense may take up to 24 hours to update. +## Next steps ++- [Complete a similar tutorial using the Azure portal.](tutorial-logs-ingestion-portal.md) +- [Read more about custom logs.](logs-ingestion-api-overview.md) +- [Learn more about writing transformation queries](../essentials//data-collection-transformations.md) |
| azure-monitor | Tutorial Logs Ingestion Portal | https://github.com/MicrosoftDocs/azure-docs/commits/main/articles/azure-monitor/logs/tutorial-logs-ingestion-portal.md | + + Title: Tutorial - Send data to Azure Monitor Logs using REST API (Azure portal) +description: Tutorial on how to send data to a Log Analytics workspace in Azure Monitor using REST API. Azure portal version. + Last updated : 07/15/2022+++# Tutorial: Send data to Azure Monitor Logs using REST API (Azure portal) +[Logs ingestion API (preview)](logs-ingestion-api-overview.md) in Azure Monitor allow you to send external data to a Log Analytics workspace with a REST API. This tutorial uses the Azure portal to walk through configuration of a new table and a sample application to send log data to Azure Monitor. ++> [!NOTE] +> This tutorial uses the Azure portal. See [Tutorial: Send data to Azure Monitor Logs using REST API (Resource Manager templates)](tutorial-logs-ingestion-api.md) for a similar tutorial using resource manager templates. ++In this tutorial, you learn to: ++> [!div class="checklist"] +> * Create a custom table in a Log Analytics workspace +> * Create a data collection endpoint to receive data over HTTP +> * Create a data collection rule that transforms incoming data to match the schema of the target table +> * Create a sample application to send custom data to Azure Monitor +++## Prerequisites +To complete this tutorial, you need the following: ++- Log Analytics workspace where you have at least [contributor rights](manage-access.md#azure-rbac) . +- [Permissions to create Data Collection Rule objects](../essentials/data-collection-rule-overview.md#permissions) in the workspace. +++## Overview of tutorial +In this tutorial, you'll use a PowerShell script to send sample Apache access logs over HTTP to the API endpoint. This will require a script to convert this data to the JSON format that's required for the Azure Monitor logs ingestion API. The data will further be converted with a transformation in a data collection rule (DCR) that filters out records that shouldn't be ingested and create the columns required for the table that the data will be sent to. Once the configuration is complete, you'll send sample data from the command line and then inspect the results in Log Analytics. +++## Configure application +Start by registering an Azure Active Directory application to authenticate against the API. Any ARM authentication scheme is supported, but this will follow the [Client Credential Grant Flow scheme](../../active-directory/develop/v2-oauth2-client-creds-grant-flow.md) for this tutorial. ++1. From the **Azure Active Directory** menu in the Azure portal, select **App registrations** and then **New registration**. ++ :::image type="content" source="media/tutorial-logs-ingestion-portal/new-app-registration.png" lightbox="media/tutorial-logs-ingestion-portal/new-app-registration.png" alt-text="Screenshot showing app registration screen."::: ++2. Give the application a name and change the tenancy scope if the default is not appropriate for your environment. A **Redirect URI** isn't required. ++ :::image type="content" source="media/tutorial-logs-ingestion-portal/new-app-name.png" lightbox="media/tutorial-logs-ingestion-portal/new-app-name.png" alt-text="Screenshot showing app details."::: ++3. Once registered, you can view the details of the application. Note the **Application (client) ID** and the **Directory (tenant) ID**. You'll need these values later in the process. ++ :::image type="content" source="media/tutorial-logs-ingestion-portal/new-app-id.png" lightbox="media/tutorial-logs-ingestion-portal/new-app-id.png" alt-text="Screenshot showing app id."::: ++4. You now need to generate an application client secret, which is similar to creating a password to use with a username. Select **Certificates & secrets** and then **New client secret**. Give the secret a name to identify its purpose and select an **Expires** duration. *1 year* is selected here although for a production implementation, you would follow best practices for a secret rotation procedure or use a more secure authentication mode such a certificate. ++ :::image type="content" source="media/tutorial-logs-ingestion-portal/new-app-secret.png" lightbox="media/tutorial-logs-ingestion-portal/new-app-secret.png" alt-text="Screenshot showing secret for new app."::: ++5. Click **Add** to save the secret and then note the **Value**. Ensure that you record this value since You can't recover it once you navigate away from this page. Use the same security measures as you would for safekeeping a password as it's the functional equivalent. ++ :::image type="content" source="media/tutorial-logs-ingestion-portal/new-app-secret-value.png" lightbox="media/tutorial-logs-ingestion-portal/new-app-secret-value.png" alt-text="Screenshot show secret value for new app."::: ++## Create data collection endpoint +A [data collection endpoint (DCE)](../essentials/data-collection-endpoint-overview.md) is required to accept the data from the script. Once you configure the DCE and link it to a data collection rule, you can send data over HTTP from your application. The DCE must be located in the same region as the Log Analytics workspace where the data will be sent. ++1. To create a new DCE, go to the **Monitor** menu in the Azure portal. Select **Data Collection Endpoints** and then **Create**. ++ :::image type="content" source="media/tutorial-logs-ingestion-portal/new-data-collection-endpoint.png" lightbox="media/tutorial-logs-ingestion-portal/new-data-collection-endpoint.png" alt-text="Screenshot showing new data collection endpoint."::: ++2. Provide a name for the DCE and ensure that it's in the same region as your workspace. Click **Create** to create the DCE. ++ :::image type="content" source="media/tutorial-logs-ingestion-portal/data-collection-endpoint-details.png" lightbox="media/tutorial-logs-ingestion-portal/data-collection-endpoint-details.png" alt-text="Screenshot showing data collection endpoint details."::: ++3. Once the DCE is created, select it so you can view its properties. Note the **Logs ingestion** URI since you'll need this in a later step. ++ :::image type="content" source="media/tutorial-logs-ingestion-portal/data-collection-endpoint-uri.png" lightbox="media/tutorial-logs-ingestion-portal/data-collection-endpoint-uri.png" alt-text="Screenshot showing data collection endpoint uri."::: +++## Generate sample data +The following PowerShell script both generates sample data to configure the custom table and sends sample data to the logs ingestion API to test the configuration. ++1. Run the following PowerShell command which adds a required assembly for the script. ++ ```powershell + Add-Type -AssemblyName System.Web + ``` ++2. Update the values of `$tenantId`, `$appId`, and `$appSecret` with the values you noted for **Directory (tenant) ID**, **Application (client) ID**, and secret **Value** and then save with the file name *LogGenerator.ps1*. ++ ``` PowerShell + param ([Parameter(Mandatory=$true)] $Log, $Type="file", $Output, $DcrImmutableId, $DceURI, $Table) + ################ + ##### Usage + ################ + # LogGenerator.ps1 + # -Log <String> - log file to be forwarded + # [-Type "file|API"] - whether the script should generate sample JSON file or send data via + # API call. Data will be written to a file by default + # [-Output <String>] - path to resulting JSON sample + # [-DcrImmutableId <string>] - DCR immutable ID + # [-DceURI] - Data collection endpoint URI + # [-Table] - The name of the custom log table, including "_CL" suffix +++ ##### >>>> PUT YOUR VALUES HERE <<<<< + # information needed to authenticate to AAD and obtain a bearer token + $tenantId = "<put tenant ID here>"; #the tenant ID in which the Data Collection Endpoint resides + $appId = "<put application ID here>"; #the app ID created and granted permissions + $appSecret = "<put secret value here>"; #the secret created for the above app - never store your secrets in the source code + ##### >>>> END <<<<< +++ $file_data = Get-Content $Log + if ("file" -eq $Type) { + ############ + ## Convert plain log to JSON format and output to .json file + ############ + # If not provided, get output file name + if ($null -eq $Output) { + $Output = Read-Host "Enter output file name" + }; ++ # Form file payload + $payload = @(); + $records_to_generate = [math]::min($file_data.count, 500) + for ($i=0; $i -lt $records_to_generate; $i++) { + $log_entry = @{ + # Define the structure of log entry, as it will be sent + Time = Get-Date ([datetime]::UtcNow) -Format O + Application = "LogGenerator" + RawData = $file_data[$i] + } + $payload += $log_entry + } + # Write resulting payload to file + New-Item -Path $Output -ItemType "file" -Value ($payload | ConvertTo-Json) -Force ++ } else { + ############ + ## Send the content to the data collection endpoint + ############ + if ($null -eq $DcrImmutableId) { + $DcrImmutableId = Read-Host "Enter DCR Immutable ID" + }; ++ if ($null -eq $DceURI) { + $DceURI = Read-Host "Enter data collection endpoint URI" + } ++ if ($null -eq $Table) { + $Table = Read-Host "Enter the name of custom log table" + } ++ ## Obtain a bearer token used to authenticate against the data collection endpoint + $scope = [System.Web.HttpUtility]::UrlEncode("https://monitor.azure.com//.default") + $body = "client_id=$appId&scope=$scope&client_secret=$appSecret&grant_type=client_credentials"; + $headers = @{"Content-Type" = "application/x-www-form-urlencoded" }; + $uri = "https://login.microsoftonline.com/$tenantId/oauth2/v2.0/token" + $bearerToken = (Invoke-RestMethod -Uri $uri -Method "Post" -Body $body -Headers $headers).access_token ++ ## Generate and send some data + foreach ($line in $file_data) { + # We are going to send log entries one by one with a small delay + $log_entry = @{ + # Define the structure of log entry, as it will be sent + Time = Get-Date ([datetime]::UtcNow) -Format O + Application = "LogGenerator" + RawData = $line + } + # Sending the data to Log Analytics via the DCR! + $body = $log_entry | ConvertTo-Json -AsArray; + $headers = @{"Authorization" = "Bearer $bearerToken"; "Content-Type" = "application/json" }; + $uri = "$DceURI/dataCollectionRules/$DcrImmutableId/streams/Custom-$Table"+"?api-version=2021-11-01-preview"; + $uploadResponse = Invoke-RestMethod -Uri $uri -Method "Post" -Body $body -Headers $headers; ++ # Let's see how the response looks like + Write-Output $uploadResponse + Write-Output "" ++ # Pausing for 1 second before processing the next entry + Start-Sleep -Seconds 1 + } + } + ``` ++3. Copy the sample log data from [sample data](#sample-data) or copy your own Apache log data into a file called `sample_access.log`. ++4. To read the data in the file and create a JSON file called `data_sample.json` that you can send to the logs ingestion API, run: ++ ```PowerShell + .\LogGenerator.ps1 -Log "sample_access.log" -Type "file" -Output "data_sample.json" + ``` + +## Add custom log table +Before you can send data to the workspace, you need to create the custom table that the data will be sent to. ++1. Go to the **Log Analytics workspaces** menu in the Azure portal and select **Tables (preview)**. The tables in the workspace will be displayed. Select **Create** and then **New custom log (DCR based)**. ++ :::image type="content" source="media/tutorial-logs-ingestion-portal/new-custom-log.png" lightbox="media/tutorial-logs-ingestion-portal/new-custom-log.png" alt-text="Screenshot showing new DCR-based custom log."::: ++2. Specify a name for the table. You don't need to add the *_CL* suffix required for a custom table since this will be automatically added to the name you specify. ++3. Click **Create a new data collection rule** to create the DCR that will be used to send data to this table. If you have an existing data collection rule, you can choose to use it instead. Specify the **Subscription**, **Resource group**, and **Name** for the data collection rule that will contain the custom log configuration. ++ :::image type="content" source="media/tutorial-logs-ingestion-portal/new-data-collection-rule.png" lightbox="media/tutorial-logs-ingestion-portal/new-data-collection-rule.png" alt-text="Screenshot showing new data collection rule."::: ++4. Select the data collection endpoint that you created and click **Next**. ++ :::image type="content" source="media/tutorial-logs-ingestion-portal/custom-log-table-name.png" lightbox="media/tutorial-logs-ingestion-portal/custom-log-table-name.png" alt-text="Screenshot showing custom log table name."::: +++## Parse and filter sample data +Instead of directly configuring the schema of the table, the portal allows you to upload sample data so that Azure Monitor can determine the schema. The sample is expected to be a JSON file containing one or multiple log records structured in the same way they will be sent in the body of HTTP request of the logs ingestion API call. ++1. Click **Browse for files** and locate *data_sample.json* that you previously created. ++ :::image type="content" source="media/tutorial-logs-ingestion-portal/custom-log-browse-files.png" lightbox="media/tutorial-logs-ingestion-portal/custom-log-browse-files.png" alt-text="Screenshot showing custom log browse for files."::: ++2. Data from the sample file is displayed with a warning that a `TimeGenerated` is not in the data. All log tables within Azure Monitor Logs are required to have a `TimeGenerated` column populated with the timestamp of logged event. In this sample, the timestamp of event is stored in field called `Time`. You're going to add a transformation that will rename this column in the output. ++3. Click **Transformation editor** to open the transformation editor to add this column. You're going to add a transformation that will rename this column in the output. The transformation editor lets you create a transformation for the incoming data stream. This is a KQL query that is run against each incoming record. The results of the query will be stored in the destination table. See [Data collection rule transformations in Azure Monitor](../essentials//data-collection-transformations.md) for details on transformation queries. ++ :::image type="content" source="media/tutorial-logs-ingestion-portal/custom-log-data-preview.png" lightbox="media/tutorial-logs-ingestion-portal/custom-log-data-preview.png" alt-text="Screenshot showing custom log data preview."::: ++4. Add the following query to the transformation editor to add the `TimeGenerated` column to the output. ++ ```kusto + source + | extend TimeGenerated = todatetime(Time) + ``` ++5. Click **Run** to view the results. You can see that the `TimeGenerated` column is now added to the other columns. Most of the interesting data is contained in the `RawData` column though ++ :::image type="content" source="media/tutorial-logs-ingestion-portal/custom-log-query-01.png" lightbox="media/tutorial-logs-ingestion-portal/custom-log-query-01.png" alt-text="Screenshot showing initial custom log data query."::: ++6. Modify the query to the following, which extracts the client IP address, HTTP method, address of the page being access, and the response code from each log entry. ++ ```kusto + source + | extend TimeGenerated = todatetime(Time) + | parse RawData with + ClientIP:string + ' ' * + ' ' * + ' [' * '] "' RequestType:string + " " Resource:string + " " * + '" ' ResponseCode:int + " " * + ``` ++7. Click **Run** to views the results. This extracts the contents of `RawData` into separate columns `ClientIP`, `RequestType`, `Resource`, and `ResponseCode`. ++ :::image type="content" source="media/tutorial-logs-ingestion-portal/custom-log-query-02.png" lightbox="media/tutorial-logs-ingestion-portal/custom-log-query-02.png" alt-text="Screenshot showing custom log data query with parse command."::: ++8. The query can be optimized more though by removing the `RawData` and `Time` columns since they aren't needed anymore.You can also filter out any records with `ResponseCode` of 200 since you're only interested in collecting data for requests that were not successful. This reduces the volume of data being ingested which reduces its overall cost. +++ ```kusto + source + | extend TimeGenerated = todatetime(Time) + | parse RawData with + ClientIP:string + ' ' * + ' ' * + ' [' * '] "' RequestType:string + " " Resource:string + " " * + '" ' ResponseCode:int + " " * + | where ResponseCode != 200 + | project-away Time, RawData + ``` ++9. Click **Run** to views the results. ++ :::image type="content" source="media/tutorial-logs-ingestion-portal/custom-log-query-03.png" lightbox="media/tutorial-logs-ingestion-portal/custom-log-query-03.png" alt-text="Screenshot showing custom log data query with filter."::: ++10. Click **Apply** to save the transformation and view the schema of the table that's about to be created. Click **Next** to proceed. ++ :::image type="content" source="media/tutorial-logs-ingestion-portal/custom-log-final-schema.png" lightbox="media/tutorial-logs-ingestion-portal/custom-log-final-schema.png" alt-text="Screenshot showing custom log final schema."::: ++11. Verify the final details and click **Create** to save the custom log. ++ :::image type="content" source="media/tutorial-logs-ingestion-portal/custom-log-create.png" lightbox="media/tutorial-logs-ingestion-portal/custom-log-create.png" alt-text="Screenshot showing custom log create."::: ++## Collect information from DCR +With the data collection rule created, you need to collect its ID which is needed in the API call. ++1. From the **Monitor** menu in the Azure portal, select **Data collection rules** and select the DCR you just created. From **Overview** for the data collection rule, select the **JSON View**. ++ :::image type="content" source="media/tutorial-logs-ingestion-portal/data-collection-rule-json-view.png" lightbox="media/tutorial-logs-ingestion-portal/data-collection-rule-json-view.png" alt-text="Screenshot showing data collection rule JSON view."::: ++2. Copy the **immutableId** value. ++ :::image type="content" source="media/tutorial-logs-ingestion-portal/data-collection-rule-immutable-id.png" lightbox="media/tutorial-logs-ingestion-portal/data-collection-rule-immutable-id.png" alt-text="Screenshot showing collecting immutable ID from JSON view."::: ++++## Assign permissions to DCR +The final step is to give the application permission to use the DCR. This will allow any application using the correct application ID and application key to send data to the new DCE and DCR. ++1. Select **Access Control (IAM)** for the DCR and then **Add role assignment**. ++ :::image type="content" source="media/tutorial-logs-ingestion-portal/add-role-assignment.png" lightbox="media/tutorial-logs-ingestion-portal/custom-log-create.png" alt-text="Screenshot showing adding custom role assignment to DCR."::: ++2. Select **Monitoring Metrics Publisher** and click **Next**. You could instead create a custom action with the `Microsoft.Insights/Telemetry/Write` data action. ++ :::image type="content" source="media/tutorial-logs-ingestion-portal/add-role-assignment-select-role.png" lightbox="media/tutorial-logs-ingestion-portal/add-role-assignment-select-role.png" alt-text="Screenshot showing selecting role for DCR role assignment."::: ++3. Select **User, group, or service principal** for **Assign access to** and click **Select members**. Select the application that you created and click **Select**. ++ :::image type="content" source="media/tutorial-logs-ingestion-portal/add-role-assignment-select-member.png" lightbox="media/tutorial-logs-ingestion-portal/add-role-assignment-select-member.png" alt-text="Screenshot showing selecting members for DCR role assignment."::: +++4. Click **Review + assign** and verify the details before saving your role assignment. ++ :::image type="content" source="media/tutorial-logs-ingestion-portal/add-role-assignment-save.png" lightbox="media/tutorial-logs-ingestion-portal/add-role-assignment-save.png" alt-text="Screenshot showing saving DCR role assignment."::: ++++## Send sample data +Allow at least 30 minutes for the configuration to take effect. You may also experience increased latency for the first few entries, but this should normalize. ++1. Run the following command providing the values that you collected for your data collection rule and data collection endpoint. The script will start ingesting data by placing calls to the API at pace of approximately 1 record per second. ++```PowerShell +.\LogGenerator.ps1 -Log "sample_access.log" -Type "API" -Table "ApacheAccess_CL" -DcrImmutableId <immutable ID> -DceUri <data collection endpoint URL> +``` ++2. From Log Analytics, query your newly created table to verify that data arrived and if it is transformed properly. ++## Troubleshooting +This section describes different error conditions you may receive and how to correct them. ++### Script returns error code 403 +Ensure that you have the correct permissions for your application to the DCR. You may also need to wait up to 30 minutes for permissions to propagate. ++### Script returns error code 413 or warning of `TimeoutExpired` with the message `ReadyBody_ClientConnectionAbort` in the response +The message is too large. The maximum message size is currently 1MB per call. ++### Script returns error code 429 +API limits have been exceeded. The limits are currently set to 500MB of data/minute for both compressed and uncompressed data, as well as 300,000 requests/minute. Retry after the duration listed in the `Retry-After` header in the response. +### Script returns error code 503 +Ensure that you have the correct permissions for your application to the DCR. You may also need to wait up to 30 minutes for permissions to propagate. ++### You don't receive an error, but data doesn't appear in the workspace +The data may take some time to be ingested, especially if this is the first time data is being sent to a particular table. It shouldn't take longer than 15 minutes. ++### IntelliSense in Log Analytics not recognizing new table +The cache that drives IntelliSense may take up to 24 hours to update. ++## Sample data +Following is sample data that you can use for the tutorial. Alternatively, you can use your own data if you have your own Apache access logs. ++``` +0.0.139.0 +0.0.153.185 +0.0.153.185 +0.0.66.230 +0.0.148.92 +0.0.35.224 +0.0.162.225 +0.0.162.225 +0.0.148.108 +0.0.148.1 +0.0.203.24 +0.0.4.214 +0.0.10.125 +0.0.10.125 +0.0.10.125 +0.0.10.125 +0.0.10.117 +0.0.10.114 +0.0.10.114 +0.0.10.125 +0.0.10.117 +0.0.10.117 +0.0.10.114 +0.0.10.114 +0.0.10.125 +0.0.10.114 +0.0.10.114 +0.0.10.125 +0.0.10.117 +0.0.10.117 +0.0.10.114 +0.0.10.125 +0.0.10.117 +0.0.10.114 +0.0.10.117 +0.0.10.125 +0.0.10.125 +0.0.10.125 +0.0.10.125 +0.0.10.125 +0.0.10.125 +0.0.10.114 +0.0.10.117 +0.0.167.138 +0.0.149.55 +0.0.229.86 +0.0.117.249 +0.0.117.249 +0.0.117.249 +0.0.64.41 +0.0.208.79 +0.0.208.79 +0.0.208.79 +0.0.208.79 +0.0.196.129 +0.0.196.129 +0.0.66.158 +0.0.161.12 +0.0.161.12 +0.0.51.36 +0.0.51.36 +0.0.145.131 +0.0.145.131 +0.0.0.179 +0.0.0.179 +0.0.145.131 +0.0.145.131 +0.0.95.52 +0.0.95.52 +0.0.51.36 +0.0.51.36 +0.0.227.31 +0.0.227.31 +0.0.51.36 +0.0.51.36 +0.0.51.36 +0.0.51.36 +0.0.4.22 +0.0.4.22 +0.0.143.24 +0.0.143.24 +0.0.0.98 +0.0.0.98 +0.0.51.62 +0.0.51.62 +0.0.51.36 +0.0.51.36 +0.0.0.98 +0.0.0.98 +0.0.58.254 +0.0.58.254 +0.0.51.62 +0.0.51.62 +0.0.227.31 +0.0.227.31 +0.0.0.179 +0.0.0.179 +0.0.58.254 +0.0.58.254 +0.0.95.52 +0.0.95.52 +0.0.0.98 +0.0.0.98 +0.0.58.90 +0.0.58.90 +0.0.51.36 +0.0.51.36 +0.0.207.154 +0.0.207.154 +0.0.95.52 +0.0.95.52 +0.0.51.62 +0.0.51.62 +0.0.145.131 +0.0.145.131 +0.0.58.90 +0.0.58.90 +0.0.227.55 +0.0.227.55 +0.0.95.52 +0.0.95.52 +0.0.161.12 +0.0.161.12 +0.0.227.55 +0.0.227.55 +0.0.143.30 +0.0.143.30 +0.0.227.31 +0.0.227.31 +0.0.161.6 +0.0.161.6 +0.0.161.6 +0.0.227.31 +0.0.227.31 +0.0.51.62 +0.0.51.62 +0.0.227.31 +0.0.227.31 +0.0.95.20 +0.0.95.20 +0.0.207.154 +0.0.207.154 +0.0.0.98 +0.0.0.98 +0.0.51.36 +0.0.51.36 +0.0.227.55 +0.0.227.55 +0.0.207.154 +0.0.207.154 +0.0.51.36 +0.0.51.36 +0.0.51.36 +0.0.51.36 +0.0.207.221 +0.0.207.221 +0.0.0.179 +0.0.0.179 +0.0.161.12 +0.0.161.12 +0.0.58.90 +0.0.58.90 +0.0.145.106 +0.0.145.106 +0.0.145.106 +0.0.145.106 +0.0.0.179 +0.0.0.179 +0.0.149.8 +0.0.207.154 +0.0.207.154 +0.0.227.31 +0.0.227.31 +0.0.51.62 +0.0.51.62 +0.0.227.55 +0.0.227.55 +0.0.143.30 +0.0.143.30 +0.0.95.52 +0.0.95.52 +0.0.145.131 +0.0.145.131 +0.0.51.62 +0.0.51.62 +0.0.0.98 +0.0.0.98 +0.0.207.221 +0.0.145.131 +0.0.207.221 +0.0.145.131 +0.0.51.62 +0.0.51.62 +0.0.51.36 +0.0.51.36 +0.0.145.131 +0.0.145.131 +0.0.58.254 +0.0.58.254 +0.0.145.106 +0.0.145.106 +0.0.207.221 +0.0.207.221 +0.0.227.31 +0.0.227.31 +0.0.145.106 +0.0.145.106 +0.0.145.131 +0.0.145.131 +0.0.0.179 +0.0.0.179 +0.0.227.31 +0.0.227.31 +0.0.227.55 +0.0.227.55 +0.0.95.52 +0.0.95.52 +0.0.0.98 +0.0.0.98 +0.0.4.35 +0.0.4.35 +0.0.4.22 +0.0.4.22 +0.0.58.90 +0.0.58.90 +0.0.145.106 +0.0.145.106 +0.0.143.24 +0.0.143.24 +0.0.227.55 +0.0.227.55 +0.0.207.154 +0.0.207.154 +0.0.143.30 +0.0.143.30 +0.0.227.31 +0.0.227.31 +0.0.0.179 +0.0.0.179 +0.0.0.98 +0.0.0.98 +0.0.207.221 +0.0.207.221 +0.0.0.179 +0.0.0.179 +0.0.0.98 +0.0.0.98 +0.0.207.221 +0.0.207.221 +0.0.207.154 +0.0.207.154 +0.0.58.254 +0.0.58.254 +0.0.51.36 +0.0.51.36 +0.0.51.36 +0.0.51.36 +0.0.207.154 +0.0.207.154 +0.0.161.6 +0.0.145.131 +0.0.145.131 +0.0.207.221 +0.0.207.221 +0.0.95.20 +0.0.95.20 +0.0.183.233 +0.0.183.233 +0.0.51.36 +0.0.51.36 +0.0.95.52 +0.0.95.52 +0.0.227.31 +0.0.227.31 +0.0.51.62 +0.0.51.62 +0.0.95.52 +0.0.95.52 +0.0.207.154 +0.0.207.154 +0.0.51.36 +0.0.51.36 +0.0.58.90 +0.0.58.90 +0.0.4.35 +0.0.4.35 +0.0.95.52 +0.0.95.52 +0.0.167.138 +0.0.51.36 +0.0.51.36 +0.0.161.6 +0.0.161.6 +0.0.58.254 +0.0.58.254 +0.0.207.154 +0.0.207.154 +0.0.58.90 +0.0.58.90 +0.0.51.62 +0.0.51.62 +0.0.58.90 +0.0.58.90 +0.0.81.164 +0.0.81.164 +0.0.207.221 +0.0.207.221 +0.0.227.55 +0.0.227.55 +0.0.227.55 +0.0.227.55 +0.0.207.221 +0.0.207.154 +0.0.207.154 +0.0.207.221 +0.0.143.30 +0.0.143.30 +0.0.0.179 +0.0.0.179 +0.0.51.62 +0.0.51.62 +0.0.4.35 +0.0.4.35 +0.0.207.221 +0.0.207.221 +0.0.51.62 +0.0.51.62 +0.0.51.62 +0.0.51.62 +0.0.95.20 +0.0.4.35 +0.0.4.35 +0.0.58.254 +0.0.58.254 +0.0.145.106 +0.0.145.106 +0.0.0.98 +0.0.0.98 +0.0.95.52 +0.0.95.52 +0.0.51.62 +0.0.51.62 +0.0.207.221 +0.0.207.221 +0.0.143.30 +0.0.143.30 +0.0.207.154 +0.0.207.154 +0.0.143.30 +0.0.95.20 +0.0.95.20 +0.0.0.98 +0.0.0.98 +0.0.145.131 +0.0.145.131 +0.0.161.12 +0.0.161.12 +0.0.95.52 +0.0.95.52 +0.0.161.12 +0.0.161.12 +0.0.0.179 +0.0.0.179 +0.0.4.35 +0.0.4.35 +0.0.164.246 +0.0.161.12 +0.0.161.12 +0.0.161.12 +0.0.161.12 +0.0.207.221 +0.0.207.221 +0.0.4.35 +0.0.4.35 +0.0.207.221 +0.0.207.221 +0.0.145.106 +0.0.145.106 +0.0.4.22 +0.0.4.22 +0.0.161.12 +0.0.161.12 +0.0.58.254 +0.0.58.254 +0.0.161.12 +0.0.161.12 +0.0.66.216 +0.0.0.179 +0.0.0.179 +0.0.145.131 +0.0.145.131 +0.0.4.35 +0.0.4.35 +0.0.58.254 +0.0.58.254 +0.0.143.24 +0.0.143.24 +0.0.143.24 +0.0.143.24 +0.0.207.221 +0.0.207.221 +0.0.58.254 +0.0.58.254 +0.0.145.131 +0.0.145.131 +0.0.51.36 +0.0.51.36 +0.0.227.31 +0.0.161.12 +0.0.227.31 +0.0.161.6 +0.0.161.6 +0.0.207.221 +0.0.207.221 +0.0.161.12 +0.0.145.106 +0.0.145.106 +0.0.161.6 +0.0.161.6 +0.0.95.20 +0.0.95.20 +0.0.4.35 +0.0.4.35 +0.0.95.52 +0.0.95.52 +0.0.128.50 +0.0.227.31 +0.0.227.31 +0.0.227.31 +0.0.227.31 +0.0.227.55 +0.0.227.55 +0.0.29.211 +0.0.29.211 +0.0.29.211 +0.0.29.211 +0.0.29.211 +0.0.29.211 +0.0.29.211 +0.0.29.211 +0.0.29.211 +0.0.29.211 +0.0.29.211 +0.0.29.211 +0.0.29.211 +0.0.29.211 +0.0.29.211 +0.0.29.211 +0.0.29.211 +0.0.29.211 +0.0.29.211 +0.0.29.211 +0.0.29.211 +0.0.29.211 +0.0.29.211 +0.0.29.211 +0.0.29.211 +0.0.29.211 +0.0.29.211 +0.0.29.211 +0.0.29.211 +0.0.29.211 +0.0.29.211 +0.0.29.211 +0.0.29.211 +0.0.29.211 +0.0.29.211 +0.0.29.211 +0.0.29.211 +0.0.29.211 +0.0.29.211 +0.0.29.211 +0.0.29.211 +0.0.29.211 +0.0.29.211 +0.0.29.211 +0.0.29.211 +0.0.29.211 +0.0.29.211 +0.0.29.211 +0.0.29.211 +0.0.29.211 +0.0.29.211 +0.0.29.211 +0.0.29.211 +0.0.29.211 +0.0.29.211 +0.0.29.211 +0.0.29.211 +0.0.29.211 +0.0.29.211 +0.0.29.211 +0.0.29.211 +0.0.29.211 +0.0.29.211 +0.0.29.211 +0.0.29.211 +0.0.29.211 +0.0.29.211 +0.0.29.211 +``` +++## Next steps ++- [Complete a similar tutorial using the Azure portal.](tutorial-logs-ingestion-api.md) +- [Read more about custom logs.](logs-ingestion-api-overview.md) +- [Learn more about writing transformation queries](../essentials//data-collection-transformations.md) |
| azure-monitor | Tutorial Workspace Transformations Api | https://github.com/MicrosoftDocs/azure-docs/commits/main/articles/azure-monitor/logs/tutorial-workspace-transformations-api.md | + + Title: Tutorial - Add ingestion-time transformation to Azure Monitor Logs using resource manager templates +description: Describes how to add a custom transformation to data flowing through Azure Monitor Logs using resource manager templates. + Last updated : 07/01/2022+++# Tutorial: Add transformation in workspace data collection rule to Azure Monitor using resource manager templates (preview) +This tutorial walks you through configuration of a sample [transformation in a workspace data collection rule](../essentials/data-collection-transformations.md) using resource manager templates. [Transformations](../essentials/data-collection-transformations.md) in Azure Monitor allow you to filter or modify incoming data before it's sent to its destination. Workspace transformations provide support for [ingestion-time transformations](../essentials/data-collection-transformations.md) for workflows that don't yet use the [Azure Monitor data ingestion pipeline](../essentials/data-collection.md). ++Workspace transformations are stored together in a single [data collection rule (DCR)](../essentials/data-collection-rule-overview.md) for the workspace, called the workspace DCR. Each transformation is associated with a particular table. The transformation will be applied to all data sent to this table from any workflow not using a DCR. ++> [!NOTE] +> This tutorial uses resource manager templates and REST API to configure a workspace transformation. See [Tutorial: Add transformation in workspace data collection rule to Azure Monitor using the Azure portal (preview)](tutorial-workspace-transformations-portal.md) for the same tutorial using the Azure portal. ++In this tutorial, you learn to: ++> [!div class="checklist"] +> * Configure [workspace transformation](../essentials/data-collection-transformations.md#workspace-transformation-dcr) for a table in a Log Analytics workspace. +> * Write a log query for an ingestion-time transform. +++> [!NOTE] +> This tutorial uses PowerShell from Azure Cloud Shell to make REST API calls using the Azure Monitor **Tables** API and the Azure portal to install resource manager templates. You can use any other method to make these calls. ++## Prerequisites +To complete this tutorial, you need the following: ++- Log Analytics workspace where you have at least [contributor rights](manage-access.md#azure-rbac). +- [Permissions to create Data Collection Rule objects](../essentials/data-collection-rule-overview.md#permissions) in the workspace. +- The table must already have some data. +- The table can't already be linked to the [workspace transformation DCR](../essentials/data-collection-transformations.md#workspace-transformation-dcr). +++## Overview of tutorial +In this tutorial, you'll reduce the storage requirement for the `LAQueryLogs` table by filtering out certain records. You'll also remove the contents of a column while parsing the column data to store a piece of data in a custom column. The [LAQueryLogs table](query-audit.md#audit-data) is created when you enable [log query auditing](query-audit.md) in a workspace, but this is only used as a sample for the tutorial. You can use this same basic process to create a transformation for any [supported table](tables-feature-support.md) in a Log Analytics workspace. +++## Enable query audit logs +You need to enable [query auditing](query-audit.md) for your workspace to create the `LAQueryLogs` table that you'll be working with. This is not required for all ingestion time transformations. It's just to generate the sample data that this sample transformation will use. ++1. From the **Log Analytics workspaces** menu in the Azure portal, select **Diagnostic settings** and then **Add diagnostic setting**. ++ :::image type="content" source="media/tutorial-workspace-transformations-portal/diagnostic-settings.png" lightbox="media/tutorial-workspace-transformations-portal/diagnostic-settings.png" alt-text="Screenshot of diagnostic settings."::: ++2. Provide a name for the diagnostic setting and select the workspace so that the auditing data is stored in the same workspace. Select the **Audit** category and then click **Save** to save the diagnostic setting and close the diagnostic setting page. ++ :::image type="content" source="media/tutorial-workspace-transformations-portal/new-diagnostic-setting.png" lightbox="media/tutorial-workspace-transformations-portal/new-diagnostic-setting.png" alt-text="Screenshot of new diagnostic setting."::: ++3. Select **Logs** and then run some queries to populate `LAQueryLogs` with some data. These queries don't need to actually return any data. ++ :::image type="content" source="media/tutorial-workspace-transformations-portal/sample-queries.png" lightbox="media/tutorial-workspace-transformations-portal/sample-queries.png" alt-text="Screenshot of sample log queries."::: ++## Update table schema +Before you can create the transformation, the following two changes must be made to the table: ++- The table must be enabled for workspace transformation. This is required for any table that will have a transformation, even if the transformation doesn't modify the table's schema. +- Any additional columns populated by the transformation must be added to the table. ++Use the **Tables - Update** API to configure the table with the PowerShell code below. Calling the API enables the table for workspace transformations, whether or not custom columns are defined. In this sample, it includes a custom column called *Resources_CF* that will be populated with the transformation query. ++> [!IMPORTANT] +> Any custom columns added to a built-in table must end in *_CF*. Columns added to a custom table (a table with a name that ends in *_CL*) does not need to have this suffix. ++1. Click the **Cloud Shell** button in the Azure portal and ensure the environment is set to **PowerShell**. ++ :::image type="content" source="media/tutorial-workspace-transformations-api/open-cloud-shell.png" lightbox="media/tutorial-workspace-transformations-api/open-cloud-shell.png" alt-text="Screenshot of opening cloud shell."::: ++2. Copy the following PowerShell code and replace the **Path** parameter with the details for your workspace. ++ ```PowerShell + $tableParams = @' + { + "properties": { + "schema": { + "name": "LAQueryLogs", + "columns": [ + { + "name": "Resources_CF", + "description": "The list of resources, this query ran against", + "type": "string", + "isDefaultDisplay": true, + "isHidden": false + } + ] + } + } + } + '@ ++ Invoke-AzRestMethod -Path "/subscriptions/{subscription}/resourcegroups/{resourcegroup}/providers/microsoft.operationalinsights/workspaces/{workspace}/tables/LAQueryLogs?api-version=2021-12-01-preview" -Method PUT -payload $tableParams + ``` ++3. Paste the code into the cloud shell prompt to run it. ++ :::image type="content" source="media/tutorial-workspace-transformations-api/cloud-shell-script.png" lightbox="media/tutorial-workspace-transformations-api/cloud-shell-script.png" alt-text="Screenshot of script in cloud shell."::: ++4. You can verify that the column was added by going to the **Log Analytics workspace** menu in the Azure portal. Select **Logs** to open Log Analytics and then expand the `LAQueryLogs` table to view its columns. ++ :::image type="content" source="media/tutorial-workspace-transformations-portal/verify-table.png" lightbox="media/tutorial-workspace-transformations-portal/verify-table.png" alt-text="Screenshot of Log Analytics with new column."::: ++## Define transformation query +Use Log Analytics to test the transformation query before adding it to a data collection rule. ++1. Open your workspace in the **Log Analytics workspaces** menu in the Azure portal and select **Logs** to open Log Analytics. ++2. Run the following query to view the contents of the `LAQueryLogs` table. Notice the contents of the `RequestContext` column. The transformation will retrieve the workspace name from this column and remove the rest of the data in it. ++ ```kusto + LAQueryLogs + | take 10 + ``` ++ :::image type="content" source="media/tutorial-workspace-transformations-portal/initial-query.png" lightbox="media/tutorial-workspace-transformations-portal/initial-query.png" alt-text="Screenshot of initial query in Log Analytics."::: ++3. Modify the query to the following: ++ ``` kusto + LAQueryLogs + | where QueryText !contains 'LAQueryLogs' + | extend Context = parse_json(RequestContext) + | extend Workspace_CF = tostring(Context['workspaces'][0]) + | project-away RequestContext, Context + ``` + This makes the following changes: ++ - Drop rows related to querying the `LAQueryLogs` table itself to save space since these log entries aren't useful. + - Add a column for the name of the workspace that was queried. + - Remove data from the `RequestContext` column to save space. +++ :::image type="content" source="media/tutorial-workspace-transformations-portal/modified-query.png" lightbox="media/tutorial-workspace-transformations-portal/modified-query.png" alt-text="Screenshot of modified query in Log Analytics."::: +++4. Make the following changes to the query to use it in the transformation: ++ - Instead of specifying a table name (`LAQueryLogs` in this case) as the source of data for this query, use the `source` keyword. This is a virtual table that always represents the incoming data in a transformation query. + - Remove any operators that aren't supported by transform queries. See [Supported tables for ingestion-time transformations](tables-feature-support.md) for a detail list of operators that are supported. + - Flatten the query to a single line so that it can fit into the DCR JSON. ++ Following is the query that you will use in the transformation after these modifications: ++ ```kusto + source | where QueryText !contains 'LAQueryLogs' | extend Context = parse_json(RequestContext) | extend Resources_CF = tostring(Context['workspaces']) |extend RequestContext = '' + ``` ++## Create data collection rule (DCR) +Since this is the first transformation in the workspace, you need to create a [workspace transformation DCR](../essentials/data-collection-transformations.md#workspace-transformation-dcr). If you create workspace transformations for other tables in the same workspace, they must be stored in this same DCR. ++1. In the Azure portal's search box, type in *template* and then select **Deploy a custom template**. ++ :::image type="content" source="media/tutorial-workspace-transformations-api/deploy-custom-template.png" lightbox="media/tutorial-workspace-transformations-api/deploy-custom-template.png" alt-text="Screenshot to deploy custom template."::: ++2. Click **Build your own template in the editor**. ++ :::image type="content" source="media/tutorial-workspace-transformations-api/build-custom-template.png" lightbox="media/tutorial-workspace-transformations-api/build-custom-template.png" alt-text="Screenshot to build template in the editor."::: ++3. Paste the resource manager template below into the editor and then click **Save**. This template defines the DCR and contains the transformation query. You don't need to modify this template since it will collect values for its parameters. ++ :::image type="content" source="media/tutorial-workspace-transformations-api/edit-template.png" lightbox="media/tutorial-workspace-transformations-api/edit-template.png" alt-text="Screenshot to edit resource manager template."::: +++ ```json + { +     "$schema": "https://schema.management.azure.com/schemas/2019-04-01/deploymentTemplate.json#", +     "contentVersion": "1.0.0.0", +     "parameters": { +         "dataCollectionRuleName": { +             "type": "string", +             "metadata": { +                 "description": "Specifies the name of the Data Collection Rule to create." +             } +         }, +         "location": { +             "type": "string", +             "defaultValue": "westus2", +             "allowedValues": [ +                 "westus2", + "eastus2", +                 "eastus2euap" +             ], +             "metadata": { +                 "description": "Specifies the location in which to create the Data Collection Rule." +             } +         }, +         "workspaceResourceId": { +             "type": "string", +             "metadata": { +                 "description": "Specifies the Azure resource ID of the Log Analytics workspace to use." +             } +         } +     }, +     "resources": [ +         { +             "type": "Microsoft.Insights/dataCollectionRules", +             "name": "[parameters('dataCollectionRuleName')]", +             "location": "[parameters('location')]", +             "apiVersion": "2021-09-01-preview", +             "kind": "WorkspaceTransforms", +             "properties": { + "destinations": { + "logAnalytics": [ + { + "workspaceResourceId": "[parameters('workspaceResourceId')]", + "name": "clv2ws1" + } + ] + }, + "dataFlows": [ + { + "streams": [ + "Microsoft-Table-LAQueryLogs" + ], + "destinations": [ + "clv2ws1" + ], + "transformKql": "source |where QueryText !contains 'LAQueryLogs' | extend Context = parse_json(RequestContext) | extend Resources_CF = tostring(Context['workspaces']) |extend RequestContext = ''" + } + ] +             } +         } +     ], +     "outputs": { +         "dataCollectionRuleId": { +             "type": "string", +             "value": "[resourceId('Microsoft.Insights/dataCollectionRules', parameters('dataCollectionRuleName'))]" +         } +     } + } + ``` ++4. On the **Custom deployment** screen, specify a **Subscription** and **Resource group** to store the data collection rule and then provide values defined in the template. This includes a **Name** for the data collection rule and the **Workspace Resource ID** that you collected in a previous step. The **Location** should be the same location as the workspace. The **Region** will already be populated and is used for the location of the data collection rule. ++ :::image type="content" source="media/tutorial-workspace-transformations-api/custom-deployment-values.png" lightbox="media/tutorial-workspace-transformations-api/custom-deployment-values.png" alt-text="Screenshot to edit custom deployment values."::: ++5. Click **Review + create** and then **Create** when you review the details. ++6. When the deployment is complete, expand the **Deployment details** box and click on your data collection rule to view its details. Click **JSON View**. ++ :::image type="content" source="media/tutorial-workspace-transformations-api/data-collection-rule-details.png" lightbox="media/tutorial-workspace-transformations-api/data-collection-rule-details.png" alt-text="Screenshot for data collection rule details."::: ++7. Copy the **Resource ID** for the data collection rule. You'll use this in the next step. ++ :::image type="content" source="media/tutorial-workspace-transformations-api/data-collection-rule-json-view.png" lightbox="media/tutorial-workspace-transformations-api/data-collection-rule-json-view.png" alt-text="Screenshot for data collection rule JSON view."::: ++## Link workspace to DCR +The final step to enable the transformation is to link the DCR to the workspace. ++> [!IMPORTANT] +> A workspace can only be connected to a single DCR, and the linked DCR must contain this workspace as a destination. ++Use the **Workspaces - Update** API to configure the table with the PowerShell code below. ++1. Click the **Cloud shell** button to open cloud shell again. Copy the following PowerShell code and replace the parameters with values for your workspace and DCR. ++ ```PowerShell + $defaultDcrParams = @' + { + "properties": { + "defaultDataCollectionRuleResourceId": "/subscriptions/{subscription}/resourceGroups/{resourcegroup}/providers/Microsoft.Insights/dataCollectionRules/{DCR}" + } + } + '@ ++ Invoke-AzRestMethod -Path "/subscriptions/{subscription}/resourcegroups/{resourcegroup}/providers/microsoft.operationalinsights/workspaces/{workspace}?api-version=2021-12-01-preview" -Method PATCH -payload $defaultDcrParams + ``` ++2. Paste the code into the cloud shell prompt to run it. ++ :::image type="content" source="media/tutorial-workspace-transformations-api/cloud-shell-script-link-workspace.png" lightbox="media/tutorial-workspace-transformations-api/cloud-shell-script-link-workspace.png" alt-text="Screenshot of script to link workspace to DCR."::: ++## Test transformation +Allow about 30 minutes for the transformation to take effect, and you can then test it by running a query against the table. Only data sent to the table after the transformation was applied will be affected. ++For this tutorial, run some sample queries to send data to the `LAQueryLogs` table. Include some queries against `LAQueryLogs` so you can verify that the transformation filters these records. Notice that the output has the new `Workspace_CF` column, and there are no records for `LAQueryLogs`. +++## Troubleshooting +This section describes different error conditions you may receive and how to correct them. ++### IntelliSense in Log Analytics not recognizing new columns in the table +The cache that drives IntelliSense may take up to 24 hours to update. ++### Transformation on a dynamic column isn't working +There is currently a known issue affecting dynamic columns. A temporary workaround is to explicitly parse dynamic column data using `parse_json()` prior to performing any operations against them. ++## Next steps ++- [Read more about transformations](../essentials/data-collection-transformations.md) +- [See which tables support workspace transformations](tables-feature-support.md) +- [Learn more about writing transformation queries](../essentials/data-collection-transformations-structure.md) |
| azure-monitor | Tutorial Workspace Transformations Portal | https://github.com/MicrosoftDocs/azure-docs/commits/main/articles/azure-monitor/logs/tutorial-workspace-transformations-portal.md | + + Title: Tutorial - Add workspace transformation to Azure Monitor Logs using Azure portal +description: Describes how to add a custom transformation to data flowing through Azure Monitor Logs using the Azure portal. + Last updated : 07/01/2022+++# Tutorial: Add transformation in workspace data collection rule using the Azure portal (preview) +This tutorial walks you through configuration of a sample [transformation in a workspace data collection rule](../essentials/data-collection-transformations.md) using the Azure portal. [Transformations](../essentials/data-collection-transformations.md) in Azure Monitor allow you to filter or modify incoming data before it's sent to its destination. Workspace transformations provide support for [ingestion-time transformations](../essentials/data-collection-transformations.md) for workflows that don't yet use the [Azure Monitor data ingestion pipeline](../essentials/data-collection.md). ++Workspace transformations are stored together in a single [data collection rule (DCR)](../essentials/data-collection-rule-overview.md) for the workspace, called the workspace DCR. Each transformation is associated with a particular table. The transformation will be applied to all data sent to this table from any workflow not using a DCR. ++> [!NOTE] +> This tutorial uses the Azure portal to configure a workspace transformation. See [Tutorial: Add transformation in workspace data collection rule to Azure Monitor using resource manager templates (preview)](tutorial-workspace-transformations-api.md) for the same tutorial using resource manager templates and REST API. ++In this tutorial, you learn to: ++> [!div class="checklist"] +> * Configure [workspace transformation](../essentials/data-collection-transformations.md#workspace-transformation-dcr) for a table in a Log Analytics workspace. +> * Write a log query for a workspace transformation. +++## Prerequisites +To complete this tutorial, you need the following: ++- Log Analytics workspace where you have at least [contributor rights](manage-access.md#azure-rbac). +- [Permissions to create data collection rule (DCR) objects](../essentials/data-collection-rule-overview.md#permissions) in the workspace. +- The table must already have some data. +- The table can't be linked to the [workspace transformation DCR](../essentials/data-collection-transformations.md#workspace-transformation-dcr). +++## Overview of tutorial +In this tutorial, you'll reduce the storage requirement for the `LAQueryLogs` table by filtering out certain records. You'll also remove the contents of a column while parsing the column data to store a piece of data in a custom column. The [LAQueryLogs table](query-audit.md#audit-data) is created when you enable [log query auditing](query-audit.md) in a workspace. You can use this same basic process to create a transformation for any [supported table](tables-feature-support.md) in a Log Analytics workspace. ++This tutorial will use the Azure portal which provides a wizard to walk you through the process of creating an ingestion-time transformation. The following actions are performed for you when you complete this wizard: ++- Updates the table schema with any additional columns from the query. +- Creates a `WorkspaceTransforms` data collection rule (DCR) and links it to the workspace if a default DCR isn't already linked to the workspace. +- Creates an ingestion-time transformation and adds it to the DCR. +++## Enable query audit logs +You need to enable [query auditing](query-audit.md) for your workspace to create the `LAQueryLogs` table that you'll be working with. This is not required for all ingestion time transformations. It's just to generate the sample data that we'll be working with. ++1. From the **Log Analytics workspaces** menu in the Azure portal, select **Diagnostic settings** and then **Add diagnostic setting**. ++ :::image type="content" source="media/tutorial-workspace-transformations-portal/diagnostic-settings.png" lightbox="media/tutorial-workspace-transformations-portal/diagnostic-settings.png" alt-text="Screenshot of diagnostic settings."::: ++2. Provide a name for the diagnostic setting and select the workspace so that the auditing data is stored in the same workspace. Select the **Audit** category and then click **Save** to save the diagnostic setting and close the diagnostic setting page. ++ :::image type="content" source="media/tutorial-workspace-transformations-portal/new-diagnostic-setting.png" lightbox="media/tutorial-workspace-transformations-portal/new-diagnostic-setting.png" alt-text="Screenshot of new diagnostic setting."::: ++3. Select **Logs** and then run some queries to populate `LAQueryLogs` with some data. These queries don't need to return data to be added to the audit log. ++ :::image type="content" source="media/tutorial-workspace-transformations-portal/sample-queries.png" lightbox="media/tutorial-workspace-transformations-portal/sample-queries.png" alt-text="Screenshot of sample log queries."::: ++## Add transformation to the table +Now that the table's created, you can create the transformation for it. ++1. From the **Log Analytics workspaces** menu in the Azure portal, select **Tables (preview)**. Locate the `LAQueryLogs` table and select **Create transformation**. ++ :::image type="content" source="media/tutorial-workspace-transformations-portal/create-transformation.png" lightbox="media/tutorial-workspace-transformations-portal/create-transformation.png" alt-text="Screenshot of creating a new transformation."::: +++2. Since this is the first transformation in the workspace, you need to create a [workspace transformation DCR](../essentials/data-collection-transformations.md#workspace-transformation-dcr). If you create transformations for other tables in the same workspace, they will be stored in this same DCR. Click **Create a new data collection rule**. The **Subscription** and **Resource group** will already be populated for the workspace. Provide a name for the DCR and click **Done**. ++ :::image type="content" source="media/tutorial-workspace-transformations-portal/new-data-collection-rule.png" lightbox="media/tutorial-workspace-transformations-portal/new-data-collection-rule.png" alt-text="Screenshot of creating a new data collection rule."::: ++3. Click **Next** to view sample data from the table. As you define the transformation, the result will be applied to the sample data allowing you to evaluate the results before applying it to actual data. Click **Transformation editor** to define the transformation. ++ :::image type="content" source="media/tutorial-workspace-transformations-portal/sample-data.png" lightbox="media/tutorial-workspace-transformations-portal/sample-data.png" alt-text="Screenshot of sample data from the log table."::: ++4. In the transformation editor, you can see the transformation that will be applied to the data prior to its ingestion into the table. The incoming data is represented by a virtual table named `source`, which has the same set of columns as the destination table itself. The transformation initially contains a simple query returning the `source` table with no changes. ++5. Modify the query to the following: ++ ``` kusto + source + | where QueryText !contains 'LAQueryLogs' + | extend Context = parse_json(RequestContext) + | extend Workspace_CF = tostring(Context['workspaces'][0]) + | project-away RequestContext, Context + ``` ++ This makes the following changes: ++ - Drop rows related to querying the `LAQueryLogs` table itself to save space since these log entries aren't useful. + - Add a column for the name of the workspace that was queried. + - Remove data from the `RequestContext` column to save space. ++++ > [!Note] + > Using the Azure portal, the output of the transformation will initiate changes to the table schema if required. Columns will be added to match the transformation output if they don't already exist. Make sure that your output doesn't contain any additional columns that you don't want added to the table. If the output does not include columns that are already in the table, those columns will not be removed, but data will not be added. + > + > Any custom columns added to a built-in table must end in *_CF*. Columns added to a custom table (a table with a name that ends in *_CL*) does not need to have this suffix. ++6. Copy the query into the transformation editor and click **Run** to view results from the sample data. You can verify that the new `Workspace_CF` column is in the query. ++ :::image type="content" source="media/tutorial-workspace-transformations-portal/transformation-editor.png" lightbox="media/tutorial-workspace-transformations-portal/transformation-editor.png" alt-text="Screenshot of transformation editor."::: ++7. Click **Apply** to save the transformation and then **Next** to review the configuration. Click **Create** to update the data collection rule with the new transformation. ++ :::image type="content" source="media/tutorial-workspace-transformations-portal/save-transformation.png" lightbox="media/tutorial-workspace-transformations-portal/save-transformation.png" alt-text="Screenshot of saving transformation."::: ++## Test transformation +Allow about 30 minutes for the transformation to take effect and then test it by running a query against the table. Only data sent to the table after the transformation was applied will be affected. ++For this tutorial, run some sample queries to send data to the `LAQueryLogs` table. Include some queries against `LAQueryLogs` so you can verify that the transformation filters these records. Notice that the output has the new `Workspace_CF` column, and there are no records for `LAQueryLogs`. ++## Troubleshooting +This section describes different error conditions you may receive and how to correct them. ++### IntelliSense in Log Analytics not recognizing new columns in the table +The cache that drives IntelliSense may take up to 24 hours to update. ++### Transformation on a dynamic column isn't working +There is currently a known issue affecting dynamic columns. A temporary workaround is to explicitly parse dynamic column data using `parse_json()` prior to performing any operations against them. ++## Next steps ++- [Read more about transformations](../essentials/data-collection-transformations.md) +- [See which tables support workspace transformations](tables-feature-support.md) +- [Learn more about writing transformation queries](../essentials/data-collection-transformations-structure.md) |
| azure-monitor | Workspace Design | https://github.com/MicrosoftDocs/azure-docs/commits/main/articles/azure-monitor/logs/workspace-design.md | In a hybrid model, each tenant has its own workspace, and some mechanism is used There are two options to implement logs in a central location: -- Central workspace. The service provider creates a workspace in its tenant and use a script that utilizes the [Query API](api/overview.md) with the [custom logs API](custom-logs-overview.md) to bring the data from the tenant workspaces to this central location. Another option is to use [Azure Logic Apps](../../logic-apps/logic-apps-overview.md) to copy data to the central workspace.+- Central workspace. The service provider creates a workspace in its tenant and use a script that utilizes the [Query API](api/overview.md) with the [logs ingestion API](logs-ingestion-api-overview.md) to bring the data from the tenant workspaces to this central location. Another option is to use [Azure Logic Apps](../../logic-apps/logic-apps-overview.md) to copy data to the central workspace. - Power BI. The tenant workspaces export data to Power BI using the integration between the [Log Analytics workspace and Power BI](log-powerbi.md). |
| azure-monitor | Observability Data | https://github.com/MicrosoftDocs/azure-docs/commits/main/articles/azure-monitor/observability-data.md | + + Title: Observability data in Azure Monitor +description: Describes the +documentationcenter: '' ++ na + Last updated : 04/05/2022+++# Observability data in Azure Monitor +Enabling observability across today's complex computing environments running distributed applications that rely on both cloud and on-premises services, requires collection of operational data from every layer and every component of the distributed system. You need to be able to perform deep insights on this data and consolidate it into a single pane of glass with different perspectives to support the multitude of stakeholders in your organization. ++[Azure Monitor](overview.md) collects and aggregates data from a variety of sources into a common data platform where it can be used for analysis, visualization, and alerting. It provides a consistent experience on top of data from multiple sources, which gives you deep insights across all your monitored resources and even with data from other services that store their data in Azure Monitor. ++++## Pillars of observability ++Metrics, logs, and distributed traces are commonly referred to as the three pillars of observability. These are the different kinds of data that a monitoring tool must collect and analyze to provide sufficient observability of a monitored system. Observability can be achieved by correlating data from multiple pillars and aggregating data across the entire set of resources being monitored. Because Azure Monitor stores data from multiple sources together, the data can be correlated and analyzed using a common set of tools. It also correlates data across multiple Azure subscriptions and tenants, in addition to hosting data for other services. ++Azure resources generate a significant amount of monitoring data. Azure Monitor consolidates this data along with monitoring data from other sources into either a Metrics or Logs platform. Each is optimized for particular monitoring scenarios, and each supports different features in Azure Monitor. Features such as data analysis, visualizations, or alerting require you to understand the differences so that you can implement your required scenario in the most efficient and cost effective manner. Insights in Azure Monitor such as [Application Insights](app/app-insights-overview.md) or [VM insights](vm/vminsights-overview.md) have analysis tools that allow you to focus on the particular monitoring scenario without having to understand the differences between the two types of data. +++## Metrics +[Metrics](essentials/data-platform-metrics.md) are numerical values that describe some aspect of a system at a particular point in time. They are collected at regular intervals and are identified with a timestamp, a name, a value, and one or more defining labels. Metrics can be aggregated using a variety of algorithms, compared to other metrics, and analyzed for trends over time. ++Metrics in Azure Monitor are stored in a time-series database which is optimized for analyzing time-stamped data. This makes metrics particularly suited for alerting and fast detection of issues. They can tell you how your system is performing but typically need to be combined with logs to identify the root cause of issues. ++Metrics are available for interactive analysis in the Azure portal with [Azure Metrics Explorer](essentials/metrics-getting-started.md). They can be added to an [Azure dashboard](app/tutorial-app-dashboards.md) for visualization in combination with other data and used for near-real time [alerting](alerts/alerts-metric.md). ++Read more about Azure Monitor Metrics including their sources of data in [Metrics in Azure Monitor](essentials/data-platform-metrics.md). ++## Logs +[Logs](logs/data-platform-logs.md) are events that occurred within the system. They can contain different kinds of data and may be structured or free form text with a timestamp. They may be created sporadically as events in the environment generate log entries, and a system under heavy load will typically generate more log volume. ++Logs in Azure Monitor are stored in a Log Analytics workspace that's based on [Azure Data Explorer](/azure/data-explorer/) which provides a powerful analysis engine and [rich query language](/azure/kusto/query/). Logs typically provide enough information to provide complete context of the issue being identified and are valuable for identifying root case of issues. ++> [!NOTE] +> It's important to distinguish between Azure Monitor Logs and sources of log data in Azure. For example, subscription level events in Azure are written to an [activity log](essentials/platform-logs-overview.md) that you can view from the Azure Monitor menu. Most resources will write operational information to a [resource log](essentials/platform-logs-overview.md) that you can forward to different locations. Azure Monitor Logs is a log data platform that collects activity logs and resource logs along with other monitoring data to provide deep analysis across your entire set of resources. +++ You can work with [log queries](logs/log-query-overview.md) interactively with [Log Analytics](logs/log-query-overview.md) in the Azure portal or add the results to an [Azure dashboard](app/tutorial-app-dashboards.md) for visualization in combination with other data. You can also create [log alerts](alerts/alerts-log.md) which will trigger an alert based on the results of a schedule query. ++Read more about Azure Monitor Logs including their sources of data in [Logs in Azure Monitor](logs/data-platform-logs.md). ++## Distributed traces +Traces are series of related events that follow a user request through a distributed system. They can be used to determine behavior of application code and the performance of different transactions. While logs will often be created by individual components of a distributed system, a trace measures the operation and performance of your application across the entire set of components. ++Distributed tracing in Azure Monitor is enabled with the [Application Insights SDK](app/distributed-tracing.md), and trace data is stored with other application log data collected by Application Insights. This makes it available to the same analysis tools as other log data including log queries, dashboards, and alerts. ++Read more about distributed tracing at [What is Distributed Tracing?](app/distributed-tracing.md). +++## Next steps ++- Read more about [Metrics in Azure Monitor](essentials/data-platform-metrics.md). +- Read more about [Logs in Azure Monitor](logs/data-platform-logs.md). +- Learn about the [monitoring data available](data-sources.md) for different resources in Azure. |
| azure-monitor | Overview | https://github.com/MicrosoftDocs/azure-docs/commits/main/articles/azure-monitor/overview.md | Title: Azure Monitor overview | Microsoft Docs + Title: Azure Monitor overview description: Overview of Microsoft services and functionalities that contribute to a complete monitoring strategy for your Azure services and applications. A few examples of what you can do with Azure Monitor include: [!INCLUDE [azure-lighthouse-supported-service](../../includes/azure-lighthouse-supported-service.md)] ## Overview+The following diagram gives a high-level view of Azure Monitor. At the center of the diagram are the data stores for metrics and logs, which are the two fundamental types of data used by Azure Monitor. On the left are the [sources of monitoring data](data-sources.md) that populate these [data stores](data-platform.md). On the right are the different functions that Azure Monitor performs with this collected data. This includes such actions as analysis, alerting, and streaming to external systems. -The following diagram gives a high-level view of Azure Monitor. At the center of the diagram are the data stores for metrics and logs, which are the two fundamental types of data used by Azure Monitor. On the left are the [sources of monitoring data](agents/data-sources.md) that populate these [data stores](data-platform.md). On the right are the different functions that Azure Monitor performs with this collected data. Actions include analysis, alerting, and streaming to external systems. :::image type="content" source="media/overview/azure-monitor-overview-optm.svg" alt-text="Diagram that shows an overview of Azure Monitor." border="false" lightbox="media/overview/azure-monitor-overview-optm.svg"::: The following video uses an earlier version of the preceding diagram, but its ex > [!VIDEO https://www.microsoft.com/en-us/videoplayer/embed/RE4qXeL] ## Monitor data platform- All data collected by Azure Monitor fits into one of two fundamental types, [metrics and logs](data-platform.md). [Metrics](essentials/data-platform-metrics.md) are numerical values that describe some aspect of a system at a particular point in time. They're lightweight and capable of supporting near-real-time scenarios. [Logs](logs/data-platform-logs.md) contain different kinds of data organized into records with different sets of properties for each type. Telemetry such as events and traces is stored as logs in addition to performance data so that it can all be combined for analysis. For many Azure resources, you'll see data collected by Azure Monitor right in their overview page in the Azure portal. Look at any virtual machine (VM), for example, and you'll see several charts that display performance metrics. Select any of the graphs to open the data in [Metrics Explorer](essentials/metrics-charts.md) in the Azure portal. With Metrics Explorer, you can chart the values of multiple metrics over time. You can view the charts interactively or pin them to a dashboard to view them with other visualizations. You'll often have the requirement to integrate Azure Monitor with other systems Multiple APIs are available to read and write metrics and logs to and from Azure Monitor in addition to accessing generated alerts. You can also configure and retrieve alerts. With APIs, you have essentially unlimited possibilities to build custom solutions that integrate with Azure Monitor. ++## Observability data in Azure Monitor +Metrics, logs, and distributed traces are commonly referred to as the three pillars of observability. These are the different kinds of data that a monitoring tool must collect and analyze to provide sufficient observability of a monitored system. Observability can be achieved by correlating data from multiple pillars and aggregating data across the entire set of resources being monitored. Because Azure Monitor stores data from multiple sources together, the data can be correlated and analyzed using a common set of tools. It also correlates data across multiple Azure subscriptions and tenants, in addition to hosting data for other services. ++Azure resources generate a significant amount of monitoring data. Azure Monitor consolidates this data along with monitoring data from other sources into either a Metrics or Logs platform. Each is optimized for particular monitoring scenarios, and each supports different features in Azure Monitor. Features such as data analysis, visualizations, or alerting require you to understand the differences so that you can implement your required scenario in the most efficient and cost effective manner. Insights in Azure Monitor such as [Application Insights](app/app-insights-overview.md) or [Container insights](containers/container-insights-overview.md) have analysis tools that allow you to focus on the particular monitoring scenario without having to understand the differences between the two types of data. ++| Pillar | Description | +|:|:| +| Metrics | Metrics are numerical values that describe some aspect of a system at a particular point in time. They are collected at regular intervals and are identified with a timestamp, a name, a value, and one or more defining labels. Metrics can be aggregated using a variety of algorithms, compared to other metrics, and analyzed for trends over time.<br><br>Metrics in Azure Monitor are stored in a time-series database which is optimized for analyzing time-stamped data. For more information, see [Azure Monitor Metrics](essentials/data-platform-metrics.md). | +| Logs | [Logs](logs/data-platform-logs.md) are events that occurred within the system. They can contain different kinds of data and may be structured or free form text with a timestamp. They may be created sporadically as events in the environment generate log entries, and a system under heavy load will typically generate more log volume.<br><br>Logs in Azure Monitor are stored in a Log Analytics workspace that's based on [Azure Data Explorer](/azure/data-explorer/) which provides a powerful analysis engine and [rich query language](/azure/kusto/query/). For more information, see [Azure Monitor Logs](logs/data-platform-logs.md). | +| Distributed traces | Traces are series of related events that follow a user request through a distributed system. They can be used to determine behavior of application code and the performance of different transactions. While logs will often be created by individual components of a distributed system, a trace measures the operation and performance of your application across the entire set of components.<br><br>Distributed tracing in Azure Monitor is enabled with the [Application Insights SDK](app/distributed-tracing.md), and trace data is stored with other application log data collected by Application Insights and stored in Azure Monitor Logs. For more information, see [What is Distributed Tracing?](app/distributed-tracing.md). | +++> [!NOTE] +> It's important to distinguish between Azure Monitor Logs and sources of log data in Azure. For example, subscription level events in Azure are written to an [activity log](essentials/platform-logs-overview.md) that you can view from the Azure Monitor menu. Most resources will write operational information to a [resource log](essentials/platform-logs-overview.md) that you can forward to different locations. Azure Monitor Logs is a log data platform that collects activity logs and resource logs along with other monitoring data to provide deep analysis across your entire set of resources. +++++ ## Next steps Learn more about: * [Metrics and logs](./data-platform.md#metrics) for the data collected by Azure Monitor.-* [Data sources](agents/data-sources.md) for how the different components of your application send telemetry. +* [Data sources](data-sources.md) for how the different components of your application send telemetry. * [Log queries](logs/log-query-overview.md) for analyzing collected data. * [Best practices](/azure/architecture/best-practices/monitoring) for monitoring cloud applications and services. |
| azure-monitor | Profiler Aspnetcore Linux | https://github.com/MicrosoftDocs/azure-docs/commits/main/articles/azure-monitor/profiler/profiler-aspnetcore-linux.md | Title: Profile ASP.NET Core Azure Linux web apps with Application Insights Profiler | Microsoft Docs -description: A conceptual overview and step-by-step tutorial on how to use Application Insights Profiler. + Title: Enable Profiler for ASP.NET Core web applications hosted in Linux on App Services | Microsoft Docs +description: Learn how to enable Profiler on your ASP.NET Core web application hosted in Linux on App Services. ms.devlang: csharp Previously updated : 06/16/2022- Last updated : 07/18/2022+ -# Profile ASP.NET Core Azure Linux web apps with Application Insights Profiler +# Enable Profiler for ASP.NET Core web applications hosted in Linux on App Services -Find out how much time is spent in each method of your live web application when using [Application Insights](../app/app-insights-overview.md). Application Insights Profiler is now available for ASP.NET Core web apps that are hosted in Linux on Azure App Service. This guide provides step-by-step instructions on how the Profiler traces can be collected for ASP.NET Core Linux web apps. +Using Profiler, you can track how much time is spent in each method of your live ASP.NET Core web apps that are hosted in Linux on Azure App Service. While this guide focuses on web apps hosted in Linux, you can experiment using Linux, Windows, and Mac development environments. -After you complete this walkthrough, your app can collect Profiler traces like the traces that are shown in the image. In this example, the Profiler trace indicates that a particular web request is slow because of time spent waiting. The *hot path* in the code that's slowing the app is marked by a flame icon. The **About** method in the **HomeController** section is slowing the web app because the method is calling the **Thread.Sleep** function. -- +In this guide, you'll: +> [!div class="checklist"] +> - Set up and deploy an ASP.NET Core web application hosted on Linux. +> - Add Application Insights Profiler to the ASP.NET Core web application. + ## Prerequisites-The following instructions apply to all Windows, Linux, and Mac development environments: -* Install the [.NET Core SDK 3.1 or later](https://dotnet.microsoft.com/download/dotnet). -* Install Git by following the instructions at [Getting Started - Installing Git](https://git-scm.com/book/en/v2/Getting-Started-Installing-Git). +- Install the [latest and greatest .NET Core SDK](https://dotnet.microsoft.com/download/dotnet). +- Install Git by following the instructions at [Getting Started - Installing Git](https://git-scm.com/book/en/v2/Getting-Started-Installing-Git). ## Set up the project locally -1. Open a Command Prompt window on your machine. The following instructions work for all Windows, Linux, and Mac development environments. +1. Open a Command Prompt window on your machine. 1. Create an ASP.NET Core MVC web application: The following instructions apply to all Windows, Linux, and Mac development envi dotnet add package Microsoft.ApplicationInsights.Profiler.AspNetCore ``` -1. Enable Application Insights and Profiler in Startup.cs: +1. In your preferred code editor, enable Application Insights and Profiler in `Program.cs`: ```csharp public void ConfigureServices(IServiceCollection services) The following instructions apply to all Windows, Linux, and Mac development envi ## Create the Linux web app to host your project -1. Create the web app environment by using App Service on Linux: +1. In the Azure portal, create a web app environment by using App Service on Linux: ++ :::image type="content" source="./media/profiler-aspnetcore-linux/create-web-app.png" alt-text="Screenshot of creating the Linux web app."::: - :::image type="content" source="./media/profiler-aspnetcore-linux/create-linux-app-service.png" alt-text="Create the Linux web app"::: +1. Go to your new web app resource and select **Deployment Center** > **FTPS credentials** to create the deployment credentials. Make note of your credentials to use later. -2. Create the deployment credentials: + :::image type="content" source="./media/profiler-aspnetcore-linux/credentials.png" alt-text="Screenshot of creating the deployment credentials."::: - > [!NOTE] - > Record your password to use later when deploying your web app. +1. Click **Save**. +1. Select the **Settings** tab. +1. In the drop-down, select **Local Git** to set up a local Git repository in the web app. -  + :::image type="content" source="./media/profiler-aspnetcore-linux/deployment-options.png" alt-text="Screenshot of view deployment options in a drop-down."::: -3. Choose the deployment options. Set up a local Git repository in the web app by following the instructions on the Azure portal. A Git repository is automatically created. +1. Click **Save** to create a Git repository with a Git Clone Uri. -  + :::image type="content" source="./media/profiler-aspnetcore-linux/local-git-repo.png" alt-text="Screenshot of setting up the local Git repository."::: -For more deployment options, see [App Service documentation](../../app-service/index.yml). + For more deployment options, see [App Service documentation](../../app-service/deploy-best-practices.md). ## Deploy your project For more deployment options, see [App Service documentation](../../app-service/i ... ``` -## Add Application Insights to monitor your web apps +## Add Application Insights to monitor your web app -1. [Create an Application Insights resource](../app/create-new-resource.md). +You can add Application Insights to your web app either via: -2. Copy the **iKey** value of the Application Insights resource and set the following settings in your web apps: +- The Enablement blade in the Azure portal, +- The Configuration blade in the Azure portal, or +- Manually adding to your web app settings. - `APPINSIGHTS_INSTRUMENTATIONKEY: [YOUR_APPINSIGHTS_KEY]` +# [Enablement blade](#tab/enablement) - When the app settings are changed, the site automatically restarts. After the new settings are applied, the Profiler immediately runs for two minutes. The Profiler then runs for two minutes every hour. +1. In your web app on the Azure portal, select **Application Insights** in the left side menu. +1. Click **Turn on Application Insights**. -3. Generate some traffic to your website. You can generate traffic by refreshing the site **About** page a few times. + :::image type="content" source="./media/profiler-aspnetcore-linux/turn-on-app-insights.png" alt-text="Screenshot of turning on Application Insights."::: -4. Wait two to five minutes for the events to aggregate to Application Insights. +1. Under **Application Insights**, select **Enable**. -5. Browse to the Application Insights **Performance** pane in the Azure portal. You can view the Profiler traces at the bottom right of the pane. + :::image type="content" source="./media/profiler-aspnetcore-linux/enable-app-insights.png" alt-text="Screenshot of enabling Application Insights."::: -  +1. Under **Link to an Application Insights resource**, either create a new resource or select an existing resource. For this example, we'll create a new resource. + :::image type="content" source="./media/profiler-aspnetcore-linux/link-app-insights.png" alt-text="Screenshot of linking your Application Insights to a new or existing resource."::: +1. Click **Apply** > **Yes** to apply and confirm. -## Next steps -If you use custom containers that are hosted by Azure App Service, follow the instructions in [ -Enable Service Profiler for a containerized ASP.NET Core application](https://github.com/Microsoft/ApplicationInsights-Profiler-AspNetCore/tree/master/examples/EnableServiceProfilerForContainerApp) to enable Application Insights Profiler. +# [Configuration blade](#tab/config) ++1. [Create an Application Insights resource](../app/create-workspace-resource.md) in the same Azure subscription as your App Service. +1. Navigate to the Application Insights resource. +1. Copy the **Instrumentation Key** (iKey). +1. In your web app on the Azure portal, select **Configuration** in the left side menu. +1. Click **New application setting**. ++ :::image type="content" source="./media/profiler-aspnetcore-linux/new-setting-configuration.png" alt-text="Screenshot of adding new application setting in the configuration blade."::: ++1. Add the following settings in the **Add/Edit application setting** pane, using your saved iKey: ++ | Name | Value | + | - | -- | + | APPINSIGHTS_INSTRUMENTATIONKEY | [YOUR_APPINSIGHTS_KEY] | ++ :::image type="content" source="./media/profiler-aspnetcore-linux/add-ikey-settings.png" alt-text="Screenshot of adding iKey to the settings pane."::: ++1. Click **OK**. ++ :::image type="content" source="./media/profiler-aspnetcore-linux/save-app-insights-key.png" alt-text="Screenshot of saving the application insights key settings."::: -Report any issues or suggestions to the Application Insights GitHub repository: -[ApplicationInsights-Profiler-AspNetCore: Issues](https://github.com/Microsoft/ApplicationInsights-Profiler-AspNetCore/issues). +1. Click **Save**. ++# [Web app settings](#tab/appsettings) ++1. [Create an Application Insights resource](../app/create-workspace-resource.md) in the same Azure subscription as your App Service. +1. Navigate to the Application Insights resource. +1. Copy the **Instrumentation Key** (iKey). +1. In your preferred code editor, navigate to your ASP.NET Core project's `appsettings.json` file. +1. Add the following and insert your copied iKey: ++ ```json + "ApplicationInsights": + { + "InstrumentationKey": "<your-instrumentation-key>" + } + ``` ++1. Save `appsettings.json` to apply the settings change. ++++## Next steps +Learn how to... +> [!div class="nextstepaction"] +> [Generate load and view Profiler traces](./profiler-data.md) |
| azure-monitor | Profiler Settings | https://github.com/MicrosoftDocs/azure-docs/commits/main/articles/azure-monitor/profiler/profiler-settings.md | Title: Configure Application Insights Profiler | Microsoft Docs description: Use the Azure Application Insights Profiler settings pane to see Profiler status and start profiling sessions ms.contributor: Charles.Weininger Previously updated : 04/26/2022- Last updated : 07/18/2022 # Configure Application Insights Profiler To open the Azure Application Insights Profiler settings pane, select **Performance** from the left menu within your Application Insights page. View profiler traces across your Azure resources via two methods: View profiler traces across your Azure resources via two methods: Select the **Profiler** button from the top menu. **By operation** 1. Select an operation from the **Operation name** list ("Overall" is highlighted by default). 1. Select the **Profiler traces** button. - :::image type="content" source="./media/profiler-settings/operation-entry-inline.png" alt-text="Select operation and Profiler traces to view all profiler traces" lightbox="media/profiler-settings/operation-entry.png"::: + :::image type="content" source="./media/profiler-settings/operation-entry-inline.png" alt-text="Screenshot of selecting operation and Profiler traces to view all profiler traces." lightbox="media/profiler-settings/operation-entry.png"::: 1. Select one of the requests from the list to the left. 1. Select **Configure Profiler**. - :::image type="content" source="./media/profiler-settings/configure-profiler-inline.png" alt-text="Overall selection and clicking Profiler traces to view all profiler traces" lightbox="media/profiler-settings/configure-profiler.png"::: + :::image type="content" source="./media/profiler-settings/configure-profiler-inline.png" alt-text="Screenshot of the overall selection and clicking Profiler traces to view all profiler traces." lightbox="media/profiler-settings/configure-profiler.png"::: Once within the Profiler, you can configure and view the Profiler. The **Application Insights Profiler** page has these features: | Feature | Description | |-|-| Select the Triggers button on the menu bar to open the CPU, Memory, and Sampling You can set up a trigger to start profiling when the percentage of CPU or Memory use hits the level you set. | Setting | Description | |-|-| Unlike CPU or memory triggers, the Sampling trigger isn't triggered by an event. - Turn this trigger off to disable random sampling. - Set how often profiling will occur and the duration of the profiling session. | Setting | Description | |-|-| Triggered by | How the session was started, either by a trigger, Profile Now, or App Name | Name of the application that was profiled. Machine Instance | Name of the machine the profiler agent ran on. Timestamp | Time when the profile was captured.-Tracee | Number of traces that were attached to individual requests. CPU % | Percentage of CPU that was being used while the profiler was running. Memory % | Percentage of memory that was being used while the profiler was running. |
| azure-monitor | Service Limits | https://github.com/MicrosoftDocs/azure-docs/commits/main/articles/azure-monitor/service-limits.md | This article lists limits in different areas of Azure Monitor. [!INCLUDE [monitoring-limits](../../includes/azure-monitor-limits-autoscale.md)] -## Custom logs +## Logs ingestion API [!INCLUDE [custom-logs](../../includes/azure-monitor-limits-custom-logs.md)] |
| azure-monitor | Workbooks Commonly Used Components | https://github.com/MicrosoftDocs/azure-docs/commits/main/articles/azure-monitor/visualize/workbooks-commonly-used-components.md | You may want to summarize status using a simple visual indication instead of pre The example below shows how do setup a traffic light icon per computer based on the CPU utilization metric. 1. [Create a new empty workbook](workbooks-create-workbook.md).-1. [Add a parameters](workbooks-create-workbook.md#add-a-parameter-to-an-azure-workbook), make it a [time range parameter](workbooks-time.md), and name it **TimeRange**. +1. [Add a parameters](workbooks-create-workbook.md#add-a-parameter-to-a-workbook), make it a [time range parameter](workbooks-time.md), and name it **TimeRange**. 1. Select **Add query** to add a log query control to the workbook. 1. Select the `log` query type, a `Log Analytics' resource type, and a Log Analytics workspace in your subscription that has VM performance data as a resource. 1. In the Query editor, enter: The following example shows how to enable this scenario: Let's say you want the ### Setup parameters -1. [Create a new empty workbook](workbooks-create-workbook.md) and [add a parameter component](workbooks-create-workbook.md#add-a-parameter-to-an-azure-workbook). +1. [Create a new empty workbook](workbooks-create-workbook.md) and [add a parameter component](workbooks-create-workbook.md#add-a-parameter-to-a-workbook). 1. Select **Add parameter** to create a new parameter. Use the following settings: - Parameter name: `OsFilter` - Display name: `Operating system` |
| azure-monitor | Workbooks Create Workbook | https://github.com/MicrosoftDocs/azure-docs/commits/main/articles/azure-monitor/visualize/workbooks-create-workbook.md | Title: Creating an Azure Workbook -description: Learn how to create an Azure Workbook. + Title: Create an Azure workbook +description: Learn how to create a workbook in Azure Workbooks. Last updated 05/30/2022 -# Create an Azure Workbook -This article describes how to create a new workbook and how to add elements to your Azure Workbook. +# Create an Azure workbook ++This article describes how to create a new workbook and how to add elements to your Azure workbook. This video walks you through creating workbooks. > [!VIDEO https://www.microsoft.com/en-us/videoplayer/embed/RE4B4Ap] -## Create a new Azure Workbook +## Create a new workbook ++To create a new workbook: -To create a new Azure workbook: -1. From the Azure Workbooks page, select an empty template or select **New** in the top toolbar. +1. On the **Azure Workbooks** page, select an empty template or select **New**. 1. Combine any of these elements to add to your workbook:- - [Text](#adding-text) - - [Parameters](#adding-parameters) - - [Queries](#adding-queries) - - [Metric charts](#adding-metric-charts) - - [Links](#adding-links) - - [Groups](#adding-groups) + - [Text](#add-text) + - [Queries](#add-queries) + - [Parameters](#add-parameters) + - [Metric charts](#add-metric-charts) + - [Links](#add-links) + - [Groups](#add-groups) - Configuration options -## Adding text +## Add text ++You can include text blocks in your workbooks. For example, the text can be human analysis of the telemetry, information to help users interpret the data, and section headings. -Workbooks allow authors to include text blocks in their workbooks. The text can be human analysis of the telemetry, information to help users interpret the data, section headings, etc. + :::image type="content" source="media/workbooks-create-workbook/workbooks-text-example.png" alt-text="Screenshot that shows adding text to a workbook."::: - :::image type="content" source="media/workbooks-create-workbook/workbooks-text-example.png" alt-text="Screenshot of adding text to a workbook."::: +Text is added through a Markdown control that you use to add your content. You can use the full formatting capabilities of Markdown like different heading and font styles, hyperlinks, and tables. By using Markdown, you can create rich Word- or portal-like reports or analytic narratives. Text can contain parameter values in the Markdown text. Those parameter references are updated as the parameters change. -Text is added through a markdown control into which an author can add their content. An author can use the full formatting capabilities of markdown. These include different heading and font styles, hyperlinks, tables, etc. Markdown allows authors to create rich Word- or Portal-like reports or analytic narratives. Text can contain parameter values in the markdown text, and those parameter references will be updated as the parameters change. +Edit mode: + :::image type="content" source="media/workbooks-create-workbook/workbooks-text-control-edit-mode.png" alt-text="Screenshot that shows adding text to a workbook in edit mode."::: -**Edit mode**: - :::image type="content" source="media/workbooks-create-workbook/workbooks-text-control-edit-mode.png" alt-text="Screenshot showing adding text to a workbook in edit mode."::: +Preview mode: + :::image type="content" source="media/workbooks-create-workbook/workbooks-text-control-edit-mode-preview.png" alt-text="Screenshot that shows adding text to a workbook in preview mode."::: -**Preview mode**: - :::image type="content" source="media/workbooks-create-workbook/workbooks-text-control-edit-mode-preview.png" alt-text="Screenshot showing adding text to a workbook in preview mode."::: +### Add text to a workbook -### Add text to an Azure workbook +1. Make sure you're in edit mode by selecting **Edit**. +1. Add text by doing one of these steps: -1. Make sure you are in **Edit** mode by selecting the **Edit** in the toolbar. -1. Add text by doing either of these steps: - - Select **Add**, and **Add text** below an existing element, or at the bottom of the workbook. - - Select the ellipses (...) to the right of the **Edit** button next to one of the elements in the workbook, then select **Add** and then **Add text**. -1. Enter markdown text into the editor field. -1. Use the **Text Style** option to switch between plain markdown, and markdown wrapped with the Azure portal's standard info/warning/success/error styling. + * Select **Add** > **Add text** below an existing element or at the bottom of the workbook. + * Select the ellipsis (...) to the right of the **Edit** button next to one of the elements in the workbook. Then select **Add** > **Add text**. ++1. Enter Markdown text in the editor field. +1. Use the **Text Style** option to switch between plain Markdown and Markdown wrapped with the Azure portal's standard info, warning, success, and error styling. > [!TIP]- > Use this [markdown cheat sheet](https://github.com/adam-p/markdown-here/wiki/Markdown-Cheatsheet) to see the different formatting options. + > Use this [Markdown cheat sheet](https://github.com/adam-p/markdown-here/wiki/Markdown-Cheatsheet) to see the different formatting options. -1. Use the **Preview** tab to see how your content will look. The preview shows the content inside a scrollable area to limit its size, but when displayed at runtime, the markdown content will expand to fill whatever space it needs, without a scrollbar. +1. Use the **Preview** tab to see how your content will look. The preview shows the content inside a scrollable area to limit its size. At runtime, the Markdown content expands to fill whatever space it needs, without a scrollbar. 1. Select **Done Editing**. ### Text styles-These text styles are available: ++These text styles are available. | Style | Description | | | |-| plain| No formatting is applied | -|info| The portal's "info" style, with a `ℹ` or similar icon and blue background | -|error| The portal's "error" style, with a `❌` or similar icon and red background | -|success| The portal's "success" style, with a `✔` or similar icon and green background | -|upsell| The portal's "upsell" style, with a `🚀` or similar icon and purple background | -|warning| The portal's "warning" style, with a `⚠` or similar icon and blue background | -+|plain| No formatting is applied. | +|info| The portal's info style, with an `ℹ` or similar icon and blue background. | +|error| The portal's error style, with an `❌` or similar icon and red background. | +|success| The portal's success style, with a `✔` or similar icon and green background. | +|upsell| The portal's upsell style, with a `🚀` or similar icon and purple background. | +|warning| The portal's warning style, with a `⚠` or similar icon and blue background. | -You can also choose a text parameter as the source of the style. The parameter value must be one of the above text values. The absence of a value, or any unrecognized value will be treated as `plain` style. +You can also choose a text parameter as the source of the style. The parameter value must be one of the preceding text values. The absence of a value or any unrecognized value is treated as plain style. ### Text style examples -**Info style example**: - :::image type="content" source="media/workbooks-create-workbook/workbooks-text-control-edit-mode-preview.png" alt-text="Screenshot of adding text to a workbook in preview mode showing info style."::: +Info style example: + :::image type="content" source="media/workbooks-create-workbook/workbooks-text-control-edit-mode-preview.png" alt-text="Screenshot that shows adding text to a workbook in preview mode showing info style."::: -**Warning style example**: - :::image type="content" source="media/workbooks-create-workbook/workbooks-text-example-warning.png" alt-text="Screenshot of a text visualization in warning style."::: +Warning style example: + :::image type="content" source="media/workbooks-create-workbook/workbooks-text-example-warning.png" alt-text="Screenshot that shows a text visualization in warning style."::: -## Adding queries +## Add queries -Azure Workbooks allow you to query any of the supported workbook [data sources](workbooks-data-sources.md). +You can query any of the supported workbook [data sources](workbooks-data-sources.md). For example, you can query Azure Resource Health to help you view any service problems affecting your resources. You can also query Azure Monitor metrics, which is numeric data collected at regular intervals. Azure Monitor metrics provide information about an aspect of a system at a particular time. -### Add a query to an Azure Workbook +### Add a query to a workbook -1. Make sure you are in **Edit** mode by selecting the **Edit** in the toolbar. -1. Add a query by doing either of these steps: - - Select **Add**, and **Add query** below an existing element, or at the bottom of the workbook. - - Select the ellipses (...) to the right of the **Edit** button next to one of the elements in the workbook, then select **Add** and then **Add query**. +1. Make sure you're in edit mode by selecting **Edit**. +1. Add a query by doing one of these steps: + - Select **Add** > **Add query** below an existing element or at the bottom of the workbook. + - Select the ellipsis (...) to the right of the **Edit** button next to one of the elements in the workbook. Then select **Add** > **Add query**. 1. Select the [data source](workbooks-data-sources.md) for your query. The other fields are determined based on the data source you choose. 1. Select any other values that are required based on the data source you selected. 1. Select the [visualization](workbooks-visualizations.md) for your workbook.-1. In the query section, enter your query, or select from a list of sample queries by selecting **Samples**, and then edit the query to your liking. +1. In the query section, enter your query, or select from a list of sample queries by selecting **Samples**. Then edit the query to your liking. 1. Select **Run Query**.-1. When you're sure you have the query you want in your workbook, select **Done editing**. +1. When you're sure you have the query you want in your workbook, select **Done Editing**. +## Add parameters -### Best practices for using resource centric log queries +This section discusses how to add parameters. -This video shows you how to use resource level logs queries in Azure Workbooks. It also has tips and tricks on how to enable advanced scenarios and improve performance. +### Best practices for using resource-centric log queries ++This video shows you how to use resource-level logs queries in Azure Workbooks. It also has tips and tricks on how to enable advanced scenarios and improve performance. > [!VIDEO https://www.youtube.com/embed/8CvjM0VvOA80] -#### Using a dynamic resource type parameter -Dynamic resource type parameters use dynamic scopes for more efficient querying. The snippet below uses this heuristic: -1. _Individual resources_: if the count of selected resource is less than or equal to 5 -2. _Resource groups_: if the number of resources is over 5 but the number of resource groups the resources belong to is less than or equal to 3 -3. _Subscriptions_: otherwise +#### Use a dynamic resource type parameter ++Dynamic resource type parameters use dynamic scopes for more efficient querying. The following snippet uses this heuristic: ++1. **Individual resources**: If the count of selected resource is less than or equal to 5 +1. **Resource groups**: If the number of resources is over 5 but the number of resource groups the resources belong to is less than or equal to 3 +1. **Subscriptions**: Otherwise ``` Resources Dynamic resource type parameters use dynamic scopes for more efficient querying. x == 'microsoft.resources/subscriptions' and resourceGroups > 3 and resourceCount > 5, true, false) ```-#### Using a static resource scope for querying multiple resource types ++#### Use a static resource scope for querying multiple resource types ```json [ Dynamic resource type parameters use dynamic scopes for more efficient querying. { "value":"microsoft.compute/virtualmachinescaleset", "label":"Virtual machine scale set", "selected":true } ] ```-#### Using resource parameters grouped by resource type ++#### Use resource parameters grouped by resource type + ``` Resources | where type =~ 'microsoft.compute/virtualmachines' or type =~ 'microsoft.compute/virtualmachinescalesets' Resources group = iff(type =~ 'microsoft.compute/virtualmachines', 'Virtual machines', 'Virtual machine scale sets') ``` -## Adding parameters +## Add a parameter -You can collect input from consumers and reference it in other parts of the workbook using parameters. Often, you would use parameters to scope the result set or to set the right visual. Parameters help you build interactive reports and experiences. +You can control how your parameter controls are presented to consumers with workbooks. Examples include text box versus dropdown list, single- versus multi-select, or values from text, JSON, KQL, or Azure Resource Graph. -Workbooks allow you to control how your parameter controls are presented to consumers – text box vs. drop down, single- vs. multi-select, values from text, JSON, KQL, or Azure Resource Graph, etc. +### Add a parameter to a workbook -### Add a parameter to an Azure Workbook +1. Make sure you're in edit mode by selecting **Edit**. +1. Add a parameter by doing one of these steps: + - Select **Add** > **Add parameter** below an existing element or at the bottom of the workbook. + - Select the ellipsis (...) to the right of the **Edit** button next to one of the elements in the workbook. Then select **Add** > **Add parameter**. +1. In the new parameter pane that appears, enter values for these fields: -1. Make sure you are in **Edit** mode by selecting the **Edit** in the toolbar. -1. Add a parameter by doing either of these steps: - - Select **Add**, and **Add parameter** below an existing element, or at the bottom of the workbook. - - Select the ellipses (...) to the right of the **Edit** button next to one of the elements in the workbook, then select **Add** and then **Add parameter**. -1. In the new parameter pane that pops up enter values for these fields: + - **Parameter name**: Parameter names can't include spaces or special characters. + - **Display name**: Display names can include spaces, special characters, and emojis. + - **Parameter type**: + - **Required**: - - Parameter name: Parameter names can't include spaces or special characters - - Display name: Display names can include spaces, special characters, emoji, etc. - - Parameter type: - - Required: - -1. Select **Done editing**. +1. Select **Done Editing**. - :::image type="content" source="media/workbooks-parameters/workbooks-time-settings.png" alt-text="Screenshot showing the creation of a time range parameter."::: + :::image type="content" source="media/workbooks-parameters/workbooks-time-settings.png" alt-text="Screenshot that shows the creation of a time range parameter."::: -## Adding metric charts +## Add metric charts -Most Azure resources emit metric data about state and health such as CPU utilization, storage availability, count of database transactions, failing app requests, etc. Using workbooks, you can create visualizations of the metric data as time-series charts. +Most Azure resources emit metric data about state and health, such as CPU utilization, storage availability, count of database transactions, and failing app requests. You can create visualizations of this metric data as time-series charts in workbooks. -The example below shows the number of transactions in a storage account over the prior hour. This allows the storage owner to see the transaction trend and look for anomalies in behavior. +The following example shows the number of transactions in a storage account over the prior hour. This information allows you to see the transaction trend and look for anomalies in behavior. - :::image type="content" source="media/workbooks-create-workbook/workbooks-metric-chart-storage-area.png" alt-text="Screenshot showing a metric area chart for storage transactions in a workbook."::: + :::image type="content" source="media/workbooks-create-workbook/workbooks-metric-chart-storage-area.png" alt-text="Screenshot that shows a metric area chart for storage transactions in a workbook."::: -### Add a metric chart to an Azure Workbook +### Add a metric chart to a workbook -1. Make sure you are in **Edit** mode by selecting the **Edit** in the toolbar. -1. Add a metric chart by doing either of these steps: - - Select **Add**, and **Add metric** below an existing element, or at the bottom of the workbook. - - Select the ellipses (...) to the right of the **Edit** button next to one of the elements in the workbook, then select **Add** and then **Add metric**. +1. Make sure you're in edit mode by selecting **Edit**. +1. Add a metric chart by doing one of these steps: + - Select **Add** > **Add metric** below an existing element or at the bottom of the workbook. + - Select the ellipsis (...) to the right of the **Edit** button next to one of the elements in the workbook. Then select **Add** > **Add metric**. 1. Select a **resource type**, the resources to target, the metric namespace and name, and the aggregation to use.-1. Set other parameters if needed such time range, split-by, visualization, size and color palette. +1. Set parameters such as time range, split by, visualization, size, and color palette, if needed. 1. Select **Done Editing**. -This is a metric chart in edit mode: +Example of a metric chart in edit mode: ### Metric chart parameters -| Parameter | Explanation | Example | +| Parameter | Description | Examples | | - |:-|:-|-| Resource Type| The resource type to target | Storage or Virtual Machine. | -| Resources| A set of resources to get the metrics value from | MyStorage1 | -| Namespace | The namespace with the metric | Storage > Blob | -| Metric| The metric to visualize | Storage > Blob > Transactions | -| Aggregation | The aggregation function to apply to the metric | Sum, Count, Average, etc. | -| Time Range | The time window to view the metric in | Last hour, Last 24 hours, etc. | -| Visualization | The visualization to use | Area, Bar, Line, Scatter, Grid | -| Split By| Optionally split the metric on a dimension | Transactions by Geo type | -| Size | The vertical size of the control | Small, medium or large | -| Color palette | The color palette to use in the chart. Ignored if the `Split by` parameter is used | Blue, green, red, etc. | +| Resource type| The resource type to target. | Storage or Virtual Machine | +| Resources| A set of resources to get the metrics value from. | MyStorage1 | +| Namespace | The namespace with the metric. | Storage > Blob | +| Metric| The metric to visualize. | Storage > Blob > Transactions | +| Aggregation | The aggregation function to apply to the metric. | Sum, count, average | +| Time range | The time window to view the metric in. | Last hour, last 24 hours | +| Visualization | The visualization to use. | Area, bar, line, scatter, grid | +| Split by| Optionally split the metric on a dimension. | Transactions by geo type | +| Size | The vertical size of the control. | Small, medium, or large | +| Color palette | The color palette to use in the chart. It's ignored if the **Split by** parameter is used. | Blue, green, red | ### Metric chart examples -**Transactions split by API name as a line chart** +Examples of metric charts are shown. - :::image type="content" source="media/workbooks-create-workbook/workbooks-metric-chart-storage-split-line.png" alt-text="Screenshot showing a metric line chart for Storage transactions split by API name."::: +#### Transactions split by API name as a line chart + :::image type="content" source="media/workbooks-create-workbook/workbooks-metric-chart-storage-split-line.png" alt-text="Screenshot that shows a metric line chart for storage transactions split by API name."::: -**Transactions split by response type as a large bar chart** +#### Transactions split by response type as a large bar chart - :::image type="content" source="media/workbooks-create-workbook/workbooks-metric-chart-storage-bar-large.png" alt-text="Screenshot showing a large metric bar chart for Storage transactions split by response type."::: + :::image type="content" source="media/workbooks-create-workbook/workbooks-metric-chart-storage-bar-large.png" alt-text="Screenshot that shows a large metric bar chart for storage transactions split by response type."::: -**Average latency as a scatter chart** +#### Average latency as a scatter chart - :::image type="content" source="media/workbooks-create-workbook/workbooks-metric-chart-storage-scatter.png" alt-text="Screenshot showing a metric scatter chart for storage latency."::: + :::image type="content" source="media/workbooks-create-workbook/workbooks-metric-chart-storage-scatter.png" alt-text="Screenshot that shows a metric scatter chart for storage latency."::: -## Adding links +## Add links -You can use links to create links to other views, workbooks, other components inside a workbook, or to create tabbed views within a workbook. The links can be styled as hyperlinks, buttons, and tabs. +You can use links to create links to other views, workbooks, and other components inside a workbook, or to create tabbed views within a workbook. The links can be styled as hyperlinks, buttons, and tabs. - :::image type="content" source="media/workbooks-create-workbook/workbooks-empty-links.png" alt-text="Screenshot of adding a link to a workbook."::: ### Link styles-You can apply styles to the link element itself and to individual links. -**Link element styles** +You can apply styles to the link element itself and to individual links. +#### Link element styles |Style |Sample |Notes | ||||-|Bullet List | :::image type="content" source="media/workbooks-create-workbook/workbooks-link-style-bullet.png" alt-text="Screenshot of bullet style workbook link."::: | The default, links, appears as a bulleted list of links, one on each line. The **Text before link** and **Text after link** fields can be used to add more text before or after the link components. | -|List |:::image type="content" source="media/workbooks-create-workbook/workbooks-link-style-list.png" alt-text="Screenshot of list style workbook link."::: | Links appear as a list of links, with no bullets. | -|Paragraph | :::image type="content" source="media/workbooks-create-workbook/workbooks-link-style-paragraph.png" alt-text="Screenshot of paragraph style workbook link."::: |Links appear as a paragraph of links, wrapped like a paragraph of text. | -|Navigation | :::image type="content" source="media/workbooks-create-workbook/workbooks-link-style-navigation.png" alt-text="Screenshot of navigation style workbook link."::: | Links appear as links, with vertical dividers, or pipes (`|`) between each link. | -|Tabs | :::image type="content" source="media/workbooks-create-workbook/workbooks-link-style-tabs.png" alt-text="Screenshot of tabs style workbook link."::: |Links appear as tabs. Each link appears as a tab, no link styling options apply to individual links. See the [tabs](#using-tabs) section below for how to configure tabs. | -|Toolbar | :::image type="content" source="media/workbooks-create-workbook/workbooks-link-style-toolbar.png" alt-text="Screenshot of toolbar style workbook link."::: | Links appear an Azure portal styled toolbar, with icons and text. Each link appears as a toolbar button. See the [toolbar](#using-toolbars) section below for how to configure toolbars. | -+|Bullet List | :::image type="content" source="media/workbooks-create-workbook/workbooks-link-style-bullet.png" alt-text="Screenshot that shows a bullet-style workbook link."::: | The default, links, appears as a bulleted list of links, one on each line. The **Text before link** and **Text after link** fields can be used to add more text before or after the link components. | +|List |:::image type="content" source="media/workbooks-create-workbook/workbooks-link-style-list.png" alt-text="Screenshot that shows a list-style workbook link."::: | Links appear as a list of links, with no bullets. | +|Paragraph | :::image type="content" source="media/workbooks-create-workbook/workbooks-link-style-paragraph.png" alt-text="Screenshot that shows a paragraph-style workbook link."::: |Links appear as a paragraph of links, wrapped like a paragraph of text. | +|Navigation | :::image type="content" source="media/workbooks-create-workbook/workbooks-link-style-navigation.png" alt-text="Screenshot that shows a navigation-style workbook link."::: | Links appear as links with vertical dividers, or pipes, between each link. | +|Tabs | :::image type="content" source="media/workbooks-create-workbook/workbooks-link-style-tabs.png" alt-text="Screenshot that shows a tabs-style workbook link."::: |Links appear as tabs. Each link appears as a tab. No link styling options apply to individual links. To configure tabs, see the [Use tabs](#use-tabs) section. | +|Toolbar | :::image type="content" source="media/workbooks-create-workbook/workbooks-link-style-toolbar.png" alt-text="Screenshot that shows a toolbar-style workbook link."::: | Links appear as an Azure portal-styled toolbar, with icons and text. Each link appears as a toolbar button. To configure toolbars, see the [Use toolbars](#use-toolbars) section. | -**Link styles** +#### Link styles | Style | Description | |:- |:-|-| Link | By default links appear as a hyperlink. URL links can only be link style. | -| Button (Primary) | The link appears as a "primary" button in the portal, usually a blue color | -| Button (Secondary) | The links appear as a "secondary" button in the portal, usually a "transparent" color, a white button in light themes and a dark gray button in dark themes. | +| Link | By default, links appear as a hyperlink. URL links can only be link style. | +| Button (primary) | The link appears as a "primary" button in the portal, usually a blue color. | +| Button (secondary) | The links appear as a "secondary" button in the portal, usually a "transparent" color, a white button in light themes, and a dark gray button in dark themes. | -If required parameters are used in button text, tooltip text, or value fields, and the required parameter is unset when using buttons, the button is disabled. You can use this capability, for example, to disable buttons when no value is selected in another parameter or control. +If required parameters are used in button text, tooltip text, or value fields, and the required parameter is unset when you use buttons, the button is disabled. You can use this capability, for example, to disable buttons when no value is selected in another parameter or control. ### Link actions-Links can use all of the link actions available in [link actions](workbooks-link-actions.md), and have two more available actions: ++Links can use all the link actions available in [link actions](workbooks-link-actions.md), and they have two more available actions. | Action | Description | |:- |:-|-|Set a parameter value | A parameter can be set to a value when selecting a link, button, or tab. Tabs are often configured to set a parameter to a value, which hides and shows other parts of the workbook based on that value.| -|Scroll to a step| When selecting a link, the workbook will move focus and scroll to make another component visible. This action can be used to create a "table of contents", or a "go back to the top" style experience. | +|Set a parameter value | A parameter can be set to a value when you select a link, button, or tab. Tabs are often configured to set a parameter to a value, which hides and shows other parts of the workbook based on that value.| +|Scroll to a step| When you select a link, the workbook moves focus and scrolls to make another component visible. This action can be used to create a "table of contents" or a "go back to the top"-style experience. | -### Using tabs +### Use tabs -Most of the time, tab links are combined with the **Set a parameter value** action. Here's an example showing the links component configured to create 2 tabs, where selecting either tab will set a **selectedTab** parameter to a different value (the example shows a third tab being edited to show the parameter name and parameter value placeholders): +Most of the time, tab links are combined with the **Set a parameter value** action. This example shows the links step configured to create two tabs, where selecting either tab sets a **selectedTab** parameter to a different value. The example also shows a third tab being edited to show the parameter name and parameter value placeholders. - :::image type="content" source="media/workbooks-create-workbook/workbooks-creating-tabs.png" alt-text="Screenshot of creating tabs in workbooks."::: + :::image type="content" source="media/workbooks-create-workbook/workbooks-creating-tabs.png" alt-text="Screenshot that shows creating tabs in workbooks."::: +You can then add other components in the workbook that are conditionally visible if the **selectedTab** parameter value is **1** by using the advanced settings. -You can then add other components in the workbook that are conditionally visible if the **selectedTab** parameter value is "1" by using the advanced settings: + :::image type="content" source="media/workbooks-create-workbook/workbooks-selected-tab.png" alt-text="Screenshot that shows conditionally visible tab in workbooks."::: - :::image type="content" source="media/workbooks-create-workbook/workbooks-selected-tab.png" alt-text="Screenshot of conditionally visible tab in workbooks."::: +The first tab is selected by default, initially setting **selectedTab** to **1** and making that component visible. Selecting the second tab changes the value of the parameter to **2**, and different content is displayed. -The first tab is selected by default, initially setting **selectedTab** to 1, and making that component visible. Selecting the second tab will change the value of the parameter to "2", and different content will be displayed: + :::image type="content" source="media/workbooks-create-workbook/workbooks-selected-tab2.png" alt-text="Screenshot that shows workbooks with content displayed when the selected tab is 2."::: - :::image type="content" source="media/workbooks-create-workbook/workbooks-selected-tab2.png" alt-text="Screenshot of workbooks with content displayed when selected tab is 2."::: --A sample workbook with the above tabs is available in [sample Azure Workbooks with links](workbooks-sample-links.md#sample-workbook-with-links). +A sample workbook with the preceding tabs is available in [sample Azure workbooks with links](workbooks-sample-links.md#sample-workbook-with-links). ### Tabs limitations - URL links aren't supported in tabs. A URL link in a tab appears as a disabled tab. - No component styling is supported in tabs. components are displayed as tabs, and only the tab name (link text) field is displayed. Fields that aren't used in tab style are hidden while in edit mode. - The first tab is selected by default, invoking whatever action that tab has specified. If the first tab's action opens another view, as soon as the tabs are created, a view appears.+ - You can use tabs to open other views, but use this functionality sparingly. Most users won't expect to navigate by selecting a tab. If other tabs set a parameter to a specific value, a tab that opens a view wouldn't change that value, so the rest of the workbook content will continue to show the view/data for the previous tab. -### Using toolbars +### Use toolbars -Use the Toolbar style to have your links appear styled as a toolbar. In toolbar style, the author must fill in fields for: +Use the toolbar style to have your links appear styled as a toolbar. In toolbar style, you must fill in fields for: + - **Button text**: The text to display on the toolbar. Parameters can be used in this field. + - **Icons**: The icons to display on the toolbar. + - **Tooltip text**: Text to be displayed on the toolbar button's tooltip text. Parameters can be used in this field. :::image type="content" source="media/workbooks-create-workbook/workbooks-links-create-toolbar.png" alt-text="Screenshot of creating links styled as a toolbar in workbooks."::: -If any required parameters are used in button text, tooltip text, or value fields, and the required parameter is unset, the toolbar button will be disabled. For example, this can be used to disable toolbar buttons when no value is selected in another parameter/control. +If any required parameters are used in button text, tooltip text, or value fields, and the required parameter is unset, the toolbar button will be disabled. For example, this functionality can be used to disable toolbar buttons when no value is selected in another parameter/control. -A sample workbook with toolbars, globals parameters, and ARM Actions is available in [sample Azure Workbooks with links](workbooks-sample-links.md#sample-workbook-with-toolbar-links). +A sample workbook with toolbars, global parameters, and Azure Resource Manager actions is available in [sample workbooks with links](workbooks-sample-links.md#sample-workbook-with-toolbar-links). -## Adding groups +## Add groups -A group component in a workbook allows you to logically group a set of components in a workbook. +You can logically group a set of components by using a group component in a workbook. Groups in workbooks are useful for several things: - **Layout**: When you want components to be organized vertically, you can create a group of components that will all stack up and set the styling of the group to be a percentage width instead of setting percentage width on all the individual components.- - **Visibility**: When you want several components to hide or show together, you can set the visibility of the entire group of components, instead of setting visibility settings on each individual component. This can be useful in templates that use tabs, as you can use a group as the content of the tab, and the entire group can be hidden/shown based on a parameter set by the selected tab. - - **Performance**: When you have a large template with many sections or tabs, you can convert each section into its own sub-template, and use groups to load all the sub-templates within the top-level template. The content of the sub-templates won't load or run until a user makes those groups visible. Learn more about [how to split a large template into many templates](#splitting-a-large-template-into-many-templates). + - **Visibility**: When you want several components to hide or show together, you can set the visibility of the entire group of components, instead of setting visibility settings on each individual component. This functionality can be useful in templates that use tabs. You can use a group as the content of the tab, and the entire group can be hidden or shown based on a parameter set by the selected tab. + - **Performance**: When you have a large template with many sections or tabs, you can convert each section into its own subtemplate. You can use groups to load all the subtemplates within the top-level template. The content of the subtemplates won't load or run until a user makes those groups visible. Learn more about [how to split a large template into many templates](#split-a-large-template-into-many-templates). ### Add a group to your workbook -1. Make sure you are in **Edit** mode by selecting the **Edit** in the toolbar. -1. Add a group by doing either of these steps: - - Select **Add**, and **Add group** below an existing element, or at the bottom of the workbook. - - Select the ellipses (...) to the right of the **Edit** button next to one of the elements in the workbook, then select **Add** and then **Add group**. +1. Make sure you're in edit mode by selecting **Edit**. +1. Add a group by doing one of these steps: + - Select **Add** > **Add group** below an existing element or at the bottom of the workbook. + - Select the ellipsis (...) to the right of the **Edit** button next to one of the elements in the workbook. Then select **Add** > **Add group**. ++ :::image type="content" source="media/workbooks-create-workbook/workbooks-add-group.png" alt-text="Screenshot that shows adding a group to a workbook. "::: - :::image type="content" source="media/workbooks-create-workbook/workbooks-add-group.png" alt-text="Screenshot showing selecting adding a group to a workbook. "::: 1. Select components for your group.-1. Select **Done editing.** +1. Select **Done Editing.** - This is a group in read mode with two components inside: a text component and a query component. + This group is in read mode with two components inside: a text component and a query component. - :::image type="content" source="media/workbooks-create-workbook/workbooks-groups-view.png" alt-text="Screenshot showing a group in read mode in a workbook."::: + :::image type="content" source="media/workbooks-create-workbook/workbooks-groups-view.png" alt-text="Screenshot that shows a group in read mode in a workbook."::: - In edit mode, you can see those two components are actually inside a group component. In the screenshot below, the group is in edit mode. The group contains two components inside the dashed area. Each component can be in edit or read mode, independent of each other. For example, the text step is in edit mode while the query step is in read mode. + In edit mode, you can see those two components are actually inside a group component. In the following screenshot, the group is in edit mode. The group contains two components inside the dashed area. Each component can be in edit or read mode, independent of each other. For example, the text step is in edit mode while the query step is in read mode. :::image type="content" source="media/workbooks-create-workbook/workbooks-groups-edit.png" alt-text="Screenshot of a group in edit mode in a workbook."::: ### Scoping a group -A group is treated as a new scope in the workbook. Any parameters created in the group are only visible inside the group. This is also true for merge - you can only see data inside their group or at the parent level. +A group is treated as a new scope in the workbook. Any parameters created in the group are only visible inside the group. This is also true for merge. You can only see data inside the group or at the parent level. ### Group types You can specify which type of group to add to your workbook. There are two types of groups: + - **Editable**: The group in the workbook allows you to add, remove, or edit the contents of the components in the group. This group is most commonly used for layout and visibility purposes. + - **From a template**: The group in the workbook loads from the contents of another workbook by its ID. The content of that workbook is loaded and merged into the workbook at runtime. In edit mode, you can't modify any of the contents of the group. They'll just load again from the template the next time the component loads. When you load a group from a template, use the full Azure Resource ID of an existing workbook. ### Load types You can specify how and when the contents of a group are loaded. #### Lazy loading -Lazy loading is the default. In lazy loading, the group is only loaded when the component is visible. This allows a group to be used by tab components. If the tab is never selected, the group never becomes visible and therefore the content isn't loaded. +Lazy loading is the default. In lazy loading, the group is only loaded when the component is visible. This functionality allows a group to be used by tab components. If the tab is never selected, the group never becomes visible, so the content isn't loaded. For groups created from a template, the content of the template isn't retrieved and the components in the group aren't created until the group becomes visible. Users see progress spinners for the whole group while the content is retrieved. #### Explicit loading -In this mode, a button is displayed where the group would be, and no content is retrieved or created until the user explicitly clicks the button to load the content. This is useful in scenarios where the content might be expensive to compute or rarely used. The author can specify the text to appear on the button. --This screenshot shows explicit load settings with a configured "Load more" button. +In this mode, a button is displayed where the group would be. No content is retrieved or created until the user explicitly selects the button to load the content. This functionality is useful in scenarios where the content might be expensive to compute or rarely used. You can specify the text to appear on the button. - :::image type="content" source="media/workbooks-create-workbook/workbooks-groups-explicitly-loaded.png" alt-text="Screenshot of explicit load settings for a group in workbooks."::: +This screenshot shows explicit load settings with a configured **Load More** button: -This is the group before being loaded in the workbook: + :::image type="content" source="media/workbooks-create-workbook/workbooks-groups-explicitly-loaded.png" alt-text="Screenshot that shows explicit load settings for a group in the workbook."::: - :::image type="content" source="media/workbooks-create-workbook/workbooks-groups-explicitly-loaded-before.png" alt-text="Screenshot showing an explicit group before being loaded in the workbook."::: +This screenshot shows the group before being loaded in the workbook: + :::image type="content" source="media/workbooks-create-workbook/workbooks-groups-explicitly-loaded-before.png" alt-text="Screenshot that shows an explicit group before being loaded in the workbook."::: -The group after being loaded in the workbook: +This screenshot shows the group after being loaded in the workbook: - :::image type="content" source="media/workbooks-create-workbook/workbooks-groups-explicitly-loaded-after.png" alt-text="Screenshot showing an explicit group after being loaded in the workbook."::: + :::image type="content" source="media/workbooks-create-workbook/workbooks-groups-explicitly-loaded-after.png" alt-text="Screenshot that shows an explicit group after being loaded in the workbook."::: #### Always mode -In **Always** mode, the content of the group is always loaded and created as soon as the workbook loads. This is most frequently used when you're using a group only for layout purposes, where the content will always be visible. +In **Always** mode, the content of the group is always loaded and created as soon as the workbook loads. This functionality is most frequently used when you're using a group only for layout purposes, where the content is always visible. -### Using templates inside a group +### Use templates inside a group -When a group is configured to load from a template, by default, that content will be loaded in lazy mode, and it will only load when the group is visible. +When a group is configured to load from a template, by default, that content is loaded in lazy mode. It only loads when the group is visible. -When a template is loaded into a group, the workbook attempts to merge any parameters declared in the template with parameters that already exist in the group. Any parameters that already exist in the workbook with identical names will be merged out of the template being loaded. If all parameters in a parameter component are merged out, the entire parameters component will disappear. +When a template is loaded into a group, the workbook attempts to merge any parameters declared in the template with parameters that already exist in the group. Any parameters that already exist in the workbook with identical names are merged out of the template being loaded. If all parameters in a parameter component are merged out, the entire parameters component disappears. #### Example 1: All parameters have identical names -Suppose you have a template that has two parameters at the top, a time range parameter and a text parameter named "**Filter**": +Suppose you have a template that has two parameters at the top, a time range parameter and a text parameter named **Filter**: - :::image type="content" source="media/workbooks-create-workbook/workbooks-groups-top-level-params.png" alt-text="Screenshot showing top level parameters in a workbook."::: + :::image type="content" source="media/workbooks-create-workbook/workbooks-groups-top-level-params.png" alt-text="Screenshot that shows top-level parameters in a workbook."::: Then a group component loads a second template that has its own two parameters and a text component, where the parameters are named the same: - :::image type="content" source="media/workbooks-create-workbook/workbooks-groups-merged-away.png" alt-text="Screenshot of a workbook template with top level parameters."::: + :::image type="content" source="media/workbooks-create-workbook/workbooks-groups-merged-away.png" alt-text="Screenshot that shows a workbook template with top-level parameters."::: -When the second template is loaded into the group, the duplicate parameters are merged out. Since all of the parameters are merged away, the inner parameters component is also merged out, resulting in the group containing only the text component. +When the second template is loaded into the group, the duplicate parameters are merged out. Because all the parameters are merged away, the inner parameters component is also merged out. The result is that the group contains only the text component. ### Example 2: One parameter has an identical name -Suppose you have a template that has two parameters at the top, a **time range** parameter and a text parameter named "**FilterB**" (): +Suppose you have a template that has two parameters at the top, a time range parameter and a text parameter named **FilterB** (): - :::image type="content" source="media/workbooks-create-workbook/workbooks-groups-wont-merge-away.png" alt-text="Screenshot of a group component with the result of parameters merged away."::: + :::image type="content" source="media/workbooks-create-workbook/workbooks-groups-wont-merge-away.png" alt-text="Screenshot that shows a group component with the result of parameters merged away."::: When the group's component's template is loaded, the **TimeRange** parameter is merged out of the group. The workbook contains the initial parameters component with **TimeRange** and **Filter**, and the group's parameter only includes **FilterB**. - :::image type="content" source="media/workbooks-create-workbook/workbooks-groups-wont-merge-away-result.png" alt-text="Screenshot of workbook group where parameters won't merge away."::: + :::image type="content" source="media/workbooks-create-workbook/workbooks-groups-wont-merge-away-result.png" alt-text="Screenshot that shows a workbook group where parameters won't merge away."::: -If the loaded template had contained **TimeRange** and **Filter** (instead of **FilterB**), then the resulting workbook would have a parameters component and a group with only the text component remaining. +If the loaded template had contained **TimeRange** and **Filter** (instead of **FilterB**), the resulting workbook would have a parameters component and a group with only the text component remaining. -### Splitting a large template into many templates +### Split a large template into many templates -To improve performance, it's helpful to break up a large template into multiple smaller templates that loads some content in lazy mode or on demand by the user. This makes the initial load faster since the top-level template can be much smaller. +To improve performance, it's helpful to break up a large template into multiple smaller templates that load some content in lazy mode or on demand by the user. This arrangement makes the initial load faster because the top-level template can be much smaller. -When splitting a template into parts, you'll basically need to split the template into many templates (sub-templates) that all work individually. If the top-level template has a **TimeRange** parameter that other components use, the sub-template will need to also have a parameters component that defines a parameter with same exact name. The sub-templates will work independently and can load inside larger templates in groups. +When you split a template into parts, you need to split the template into many templates (subtemplates) that all work individually. If the top-level template has a **TimeRange** parameter that other components use, the subtemplate also needs to have a parameters component that defines a parameter with the same exact name. The subtemplates work independently and can load inside larger templates in groups. -To turn a larger template into multiple sub-templates: +To turn a larger template into multiple subtemplates: -1. Create a new empty group near the top of the workbook, after the shared parameters. This new group will eventually become a sub-template. -1. Create a copy of the shared parameters component, and then use **move into group** to move the copy into the group created in step 1. This parameter allows the sub-template to work independently of the outer template, and will get merged out when loaded inside the outer template. +1. Create a new empty group near the top of the workbook, after the shared parameters. This new group eventually becomes a subtemplate. +1. Create a copy of the shared parameters component. Then use **move into group** to move the copy into the group created in step 1. This parameter allows the subtemplate to work independently of the outer template and is merged out when it's loaded inside the outer template. > [!NOTE]- > sub-templates don't technically need to have the parameters that get merged out if you never plan on the sub-templates being visible by themselves. However, if the sub-templates do not have the parameters, it will make them very hard to edit or debug if you need to do so later. --1. Move each component in the workbook you want to be in the sub-template into the group created in step 1. -1. If the individual components moved in step 3 had conditional visibilities, that will become the visibility of the outer group (like used in tabs). Remove them from the components inside the group and add that visibility setting to the group itself. Save here to avoid losing changes and/or export and save a copy of the json content. -1. If you want that group to be loaded from a template, you can use the **Edit** toolbar button in the group. This will open just the content of that group as a workbook in a new window. You can then save it as appropriate and close this workbook view (don't close the browser, just that view to go back to the previous workbook you were editing). -1. You can then change the group component to load from template and set the template ID field to the workbook/template you created in step 5. To work with workbooks IDs, the source needs to be the full Azure Resource ID of a shared workbook. Press *Load* and the content of that group will now be loaded from that sub-template instead of saved inside this outer workbook. + > Subtemplates don't technically need to have the parameters that get merged out if you never plan on the subtemplates being visible by themselves. If the subtemplates don't have the parameters, they'll be hard to edit or debug if you need to do so later. +1. Move each component in the workbook you want to be in the subtemplate into the group created in step 1. +1. If the individual components moved in step 3 had conditional visibilities, that will become the visibility of the outer group (like used in tabs). Remove them from the components inside the group and add that visibility setting to the group itself. Save here to avoid losing changes. You can also export and save a copy of the JSON content. +1. If you want that group to be loaded from a template, you can use **Edit** in the group. This action opens only the content of that group as a workbook in a new window. You can then save it as appropriate and close this workbook view. Don't close the browser. Only close that view to go back to the previous workbook where you were editing. +1. You can then change the group component to load from a template and set the template ID field to the workbook/template you created in step 5. To work with workbook IDs, the source needs to be the full Azure Resource ID of a shared workbook. Select **Load** and the content of that group is now loaded from that subtemplate instead of being saved inside this outer workbook. ## Next steps-- [Common Workbook use cases](workbooks-commonly-used-components.md)++[Common Azure Workbooks use cases](workbooks-commonly-used-components.md) |
| azure-monitor | Workbooks Criteria | https://github.com/MicrosoftDocs/azure-docs/commits/main/articles/azure-monitor/visualize/workbooks-criteria.md | Title: Azure Workbooks criteria parameters. -description: Learn about adding criteria parameters to your Azure workbook. + Title: Azure Workbooks criteria parameters +description: Learn about adding criteria parameters to your workbook. -When a query depends on many parameters, then the query will be stalled until each of its parameters have been resolved. Sometimes a parameter could have a simple query that concatenates a string or performs a conditional evaluation. However these queries still make network calls to services that perform these basic operations and that increases the time it takes for a parameter to resolve a value. This results in long load times for complex workbooks. +When a query depends on many parameters, the query will be stalled until each of its parameters has been resolved. Sometimes a parameter could have a simple query that concatenates a string or performs a conditional evaluation. These queries still make network calls to services that perform these basic operations, and that process increases the time it takes for a parameter to resolve a value. The result is long load times for complex workbooks. -Using criteria parameters, you can define a set of criteria based on previously specified parameters which will be evaluated to provide a dynamic value. The main benefit of using criteria parameters is that criteria parameters can resolve values of previously specified parameters and perform simple conditional operations without making any network calls. Below is an example of such a use case. +When you use criteria parameters, you can define a set of criteria based on previously specified parameters that will be evaluated to provide a dynamic value. The main benefit of using criteria parameters is that criteria parameters can resolve values of previously specified parameters and perform simple conditional operations without making any network calls. The following example is a criteria-parameters use case. ## Example-Consider the conditional query below: +Consider the following conditional query: + ``` let metric = dynamic({Counter}); print tostring((metric.object == 'Network Adapter' and (metric.counter == 'Bytes Received/sec' or metric.counter == 'Bytes Sent/sec')) or (metric.object == 'Network' and (metric.counter == 'Total Bytes Received' or metric.counter == 'Total Bytes Transmitted'))) ``` -If the user is focused on the `metric.counter` object, essentially the value of the parameter `isNetworkCounter` should be true, if the parameter `Counter` has `Bytes Received/sec`, `Bytes Sent/sec`, `Total Bytes Received`, or `Total Bytes Transmitted`. +If you're focused on the `metric.counter` object, the value of the parameter `isNetworkCounter` should be true if the parameter `Counter` has `Bytes Received/sec`, `Bytes Sent/sec`, `Total Bytes Received`, or `Total Bytes Transmitted`. -This can be translated to a criteria text parameter like so: +This can be translated to a criteria text parameter: -In the image above, the conditions will be evaluated from top to bottom and the value of the parameter `isNetworkCounter` will take the value of which ever condition evaluates to true first. All conditions except for the default condition (the 'else' condition) can be reordered to get the desired outcome. +In the preceding screenshot, the conditions will be evaluated from top to bottom and the value of the parameter `isNetworkCounter` will take the value of whichever condition evaluates to true first. All conditions except for the default condition (the "else" condition) can be reordered to get the desired outcome. ## Set up criteria+ 1. Start with a workbook with at least one existing parameter in edit mode.- 1. Choose Add parameters from the links within the workbook. - 1. Select on the blue Add Parameter button. - 1. In the new parameter pane that pops up enter: - - Parameter name: rand - - Parameter type: Text - - Required: checked - - Get data from: Query - - Enter `print rand(0-1)` into the query editor. This parameter will output a value between 0-1. - 1. Choose 'Save' from the toolbar to create the parameter. + 1. Select **Add parameters** > **Add Parameter**. + 1. In the new parameter pane that opens, enter: + - **Parameter name**: `rand` + - **Parameter type**: `Text` + - **Required**: `checked` + - **Get data from**: `Query` + - Enter `print rand(0-1)` in the query editor. This parameter will output a value between 0-1. + 1. Select **Save** to create the parameter. > [!NOTE]- > The first parameter in the workbook will not show the `Criteria` tab. + > The first parameter in the workbook won't show the **Criteria** tab. - :::image type="content" source="media/workbooks-criteria/workbooks-criteria-first-param.png" alt-text="Screenshot showing the first parameter."::: + :::image type="content" source="media/workbooks-criteria/workbooks-criteria-first-param.png" alt-text="Screenshot that shows the first parameter."::: -1. In the table with the 'rand' parameter, select on the blue Add Parameter button. -1. In the new parameter pane that pops up enter: - - Parameter name: randCriteria - - Parameter type: Text - - Required: checked - - Get data from: Criteria -1. A grid appears. Select **Edit** next to the blank text box to open the 'Criteria Settings' form. Refer to [Criteria Settings form](#criteria-settings-form) for the description of each field. +1. In the table with the `rand` parameter, select **Add Parameter**. +1. In the new parameter pane that opens, enter: + - **Parameter name**: `randCriteria` + - **Parameter type**: `Text` + - **Required**: `checked` + - **Get data from**: `Criteria` +1. A grid appears. Select **Edit** next to the blank text box to open the **Criteria Settings** form. For a description of each field, see [Criteria Settings form](#criteria-settings-form). - :::image type="content" source="media/workbooks-criteria/workbooks-criteria-setting.png" alt-text="Screenshot showing the criteria settings form."::: + :::image type="content" source="media/workbooks-criteria/workbooks-criteria-setting.png" alt-text="Screenshot that shows the Criteria Settings form."::: -1. Enter the data below to populate the first Criteria, then select 'OK'. - - First operand: rand - - Operator: > - - Value from: Static Value - - Second Operand: 0.25 - - Value from: Static Value - - Result is: is over 0.25 +1. Enter the following data to populate the first criteria, and then select **OK**: + - **First operand**: `rand` + - **Operator**: `>` + - **Value from**: `Static Value` + - **Second operand**: `0.25` + - **Value from**: `Static Value` + - **Result is**: `is over 0.25` - :::image type="content" source="media/workbooks-criteria/workbooks-criteria-setting-filled.png" alt-text="Screenshot showing the criteria settings form filled."::: + :::image type="content" source="media/workbooks-criteria/workbooks-criteria-setting-filled.png" alt-text="Screenshot that shows the Criteria Settings form filled in."::: -1. Select on edit, next to the condition `Click edit to specify a result for the default condition.`, this will edit the default condition. +1. Select **Edit** next to the condition `Click edit to specify a result for the default condition` to edit the default condition. > [!NOTE]- > For the default condition, everthing should be disabled except for the last `Value from` and `Result is` fields. + > For the default condition, everything should be disabled except for the last `Value from` and `Result is` fields. ++1. Enter the following data to populate the default condition, and then select **OK**: + - **Value from**: Static Value + - **Result is**: is 0.25 or under -1. Enter the data below to populate the default condition, then select 'OK'. - - Value from: Static Value - - Result is: is 0.25 or under + :::image type="content" source="media/workbooks-criteria/workbooks-criteria-default.png" alt-text="Screenshot that shows the Criteria Settings default form filled."::: - :::image type="content" source="media/workbooks-criteria/workbooks-criteria-default.png" alt-text="Screenshot showing the criteria settings default form filled."::: +1. Save the parameter. +1. Refresh the workbook to see the `randCriteria` parameter in action. Its value will be based on the value of `rand`. -1. Save the Parameter -1. Select on the refresh button on the workbook, to see the `randCriteria` parameter in action. Its value will be based on the value of `rand`! +## Criteria Settings form -## Criteria settings form |Form fields|Description| |--|-|-|First operand| This is a dropdown consisting of parameter names that have already been created. The value of the parameter will be used on the left hand side of the comparison | -|Operator|The operator used to compare the first and the second operands. Can be a numerical or string evaluation. The operator `is empty` will disable the `Second operand` as only the `First operand` is required.| -|Value from|If set to `Parameter`, a dropdown consisting of parameters that have already been created will be shown. The value of that parameter will be used on the right hand side of the comparison.<br/> If set to `Static Value`, a text box will be shown where an author can enter a value for the right hand side of the comparison.| -|Second Operand| Will be either a dropdown menu consisting of created parameters, or a textbox depending on the above `Value from` selection.| -|Value from|If set to `Parameter`, a dropdown consisting of parameters that have already been created will be shown. The value of that parameter will be used for the return value of the current parameter.<br/> If set to `Static Value`:<br>a text box will be shown where an author can enter a value for the result.<br>>An author can also dereference other parameters by using curly braces around the parameter name.<br>>It is possible concatenate multiple parameters and create a custom string, for example: "`{paramA}`, `{paramB}`, and some string" <br><br>If set to `Expression`:<br> a text box will be shown where an author can enter a mathematical expression that will be evaluated as the result<br>Like the `Static Value` case, multiple parameters may be dereferenced in this text box.<br>If the parameter value referenced in the text box is not a number, it will be treated as the value `0`| -|Result is| Will be either a dropdown menu consisting of created parameters, or a textbox depending on the above Value from selection. The textbox will be evaluated as the final result of this Criteria Settings form. +|First operand| This dropdown list consists of parameter names that have already been created. The value of the parameter will be used on the left side of the comparison. | +|Operator|The operator used to compare the first and second operands. Can be a numerical or string evaluation. The operator `is empty` will disable the `Second operand` because only the `First operand` is required.| +|Value from|If set to `Parameter`, a dropdown list consisting of parameters that have already been created appears. The value of that parameter will be used on the right side of the comparison.<br/> If set to `Static Value`, a text box appears where you can enter a value for the right side of the comparison.| +|Second operand| Will be either a dropdown menu consisting of created parameters or a text box depending on the preceding `Value from` selection.| +|Value from|If set to `Parameter`, a dropdown list consisting of parameters that have already been created appears. The value of that parameter will be used for the return value of the current parameter.<br/> If set to `Static Value`:<br>- A text box appears where you can enter a value for the result.<br>- You can also dereference other parameters by using curly braces around the parameter name.<br>- It's possible to concatenate multiple parameters and create a custom string, for example, "`{paramA}`, `{paramB}`, and some string." <br><br>If set to `Expression`:<br> - A text box appears where you can enter a mathematical expression that will be evaluated as the result.<br>- Like the `Static Value` case, multiple parameters might be dereferenced in this text box.<br>- If the parameter value referenced in the text box isn't a number, it will be treated as the value `0`.| +|Result is| Will be either a dropdown menu consisting of created parameters or a textbox depending on the preceding `Value from` selection. The text box will be evaluated as the final result of this **Criteria Settings** form. |
| azure-monitor | Workbooks Dropdowns | https://github.com/MicrosoftDocs/azure-docs/commits/main/articles/azure-monitor/visualize/workbooks-dropdowns.md | Title: Azure Monitor Workbook drop down parameters -description: Simplify complex reporting with prebuilt and custom parameterized workbooks containing dropdown parameters + Title: Azure Monitor workbook dropdown parameters +description: Simplify complex reporting with prebuilt and custom parameterized workbooks containing dropdown parameters. -# Workbook drop down parameters +# Workbook dropdown parameters -Drop downs allow user to collect one or more input values from a known set (for example, select one of your app’s requests). Drop downs provide a user-friendly way to collect arbitrary inputs from users. Drop downs are especially useful in enabling filtering in your interactive reports. +By using dropdown parameters, you can collect one or more input values from a known set. For example, you can use a dropdown parameter to select one of your app's requests. Dropdown parameters also provide a user-friendly way to collect arbitrary inputs from users. Dropdown parameters are especially useful in enabling filtering in your interactive reports. -The easiest way to specify a drop-down is by providing a static list in the parameter setting. A more interesting way is to get the list dynamically via a KQL query. Parameter settings also allow you to specify whether it is single or multi-select, and if it is multi-select, how the result set should be formatted (delimiter, quotation, etc.). +The easiest way to specify a dropdown parameter is by providing a static list in the parameter setting. A more interesting way is to get the list dynamically via a KQL query. You can also specify whether it's single or multi-select by using parameter settings. If it's multi-select, you can specify how the result set should be formatted, for example, as delimiter or quotation. -## Creating a static drop-down parameter +## Create a static dropdown parameter 1. Start with an empty workbook in edit mode.-2. Choose _Add parameters_ from the links within the workbook. -3. Click on the blue _Add Parameter_ button. -4. In the new parameter pane that pops up enter: - 1. Parameter name: `Environment` - 2. Parameter type: `Drop down` - 3. Required: `checked` - 4. Allow `multiple selection`: `unchecked` - 5. Get data from: `JSON` -5. In the JSON Input text block, insert this json snippet: +1. Select **Add parameters** > **Add Parameter**. +1. In the new parameter pane that opens, enter: + 1. **Parameter name**: `Environment` + 1. **Parameter type**: `Drop down` + 1. **Required**: `checked` + 1. **Allow multiple selections**: `unchecked` + 1. **Get data from**: `JSON` +1. In the **JSON Input** text block, insert this JSON snippet: + ```json [ { "value":"dev", "label":"Development" }, The easiest way to specify a drop-down is by providing a static list in the para { "value":"prod", "label":"Production", "selected":true } ] ```-6. Hit the blue `Update` button. -7. Choose 'Save' from the toolbar to create the parameter. -8. The Environment parameter will be a drop-down with the three values. -  +1. Select **Update**. +1. Select **Save** to create the parameter. +1. The **Environment** parameter will be a dropdown list with the three values. ++  -## Creating a static dropdown with groups of items +## Create a static dropdown list with groups of items -If your query result/json contains a "group" field, the dropdown will display groups of values. Follow the above sample, but use the following json instead: +If your query result/JSON contains a `group` field, the dropdown list will display groups of values. Follow the preceding sample, but use the following JSON instead: ```json [ If your query result/json contains a "group" field, the dropdown will display gr ] ``` - + +## Create a dynamic dropdown parameter -## Creating a dynamic drop-down parameter 1. Start with an empty workbook in edit mode.-2. Choose _Add parameters_ from the links within the workbook. -3. Click on the blue _Add Parameter_ button. -4. In the new parameter pane that pops up enter: - 1. Parameter name: `RequestName` - 2. Parameter type: `Drop down` - 3. Required: `checked` - 4. Allow `multiple selection`: `unchecked` - 5. Get data from: `Query` -5. In the JSON Input text block, insert this json snippet: +1. Select **Add parameters** > **Add Parameter**. +1. In the new parameter pane that opens, enter: + 1. **Parameter name**: `RequestName` + 1. **Parameter type**: `Drop down` + 1. **Required**: `checked` + 1. **Allow multiple selections**: `unchecked` + 1. **Get data from**: `Query` +1. In the **JSON Input** text block, insert this JSON snippet: ```kusto requests | summarize by name | order by name asc ```-1. Hit the blue `Run Query` button. -2. Choose 'Save' from the toolbar to create the parameter. -3. The RequestName parameter will be a drop-down the names of all requests in the app. -  +1. Select **Run Query**. +1. Select **Save** to create the parameter. +1. The **RequestName** parameter will be a dropdown list with the names of all requests in the app. ++  ++## Reference a dropdown parameter -## Referencing drop down parameter +You can reference dropdown parameters. ### In KQL-1. Add a query control to the workbook and select an Application Insights resource. -2. In the KQL editor, enter this snippet ++1. Select **Add query** to add a query control, and then select an Application Insights resource. +1. In the KQL editor, enter this snippet: ```kusto requests If your query result/json contains a "group" field, the dropdown will display gr | summarize Requests = count() by bin(timestamp, 1h) ```-3. This expands on query evaluation time to: ++1. The snippet expands on query evaluation time to: ```kusto requests If your query result/json contains a "group" field, the dropdown will display gr | summarize Requests = count() by bin(timestamp, 1h) ``` -4. Run query to see the results. Optionally, render it as a chart. +1. Run the query to see the results. Optionally, render it as a chart. -  +  +## Parameter value, label, selection, and group -## Parameter value, label, selection and group -The query used in the dynamic drop-down parameter above just returns a list of values that are rendered faithfully in the drop-down. But what if you wanted a different display name, or one of these to be selected? Drop down parameters allow this via the value, label, selection and group columns. +The query used in the preceding dynamic dropdown parameter returns a list of values that are rendered faithfully in the dropdown list. But what if you wanted a different display name or one of the names to be selected? Dropdown parameters use value, label, selection, and group columns for this functionality. -The sample below shows how to get a list of Application Insights dependencies whose display names are styled with an emoji, has the first one selected, and is grouped by operation names. +The following sample shows how to get a list of Application Insights dependencies whose display names are styled with an emoji, has the first one selected, and is grouped by operation names: ```kusto dependencies dependencies | project value = name, label = strcat('🌐 ', name), selected = iff(Rank == 1, true, false), group = operation_Name ``` - + +## Dropdown parameter options -## Drop down parameter options -| Parameter | Explanation | Example | +| Parameter | Description | Example | | - |:-|:-| | `{DependencyName}` | The selected value | GET fabrikamaccount | | `{DependencyName:label}` | The selected label | 🌐 GET fabrikamaccount | | `{DependencyName:value}` | The selected value | GET fabrikamaccount | ## Multiple selection-The examples so far explicitly set the parameter to select only one value in the drop-down. Drop down parameters also support `multiple selection` - enabling this is as simple as checking the `Allow multiple selection` option. -The user also has the option of specifying the format of the result set via the `delimiter` and `quote with` settings. The default just returns the values as a collection in this form: 'a', 'b', 'c'. They also have the option to limit the number of selections. +The examples so far explicitly set the parameter to select only one value in the dropdown list. Dropdown parameters also support *multiple selection*. To enable this option, select the **Allow multiple selections** checkbox. ++You can specify the format of the result set via the **Delimiter** and **Quote with** settings. The default returns the values as a collection in the form of **a**, **b**, **c**. You can also limit the number of selections. The KQL referencing the parameter will need to change to work with the format of the result. The most common way to enable it is via the `in` operator. dependencies | summarize Requests = count() by bin(timestamp, 1h), name ``` -Here is an example for multi-select drop-down at work: +This example shows the multi-select dropdown parameter at work: - + ## Next steps +[Getting started with Azure Workbooks](workbooks-getting-started.md) |
| azure-monitor | Workbooks Multi Value | https://github.com/MicrosoftDocs/azure-docs/commits/main/articles/azure-monitor/visualize/workbooks-multi-value.md | Title: Azure Workbooks multi value parameters. -description: Learn about adding multi value parameters to your Azure workbook. + Title: Azure Workbooks multi-value parameters +description: Learn about adding multi-value parameters to your workbook. Last updated 07/05/2022 -# Multi-value Parameters +# Multi-value parameters -A multi-value parameter allows the user to set one or more arbitrary text values. Multi-value parameters are commonly used for filtering, often when a drop-down control may contain too many values to be useful. +A multi-value parameter allows the user to set one or more arbitrary text values. Multi-value parameters are commonly used for filtering, often when a dropdown control might contain too many values to be useful. +## Create a static multi-value parameter -## Creating a static multi-value parameter 1. Start with an empty workbook in edit mode.-1. Select **Add parameters** from the links within the workbook. -1. Select the blue _Add Parameter_ button. -1. In the new parameter pane that pops up enter: - - Parameter name: `Filter` - - Parameter type: `Multi-value` - - Required: `unchecked` - - Get data from: `None` -1. Select **Save** from the toolbar to create the parameter. -1. The Filter parameter will be a multi-value parameter, initially with no values: +1. Select **Add parameters** > **Add Parameter**. +1. In the new parameter pane that opens, enter: + - **Parameter name**: `Filter` + - **Parameter type**: `Multi-value` + - **Required**: `unchecked` + - **Get data from**: `None` +1. Select **Save** to create the parameter. +1. The **Filter** parameter will be a multi-value parameter, initially with no values. - :::image type="content" source="media/workbooks-multi-value/workbooks-multi-value-create.png" alt-text="Screenshot showing the creation of mulit-value parameter in workbooks."::: + :::image type="content" source="media/workbooks-multi-value/workbooks-multi-value-create.png" alt-text="Screenshot that shows the creation of a multi-value parameter in a workbook."::: -1. You can then add multiple values: +1. You can then add multiple values. - :::image type="content" source="media/workbooks-multi-value/workbooks-multi-value-third-value.png" alt-text="Screenshot showing the user adding a third value in workbooks."::: + :::image type="content" source="media/workbooks-multi-value/workbooks-multi-value-third-value.png" alt-text="Screenshot that shows adding a third value in a workbook."::: --A multi-value parameter behaves similarly to a multi-select [drop down parameter](workbooks-dropdowns.md). As such, it is commonly used in an "in" like scenario +A multi-value parameter behaves similarly to a multi-select [dropdown parameter](workbooks-dropdowns.md) and is commonly used in an "in"-like scenario. ``` let computerFilter = dynamic([{Computer}]); A multi-value parameter behaves similarly to a multi-select [drop down parameter ``` ## Parameter field style-Multi-value parameter supports following field style: -1. Standard: Allows a user to add or remove arbitrary text items - :::image type="content" source="media/workbooks-multi-value/workbooks-multi-value-standard.png" alt-text="Screenshot showing standard workbooks multi-value field."::: +A multi-value parameter supports the following field styles: ++1. **Standard**: Allows you to add or remove arbitrary text items. ++ :::image type="content" source="media/workbooks-multi-value/workbooks-multi-value-standard.png" alt-text="Screenshot that shows the workbook standard multi-value field."::: ++1. **Password**: Allows you to add or remove arbitrary password fields. The password values are only hidden in the UI when you type. The values are still fully accessible as a parameter value when referred. They're stored unencrypted when the workbook is saved. -1. Password: Allows a user to add or remove arbitrary password fields. The password values are only hidden on UI when user types. The values are still fully accessible as a param value when referred and they are stored unencrypted when workbook is saved. + :::image type="content" source="media/workbooks-multi-value/workbooks-multi-value-password.png" alt-text="Screenshot that shows a workbook password multi-value field."::: - :::image type="content" source="media/workbooks-multi-value/workbooks-multi-value-password.png" alt-text="Screenshot showing a workbooks password multi-value field."::: +## Create a multi-value parameter with initial values -## Creating a multi-value with initial values -You can use a query to seed the multi-value parameter with initial values. The user can then manually remove values, or add more values. If a query is used to populate the multi-value parameter, a restore defaults button will appear on the parameter to restore back to the originally queried values. +You can use a query to seed the multi-value parameter with initial values. You can then manually remove values or add more values. If a query is used to populate the multi-value parameter, a restore defaults button appears on the parameter to restore back to the originally queried values. 1. Start with an empty workbook in edit mode.-1. Select **add parameters** from the links within the workbook. -1. Select **Add Parameter**. -1. In the new parameter pane that pops up enter: - - Parameter name: `Filter` - - Parameter type: `Multi-value` - - Required: `unchecked` - - Get data from: `JSON` -1. In the JSON Input text block, insert this json snippet: +1. Select **Add parameters** > **Add Parameter**. +1. In the new parameter pane that opens, enter: + - **Parameter name**: `Filter` + - **Parameter type**: `Multi-value` + - **Required**: `unchecked` + - **Get data from**: `JSON` +1. In the **JSON Input** text block, insert this JSON snippet: + ``` ["apple", "banana", "carrot" ] ```- All of the items that are the result of the query will be shown as multi value items. - (you are not limited to JSON, you can use any query provider to provide initial values, but will be limited to the first 100 results) ++ All the items that are the result of the query are shown as multi-value items. + You aren't limited to JSON. You can use any query provider to provide initial values, but you'll be limited to the first 100 results. 1. Select **Run Query**.-1. Select **Save** from the toolbar to create the parameter. -1. The Filter parameter will be a multi-value parameter with three initial values. +1. Select **Save** to create the parameter. +1. The **Filter** parameter will be a multi-value parameter with three initial values. ++ :::image type="content" source="media/workbooks-multi-value/workbooks-multi-value-initial-values.png" alt-text="Screenshot that shows the creation of a dynamic dropdown in a workbook."::: - :::Screenshot type="content" source="media/workbooks-multi-value/workbooks-multi-value-initial-values.png" alt-text="Screenshot showing the creation of a dynamic drop-down in workbooks."::: ## Next steps -- [Workbook parameters](workbooks-parameters.md).-- [Workbook drop down parameters](workbooks-dropdowns.md)+- [Workbook parameters](workbooks-parameters.md) +- [Workbook dropdown parameters](workbooks-dropdowns.md) |
| azure-monitor | Workbooks Options Group | https://github.com/MicrosoftDocs/azure-docs/commits/main/articles/azure-monitor/visualize/workbooks-options-group.md | Title: Azure Workbooks options group parameters. + Title: Azure Workbooks options group parameters description: Learn about adding options group parameters to your Azure workbook. -An options group parameter allows the user to select one value from a known set (for example, select one of your appΓÇÖs requests). When there is a small number of values, an options group can be a better choice than a [drop-down parameter](workbooks-dropdowns.md), since the user can see all the possible values, and see which one is selected. Options groups are commonly used for yes/no or on/off style choices. When there are a large number of possible values, using a drop-down is a better choice. Unlike drop-down parameters, an options group always only allows one selected value. +When you use an options group parameter, you can select one value from a known set. For example, you can select one of your app's requests. If you're working with a few values, an options group can be a better choice than a [dropdown parameter](workbooks-dropdowns.md). You can see all the possible values and see which one is selected. ++Options groups are commonly used for yes/no or on/off style choices. When there are many possible values, using a dropdown list is a better choice. Unlike dropdown parameters, an options group always allows only one selected value. You can specify the list by:-- providing a static list in the parameter setting-- using a KQL query to retrieve the list dynamically -## Creating a static options group parameter +- Providing a static list in the parameter setting. +- Using a KQL query to retrieve the list dynamically. ++## Create a static options group parameter + 1. Start with an empty workbook in edit mode.-1. Choose **Add parameters** from the links within the workbook. -1. Select **Add Parameter**. -1. In the new parameter pane that pops up enter: - - Parameter name: `Environment` - - Parameter type: `Options Group` - - Required: `checked` - - Get data from: `JSON` -1. In the JSON Input text block, insert this json snippet: +1. Select **Add parameters** > **Add Parameter**. +1. In the new parameter pane that opens, enter: + - **Parameter name**: `Environment` + - **Parameter type**: `Options Group` + - **Required**: `checked` + - **Get data from**: `JSON` +1. In the **JSON Input** text block, insert this JSON snippet: + ```json [ { "value":"dev", "label":"Development" }, You can specify the list by: { "value":"prod", "label":"Production", "selected":true } ] ```- (you are not limited to JSON, you can use any query provider to provide initial values, but will be limited to the first 100 results) ++ You aren't limited to JSON. You can use any query provider to provide initial values, but you'll be limited to the first 100 results. 1. Select **Update**.-1. Select **Save** from the toolbar to create the parameter. -1. The Environment parameter will be an options group control with the three values. +1. Select **Save** to create the parameter. +1. The **Environment** parameter will be an options group control with the three values. - :::image type="content" source="media/workbooks-options-group/workbooks-options-group-create.png" alt-text="Screenshot showing the creation of a static options group in a workbook."::: + :::image type="content" source="media/workbooks-options-group/workbooks-options-group-create.png" alt-text="Screenshot that shows the creation of a static options group in a workbook."::: ## Next steps -- [Workbook parameters](workbooks-parameters.md).-- [Workbook drop down parameters](workbooks-dropdowns.md)+- [Workbook parameters](workbooks-parameters.md) +- [Workbook dropdown parameters](workbooks-dropdowns.md) |
| azure-monitor | Workbooks Parameters | https://github.com/MicrosoftDocs/azure-docs/commits/main/articles/azure-monitor/visualize/workbooks-parameters.md | Title: Creating Workbook parameters + Title: Create workbook parameters description: Learn how to add parameters to your workbook to collect input from the consumers and reference it in other parts of the workbook. Last updated 07/05/2022 # Workbook parameters -Parameters allow workbook authors to collect input from the consumers and reference it in other parts of the workbook ΓÇô usually to scope the result set or setting the right visual. It is a key capability that allows authors to build interactive reports and experiences. +By using parameters, you can collect input from consumers and reference it in other parts of a workbook. It's usually used to scope the result set or set the right visual. You can build interactive reports and experiences by using this key capability. -Workbooks allow you to control how your parameter controls are presented to consumers ΓÇô text box vs. drop down, single- vs. multi-select, values from text, JSON, KQL, or Azure Resource Graph, etc. +When you use workbooks, you can control how your parameter controls are presented to consumers. They can be text box versus dropdown list, single- versus multi-select, and values from text, JSON, KQL, or Azure Resource Graph. Supported parameter types include:-* [Time](workbooks-time.md) - allows a user to select from pre-populated time ranges or select a custom range -* [Drop down](workbooks-dropdowns.md) - allows a user to select from a value or set of values -* [Options group](workbooks-options-group.md) -* [Text](workbooks-text.md) - allows a user to enter arbitrary text -* [Criteria](workbooks-criteria.md) -* [Resource](workbooks-resources.md) - allows a user to select one or more Azure resources -* [Subscription](workbooks-resources.md) - allows a user to select one or more Azure subscription resources -* [Multi-value](workbooks-multi-value.md) -* Resource Type - allows a user to select one or more Azure resource type values -* Location - allows a user to select one or more Azure location values ++* [Time](workbooks-time.md): Allows you to select from pre-populated time ranges or select a custom range +* [Drop down](workbooks-dropdowns.md): Allows you to select from a value or set of values +* [Options group](workbooks-options-group.md): Allows you to select one value from a known set +* [Text](workbooks-text.md): Allows you to enter arbitrary text +* [Criteria](workbooks-criteria.md): Allows you to define a set of criteria based on previously specified parameters, which will be evaluated to provide a dynamic value +* [Resource](workbooks-resources.md): Allows you to select one or more Azure resources +* [Subscription](workbooks-resources.md): Allows you to select one or more Azure subscription resources +* [Multi-value](workbooks-multi-value.md): Allows you to set one or more arbitrary text values +* Resource type: Allows you to select one or more Azure resource type values +* Location: Allows you to select one or more Azure location values ## Reference a parameter-You can reference parameters values from other parts of workbooks either using bindings or value expansions. -### Reference a parameter with Bindings ++You can reference parameter values from other parts of workbooks either by using bindings or value expansions. ++### Reference a parameter with bindings This example shows how to reference a time range parameter with bindings: -1. Add a query control to the workbook and select an Application Insights resource. -2. Open the _Time Range_ drop-down and select the `Time Range` option from the Parameters section at the bottom. -3. This binds the time range parameter to the time range of the chart. The time scope of the sample query is now Last 24 hours. -4. Run query to see the results +1. Select **Add query** to add a query control, and then select an Application Insights resource. +1. Open the **Time Range** dropdown list and select the **Time Range** option from the **Parameters** section at the bottom: + - This option binds the time range parameter to the time range of the chart. + - The time scope of the sample query is now **Last 24 hours**. +1. Run the query to see the results. - :::image type="content" source="media/workbooks-parameters/workbooks-time-binding.png" alt-text="Screenshot showing a time range parameter referenced via bindings."::: + :::image type="content" source="media/workbooks-parameters/workbooks-time-binding.png" alt-text="Screenshot that shows a time range parameter referenced via bindings."::: ### Reference a parameter with KQL This example shows how to reference a time range parameter with KQL: -1. Add a query control to the workbook and select an Application Insights resource. -2. In the KQL, enter a time scope filter using the parameter: `| where timestamp {TimeRange}` -3. This expands on query evaluation time to `| where timestamp > ago(1d)`, which is the time range value of the parameter. -4. Run query to see the results +1. Select **Add query** to add a query control, and then select an Application Insights resource. +1. In the KQL, enter a time scope filter by using the parameter `| where timestamp {TimeRange}`: + - This parameter expands on query evaluation time to `| where timestamp > ago(1d)`. + - This option is the time range value of the parameter. +1. Run the query to see the results. - :::image type="content" source="media/workbooks-parameters/workbooks-time-in-code.png" alt-text="Screenshot showing a time range referenced in the K Q L query."::: + :::image type="content" source="media/workbooks-parameters/workbooks-time-in-code.png" alt-text="Screenshot that shows a time range referenced in the KQL query."::: -### Reference a parameter with Text +### Reference a parameter with text This example shows how to reference a time range parameter with text: 1. Add a text control to the workbook.-2. In the markdown, enter `The chosen time range is {TimeRange:label}` -3. Choose _Done Editing_ -4. The text control will show text: _The chosen time range is Last 24 hours_ +1. In the Markdown, enter `The chosen time range is {TimeRange:label}`. +1. Select **Done Editing**. +1. The text control shows the text *The chosen time range is Last 24 hours*. ## Parameter formatting options -Each parameter type has its own formatting options. Use the **Previews** section of the **Edit Parameter** pane to see the formatting expansion options for your parameter: +Each parameter type has its own formatting options. Use the **Previews** section of the **Edit Parameter** pane to see the formatting expansion options for your parameter. ++ :::image type="content" source="media/workbooks-parameters/workbooks-time-settings.png" alt-text="Screenshot that shows time range parameter options."::: ++You can use these options to format all parameter types except for **Time range picker**. For examples of formatting times, see [Time parameter options](workbooks-time.md#time-parameter-options). - :::image type="content" source="media/workbooks-parameters/workbooks-time-settings.png" alt-text="Screenshot showing a time range parameter options."::: +Other parameter types include: -You can use these options to format all parameter types except for the time range picker. For examples of formatting times, see [Time parameter options](workbooks-time.md#time-parameter-options). + - **Resource picker**: Resource IDs are formatted. + - **Subscription picker**: Subscription values are formatted. - - For Resource picker, resource IDs are formatted. - - For Subscription picker, subscription values are formatted. - ### Convert toml to json **Syntax**: `{param:tomltojson}` -**Original Value**: +**Original value**: ``` name = "Sam Green" state = "New York" country = "USA" ``` -**Formatted Value**: +**Formatted value**: ``` { country = "USA" } } ```+ ### Escape JSON **Syntax**: `{param:escapejson}` -**Original Value**: +**Original value**: ``` { country = "USA" } ``` -**Formatted Value**: +**Formatted value**: ``` {\r\n\t\"name\": \"Sam Green\",\r\n\t\"address\": {\r\n\t\t\"state\": \"New York\",\r\n\t\t\"country\": \"USA\"\r\n }\r\n} country = "USA" **Syntax**: `{param:base64}` -**Original Value**: +**Original value**: ``` Sample text to test base64 encoding ``` -**Formatted Value**: +**Formatted value**: ``` U2FtcGxlIHRleHQgdG8gdGVzdCBiYXNlNjQgZW5jb2Rpbmc= ``` -## Formatting parameters using JSONPath +## Format parameters by using JSONPath + For string parameters that are JSON content, you can use [JSONPath](workbooks-jsonpath.md) in the parameter format string. -For example, you may have a string parameter named `selection` that was the result of a query or selection in a visualization that has the following value +For example, you might have a string parameter named `selection` that was the result of a query or selection in a visualization that has the following value: + ```json { "series":"Failures", "x": 5, "y": 10 } ``` -Using JSONPath, you could get individual values from that object: +By using JSONPath, you could get individual values from that object: -format | result +Format | Result | `{selection:$.series}` | `Failures` `{selection:$.x}` | `5` `{selection:$.y}`| `10` > [!NOTE]-> If the parameter value is not valid json, the result of the format will be an empty value. +> If the parameter value isn't valid JSON, the result of the format will be an empty value. ++## Parameter style -## Parameter Style The following styles are available for the parameters.+ ### Pills-In pills style, the default style, the parameters look like text, and require the user to select them once to go into the edit mode. - :::image type="content" source="media/workbooks-parameters/workbooks-pills-read-mode.png" alt-text="Screenshot showing Workbooks pill style read mode."::: +Pills style is the default style. The parameters look like text and require the user to select them once to go into the edit mode. ++ :::image type="content" source="media/workbooks-parameters/workbooks-pills-read-mode.png" alt-text="Screenshot that shows Azure Workbooks pills-style read mode."::: - :::image type="content" source="media/workbooks-parameters/workbooks-pills-edit-mode.png" alt-text="Screenshot that shows Workbooks pill style edit mode."::: + :::image type="content" source="media/workbooks-parameters/workbooks-pills-edit-mode.png" alt-text="Screenshot that shows Azure Workbooks pills-style edit mode."::: ### Standard+ In standard style, the controls are always visible, with a label above the control. - :::image type="content" source="media/workbooks-parameters/workbooks-standard.png" alt-text="Screenshot that shows Workbooks standard style."::: + :::image type="content" source="media/workbooks-parameters/workbooks-standard.png" alt-text="Screenshot that shows Azure Workbooks standard style."::: ++### Form horizontal ++In form horizontal style, the controls are always visible, with the label on the left side of the control. -### Form Horizontal -In horizontal style form, the controls are always visible, with label on left side of the control. + :::image type="content" source="media/workbooks-parameters/workbooks-form-horizontal.png" alt-text="Screenshot that shows Azure Workbooks form horizontal style."::: - :::image type="content" source="media/workbooks-parameters/workbooks-form-horizontal.png" alt-text="Screenshot that shows Workbooks form horizontal style."::: +### Form vertical -### Form Vertical -In vertical style from, the controls are always visible, with label above the control. Unlike standard style, there is only one label or control in one row. +In form vertical style, the controls are always visible, with the label above the control. Unlike standard style, there's only one label or control in one row. - :::image type="content" source="media/workbooks-parameters/workbooks-form-vertical.png" alt-text="Screenshot that shows Workbooks form vertical style."::: + :::image type="content" source="media/workbooks-parameters/workbooks-form-vertical.png" alt-text="Screenshot that shows Azure Workbooks form vertical style."::: > [!NOTE]-> In standard, form horizontal, and form vertical layouts, there's no concept of inline editing, the controls are always in edit mode. +> In standard, form horizontal, and form vertical layouts, there's no concept of inline editing. The controls are always in edit mode. ## Global parameters-Now that you've learned how parameters work, and the limitations about only being able to use a parameter "downstream" of where it is set, it is time to learn about global parameters, which change those rules. -With a global parameter, the parameter must still be declared before it can be used, but any step that sets a value to that parameter will affect all instances of that parameter in the workbook. +Now that you've learned how parameters work, and the limitations about only being able to use a parameter "downstream" of where it's set, it's time to learn about global parameters, which change those rules. ++With a global parameter, the parameter must still be declared before it can be used. But any step that sets a value to that parameter will affect all instances of that parameter in the workbook. > [!NOTE]-> Because changing a global parameter has this "update all" behavior, The global setting should only be turned on for parameters that require this behavior. A combination of global parameters that depend on each other can create a cycle or oscillation where the competing globals change each other over and over. In order to avoid cycles, you cannot "redeclare" a parameter that's been declared as global. Any subsequent declarations of a parameter with the same name will create a read only parameter that cannot be edited in that place. +> Because changing a global parameter has this "update all" behavior, the global setting should only be turned on for parameters that require this behavior. A combination of global parameters that depend on each other can create a cycle or oscillation where the competing globals change each other over and over. To avoid cycles, you can't "redeclare" a parameter that's been declared as global. Any subsequent declarations of a parameter with the same name will create a read-only parameter that can't be edited in that place. Common uses of global parameters: -1. Synchronizing time ranges between many charts. - - without a global parameter, any time range brush in a chart will only be exported after that chart, so selecting a time range in the third chart will only update the fourth chart - - with a global parameter, you can create a global **timeRange** parameter, give it a default value, and have all the other charts use that as their bound time range and as their time brush output (additionally setting the "only export the parameter when the range is brushed" setting). Any change of time range in any chart will update the global **timeRange** parameter at the top of the workbook. This can be used to make a workbook act like a dashboard. --1. Allowing changing the selected tab in a links step via links or buttons - - without a global parameter, the links step only outputs a parameter for the selected tab - - with a global parameter, you can create a global **selectedTab** parameter, and use that parameter name in the tab selections in the links step. This allows you to pass that parameter value into the workbook from a link, or by using another button or link to change the selected tab. Using buttons from a links step in this way can make a wizard-like experience, where buttons at the bottom of a step can affect the visible sections above it. +1. Synchronize time ranges between many charts: + - Without a global parameter, any time range brush in a chart will only be exported after that chart. So, selecting a time range in the third chart will only update the fourth chart. + - With a global parameter, you can create a global **timeRange** parameter, give it a default value, and have all the other charts use that as their bound time range and time brush output. In addition, set the **Only export the parameter when a range is brushed** setting. Any change of time range in any chart updates the global **timeRange** parameter at the top of the workbook. This functionality can be used to make a workbook act like a dashboard. +1. Allow changing the selected tab in a links step via links or buttons: + - Without a global parameter, the links step only outputs a parameter for the selected tab. + - With a global parameter, you can create a global **selectedTab** parameter. Then you can use that parameter name in the tab selections in the links step. You can pass that parameter value into the workbook from a link or by using another button or link to change the selected tab. Using buttons from a links step in this way can make a wizard-like experience, where buttons at the bottom of a step can affect the visible sections above it. ### Create a global parameter-When creating the parameter in a parameters step, use the "Treat this parameter as a global" option in advanced settings. The only way to make a global parameter is to declare it with a parameters step. The other methods of creating parameters (via selections, brushing, links, buttons, tabs) can only update a global parameter, they cannot themselves declare one. - :::image type="content" source="media/workbooks-parameters/workbooks-parameters-global-setting.png" alt-text="Screenshot of setting global parameters in Workbooks."::: +When you create the parameter in a parameters step, use the **Treat this parameter as a global** option in **Advanced Settings**. The only way to make a global parameter is to declare it with a parameters step. The other methods of creating parameters, via selections, brushing, links, buttons, and tabs, can only update a global parameter. They can't declare one themselves. ++ :::image type="content" source="media/workbooks-parameters/workbooks-parameters-global-setting.png" alt-text="Screenshot that shows setting global parameters in a workbook."::: The parameter will be available and function as normal parameters do. -### Updating the value of an existing global parameter -For the chart example above, the most common way to update a global parameter is by using Time Brushing. +### Update the value of an existing global parameter ++For the chart example, the most common way to update a global parameter is by using time brushing. -In this example, the **timerange** parameter above is declared as a global. In a query step below that, create and run a query that uses that **timerange** parameter in the query and returns a time chart result. In the advanced settings for the query step, enable the time range brushing setting, and use the same parameter name as the output for the time brush parameter, and also set the only export the parameter when brushed option. +In this example, the **timerange** parameter is declared as global. In a query step below that, create and run a query that uses that **timerange** parameter in the query and returns a time chart result. In **Advanced Settings** for the query step, enable the time range brushing setting. Use the same parameter name as the output for the time brush parameter. Also, select the **Only export the parameter when a range is brushed** option. - :::image type="content" source="media/workbooks-parameters/workbooks-global-time-range-brush.png" alt-text="Screenshot of global time brush setting in Workbooks."::: + :::image type="content" source="media/workbooks-parameters/workbooks-global-time-range-brush.png" alt-text="Screenshot that shows the global time brush setting in a workbook."::: -Whenever a time range is brushed in this chart, it will also update the **timerange** parameter above this query, and the query step itself (since it also depends on **timerange**!): +Whenever a time range is brushed in this chart, it also updates the **timerange** parameter above this query, and the query step itself, because it also depends on **timerange**. 1. Before brushing: - - The time range is shown as "last hour". + - The time range is shown as **Last hour**. - The chart shows the last hour of data. - :::image type="content" source="media/workbooks-parameters/workbooks-global-before-brush.png" alt-text="Screenshot of setting global parameters before brushing."::: + :::image type="content" source="media/workbooks-parameters/workbooks-global-before-brush.png" alt-text="Screenshot that shows setting global parameters before brushing."::: 1. During brushing: - - The time range is still last hour, and the brushing outlines are drawn. - - No parameters/etc have changed. once you let go of the brush, the time range will be updated. + - The time range is still the last hour, and the brushing outlines are drawn. + - No parameters have changed. After you let go of the brush, the time range is updated. - :::image type="content" source="media/workbooks-parameters/workbooks-global-during-brush.png" alt-text="Screenshot of setting global parameters during brushing."::: + :::image type="content" source="media/workbooks-parameters/workbooks-global-during-brush.png" alt-text="Screenshot that shows setting global parameters during brushing."::: 1. After brushing: - - The time range specified by the time brush will be set by this step, overriding the global value (the timerange dropdown now displays that custom time range). - - Because the global value at the top has changed, and because this chart depends on **timerange** as an input, the time range of the query used in the chart will also update, causing the query to and the chart to update. + - The time range specified by the time brush is set by this step. It overrides the global value. The **timerange** dropdown list now displays that custom time range. + - Because the global value at the top has changed, and because this chart depends on **timerange** as an input, the time range of the query used in the chart also updates. As a result, the query and the chart will update. - Any other steps in the workbook that depend on **timerange** will also update. - :::image type="content" source="media/workbooks-parameters/workbooks-global-after-brush.png" alt-text="Screenshot of setting global parameters after brushing."::: + :::image type="content" source="media/workbooks-parameters/workbooks-global-after-brush.png" alt-text="Screenshot that shows setting global parameters after brushing."::: > [!NOTE]- > If you do not use a global parameter, the **timerange** parameter value will only change below this query step, things above or this item itself would not update. + > If you don't use a global parameter, the **timerange** parameter value will only change below this query step. Things above this step or this item itself won't update. |
| azure-monitor | Workbooks Resources | https://github.com/MicrosoftDocs/azure-docs/commits/main/articles/azure-monitor/visualize/workbooks-resources.md | Title: Azure Monitor workbooks resource parameters -description: Learn how to use resource parameters to allow picking of resources in workbooks. Use the resource parameters to set the scope from which to get the data from. + Title: Azure Monitor workbook resource parameters +description: Learn how to use resource parameters to allow picking of resources in workbooks. Use the resource parameters to set the scope from which to get the data. ibiza Last updated 07/05/2022 # Workbook resource parameters -Resource parameters allow picking of resources in workbooks. This is useful in setting the scope from which to get the data from. An example is allowing users to select the set of VMs, which the charts later will use when presenting the data. +Resource parameters allow picking of resources in workbooks. This functionality is useful in setting the scope from which to get the data. An example would be allowing you to select the set of VMs, which charts use later when presenting the data. -Values from resource pickers can come from the workbook context, static list or from Azure Resource Graph queries. +Values from resource pickers can come from the workbook context, static list, or Azure Resource Graph queries. ## Create a resource parameter (workbook resources)+ 1. Start with an empty workbook in edit mode.-2. Choose _Add parameters_ from the links within the workbook. -3. Click on the blue _Add Parameter_ button. -4. In the new parameter pane that pops up enter: - 1. Parameter name: `Applications` - 2. Parameter type: `Resource picker` - 3. Required: `checked` - 4. Allow multiple selections: `checked` -5. Get data from: `Workbook Resources` -6. Include only resource types: `Application Insights` -7. Choose 'Save' from the toolbar to create the parameter. -- +1. Select **Add parameters** > **Add Parameter**. +1. In the new parameter pane that opens, enter: + 1. **Parameter name**: `Applications` + 1. **Parameter type**: `Resource picker` + 1. **Required**: `checked` + 1. **Allow multiple selections**: `checked` + 1. **Get data from**: `Workbook Resources` + 1. **Include only resource types**: `Application Insights` +1. Select **Save** to create the parameter. ++  ## Create an Azure Resource Graph resource parameter+ 1. Start with an empty workbook in edit mode.-2. Choose _Add parameters_ from the links within the workbook. -3. Click on the blue _Add Parameter_ button. -4. In the new parameter pane that pops up enter: - 1. Parameter name: `Applications` - 2. Parameter type: `Resource picker` - 3. Required: `checked` - 4. Allow multiple selections: `checked` -5. Get data from: `Query` - 1. Query Type: `Azure Resource Graph` - 2. Subscriptions: `Use default subscriptions` - 3. In the query control, add this snippet +1. Select **Add parameters** > **Add Parameter**. +1. In the new parameter pane that opens, enter: + 1. **Parameter name**: `Applications` + 1. **Parameter type**: `Resource picker` + 1. **Required**: `checked` + 1. **Allow multiple selections**: `checked` + 1. **Get data from**: `Query` + 1. **Query Type**: `Azure Resource Graph` + 1. **Subscriptions**: `Use default subscriptions` + 1. In the query control, add this snippet: + ```kusto where type == 'microsoft.insights/components' | project value = id, label = name, selected = false, group = resourceGroup ```-7. Choose 'Save' from the toolbar to create the parameter. - +1. Select **Save** to create the parameter. ++  > [!NOTE]-> Azure Resource Graph is not yet available in all clouds. Ensure that it is supported in your target cloud if you choose this approach. +> Azure Resource Graph isn't yet available in all clouds. Ensure that it's supported in your target cloud if you choose this approach. -[Azure Resource Graph documentation](../../governance/resource-graph/overview.md) +For more information on Azure Resource Graph, see [What is Azure Resource Graph?](../../governance/resource-graph/overview.md). ## Create a JSON list resource parameter+ 1. Start with an empty workbook in edit mode.-2. Choose _Add parameters_ from the links within the workbook. -3. Click on the blue _Add Parameter_ button. -4. In the new parameter pane that pops up enter: - 1. Parameter name: `Applications` - 2. Parameter type: `Resource picker` - 3. Required: `checked` - 4. Allow multiple selections: `checked` -5. Get data from: `JSON` - 1. In the content control, add this json snippet - ```json - [ - { "value":"/subscriptions/<sub-id>/resourceGroups/<resource-group>/providers/<resource-type>/acmeauthentication", "label": "acmeauthentication", "selected":true, "group":"Acme Backend" }, - { "value":"/subscriptions/<sub-id>/resourceGroups/<resource-group>/providers/<resource-type>/acmeweb", "label": "acmeweb", "selected":false, "group":"Acme Frontend" } - ] - ``` - 2. Hit the blue _Update_ button. -6. Optionally set the `Include only resource types` to _Application Insights_ -7. Choose 'Save' from the toolbar to create the parameter. +1. Select **Add parameters** > **Add Parameter**. +1. In the new parameter pane that opens, enter: + 1. **Parameter name**: `Applications` + 1. **Parameter type**: `Resource picker` + 1. **Required**: `checked` + 1. **Allow multiple selections**: `checked` + 1. **Get data from**: `JSON` + 1. In the content control, add this JSON snippet: ++ ```json + [ + { "value":"/subscriptions/<sub-id>/resourceGroups/<resource-group>/providers/<resource-type>/acmeauthentication", "label": "acmeauthentication", "selected":true, "group":"Acme Backend" }, + { "value":"/subscriptions/<sub-id>/resourceGroups/<resource-group>/providers/<resource-type>/acmeweb", "label": "acmeweb", "selected":false, "group":"Acme Frontend" } + ] + ``` ++ 1. Select **Update**. +1. Optionally, set `Include only resource types` to **Application Insights**. +1. Select **Save** to create the parameter. ## Reference a resource parameter-1. Add a query control to the workbook and select an Application Insights resource. -2. Use the _Application Insights_ drop down to bind the parameter to the control. Doing this sets the scope of the query to the resources returned by the parameter at run time. -4. In the KQL control, add this snippet ++1. Select **Add query** to add a query control, and then select an Application Insights resource. +1. Use the **Application Insights** dropdown list to bind the parameter to the control. This step sets the scope of the query to the resources returned by the parameter at runtime. +1. In the KQL control, add this snippet: + ```kusto requests | summarize Requests = count() by appName, name | order by Requests desc ```-5. Run query to see the results. - +1. Run the query to see the results. -> This approach can be used to bind resources to other controls like metrics. +  ++This approach can be used to bind resources to other controls like metrics. ## Resource parameter options-| Parameter | Explanation | Example | ++| Parameter | Description | Example | | - |:-|:-|-| `{Applications}` | The selected resource ID | _/subscriptions/\<sub-id\>/resourceGroups/\<resource-group\>/providers/\<resource-type\>/acmeauthentication_ | -| `{Applications:label}` | The label of the selected resource | `acmefrontend` | -| `{Applications:value}` | The value of the selected resource | _'/subscriptions/\<sub-id\>/resourceGroups/\<resource-group\>/providers/\<resource-type\>/acmeauthentication'_ | -| `{Applications:name}` | The name of the selected resource | `acmefrontend` | -| `{Applications:resourceGroup}` | The resource group of the selected resource | `acmegroup` | -| `{Applications:resourceType}` | The type of the selected resource | _microsoft.insights/components_ | -| `{Applications:subscription}` | The subscription of the selected resource | | -| `{Applications:grid}` | A grid showing the resource properties. Useful to render in a text block while debugging | | +| `{Applications}` | The selected resource ID. | _/subscriptions/\<sub-id\>/resourceGroups/\<resource-group\>/providers/\<resource-type\>/acmeauthentication_ | +| `{Applications:label}` | The label of the selected resource. | `acmefrontend` | +| `{Applications:value}` | The value of the selected resource. | _'/subscriptions/\<sub-id\>/resourceGroups/\<resource-group\>/providers/\<resource-type\>/acmeauthentication'_ | +| `{Applications:name}` | The name of the selected resource. | `acmefrontend` | +| `{Applications:resourceGroup}` | The resource group of the selected resource. | `acmegroup` | +| `{Applications:resourceType}` | The type of the selected resource. | _microsoft.insights/components_ | +| `{Applications:subscription}` | The subscription of the selected resource. | | +| `{Applications:grid}` | A grid that shows the resource properties. Useful to render in a text block while debugging. | | ## Next steps +[Getting started with Azure Workbooks](workbooks-getting-started.md) |
| azure-monitor | Workbooks Text | https://github.com/MicrosoftDocs/azure-docs/commits/main/articles/azure-monitor/visualize/workbooks-text.md | Title: Azure Monitor workbooks text parameters + Title: Azure Monitor workbook text parameters description: Simplify complex reporting with prebuilt and custom parameterized workbooks. Learn more about workbook text parameters. Last updated 07/05/2022 # Workbook text parameters -Textbox parameters provide a simple way to collect text input from workbook users. They're used when it isn't practical to use a drop-down to collect the input (for example, an arbitrary threshold or generic filters). Workbooks allow authors to get the default value of the textbox from a query. This allows interesting scenarios like setting the default threshold based on the p95 of the metric. +Text box parameters provide a simple way to collect text input from workbook users. They're used when it isn't practical to use a dropdown list to collect the input, for example, with an arbitrary threshold or generic filters. By using a workbook, you can get the default value of the text box from a query. This functionality allows for interesting scenarios like setting the default threshold based on the p95 of the metric. -A common use of textboxes is as internal variables used by other workbook controls. This is done by using a query for default values, and making the input control invisible in read-mode. For example, a user may want a threshold to come from a formula (not a user) and then use the threshold in subsequent queries. +A common use of text boxes is as internal variables used by other workbook controls. You use a query for default values and make the input control invisible in read mode. For example, you might want a threshold to come from a formula, not a user, and then use the threshold in subsequent queries. ## Create a text parameter+ 1. Start with an empty workbook in edit mode.-2. Choose _Add parameters_ from the links within the workbook. -3. Select on the blue _Add Parameter_ button. -4. In the new parameter pane that pops up enter: - 1. Parameter name: `SlowRequestThreshold` - 2. Parameter type: `Text` - 3. Required: `checked` - 4. Get data from: `None` -5. Choose 'Save' from the toolbar to create the parameter. +1. Select **Add parameters** > **Add Parameter**. +1. In the new parameter pane that opens, enter: + 1. **Parameter name**: `SlowRequestThreshold` + 1. **Parameter type**: `Text` + 1. **Required**: `checked` + 1. **Get data from**: `None` +1. Select **Save** to create the parameter. - :::image type="content" source="./media/workbooks-text/text-create.png" alt-text="Screenshot showing the creation of a text parameter."::: + :::image type="content" source="./media/workbooks-text/text-create.png" alt-text="Screenshot that shows the creation of a text parameter."::: -This is how the workbook will look like in read-mode. +This screenshot shows how the workbook looks in read mode: ## Parameter field style-Text parameter supports following field style: -- Standard: A single line text field.+The text parameter supports the following field styles: ++- **Standard**: A single line text field. ++ :::image type="content" source="./media/workbooks-text/standard-text.png" alt-text="Screenshot that shows a standard text field."::: - :::image type="content" source="./media/workbooks-text/standard-text.png" alt-text="Screenshot showing standard text field."::: +- **Password**: A single line password field. The password value is only hidden in the UI when you type. The value is fully accessible as a parameter value when referred. It's stored unencrypted when the workbook is saved. -- Password: A single line password field. The password value is only hidden on UI when user types. The value is still fully accessible as a param value when referred and it's stored unencrypted when workbook is saved.+ :::image type="content" source="./media/workbooks-text/password-text.png" alt-text="Screenshot that shows a password field."::: - :::image type="content" source="./media/workbooks-text/password-text.png" alt-text="Screenshot showing password field."::: +- **Multiline**: A multiline text field with support of rich IntelliSense and syntax colorization for the following languages: -- Multiline: A multiline text field with support of rich intellisense and syntax colorization for following languages: - Text - Markdown - JSON Text parameter supports following field style: - KQL - TOML - User can also specify the height for the multiline editor. + You can also specify the height for the multiline editor. - :::image type="content" source="./media/workbooks-text/kql-text.png" alt-text="Screenshot showing multiline text field."::: + :::image type="content" source="./media/workbooks-text/kql-text.png" alt-text="Screenshot that shows a multiline text field."::: ## Reference a text parameter-1. Add a query control to the workbook by selecting the blue `Add query` link and select an Application Insights resource. -2. In the KQL box, add this snippet: ++1. Select **Add query** to add a query control, and then select an Application Insights resource. +1. In the KQL box, add this snippet: + ```kusto requests | summarize AllRequests = count(), SlowRequests = countif(duration >= {SlowRequestThreshold}) by name | extend SlowRequestPercent = 100.0 * SlowRequests / AllRequests | order by SlowRequests desc ```-3. By using the text parameter with a value of 500 coupled with the query control you effectively running the query below: ++1. By using the text parameter with a value of 500 coupled with the query control, you effectively run the following query: + ```kusto requests | summarize AllRequests = count(), SlowRequests = countif(duration >= 500) by name | extend SlowRequestPercent = 100.0 * SlowRequests / AllRequests | order by SlowRequests desc ```-4. Run query to see the results - :::image type="content" source="./media/workbooks-text/text-reference.png" alt-text="Screenshot showing a text parameter referenced in KQL."::: +1. Run the query to see the results. ++ :::image type="content" source="./media/workbooks-text/text-reference.png" alt-text="Screenshot that shows a text parameter referenced in KQL."::: > [!NOTE]-> In the example above, `{SlowRequestThreshold}` represents an integer value. If you were querying for a string like `{ComputerName}` you would need to modify your Kusto query to add quotes `"{ComputerName}"` in order for the parameter field to an accept input without quotes. +> In the preceding example, `{SlowRequestThreshold}` represents an integer value. If you were querying for a string like `{ComputerName}`, you would need to modify your Kusto query to add quotation marks `"{ComputerName}"` in order for the parameter field to accept an input without quotation marks. ## Set the default values using queries+ 1. Start with an empty workbook in edit mode.-2. Choose _Add parameters_ from the links within the workbook. -3. Select on the blue _Add Parameter_ button. -4. In the new parameter pane that pops up enter: - 1. Parameter name: `SlowRequestThreshold` - 2. Parameter type: `Text` - 3. Required: `checked` - 4. Get data from: `Query` -5. In the KQL box, add this snippet: +1. Select **Add parameters** > **Add Parameter**. +1. In the new parameter pane that opens, enter: + 1. **Parameter name**: `SlowRequestThreshold` + 1. **Parameter type**: `Text` + 1. **Required**: `checked` + 1. **Get data from**: `Query` +1. In the KQL box, add this snippet: + ```kusto requests | summarize round(percentile(duration, 95), 2) ```+ This query sets the default value of the text box to the 95th percentile duration for all requests in the app.-6. Run query to see the result -7. Choose 'Save' from the toolbar to create the parameter. +1. Run the query to see the results. +1. Select **Save** to create the parameter. - :::image type="content" source="./media/workbooks-text/text-default-value.png" alt-text="Screenshot showing a text parameter with default value from KQL."::: + :::image type="content" source="./media/workbooks-text/text-default-value.png" alt-text="Screenshot that shows a text parameter with a default value from KQL."::: > [!NOTE]-> While this example queries Application Insights data, the approach can be used for any log based data source - Log Analytics, Azure Resource Graph, etc. +> While this example queries Application Insights data, the approach can be used for any log-based data source, such as Log Analytics and Azure Resource Graph. -## Add validations +## Add validations -For standard and password text parameters, user can add validation rules that are applied to the text field. Add a valid regex with error message. If message is set, it's shown as error when field is invalid. +For standard and password text parameters, you can add validation rules that are applied to the text field. Add a valid regex with an error message. If the message is set, it's shown as an error when the field is invalid. -If match is selected, the field is valid if value matches the regex and if match isn't selected then the field is valid if it doesn't match the regex. +If the match is selected, the field is valid if the value matches the regex. If the match isn't selected, the field is valid if it doesn't match the regex. -## Format JSON data +## Format JSON data -If JSON is selected as the language for the multiline text field, then the field will have a button that will format the JSON data of the field. User can also use the shortcut `(ctrl + \)` to format the JSON data. +If JSON is selected as the language for the multiline text field, the field will have a button that formats the JSON data of the field. You can also use the shortcut Ctrl + \ to format the JSON data. -If data is coming from a query, user can select the option to pre-format the JSON data returned by the query. +If data is coming from a query, you can select the option to pre-format the JSON data that's returned by the query. ## Next steps +[Get started with Azure Workbooks](workbooks-getting-started.md) |
| azure-monitor | Workbooks Time | https://github.com/MicrosoftDocs/azure-docs/commits/main/articles/azure-monitor/visualize/workbooks-time.md | Title: Azure Monitor workbooks time parameters + Title: Azure Monitor workbook time parameters description: Learn how to set time parameters to allow users to set the time context of analysis. The time parameters are used by almost all reports. Last updated 07/05/2022 # Workbook time parameters -Time parameters allow users to set the time context of analysis and is used by almost all reports. It is relatively simple to setup and use - allowing authors to specify the time ranges to show in the drop-down, including the option for custom time ranges. +With time parameters, you can set the time context of analysis, which is used by almost all reports. Time parameters are simple to set up and use. You can use them to specify the time ranges to show in a dropdown list. You can also create custom time ranges. ## Create a time parameter 1. Start with an empty workbook in edit mode.-1. Choose **Add parameters** from the links within the workbook. -1. Select **Add Parameter**. -1. In the new parameter pane that pops up enter: - - Parameter name: `TimeRange` - - Parameter type: `Time range picker` - - Required: `checked` - - Available time ranges: Last hour, Last 12 hours, Last 24 hours, Last 48 hours, Last 3 days, Last 7 days and Allow custom time range selection +1. Select **Add parameters** > **Add Parameter**. +1. In the new parameter pane that opens, enter: + - **Parameter name**: `TimeRange` + - **Parameter type**: `Time range picker` + - **Required**: `checked` + - **Available time ranges**: `Last hour`, `Last 12 hours`, `Last 24 hours`, `Last 48 hours`, `Last 3 days`, `Last 7 days`, and `Allow custom time range selection`. 1. Select **Save** to create the parameter. - :::image type="content" source="media/workbooks-time/time-settings.png" alt-text="Screenshot showing the creation of a workbooks time range parameter."::: + :::image type="content" source="media/workbooks-time/parameters-time.png" alt-text="Screenshot that shows a time range parameter in read mode."::: -This is what the workbook looks like in read-mode. +This is what the workbook looks like in read mode. +## Reference a time parameter -## Referencing a time parameter -### Referencing a time parameter with bindings +You can reference time parameters with bindings, KQL, or text. -1. Add a query control to the workbook and select an Application Insights resource. -1. Most workbook controls support a _Time Range_ scope picker. Open the _Time Range_ drop-down and select the `{TimeRange}` in the time range parameters group at the bottom. -1. This binds the time range parameter to the time range of the chart. The time scope of the sample query is now Last 24 hours. -1. Run query to see the results +### Reference a time parameter with bindings - :::image type="content" source="media/workbooks-time/time-binding.png" alt-text="Screenshot showing a workbooks time range parameter referenced via bindings."::: +1. Select **Add query** to add a query control, and then select an Application Insights resource. +1. Most workbook controls support a **Time Range** scope picker. Open the **Time Range** dropdown list and select the `{TimeRange}` in the **Time Range Parameters** group at the bottom: -### Referencing a time parameter with KQL + * This control binds the time range parameter to the time range of the chart. + * The time scope of the sample query is now **Last 24 hours**. +1. Run the query to see the results. -1. Add a query control to the workbook and select an Application Insights resource. -2. In the KQL, enter a time scope filter using the parameter: `| where timestamp {TimeRange}` -3. This expands on query evaluation time to `| where timestamp > ago(1d)`, which is the time range value of the parameter. -4. Run query to see the results + :::image type="content" source="media/workbooks-time/time-binding.png" alt-text="Screenshot that shows a time range parameter referenced via bindings."::: - :::image type="content" source="media/workbooks-time/time-in-code.png" alt-text="Screenshot showing a time range referenced in KQL."::: +### Reference a time parameter with KQL -### Referencing a time parameter in text +1. Select **Add query** to add a query control, and then select an Application Insights resource. +1. In the KQL, enter a time scope filter by using the parameter `| where timestamp {TimeRange}`: ++ * This parameter expands on the query evaluation time to `| where timestamp > ago(1d)`. + * This option is the time range value of the parameter. ++1. Run the query to see the results. ++ :::image type="content" source="media/workbooks-time/time-in-code.png" alt-text="Screenshot that shows a time range referenced in KQL."::: ++### Reference a time parameter in text 1. Add a text control to the workbook.-2. In the markdown, enter `The chosen time range is {TimeRange:label}` -3. Choose _Done Editing_ -4. The text control will show text: _The chosen time range is Last 24 hours_ +1. In the Markdown, enter `The chosen time range is {TimeRange:label}`. +1. Select **Done Editing**. +1. The text control shows the text *The chosen time range is Last 24 hours*. ## Time parameter options -| Parameter | Explanation | Example | +| Parameter | Description | Example | | - |:-|:-| | `{TimeRange}` | Time range label | Last 24 hours | | `{TimeRange:label}` | Time range label | Last 24 hours |-| `{TimeRange:value}` | Time range value | > ago(1d) | -| `{TimeRange:query}` | Time range query | > ago(1d) | +| `{TimeRange:value}` | Time range value | > ago (1d) | +| `{TimeRange:query}` | Time range query | > ago (1d) | | `{TimeRange:start}` | Time range start time | 3/20/2019 4:18 PM | | `{TimeRange:end}` | Time range end time | 3/21/2019 4:18 PM | | `{TimeRange:grain}` | Time range grain | 30 m | --### Using parameter options in a query +### Use parameter options in a query ```kusto requests requests ## Next steps +[Getting started with Azure Workbooks](workbooks-getting-started.md) |
| azure-resource-manager | Template Tutorial Deployment Script | https://github.com/MicrosoftDocs/azure-docs/commits/main/articles/azure-resource-manager/templates/template-tutorial-deployment-script.md | To complete this article, you need: Use the following CLI script to get the ID by providing the resource group name and the identity name. - ```azurecli-interactive - echo "Enter the Resource Group name:" && - read resourceGroupName && - az identity list -g $resourceGroupName - ``` + # [CLI](#tab/CLI) ++ ```azurecli-interactive + echo "Enter the Resource Group name:" && + read resourceGroupName && + az identity list -g $resourceGroupName + ``` ++ # [PowerShell](#tab/PowerShell) ++ ```powershell-interactive + $resourceGroupName = Read-Host -Prompt "Enter the Resource Group name" + (Get-AzUserAssignedIdentity -ResourceGroupName $resourceGroupname).id ++ Write-Host "Press [ENTER] to continue ..." + ``` ++ ## Open a Quickstart template The deployment script adds a certificate to the key vault. Configure the key vau 1. Select **Upload/download files**, and then select **Upload**. See the previous screenshot. Select the file you saved in the previous section. After uploading the file, you can use the `ls` command and the `cat` command to verify the file was uploaded successfully. -1. Run the following PowerShell script to deploy the template. +1. Run the following Azure CLI or Azure PowerShell script to deploy the template. ++ # [CLI](#tab/CLI) ++ ```azurecli-interactive + echo "Enter a project name that is used to generate resource names:" && + read projectName && + echo "Enter the location (i.e. centralus):" && + read location && + echo "Enter your email address used to sign in to Azure:" && + read upn && + echo "Enter the user-assigned managed identity ID:" && + read identityId && + adUserId=$((az ad user show --id jgao@microsoft.com) | jq -r '.id') && + resourceGroupName="${projectName}rg" && + keyVaultName="${projectName}kv" && + az group create --name $resourceGroupName --location $location && + az deployment group create --resource-group $resourceGroupName --template-file "$HOME/azuredeploy.json" --parameters identityId=$identityId keyVaultName=$keyVaultName objectId=$adUserId + ``` ++ # [PowerShell](#tab/PowerShell) ```azurepowershell-interactive $projectName = Read-Host -Prompt "Enter a project name that is used to generate resource names" The deployment script adds a certificate to the key vault. Configure the key vau Write-Host "Press [ENTER] to continue ..." ``` + + The deployment script service needs to create additional deployment script resources for script execution. The preparation and the cleanup process can take up to one minute to complete in addition to the actual script execution time. The deployment failed because the invalid command, `Write-Output1` is used in the script. You will get an error saying: |
| azure-signalr | Signalr Howto Authorize Application | https://github.com/MicrosoftDocs/azure-docs/commits/main/articles/azure-signalr/signalr-howto-authorize-application.md | Title: Authorize request to SignalR resources with Azure AD from Azure applicati description: This article provides information about authorizing request to SignalR resources with Azure AD from Azure applications Previously updated : 09/06/2021 Last updated : 07/18/2022 -+ ms.devlang: csharp The first step is to register an Azure application. 1. On the [Azure portal](https://portal.azure.com/), search for and select **Azure Active Directory** 2. Under **Manage** section, select **App registrations**.-3. Click **New registration**. +3. Select **New registration**.  4. Enter a display **Name** for your application.-5. Click **Register** to confirm the register. +5. Select **Register** to confirm the register. Once you have your application registered, you can find the **Application (client) ID** and **Directory (tenant) ID** under its Overview page. These GUIDs can be useful in the following steps. You can add both certificates and client secrets (a string) as credentials to yo The application requires a client secret to prove its identity when requesting a token. To create a client secret, follow these steps. 1. Under **Manage** section, select **Certificates & secrets**-1. On the **Client secrets** tab, click **New client secret**. +1. On the **Client secrets** tab, select **New client secret**.  1. Enter a **description** for the client secret, and choose a **expire time**. 1. Copy the value of the **client secret** and then paste it to a secure location. The best practice is to configure identity and credentials in your environment v | `AZURE_TENANT_ID` | The Azure Active Directory tenant(directory) ID. | | `AZURE_CLIENT_ID` | The client(application) ID of an App Registration in the tenant. | | `AZURE_CLIENT_SECRET` | A client secret that was generated for the App Registration. |-| `AZURE_CLIENT_CERTIFICATE_PATH` | A path to certificate and private key pair in PEM or PFX format, which can authenticate the App Registration. | +| `AZURE_CLIENT_CERTIFICATE_PATH` | A path to a certificate and private key pair in PEM or PFX format, which can authenticate the App Registration. | | `AZURE_USERNAME` | The username, also known as upn, of an Azure Active Directory user account. |-| `AZURE_PASSWORD` | The password of the Azure Active Directory user account. Note this does not support accounts with MFA enabled. | +| `AZURE_PASSWORD` | The password for the Azure Active Directory user account. Password isn't supported for accounts with MFA enabled. | -By doing this, you can use either [DefaultAzureCredential](/dotnet/api/azure.identity.defaultazurecredential) or [EnvironmentCredential](/dotnet/api/azure.identity.environmentcredential) to configure your SignalR endpoints. +You can use either [DefaultAzureCredential](/dotnet/api/azure.identity.defaultazurecredential) or [EnvironmentCredential](/dotnet/api/azure.identity.environmentcredential) to configure your SignalR endpoints. ```C# services.AddSignalR().AddAzureSignalR(option => Then you choose to configure your Azure application identity in [pre-defined env #### Configure identity in pre-defined environment variables -See [Environment variables](/dotnet/api/overview/azure/identity-readme#environment-variables) for the list of pre-defined environment variables. It is recommended when you have multiple services include SignalR dependent on the same Azure application identity, so that you don't need to configure the identity for each service. These environment variables might also be used by other services according to the settings of other services. +See [Environment variables](/dotnet/api/overview/azure/identity-readme#environment-variables) for the list of pre-defined environment variables. When you have multiple services, we recommend that you use the same application identity, so that you don't need to configure the identity for each service. These environment variables might also be used by other services according to the settings of other services. For example, to use client secret credentials, configure as follows in the `local.settings.json` file. ```json AZURE_CLIENT_SECRET = ... #### Configure identity in SignalR specified variables -The SignalR specified variables share the same key prefix with `serviceUri` key. Here is the list of variables you might use: +The SignalR specified variables share the same key prefix with `serviceUri` key. Here's the list of variables you might use: * clientId * clientSecret * tenantId |
| azure-signalr | Signalr Howto Authorize Managed Identity | https://github.com/MicrosoftDocs/azure-docs/commits/main/articles/azure-signalr/signalr-howto-authorize-managed-identity.md | Title: Authorize request to SignalR resources with Azure AD from managed identit description: This article provides information about authorizing request to SignalR resources with Azure AD from managed identities Previously updated : 09/06/2021 Last updated : 07/18/2022 -+ ms.devlang: csharp -This article shows how to configure your SignalR resource and codes to authorize the request to a SignalR resource from a managed identity. +This article shows how to configure your SignalR resource and code to authorize a managed identity request to a SignalR resource. ## Configure managed identities The first step is to configure managed identities. -This is an example for configuring `System-assigned managed identity` on a `Virtual Machine` using the Azure portal. +This example shows you how to configure `System-assigned managed identity` on a `Virtual Machine` using the Azure portal. 1. Open [Azure portal](https://portal.azure.com/), Search for and select a Virtual Machine. 1. Under **Settings** section, select **Identity**. 1. On the **System assigned** tab, toggle the **Status** to **On**. -1. Click the **Save** button to confirm the change. +1. Select the **Save** button to confirm the change. To learn how to create user-assigned managed identities, see this article: To learn more about how to assign and manage Azure role assignments, see these a You can use either [DefaultAzureCredential](/dotnet/api/overview/azure/identity-readme#defaultazurecredential) or [ManagedIdentityCredential](/dotnet/api/azure.identity.managedidentitycredential) to configure your SignalR endpoints. - However, the best practice is to use `ManagedIdentityCredential` directly. -The system-assigned managed identity will be used by default, but **please make sure that you don't configure any environment variables** that the [EnvironmentCredential](/dotnet/api/azure.identity.environmentcredential) preserved if you were using `DefaultAzureCredential`. Otherwise it will fall back to use `EnvironmentCredential` to make the request and it will result to a `Unauthorized` response in most cases. +The system-assigned managed identity will be used by default, but **make sure that you don't configure any environment variables** that the [EnvironmentCredential](/dotnet/api/azure.identity.environmentcredential) preserved if you were using `DefaultAzureCredential`. Otherwise it will fall back to use `EnvironmentCredential` to make the request and it will result to a `Unauthorized` response in most cases. ```C# services.AddSignalR().AddAzureSignalR(option => services.AddSignalR().AddAzureSignalR(option => ### Azure Functions SignalR bindings -Azure Functions SignalR bindings use [application settings](../azure-functions/functions-how-to-use-azure-function-app-settings.md) on portal or [`local.settings.json`](../azure-functions/functions-develop-local.md#local-settings-file) at local to configure managed-identity to access your SignalR resources. +Azure Functions SignalR bindings use [application settings](../azure-functions/functions-how-to-use-azure-function-app-settings.md) on portal or [`local.settings.json`](../azure-functions/functions-develop-local.md#local-settings-file) at local to configure managed identity to access your SignalR resources. You might need a group of key-value pairs to configure an identity. The keys of all the key-value pairs must start with a **connection name prefix** (defaults to `AzureSignalRConnectionString`) and a separator (`__` on portal and `:` at local). The prefix can be customized with binding property [`ConnectionStringSetting`](../azure-functions/functions-bindings-signalr-service.md). #### Using system-assigned identity -If you only configure the service URI, then the `DefaultAzureCredential` is used. This is useful when you want to share the same configuration on Azure and local dev environment. To learn how `DefaultAzureCredential` works, see [DefaultAzureCredential](/dotnet/api/overview/azure/identity-readme#defaultazurecredential). +If you only configure the service URI, then the `DefaultAzureCredential` is used. This class is useful when you want to share the same configuration on Azure and local dev environment. To learn how `DefaultAzureCredential` works, see [DefaultAzureCredential](/dotnet/api/overview/azure/identity-readme#defaultazurecredential). -On Azure portal, set as follows to configure a `DefaultAzureCredential`. If you make sure that you don't configure any [environment variables listed here](/dotnet/api/overview/azure/identity-readme#environment-variables), then the system-assigned identity will be used to authenticate. +On Azure portal, use the following example to configure a `DefaultAzureCredential`. If don't configure any [environment variables listed here](/dotnet/api/overview/azure/identity-readme#environment-variables), then the system-assigned identity will be used to authenticate. ``` <CONNECTION_NAME_PREFIX>__serviceUri=https://<SIGNALR_RESOURCE_NAME>.service.signalr.net ``` -Here is a config sample of `DefaultAzureCredential` in the `local.settings.json` file. Note that at local there is no managed-identity, and the authentication via Visual Studio, Azure CLI and Azure PowerShell accounts will be attempted in order. +Here's a config sample of `DefaultAzureCredential` in the `local.settings.json` file. At the local scope there's no managed identity, and the authentication via Visual Studio, Azure CLI, and Azure PowerShell accounts will be attempted in order. ```json { "Values": { Here is a config sample of `DefaultAzureCredential` in the `local.settings.json` } ``` -If you want to use system-assigned identity independently and without the influence of [other environment variables](/dotnet/api/overview/azure/identity-readme#environment-variables), you should set the `credential` key with connection name prefix to `managedidentity`. Here is an application settings sample: +If you want to use system-assigned identity independently and without the influence of [other environment variables](/dotnet/api/overview/azure/identity-readme#environment-variables), you should set the `credential` key with connection name prefix to `managedidentity`. Here's an application settings sample: ``` <CONNECTION_NAME_PREFIX>__serviceUri = https://<SIGNALR_RESOURCE_NAME>.service.signalr.net If you want to use system-assigned identity independently and without the influe #### Using user-assigned identity -If you want to use user-assigned identity, you need to assign one more `clientId` key with connection name prefix compared to system-assigned identity. Here is the application settings sample: +If you want to use user-assigned identity, you need to assign one more `clientId` key with connection name prefix compared to system-assigned identity. Here's the application settings sample: ``` <CONNECTION_NAME_PREFIX>__serviceUri = https://<SIGNALR_RESOURCE_NAME>.service.signalr.net <CONNECTION_NAME_PREFIX>__credential = managedidentity |
| azure-signalr | Signalr Howto Azure Policy | https://github.com/MicrosoftDocs/azure-docs/commits/main/articles/azure-signalr/signalr-howto-azure-policy.md | Title: Compliance using Azure Policy description: Assign built-in policies in Azure Policy to audit compliance of your Azure SignalR Service resources. - Previously updated : 06/17/2020+ Last updated : 07/18/2022 |
| azure-signalr | Signalr Howto Diagnostic Logs | https://github.com/MicrosoftDocs/azure-docs/commits/main/articles/azure-signalr/signalr-howto-diagnostic-logs.md | Title: Resource Logs for Azure SignalR Service description: Learn how to set up resource logs for Azure SignalR Service and how to utilize it to self-troubleshoot. - Previously updated : 04/20/2022+ Last updated : 07/18/2022 To enable resource logs, you'll need somewhere to store your log data. This tuto ## Set up resource logs for an Azure SignalR Service -You can view resource logs for Azure SignalR Service. These logs provide richer view of connectivity to your Azure SignalR Service instance. The resource logs provide detailed information of every connection. For example, basic information (user ID, connection ID and transport type, and so on) and event information (connect, disconnect and abort event, and so on) of the connection. resource logs can be used for issue identification, connection tracking and analysis. +You can view resource logs for Azure SignalR Service. These logs provide a richer view of connectivity to your Azure SignalR Service instance. The resource logs provide detailed information for every connection. For example, basic information (user ID, connection ID, and transport type, and so on) and event information (connect, disconnect and abort event, and so on) of the connection. resource logs can be used for issue identification, connection tracking and analysis. ### Enable resource logs To view resource logs, follow these steps: :::image type="content" alt-text="Query log in Log Analytics" source="./media/signalr-tutorial-diagnostic-logs/query-log-in-log-analytics.png" lightbox="./media/signalr-tutorial-diagnostic-logs/query-log-in-log-analytics.png"::: -To use sample query for SignalR service, please follow the steps below: +To use sample query for SignalR service, follow the steps below: 1. Select `Logs` in your target Log Analytics. 2. Select `Queries` to open query explorer. 3. Select `Resource type` to group sample queries in resource type. Reason | Description Connection count reaches limit | Connection count reaches limit of your current price tier. Consider scale up service unit Application server closed the connection | App server triggers the abortion. It can be considered as an expected abortion Connection ping timeout | Usually it's caused by network issue. Consider checking your app server's availability from the internet-Service reloading, please reconnect | Azure SignalR Service is reloading. Azure SignalR support auto-reconnecting, you can wait until reconnected or manually reconnect to Azure SignalR Service +Service reloading, try reconnecting | Azure SignalR Service is reloading. Azure SignalR support auto-reconnecting, you can wait until reconnected or manually reconnect to Azure SignalR Service Internal server transient error | Transient error occurs in Azure SignalR Service, should be auto-recovered Server connection dropped | Server connection drops with unknown error, consider self-troubleshooting with service/server/client side log first. Try to exclude basic issues (e.g Network issue, app server side issue, etc.). If the issue isn't resolved, contact us for further help. For more information, see [Get help](#get-help) section. ###### Unexpected connection growing -To troubleshoot about unexpected connection growing, the first thing you need to do is filter out the extra connections. You can add unique test user ID to your test client connection. Then verify it in with resource logs, you see more than one client connections have the same test user ID or IP, then it's likely the client side create and establish more connections than expectation. Check your client side. +To troubleshoot about unexpected connection growing, the first thing you need to do is filter out the extra connections. You can add unique test user ID to your test client connection. Check the resource logs. If you see more than one client connections have the same test user ID or IP, then it's likely the client side is creating more connections than expected. Check your client side. ##### Authorization failure -If you get 401 Unauthorized returned for client requests, check your resource logs. If you encounter `Failed to validate audience. Expected Audiences: <valid audience>. Actual Audiences: <actual audience>`, it means your all audiences in your access token is invalid. Try to use the valid audiences suggested in the log. +If you get 401 Unauthorized returned for client requests, check your resource logs. If you encounter `Failed to validate audience. Expected Audiences: <valid audience>. Actual Audiences: <actual audience>`, it means your all audiences in your access token are invalid. Try to use the valid audiences suggested in the log. ##### Throttling -If you find that you can't establish SignalR client connections to Azure SignalR Service, check your resource logs. If you encounter `Connection count reaches limit` in resource log, you establish too many connections to SignalR Service, which reach the connection count limit. Consider scaling up your SignalR Service. If you encounter `Message count reaches limit` in resource log, it means you use free tier, and you use up the quota of messages. If you want to send more messages, consider changing your SignalR Service to standard tier to send additional messages. For more information, see [Azure SignalR Service Pricing](https://azure.microsoft.com/pricing/details/signalr-service/). +If you find that you can't establish SignalR client connections to Azure SignalR Service, check your resource logs. If you encounter `Connection count reaches limit` in resource log, you establish too many connections to SignalR Service, which reach the connection count limit. Consider scaling up your SignalR Service. If you encounter `Message count reaches limit` in resource log, it means you use free tier, and you use up the quota of messages. If you want to send more messages, consider changing your SignalR Service to standard tier to send more messages. For more information, see [Azure SignalR Service Pricing](https://azure.microsoft.com/pricing/details/signalr-service/). #### Message related issues When encountering message related problem, you can take advantage of messaging l > > For ASP.NET, see [here](/aspnet/signalr/overview/testing-and-debugging/enabling-signalr-tracing) to enable logging in server and client. -If you don't mind potential performance impact and no client-to-server direction message, check the `Messaging` in `Log Source Settings/Types` to enable *collect-all* log collecting behavior. For more information about this behavior, see [collect all section](#collect-all). +If you don't mind potential performance effects and no client-to-server direction message, check the `Messaging` in `Log Source Settings/Types` to enable *collect-all* log collecting behavior. For more information about this behavior, see [collect all section](#collect-all). Otherwise, uncheck the `Messaging` to enable *collect-partially* log collecting behavior. This behavior requires configuration in client and server to enable it. For more information, see [collect partially section](#collect-partially). SignalR service only trace messages in direction **from server to client via Sig > If you want to trace message and [send messages from outside a hub](/aspnet/core/signalr/hubcontext) in your app server, you need to enable **collect all** collecting behavior to collect message logs for the messages which are not originated from diagnostic clients. > Diagnostic clients works for both **collect all** and **collect partially** collecting behaviors. It has higher priority to collect logs. For more information, see [diagnostic client section](#diagnostic-client). -By checking the sign in server and service side, you can easily find out whether the message is sent from server, arrives at SignalR service, and leaves from SignalR service. Basically, by checking if the *received* and *sent* message are matched or not based on message tracing ID, you can tell whether the message loss issue is in server or SignalR service in this direction. For more information, see the [details](#message-flow-detail-for-path3) below. +By checking the sign-in server and service side, you can easily find out whether the message is sent from server, arrives at SignalR service, and leaves from SignalR service. Basically, by checking if the *received* and *sent* message are matched or not based on message tracing ID, you can tell whether the message loss issue is in server or SignalR service in this direction. For more information, see the [details](#message-flow-detail-for-path3) below. For **collect partially** collecting behavior: Once you mark the client as diagnostic client, SignalR service will trace messages in both directions. -By checking the sign in server and service side, you can easily find out whether the message is pass the server or SignalR service successfully. Basically, by checking if the *received* and *sent* message are matched or not based on message tracing ID, you can tell whether the message loss issue is in server or SignalR service. For more information, see the details below. +By checking the sign-in server and service side, you can easily find out whether the message is pass the server or SignalR service successfully. Basically, by checking if the *received* and *sent* message are matched or not based on message tracing ID, you can tell whether the message loss issue is in server or SignalR service. For more information, see the details below. **Details of the message flow** For the direction **from client to server via SignalR service**, SignalR service will **only** consider the invocation that is originated from diagnostic client, that is, the message generated directly in diagnostic client, or service message generated due to the invocation of diagnostic client indirectly. -The tracing ID will be generated in SignalR service once the message arrives at SignalR service in **Path 1**. SignalR service will generate a log `Received a message <MessageTracingId> from client connection <ConnectionId>.` for each message in diagnostic client. Once the message leaves from the SignalR to server, SignalR service will generate a log `Sent a message <MessageTracingId> to server connection <ConnectionId> successfully.` If you see these two logs, you can be sure that the message passes through SignalR service successfully. +The tracing ID will be generated in SignalR service once the message arrives at SignalR service in **Path 1**. SignalR service will generate a log `Received a message <MessageTracingId> from client connection <ConnectionId>.` for each message in diagnostic client. Once the message leaves from the SignalR to server, SignalR service will generate a log message `Sent a message <MessageTracingId> to server connection <ConnectionId> successfully.` If you see these two logs, you can be sure that the message passes through SignalR service successfully. > [!NOTE] > Due to the limitation of ASP.NET Core SignalR, the message comes from client doesn't contains any message level ID. But ASP.NET SignalR generate *invocation ID* for each message, you can use it to map with the tracing ID. Once you enable messaging logs, you're able to compare the message arriving time 1. Find the message logs in server to find when the client joined the group and when the group message is sent. 1. Get the message tracing ID A of joining the group and the message tracing ID B of group message from the message logs. 1. Filter these message tracing ID among messaging logs in your log archive target, then compare their arriving timestamps, you'll find which message is arrived first in SignalR service.-1. If message tracing ID A's arriving time later than B's, then you must be sending group message **before** the client joining the group.Then you need to make sure the client is in the group before sending group messages. +1. If message tracing ID A arriving time later than B arriving time, then you must be sending group message **before** the client joining the group.Then you need to make sure the client is in the group before sending group messages. If a message get lost in SignalR or server, try to get the warning logs based on the message tracing ID to get the reason. If you need further help, see the [get help section](#get-help). -## Advanced topic +## Advanced ### Resource logs collecting behaviors Provide: 5. [Optional] Repro code > [!NOTE]-> If you open issue in GitHub, keep your sensitive information (For example, resource ID, server/client logs) private, only send to members in Microsoft organization privately. +> If you open an issue in GitHub, keep your sensitive information (For example, resource ID, server/client logs) private, only send to members in Microsoft organization privately. |
| azure-signalr | Signalr Howto Event Grid Integration | https://github.com/MicrosoftDocs/azure-docs/commits/main/articles/azure-signalr/signalr-howto-event-grid-integration.md | description: A guide to show you how to enable Event Grid events for your Signal - Previously updated : 11/13/2019+ Last updated : 07/18/2022 Azure Event Grid is a fully managed event routing service that provides uniform ## Create a resource group -An Azure resource group is a logical container in which you deploy and manage your Azure resources. The following [az group create][az-group-create] command creates a resource group named *myResourceGroup* in the *eastus* region. If you want to use a different name for your resource group, set `RESOURCE_GROUP_NAME` to a different value. +An Azure resource group is a logical container in which you deploy and manage your Azure resources. The command [az group create][az-group-create] creates a resource group named *myResourceGroup* in the *eastus* region. If you want to use a different name for your resource group, set `RESOURCE_GROUP_NAME` to a different value. ```azurecli-interactive RESOURCE_GROUP_NAME=myResourceGroup az group create --name $RESOURCE_GROUP_NAME --location eastus ## Create a SignalR Service -Next, deploy an Azure Signalr Service into the resource group with the following commands. +Next, deploy an Azure Signals Service into the resource group with the following commands. ```azurecli-interactive SIGNALR_NAME=SignalRTestSvc az signalr create --resource-group $RESOURCE_GROUP_NAME --name $SIGNALR_NAME --sku Free_F1 ``` -Once the SignalR Service has been created, the Azure CLI returns output similar to the following: +Once the SignalR Service has been created, the Azure CLI returns output similar to the following example: ```json { az deployment group create \ --parameters siteName=$SITE_NAME hostingPlanName=$SITE_NAME-plan ``` -Once the deployment succeeds (it might take a few minutes), open a browser and navigate to your web app to make sure it's running: +Once the deployment succeeds (it might take a few minutes), open your browser, and then go to your web app to make sure it's running: `http://<your-site-name>.azurewebsites.net` Once the deployment succeeds (it might take a few minutes), open a browser and n ## Subscribe to registry events -In Event Grid, you subscribe to a *topic* to tell it which events you want to track, and where to send them. The following [az eventgrid event-subscription create][az-eventgrid-event-subscription-create] command subscribes to the Azure SignalR Service you created, and specifies your web app's URL as the endpoint to which it should send events. The environment variables you populated in earlier sections are reused here, so no edits are required. +In Event Grid, you subscribe to a *topic* to tell it which events you want to track, and where to send them. The command [az eventgrid event-subscription create][az-eventgrid-event-subscription-create] subscribes to the Azure SignalR Service you created and specifies your web app's URL as the endpoint to which it should send events. The environment variables you populated in earlier sections are reused here, so no edits are required. ```azurecli-interactive SIGNALR_SERVICE_ID=$(az signalr show --resource-group $RESOURCE_GROUP_NAME --name $SIGNALR_NAME --query id --output tsv) az eventgrid event-subscription create \ --endpoint $APP_ENDPOINT ``` -When the subscription is completed, you should see output similar to the following: +When the subscription is completed, you should see output similar to the following example: ```JSON { When the subscription is completed, you should see output similar to the followi ## Trigger registry events -Switch to the service mode to `Serverless Mode` and setup a client connection to the SignalR Service. You can take [Serverless Sample](https://github.com/aspnet/AzureSignalR-samples/tree/master/samples/Serverless) as a reference. +Switch to the service mode to `Serverless Mode` and set up a client connection to the SignalR Service. You can take [Serverless Sample](https://github.com/aspnet/AzureSignalR-samples/tree/master/samples/Serverless) as a reference. ```bash git clone git@github.com:aspnet/AzureSignalR-samples.git dotnet run ## View registry events -You have now connected a client to the SignalR Service. Navigate to your Event Grid Viewer web app, and you should see a `ClientConnectionConnected` event. If you terminate the client, you will also see a `ClientConnectionDisconnected` event. +You've now connected a client to the SignalR Service. Navigate to your Event Grid Viewer web app, and you should see a `ClientConnectionConnected` event. If you terminate the client, you'll also see a `ClientConnectionDisconnected` event. <!-- LINKS - External --> [azure-account]: https://azure.microsoft.com/free/?WT.mc_id=A261C142F |
| azure-signalr | Signalr Howto Key Rotation | https://github.com/MicrosoftDocs/azure-docs/commits/main/articles/azure-signalr/signalr-howto-key-rotation.md | Title: How to rotate access key for Azure SignalR Service description: An overview on why the customer needs to routinely rotate the access keys and how to do it with the Azure portal GUI and the Azure CLI. - Previously updated : 03/01/2019+ Last updated : 07/18/2022 # How to rotate access key for Azure SignalR Service -Each Azure SignalR Service instance has a pair of access keys called Primary and Secondary keys. They're used to authenticate SignalR clients when requests are made to the service. The keys are associated with the instance endpoint url. Keep your keys secure, and rotate them regularly. You're provided with two access keys, so you can maintain connections by using one key while regenerating the other. +Each Azure SignalR Service instance has a pair of access keys called Primary and Secondary keys. They're used to authenticate SignalR clients when requests are made to the service. The keys are associated with the instance endpoint URL. Keep your keys secure, and rotate them regularly. You're provided with two access keys so that you can maintain connections by using one key while regenerating the other. ## Why rotate access keys? |
| azure-signalr | Signalr Howto Move Across Regions | https://github.com/MicrosoftDocs/azure-docs/commits/main/articles/azure-signalr/signalr-howto-move-across-regions.md | You can use an Azure Resource Manager template to export the existing configurat ## Prerequisites - Ensure that the service and features that you're using are supported in the target region.-- Verify that your Azure subscription allows you to create SignalR resource in the target region that's used.+- Verify that your Azure subscription allows you to create SignalR resource in the target region. - Contact support to enable the required quota. - For preview features, ensure that your subscription is allowlisted for the target region. |
| azure-signalr | Signalr Howto Scale Autoscale | https://github.com/MicrosoftDocs/azure-docs/commits/main/articles/azure-signalr/signalr-howto-scale-autoscale.md | Title: Auto scale Azure SignalR Service description: Learn how to autoscale Azure SignalR Service. -+ Last updated 06/06/2022 |
| azure-signalr | Signalr Howto Scale Multi Instances | https://github.com/MicrosoftDocs/azure-docs/commits/main/articles/azure-signalr/signalr-howto-scale-multi-instances.md | Title: Scale with multiple instances - Azure SignalR Service -description: In many scaling scenarios, customer often needs to provision multiple instances and configure to use them together, to create a large-scale deployment. For example, sharding requires multiple instances support. +description: In many scaling scenarios, customers often need to create multiple instances and use them together to create a large-scale deployment. For example, sharding requires multiple instances support. -+ ms.devlang: csharp Previously updated : 04/08/2022 Last updated : 07/18/2022 # How to scale SignalR Service with multiple instances? By default, the SDK uses the [DefaultEndpointRouter](https://github.com/Azure/az 2. Server message routing - When *sending message to a specific **connection***, and the target connection is routed to current server, the message goes directly to that connected endpoint. Otherwise, the messages are broadcasted to every Azure SignalR endpoint. + When sending a message to a specific *connection* and the target connection is routed to current server, the message goes directly to that connected endpoint. Otherwise, the messages are broadcasted to every Azure SignalR endpoint. #### Customize routing algorithm You can create your own router when you have special knowledge to identify which endpoints the messages should go to. private class CustomRouter : EndpointRouterDecorator ## Dynamic Scale ServiceEndpoints -From SDK version 1.5.0, we're enabling dynamic scale ServiceEndpoints for ASP.NET Core version first. So you don't have to restart app server when you need to add/remove a ServiceEndpoint. As ASP.NET Core is supporting default configuration like `appsettings.json` with `reloadOnChange: true`, you don't need to change a code and it's supported by nature. And if you'd like to add some customized configuration and work with hot-reload, please refer to [this](/aspnet/core/fundamentals/configuration/?view=aspnetcore-3.1&preserve-view=true). +From SDK version 1.5.0, we're enabling dynamic scale ServiceEndpoints for ASP.NET Core version first. So you don't have to restart app server when you need to add/remove a ServiceEndpoint. As ASP.NET Core is supporting a default configuration like `appsettings.json` with `reloadOnChange: true`, you don't need to change code, and it's supported by nature. And if you'd like to add some customized configuration and work with hot-reload, refer to [Configuration in ASP.NET Core](/aspnet/core/fundamentals/configuration/?view=aspnetcore-3.1&preserve-view=true). -> [!NOTE] +> [!NOTE] > > Considering the time of connection set-up between server/service and client/service may be different, to ensure no message loss during the scale process, we have a staging period waiting for server connections be ready before open the new ServiceEndpoint to clients. Usually it takes seconds to complete and you'll be able to see log like `Succeed in adding endpoint: '{endpoint}'` which indicates the process complete. But for some unexpected reasons like cross-region network issue or configuration inconsistent on different app servers, the staging period will not be able to finish correctly. Since limited things can be done in these cases, we choose to promote the scale as it is. It's suggested to restart App Server when you find the scaling process not working correctly. > In cross-region cases, network can be unstable. For one app server located in *E  -When a client tries `/negotiate` with the app server, with the default router, SDK **randomly selects** one endpoint from the set of available `primary` endpoints. When the primary endpoint is not available, SDK then **randomly selects** from all available `secondary` endpoints. The endpoint is marked as **available** when the connection between server and the service endpoint is alive. +When a client tries `/negotiate` with the app server, with the default router, SDK **randomly selects** one endpoint from the set of available `primary` endpoints. When the primary endpoint isn't available, SDK then **randomly selects** from all available `secondary` endpoints. The endpoint is marked as **available** when the connection between server and the service endpoint is alive. -In cross-region scenario, when a client tries `/negotiate` with the app server hosted in *East US*, by default it always returns the `primary` endpoint located in the same region. When all *East US* endpoints are not available, the client is redirected to endpoints in other regions. Fail-over section below describes the scenario in detail. +In cross-region scenario, when a client tries `/negotiate` with the app server hosted in *East US*, by default it always returns the `primary` endpoint located in the same region. When all *East US* endpoints aren't available, the client is redirected to endpoints in other regions. Fail over section below describes the scenario in detail.  ## Fail-over -When all `primary` endpoints are not available, client's `/negotiate` picks from the available `secondary` endpoints. This fail-over mechanism requires that each endpoint should serve as `primary` endpoint to at least one app server. +When all `primary` endpoints aren't available, client's `/negotiate` picks from the available `secondary` endpoints. This fail-over mechanism requires that each endpoint should serve as `primary` endpoint to at least one app server.  |
| azure-signalr | Signalr Howto Scale Signalr | https://github.com/MicrosoftDocs/azure-docs/commits/main/articles/azure-signalr/signalr-howto-scale-signalr.md | Title: Scale an instance of Azure SignalR Service description: Learn how to scale an Azure SignalR Service instance to add or reduce capacity, through Azure portal or Azure CLI. - Previously updated : 9/9/2020+ Last updated : 07/18/2022 This article shows you how to scale your instance of Azure SignalR Service. Ther * [Scale up](https://en.wikipedia.org/wiki/Scalability#Horizontal_and_vertical_scaling): Get more units, connections, messages, and more. You scale up by changing the pricing tier from Free to Standard. * [Scale out](https://en.wikipedia.org/wiki/Scalability#Horizontal_and_vertical_scaling): Increase the number of SignalR units. You can scale out to as many as 100 units. There are limited unit options to select for the scaling: 1, 2, 5, 10, 20, 50 and 100 units for a single SignalR Service instance. -The scale settings take a few minutes to apply. In rare cases, it may take around 30 minutes to apply. They don't require you to change your code or redeploy your server application. +The scale settings take a few minutes to apply. In rare cases, it may take around 30 minutes to apply. Scaling doesn't require you to change your code or redeploy your server application. For information about the pricing and capacities of individual SignalR Service, see [Azure SignalR Service Pricing Details](https://azure.microsoft.com/pricing/details/signalr-service/). For information about the pricing and capacities of individual SignalR Service, 2. In your SignalR Service page, from the left menu, select **Scale**. -3. Choose your pricing tier, and then click **Select**. Set the unit count for **Standard** Tier. +3. Choose your pricing tier, and then select **Select**. Set the unit count for **Standard** Tier.  -4. Click **Save**. +4. Select **Save**. ## Scale using Azure CLI az signalr update \ --unit-count 50 ``` -Make a note of the actual name generated for the new resource group. You will use that resource group name when you want to delete all group resources. +Make a note of the actual name generated for the new resource group. You'll use that resource group name when you want to delete all group resources. [!INCLUDE [cli-script-clean-up](../../includes/cli-script-clean-up.md)] |
| azure-signalr | Signalr Howto Troubleshoot Guide | https://github.com/MicrosoftDocs/azure-docs/commits/main/articles/azure-signalr/signalr-howto-troubleshoot-guide.md | Title: "Troubleshooting guide for Azure SignalR Service" description: Learn how to troubleshoot common issues - Previously updated : 11/06/2020+ Last updated : 07/18/2022 ms.devlang: csharp # Troubleshooting guide for Azure SignalR Service common issues -This guidance is to provide useful troubleshooting guide based on the common issues customers met and resolved in the past years. +This article provides troubleshooting guidance for some of the common issues that customers might encounter. ## Access token too long With SDK version **1.0.6** or higher, `/negotiate` will throw `413 Payload Too L By default, claims from `context.User.Claims` are included when generating JWT access token to **ASRS**(**A**zure **S**ignal**R** **S**ervice), so that the claims are preserved and can be passed from **ASRS** to the `Hub` when the client connects to the `Hub`. -In some cases, `context.User.Claims` are used to store lots of information for app server, most of which are not used by `Hub`s but by other components. +In some cases, `context.User.Claims` are used to store lots of information for app server, most of which aren't used by `Hub`s but by other components. The generated access token is passed through the network, and for WebSocket/SSE connections, access tokens are passed through query strings. So as the best practice, we suggest only passing **necessary** claims from the client through **ASRS** to your app server when the Hub needs. -There is a `ClaimsProvider` for you to customize the claims passing to **ASRS** inside the access token. +There's a `ClaimsProvider` for you to customize the claims passing to **ASRS** inside the access token. For ASP.NET Core: services.MapAzureSignalR(GetType().FullName, options => ### Possible errors * ASP.NET "No server available" error [#279](https://github.com/Azure/azure-signalr/issues/279)-* ASP.NET "The connection is not active, data cannot be sent to the service." error [#324](https://github.com/Azure/azure-signalr/issues/324) +* ASP.NET "The connection isn't active, data cannot be sent to the service." error [#324](https://github.com/Azure/azure-signalr/issues/324) * "An error occurred while making the HTTP request to `https://<API endpoint>`. This error could be because the server certificate is not configured properly with HTTP.SYS in the HTTPS case. This error could also be caused by a mismatch of the security binding between the client and the server." ### Root cause -Azure Service only supports TLS1.2 for security concerns. With .NET framework, it is possible that TLS1.2 is not the default protocol. As a result, the server connections to ASRS cannot be successfully established. +Azure Service only supports TLS1.2 for security concerns. With .NET framework, it's possible that TLS1.2 isn't the default protocol. As a result, the server connections to ASRS can't be successfully established. ### Troubleshooting guide Check if your client request has multiple `hub` query strings. `hub` is a preser ### Root cause -Currently the default value of JWT token's lifetime is 1 hour. +Currently the default value of JWT token's lifetime is one (1) hour. -For ASP.NET Core SignalR, when it is using WebSocket transport type, it is OK. +For ASP.NET Core SignalR, when it's using WebSocket transport type, it's OK. -For ASP.NET Core SignalR's other transport type, SSE and long-polling, this means by default the connection can at most persist for 1 hour. +For ASP.NET Core SignalR's other transport type, SSE and long-polling, the default lifetime means by default the connection can at most persist for one hour. -For ASP.NET SignalR, the client sends a `/ping` KeepAlive request to the service from time to time, when the `/ping` fails, the client **aborts** the connection and never reconnect. This means, for ASP.NET SignalR, the default token lifetime makes the connection lasts for **at most** 1 hour for all the transport type. +For ASP.NET SignalR, the client sends a `/ping` "keep alive" request to the service from time to time, when the `/ping` fails, the client **aborts** the connection and never reconnect. For ASP.NET SignalR, the default token lifetime makes the connection last for *at most* one hour for all the transport type. ### Solution -For security concerns, extend TTL is not encouraged. We suggest adding reconnect logic from the client to restart the connection when such 401 occurs. When the client restarts the connection, it will negotiate with app server to get the JWT token again and get a renewed token. +For security concerns, extend TTL isn't encouraged. We suggest adding reconnect logic from the client to restart the connection when such 401 occurs. When the client restarts the connection, it will negotiate with app server to get the JWT token again and get a renewed token. Check [here](#restart_connection) for how to restart client connections. For a SignalR persistent connection, it first `/negotiate` to Azure SignalR serv ### Troubleshooting guide * Following [How to view outgoing requests](#view_request) to get the request from the client to the service.-* Check the URL of the request when 404 occurs. If the URL is targeting to your web app, and similar to `{your_web_app}/hubs/{hubName}`, check if the client `SkipNegotiation` is `true`. When using Azure SignalR, the client receives redirect URL when it first negotiates with the app server. The client should **NOT** skip negotiation when using Azure SignalR. -* Another 404 can happen when the connect request is handled more than **5** seconds after `/negotiate` is called. Check the timestamp of the client request, and open an issue to us if the request to the service has a slow response. +* Check the URL of the request when 404 occurs. If the URL is targeting to your web app, and similar to `{your_web_app}/hubs/{hubName}`, check if the client `SkipNegotiation` is `true`. The client receives a redirect URL when it first negotiates with the app server. The client must *not* skip negotiation when using Azure SignalR. +* Another 404 can happen when the connect request is handled more than five (5) seconds after `/negotiate` is called. Check the timestamp of the client request, and open an issue to us if the request to the service has a slow response. [Having issues or feedback about the troubleshooting? Let us know.](https://aka.ms/asrs/survey/troubleshooting) ## 404 returned for ASP.NET SignalR's reconnect request -For ASP.NET SignalR, when the [client connection drops](#client_connection_drop), it reconnects using the same `connectionId` for three times before stopping the connection. `/reconnect` can help if the connection is dropped due to network intermittent issues that `/reconnect` can reestablish the persistent connection successfully. Under other circumstances, for example, the client connection is dropped due to the routed server connection is dropped, or SignalR Service has some internal errors like instance restart/failover/deployment, the connection no longer exists, thus `/reconnect` returns `404`. It is the expected behavior for `/reconnect` and after three times retry the connection stops. We suggest having [connection restart](#restart_connection) logic when connection stops. +For ASP.NET SignalR, when the [client connection drops](#client_connection_drop), it reconnects using the same `connectionId` for three times before stopping the connection. `/reconnect` can help if the connection is dropped due to network intermittent issues that `/reconnect` can reestablish the persistent connection successfully. Under other circumstances, for example, the client connection is dropped due to the routed server connection is dropped, or SignalR Service has some internal errors like instance restart/failover/deployment, the connection no longer exists, thus `/reconnect` returns `404`. It's the expected behavior for `/reconnect` and after three times retry the connection stops. We suggest having [connection restart](#restart_connection) logic when connection stops. [Having issues or feedback about the troubleshooting? Let us know.](https://aka.ms/asrs/survey/troubleshooting) We suggest having a random delay before reconnecting, check [here](#restart_conn ### Root cause -This error is reported when there is no server connection to Azure SignalR Service connected. +This error is reported when there's no server connection to Azure SignalR Service connected. ### Troubleshooting guide When the client is connected to the Azure SignalR, the persistent connection bet ### Root cause Client connections can drop under various circumstances:-* When `Hub` throws exceptions with the incoming request. -* When the server connection, which the client routed to, drops, see below section for details on [server connection drops](#server_connection_drop). -* When a network connectivity issue happens between client and SignalR Service. -* When SignalR Service has some internal errors like instance restart, failover, deployment, and so on. +* When `Hub` throws exceptions with the incoming request +* When the server connection, which the client routed to, drops, see below section for details on [server connection drops](#server_connection_drop) +* When a network connectivity issue happens between client and SignalR Service +* When SignalR Service has some internal errors like instance restart, failover, deployment, and so on ### Troubleshooting guide finally ### Common improper client connection usage -#### Azure Function example +#### Azure Function example -This issue often occurs when someone establishes SignalR client connection in Azure Function method instead of making it a static member to your Function class. You might expect only one client connection is established, but you see client connection count increases constantly in Metrics that is in Monitoring section of Azure portal resource menu, all these connections drop only after the Azure Function or Azure SignalR service restarts. This is because for **each** request, Azure Function creates **one** client connection, if you don't stop client connection in Function method, the client keeps the connections alive to Azure SignalR service. +This issue often occurs when someone establishes a SignalR client connection in an Azure Function method instead of making it a static member in the function class. You might expect only one client connection to be established, but instead you see client connection count increase constantly in metrics. All these connections drop only after the Azure Function or Azure SignalR service restarts. This behavior is because for **each** request, Azure Function creates **one** client connection, and if you don't stop client connection in the function method, the client keeps the connections alive to Azure SignalR service. #### Solution This issue often occurs when someone establishes SignalR client connection in Az When the app server starts, in the background, the Azure SDK starts to initiate server connections to the remote Azure SignalR. As described in [Internals of Azure SignalR Service](https://github.com/Azure/azure-signalr/blob/dev/docs/internal.md), Azure SignalR routes incoming client traffics to these server connections. Once a server connection is dropped, all the client connections it serves will be closed too. -As the connections between the app server and SignalR Service are persistent connections, they may experience network connectivity issues. In the Server SDK, we have **Always Reconnect** strategy to server connections. As the best practice, we also encourage users to add continuous reconnect logic to the clients with a random delay time to avoid massive simultaneous requests to the server. +As the connections between the app server and SignalR Service are persistent connections, they may experience network connectivity issues. In the Server SDK, we have an **Always Reconnect** strategy to server connections. As a best practice, we also encourage users to add continuous reconnection logic to the clients with a random delay time to avoid massive simultaneous requests to the server. -On a regular basis, there are new version releases for the Azure SignalR Service, and sometimes the Azure-wide OS patching or upgrades or occasionally interruption from our dependent services. These may bring in a short period of service disruption, but as long as client-side has the disconnect/reconnect mechanism, the impact is minimal like any client-side caused disconnect-reconnect. +Regularly, there are new version releases for the Azure SignalR Service, and sometimes the Azure-wide patching or upgrades or occasionally interruption from our dependent services. These events may bring in a short period of service disruption, but as long as client-side has a disconnect/reconnect mechanism, the effect is minimal like any client-side caused disconnect-reconnect. This section describes several possibilities leading to server connection drop, and provides some guidance on how to identify the root cause. For ASP.NET SignalR, a known issue was fixed in SDK 1.6.0. Upgrade your SDK to n ## Thread pool starvation -If your server is starving, that means no threads are working on message processing. All threads are not responding in a certain method. +If your server is starving, that means no threads are working on message processing. All threads aren't responding in a certain method. Normally, this scenario is caused by async over sync or by `Task.Result`/`Task.Wait()` in async methods. |
| azure-signalr | Signalr Howto Troubleshoot Live Trace | https://github.com/MicrosoftDocs/azure-docs/commits/main/articles/azure-signalr/signalr-howto-troubleshoot-live-trace.md | description: Learn how to use live trace tool for Azure SignalR service -+ Last updated 07/14/2022 |
| azure-signalr | Signalr Howto Troubleshoot Method | https://github.com/MicrosoftDocs/azure-docs/commits/main/articles/azure-signalr/signalr-howto-troubleshoot-method.md | Title: "Troubleshooting practice for Azure SignalR Service" description: Learn how to troubleshoot connectivity and message delivery issues - Previously updated : 11/17/2020+ Last updated : 07/18/2022 Second, you need to capture service traces to troubleshoot. For how to capture t ## How to capture service traces -To simplify troubleshooting process, Azure SignalR service provides **live trace tool** to expose service traces on **connectivity** and **messaging** categories. The traces includes but not limited to connection connected/disconnected events, message received/left events. With **live trace tool**, you can capture, view, sort, filter and export live traces. For more details, refer to [How to use live trace tool](./signalr-howto-troubleshoot-live-trace.md). +To simplify troubleshooting process, Azure SignalR service provides **live trace tool** to expose service traces on **connectivity** and **messaging** categories. The traces include but aren't limited to connection connected/disconnected events and message received/left events. With **live trace tool**, you can capture, view, sort, filter and export live traces. For more information, see [How to use live trace tool](./signalr-howto-troubleshoot-live-trace.md). [Having issues or feedback about the troubleshooting? Let us know.](https://aka.ms/asrs/survey/troubleshooting) With the client-side network trace in hand, check which request fails with what #### Server requests -SignalR *Server* maintains the *Server Connection* between *Server* and *Service*. When the app server starts, it starts the **WebSocket** connection to Azure SignalR service. All the client traffics are routed through Azure SignalR service to these *Server Connection*s and then dispatched to the `Hub`. When a *Server Connection* drops, the clients routed to this *Server Connection* will be impacted. Our Azure SignalR SDK has a logic "Always Retry" to reconnect the *Server Connection* with at most 1-minute delay to minimize the impact. +SignalR *Server* maintains the *Server Connection* between *Server* and *Service*. When the app server starts, it starts the **WebSocket** connection to Azure SignalR service. All the client traffics are routed through Azure SignalR service to these *Server Connection*s and then dispatched to the `Hub`. When a *Server Connection* drops, the clients routed to this *Server Connection* will be impacted. Our Azure SignalR SDK has a logic "Always Retry" to reconnect the *Server Connection* with at most 1-minute delay to minimize the effects. -*Server Connection*s can drop because of network instability or regular maintenance of Azure SignalR Service, or your hosted app server updates/maintainance. As long as client-side has the disconnect/reconnect mechanism, the impact is minimal like any client-side caused disconnect-reconnect. +*Server Connection*s can drop because of network instability or regular maintenance of Azure SignalR Service, or your hosted app server updates/maintainance. As long as client-side has the disconnect/reconnect mechanism, the effect is minimal like any client-side caused disconnect-reconnect. -View server-side network trace to find out the status code and error detail why *Server Connection* drops or is rejected by the *Service*, and look for the root cause inside [Troubleshooting Guide](./signalr-howto-troubleshoot-guide.md). +View the server-side network trace to find the status code and error detail why *Server Connection* drops or is rejected by the *Service*. Look for the root cause inside [Troubleshooting Guide](./signalr-howto-troubleshoot-guide.md). [Having issues or feedback about the troubleshooting? Let us know.](https://aka.ms/asrs/survey/troubleshooting) To diagnose connectivity issues in `Serverless` mode, the most straight forward ## Classic mode troubleshooting -`Classic` mode is obsoleted and is not encouraged to use. When in this mode, Azure SignalR service uses the connected *Server Connections* to determine if current service is in `default` mode or `serverless` mode. This can lead to some intermediate client connectivity issues because, when there is a sudden drop of all the connected *Server Connection*, for example due to network instability, Azure SignalR believes it is now switched to `serverless` mode, and clients connected during this period will never be routed to the hosted app server. Enable [service-side logs](#add_logs_server) and check if there are any clients recorded as `ServerlessModeEntered` if you have hosted app server however some clients never reach the app server side. If there is any, [abort these client connections](https://github.com/Azure/azure-signalr/blob/dev/docs/rest-api.md#API) and let the clients restart can help. +`Classic` mode is obsoleted and isn't encouraged to use. When in Classic mode, Azure SignalR service uses the connected *Server Connections* to determine if current service is in `default` mode or `serverless` mode. Classic mode can lead to intermediate client connectivity issues because, when there's a sudden drop of all the connected *Server Connection*, for example due to network instability, Azure SignalR believes it's now switched to `serverless` mode, and clients connected during this period will never be routed to the hosted app server. Enable [service-side logs](#add_logs_server) and check if there are any clients recorded as `ServerlessModeEntered` if you have hosted app server, however, some clients never reach the app server side. If you see any of these clients, [abort the client connections](https://github.com/Azure/azure-signalr/blob/dev/docs/rest-api.md#API), and then let the clients restart. Troubleshooting `classic` mode connectivity and message delivery issues are similar to [troubleshooting default mode issues](#default_mode_tsg). You can check the health api for service health. * 200: healthy. * 503: your service is unhealthy. You can: * Wait several minutes for autorecover.- * Check the ip address is same as the ip from portal. + * Check the ip-address is same as the ip from portal. * Or restart instance.- * If all above options do not work, contact us by adding new support request in Azure portal. + * If all above options don't work, contact us by adding new support request in Azure portal. More about [disaster recovery](./signalr-concept-disaster-recovery.md). |
| azure-video-indexer | Animated Characters Recognition How To | https://github.com/MicrosoftDocs/azure-docs/commits/main/articles/azure-video-indexer/animated-characters-recognition-how-to.md | Title: Animated character detection with Azure Video Indexer how to description: This how to demonstrates how to use animated character detection with Azure Video Indexer.- -Azure Video Indexer supports detection, grouping, and recognition of characters in animated content, this functionality is available through the Azure portal and through API. Review [this overview](animated-characters-recognition.md) topic. +Azure Video Indexer supports detection, grouping, and recognition of characters in animated content, this functionality is available through the Azure portal and through API. Review [this overview](animated-characters-recognition.md) article. This article demonstrates to how to use the animated character detection with the Azure portal and the Azure Video Indexer API. In the trial accounts the Custom Vision integration is managed by Azure Video In ### Connect your Custom Vision account (paid accounts only) -If you own an Azure Video Indexer paid account, you need to connect a Custom Vision account first. If you don't have a Custom Vision account already, please create one. For more information, see [Custom Vision](../cognitive-services/custom-vision-service/overview.md). +If you own an Azure Video Indexer paid account, you need to connect a Custom Vision account first. If you don't have a Custom Vision account already, create one. For more information, see [Custom Vision](../cognitive-services/custom-vision-service/overview.md). > [!NOTE] > Both accounts need to be in the same region. The Custom Vision integration is currently not supported in the Japan region. Paid accounts that have access to their Custom Vision account can see the models and tagged images there. Learn more about [improving your classifier in Custom Vision](../cognitive-services/custom-vision-service/getting-started-improving-your-classifier.md). -Note that the training of the model should be done only via Azure Video Indexer, and not via the Custom Vision website. +The training of the model should be done only via Azure Video Indexer, and not via the Custom Vision website. #### Connect a Custom Vision account with API -Follow these steps to connect you Custom Vision account to Azure Video Indexer, or to change the Custom Vision account that is currently connected to Azure Video Indexer: +Follow these steps to connect your Custom Vision account to Azure Video Indexer, or to change the Custom Vision account that is currently connected to Azure Video Indexer: -1. Browse to [www.customvision.ai](https://www.customvision.ai) and login. +1. Browse to [www.customvision.ai](https://www.customvision.ai) and sign in. 1. Copy the keys for the Training and Prediction resources: > [!NOTE] Follow these steps to connect you Custom Vision account to Azure Video Indexer, * Endpoint * Prediction resource ID 1. Browse and sign in to the [Azure Video Indexer](https://vi.microsoft.com/).-1. Click on the question mark on the top-right corner of the page and choose **API Reference**. -1. Make sure you are subscribed to API Management by clicking **Products** tab. If you have an API connected you can continue to the next step, otherwise, subscribe. -1. On the developer portal, click the **Complete API Reference** and browse to **Operations**. -1. Select **Connect Custom Vision Account (PREVIEW)** and click **Try it**. -1. Fill in the required fields as well as the access token and click **Send**. +1. Select the question mark on the top-right corner of the page and choose **API Reference**. +1. Make sure you're subscribed to API Management by clicking **Products** tab. If you have an API connected you can continue to the next step, otherwise, subscribe. +1. On the developer portal, select the **Complete API Reference** and browse to **Operations**. +1. Select **Connect Custom Vision Account (PREVIEW)** and select **Try it**. +1. Fill in the required fields and the access token and select **Send**. For more information about how to get the Video Indexer access token go to the [developer portal](https://api-portal.videoindexer.ai/api-details#api=Operations&operation=Get-Account-Access-Token), and see the [relevant documentation](video-indexer-use-apis.md#obtain-access-token-using-the-authorization-api). 1. Once the call return 200 OK response, your account is connected. 1. To verify your connection by browse to the [Azure Video Indexer](https://vi.microsoft.com/) portal:-1. Click on the **Content model customization** button in the top-right corner. +1. Select the **Content model customization** button in the top-right corner. 1. Go to the **Animated characters** tab.-1. Once you click on Manage models in Custom Vision, you will be transferred to the Custom Vision account you just connected. +1. Once you select Manage models in Custom Vision, you'll be transferred to the Custom Vision account you just connected. > [!NOTE] > Currently, only models that were created via Azure Video Indexer are supported. Models that are created through Custom Vision will not be available. In addition, the best practice is to edit models that were created through Azure Video Indexer only through the Azure Video Indexer platform, since changes made through Custom Vision may cause unintended results. Follow these steps to connect you Custom Vision account to Azure Video Indexer, > [!div class="mx-imgBorder"] > :::image type="content" source="./media/content-model-customization/content-model-customization.png" alt-text="Customize content model in Azure Video Indexer "::: 1. Go to the **Animated characters** tab in the model customization section.-1. Click on **Add model**. -1. Name you model and click enter to save the name. +1. Select **Add model**. +1. Name your model and select enter to save the name. > [!NOTE] > The best practice is to have one custom vision model for each animated series. ### Index a video with an animated model -For the initial training, upload at least two videos. Each should be preferably longer than 15 minutes, before expecting good recognition model. If you have shorter episodes, we recommend uploading at least 30 minutes of video content before training. This will allow you to merge groups that belong to the same character from different scenes and backgrounds, and therefore increase the chance it will detect the character in the following episodes you index. To train a model on multiple videos (episodes) you need to index them all with the same animation model. +For the initial training, upload at least two videos. Each should be preferably longer than 15 minutes, before expecting good recognition model. If you have shorter episodes, we recommend uploading at least 30 minutes of video content before training. This will allow you to merge groups that belong to the same character from different scenes and backgrounds, and therefore increase the chance it will detect the character in the following episodes you index. To train a model on multiple videos (episodes), you need to index them all with the same animation model. -1. Click on the **Upload** button. +1. Select the **Upload** button. 1. Choose a video to upload (from a file or a URL).-1. Click on **Advanced options**. +1. Select **Advanced options**. 1. Under **People / Animated characters** choose **Animation models**. 1. If you have one model it will be chosen automatically, and if you have multiple models you can choose the relevant one out of the dropdown menu.-1. Click on upload. -1. Once the video is indexed, you will see the detected characters in the **Animated characters** section in the **Insights** pane. +1. Select upload. +1. Once the video is indexed, you'll see the detected characters in the **Animated characters** section in the **Insights** pane. -Before tagging and training the model, all animated characters will be named “Unknown #X”. After you train the model they will also be recognized. +Before tagging and training the model, all animated characters will be named “Unknown #X”. After you train the model, they'll also be recognized. ### Customize the animated characters models 1. Name the characters in Azure Video Indexer. - 1. After the model created character group, it is recommended to review these groups in Custom Vision. - 1. To tag an animated character in your video, go to the **Insights** tab and click on the **Edit** button on the top-right corner of the window. - 1. In the **Insights** pane, click on any of the detected animated characters and change their names from "Unknown #X" to a temporary name (or the name that was previously assigned to the character). - 1. After typing in the new name, click on the check icon next to the new name. This saves the new name in the model in Azure Video Indexer. + 1. After the model created character group, it's recommended to review these groups in Custom Vision. + 1. To tag an animated character in your video, go to the **Insights** tab and select the **Edit** button on the top-right corner of the window. + 1. In the **Insights** pane, select any of the detected animated characters and change their names from "Unknown #X" to a temporary name (or the name that was previously assigned to the character). + 1. After typing in the new name, select the check icon next to the new name. This saves the new name in the model in Azure Video Indexer. 1. Paid accounts only: Review the groups in Custom Vision > [!NOTE] > Paid accounts that have access to their Custom Vision account can see the models and tagged images there. Learn more about [improving your classifier in Custom Vision](../cognitive-services/custom-vision-service/getting-started-improving-your-classifier.md). It’s important to note that training of the model should be done only via Azure Video Indexer (as described in this topic), and not via the Custom Vision website. 1. Go to the **Custom Models** page in Azure Video Indexer and choose the **Animated characters** tab. - 1. Click on the Edit button for the model you are working on to manage it in Custom Vision. + 1. Select the Edit button for the model you're working on to manage it in Custom Vision. 1. Review each character group: - * If the group contains unrelated images it is recommended to delete these in the Custom Vision website. - * If there are images that belong to a different character, change the tag on these specific images by click on the image, adding the right tag and deleting the wrong tag. - * If the group is not correct, meaning it contains mainly non-character images or images from multiple characters, you can delete in in Custom Vision website or in Azure Video Indexer insights. - * The grouping algorithm will sometimes split your characters to different groups. It is therefore recommended to give all the groups that belong to the same character the same name (in Azure Video Indexer Insights), which will immediately cause all these groups to appear as on in Custom Vision website. + * If the group contains unrelated images, it's recommended to delete these in the Custom Vision website. + * If there are images that belong to a different character, change the tag on these specific images by select the image, adding the right tag and deleting the wrong tag. + * If the group isn't correct, meaning it contains mainly non-character images or images from multiple characters, you can delete in Custom Vision website or in Azure Video Indexer insights. + * The grouping algorithm will sometimes split your characters to different groups. It's therefore recommended to give all the groups that belong to the same character the same name (in Azure Video Indexer Insights), which will immediately cause all these groups to appear as on in Custom Vision website. 1. Once the group is refined, make sure the initial name you tagged it with reflects the character in the group. 1. Train the model 1. After you finished editing all names you want, you need to train the model. 1. Once a character is trained into the model, it will be recognized it the next video indexed with that model. - 1. Open the customization page and click on the **Animated characters** tab and then click on the **Train** button to train your model. In order to keep the connection between Video + 1. Open the customization page and select the **Animated characters** tab and then select the **Train** button to train your model. In order to keep the connection between Video Indexer and the model, don't train the model in the Custom Vision website (paid accounts have access to Custom Vision website), only in Azure Video Indexer. Once trained, any video that will be indexed or reindexed with that model will recognize the trained characters. Once trained, any video that will be indexed or reindexed with that model will r 1. Delete an animated character. - 1. To delete an animated character in your video insights, go to the **Insights** tab and click on the **Edit** button on the top-right corner of the window. - 1. Choose the animated character and then click on the **Delete** button under their name. + 1. To delete an animated character in your video insights, go to the **Insights** tab and select the **Edit** button on the top-right corner of the window. + 1. Choose the animated character and then select the **Delete** button under their name. > [!NOTE] > This will delete the insight from this video but will not affect the model. 1. Delete a model. - 1. Click on the **Content model customization** button on the top menu and go to the **Animated characters** tab. - 1. Click on the ellipsis icon to the right of the model you wish to delete and then on the delete button. + 1. Select the **Content model customization** button on the top menu and go to the **Animated characters** tab. + 1. Select the ellipsis icon to the right of the model you wish to delete and then on the delete button. - * Paid account: the model will be disconnected from Azure Video Indexer and you will not be able to reconnect it. + * Paid account: the model will be disconnected from Azure Video Indexer and you won't be able to reconnect it. * Trial account: the model will be deleted from Customs vision as well. > [!NOTE] Once trained, any video that will be indexed or reindexed with that model will r 1. Connect a Custom Vision account. If you own an Azure Video Indexer paid account, you need to connect a Custom Vision account first. <br/>- If you don’t have a Custom Vision account already, please create one. For more information, see [Custom Vision](../cognitive-services/custom-vision-service/overview.md). + If you don’t have a Custom Vision account already, create one. For more information, see [Custom Vision](../cognitive-services/custom-vision-service/overview.md). [Connect your Custom Vision account using API](https://api-portal.videoindexer.ai/api-details#api=Operations&operation=Connect-Custom-Vision-Account). 1. Create an animated characters model. See the animated characters in the generated JSON file. ## Limitations -* Currently, the "animation identification" capability is not supported in East-Asia region. +* Currently, the "animation identification" capability isn't supported in East-Asia region. * Characters that appear to be small or far in the video may not be identified properly if the video's quality is poor. * The recommendation is to use a model per set of animated characters (for example per an animated series). |
| azure-video-indexer | Concepts Overview | https://github.com/MicrosoftDocs/azure-docs/commits/main/articles/azure-video-indexer/concepts-overview.md | TimeRange is the time range in the original video. AdjustedTimeRange is the time Azure Video Indexer supports embedding widgets in your apps. For more information, see [Embed Azure Video Indexer widgets in your apps](video-indexer-embed-widgets.md). -## Summarized insights +## Insights -Summarized insights contain an aggregated view of the data: faces, topics, emotions. For example, instead of going over each of the thousands of time ranges and checking which faces are in it, the summarized insights contains all the faces and for each one, the time ranges it appears in and the % of the time it is shown. +Insights contain an aggregated view of the data: faces, topics, emotions. Azure Video Indexer analyzes the video and audio content by running 30+ AI models, generating rich insights. Below is an illustration of the audio and video analysis performed by Azure Video Indexer in the background. ++> [!div class="mx-imgBorder"] +> :::image type="content" source="./media/video-indexer-overview/model-chart.png" alt-text="Diagram of Azure Video Indexer flow."::: + ## Next steps |
| azure-video-indexer | Create Account Portal | https://github.com/MicrosoftDocs/azure-docs/commits/main/articles/azure-video-indexer/create-account-portal.md | Search for **Microsoft.Media** and **Microsoft.EventGrid**. If not in the "Regis 1. Sign into the [Azure portal](https://portal.azure.com/). 1. Using the search bar at the top, enter **"Azure Video Indexer"**.-1. Select on *Azure Video Indexer* under *Services*. +1. Select *Azure Video Indexer* under *Services*. - 1. Select **Create**. 1. In the **Create an Azure Video Indexer resource** section enter required values. You can use the Azure portal to validate the Azure Video Indexer account and oth  -Select on *Explore Azure Video Indexer's portal* to view your new account on the [Azure Video Indexer portal](https://aka.ms/vi-portal-link). +Select *Explore Azure Video Indexer's portal* to view your new account on the [Azure Video Indexer portal](https://aka.ms/vi-portal-link). #### Unique essentials + |Name|Description| ||| |Status| When the resource is connected properly, status is **Active**. When there's a problem with the connection between the managed identity and the Media Service instance status will be *Connection to Azure Media Services failed*. Contributor role assignment on the Media Services should be added to the proper managed identity.| |Managed identity |The name of the default managed identity, user-assigned or system-assigned. The default managed identity can be updated using the *Change* button.| - ### Management API  |
| azure-video-indexer | Customize Brands Model With Api | https://github.com/MicrosoftDocs/azure-docs/commits/main/articles/azure-video-indexer/customize-brands-model-with-api.md | Title: Customize a Brands model with Azure Video Indexer API description: Learn how to customize a Brands model with the Azure Video Indexer API.- |
| azure-video-indexer | Customize Brands Model With Website | https://github.com/MicrosoftDocs/azure-docs/commits/main/articles/azure-video-indexer/customize-brands-model-with-website.md | Title: Customize a Brands model with the Azure Video Indexer website description: Learn how to customize a Brands model with the Azure Video Indexer website.- Azure Video Indexer supports brand detection from speech and visual text during A custom Brands model allows you to: - select if you want Azure Video Indexer to detect brands from the Bing brands database.-- select if you want Azure Video Indexer to exclude certain brands from being detected (essentially creating a deny list of brands).+- select if you want Azure Video Indexer to exclude certain brands from being detected (essentially creating a blocklist of brands). - select if you want Azure Video Indexer to include brands that should be part of your model that might not be in Bing's brands database (essentially creating an accept list of brands). For a detailed overview, see this [Overview](customize-brands-model-overview.md). -You can use the Azure Video Indexer website to create, use, and edit custom Brands models detected in a video, as described in this topic. You can also use the API, as described in [Customize Brands model using APIs](customize-brands-model-with-api.md). +You can use the Azure Video Indexer website to create, use, and edit custom Brands models detected in a video, as described in this article. You can also use the API, as described in [Customize Brands model using APIs](customize-brands-model-with-api.md). > [!NOTE] > If your video was indexed prior to adding a brand, you need to reindex it. You will find **Re-index** item in the drop-down menu associated with the video. Select **Advanced options** -> **Brand categories** and check **All brands**. |
| azure-video-indexer | Customize Language Model With Api | https://github.com/MicrosoftDocs/azure-docs/commits/main/articles/azure-video-indexer/customize-language-model-with-api.md | Title: Customize a Language model with Azure Video Indexer API description: Learn how to customize a Language model with the Azure Video Indexer API.- |
| azure-video-indexer | Customize Language Model With Website | https://github.com/MicrosoftDocs/azure-docs/commits/main/articles/azure-video-indexer/customize-language-model-with-website.md | Title: Customize Language model with Azure Video Indexer website description: Learn how to customize a Language model with the Azure Video Indexer website.- |
| azure-video-indexer | Customize Person Model With Api | https://github.com/MicrosoftDocs/azure-docs/commits/main/articles/azure-video-indexer/customize-person-model-with-api.md | Title: Customize a Person model with Azure Video Indexer API description: Learn how to customize a Person model with the Azure Video Indexer API.- |
| azure-video-indexer | Customize Person Model With Website | https://github.com/MicrosoftDocs/azure-docs/commits/main/articles/azure-video-indexer/customize-person-model-with-website.md | Title: Customize a Person model with Azure Video Indexer website description: Learn how to customize a Person model with the Azure Video Indexer website.- -You can use the Azure Video Indexer website to edit faces that were detected in a video, as described in this topic. You can also use the API, as described in [Customize a Person model using APIs](customize-person-model-with-api.md). +You can use the Azure Video Indexer website to edit faces that were detected in a video, as described in this article. You can also use the API, as described in [Customize a Person model using APIs](customize-person-model-with-api.md). ## Central management of Person models in your account You can use the Azure Video Indexer website to edit faces that were detected in You can then choose from your file explorer or drag and drop the face images of the face. Azure Video Indexer will take all standard image file types (ex: JPG, PNG, and more). - Azure Video Indexer can detect occurrences of this person in the future videos that you index and the current videos that you had already indexed, using the Person model to which you added this new face to. Recognition of the person in your current videos might take some time to take effect, as this is a batch process. + Azure Video Indexer can detect occurrences of this person in the future videos that you index and the current videos that you had already indexed, using the Person model to which you added this new face. Recognition of the person in your current videos might take some time to take effect, as this is a batch process. ## Rename a Person model If you don't specify a Person model during the upload, Azure Video Indexer will ## Use a Person model to reindex a video -To use a Person model to reindex a video in your collection, go to your account videos on the Azure Video Indexer home page and hover over the name of the video that you want to reindex. +To use a Person model to reindex a video in your collection, go to your account videos on the Azure Video Indexer home page, and hover over the name of the video that you want to reindex. You see options to edit, delete, and reindex your video. |
| azure-video-indexer | Multi Language Identification Transcription | https://github.com/MicrosoftDocs/azure-docs/commits/main/articles/azure-video-indexer/multi-language-identification-transcription.md | Title: Automatically identify and transcribe multi-language content with Azure Video Indexer description: This topic demonstrates how to automatically identify and transcribe multi-language content with Azure Video Indexer.- |
| azure-video-indexer | Regions | https://github.com/MicrosoftDocs/azure-docs/commits/main/articles/azure-video-indexer/regions.md | Title: Regions in which Azure Video Indexer is available description: This article talks about Azure regions in which Azure Video Indexer is available.- |
| azure-video-indexer | Use Editor Create Project | https://github.com/MicrosoftDocs/azure-docs/commits/main/articles/azure-video-indexer/use-editor-create-project.md | Title: Use the Azure Video Indexer editor to create projects and add video clips description: This topic demonstrates how to use the Azure Video Indexer editor to create projects and add video clips.- |
| azure-video-indexer | Video Indexer Output Json V2 | https://github.com/MicrosoftDocs/azure-docs/commits/main/articles/azure-video-indexer/video-indexer-output-json-v2.md | Title: Examine the Azure Video Indexer output description: This topic examines the Azure Video Indexer output produced by the Get Video Index API.- |
| azure-vmware | Deploy Zerto Disaster Recovery | https://github.com/MicrosoftDocs/azure-docs/commits/main/articles/azure-vmware/deploy-zerto-disaster-recovery.md | Title: Deploy Zerto disaster recovery on Azure VMware Solution (Initial Availability) + Title: Deploy Zerto disaster recovery on Azure VMware Solution description: Learn how to implement Zerto disaster recovery for on-premises VMware or Azure VMware Solution virtual machines. Last updated 10/25/2021 -# Deploy Zerto disaster recovery on Azure VMware Solution (Initial Availability) +# Deploy Zerto disaster recovery on Azure VMware Solution -This article explains how to implement disaster recovery for on-premises VMware or Azure VMware Solution-based virtual machines (VMs). The solution in this article uses [Zerto disaster recovery](https://www.zerto.com/solutions/use-cases/disaster-recovery/). Instances of Zerto are deployed at both the protected and the recovery sites. --Zerto is a disaster recovery solution designed to minimize downtime of the VMs if there was a disaster. Zerto's platform is built on the foundation of Continuous Data Protection (CDP), which enables minimal or close to no data loss. It provides the level of protection wanted for many business-critical and mission-critical enterprise applications. Zerto also automates and orchestrates failover and failback, ensuring minimal downtime in a disaster. Overall, Zerto simplifies management through automation and ensures fast and highly predictable recovery times. +In this article, you'll learn how to implement disaster recovery for on-premises VMware or Azure VMware Solution-based virtual machines (VMs). The solution in this article uses [Zerto disaster recovery](https://www.zerto.com/solutions/use-cases/disaster-recovery/). Instances of Zerto are deployed at both the protected and the recovery sites. +Zerto is a disaster recovery solution designed to minimize downtime of VMs should a disaster occur. Zerto's platform is built on the foundation of Continuous Data Protection (CDP) that enables minimal or close to no data loss. The platform provides the level of protection wanted for many business-critical and mission-critical enterprise applications. Zerto also automates and orchestrates failover and failback to ensure minimal downtime in a disaster. Overall, Zerto simplifies management through automation and ensures fast and highly predictable recovery times. ## Core components of the Zerto platform Zerto is a disaster recovery solution designed to minimize downtime of the VMs i | **Zerto Cloud Appliance (ZCA)** | Windows VM only used when Zerto is used to recover vSphere VMs as Azure Native IaaS VMs. The ZCA is composed of:<ul><li>**ZVM:** A Windows service that hosts the UI and integrates with the native APIs of Azure for management and orchestration.</li><li>**VRA:** A Windows service that replicates the data from or to Azure.</li></ul>The ZCA integrates natively with the platform it's deployed on, allowing you to use Azure Blob storage within a storage account on Microsoft Azure. As a result, it ensures the most cost-efficient deployment on each of these platforms. | | **Virtual Protection Group (VPG)** | Logical group of VMs created on the ZVM. Zerto allows configuring disaster recovery, Backup, and Mobility policies on a VPG. This mechanism enables a consistent set of policies to be applied to a group of VMs. | --To learn more about Zerto platform architecture, see the [Zerto Platform Architecture Guide](https://www.zerto.com/wp-content/uploads/2021/07/Zerto-Platform-Architecture-Guide.pdf). -+To learn more about Zerto platform architecture, see the [Zerto Platform Architecture Guide](https://www.zerto.com/wp-content/uploads/2021/07/Zerto-Platform-Architecture-Guide.pdf). ## Supported Zerto scenarios In this scenario, the primary site is an on-premises vSphere-based environment. :::image type="content" source="media/zerto-disaster-recovery/zerto-disaster-recovery-scenario-1.png" alt-text="Diagram showing Scenario 1 for the Zerto disaster recovery solution on Azure VMware Solution."::: - ### Scenario 2: Azure VMware Solution to Azure VMware Solution cloud disaster recovery In this scenario, the primary site is an Azure VMware Solution private cloud in one Azure Region. The disaster recovery site is an Azure VMware Solution private cloud in a different Azure Region. :::image type="content" source="media/zerto-disaster-recovery/zerto-disaster-recovery-scenario-2.png" alt-text="Diagram showing scenario 2 for the Zerto disaster recovery solution on Azure VMware Solution." border="false"::: - ### Scenario 3: Azure VMware Solution to IaaS VMs cloud disaster recovery In this scenario, the primary site is an Azure VMware Solution private cloud in one Azure Region. Azure Blobs and Azure IaaS (Hyper-V based) VMs are used in times of Disaster. :::image type="content" source="media/zerto-disaster-recovery/zerto-disaster-recovery-scenario-3.png" alt-text="Diagram showing Scenario 3 for the Zerto disaster recovery solution on Azure VMware Solution." border="false"::: -- ## Prerequisites ### On-premises VMware to Azure VMware Solution disaster recovery In this scenario, the primary site is an Azure VMware Solution private cloud in - VPN or ExpressRoute connectivity between on-premises and Azure VMware Solution. -- ### Azure VMware Solution to Azure VMware Solution cloud disaster recovery -- Azure VMware Solution private cloud must be deployed in the primary and secondary region.+- Azure VMware Solution private cloud must be deployed in the primary and secondary regions. :::image type="content" source="media/zerto-disaster-recovery/zerto-disaster-recovery-scenario-2a-prerequisite.png" alt-text="Diagram shows the first prerequisite for Scenario 2 of the Zerto disaster recovery solution on Azure VMware Solution.":::- + - Connectivity, like ExpressRoute Global Reach, between the source and target Azure VMware Solution private cloud. ### Azure VMware Solution IaaS VMs cloud disaster recovery -- Network connectivity, ExpressRoute based, from Azure VMware Solution to the vNET used for disaster recovery. +- Network connectivity, ExpressRoute based, from Azure VMware Solution to the vNET used for disaster recovery. - Follow the [Zerto Virtual Replication Azure Enterprise Guidelines](https://www.zerto.com/wp-content/uploads/2016/11/Zerto-Virtual-Replication-5.0-for-Azure.pdf) for the rest of the prerequisites. -- ## Install Zerto on Azure VMware Solution -Currently, Zerto disaster recovery on Azure VMware Solution is in Initial Availability (IA) phase. In the IA phase, you must contact Microsoft to request and qualify for IA support. +Currently, Zerto disaster recovery on Azure VMware Solution is in an Initial Availability (IA) phase. In the IA phase, you must contact Microsoft to request and qualify for IA support. To request IA support for Zerto on Azure VMware Solution, send an email request to zertoonavs@microsoft.com. In the IA phase, Azure VMware Solution only supports manual installation and onboarding of Zerto. However, Microsoft will work with you to ensure that you can manually install Zerto on your private cloud. > [!NOTE]-> As part of the manual installation, Microsoft will create a new vCenter user account for Zerto. This user account is only for Zerto Virtual Manager (ZVM) to perform operations on the Azure VMware Solution vCenter. When installing ZVM on Azure VMware Solution, donΓÇÖt select the ΓÇ£Select to enforce roles and permissions using Zerto vCenter privilegesΓÇ¥ option. -+> As part of the manual installation, Microsoft creates a new vCenter user account for Zerto. This user account is only for Zerto Virtual Manager (ZVM) to perform operations on the Azure VMware Solution vCenter. When installing ZVM on Azure VMware Solution, donΓÇÖt select the ΓÇ£Select to enforce roles and permissions using Zerto vCenter privilegesΓÇ¥ option. -After the ZVM installation, select the options below from the Zerto Virtual Manager **Site Settings**. +After the ZVM installation, select the options below from the Zerto Virtual Manager **Site Settings**. :::image type="content" source="media/zerto-disaster-recovery/zerto-disaster-recovery-install-5.png" alt-text="Screenshot of the Workload Automation section that shows to select all of the options listed for the blue checkboxes."::: >[!NOTE] >General Availability of Azure VMware Solution will enable self-service installation and Day 2 operations of Zerto on Azure VMware Solution. - ## Configure Zerto for disaster recovery To configure Zerto for the on-premises VMware to Azure VMware Solution disaster recovery and Azure VMware Solution to Azure VMware Solution Cloud disaster recovery scenarios, see the [Zerto Virtual Manager Administration Guide vSphere Environment](https://s3.amazonaws.com/zertodownload_docs/8.5_Latest/Zerto%20Virtual%20Manager%20vSphere%20Administration%20Guide.pdf?cb=1629311409). - For more information, see the [Zerto technical documentation](https://www.zerto.com/myzerto/technical-documentation/). Alternatively, you can download all the Zerto guides part of the [v8.5 Search Tool for Zerto Software PDFs documentation bundle](https://s3.amazonaws.com/zertodownload_docs/8.5_Latest/SEARCH_TOOL.zip?cb=1629311409). -- ## Ongoing management of Zerto -- As you scale your Azure VMware Solution private cloud operations, you might need to add new Azure VMware Solution hosts for Zerto protection or configure Zerto disaster recovery to new Azure VMware Solution vSphere Clusters. In both these scenarios, you'll be required to open a Support Request with the Azure VMware Solution team in the Initial Availability phase. You can open the [support ticket](https://rc.portal.azure.com/#create/Microsoft.Support) from the Azure portal for these Day 2 configurations. +- As you scale your Azure VMware Solution private cloud operations, you might need to add new Azure VMware Solution hosts for Zerto protection or configure Zerto disaster recovery to new Azure VMware Solution vSphere Clusters. In both these scenarios, you'll be required to open a Support Request with the Azure VMware Solution team in the Initial Availability phase. You can open the [support ticket](https://rc.portal.azure.com/#create/Microsoft.Support) from the Azure portal for these Day 2 configurations. - :::image type="content" source="media/zerto-disaster-recovery/support-request-zerto-disaster-recovery.png" alt-text="Screenshot showing the support request for Day 2 Zerto disaster recovery configurations."::: + :::image type="content" source="media/zerto-disaster-recovery/support-request-zerto-disaster-recovery.png" alt-text="Screenshot that shows the support request for Day 2 Zerto disaster recovery configurations."::: - In the GA phase, all the above operations will be enabled in an automated self-service fashion. - ## FAQs ### Can I use a pre-existing Zerto product license on Azure VMware Solution? -You can reuse pre-existing Zerto product licenses for Azure VMware Solution environments. If you need new Zerto licenses, email Zerto at **info@zerto.com** to acquire new licenses. +You can reuse pre-existing Zerto product licenses for Azure VMware Solution environments. If you need new Zerto licenses, email Zerto at **info@zerto.com** to acquire new licenses. ### How is Zerto supported? Zerto disaster recovery is a solution that is sold and supported by Zerto. For any support issue with Zerto disaster recovery, always contact [Zerto support](https://www.zerto.com/support-and-services/). -Zerto and Microsoft support teams will engage each other as needed to troubleshoot Zerto disaster recovery issues on Azure VMware Solution. -+Zerto and Microsoft support teams will engage each other as needed to troubleshoot Zerto disaster recovery issues on Azure VMware Solution. |
| azure-vmware | Disaster Recovery Using Vmware Site Recovery Manager | https://github.com/MicrosoftDocs/azure-docs/commits/main/articles/azure-vmware/disaster-recovery-using-vmware-site-recovery-manager.md | Title: Deploy disaster recovery with VMware Site Recovery Manager description: Deploy disaster recovery with VMware Site Recovery Manager (SRM) in your Azure VMware Solution private cloud. Previously updated : 04/11/2022 Last updated : 07/28/2022 # Deploy disaster recovery with VMware Site Recovery Manager While Microsoft aims to simplify VMware SRM and vSphere Replication installation ## Scale limitations -Scale limitations are per private cloud. --| Configuration | Limit | -| | | -| Number of protected Virtual Machines | 1000 | -| Number of Virtual Machines per recovery plan | 1000 | -| Number of protection groups per recovery plan | 250 | -| RPO Values | 5 min or higher* | -| Total number of virtual machines per protection group | 500 | -| Total number of recovery plans | 250 | --\* For information about Recovery Point Objective (RPO) lower than 15 minutes, see [How the 5 Minute Recovery Point Objective Works](https://docs.vmware.com/en/vSphere-Replication/8.3/com.vmware.vsphere.replication-admin.doc/GUID-9E17D567-A947-49CD-8A84-8EA2D676B55A.html) in the _vSphere Replication Administration guide_. --+To learn about the limits for the VMware Site Recovery Manager Add-On with the Azure VMware Soltuion, check the [Azure subscription and service limits, quotas, and constraints.](/azure/azure-resource-manager/management/azure-subscription-service-limits#azure-vmware-solution-limits) ## SRM licenses |
| azure-vmware | Integrate Azure Native Services | https://github.com/MicrosoftDocs/azure-docs/commits/main/articles/azure-vmware/integrate-azure-native-services.md | The Azure native services that you can integrate with Azure VMware Solution incl - **Azure Monitor** collects, analyzes, and acts on telemetry from your cloud and on-premises environments. It requires no deployment. You can monitor guest operating system performance to discover and map application dependencies for Azure VMware Solution or on-premises VMs. Your Log Analytics workspace in Azure Monitor enables log collection and performance counter collection using the Log Analytics agent or extensions. - With Azure Monitor, you can collect data from different [sources to monitor and analyze](../azure-monitor/agents/data-sources.md) and different types of [data for analysis, visualization, and alerting](../azure-monitor/data-platform.md). You can also create alert rules to identify issues in your environment, like high use of resources, missing patches, low disk space, and heartbeat of your VMs. You can set an automated response to detected events by sending an alert to IT Service Management (ITSM) tools. Alert detection notification can also be sent via email. + With Azure Monitor, you can collect data from different [sources to monitor and analyze](../azure-monitor/data-sources.md) and different types of [data for analysis, visualization, and alerting](../azure-monitor/data-platform.md). You can also create alert rules to identify issues in your environment, like high use of resources, missing patches, low disk space, and heartbeat of your VMs. You can set an automated response to detected events by sending an alert to IT Service Management (ITSM) tools. Alert detection notification can also be sent via email. - **Microsoft Defender for Cloud** strengthens data centers' security and provides advanced threat protection across hybrid workloads in the cloud or on-premises. It assesses Azure VMware Solution VMs' vulnerability, raises alerts as needed, and forwards them to Azure Monitor for resolution. For instance, it assesses missing operating system patches, security misconfigurations, and [endpoint protection](../security-center/security-center-services.md). You can also define security policies in [Microsoft Defender for Cloud](azure-security-integration.md). Deploy the Log Analytics agent by using [Azure Arc-enabled servers VM extension ## Enable Azure Monitor -Can collect data from different [sources to monitor and analyze](../azure-monitor/agents/data-sources.md) and different types of [data for analysis, visualization, and alerting](../azure-monitor/data-platform.md). You can also create alert rules to identify issues in your environment, like high use of resources, missing patches, low disk space, and heartbeat of your VMs. You can set an automated response to detected events by sending an alert to IT Service Management (ITSM) tools. Alert detection notification can also be sent via email. +Can collect data from different [sources to monitor and analyze](../azure-monitor/data-sources.md) and different types of [data for analysis, visualization, and alerting](../azure-monitor/data-platform.md). You can also create alert rules to identify issues in your environment, like high use of resources, missing patches, low disk space, and heartbeat of your VMs. You can set an automated response to detected events by sending an alert to IT Service Management (ITSM) tools. Alert detection notification can also be sent via email. Monitor guest operating system performance to discover and map application dependencies for Azure VMware Solution or on-premises VMs. Your Log Analytics workspace in Azure Monitor enables log collection and performance counter collection using the Log Analytics agent or extensions. |
| backup | Backup During Vm Creation | https://github.com/MicrosoftDocs/azure-docs/commits/main/articles/backup/backup-during-vm-creation.md | Title: Enable backup when you create an Azure VM description: Describes how to enable backup when you create an Azure VM with Azure Backup. Previously updated : 11/09/2021 Last updated : 07/19/2022 The Backup service creates a separate resource group (RG), different than the re Points to note: -1. You can either use the default name of the RG, or edit it according to your company requirements.<br>If you haven't created an RG, to specify an RG for restorepointcollection, follow these steps: - 1. Create an RG for restorepointcollection. For example, "rpcrg". - 1. Mention the name of RG in the VM backup policy. - >[!NOTE] - >This will create an RG with the numeric appended and will use it for restorepointcollection. +1. You can use default name of RG or customize the name according to organizational requirements. ++ >[!Note] + >When Azure Backup creates an RG, a numeric is appended to the name of RG and used for restore point collection. + 1. You provide the RG name pattern as input during VM backup policy creation. The RG name should be of the following format: `<alpha-numeric string>* n <alpha-numeric string>`. 'n' is replaced with an integer (starting from 1) and is used for scaling out if the first RG is full. One RG can have a maximum of 600 RPCs today.  |
| backup | Backup Support Matrix Iaas | https://github.com/MicrosoftDocs/azure-docs/commits/main/articles/backup/backup-support-matrix-iaas.md | Title: Support matrix for Azure VM backup description: Provides a summary of support settings and limitations when backing up Azure VMs with the Azure Backup service. Previously updated : 06/13/2022 Last updated : 07/19/2022 Storage type | Standard HDD, Standard SSD, Premium SSD. <br><br> Backup and res Managed disks | Supported. Encrypted disks | Supported.<br/><br/> Azure VMs enabled with Azure Disk Encryption can be backed up (with or without the Azure AD app).<br/><br/> Encrypted VMs can't be recovered at the file/folder level. You must recover the entire VM.<br/><br/> You can enable encryption on VMs that are already protected by Azure Backup. Disks with Write Accelerator enabled | Azure VM with WA disk backup is available in all Azure public regions starting from May 18, 2020. If WA disk backup is not required as part of VM backup, you can choose to remove with [**Selective disk** feature](selective-disk-backup-restore.md). <br><br>**Important** <br> Virtual machines with WA disks need internet connectivity for a successful backup (even though those disks are excluded from the backup).+Disks enabled for access with private EndPoint | Unsupported. Back up & Restore deduplicated VMs/disks | Azure Backup doesn't support deduplication. For more information, see this [article](./backup-support-matrix.md#disk-deduplication-support) <br/> <br/> - Azure Backup doesn't deduplicate across VMs in the Recovery Services vault <br/> <br/> - If there are VMs in deduplication state during restore, the files can't be restored because the vault doesn't understand the format. However, you can successfully perform the full VM restore. Add disk to protected VM | Supported. Resize disk on protected VM | Supported. |
| center-sap-solutions | Deploy S4hana | https://github.com/MicrosoftDocs/azure-docs/commits/main/articles/center-sap-solutions/deploy-s4hana.md | + + Title: Deploy S/4HANA infrastructure (preview) +description: Learn how to deploy S/4HANA infrastructure with Azure Center for SAP solutions (ACSS) through the Azure portal. You can deploy High Availability (HA), non-HA, and single-server configurations. ++ Last updated : 07/19/2022+++#Customer intent: As a developer, I want to deploy S/4HANA infrastructure using Azure Center for SAP solutions so that I can manage SAP workloads in the Azure portal. +++# Deploy S/4HANA infrastructure with Azure Center for SAP solutions (preview) +++In this how-to guide, you'll learn how to deploy S/4HANA infrastructure in *Azure Center for SAP solutions (ACSS)*. There are [three deployment options](#deployment-types): distributed with High Availability (HA), distributed non-HA, and single server. ++## Prerequisites ++- An Azure subscription. +- An Azure account with **Contributor** role access to the subscriptions and resource groups in which you'll create the Virtual Instance for SAP solutions (VIS) resource. +- The ACSS application **Azure SAP Workloads Management** also needs Contributor role access to the resource groups for the SAP system. There are two options to grant access: + - If your Azure account has **Owner** or **User Access Admin** role access, you can automatically grant access to the application when deploying or registering the SAP system. + - If your Azure account doesn't have Owner or User Access Admin role access, you must enable access for the ACSS application. +- A [network set up for your infrastructure deployment](prepare-network.md). ++## Deployment types ++There are three deployment options that you can select for your infrastructure, depending on your use case. ++- **Distributed with High Availability (HA)** creates distributed HA architecture. This option is recommended for production environments. If you choose this option, you need to select a **High Availability SLA**. Select the appropriate SLA for your use case: + - **99.99% (Optimize for availability)** shows available zone pairs for VM deployment. The first zone is primary and the next is secondary. Active ASCS and Database servers are deployed in the primary zone. Passive ASCS and Database servers are deployed in the secondary zone. Application servers are deployed evenly across both zones. This option isn't shown in regions without availability zones, or without at least one M-series and E-series VM SKU available in the zonal pairs within that region. + - **99.95% (Optimize for cost)** shows three availability sets for all instances. The HA ASCS cluster is deployed in the first availability set. All Application servers are deployed across the second availability set. The HA Database server is deployed in the third availability set. No availability zone names are shown. +- **Distributed** creates distributed non-HA architecture. +- **Single Server** creates architecture with a single server. This option is available for non-production environments only. +## Create deployment ++1. Sign in to the [Azure portal](https://portal.azure.com). ++1. In the search bar, enter and select **Azure Center for SAP solutions**. ++1. On the ACSS landing page, select **Create a new SAP system**. ++1. On the **Create Virtual Instance for SAP solutions** page, on the **Basics** tab, fill in the details for your project. ++ 1. For **Subscription**, select the Azure subscription into which you're deploying the infrastructure. ++ 1. For **Resource group**, select the resource group for all resources that the VIS creates. ++1. Under **Instance details**, enter the details for your SAP instance. ++ 1. For **Name** enter the three-character SAP system identifier (SID). The VIS uses the same name as the SID. ++ 1. For **Region**, select the Azure region into which you're deploying the resources. ++ 1. For **Environment type**, select whether your environment is production or non-production. If you select **Production**, you can deploy a distributed HA or non-HA S/4HANA system. It's recommended to use distributed HA deployments for production systems. If you select **Non-production**, you can use a single-server deployment. ++ 1. For **SAP product**, keep the selection as **S/4HANA**. ++ 1. For **Database**, keep the selection as **HANA**. ++ 1. For **HANA scale method**, keep the selection as **Scale up**. ++ 1. For **Deployment type**, [select and configure your deployment type](#deployment-types). ++ 1. For **Network**, create the [network you created previously with subnets](prepare-network.md). ++ 1. For **Application subnet** and **Database subnet**, map the IP address ranges as required. It's recommended to use a different subnet for each deployment. ++1. Under **Operating systems**, enter the OS details. ++ 1. For **Application OS image**, select the OS image for the application server. ++ 1. For **Database OS image**, select the OS image for the database server. ++1. Under **Administrator account**, enter your administrator account details. ++ 1. For **Authentication type**, keep the setting as **SSH public**. ++ 1. For **Username**, enter a username. ++ 1. For **SSH public key source**, select a source for the public key. You can choose to generate a new key pair, use an existing key stored in Azure, or use an existing public key stored on your local computer. If you don't have keys already saved, it's recommended to generate a new key pair. ++ 1. For **Key pair name**, enter a name for the key pair. ++1. Select **Next: Virtual machines**. ++1. In the **Virtual machines** tab, generate SKU size and total VM count recommendations for each SAP instance from ACSS. ++ 1. For **Generate Recommendation based on**, under **Get virtual machine recommendations**, select **SAP Application Performance Standard (SAPS)**. ++ 1. For **SAPS for application tier**, provide the total SAPS for the application tier. For example, 30,000. ++ 1. For **Memory size for database (GiB)**, provide the total memory size required for the database tier. For example, 1024. The value must be greater than zero, and less than or equal to 11,400. + + 1. Select **Generate Recommendation**. ++ 1. Review the VM size and count recommendations for ASCS, Application Server, and Database instances. ++ 1. To change a SKU size recommendation, select the drop-down menu or select **See all sizes**. Filter the list or search for your preferred SKU. ++ 1. To change the Application server count, enter a new count for **Number of VMs** under **Application virtual machines**. + + The number of VMs for ASCS and Database instances aren't editable. The default number for each is **2**. ++ ACSS automatically configures a database disk layout for the deployment. To view the layout for a single database server, make sure to select a VM SKU. Then, select **View disk configuration**. If there's more than one database server, the layout applies to each server. ++ 1. Select **Next: Tags**. ++1. Optionally, enter tags to apply to all resources created by the ACSS process. These resources include the VIS, ASCS instances, Application Server instances, Database instances, VMs, disks, and NICs. ++1. Select **Review + Create**. ++1. Review your settings before deployment. ++ 1. Make sure the validations have passed, and there are no errors listed. ++ 1. Review the Terms of Service, and select the acknowledgment if you agree. ++ 1. Select **Create**. ++1. Wait for the infrastructure deployment to complete. Numerous resources are deployed and configured. This process takes approximately 7 minutes. ++## Confirm deployment ++To confirm a deployment is successful: ++1. In the [Azure portal](https://portal.azure.com), search for and select **Virtual Instances for SAP solutions**. ++1. On the **Virtual Instances for SAP solutions** page, select the **Subscription** filter, and choose the subscription where you created the deployment. ++1. In the table of records, find the name of the VIS. The **Infrastructure** column value shows **Deployed** for successful deployments. ++If the deployment fails, delete the VIS resource in the Azure portal, then recreate the infrastructure. ++## Next steps ++- [Install SAP software on your infrastructure](install-software.md) |
| center-sap-solutions | Get Quality Checks Insights | https://github.com/MicrosoftDocs/azure-docs/commits/main/articles/center-sap-solutions/get-quality-checks-insights.md | + + Title: Get quality checks and insights for a Virtual Instance for SAP solutions (preview) +description: Learn how to get quality checks and insights for a Virtual Instance for SAP solutions (VIS) resource in Azure Center for SAP solutions (ACSS) through the Azure portal. ++ Last updated : 07/19/2022+++#Customer intent: As a developer, I want to use the quality checks feature so that I can learn more insights about virtual machines within my Virtual Instance for SAP resource. +++# Get quality checks and insights for a Virtual Instance for SAP solutions (preview) +++The *Quality Insights* Azure workbook in *Azure Center for SAP solutions (ACSS)* provides insights about the SAP system resources. The feature is part of the monitoring capabilities built in to the *Virtual Instance for SAP solutions (VIS)*. These quality checks make sure that your SAP system uses Azure and SAP best practices for reliability and performance. ++In this how-to guide, you'll learn how to use quality checks and insights to get more information about virtual machine (VM) configurations within your SAP system. ++## Prerequisites ++- An SAP system that you've [created with ACSS](deploy-s4hana.md) or [registered with ACSS](register-existing-system.md). ++## Open Quality Insights workbook ++To open the workbook: ++1. Sign in to the [Azure portal](https://portal.azure.com). +1. Search for and select **Azure Center for SAP solutions** in the Azure portal search bar. +1. On the **Azure Center for SAP solutions** page's sidebar menu, select **Virtual Instances for SAP solutions**. +1. On the **Virtual Instances for SAP solutions** page, select the VIS that you want to get insights about. ++ :::image type="content" source="media/get-quality-checks-insights/select-vis.png" lightbox="media/get-quality-checks-insights/select-vis.png" alt-text="Screenshot of Azure portal, showing the list of available virtual instances for SAP in a subscription."::: ++1. On the sidebar menu for the VIS, under **Monitoring** select **Quality Insights**. ++ :::image type="content" source="media/get-quality-checks-insights/quality-insights.png" lightbox="media/get-quality-checks-insights/quality-insights.png" alt-text="Screenshot of Azure portal, showing the Quality Insights workbook page selected in the sidebar menu for a virtual Instance for SAP solutions."::: ++There are multiple sections in the workbook: +- Select the default **Advisor Recommendations** tab to [see the list of recommendations made by ACSS for the different instances in your VIS](#get-advisor-recommendations) +- Select the **Virtual Machine** tab to [find information about the VMs in your VIS](#get-vm-information) +- Select the **Configuration Checks** tab to [see configuration checks for your VIS](#run-configuration-checks) ++## Get Advisor Recommendations ++The **Quality checks** feature in ACSS runs validation checks for all VIS resources. These quality checks validate the SAP system configurations follow the best practices recommended by SAP and Azure. If a VIS doesn't follow these best practices, you receive a recommendation from Azure Advisor. ++The table in the **Advisor Recommendations** tab shows all the recommendations for ASCS, Application and Database instances in the VIS. +++Select an instance name to see all recommendations, including which action to take to resolve an issue. +++The following checks are run for each VIS: ++- Checks that the VMs used for different instances in the VIS are certified by SAP. For better performance and support, make sure that a VM is certified for SAP on Azure. For more details, see [SAP note 1928533] (https://launchpad.support.sap.com/#/notes/1928533). +- Checks that accelerated networking is enabled for the NICs attached to the different VMs. Network latency between Application VMs and Database VMs for SAP workloads must be 0.7 ms or less. If accelerated networking isn't enabled, network latency can increase beyond the threshold of 0.7 ms. For more details, see the [planning and deployment checklist for SAP workloads on Azure](../virtual-machines/workloads/sap/sap-deployment-checklist.md). +- Checks that the network configuration is optimized for HANA and the OS. Makes sure that as many client ports as possible are available for HANA internal communication. You must explicitly exclude the ports used by processes and applications which bind to specific ports by adjusting the parameter `net.ipv4.ip_local_reserved_ports` to a range of 9000-64999. For more details, see [SAP note 2382421](https://launchpad.support.sap.com/#/notes/2382421). +- Checks that swap space is set to 2 GB in HANA systems. For SLES and RHEL, configure a small swap space of 2 GB to avoid performance regressions at times of high memory utilization in the OS. Typically, it's recommended that activities terminate with "out of memory" errors. This setting makes sure that the overall system is still usable and only certain requests are terminated. For more details, see [SAP note 1999997](https://launchpad.support.sap.com/#/notes/1999997). +- Checks that **fstrim** is disabled in SAP systems that run on SUSE OS. **fstrim** scans the filesystem and sends `UNMAP` commands for each unused block found. This setting is useful in a thin-provisioned system, if the system is over-provisioned. It's not recommended to run SAP HANA on an over-provisioned storage array. Active **fstrim** can cause XFS metadata corruption. For more information, see [SAP note 2205917](https://launchpad.support.sap.com/#/notes/2205917) and [Disabling fstrim - under which conditions?](https://www.suse.com/support/kb/doc/?id=000019447). +++> [!NOTE] +> These quality checks run on all VIS instances at a regular frequency of 12 hours. The corresponding recommendations in Azure Advisor also refresh at the same 12-hour frequency. ++If you take action on one or more recommendations from ACSS, wait for the next refresh to see any new recommendations from Azure Advisor. ++## Get VM information ++The **Virtual Machine** tab provides insights about the VMs in your VIS. There are multiple subsections: ++- [Azure Compute](#azure-compute) +- [Compute List](#compute-list) +- [Compute Extensions](#compute-extensions) +- [Compute + OS Disk](#compute--os-disk) +- [Compute + Data Disks](#compute--data-disks) ++### Azure Compute ++The **Azure Compute** tab shows a summary graph of the VMs inside the VIS. +++### Compute List ++The **Compute List** tab shows a table of information about the VMs inside the VIS. This information includes the VM's name and state, SKU, OS, publisher, image version and SKU, offer, Azure region, resource group, tags, and more. ++You can toggle **Show Help** to see more information about the table data. ++Select a VM name to see its overview page, and change settings like **Boot Diagnostic**. +++### Compute Extensions ++The **Compute Extensions** tab shows information about your VM extensions. There are three tabs within this section: ++- [VM+Extensions](#vm--extensions) +- [VM Extensions Status](#vm-extensions-status) +- [Failed VM Extensions](#failed-vm-extensions) ++#### VM + Extensions ++**VM+Extensions** shows a summary of any VM extensions installed on the VMs in your VIS. +++#### VM Extensions Status ++**VM Extensions Status** shows details about the VM extensions in each VM. You can see each extension's state, version, and if **AutoUpgrade** is enabled. +++#### Failed VM Extensions ++**Failed VM Extensions** shows which VM extensions are failing in the selected VIS. +++### Compute + OS Disk ++The **Compute+OS Disk** tab shows a table with OS disk configurations in the SAP system. +++### Compute + Data Disks ++The **Compute+Data Disks** tab shows a table with data disk configurations in the SAP system. +++## Run configuration checks ++The **Configuration Checks** tab provides configuration checks for the VMs in your VIS. There are four subsections: ++- [Accelerated Networking](#accelerated-networking) +- [Public IP](#public-ip) +- [Backup](#backup) +- [Load Balancer](#load-balancer) ++### Accelerated Networking ++The **Accelerated Networking** tab shows if **Accelerated Networking State** is enabled for each NIC in the VIS. It's recommended to enable this setting for reliability and performance. +++### Public IP ++The **Public IP** tab shows any public IP addresses that are associated with the NICs linked to the VMs in the VIS. +++### Backup ++The **Backup** tab shows a table of VMs that don't have Azure Backup configured. It's recommended to use Azure Backup with your VMs. +++### Load Balancer ++The **Load Balancer** tab shows information about load balancers connected to the resource group(s) for the VIS. There are two subsections: [Load Balancer Overview](#load-balancer-overview) and [Load Balancer Monitor](#load-balancer-monitor). ++#### Load Balancer Overview ++The **Load Balancer Overview** tab shows rules and details for the load balancers in the VIS. You can review: ++- If the HA ports are defined for the load balancers. +- If the load balancers have floating IP addresses enabled. +- If the keep-alive functionality is enabled, with a maximum timeout of 30 minutes. +++#### Load Balancer Monitor ++The **Load Balancer Monitor** tab shows monitoring information for the load balancers. You can filter the information by load balancer and time range. ++**Load Balancer Key Metrics**, which is a table that shows important information about the load balancers in the subscription where the VIS exists. +++**Backend health probe by Backend IP**, which is a chart that shows the health probe status for each load balancer over time. +++## Next steps ++- [Manage a VIS](manage-virtual-instance.md) +- [Monitor SAP system from the Azure portal](monitor-portal.md) |
| center-sap-solutions | Install Software | https://github.com/MicrosoftDocs/azure-docs/commits/main/articles/center-sap-solutions/install-software.md | + + Title: Install SAP software (preview) +description: Learn how to install software on your SAP system created using Azure Center for SAP solutions (ACSS). ++ Last updated : 07/19/2022+++#Customer intent: As a developer, I want to install SAP software so that I can use Azure Center for SAP solutions. +++# Install SAP software (preview) +++After you've created infrastructure for your new SAP system using *Azure Center for SAP solutions (ACSS)*, you need to install the SAP software. ++In this how-to guide, you'll learn how to upload and install all the required components in your Azure account. You can either [run a pre-installation script to automate the upload process](#upload-components-with-script) or [manually upload the components](#upload-components-manually). Then, you can [run the software installation wizard](#install-software). ++## Prerequisites ++- An Azure subscription. +- An Azure account with **Contributor** role access to the subscriptions and resource groups in which the VIS exists. +- Grant the ACSS application **Azure SAP Workloads Management**, **Storage Blob Data Reader** and **Reader and Data Access** roles on the Storage Account which has the SAP software. +- A [network set up for your infrastructure deployment](prepare-network.md). +- A deployment of S/4HANA infrastructure. +- The SSH private key for the virtual machines in the SAP system. You generated this key during the infrastructure deployment. +- If you're installing a Highly Available (HA) SAP system, get the Service Principal identifier (SPN ID) and password to authorize the Azure fence agent (STONITH device) against Azure resources. For more information, see [Use Azure CLI to create an Azure AD app and configure it to access Media Services API](/azure/media-services/previous/media-services-cli-create-and-configure-aad-app). For an example, see the Red Hat documentation for [Creating an Azure Active Directory Application](https://access.redhat.com/documentation/en-us/red_hat_enterprise_linux/7/html/deploying_red_hat_enterprise_linux_7_on_public_cloud_platforms/configuring-rhel-high-availability-on-azure_cloud-content#azure-create-an-azure-directory-application-in-ha_configuring-rhel-high-availability-on-azure). + + To avoid frequent password expiry, use the Azure Command-Line Interface (Azure CLI) to create the Service Principal identifier and password instead of the Azure portal. ++## Supported software ++ACSS supports the following SAP software version: **S/4HANA 1909 SPS 03**. ++ACSS supports the following operating system (OS) software versions: ++| Publisher | Version | Generation SKU | Patch version name | +| | - | -- | | +| Red Hat | RHEL-SAP-HA (8.2 HA Pack) | 82sapha-gen2 | 8.2.2021091202 | +| Red Hat | RHEL-SAP-HA (8.4 HA Pack) | 84sapha-gen2 | 8.4.2021091202 | +| SUSE | sles-sap-15-sp3 | gen2 | 2022.01.26 | +| SUSE | sles-sap-12-sp4 | gen2 | 2022.02.01 ++## Required components ++The following components are necessary for the SAP installation: ++- SAP software installation media (part of the `sapbits` container described later in this article) + - All essential SAP packages (*SWPM*, *SAPCAR*, etc.) + - SAP software (for example, *4 HANA 1909 SPS 03*) +- Supporting software packages for the installation process + - `pip3` version `pip-21.3.1.tar.gz` + - `wheel` version 0.37.1 + - `jq` version 1.6 + - `ansible` version 2.9.27 + - `netaddr` version 0.8.0 +- The SAP Bill of Materials (BOM), as generated by ACSS. These YAML files list all required SAP packages for the SAP software installation. There's a main BOM (`S41909SPS03_v0011ms.yaml`) and dependent BOMs (`HANA_2_00_059_v0002ms.yaml`, `SUM20SP14_latest.yaml`, `SWPM20SP11_latest.yaml`). They provide the following information: + - The full name of the SAP package (`name`) + - The package name with its file extension as downloaded (`archive`) + - The checksum of the package as specified by SAP (`checksum`) + - The shortened filename of the package (`filename`) + - The SAP URL to download the software (`url`) +- Template or INI files, which are stack XML files required to run the SAP packages. ++## Upload components with script ++You can use the following method to upload the SAP components to your Azure account using scripts. Then, you can [run the software installation wizard](#install-software) to install the SAP software. ++You also can [upload the components manually](#upload-components-manually) instead. ++### Set up storage account ++Before you can download the software, set up an Azure Storage account for the downloads. ++1. [Create an Ubuntu 20.04 VM in Azure](/cli/azure/install-azure-cli-linux?pivots=apt). ++1. Sign in to the VM. ++1. Install the Azure CLI on the VM. ++ ```bash + curl -sL https://aka.ms/InstallAzureCLIDeb | sudo bash + ``` ++1. [Update the Azure CLI](/cli/azure/update-azure-cli) to version 2.30.0 or higher. ++1. Install the following packages: ++ - `pip3` version `pip-21.3.1.tar.gz` + - `wheel` version 0.37.1 + - `jq` version 1.6 + - `ansible` version 2.9.27 + - `zip` ++1. Sign in to Azure: ++ ```azurecli + az login + ``` ++1. [Create an Azure Storage account through the Azure portal](../storage/common/storage-account-create.md). Make sure to create the storage account in the same subscription as your SAP system infrastructure. ++1. Create a container within the Azure Storage account named `sapbits`. ++ 1. On the storage account's sidebar menu, select **Containers** under **Data storage**. ++ 1. Select **+ Container**. ++ 1. On the **New container** pane, for **Name**, enter `sapbits`. ++ 1. Select **Create**. ++1. Download the following shell script for the deployer VM packages. ++ ```azurecli + wget "https://raw.githubusercontent.com/Azure/ACSS-preview/main/Installation%20Script/DownloadDeployerVMPackages.sh" -O "DownloadDeployerVMPackages.sh" + ``` ++1. Update the shell script's file permissions. ++ ```azurecli + chmod +x DownloadDeployerVMPackages.sh + ``` ++1. Run the shell script. ++ ```azurecli + ./DownloadDeployerVMPackages.sh + ``` ++1. When asked if you have a storage account, enter `Y`. ++1. When asked for the base path to the SAP storage account, enter the container path. To find the container path: + + 1. Find the storage account that you created in the Azure portal. ++ 1. Find the container named `sapbits`. ++ 1. On the container's sidebar menu, select **Properties** under **Settings**. ++ 1. Copy down the **URL** value. The format is `https://<your-storage-account>.blob.core.windows.net/sapbits`. ++1. In the Azure CLI, when asked for the access key, enter your storage account's key. To find the storage account's key: ++ 1. Find the storage account in the Azure portal. ++ 1. On the storage account's sidebar menu, select **Access keys** under **Security + networking**. ++ 1. For **key1**, select **Show key and connection string**. ++ 1. Copy the **Key** value. ++1. In the Azure portal, find the container named `sapbits` in the storage account that you created. ++1. Make sure the deployer VM packages are now visible in `sapbits`. ++ 1. Find the storage account that you created in the Azure portal. ++ 1. Find the container named `sapbits`. ++ 1. On the **Overview** page for `sapbits`, look for a folder named **deployervmpackages**. ++### Download SAP media ++After setting up your Azure Storage account, you can download the SAP installation media required to install the SAP software. ++1. Sign in to the Ubuntu VM that you created in the [previous section](#set-up-storage-account). ++1. Clone the SAP automation repository from GitHub. ++ ```azurecli + git clone https://github.com/Azure/sap-automation.git + ``` ++1. Generate a shared access signature (SAS) token for the `sapbits` container. ++ 1. In the Azure portal, open the Azure Storage account. + + 1. Open the `sapbits` container. ++ 1. On the container's sidebar menu, select **Shared access signature** under **Security + networking**. ++ 1. On the SAS page, under **Allowed resource types**, select **Container**. ++ 1. Configure other settings as necessary. ++ 1. Select **Generate SAS and connection string**. ++ 1. Copy the **SAS token** value. Make sure to copy the `?` prefix with the token. ++1. Run the Ansible script **playbook_bom_download** with your own information. ++ - For `<username>`, use your SAP username. + - For `<password>`, use your SAP password. + - For `<storageAccountAccessKey>`, use your storage account's access key. You found this value in the [previous section](#set-up-storage-account). + - For `<containerBasePath>`, use the path to your `sapbits` container. You found this value in the [previous section](#set-up-storage-account). + - For `<containerSasToken>`, enter the SAS token that you generated in the previous step for `sapbits`. ++ ```azurecli + ansible-playbook ./sap-automation/deploy/ansible/playbook_bom_downloader.yaml -e "bom_base_name=S41909SPS03_v0011ms" -e "deployer_kv_name=abcd" -e "s_user=<username>" -e "s_password=<password>" -e "sapbits_access_key=<storageAccountAccessKey>" -e "sapbits_location_base_path=<containerBasePath>" -e "sapbits_sas_token=<containerSasToken>" + ``` ++Now, you can [install the SAP software](#install-software) using the installation wizard. ++## Upload components manually ++You can use the following method to download and upload the SAP components to your Azure account manually. Then, you can [run the software installation wizard](#install-software) to install the SAP software. ++You also can [run scripts to automate this process](#upload-components-with-script) instead. ++1. Create a new Azure storage account for the SAP components. +1. Grant the ACSS application *Azure SAP Workloads Management* **Storage Blob Data Reader** and **Reader and Data Access** role access to this storage account. +1. Create a container within the storage account. You can choose any container name; for example, **sapbits**. +1. Create two folders within the contained, named **deployervmpackages** and **sapfiles**. + > [!WARNING] + > Don't change the folder name structure for any steps in this process. Otherwise, the installation process can fail. +1. Download the supporting software packages listed in the [required components list](#required-components) to your local computer. +1. Put the software packages into a ZIP file named **DeployerVMPackages.zip**. +1. Go to the **deployervmpackages** folder in the Azure storage container. Upload **DeployerVMPackages.zip**. +1. Go to the **sapfiles** folder. +1. Create two subfolders named **archives** and **boms**. +1. In the **boms** folder, create four subfolders as follows. + 1. **HANA_2_00_059_v0002ms** + 1. **S41909SPS03_v0011ms** + 1. **SWPM20SP12_latest** + 1. **SUM20SP14_latest.yaml** +1. Upload the following YAML files to the folders with the same name. + 1. [S41909SPS03_v0011ms.yaml](https://raw.githubusercontent.com/Azure/sap-automation/main/deploy/ansible/BOM-catalog/S41909SPS03_v0011ms/S41909SPS03_v0011ms.yaml) + 1. [HANA_2_00_059_v0002ms.yaml](https://raw.githubusercontent.com/Azure/sap-automation/main/deploy/ansible/BOM-catalog/HANA_2_00_059_v0002ms/HANA_2_00_059_v0002ms.yaml) + 1. [SWPM20SP12_latest.yaml](https://raw.githubusercontent.com/Azure/sap-automation/main/deploy/ansible/BOM-catalog/SWPM20SP12_latest/SWPM20SP12_latest.yaml) + 1. [SUM20SP14_latest.yaml](https://raw.githubusercontent.com/Azure/sap-automation/main/deploy/ansible/BOM-catalog/SUM20SP14_latest/SUM20SP14_latest.yaml) +1. Go to the **S41909SPS03_v0011ms** folder and create a subfolder named **templates**. +1. Download the following files. Then, upload all the files to the **templates** folder. + 1. [HANA_2_00_055_v1_install.rsp.j2](https://raw.githubusercontent.com/Azure/sap-automation/main/deploy/ansible/BOM-catalog/S41909SPS03_v0011ms/templates/HANA_2_00_055_v1_install.rsp.j2) + 1. [S41909SPS03_v0011ms-app-inifile-param.j2](https://raw.githubusercontent.com/Azure/sap-automation/main/deploy/ansible/BOM-catalog/S41909SPS03_v0011ms/templates/S41909SPS03_v0011ms-app-inifile-param.j2) + 1. [S41909SPS03_v0011ms-dbload-inifile-param.j2](https://raw.githubusercontent.com/Azure/sap-automation/main/deploy/ansible/BOM-catalog/S41909SPS03_v0011ms/templates/S41909SPS03_v0011ms-dbload-inifile-param.j2) + 1. [S41909SPS03_v0011ms-ers-inifile-param.j2](https://raw.githubusercontent.com/Azure/sap-automation/main/deploy/ansible/BOM-catalog/S41909SPS03_v0011ms/templates/S41909SPS03_v0011ms-ers-inifile-param.j2) + 1. [S41909SPS03_v0011ms-generic-inifile-param.j2](https://raw.githubusercontent.com/Azure/sap-automation/main/deploy/ansible/BOM-catalog/S41909SPS03_v0011ms/templates/S41909SPS03_v0011ms-generic-inifile-param.j2) + 1. [S41909SPS03_v0011ms-pas-inifile-param.j2](https://raw.githubusercontent.com/Azure/sap-automation/main/deploy/ansible/BOM-catalog/S41909SPS03_v0011ms/templates/S41909SPS03_v0011ms-pas-inifile-param.j2) + 1. [S41909SPS03_v0011ms-scs-inifile-param.j2](https://raw.githubusercontent.com/Azure/sap-automation/main/deploy/ansible/BOM-catalog/S41909SPS03_v0011ms/templates/S41909SPS03_v0011ms-scs-inifile-param.j2) + 1. [S41909SPS03_v0011ms-scsha-inifile-param.j2](https://raw.githubusercontent.com/Azure/sap-automation/main/deploy/ansible/BOM-catalog/S41909SPS03_v0011ms/templates/S41909SPS03_v0011ms-scsha-inifile-param.j2) + 1. [S41909SPS03_v0011ms-web-inifile-param.j2](https://raw.githubusercontent.com/Azure/sap-automation/main/deploy/ansible/BOM-catalog/S41909SPS03_v0011ms/templates/S41909SPS03_v0011ms-web-inifile-param.j2) +1. Go back to the **sapfiles** folder, then go to the **archives** subfolder. +1. Download all packages that aren't labeled as `download: false` in the [S/4HANA 1909 BOM](https://github.com/Azure/sap-automation/blob/BPaaS-preview/deploy/ansible/BOM-catalog/S41909SPS03_v0011ms/S41909SPS03_v0011ms.yaml). You can use the URL given in the BOM to download each package. Make sure to download the exact package versions listed in each BOM. Repeat this step for the main and dependent BOM files. + 1. [HANA_2_00_059_v0002ms.yaml](https://github.com/Azure/sap-automation/blob/main/deploy/ansible/BOM-catalog/HANA_2_00_059_v0002ms/HANA_2_00_059_v0002ms.yaml) + 1. [SWPM20SP12_latest.yaml](https://github.com/Azure/sap-automation/blob/main/deploy/ansible/BOM-catalog/SWPM20SP12_latest/SWPM20SP12_latest.yaml) + 1. [SUM20SP14_latest.yaml](https://github.com/Azure/sap-automation/blob/main/deploy/ansible/BOM-catalog/SUM20SP14_latest/SUM20SP14_latest.yaml) +1. Upload all the packages that you downloaded to the **archives** folder. Don't rename the files. +1. Optionally, you can install other packages that aren't required. + 1. Download the package files. + 1. Upload the files to the **archives** folder. + 1. Open the `S41909SPS03_v0011ms` YAML file for the BOM. + 1. Edit the information for each optional package to `download:true`. + 1. Save the YAML file. ++Now, you can [install the SAP software](#install-software) using the installation wizard. ++## Install software ++To install the SAP software on Azure, use the ACSS installation wizard. ++1. Sign in to the [Azure portal](https://portal.azure.com). ++1. Search for and select **Virtual Instance for SAP solutions**. ++1. Select your Virtual Instance for SAP solutions (VIS) instance. ++1. On the **Overview** page for the VIS resource, select **Install SAP software**. ++1. In the **Prerequisites** tab of the wizard, review the prerequisites. Then, select **Next**. ++1. On the **Software** tab, provide information about your SAP media. ++ 1. For **Have you uploaded the software to an Azure storage account?**, select **Yes**. ++ 1. For **Software version**, use the default **SAP S/4HANA 1909 SPS03**. ++ 1. For **BOM directory location**, select **Browse** and find the path to your BOM file. For example, `/sapfiles/boms/S41909SPS03_v0010ms.yaml`. ++ 1. For **SAP FQDN:**, provide a fully qualified domain name (FQDN) for your SAP system. For example, `sap.contoso.com`. ++ 1. For High Availability (HA) systems only, enter the client identifier for the SONITH Fencing Agent service principal for **Fencing client ID**. ++ 1. For High Availability (HA) systems only, enter the password for the SONITH Fencing Agent service principal for **Fencing client password**. ++ 1. For **SSH private key**, provide the SSH private key that you created or selected as part of your infrastructure deployment. ++ 1. Select **Next**. ++1. On the **Review + install** tab, review the software settings. ++1. Select **Install** to proceed with installation. ++1. Wait for the installation to complete. The process takes approximately three hours. You can see the progress, along with estimated times for each step, in the wizard. ++1. After the installation completes, sign in with your SAP system credentials. ++## Limitations ++The following are known limitations and issues. ++### Application Servers ++You can install a maximum of 10 Application Servers, excluding the Primary Application Server. ++### SAP package versions ++When SAP changes the version of packages for a component in the BOM, you might encounter problems with the automated installation shell script. It's recommended to download your SAP installation media as soon as possible to avoid issues. ++If you encounter this problem, follow these steps: ++1. Download a new valid package from the SAP software downloads page. ++1. Upload the new package in the `archives` folder of your Azure Storage account. ++1. Update the following contents in the BOM file(s) that reference the updated component. ++ - `name` to the new package name + - `archive` to the new package name and extension + - `checksum` to the new checksum + - `filename` to the new shortened package name + - `permissions` to `0755` + - `url` to the new SAP download URL ++1. Reupload the BOM file(s) in the `boms` folder of the storage account. ++## Next steps ++- [Monitor SAP system from Azure portal](monitor-portal.md) +- [Manage a VIS](manage-virtual-instance.md) |
| center-sap-solutions | Manage Virtual Instance | https://github.com/MicrosoftDocs/azure-docs/commits/main/articles/center-sap-solutions/manage-virtual-instance.md | + + Title: Manage a Virtual Instance for SAP solutions (preview) +description: Learn how to configure a Virtual Instance for SAP solutions (VIS) resource in Azure Center for SAP solutions (ACSS) through the Azure portal. ++ Last updated : 07/19/2022+++#Customer intent: As a developer, I want to configure my Virtual Instance for SAP solutions resource so that I can find system properties and connect to databases. +++# Manage a Virtual Instance for SAP solutions (preview) +++In this article, you'll learn how to view the *Virtual Instance for SAP solutions (VIS)* resource created in *Azure Center for SAP solutions (ACSS)* through the Azure portal. You can use these steps to find your SAP system's properties and connect parts of the VIS to other resources like databases. ++## Prerequisites ++- An Azure subscription. +- **Contributor** role access to the subscription or resource groups where you plan to deploy the SAP system. +- The ACSS application **Azure SAP Workloads Management** also needs **Contributor** role access to the resource groups for the SAP system. There are two options to grant access: + - If your Azure account has **Owner** or **User Access Admin** role access, you can automatically grant access to the application when deploying or registering the SAP system. + - If your Azure account doesn't have **Owner** or **User Access Admin** role access, you can enable access for the ACSS application. ++## Open VIS in portal ++To configure your VIS in the Azure portal: ++1. Open the [Azure portal](https://portal.azure.com) in a browser. +1. Sign in with your Azure account that has the necessary role access as described in the [prerequisites](#prerequisites). +1. In the search field in the navigation menu, enter and select **Azure Center for SAP solutions**. +1. On the **Azure Center for SAP solutions** overview page, search for and select **Virtual Instances for SAP solutions** in the sidebar menu. +1. On the **Virtual Instances for SAP solutions** page, select the VIS that you want to view. ++ :::image type="content" source="media/configure-virtual-instance/select-vis.png" lightbox="media/configure-virtual-instance/select-vis.png" alt-text="Screenshot of Azure portal, showing the VIS page in the ACSS service with a table of available VIS resources."::: ++## Monitor VIS ++To see infrastructure-based metrics for the VIS, [open the VIS in the Azure portal](#open-vis-in-portal). On the **Overview** pane, select the **Monitoring** tab. You can see the following metrics: ++- VM utilization by ASCS and Application Server instances. The graph shows CPU usage percentage for all VMs that support the ASCS and Application Server instances. +- VM utilization by the database instance. The graph shows CPU usage percentage for all VMs that support the database instance. +- IOPS consumed by the database instance's data disk. The graph shows the percentage of disk utilization by all VMs that support the database instance. ++## View instance properties ++To view properties for the instances within your VIS, first [open the VIS in the Azure portal](#open-vis-in-portal). ++In the sidebar menu, look under the section **SAP resources**: ++- To see properties of ASCS instances, select **Central server instances**. +- To see properties of application server instances, select **App server instances**. +- To see properties of database instances, select **Databases**. +++## Connect to HANA database ++If you've deployed an SAP system using ACSS, [find the SAP system's main password and HANA database passwords](#find-sap-and-hana-passwords). ++The HANA database username is either `system` or `SYSTEM` for: ++- Distributed High Availability (HA) SAP systems +- Distributed non-HA systems +- Standalone systems ++### Find SAP and HANA passwords ++To retrieve the password: ++1. [Open the VIS in the Azure portal](#open-vis-in-portal). +1. On the overview page, select the **Managed resource group**. ++ :::image type="content" source="media/configure-virtual-instance/select-managed-resource-group.png" lightbox="media/configure-virtual-instance/select-managed-resource-group.png" alt-text="Screenshot of VIS resource in the Azure portal, showing selection of managed resource group on the overview page."::: ++1. On the resource group's page, select the **Key vault** resource in the table. ++ :::image type="content" source="media/configure-virtual-instance/select-key-vault.png" lightbox="media/configure-virtual-instance/select-key-vault.png" alt-text="Screenshot of managed resource group in the Azure portal, showing the selection of the key vault on the overview page."::: ++1. On the key vault's page, select **Secrets** in the navigation menu under **Settings**. +1. Make sure that you have access to all the secrets. If you have correct permissions, you can see the SAP password file listed in the table, which hosts the global password for your SAP system. +1. Select the SAP password file name to open the secret's page. +1. Copy the **Secret value**. ++If you get the warning **The operation 'List' is not enabled in this key vault's access policy.** with the message **You are unauthorized to view these contents.**: ++1. Make sure that you're responsible to manage these secrets in your organization. +1. In the sidebar menu, under **Settings**, select **Access policies**. +1. On the access policies page for the key vault, select **+ Add Access Policy**. +1. In the pane **Add access policy**, configure the following settings. + 1. For **Configure from template (optional)**, select **Key, Secret, & Certificate Management**. + 1. For **Key permissions**, select the keys that you want to use. + 1. For **Secret permissions**, select the secrets that you want to use. + 1. For **Certificate permissions**, select the certificates that you want to use. + 1. For **Select principal**, assign your own account name. +1. Select **Add** to add the policy. +1. In the access policy's menu, select **Save** to save your settings. +1. In the sidebar menu, under **Settings**, select **Secrets**. +1. On the secrets page for the key vault, make sure you can now see the SAP password file. ++## Delete VIS ++When you delete a VIS, you also delete the managed resource group and all instances that are attached to the VIS. For example, the VIS, ASCS, Application Server, and Database instances are deleted. +Any Azure physical resources aren't deleted when you delete a VIS. For example, the VMs, disks, NICs, and other resources aren't deleted. ++> [!WARNING] +> Deleting a VIS is a permanent action! It's not possible to restore a deleted VIS. ++To delete a VIS: ++1. [Open the VIS in the Azure portal](#open-vis-in-portal). +1. On the overview page's menu, select **Delete**. ++ :::image type="content" source="media/configure-virtual-instance/delete-vis-button.png" lightbox="media/configure-virtual-instance/delete-vis-button.png" alt-text="Screenshot of VIS resource in the Azure portal, showing delete button in the overview page's menu.."::: ++1. In the deletion pane, make sure that you want to delete this VIS and related resources. You can see a count for each type of resource to be deleted. + + :::image type="content" source="media/configure-virtual-instance/delete-vis-prompt.png" lightbox="media/configure-virtual-instance/delete-vis-prompt.png" alt-text="Screenshot of deletion prompt pane for a VIS resource in the Azure portal, showing list of related resources and confirmation field to enable the delete button."::: ++1. Enter **YES** in the confirmation field. +1. Select **Delete** to delete the VIS. +1. Wait for the deletion operation to complete for the VIS and related resources. ++After you delete a VIS, you can register the SAP system again. Open ACSS in the Azure portal, and select **Register an existing SAP system**. ++## Next steps ++- [Monitor SAP system from the Azure portal](monitor-portal.md) +- [Get quality checks and insights for your VIS](get-quality-checks-insights.md) |
| center-sap-solutions | Monitor Portal | https://github.com/MicrosoftDocs/azure-docs/commits/main/articles/center-sap-solutions/monitor-portal.md | + + Title: Monitor SAP system from the Azure portal (preview) +description: Learn how to monitor the health and status of your SAP system, along with important SAP metrics, using the Azure Center for SAP solutions (ACSS) within the Azure portal. ++ Last updated : 07/19/2022+++#Customer intent: As a developer, I want to set up monitoring for my Virtual Instance for SAP solutions, so that I can monitor the health and status of my SAP system in Azure Center for SAP solutions. +++# Monitor SAP system from Azure portal (preview) +++In this how-to guide, you'll learn how to monitor the health and status of your SAP system with *Azure Center for SAP solutions (ACSS)* through the Azure portal. The following capabilities are available for your *Virtual Instance for SAP solutions* resource: ++- Monitor your SAP system, along with its instances and VMs. +- Analyze important SAP infrastructure metrics. +- Create and/or register an instance of Azure Monitor for SAP solutions (AMS) to monitor SAP platform metrics. ++## System health ++The *health* of an SAP system within ACSS is based on the status of its underlying instances. Codes for health are also determined by the collective impact of these instances on the performance of the SAP system. ++Possible values for health are: ++- **Healthy**: the system is healthy. +- **Unhealthy**: the system is unhealthy. +- **Degraded**: the system shows signs of degradation and possible failure. +- **Unknown**: the health of the system is unknown. ++## System status ++The *status* of an SAP system within ACSS indicates the current state of the system. ++Possible values for status are: ++- **Running**: the system is running. +- **Offline**: the system is offline. +- **Partially running**: the system is partially running. +- **Unavailable**: the system is unavailable. ++## Instance properties ++When you [check the health or status of your SAP system in the Azure portal](#check-health-and-status), the results for each instance are listed and color-coded. ++### Color-coding for states ++For ASCS and application server instances: ++| Color code | Status | Health | +| | -- | -- | +| Green | Running | Healthy | +| Yellow | Running | Degraded | +| Red | Running | Unhealthy | +| Gray | Unavailable | Unknown | ++For database instances: ++| Color code | Status | +| | -- | +| Green | Running | +| Yellow | Unavailable | +| Red | Unavailable | +| Gray | Unavailable | ++### Example scenarios ++The following are different scenarios with the corresponding status and health values. ++| Application instance state | ASCS instance state | System status | System health | +| -- | -- | - | - | +| Running and healthy | Running and healthy | Running | Healthy | +| Running and degraded | Running and healthy | Running | Degraded | +| Running and unhealthy | Running and healthy | Running | Unhealthy | ++## Health and status codes ++When you [check the health or status of your SAP system in the Azure portal](#check-health-and-status), these values are displayed with corresponding symbols. ++Depending on the type of instance, there are different color-coded scenarios with different status and health outcomes. ++For ASCS and application server instances, the following color-coding applies: ++## Check health and status ++> [!NOTE] +> After creating your virtual Instance for SAP solutions (VIS), you might need to wait 2-5 minutes to see health and status information. +> +> The average latency to get health and status information is about 30 seconds. ++To check basic health and status settings: ++1. Sign in to the [Azure portal](https://portal.azure.com). ++1. In the search bar, enter `SAP on Azure`, then select **Azure Center for SAP solutions** in the results. ++1. On the service's page, select **Virtual Instances for SAP solutions** in the sidebar menu. ++1. On the page for the VIS, review the table of instances. There is an overview of health and status information for each VIS. ++ :::image type="content" source="media/monitor-portal/all-vis-statuses.png" lightbox="media/monitor-portal/all-vis-statuses.png" alt-text="Screenshot of the ACSS service in the Azure portal, showing a page of all VIS resources with their health and status information."::: ++1. Select the VIS you want to check. ++1. On the **Overview** page for the VIS resource, select the **Properties** tab. ++ :::image type="content" source="media/monitor-portal/vis-resource-overview.png" lightbox="media/monitor-portal/vis-resource-overview.png" alt-text="Screenshot of the VIS resource overview in the Azure portal, showing health and status information and the Properties tab highlighted."::: ++1. On the properties page for the VIS, review the **SAP status** section to see the health of SAP instances. Review the **Virtual machines** section to see the health of VMs inside the VIS. ++ :::image type="content" source="media/monitor-portal/properties-tab.png" lightbox="media/monitor-portal/properties-tab.png" alt-text="Screenshot of the Properties tab for the VIS resource overview, showing the SAP status and Virtual machines details."::: ++To see information about ASCS instances: ++1. Open the VIS in the Azure portal, as previously described. ++1. In the sidebar menu, under **SAP resources**, select **Central service instances**. ++1. Select an instance from the table to see its properties. ++ :::image type="content" source="media/monitor-portal/ascs-vm-details.png" lightbox="media/monitor-portal/ascs-vm-details.png" alt-text="Screenshot of an ASCS instance in the Azure portal, showing health and status information for the VM."::: ++To see information about SAP application server instances: ++1. Open the VIS in the Azure portal, as previously described. ++1. In the sidebar menu, under **SAP resources**, select **App server instances**. ++1. Select an instance from the table to see its properties. + + :::image type="content" source="media/monitor-portal/app-server-vm-details.png" lightbox="media/monitor-portal/app-server-vm-details.png" alt-text="Screenshot of an Application Server instance in the Azure portal, showing health and status information for the VM."::: ++## Monitor SAP infrastructure ++ACSS enables you to analyze important SAP infrastructure metrics from the Azure portal. ++1. Sign in to the [Azure portal](https://portal.azure.com). ++1. In the search bar, enter `SAP on Azure`, then select **Azure Center for SAP solutions** in the results. ++1. On the service's page, select **SAP Virtual Instances** in the sidebar menu. ++1. On the page for the VIS, select the VIS from the table. ++1. On the overview page for the VIS, select the **Monitoring** tab. ++ :::image type="content" source="media/monitor-portal/vis-resource-overview-monitoring.png" lightbox="media/monitor-portal/vis-resource-overview-monitoring.png" alt-text="Screenshot of the Monitoring tab for a VIS resource in the Azure portal, showing monitoring charts for CPU utilization and IOPS."::: ++1. Review the monitoring charts, which include: ++ 1. CPU utilization by the Application server and ASCS server + + 1. IOPS percentage consumed by the Database server instance ++ 1. CPU utilization by the Database server instance ++1. Select any of the monitoring charts to do more in-depth analysis with Azure Monitor metrics explorer. ++## Configure Azure Monitor ++You can also set up or register AMS to monitor SAP platform-level metrics. ++1. Sign in to the [Azure portal](https://portal.azure.com). ++1. In the search bar, enter `SAP on Azure`, then select **Azure Center for SAP solutions** in the results. ++1. On the service's page, select **SAP Virtual Instances** in the sidebar menu. ++1. On the page for the VIS, select the VIS from the table. ++1. In the sidebar menu for the VIS, under **Monitoring**, select **Azure Monitor for SAP**. ++1. Select whether you want to [create a new AMS instance](#create-new-ams-resource), or [register an existing AMS instance](#register-existing-ams-resource). If you don't see this option, you've already configured this setting. ++ :::image type="content" source="media/monitor-portal/monitoring-setup.png" lightbox="media/monitor-portal/monitoring-setup.png" alt-text="Screenshot of AMS page inside a VIS resource in the Azure portal, showing the option to create or register a new instance."::: ++1. After you create or register your AMS instance, you are redirected to the AMS instance. ++### Create new AMS resource ++To configure a new AMS resource: ++1. On the **Create new AMS resource** page, select the **Basics** tab. ++ :::image type="content" source="media/monitor-portal/ams-creation.png" lightbox="media/monitor-portal/ams-creation.png" alt-text="Screenshot of AMS creation page, showing the Basics tab and required fields."::: ++1. Under **Project details**, configure your resource. ++ 1. For **Subscription**, select your Azure subscription. ++ 1. For **AMS resource group**, select the same resource group as the VIS. ++ > [!IMPORTANT] + > If you select a resource group that's different from the resource group of the VIS, the deployment fails. ++1. Under **AMS instance details**, configure your AMS instance. ++ 1. For **Resource name**, enter a name for your AMS resource. ++ 1. For **Workload region**, select an Azure region for your workload. ++1. Under **Networking**, configure networking information. ++ 1. For **Virtual network**, select a virtual network to use. ++ 1. For **Subnet**, select a subnet in your virtual network. ++ 1. For **Route All**, choose to enable or disable the option. When you enable this setting, all outbound traffic from the app is affected by your networking configuration. ++1. Select the **Review + Create** tab. ++### Register existing AMS resource ++To register an existing **AMS resource**, select the instance from the drop-down menu on the **Register AMS** page. ++> [!NOTE] +> You can only view and select the current version of AMS resources. AMS (classic) resources aren't available. ++ :::image type="content" source="media/monitor-portal/ams-registration.png" lightbox="media/monitor-portal/ams-registration.png" alt-text="Screenshot of AMS registration page, showing the selection of an existing AMS resource."::: ++## Unregister AMS from VIS ++> [!NOTE] +> This operation only unregisters the AMS resource from the VIS. To delete the AMS resource, you need to delete the AMS instance. ++To remove the link between your AMS resource and your VIS: ++1. Sign in to the [Azure portal](https://portal.azure.com). ++1. In the sidebar menu, under **Monitoring**, select **Azure Monitor for SAP**. ++1. On the AMS page, select **Delete** to unregister the resource. ++1. Wait for the confirmation message, **Azure Monitor for SAP Solutions has been unregistered successfully**. ++## Next steps ++- [Get quality checks and insights for your VIS](get-quality-checks-insights.md) |
| center-sap-solutions | Overview | https://github.com/MicrosoftDocs/azure-docs/commits/main/articles/center-sap-solutions/overview.md | + + Title: Azure Center for SAP solutions (preview) +description: Azure Center for SAP solutions (ACSS) is an Azure offering that makes SAP a top-level workload on Azure. You can use ACSS to deploy or manage SAP systems on Azure seamlessly. ++ Last updated : 07/19/2022+++#Customer intent: As a developer, I want to learn about Azure Center for SAP solutions so that I can decide to use the service with a new or existing SAP system. +++# What is Azure Center for SAP solutions? (preview) +++*Azure Center for SAP solutions (ACSS)* is an Azure offering that makes SAP a top-level workload on Azure. ACSS is an end-to-end solution that enables you to create and run SAP systems as a unified workload on Azure and provides a more seamless foundation for innovation. You can take advantage of the management capabilities for both new and existing Azure-based SAP systems. ++The guided deployment experience takes care of creating the necessary compute, storage and networking components needed to run your SAP system. ACSS then helps automate the installation of the SAP software according to Microsoft best practices. ++In ACSS, you either create a new SAP system or register an existing one, which then creates a *Virtual Instance for SAP solutions (VIS)*. The VIS brings SAP awareness to Azure by providing management capabilities, such as being able to see the status and health of your SAP systems. Another example is quality checks and insights, which allow you to know when your system isn't following documented best practices and standards. ++You can use ACSS to deploy the following types of SAP systems: ++- Single server +- Distributed +- Distributed with High Availability (HA) ++For existing SAP systems that run on Azure, there's a simple registration experience. You can register the following types of existing SAP systems that run on Azure: ++- An SAP system that runs on SAP NetWeaver or ABAP stack +- SAP systems that run on SUSE and RHEL Linux operating systems +- SAP systems that run on HANA, DB2, SQL Server, Oracle, Max DB, or SAP ASE databases ++ACSS brings services, tools and frameworks together to provide an end-to-end unified experience for deployment and management of SAP workloads on Azure, creating the foundation for you to build innovative solutions for your unique requirements. ++## What is a Virtual Instance for SAP solutions? +When you use ACSS, you'll create a *Virtual Instance for SAP solutions (VIS)* resource. The VIS is a logical representation of an SAP system on Azure. ++Every time that you [create a new SAP system through ACSS](deploy-s4hana.md), or [register an existing SAP system to ACSS](register-existing-system.md), Azure creates a VIS. A VIS contains the metadata for the entire SAP system. ++Each VIS consists of: ++- The SAP system itself, referred to by the SAP System Identifier (SID) +- An ABAP Central Services (ASCS) instance +- A database instance +- One or more SAP Application Server instances ++ This diagram shows a VIS that contains an SAP system. The SAP system contains an ASCS instance, an Application Server instance, and a database instance. Each instance connects to the VM level for compute, storage and networking capabilities. ++Inside the VIS, the SID is the parent resource. Your VIS resource is named after the SID of your SAP system. Any ASCS, Application Server, or database instances are child resources of the SID. The child resources are associated with one or more VM resources outside of the VIS. A standalone system has all three instances mapped to a single VM. A distributed system has one ASCS and one Database instance, with each mapped to a VM. High Availability (HA) deployments have the ASCS and Database instances mapped to multiple VMs to enable HA. A distributed or HA type SAP system can have multiple Application Server instances linked to their respective VMs. ++## What can you do with ACSS? ++After you create a VIS, you can: ++- See an overview of the entire SAP system, including the different parts of the VIS. +- View the SAP system metadata. For example, properties of ASCS, database, and Application Server instances; properties of SAP environment details; and properties of associated VM resources. +- Get the latest status and health check for your SAP system. +- Start and stop the SAP application tier. +- Get quality checks and insights about your SAP system. +- Monitor your Azure infrastructure metrics for your SAP system resources. For example, the CPU percentage used for ASCS and Application Server VMs, or disk input/output operations per second (IOPS). ++## Next steps ++- [Create a network for a new VIS deployment](prepare-network.md) +- [Register an existing SAP system in ACSS](register-existing-system.md) |
| center-sap-solutions | Prepare Network | https://github.com/MicrosoftDocs/azure-docs/commits/main/articles/center-sap-solutions/prepare-network.md | + + Title: Prepare network for infrastructure deployment (preview) +description: Learn how to prepare a network for use with an S/4HANA infrastructure deployment with Azure Center for SAP solutions (ACSS) through the Azure portal. ++ Last updated : 07/19/2022+++#Customer intent: As a developer, I want to create a virtual network so that I can deploy S/4HANA infrastructure in Azure Center for SAP solutions. +++# Prepare network for infrastructure deployment (preview) +++In this how-to guide, you'll learn how to prepare a virtual network to deploy S/4 HANA infrastructure using *Azure Center for SAP solutions (ACSS)*. This article provides general guidance about creating a virtual network. Your individual environment and use case will determine how you need to configure your own network settings for use with a *Virtual Instance for SAP (VIS)* resource. ++If you have an existing network that you're ready to use with ACSS, [go to the deployment guide](deploy-s4hana.md) instead of following this guide. ++## Prerequisites ++- An Azure subscription. +- [Review the quotas for your Azure subscription](../azure-portal/supportability/view-quotas.md). If the quotas are low, you might need to create a support request before creating your infrastructure deployment. Otherwise, you might experience deployment failures or an **Insufficient quota** error. +- It's recommended to have multiple IP addresses in the subnet or subnets before you begin deployment. For example, it's always better to have a `/26` mask instead of `/29`. +- Note the SAP Application Performance Standard (SAPS) and database memory size that you need to allow ACSS to size your SAP system. If you're not sure, you can also select the VMs. There are: + - A single or cluster of ASCS VMs, which make up a single ASCS instance in the VIS. + - A single or cluster of Database VMs, which make up a single Database instance in the VIS. + - A single Application Server VM, which makes up a single Application instance in the VIS. Depending on the number of Application Servers being deployed or registered, there can be multiple application instances. ++## Create network ++You must create a network for the infrastructure deployment on Azure. Make sure to create the network in the same region that you want to deploy the SAP system. ++Some of the required network components are: ++- A virtual network +- Subnets for the Application Servers and Database Servers. Your configuration needs to allow communication between these subnets. +- Azure network security groups +- Azure application security groups +- Route tables +- Firewalls +- Network Virtual Appliances (NVAs) ++For more information, see the [example network configuration](#example-network-configuration). ++## Connect network ++At a minimum, the network needs to have outbound internet connectivity for successful infrastructure deployment and software installation. The application and database subnets also need to be able to communicate with each other. ++If internet connectivity isn't possible, allowlist the IP addresses for the following areas: ++- [SUSE or Red Hat endpoints](#allowlist-suse-or-red-hat-endpoints) +- [Azure Storage accounts](#allowlist-storage-accounts) +- [Allowlist Azure Key Vault](#allowlist-key-vault) +- [Allowlist Azure Active Directory (Azure AD)](#allowlist-azure-ad) +- [Allowlist Azure Resource Manager](#allowlist-azure-resource-manager) ++Then, make sure all resources within the virtual network can connect to each other. For example, [configure a network security group](../virtual-network/manage-network-security-group.md#work-with-network-security-groups) to allow resources within the virtual network to communicate by listening on all ports. ++- Set the **Source port ranges** to **\***. +- Set the **Destination port ranges** to **\***. +- Set the **Action** to **Allow** ++If it's not possible to allow the resources within the virtual network to connect to each other, allow connections between the application and database subnets, and [open important SAP ports in the virtual network](#open-important-sap-ports) instead. ++### Allowlist SUSE or Red Hat endpoints ++If you're using SUSE for the VMs, [allowlist the SUSE endpoints](https://www.suse.com/c/azure-public-cloud-update-infrastructure-101/). For example: ++1. Create a VM with any OS [using the Azure portal](../virtual-machines/linux/quick-create-portal.md) or [using Azure Cloud Shell](../cloud-shell/overview.md). Or, install *openSUSE Leap* from the Microsoft Store and enable WSL. +1. Install *pip3* by running `zypper install python3-pip`. +1. Install the *pip* package *susepubliccloudinfo* by running `pip3 install susepubliccloudinfo`. +1. Get a list of IP addresses to configure in the network and firewall by running `pint microsoft servers --json --region` with the appropriate Azure region parameter. +1. Allowlist all these IP addresses on the firewall or network security group where you're planning to attach the subnets. ++If you're using Red Hat for the VMs, [allowlist the Red Hat endpoints](../virtual-machines/workloads/redhat/redhat-rhui.md#the-ips-for-the-rhui-content-delivery-servers) as needed. The default allowlist is the Azure Global IP addresses. Depending on your use case, you might also need to allowlist Azure US Government or Azure Germany IP addresses. Configure all IP addresses from your list on the firewall or the network security group where you want to attach the subnets. ++### Allowlist storage accounts ++ACSS needs access to the following storage accounts to install SAP software correctly: ++- The storage account where you're storing the SAP media that is required during software installation. +- The storage account created by ACSS in a managed resource group, which ACSS also owns and manages. ++There are multiple options to allow access to these storage accounts: ++- Allow internet connectivity +- Configure a [**Storage** service tag](../virtual-network/service-tags-overview.md#available-service-tags) +- Configure [**Storage** service tags](../virtual-network/service-tags-overview.md#available-service-tags) with regional scope. Make sure to configure tags for the Azure region where you're deploying the infrastructure, and where the storage account with the SAP media exists. +- Allowlist the regional [Azure IP ranges](https://www.microsoft.com/en-us/download/details.aspx?id=56519). ++### Allowlist Key Vault ++ACSS creates a key vault to store and access the secret keys during software installation. This key vault also stores the SAP system password. To allow access to this key vault, you can: ++- Allow internet connectivity +- Configure a [**AzureKeyVault** service tag](../virtual-network/service-tags-overview.md#available-service-tags) +- Configure an [**AzureKeyVault** service tag](../virtual-network/service-tags-overview.md#available-service-tags) with regional scope. Make sure to configure the tag in the region where you're deploying the infrastructure. ++### Allowlist Azure AD ++ACSS uses Azure AD to get the authentication token for obtaining secrets from a managed key vault during SAP installation. To allow access to Azure AD, you can: ++- Allow internet connectivity +- Configure an [**AzureActiveDirectory** service tag](../virtual-network/service-tags-overview.md#available-service-tags). ++### Allowlist Azure Resource Manager ++ACSS uses a managed identity for software installation. Managed identity authentication requires a call to the Azure Resource Manager endpoint. To allow access to this endpoint, you can: ++- Allow internet connectivity +- Configure an [**AzureResourceManager** service tag](../virtual-network/service-tags-overview.md#available-service-tags). ++### Open important SAP ports ++If you're unable to [allow connection between all resources in the virtual network](#connect-network) as previously described, you can open important SAP ports in the virtual network instead. This method allows resources within the virtual network to listen on these ports for communication purposes. If you're using more than one subnet, these settings also allow connectivity within the subnets. ++Open the SAP ports listed in the following table. Replace the placeholder values (`xx`) in applicable ports with your SAP instance number. For example, if your SAP instance number is `01`, then `32xx` becomes `3201`. ++| SAP service | Port range | Allow incoming traffic | Allow outgoing traffic | Purpose | +| - | - | - | - | -- | +| Host Agent | 1128, 1129 | Yes | Yes | HTTP/S port for the SAP host agent. | +| Web Dispatcher | 32xx | Yes | Yes | SAPGUI and RFC communication. | +| Gateway | 33xx | Yes | Yes | RFC communication. | +| Gateway (secured) | 48xx | Yes | Yes | RFC communication. | +| Internet Communication Manager (ICM) | 80xx, 443xx | Yes | Yes | HTTP/S communication for SAP Fiori, WEB GUI | +| Message server | 36xx, 81xx, 444xx | Yes | No | Load balancing; ASCS to app servers communication; GUI sign-in; HTTP/S traffic to and from message server. | +| Control agent | 5xx13, 5xx14 | Yes | No | Stop, start, and get status of SAP system. | +| SAP installation | 4237 | Yes | No | Initial SAP installation. | +| HTTP and HTTPS | 5xx00, 5xx01 | Yes | Yes | HTTP/S server port. | +| IIOP | 5xx02, 5xx03, 5xx07 | Yes | Yes | Service request port. | +| P4 | 5xx04-6 | Yes | Yes | Service request port. | +| Telnet | 5xx08 | Yes | No | Service port for management. | +| SQL communication | 3xx13, 3xx15, 3xx40-98 | Yes | No | Database communication port with application, including ABAP or JAVA subnet. | +| SQL server | 1433 | Yes | No | Default port for MS-SQL in SAP; required for ABAP or JAVA database communication. | +| HANA XS engine | 43xx, 80xx | Yes | Yes | HTTP/S request port for web content. | ++## Example network configuration ++The configuration process for an example network might include: ++1. Create a virtual network, or use an existing virtual network. ++1. Create the following subnets inside the virtual network: ++ 1. An application tier subnet. ++ 1. A database tier subnet. ++ 1. A subnet for use with the firewall, named **Azure FirewallSubnet**. ++1. Create a new firewall resource: ++ 1. Attach the firewall to the virtual network. ++ 1. Create a rule to allowlist RHEL or SUSE endpoints. Make sure to allow all source IP addresses (`*`), set the source port to **Any**, allow the destination IP addresses for RHEL or SUSE, and set the destination port to **Any**. ++ 1. Create a rule to allow service tags. Make sure to allow all source IP addresses (`*`), set the destination type to **Service tag**. Then, allow the tags **Microsoft.Storage**, **Microsoft.KeyVault**, **AzureResourceManager** and **Microsoft.AzureActiveDirectory**. ++1. Create a route table resource: ++ 1. Add a new route of the type **Virtual Appliance**. ++ 1. Set the IP address to the firewall's IP address, which you can find on the overview of the firewall resource in the Azure portal. ++1. Update the subnets for the application and database tiers to use the new route table. ++1. If you're using a network security group with the virtual network, add the following inbound rule. This rule provides connectivity between the subnets for the application and database tiers. ++ | Priority | Port | Protocol | Source | Destination | Action | + | -- | - | -- | | -- | | + | 100 | Any | Any | virtual network | virtual network | Allow | ++1. If you're using a network security group instead of a firewall, add outbound rules to allow installation. ++ | Priority | Port | Protocol | Source | Destination | Action | + | -- | - | -- | | -- | | + | 110 | Any | Any | Any | SUSE or Red Hat endpoints | Allow | + | 115 | Any | Any | Any | Azure Resource Manager | Allow | + | 116 | Any | Any | Any | Azure AD | Allow | + | 117 | Any | Any | Any | Storage accounts | Allow | + | 118 | 8080 | Any | Any | Key vault | Allow | + | 119 | Any | Any | Any | virtual network | Allow | + +## Next steps ++- [Deploy S/4HANA infrastructure](deploy-s4hana.md) |
| center-sap-solutions | Register Existing System | https://github.com/MicrosoftDocs/azure-docs/commits/main/articles/center-sap-solutions/register-existing-system.md | + + Title: Register existing SAP system (preview) +description: Learn how to register an existing SAP system in Azure Center for SAP solutions (ACSS) through the Azure portal. You can visualize, manage, and monitor your existing SAP system through ACSS. ++ Last updated : 07/19/2022+++#Customer intent: As a developer, I want to register my existing SAP system so that I can use the system with Azure Center for SAP solutions (ACSS). +++# Register existing SAP system (preview) +++In this how-to guide, you'll learn how to register an existing SAP system with *Azure Center for SAP solutions (ACSS)*. After you register an SAP system with ACSS, you can use its visualization, management and monitoring capabilities through the Azure portal. For example, you can: ++- View and track the SAP system as an Azure resource, called the *Virtual Instance for SAP solutions (VIS)*. +- Get recommendations for your SAP infrastructure, based on quality checks that evaluate best practices for SAP on Azure. +- Get health and status information about your SAP system. +- Start and Stop SAP application tier. +- Monitor the Azure infrastructure metrics for the SAP system resources. ++## Prerequisites ++- Check that you're trying to register a [supported SAP system configuration](#supported-systems) +- Check that your Azure account has **Contributor** role access on the subscription or resource groups where you have the SAP system resources. +- Make sure each virtual machine (VM) in the SAP system is currently running on Azure. These VMs include: + - The ABAP SAP Central Services (ASCS) Server instance + - The Application Server instance or instances + - The Database instance for the SAP system identifier (SID) +- Make sure the **sapstartsrv** process is currently running on all the VMs in the SAP system. + - Command to start up sapstartsrv process on SAP VMs: /usr/sap/hostctrl/exe/hostexecstart -start +- Grant the ACSS application **Azure SAP Workloads Management** **Contributor** role access to the resource groups for the SAP system. There are two options: + - If your Azure account has **Owner** or **User Access Admin** role access, you can automatically grant access to the application when registering the SAP system. + - If your Azure account doesn't have **Owner** or **User Access Admin** role access, you can [enable access for the ACSS application](#enable-acss-resource-permissions) as described later. +- Grant access to your Azure Storage accounts from the virtual network where the SAP system exists. Use one of these options: + - Allow outbound internet connectivity for the VMs. + - Use a [**Storage** service tag](../virtual-network/service-tags-overview.md) to allow connectivity to any Azure storage account from the VMs. + - Use a [**Storage** service tag with regional scope](../virtual-network/service-tags-overview.md) to allow storage account connectivity to the Azure storage accounts in the same region as the VMs. + - Allowlist the region-specific IP addresses for Azure Storage. ++## Supported systems ++You can register SAP systems with ACSS that run on the following configurations: ++- SAP NetWeaver or ABAP stacks +- SUSE and RHEL Linux operating systems +- HANA, DB2, SQL Server, Oracle, Max DB, and SAP ASE databases ++The following SAP system configurations aren't supported in ACSS: ++- Windows operating system +- HANA Large Instance (HLI) +- Systems with HANA Scale-out configuration +- Java stack +- Dual stack (ABAP and Java) +- Systems distributed across peered virtual networks +- Systems using IPv6 addresses ++## Enable ACSS resource permissions ++When you register an existing SAP system as a VIS, ACSS needs **Contributor** role access to the Azure subscription or resource group in which the SAP system exists. Before you register an SAP system with ACSS, either [update your Azure subscription permissions](#update-subscription-permissions) or [update your resource group permissions](#update-resource-group-permissions). ++ACSS uses this role access to install VM extensions on the ASCS, Application Server and DB VMs. This step allows ACSS to discover the SAP system components, and other SAP system metadata. ACSS also needs this same permission to enable SAP system monitoring and management capabilities. ++### Update subscription permissions ++To update permissions for an Azure subscription: ++1. Sign in to the [Azure portal](https://portal.azure.com). +1. Search for and select **Subscriptions** in the Azure portal's search bar. +1. On the **Subscriptions** page, select the name of the subscription where the SAP system exists. +1. In the subscription's sidebar menu, select **Access control (IAM)**. +1. On the **Access control (IAM)** page menu, select **Add role** > **Add role assignment**. +1. On the **Role** tab of the **Add role assignment** page, select the **Contributor** role in the table. +1. Select **Next**. +1. On the **Members** tab, for **Assign access to**, select **User, group, or service principal**. +1. For **Members**, select **Select members**. +1. In the **Select members** pane, search for **Azure SAP Workloads Management**. +1. Select the ACSS application in the results. +1. Select **Select**. +1. Select **Review + assign**. ++### Update resource group permissions ++To update permissions for a resource group: ++1. Sign in to the [Azure portal](https://portal.azure.com). +1. Search for and select **Resource groups** in the Azure portal's search bar. +1. On the **Resource groups** page, select the name of the resource group where the SAP system exists. +1. In the resource group's sidebar menu, select **Access control (IAM)**. +1. On the **Access control (IAM)** page, select **Add** > **Add role assignment**. +1. On the **Role** tab of the **Add role assignment** page, select the **Contributor** role in the table. +1. Select **Next**. +1. On the **Members** tab, for **Assign access to**, select **User, group, or service principal**. +1. For **Members**, select **Select members**. +1. In the **Select members** pane, search for **Azure SAP Workloads Management**. +1. Select the ACSS application in the results. +1. Select **Select**. +1. Select **Review + assign**. ++Then, repeat the process for any other resource groups where the SAP system exists. ++## Register SAP system ++To register an existing SAP system in ACSS: ++1. Sign in to the [Azure portal](https://portal.azure.com). Make sure to sign in with an Azure account that has **Contributor** role access to the subscription or resource groups where the SAP system exists. For more information, see the [resource permissions explanation](#enable-acss-resource-permissions). +1. Search for and select **Azure Center for SAP solutions** in the Azure portal's search bar. +1. On the **Azure Center for SAP solutions** page, select **Register an existing SAP system**. ++ :::image type="content" source="media/register-existing-system/register-button.png" alt-text="Screenshot of ACSS service overview page in the Azure portal, showing button to register an existing SAP system." lightbox="media/register-existing-system/register-button.png"::: ++1. On the **Basics** tab of the **Register existing SAP system** page, provide information about the SAP system. + 1. For **ASCS virtual machine**, select **Select ASCS virtual machine** and select the ASCS VM resource. + 1. For **SID name**, enter the SID name. + 1. For **SAP product**, select the SAP system product from the drop-down menu. + 1. For **Environment**, select the environment type from the drop-down menu. For example, production or non-production environments. + 1. For **Method to grant permission**, select your preferred method to grant Azure access to the related subscriptions and resource groups. + - If you choose **Automatic**, ACSS has access to the entire Azure subscription where the ASCS VM exists. To use this option, your Azure account also must have **User Access Admin** or **Owner** role access. + - If you choose **Manual**, you have to manually grant access to the resource group(s) where the SAP system exists. For more information, see the [resource permissions explanation](#enable-acss-resource-permissions). + 1. Select **Review + register** to discover the SAP system and begin the registration process. ++ :::image type="content" source="media/register-existing-system/registration-page.png" alt-text="Screenshot of ACSS registration page, highlighting mandatory fields to identify the existing SAP system." lightbox="media/register-existing-system/registration-page.png"::: ++ 1. On the **Review + register** pane, make sure your settings are correct. Then, select **Register**. ++1. Wait for the VIS resource to be created. The VIS name is the same as the SID name. The VIS deployment finishes after all SAP system components are discovered from the ASCS VM that you selected. + +You can now review the VIS resource in the Azure portal. The resource page shows the SAP system resources, and information about the system. ++If the registration doesn't succeed, see [what to do when an SAP system registration fails in ACSS](#fix-registration-failure). ++## Fix registration failure ++The process of registering an SAP system in ACSS might fail for the following reasons: ++- The selected ASCS VM and SID don't match. Make sure to select the correct ASCS VM for the SAP system that you chose, and vice versa. +- The ASCS instance or VM isn't running. Make sure the instance and VM are in the **Running** state. +- The **sapstartsrv** process isn't running on all the VMs in the SAP system. + - Command to start up sapstartsrv process on SAP VMs: /usr/sap/hostctrl/exe/hostexecstart -start +- At least one Application Server and the Database aren't running for the SAP system that you chose. Make sure the Application Servers and Database VMs are in the **Running** state. +- The user trying to register the SAP system doesn't have **Contributor** role permissions. For more information, see the [prerequisites for registering an SAP system](#prerequisites). +- The ACSS service doesn't have **Contributor** role access to the Azure subscription or resource groups where the SAP system exists. For more information, see [how to enable ACSS resource permissions](#enable-acss-resource-permissions). ++There's also a known issue with registering *S/4HANA 2021* version SAP systems. You might receive the error message: **Failed to discover details from the Db VM**. This error happens when the Database identifier is incorrectly configured on the SAP system. One possible cause is that the Application Server profile parameter `rsdb/dbid` has an incorrect identifier for the HANA Database. To fix the error: ++1. Stop the Application Server instance: + + `sapcontrol -nr -function Stop` ++1. Stop the ASCS instance: ++ `sapcontrol -nr -function Stop` ++1. Open the Application Server profile. ++1. Add the profile parameter for the HANA Database: ++ `rsdb/dbid = HanaDbSid` ++1. Restart the Application Server instance: ++ `sapcontrol -nr -function Start` ++1. Restart the ASCS instance: ++ `sapcontrol -nr -function Start` ++1. Delete the VIS resource whose registration failed. ++1. [Register the SAP system](#register-sap-system) again. ++If your registration fails: ++1. Review the previous list of possible reasons for failure. Follow any steps to fix the issue. +1. Review any error messages in the Azure portal. Follow any recommended actions. +1. Delete the VIS resource from the failed registration. The VIS has the same name as the SID that you tried to register. +1. Retry the [registration process](#register-sap-system) again. ++## Next steps ++- [Monitor SAP system from Azure portal](monitor-portal.md) +- [Manage a VIS](manage-virtual-instance.md) |
| center-sap-solutions | Start Stop Sap Systems | https://github.com/MicrosoftDocs/azure-docs/commits/main/articles/center-sap-solutions/start-stop-sap-systems.md | + + Title: Start and stop SAP systems (preview) +description: Learn how to start or stop an SAP system through the Virtual Instance for SAP solutions (VIS) resource in Azure Center for SAP solutions (ACSS) through the Azure portal. ++ Last updated : 07/19/2022+++#Customer intent: As a developer, I want to start and stop SAP systems in ACSS so that I can control instances through the Virtual Instance for SAP resource. +++# Start and stop SAP systems (preview) +++In this how-to guide, you'll learn to start and stop your SAP systems through the *Virtual Instance for SAP solutions (VIS)* resource in *Azure Center for SAP solutions (ACSS)*. ++Through the Azure portal, you can start and stop: ++- Application tier instances, which include ABAP SAP Central Services (ASCS) and Application Server instances. You can start and stop instances in the following types of deployments: + - Single-Server + - High Availability (HA) + - Distributed Non-HA +- SAP systems that run on Linux operating systems (OS). +- SAP HA systems that use Pacemaker clustering software. Other certified cluster software isn't currently supported. ++## Prerequisites ++- An SAP system that you've [created in ACSS](prepare-network.md) or [registered with ACSS](register-existing-system.md). +- For the start operation to work, all virtual machines (VMs) inside the SAP system must be running. This capability starts or stops the SAP application instances, not the VMs that make up the SAP system resources. +- The `sapstartsrv` service must be running on all VMs related to the SAP system. +- For HA deployments, the HA interface cluster connector for SAP (`sap_vendor_cluster_connector`) must be installed on the ASCS instance. For more information, see the [SUSE connector specifications](https://www.suse.com/c/sap-netweaver-suse-cluster-integration-new-sap_suse_cluster_connector-version-3-0-0/) and [RHEL connector specifications](https://access.redhat.com/solutions/3606101). ++## Stop SAP system ++To stop an SAP system in the VIS resource: ++1. Sign in to the [Azure portal](https://portal.azure.com). ++1. Search for and select **Azure Center for SAP solutions** in the search bar. ++1. Select **Virtual Instances for SAP solutions** in the sidebar menu. ++1. In the table of VIS resources, select the name of the VIS you want to stop. ++1. Select the **Stop** button. If you can't select this button, the SAP system already isn't running. ++ :::image type="content" source="media/start-stop-sap-systems/stop-button.png" lightbox="media/start-stop-sap-systems/stop-button.png" alt-text="Screenshot of the VIS resource menu in the Azure portal, showing the Stop button."::: ++1. Select **Yes** in the confirmation prompt to stop the VIS. ++ :::image type="content" source="media/start-stop-sap-systems/confirm-stop.png" lightbox="media/start-stop-sap-systems/confirm-stop.png" alt-text="Screenshot of the VIS resource menu in the Azure portal, showing the confirmation prompt to stop the VIS resource."::: ++ A notification pane then opens with a **Stopping Virtual Instance for SAP solutions** message. ++1. Wait for the VIS resource's **Status** to change to **Stopping**. ++ A notification pane then opens with a **Stopped Virtual Instance for SAP solutions** message. ++## Start SAP system ++To start an SAP system in the VIS resource: ++1. Sign in to the [Azure portal](https://portal.azure.com). ++1. Search for and select **Azure Center for SAP solutions** in the search bar. ++1. Select **Virtual Instances for SAP solutions** in the sidebar menu. ++1. In the table of VIS resources, select the name of the VIS you want to start. ++1. Select the **Start** button. If you can't select this button, make sure that you've followed the [prerequisites](#prerequisites) for the VMs within your SAP system. ++ :::image type="content" source="media/start-stop-sap-systems/start-button.png" lightbox="media/start-stop-sap-systems/start-button.png" alt-text="Screenshot of the VIS resource menu in the Azure portal, showing the Start button."::: ++ A notification pane then opens with a **Starting Virtual Instance for SAP solutions** message. The VIS resource's **Status** also changes to **Starting**. ++1. Wait for the VIS resource's **Status** to change to **Running**. ++ A notification pane then opens with a **Started Virtual Instance for SAP solutions** message. ++## Troubleshooting ++If the SAP system takes longer than 300 seconds to complete a start or stop operation, the operation terminates. After the operation terminates, the monitoring service continues to check and update the status of the SAP system in the VIS resource. ++## Next steps ++- [Monitor SAP system from the Azure portal](monitor-portal.md) +- [Get quality checks and insights for a VIS resource](get-quality-checks-insights.md) |
| cloud-services-extended-support | Enable Key Vault Virtual Machine | https://github.com/MicrosoftDocs/azure-docs/commits/main/articles/cloud-services-extended-support/enable-key-vault-virtual-machine.md | Title: Apply the Key Vault VM extension in Azure Cloud Services (extended suppor description: Learn about the Key Vault VM extension for Windows and how to enable it in Azure Cloud Services. --++ Last updated 05/12/2021 |
| cognitive-services | Cognitive Services Virtual Networks | https://github.com/MicrosoftDocs/azure-docs/commits/main/articles/cognitive-services/cognitive-services-virtual-networks.md | You can manage default network access rules for Cognitive Services resources thr 1. Set the default rule to deny network access by default. ```azurecli-interactive- az cognitiveservices account update \ - -g "myresourcegroup" -n "myaccount" \ - --default-action Deny + az resource update \ + --ids {resourceId} \ + --set properties.networkAcls="{'defaultAction':'Deny'}" ``` 1. Set the default rule to allow network access by default. ```azurecli-interactive- az cognitiveservices account update \ - -g "myresourcegroup" -n "myaccount" \ - --default-action Allow + az resource update \ + --ids {resourceId} \ + --set properties.networkAcls="{'defaultAction':'Allow'}" ``` *** |
| confidential-ledger | Overview | https://github.com/MicrosoftDocs/azure-docs/commits/main/articles/confidential-ledger/overview.md | Last updated 04/15/2021 -# Microsoft Azure confidential ledger (preview) +# Microsoft Azure confidential ledger Microsoft Azure confidential ledger (ACL) is a new and highly secure service for managing sensitive data records. It runs exclusively on hardware-backed secure enclaves, a heavily monitored and isolated runtime environment which keeps potential attacks at bay. Furthermore, Azure confidential ledger runs on a minimalistic Trusted Computing Base (TCB), which ensures that no oneΓüáΓÇönot even MicrosoftΓüáΓÇöis "above" the ledger. |
| confidential-ledger | Quickstart Net | https://github.com/MicrosoftDocs/azure-docs/commits/main/articles/confidential-ledger/quickstart-net.md | + + Title: Quickstart - Azure confidential ledger client library for .NET +description: Learn how to use Azure Confidential Ledger using the client library for .NET ++ Last updated : 07/15/2022+++ms.devlang: csharp ++++# Quickstart: Azure confidential ledger client library for .NET ++Get started with the Azure confidential ledger client library for .NET. [Azure confidential ledger](overview.md) is a new and highly secure service for managing sensitive data records. Based on a permissioned blockchain model, Azure confidential ledger offers unique data integrity advantages. These include immutability, making the ledger append-only, and tamper proofing, to ensure all records are kept intact. ++ In this quickstart, you learn how to create entries in an Azure confidential ledger using the .NET client library ++Azure confidential ledger client library resources: ++[API reference documentation](/dotnet/api/overview/azure/security.confidentialledger-readme-pre) | [Library source code](https://github.com/Azure/azure-sdk-for-net/tree/main/sdk/confidentialledger/Azure.Security.ConfidentialLedger) | [Package (NuGet)](https://www.nuget.org/packages/Azure.Security.ConfidentialLedger/1.0.0) ++## Prerequisites ++- An Azure subscription - [create one for free](https://azure.microsoft.com/free/dotnet) +- [.NET Core 3.1 SDK or later](https://dotnet.microsoft.com/download/dotnet-core) +- [Azure CLI](/cli/azure/install-azure-cli) ++You will also need a running confidential ledger, and a registered user with the `Administrator` privileges. You can create a confidential ledger (and an administrator) using the [Azure portal](quickstart-portal.md), the [Azure CLI](quickstart-cli.md), or [Azure PowerShell](quickstart-powershell.md). ++## Setup ++### Create new .NET console app ++1. In a command shell, run the following command to create a project named `acl-app`: ++ ```dotnetcli + dotnet new console --name acl-app + ``` ++1. Change to the newly created *acl-app* directory, and run the following command to build the project: ++ ```dotnetcli + dotnet build + ``` ++ The build output should contain no warnings or errors. + + ```console + Build succeeded. + 0 Warning(s) + 0 Error(s) + ``` ++### Install the package ++Install the Confidential Ledger client library for .NET with [NuGet][client_nuget_package]: ++```dotnetcli +dotnet add package Azure.Security.ConfidentialLedger --version 1.0.0 +``` ++For this quickstart, you'll also need to install the Azure SDK client library for Azure Identity: ++```dotnetcli +dotnet add package Azure.Identity +``` ++## Object model ++The Azure confidential ledger client library for .NET allows you to create an immutable ledger entry in the service. The [Code examples](#code-examples) section shows how to create a write to the ledger and retrieve the transaction id. ++## Code examples ++### Add directives ++Add the following directives to the top of *Program.cs*: ++```csharp +using System; +using Azure.Core; +using Azure.Identity; +using Azure.Security.ConfidentialLedger; +using Azure.Security.ConfidentialLedger.Certificate; +``` ++### Authenticate and create a client ++In this quickstart, logged in user is used to authenticate to Azure confidential ledger, which is preferred method for local development. The name of your confidential ledger is expanded to the key vault URI, in the format "https://\<your-confidential-ledger-name\>.confidential-ledger.azure.com". This example is using ['DefaultAzureCredential()'](/dotnet/api/azure.identity.defaultazurecredential) class from [Azure Identity Library](/dotnet/api/overview/azure/identity-readme), which allows to use the same code across different environments with different options to provide identity. ++```csharp +credential = DefaultAzureCredential() +``` ++### Write to the confidential ledger ++You can now write to the confidential ledger with the [PostLedgerEntry](/dotnet/api/azure.security.confidentialledger.confidentialledgerclient.postledgerentry#azure-security-confidentialledger-confidentialledgerclient-postledgerentry\(azure-core-requestcontent-system-string-system-boolean-azure-requestcontext\)) method. ++```csharp +Operation postOperation = ledgerClient.PostLedgerEntry( + waitUntil: WaitUntil.Completed, + RequestContent.Create( + new { contents = "Hello world!" })); ++``` ++### Get transaction ID ++The [PostLedgerEntry](/dotnet/api/azure.security.confidentialledger.confidentialledgerclient.postledgerentry) method returns an object that contains the transaction of the entry you just wrote to the confidential ledger. To get the transaction ID, access the "Id" value: ++```csharp +string transactionId = postOperation.Id; +Console.WriteLine($"Appended transaction with Id: {transactionId}"); +``` ++### Read from the confidential ledger ++With a transaction ID, you can also read from the confidential ledger using the [GetLedgerEntry](/dotnet/api/azure.security.confidentialledger.confidentialledgerclient.getledgerentry) method: ++```csharp +Response ledgerResponse = ledgerClient.GetLedgerEntry(transactionId, collectionId); ++string entryContents = JsonDocument.Parse(ledgerResponse.Content) + .RootElement + .GetProperty("entry") + .GetProperty("contents") + .GetString(); ++Console.WriteLine(entryContents); +``` ++## Test and verify ++In the console directly, execute the following command to run the app. ++```csharp +dotnet run +``` ++## Sample code ++```csharp +using System; +using Azure.Core; +using Azure.Identity; +using Azure.Security.ConfidentialLedger; +using Azure.Security.ConfidentialLedger.Certificate; + +namespace acl_app +{ + class Program + { + static Task Main(string[] args) + { ++ // Replace with the name of your confidential ledger ++ const string ledgerName = "myLedger"; + var ledgerUri = $"https://{ledgerName}.confidential-ledger.azure.com"; ++ // Create a confidential ledger client using the ledger URI and DefaultAzureCredential ++ var ledgerClient = new ConfidentialLedgerClient(new Uri(ledgerUri), new DefaultAzureCredential()); ++ // Write to the ledger ++ Operation postOperation = ledgerClient.PostLedgerEntry( + waitUntil: WaitUntil.Completed, + RequestContent.Create( + new { contents = "Hello world!" })); + + // Access the transaction ID of the ledger write ++ string transactionId = postOperation.Id; + Console.WriteLine($"Appended transaction with Id: {transactionId}"); +++ // Use the transaction ID to read from the ledger ++ Response ledgerResponse = ledgerClient.GetLedgerEntry(transactionId, collectionId); ++ string entryContents = JsonDocument.Parse(ledgerResponse.Content) + .RootElement + .GetProperty("entry") + .GetProperty("contents") + .GetString(); ++ Console.WriteLine(entryContents); ++ } + } +} +``` ++## Next steps ++To learn more about Azure confidential ledger and how to integrate it with your apps, see the following articles: ++- [Overview of Microsoft Azure confidential ledger](overview.md) +- [Azure confidential ledger client library source code](https://github.com/Azure/azure-sdk-for-net/tree/main/sdk/confidentialledger/Azure.Security.ConfidentialLedger) +- [Package (NuGet)](https://www.nuget.org/packages/Azure.Security.ConfidentialLedger/1.0.0) |
| cosmos-db | Cosmosdb Migrationchoices | https://github.com/MicrosoftDocs/azure-docs/commits/main/articles/cosmos-db/cosmosdb-migrationchoices.md | A summary of migration pathways from your current solution to Azure Cosmos DB AP |Online|[Azure Database Migration Service](../dms/tutorial-mongodb-cosmos-db-online.md)| MongoDB|Azure Cosmos DB API for MongoDB |• Makes use of the Azure Cosmos DB bulk executor library. <br/>• Suitable for large datasets and takes care of replicating live changes. <br/>• Works only with other MongoDB sources.| |Offline|[Azure Database Migration Service](../dms/tutorial-mongodb-cosmos-db-online.md)| MongoDB| Azure Cosmos DB API for MongoDB| • Makes use of the Azure Cosmos DB bulk executor library. <br/>• Suitable for large datasets and takes care of replicating live changes. <br/>• Works only with other MongoDB sources.| |Offline|[Azure Data Factory](../data-factory/connector-azure-cosmos-db-mongodb-api.md)| •JSON/CSV Files<br/>•Azure Cosmos DB SQL API<br/>•Azure Cosmos DB API for MongoDB <br/>•MongoDB<br/>•SQL Server<br/>•Table Storage<br/>•Azure Blob Storage <br/><br/> See the [Azure Data Factory](../data-factory/connector-overview.md) article for other supported sources. | •Azure Cosmos DB SQL API<br/>•Azure Cosmos DB API for MongoDB <br/>• JSON files <br/><br/> See the [Azure Data Factory](../data-factory/connector-overview.md) article for other supported targets.| • Easy to set up and supports multiple sources. <br/>• Makes use of the Azure Cosmos DB bulk executor library. <br/>• Suitable for large datasets. <br/>• Lack of checkpointing means that any issue during the course of migration would require a restart of the whole migration process.<br/>• Lack of a dead letter queue would mean that a few erroneous files could stop the entire migration process. <br/>• Needs custom code to increase read throughput for certain data sources.|-|Offline|Existing Mongo Tools ([mongodump](mongodb/tutorial-mongotools-cosmos-db.md#mongodumpmongorestore), [mongorestore](mongodb/tutorial-mongotools-cosmos-db.md#mongodumpmongorestore), [Studio3T](mongodb/connect-using-mongochef.md))|MongoDB | Azure Cosmos DB API for MongoDB| • Easy to set up and integration. <br/>• Needs custom handling for throttles.| +|Offline|Existing Mongo Tools ([mongodump](mongodb/tutorial-mongotools-cosmos-db.md#mongodumpmongorestore), [mongorestore](mongodb/tutorial-mongotools-cosmos-db.md#mongodumpmongorestore), [Studio3T](mongodb/connect-using-mongochef.md))|•MongoDB<br/>•Azure Cosmos DB API for MongoDB<br/> | Azure Cosmos DB API for MongoDB| • Easy to set up and integration. <br/>• Needs custom handling for throttles.| ## Azure Cosmos DB Cassandra API |
| cosmos-db | Free Tier | https://github.com/MicrosoftDocs/azure-docs/commits/main/articles/cosmos-db/free-tier.md | Title: Azure Cosmos DB free tier description: Use Azure Cosmos DB free tier to get started, develop, test your applications. With free tier, you'll get the first 1000 RU/s and 25 GB of storage in the account for free. --++ Previously updated : 03/29/2022 Last updated : 07/08/2022 -# Azure Cosmos DB free tier +# Azure Cosmos DB free tier + [!INCLUDE[appliesto-all-apis](includes/appliesto-all-apis.md)] Azure Cosmos DB free tier makes it easy to get started, develop, test your applications, or even run small production workloads for free. When free tier is enabled on an account, you'll get the first 1000 RU/s and 25 GB of storage in the account for free. The throughput and storage consumed beyond these limits are billed at regular price. Free tier is available for all API accounts with provisioned throughput, autoscale throughput, single, or multiple write regions. Free tier lasts indefinitely for the lifetime of the account and it comes with all the [benefits and features](introduction.md#key-benefits) of a regular Azure Cosmos DB account. These benefits include unlimited storage and throughput (RU/s), SLAs, high availability, turnkey global distribution in all Azure regions, and more. -You can have up to one free tier Azure Cosmos DB account per an Azure subscription and you must opt-in when creating the account. If you do not see the option to apply the free tier discount, this means another account in the subscription has already been enabled with free tier. If you create an account with free tier and then delete it, you can apply free tier for a new account. When creating a new account, itΓÇÖs recommended to enable the free tier discount if itΓÇÖs available. +You can have up to one free tier Azure Cosmos DB account per an Azure subscription and you must opt in when creating the account. If you don't see the option to apply the free tier discount, another account in the subscription has already been enabled with free tier. If you create an account with free tier and then delete it, you can apply free tier for a new account. When creating a new account, itΓÇÖs recommended to enable the free tier discount if itΓÇÖs available. > [!NOTE] > Free tier is currently not available for serverless accounts. ## Free tier with shared throughput database -In shared throughput model, when you provision throughput on a database, the throughput is shared across all the containers in the database. When using the free tier, you can provision a shared database with up to 1000 RU/s for free. All containers in the database will share the throughput. +In shared throughput model, when you provision throughput on a database, the throughput is shared across all the containers in the database. When using the free tier, you can provision a shared database with up to 1000 RU/s for free. All containers in the database will share the throughput. -Just like the regular account, in the free tier account, a shared throughput database can have a max of 25 containers. -Any additional databases with shared throughput or containers with dedicated throughput beyond 1000 RU/s are billed at the regular pricing. +Just like the regular account, in the free tier account, a shared throughput database can have a max of 25 containers. +Any other databases with shared throughput or containers with dedicated throughput beyond 1000 RU/s are billed at the regular pricing. ## Free tier with Azure discount -The Azure Cosmos DB free tier is compatible with the [Azure free account](optimize-dev-test.md#azure-free-account). To opt-in, create an Azure Cosmos DB free tier account in your Azure free account subscription. For the first 12 months, you will get a combined discount of 1400 RU/s (1000 RU/s from Azure Cosmos DB free tier and 400 RU/s from Azure free account) and 50 GB of storage (25 GB from Azure Cosmos DB free tier and 25 GB from Azure free account). After the 12 months expires, you will continue to get 1000 RU/s and 25 GB from the Azure Cosmos DB free tier, for the lifetime of the Azure Cosmos DB account. For an example of how the charges are stacked, see [Billing examples with free tier accounts](understand-your-bill.md#azure-free-tier). +The Azure Cosmos DB free tier is compatible with the [Azure free account](optimize-dev-test.md#azure-free-account). To opt in, create an Azure Cosmos DB free tier account in your Azure free account subscription. For the first 12 months, you'll get a combined discount of 1400 RU/s (1000 RU/s from Azure Cosmos DB free tier and 400 RU/s from Azure free account) and 50 GB of storage (25 GB from Azure Cosmos DB free tier and 25 GB from Azure free account). After the 12 months expire, you'll continue to get 1000 RU/s and 25 GB from the Azure Cosmos DB free tier, for the lifetime of the Azure Cosmos DB account. For an example of how the charges are stacked, see [Billing examples with free tier accounts](understand-your-bill.md#azure-free-tier). > [!NOTE] > Azure Cosmos DB free tier is different from the Azure free account. The Azure free account offers Azure credits and resources for free for a limited time. When using Azure Cosmos DB as a part of this free account, you get 25-GB storage and 400 RU/s of provisioned throughput for 12 months. ## Best practices to keep your account free -When using Azure Cosmos DB free tier, to keep your account completely free of charge, your account should not have any additional RU/s or storage consumption other than the one offered by the free tier. +To keep your account free of charge, your account shouldn't have any more RU/s or storage consumption other than the one offered by the Azure Cosmos DB free tier. For example, the following are some options that donΓÇÖt result in any monthly charge: * One database with a max of 1000 RU/s provisioned throughput. * Two containers one with a max of 400 RU/s and other with a max of 600 RU/s provisioned throughput.-* Account with 2 regions with a single region that has one container with a max of 500 RU/s provisioned throughput. +* Account with two regions with a single region that has one container with a max of 500 RU/s provisioned throughput. ## Create an account with free tier When creating the account using the Azure portal, set the **Apply Free Tier Disc ### ARM template -To create a free tier account by using an ARM template, set the property `"enableFreeTier": true`. For the complete template, see deploy an [ARM template with free tier](manage-with-templates.md#free-tier) example. +To create a free tier account by using an ARM template, set the property `"enableFreeTier": true`. For the complete template, see [deploy an ARM template with free tier](manage-with-templates.md#free-tier) example. ### CLI New-AzCosmosDBAccount -ResourceGroupName "MyResourcegroup" ` -DefaultConsistencyLevel "Session" ` ``` +### Unable to create a free-tier account ++If the option to create a free-tier account is disabled or if you receive an error saying you can't create a free-tier account, another account in the subscription has already been enabled with free tier. To find the existing free-tier account and the resource group it is in, use this Azure CLI script, [Find Existing Free-Tier Account](scripts/cli/common/free-tier.md). + ## Next steps After you create a free tier account, you can start building apps with Azure Cosmos DB with the following articles: |
| cosmos-db | How To Manage Database Account | https://github.com/MicrosoftDocs/azure-docs/commits/main/articles/cosmos-db/how-to-manage-database-account.md | -This article describes how to manage various tasks on an Azure Cosmos account using the Azure portal. +This article describes how to manage various tasks on an Azure Cosmos account using the Azure portal. > [!TIP] > Azure Cosmos DB can also be managed with other Azure management clients including [Azure PowerShell](manage-with-powershell.md), [Azure CLI](sql/manage-with-cli.md), [Azure Resource Manager templates](./manage-with-templates.md), and [Bicep](sql/manage-with-bicep.md). This article describes how to manage various tasks on an Azure Cosmos account us ## Add/remove regions from your database account > [!TIP]-> When a new region is added, all data must be fully replicated and committed into the new region before the region is marked as available. The amount of time this operation takes will depend upon how much data is stored within the account. If an [asynchronous throughput scaling operation](scaling-provisioned-throughput-best-practices.md#background-on-scaling-rus) is in progress, the throughput scale-up operation will be paused and will resume automatically when the add/remove region operation is complete. +> When a new region is added, all data must be fully replicated and committed into the new region before the region is marked as available. The amount of time this operation takes will depend upon how much data is stored within the account. If an [asynchronous throughput scaling operation](scaling-provisioned-throughput-best-practices.md#background-on-scaling-rus) is in progress, the throughput scale-up operation will be paused and will resume automatically when the add/remove region operation is complete. 1. Sign in to [Azure portal](https://portal.azure.com). -1. Go to your Azure Cosmos account, and open the **Replicate data globally** menu. +1. Go to your Azure Cosmos account, and select **Replicate data globally** in the resource menu. 1. To add regions, select the hexagons on the map with the **+** label that corresponds to your desired region(s). Alternatively, to add a region, select the **+ Add region** option and choose a region from the drop-down menu. This article describes how to manage various tasks on an Azure Cosmos account us :::image type="content" source="./media/how-to-manage-database-account/add-region.png" alt-text="Add or remove regions menu"::: -In a single-region write mode, you cannot remove the write region. You must fail over to a different region before you can delete the current write region. +In a single-region write mode, you can't remove the write region. You must fail over to a different region before you can delete the current write region. In a multi-region write mode, you can add or remove any region, if you have at least one region. Open the **Replicate Data Globally** tab and select **Enable** to enable multi-r ## <a id="automatic-failover"></a>Enable service-managed failover for your Azure Cosmos account -The Service-Managed failover option allows Azure Cosmos DB to failover to the region with the highest failover priority with no user action should a region become unavailable. When service-managed failover is enabled, region priority can be modified. Account must have two or more regions to enable service-managed failover. +The Service-Managed failover option allows Azure Cosmos DB to fail over to the region with the highest failover priority with no user action should a region become unavailable. When service-managed failover is enabled, region priority can be modified. Account must have two or more regions to enable service-managed failover. 1. From your Azure Cosmos account, open the **Replicate data globally** pane. The Service-Managed failover option allows Azure Cosmos DB to failover to the re :::image type="content" source="./media/how-to-manage-database-account/replicate-data-globally.png" alt-text="Replicate data globally menu"::: -3. On the **Automatic Failover** pane, make sure that **Enable Automatic Failover** is set to **ON**. +3. On the **Automatic Failover** pane, make sure that **Enable Automatic Failover** is set to **ON**. 4. Select **Save**. |
| cosmos-db | Local Emulator | https://github.com/MicrosoftDocs/azure-docs/commits/main/articles/cosmos-db/local-emulator.md | Start emulator from an administrator [command prompt](emulator-command-line-para Start emulator from an administrator [command prompt](emulator-command-line-parameters.md)with "/EnableGremlinEndpoint". Alternatively you can also set the environment variable `AZURE_COSMOS_EMULATOR_GREMLIN_ENDPOINT=true` -1. [Install apache-tinkerpop-gremlin-console-3.3.4](https://archive.apache.org/dist/tinkerpop/3.3.4). +1. [Install apache-tinkerpop-gremlin-console-3.6.0](https://archive.apache.org/dist/tinkerpop/3.6.0). 1. From the emulator's data explorer create a database "db1" and a collection "coll1"; for the partition key, choose "/name" 1. Run the following commands in a regular command prompt window: ```bash- cd /d C:\sdk\apache-tinkerpop-gremlin-console-3.3.4-bin\apache-tinkerpop-gremlin-console-3.3.4 + cd /d C:\sdk\apache-tinkerpop-gremlin-console-3.6.0-bin\apache-tinkerpop-gremlin-console-3.6.0 copy /y conf\remote.yaml conf\remote-localcompute.yaml notepad.exe conf\remote-localcompute.yaml |
| cosmos-db | Mongodb Time To Live | https://github.com/MicrosoftDocs/azure-docs/commits/main/articles/cosmos-db/mongodb/mongodb-time-to-live.md | Title: MongoDB per-document TTL feature in Azure Cosmos DB -description: Learn how to set time to live value for documents using Azure Cosmos DB's API for MongoDB to automatically purge them from the system after a period of time. +description: Learn how to set time to live value for documents using Azure Cosmos DB's API for MongoDB, to automatically purge them from the system after a period of time. MongoShell example: ``` globaldb:PRIMARY> db.coll.createIndex({"_ts":1}, {expireAfterSeconds: 10})+``` +The command in the above example will create an index with TTL functionality. ++The output of the command includes various metadata: ++```output { "_t" : "CreateIndexesResponse", "ok" : 1, globaldb:PRIMARY> db.coll.createIndex({"_ts":1}, {expireAfterSeconds: 10}) } ``` -The command in the above example will create an index with TTL functionality. Once the index is created, the database will automatically delete any documents in that collection that have not been modified in the last 10 seconds. + Once the index is created, the database will automatically delete any documents in that collection that have not been modified in the last 10 seconds. > [!NOTE] > `_ts` is a Cosmos DB-specific field and is not accessible from MongoDB clients. It is a reserved (system) property that contains the timestamp of the document's last modification. |
| cosmos-db | Free Tier | https://github.com/MicrosoftDocs/azure-docs/commits/main/articles/cosmos-db/scripts/cli/common/free-tier.md | + + Title: Find an existing Azure Cosmos DB free-tier account in a subscription +description: Find an existing Azure Cosmos DB free-tier account in a subscription +++++ Last updated : 07/08/2022+++# Find an existing Azure Cosmos DB free-tier account in a subscription using Azure CLI +++The script in this article demonstrates how to locate an Azure Cosmos DB free-tier account within a subscription. ++Each Azure subscription can have up to one Azure Cosmos DB free-tier account. If you're trying to create a free-tier account, the option may be disabled in the Azure portal, or you get an error when attempting to create a free-tier account. If either of these issues occur, use this script to locate the name of the existing free-tier account, and the resource group it belongs to. ++++- This article requires version 2.9.1 or later of the Azure CLI. If using Azure Cloud Shell, the latest version is already installed. ++## Sample script +++### Run the script +++## Sample reference ++This script uses the following commands. Each command in the table links to command specific documentation. ++| Command | Notes | +||| +| [az group list](/cli/azure/group#az-group-list) | Lists all resource groups in an Azure subscription. | +| [az cosmosdb list](/cli/azure/cosmosdb#az-cosmosdb-list) | Lists all Azure Cosmos DB account in a resource group. | ++## Next steps ++For more information on the Azure Cosmos DB CLI, see [Azure Cosmos DB CLI documentation](/cli/azure/cosmosdb). ++For Azure CLI samples for specific APIs, see: ++- [CLI Samples for Cassandra](../../../cassandr) +- [CLI Samples for Gremlin](../../../graph/cli-samples.md) +- [CLI Samples for MongoDB API](../../../mongodb/cli-samples.md) +- [CLI Samples for SQL](../../../sql/cli-samples.md) +- [CLI Samples for Table](../../../table/cli-samples.md) |
| cosmos-db | Manage With Cli | https://github.com/MicrosoftDocs/azure-docs/commits/main/articles/cosmos-db/sql/manage-with-cli.md | For Azure CLI samples for other APIs see [CLI Samples for Cassandra](../cassandr The following sections demonstrate how to manage the Azure Cosmos account, including: -* [Create an Azure Cosmos account](#create-an-azure-cosmos-db-account) -* [Add or remove regions](#add-or-remove-regions) -* [Enable multi-region writes](#enable-multiple-write-regions) -* [Set regional failover priority](#set-failover-priority) -* [Enable service-managed failover](#enable-service-managed-failover) -* [Trigger manual failover](#trigger-manual-failover) -* [List account keys](#list-account-keys) -* [List read-only account keys](#list-read-only-account-keys) -* [List connection strings](#list-connection-strings) -* [Regenerate account key](#regenerate-account-key) +- [Create an Azure Cosmos account](#create-an-azure-cosmos-db-account) +- [Add or remove regions](#add-or-remove-regions) +- [Enable multi-region writes](#enable-multiple-write-regions) +- [Set regional failover priority](#set-failover-priority) +- [Enable service-managed failover](#enable-service-managed-failover) +- [Trigger manual failover](#trigger-manual-failover) +- [List account keys](#list-account-keys) +- [List read-only account keys](#list-read-only-account-keys) +- [List connection strings](#list-connection-strings) +- [Regenerate account key](#regenerate-account-key) ### Create an Azure Cosmos DB account Create an Azure Cosmos account with two regions, add a region, and remove a regi > [!NOTE] > This command allows you to add and remove regions but does not allow you to modify failover priorities or trigger a manual failover. See [Set failover priority](#set-failover-priority) and [Trigger manual failover](#trigger-manual-failover). > [!TIP]-> When a new region is added, all data must be fully replicated and committed into the new region before the region is marked as available. The amount of time this operation takes will depend upon how much data is stored within the account. If an [asynchronous throughput scaling operation](../scaling-provisioned-throughput-best-practices.md#background-on-scaling-rus) is in progress, the throughput scale-up operation will be paused and will resume automatically when the add/remove region operation is complete. +> When a new region is added, all data must be fully replicated and committed into the new region before the region is marked as available. The amount of time this operation takes will depend upon how much data is stored within the account. If an [asynchronous throughput scaling operation](../scaling-provisioned-throughput-best-practices.md#background-on-scaling-rus) is in progress, the throughput scale-up operation will be paused and will resume automatically when the add/remove region operation is complete. ```azurecli-interactive resourceGroupName='myResourceGroup' az cosmosdb keys regenerate \ The following sections demonstrate how to manage the Azure Cosmos DB database, including: -* [Create a database](#create-a-database) -* [Create a database with shared throughput](#create-a-database-with-shared-throughput) -* [Migrate a database to autoscale throughput](#migrate-a-database-to-autoscale-throughput) -* [Change database throughput](#change-database-throughput) -* [Prevent a database from being deleted](#prevent-a-database-from-being-deleted) +- [Create a database](#create-a-database) +- [Create a database with shared throughput](#create-a-database-with-shared-throughput) +- [Migrate a database to autoscale throughput](#migrate-a-database-to-autoscale-throughput) +- [Change database throughput](#change-database-throughput) +- [Prevent a database from being deleted](#prevent-a-database-from-being-deleted) ### Create a database az cosmosdb sql database throughput update \ ### Prevent a database from being deleted -Put an Azure resource delete lock on a database to prevent it from being deleted. This feature requires locking the Cosmos account from being changed by data plane SDKs. To learn more see, [Preventing changes from SDKs](../role-based-access-control.md#prevent-sdk-changes). Azure resource locks can also prevent a resource from being changed by specifying a `ReadOnly` lock type. For a Cosmos database, it can be used to prevent throughput from being changed. +Put an Azure resource delete lock on a database to prevent it from being deleted. This feature requires locking the Cosmos account from being changed by data plane SDKs. To learn more, see [preventing changes from SDKs](../role-based-access-control.md#prevent-sdk-changes). Azure resource locks can also prevent a resource from being changed by specifying a `ReadOnly` lock type. For a Cosmos database, it can be used to prevent throughput from being changed. ```azurecli-interactive resourceGroupName='myResourceGroup' az lock delete --ids $lockid The following sections demonstrate how to manage the Azure Cosmos DB container, including: -* [Create a container](#create-a-container) -* [Create a container with autoscale](#create-a-container-with-autoscale) -* [Create a container with TTL enabled](#create-a-container-with-ttl) -* [Create a container with custom index policy](#create-a-container-with-a-custom-index-policy) -* [Change container throughput](#change-container-throughput) -* [Migrate a container to autoscale throughput](#migrate-a-container-to-autoscale-throughput) -* [Prevent a container from being deleted](#prevent-a-container-from-being-deleted) +- [Create a container](#create-a-container) +- [Create a container with autoscale](#create-a-container-with-autoscale) +- [Create a container with TTL enabled](#create-a-container-with-ttl) +- [Create a container with custom index policy](#create-a-container-with-a-custom-index-policy) +- [Change container throughput](#change-container-throughput) +- [Migrate a container to autoscale throughput](#migrate-a-container-to-autoscale-throughput) +- [Prevent a container from being deleted](#prevent-a-container-from-being-deleted) ### Create a container az cosmosdb sql container throughput show \ ### Prevent a container from being deleted -Put an Azure resource delete lock on a container to prevent it from being deleted. This feature requires locking the Cosmos account from being changed by data plane SDKs. To learn more see, [Preventing changes from SDKs](../role-based-access-control.md#prevent-sdk-changes). Azure resource locks can also prevent a resource from being changed by specifying a `ReadOnly` lock type. For a Cosmos container, this can be used to prevent throughput or any other property from being changed. +Put an Azure resource delete lock on a container to prevent it from being deleted. This feature requires locking the Cosmos account from being changed by data plane SDKs. To learn more, see [preventing changes from SDKs](../role-based-access-control.md#prevent-sdk-changes). Azure resource locks can also prevent a resource from being changed by specifying a `ReadOnly` lock type. For a Cosmos container, locks can be used to prevent throughput or any other property from being changed. ```azurecli-interactive resourceGroupName='myResourceGroup' az lock delete --ids $lockid For more information on the Azure CLI, see: -* [Install Azure CLI](/cli/azure/install-azure-cli) -* [Azure CLI Reference](/cli/azure/cosmosdb) -* [Additional Azure CLI samples for Azure Cosmos DB](cli-samples.md) +- [Install Azure CLI](/cli/azure/install-azure-cli) +- [Azure CLI Reference](/cli/azure/cosmosdb) +- [More Azure CLI samples for Azure Cosmos DB](cli-samples.md) |
| cosmos-db | Sql Query Getting Started | https://github.com/MicrosoftDocs/azure-docs/commits/main/articles/cosmos-db/sql/sql-query-getting-started.md | -**Point reads** - You can do a key/value lookup on a single *item ID* and partition key. The *item ID* and partition key combination is the key and the item itself is the value. For a 1 KB document, point reads typically cost 1 [request unit](../request-units.md) with a latency under 10 ms. Point reads return a single item. +**Point reads** - You can do a key/value lookup on a single *item ID* and partition key. The *item ID* and partition key combination is the key and the item itself is the value. For a 1 KB document, point reads typically cost 1 [request unit](../request-units.md) with a latency under 10 ms. Point reads return a single whole item, not a partial item or a specific field. Here are some examples of how to do **Point reads** with each SDK: |
| cost-management-billing | Migrate Cost Management Api | https://github.com/MicrosoftDocs/azure-docs/commits/main/articles/cost-management-billing/costs/migrate-cost-management-api.md | Title: Migrate EA to Microsoft Customer Agreement APIs - Azure description: This article helps you understand the consequences of migrating a Microsoft Enterprise Agreement (EA) to a Microsoft Customer Agreement. Previously updated : 03/22/2022 Last updated : 07/19/2022 EA APIs use an API key for authentication and authorization. MCA APIs use Azure | Purpose | EA API | MCA API | | | | | | Balance and credits | [/balancesummary](/rest/api/billing/enterprise/billing-enterprise-api-balance-summary) | Microsoft.Billing/billingAccounts/billingProfiles/availableBalanceussae |-| Usage (JSON) | [/usagedetails](/rest/api/billing/enterprise/billing-enterprise-api-usage-detail#json-format)[/usagedetailsbycustomdate](/rest/api/billing/enterprise/billing-enterprise-api-usage-detail#json-format) | [Microsoft.Consumption/usageDetails](/rest/api/consumption/usagedetails)<sup>1</sup> | -| Usage (CSV) | [/usagedetails/download](/rest/api/billing/enterprise/billing-enterprise-api-usage-detail#csv-format)[/usagedetails/submit](/rest/api/billing/enterprise/billing-enterprise-api-usage-detail#csv-format) | [Microsoft.Consumption/usageDetails/download](/rest/api/consumption/usagedetails)<sup>1</sup> | -| Marketplace Usage (CSV) | [/marketplacecharges](/rest/api/billing/enterprise/billing-enterprise-api-marketplace-storecharge)[/marketplacechargesbycustomdate](/rest/api/billing/enterprise/billing-enterprise-api-marketplace-storecharge) | [Microsoft.Consumption/usageDetails/download](/rest/api/consumption/usagedetails)<sup>1</sup> | +| Usage (JSON) | [/usagedetails](/rest/api/billing/enterprise/billing-enterprise-api-usage-detail#json-format)[/usagedetailsbycustomdate](/rest/api/billing/enterprise/billing-enterprise-api-usage-detail#json-format) | [Microsoft.Consumption/usageDetails](/rest/api/consumption/usagedetails)¹ | +| Usage (CSV) | [/usagedetails/download](/rest/api/billing/enterprise/billing-enterprise-api-usage-detail#csv-format)[/usagedetails/submit](/rest/api/billing/enterprise/billing-enterprise-api-usage-detail#csv-format) | [Microsoft.Consumption/usageDetails/download](/rest/api/consumption/usagedetails)¹ | +| Marketplace Usage (CSV) | [/marketplacecharges](/rest/api/billing/enterprise/billing-enterprise-api-marketplace-storecharge)[/marketplacechargesbycustomdate](/rest/api/billing/enterprise/billing-enterprise-api-marketplace-storecharge) | [Microsoft.Consumption/usageDetails/download](/rest/api/consumption/usagedetails)¹ | | Billing periods | [/billingperiods](/rest/api/billing/enterprise/billing-enterprise-api-billing-periods) | Microsoft.Billing/billingAccounts/billingProfiles/invoices | | Price sheet | [/pricesheet](/rest/api/billing/enterprise/billing-enterprise-api-pricesheet) | Microsoft.Billing/billingAccounts/billingProfiles/pricesheet/default/download format=json\|csv Microsoft.Billing/billingAccounts/…/billingProfiles/…/invoices/… /pricesheet/default/download format=json\|csv Microsoft.Billing/billingAccounts/../billingProfiles/../providers/Microsoft.Consumption/pricesheets/download | | Reservation purchases | [/reservationcharges](/rest/api/billing/enterprise/billing-enterprise-api-reserved-instance-charges) | Microsoft.Billing/billingAccounts/billingProfiles/transactions | | Reservation recommendations | [/SharedReservationRecommendations](/rest/api/billing/enterprise/billing-enterprise-api-reserved-instance-recommendation#request-for-shared-reserved-instance-recommendations)[/](/rest/api/billing/enterprise/billing-enterprise-api-reserved-instance-recommendation#request-for-single-reserved-instance-recommendations)[SingleReservationRecommendations](/rest/api/billing/enterprise/billing-enterprise-api-reserved-instance-recommendation#request-for-single-reserved-instance-recommendations) | [Microsoft.Consumption/reservationRecommendations](/rest/api/consumption/reservationrecommendations/list) | | Reservation usage | [/reservationdetails](/rest/api/billing/enterprise/billing-enterprise-api-reserved-instance-usage#request-for-reserved-instance-usage-details)[/reservationsummaries](/rest/api/billing/enterprise/billing-enterprise-api-reserved-instance-usage) | [Microsoft.Consumption/reservationDetails](/rest/api/consumption/reservationsdetails)[Microsoft.Consumption/reservationSummaries](/rest/api/consumption/reservationssummaries) | -<sup>1</sup> Azure service and third-party Marketplace usage are available with the [Usage Details API](/rest/api/consumption/usagedetails). +¹ Azure service and third-party Marketplace usage are available with the [Usage Details API](/rest/api/consumption/usagedetails). The following APIs are available to MCA billing accounts: | Purpose | Microsoft Customer Agreement (MCA) API | | | |-| Billing accounts<sup>2</sup> | Microsoft.Billing/billingAccounts | -| Billing profiles<sup>2</sup> | Microsoft.Billing/billingAccounts/billingProfiles | -| Invoice sections<sup>2</sup> | Microsoft.Billing/billingAccounts/invoiceSections | +| Billing accounts² | Microsoft.Billing/billingAccounts | +| Billing profiles² | Microsoft.Billing/billingAccounts/billingProfiles | +| Invoice sections² | Microsoft.Billing/billingAccounts/invoiceSections | | Invoices | Microsoft.Billing/billingAccounts/billingProfiles/invoices | | Billing subscriptions | {scope}/billingSubscriptions | -<sup>2</sup> APIs return lists of objects, which are scopes, where Cost Management experiences in the Azure portal and APIs operate. For more information about Cost Management scopes, see [Understand and work with scopes](understand-work-scopes.md). +² APIs return lists of objects, which are scopes, where Cost Management experiences in the Azure portal and APIs operate. For more information about Cost Management scopes, see [Understand and work with scopes](understand-work-scopes.md). If you use any existing EA APIs, you need to update them to support MCA billing accounts. The following table shows other integration changes: | Purpose | Old offering | New offering | | | | |-| Power BI | [Microsoft Consumption Insights](/power-bi/desktop-connect-azure-consumption-insights) content pack and connector | [Azure Consumption Insights connector](/power-bi/desktop-connect-azure-consumption-insights) | +| Power BI | [Microsoft Consumption Insights](/power-bi/desktop-connect-azure-consumption-insights) content pack and connector | [Azure Consumption Insights connector](/power-bi/connect-data/desktop-connect-azure-cost-management) | ## APIs to get balance and credits The property name containing the array of usage records changed from data to _va | | | | | AccountId | N/A | The subscription creator isn't tracked. Use invoiceSectionId (same as departmentId). | | AccountNameAccountOwnerId and AccountOwnerEmail | N/A | The subscription creator isn't tracked. Use invoiceSectionName (same as departmentName). |-| AdditionalInfo | additionalInfo | | +| AdditionalInfo | additionalInfo | | | ChargesBilledSeparately | isAzureCreditEligible | Note that these properties are opposites. If isAzureCreditEnabled is true, ChargesBilledSeparately would be false. |-| ConsumedQuantity | quantity | | +| ConsumedQuantity | quantity | | | ConsumedService | consumedService | Exact string values might differ. |-| ConsumedServiceId | None | | -| CostCenter | costCenter | | -| Date and usageStartDate | date | | +| ConsumedServiceId | None | | +| CostCenter | costCenter | | +| Date and usageStartDate | date | | | Day | None | Parses day from date. | | DepartmentId | invoiceSectionId | Exact values differ. | | DepartmentName | invoiceSectionName | Exact string values might differ. Configure invoice sections to match departments, if needed. |-| ExtendedCost and Cost | costInBillingCurrency | | -| InstanceId | resourceId | | -| Is Recurring Charge | None | | -| Location | location | | +| ExtendedCost and Cost | costInBillingCurrency | | +| InstanceId | resourceId | | +| Is Recurring Charge | None | | +| Location | location | | | MeterCategory | meterCategory | Exact string values might differ. | | MeterId | meterId | Exact string values differ. | | MeterName | meterName | Exact string values might differ. | The property name containing the array of usage records changed from data to _va | MeterSubCategory | meterSubCategory | Exact string values might differ. | | Month | None | Parses month from date. | | Offer Name | None | Use publisherName and productOrderName. |-| OfferID | None | | -| Order Number | None | | +| OfferID | None | | +| Order Number | None | | | PartNumber | None | Use meterId and productOrderName to uniquely identify prices. |-| Plan Name | productOrderName | | +| Plan Name | productOrderName | | | Product | Product | | | ProductId | productId | Exact string values differ. |-| Publisher Name | publisherName | | -| ResourceGroup | resourceGroupName | | +| Publisher Name | publisherName | | +| ResourceGroup | resourceGroupName | | | ResourceGuid | meterId | Exact string values differ. |-| ResourceLocation | resourceLocation | | -| ResourceLocationId | None | | -| ResourceRate | effectivePrice | | -| ServiceAdministratorId | N/A | | -| ServiceInfo1 | serviceInfo1 | | -| ServiceInfo2 | serviceInfo2 | | +| ResourceLocation | resourceLocation | | +| ResourceLocationId | None | | +| ResourceRate | effectivePrice | | +| ServiceAdministratorId | N/A | | +| ServiceInfo1 | serviceInfo1 | | +| ServiceInfo2 | serviceInfo2 | | | ServiceName | meterCategory | Exact string values might differ. | | ServiceTier | meterSubCategory | Exact string values might differ. |-| StoreServiceIdentifier | N/A | | -| SubscriptionGuid | subscriptionId | | -| SubscriptionId | subscriptionId | | -| SubscriptionName | subscriptionName | | +| StoreServiceIdentifier | N/A | | +| SubscriptionGuid | subscriptionId | | +| SubscriptionId | subscriptionId | | +| SubscriptionName | subscriptionName | | | Tags | tags | The tags property applies to root object, not to the nested properties property. | | UnitOfMeasure | unitOfMeasure | Exact string values differ. |-| usageEndDate | date | | +| usageEndDate | date | | | Year | None | Parses year from date. | | (new) | billingCurrency | Currency used for the charge. | | (new) | billingProfileId | Unique ID for the billing profile (same as enrollment). | The following table shows fields in the older Enterprise Get price sheet API. It | Old property | New property | Notes | | | | | | billingPeriodId | _Not applicable_ | Not applicable. For Microsoft Customer Agreements, the invoice and associated price sheet replaced the concept of billingPeriodId. |-| meterId | meterId | | +| meterId | meterId | | | unitOfMeasure | unitOfMeasure | Exact string values might differ. | | includedQuantity | includedQuantity | Not applicable for services in Microsoft Customer Agreements. | | partNumber | _Not applicable_ | Instead, use a combination of productOrderName (same as offerID) and meterID. | The older properties for [Azure Resource Manager Price Sheet APIs](/rest/api/con | Meter name | meterName | Name of the meter. Meter represents the Azure service deployable resource. | | Meter category | service | Name of the classification category for the meter. Same as the service in the Microsoft Customer Agreement Price Sheet. Exact string values differ. | | Meter subcategory | meterSubCategory | Name of the meter subclassification category. Based on the classification of high-level feature set differentiation in the service. For example, Basic SQL DB vs Standard SQL DB. |-| Meter region | meterRegion | | +| Meter region | meterRegion | | | Unit | _Not applicable_ | Can be parsed from unitOfMeasure. |-| Unit of measure | unitOfMeasure | | +| Unit of measure | unitOfMeasure | | | Part number | _Not applicable_ | Instead of part number, use productOrderName and MeterID to uniquely identify the price for a billing profile. Fields are listed on the MCA invoice instead of the part number in MCA invoices. | | Unit price | unitPrice | Microsoft Customer Agreement unit price. | | Currency code | pricingCurrency | Microsoft Customer Agreements represent prices in pricing currency and billing currency. Currency code is the same as the pricingCurrency in Microsoft Customer Agreements. | |
| cost-management-billing | Pay By Invoice | https://github.com/MicrosoftDocs/azure-docs/commits/main/articles/cost-management-billing/manage/pay-by-invoice.md | tags: billing Previously updated : 05/24/2022 Last updated : 07/18/2022 Follow the steps below to switch a billing profile to check/wire transfer. Only 1. Under the *Other payment methods* heading, select the ellipsis (...) symbol, and then select **Make default**. :::image type="content" source="./media/pay-by-invoice/customer-led-switch-to-invoice.png" alt-text="Screenshot showing Check/wire transfer ellipsis and Made default option." lightbox="./media/pay-by-invoice/customer-led-switch-to-invoice.png" ::: +## Check or wire transfer payment processing time ++Payments made by check are posted three to five business days after the check clears your bank. You can contact your bank to confirm the check status. ++Payments made by wire transfer have processing times that vary, depending on the type of transfer: ++- ACH domestic transfers - Five business days. Two to three days to arrive, plus two days to post. +- Wire transfers (domestic) - Four business days. Two days to arrive, plus two days to post. +- Wire transfers (international) - Seven business days. Five days to arrive, plus two days to post. ++If your account is approved for payment by check or wire transfer, the instructions for payment can are found on the invoice. + ## Check access to a Microsoft Customer Agreement [!INCLUDE [billing-check-mca](../../../includes/billing-check-mca.md)] |
| data-factory | Connector Presto | https://github.com/MicrosoftDocs/azure-docs/commits/main/articles/data-factory/connector-presto.md | This article outlines how to use the Copy Activity in an Azure Data Factory or S ## Supported capabilities -This Presto connector is supported for the following activities: +This Presto connector is supported for the following capabilities: -- [Copy activity](copy-activity-overview.md) with [supported source/sink matrix](copy-activity-overview.md)-- [Lookup activity](control-flow-lookup-activity.md)+| Supported capabilities|IR | +|| --| +|[Copy activity](copy-activity-overview.md) (source/-)|① ②| +|[Lookup activity](control-flow-lookup-activity.md)|① ②| -You can copy data from Presto to any supported sink data store. For a list of data stores that are supported as sources/sinks by the copy activity, see the [Supported data stores](copy-activity-overview.md#supported-data-stores-and-formats) table. +<small>*① Azure integration runtime ② Self-hosted integration runtime*</small> ++For a list of data stores that are supported as sources/sinks by the copy activity, see the [Supported data stores](copy-activity-overview.md#supported-data-stores-and-formats) table. The service provides a built-in driver to enable connectivity, therefore you don't need to manually install any driver using this connector. |
| data-factory | Connector Sap Business Warehouse Open Hub | https://github.com/MicrosoftDocs/azure-docs/commits/main/articles/data-factory/connector-sap-business-warehouse-open-hub.md | This article outlines how to use the Copy Activity in Azure Data Factory and Syn ## Supported capabilities -This SAP Business Warehouse via Open Hub connector is supported for the following activities: +This SAP Business Warehouse Open Hub connector is supported for the following capabilities: -- [Copy activity](copy-activity-overview.md) with [supported source/sink matrix](copy-activity-overview.md)-- [Lookup activity](control-flow-lookup-activity.md)+| Supported capabilities|IR | +|| --| +|[Copy activity](copy-activity-overview.md) (source/-)|②| +|[Lookup activity](control-flow-lookup-activity.md)|②| -You can copy data from SAP Business Warehouse via Open Hub to any supported sink data store. For a list of data stores that are supported as sources/sinks by the copy activity, see the [Supported data stores](copy-activity-overview.md#supported-data-stores-and-formats) table. +<small>*① Azure integration runtime ② Self-hosted integration runtime*</small> ++ For a list of data stores that are supported as sources/sinks by the copy activity, see the [Supported data stores](copy-activity-overview.md#supported-data-stores-and-formats) table. Specifically, this SAP Business Warehouse Open Hub connector supports: |
| data-factory | Connector Sap Business Warehouse | https://github.com/MicrosoftDocs/azure-docs/commits/main/articles/data-factory/connector-sap-business-warehouse.md | This article outlines how to use the Copy Activity in Azure Data Factory and Syn ## Supported capabilities -This SAP Business Warehouse connector is supported for the following activities: +This SAP Business Warehouse connector is supported for the following capabilities: -- [Copy activity](copy-activity-overview.md) with [supported source/sink matrix](copy-activity-overview.md)-- [Lookup activity](control-flow-lookup-activity.md)+| Supported capabilities|IR | +|| --| +|[Copy activity](copy-activity-overview.md) (source/-)|②| +|[Lookup activity](control-flow-lookup-activity.md)|②| -You can copy data from SAP Business Warehouse to any supported sink data store. For a list of data stores that are supported as sources/sinks by the copy activity, see the [Supported data stores](copy-activity-overview.md#supported-data-stores-and-formats) table. +<small>*① Azure integration runtime ② Self-hosted integration runtime*</small> ++For a list of data stores that are supported as sources/sinks by the copy activity, see the [Supported data stores](copy-activity-overview.md#supported-data-stores-and-formats) table. Specifically, this SAP Business Warehouse connector supports: |
| data-factory | Connector Sap Hana | https://github.com/MicrosoftDocs/azure-docs/commits/main/articles/data-factory/connector-sap-hana.md | This article outlines how to use the Copy Activity in Azure Data Factory and Syn ## Supported capabilities -This SAP HANA connector is supported for the following activities: +This SAP HANA connector is supported for the following capabilities: -- [Copy activity](copy-activity-overview.md) with [supported source/sink matrix](copy-activity-overview.md)-- [Lookup activity](control-flow-lookup-activity.md)+| Supported capabilities|IR | +|| --| +|[Copy activity](copy-activity-overview.md) (source/sink)|②| +|[Lookup activity](control-flow-lookup-activity.md)|②| -You can copy data from SAP HANA database to any supported sink data store. For a list of data stores supported as sources/sinks by the copy activity, see the [Supported data stores](copy-activity-overview.md#supported-data-stores-and-formats) table. +<small>*① Azure integration runtime ② Self-hosted integration runtime*</small> ++For a list of data stores supported as sources/sinks by the copy activity, see the [Supported data stores](copy-activity-overview.md#supported-data-stores-and-formats) table. Specifically, this SAP HANA connector supports: |
| data-factory | Connector Sap Table | https://github.com/MicrosoftDocs/azure-docs/commits/main/articles/data-factory/connector-sap-table.md | This article outlines how to use the copy activity in Azure Data Factory and Azu ## Supported capabilities -This SAP table connector is supported for the following activities: +This SAP table connector is supported for the following capabilities: -- [Copy activity](copy-activity-overview.md) with [supported source/sink matrix](copy-activity-overview.md)-- [Lookup activity](control-flow-lookup-activity.md)+| Supported capabilities|IR | +|| --| +|[Copy activity](copy-activity-overview.md) (source/-)|②| +|[Lookup activity](control-flow-lookup-activity.md)|②| -You can copy data from an SAP table to any supported sink data store. For a list of the data stores that are supported as sources or sinks by the copy activity, see the [Supported data stores](copy-activity-overview.md#supported-data-stores-and-formats) table. +<small>*① Azure integration runtime ② Self-hosted integration runtime*</small> ++For a list of the data stores that are supported as sources or sinks by the copy activity, see the [Supported data stores](copy-activity-overview.md#supported-data-stores-and-formats) table. Specifically, this SAP table connector supports: |
| data-factory | Connector Snowflake | https://github.com/MicrosoftDocs/azure-docs/commits/main/articles/data-factory/connector-snowflake.md | This article outlines how to use the Copy activity in Azure Data Factory and Azu ## Supported capabilities -This Snowflake connector is supported for the following activities: +This Snowflake connector is supported for the following capabilities: -- [Copy activity](copy-activity-overview.md) with a [supported source/sink matrix](copy-activity-overview.md) table-- [Mapping data flow](concepts-data-flow-overview.md)-- [Lookup activity](control-flow-lookup-activity.md)-- [Script activity](transform-data-using-script.md)+| Supported capabilities|IR | +|| --| +|[Copy activity](copy-activity-overview.md) (source/sink)|① ②| +|[Mapping data flow](concepts-data-flow-overview.md) (source/sink)|① | +|[Lookup activity](control-flow-lookup-activity.md)|① ②| +|[Script activity](transform-data-using-script.md)|① ②| ++<small>*① Azure integration runtime ② Self-hosted integration runtime*</small> For the Copy activity, this Snowflake connector supports the following functions: |
| defender-for-cloud | Defender For Storage Introduction | https://github.com/MicrosoftDocs/azure-docs/commits/main/articles/defender-for-cloud/defender-for-storage-introduction.md | You can [enable Microsoft Defender for Storage](../storage/common/azure-defender Defender for Storage continually analyzes the telemetry stream generated by the [Azure Blob Storage](https://azure.microsoft.com/services/storage/blobs/) and Azure Files services. When potentially malicious activities are detected, security alerts are generated. These alerts are displayed in Microsoft Defender for Cloud, together with the details of the suspicious activity along with the relevant investigation steps, remediation actions, and security recommendations. -Analyzed telemetry of Azure Blob Storage includes operation types such as `Get Blob`, `Put Blob`, `Get Container ACL`, `List Blobs`, and `Get Blob Properties`. Examples of analyzed Azure Files operation types include `Get File`, C`reate File`, `List Files`, `Get File Properties`, and `Put Range`. +Analyzed telemetry of Azure Blob Storage includes operation types such as `Get Blob`, `Put Blob`, `Get Container ACL`, `List Blobs`, and `Get Blob Properties`. Examples of analyzed Azure Files operation types include `Get File`, `Create File`, `List Files`, `Get File Properties`, and `Put Range`. Defender for Storage doesn't access the Storage account data and has no impact on its performance. |
| defender-for-cloud | Release Notes | https://github.com/MicrosoftDocs/azure-docs/commits/main/articles/defender-for-cloud/release-notes.md | Title: Release notes for Microsoft Defender for Cloud description: A description of what's new and changed in Microsoft Defender for Cloud Previously updated : 07/05/2022 Last updated : 07/19/2022 # What's new in Microsoft Defender for Cloud? Learn more about the governance experience in [Driving your organization to reme ### Filter security alerts by IP address -In many cases of attacks, you want to track alerts based on the IP address of the entity involved in the attack. Up until now, the IP appeared only in the "Related Entities" section in the single alert blade. Now, you can filter the alerts in the security alerts blade to see the alerts related to the IP address, and you can search for a specific IP address. +In many cases of attacks, you want to track alerts based on the IP address of the entity involved in the attack. Up until now, the IP appeared only in the "Related Entities" section in the single alert pane. Now, you can filter the alerts in the security alerts page to see the alerts related to the IP address, and you can search for a specific IP address. :::image type="content" source="media/release-notes/ip-address-filter-for-alerts.png" alt-text="Screenshot of filter for I P address in Defender for Cloud alerts." lightbox="media/release-notes/ip-address-filter-for-alerts.png"::: |
| defender-for-cloud | Secure Score Security Controls | https://github.com/MicrosoftDocs/azure-docs/commits/main/articles/defender-for-cloud/secure-score-security-controls.md | description: Description of Microsoft Defender for Cloud's secure score and its Previously updated : 06/02/2022 Last updated : 07/18/2022 # Security posture for Microsoft Defender for Cloud On the Security posture page, you're able to see the secure score for your entir | :::image type="content" source="media/secure-score-security-controls/select-environment.png" alt-text="Screenshot showing the different environment options."::: | Select your environment to see its secure score, and details. Multiple environments can be selected at once. The page will change based on your selection here.| | :::image type="content" source="media/secure-score-security-controls/environment.png" alt-text="Screenshot of the environment section of the security posture page."::: | Shows the total number of subscriptions, accounts and projects that affect your overall score. It also shows how many unhealthy resources and how many recommendations exist in your environments. | -The bottom half of the page allows you to view, and manage all of your individual subscriptions, accounts, and projects, by viewing their individual secure scores, number of unhealthy resources and even view their recommendations. +The bottom half of the page allows you to view and manage viewing the individual secure scores, number of unhealthy resources and even view the recommendations for all of your individual subscriptions, accounts, and projects. You can group this section by environment by selecting the Group by Environment checkbox. You can group this section by environment by selecting the Group by Environment The contribution of each security control towards the overall secure score is shown on the recommendations page. To get all the possible points for a security control, all of your resources must comply with all of the security recommendations within the security control. For example, Defender for Cloud has multiple recommendations regarding how to secure your management ports. You'll need to remediate them all to make a difference to your secure score. ### Example scores for a control In this example: - - **Remediate vulnerabilities security control** - This control groups multiple recommendations related to discovering and resolving known vulnerabilities. -- **Max score** - :::image type="icon" source="media/secure-score-security-controls/max-score.png" border="false":::-- The maximum number of points you can gain by completing all recommendations within a control. The maximum score for a control indicates the relative significance of that control and is fixed for every environment. Use the max score values to triage the issues to work on first.<br>For a list of all controls and their max scores, see [Security controls and their recommendations](#security-controls-and-their-recommendations). +- **Max score** - The maximum number of points you can gain by completing all recommendations within a control. The maximum score for a control indicates the relative significance of that control and is fixed for every environment. Use the max score values to triage the issues to work on first.<br>For a list of all controls and their max scores, see [Security controls and their recommendations](#security-controls-and-their-recommendations). -- **Current score** - :::image type="icon" source="media/secure-score-security-controls/current-score.png" border="false":::+- **Current score** - The current score for this control. - The current score for this control.<br>Current score=[Score per resource]*[Number of healthy resources]. + Current score = [Score per resource] * [Number of healthy resources] Each control contributes towards the total score. In this example, the control is contributing 2.00 points to current total secure score. -- **Potential score increase** - :::image type="icon" source="media/secure-score-security-controls/potential-increase.png" border="false":::-- The remaining points available to you within the control. If you remediate all the recommendations in this control, your score will increase by 9%. +- **Potential score increase** - The remaining points available to you within the control. If you remediate all the recommendations in this control, your score will increase by 9%. - For example, Potential score increase=[Score per resource]*[Number of unhealthy resources] or 0.1714 x 30 unhealthy resources = 5.14. + Potential score increase = [Score per resource] * [Number of unhealthy resources] -- **Insights** - :::image type="icon" source="media/secure-score-security-controls/insights.png" border="false":::-- Gives you extra details for each recommendation. Which can be: +- **Insights** - Gives you extra details for each recommendation, such as: - :::image type="icon" source="media/secure-score-security-controls/preview-icon.png" border="false"::: Preview recommendation - This recommendation won't affect your secure score until it's GA. In this example: |-|-| |**Security control's current score**|<br><br><br>Each individual security control contributes towards the Security Score. Each resource affected by a recommendation within the control, contributes towards the control's current score. The current score for each control is a measure of the status of the resources *within* the control.<br><br>In this example, the max score of 6 would be divided by 78 because that's the sum of the healthy and unhealthy resources.<br>6 / 78 = 0.0769<br>Multiplying that by the number of healthy resources (4) results in the current score:<br>0.0769 * 4 = **0.31**<br><br>| |**Secure score**<br>Single subscription, or connector|<br><br><br><br>In this example, there's a single subscription, or connector with all security controls available (a potential maximum score of 60 points). The score shows 28 points out of a possible 60 and the remaining 32 points are reflected in the "Potential score increase" figures of the security controls.<br> <br> This equation is the same equation for a connector with just the word subscription being replaced by the word connector. |-|**Secure score**<br>Multiple subscriptions, and connectors|<br><br><br>When calculating the combined score for multiple subscriptions, and connectors, Defender for Cloud includes a *weight* for each subscription, and connector. The relative weights for your subscriptions, and connectors are determined by Defender for Cloud based on factors such as the number of resources.<br>The current score for each subscription, a dn connector is calculated in the same way as for a single subscription, or connector, but then the weight is applied as shown in the equation.<br>When viewing multiple subscriptions, and connectors, the secure score evaluates all resources within all enabled policies and groups their combined impact on each security control's maximum score.<br><br>The combined score is **not** an average; rather it's the evaluated posture of the status of all resources across all subscriptions, and connectors.<br><br>Here too, if you go to the recommendations page and add up the potential points available, you'll find that it's the difference between the current score (22) and the maximum score available (58).| +|**Secure score**<br>Multiple subscriptions, and connectors|<br><br><br>The combined score for multiple subscriptions and connectors includes a *weight* for each subscription, and connector. The relative weights for your subscriptions, and connectors are determined by Defender for Cloud based on factors such as the number of resources.<br>The current score for each subscription, a dn connector is calculated in the same way as for a single subscription, or connector, but then the weight is applied as shown in the equation.<br>When you view multiple subscriptions and connectors, the secure score evaluates all resources within all enabled policies and groups their combined impact on each security control's maximum score.<br><br>The combined score is **not** an average; rather it's the evaluated posture of the status of all resources across all subscriptions, and connectors.<br><br>Here too, if you go to the recommendations page and add up the potential points available, you'll find that it's the difference between the current score (22) and the maximum score available (58).| ### Which recommendations are included in the secure score calculations? Only built-in recommendations have an impact on the secure score. Recommendations flagged as **Preview** aren't included in the calculations of your secure score. They should still be remediated wherever possible, so that when the preview period ends they'll contribute towards your score. -An example of a preview recommendation: -+Preview recommendations are marked with: :::image type="icon" source="media/secure-score-security-controls/preview-icon.png" border="false"::: ## Improve your secure score To improve your secure score, remediate security recommendations from your recommendations list. You can remediate each recommendation manually for each resource, or use the **Fix** option (when available) to resolve an issue on multiple resources quickly. For more information, see [Remediate recommendations](implement-security-recommendations.md). -You can also configure the Enforce and Deny options on the relevant recommendations to improve your score and ensure your users don't create resources that negatively impact your score. Learn more in [Prevent misconfigurations with Enforce/Deny recommendations](prevent-misconfigurations.md). +You can also [configure the Enforce and Deny options](prevent-misconfigurations.md) on the relevant recommendations to improve your score and make sure your users don't create resources that negatively impact your score. ## Security controls and their recommendations |
| defender-for-iot | Hpe Proliant Dl360 | https://github.com/MicrosoftDocs/azure-docs/commits/main/articles/defender-for-iot/organizations/appliance-catalog/hpe-proliant-dl360.md | This procedure describes how to update the HPE BIOS configuration for your OT se 1. Select **Esc** twice to close the **System Configuration** form. -1. Select **Embedded RAID 1: HPE Smart Array P408i-a SR Gen 10** > **Array Configuration** > **Create Array**. +1. Select **Embedded RAID1: HPE Smart Array P408i-a SR Gen 10** > **Array Configuration** > **Create Array**. -1. In the **Create Array** form, select all the options. +1. In the **Create Array** form, select all the drives, and enable RAID Level 5. > [!NOTE] > For **Data-at-Rest** encryption, see the HPE guidance for activating RAID Secure Encryption or using Self-Encrypting-Drives (SED). |
| defender-for-iot | Connect Sensors | https://github.com/MicrosoftDocs/azure-docs/commits/main/articles/defender-for-iot/organizations/connect-sensors.md | This procedure describes how to install and configure a connection between your ```bash sudo apt-get update- sudu apt-get install squid + sudo apt-get install squid ``` 1. Locate the Squid configuration file. For example, at `/etc/squid/squid.conf` or `/etc/squid/conf.d/`, and open the file in a text editor. While you'll need to migrate your connections before the [legacy version reaches ## Next steps -For more information, see [Sensor connection methods](architecture-connections.md). +For more information, see [Sensor connection methods](architecture-connections.md). |
| defender-for-iot | Ot Pre Configured Appliances | https://github.com/MicrosoftDocs/azure-docs/commits/main/articles/defender-for-iot/organizations/ot-pre-configured-appliances.md | You can [order](mailto:hardware.sales@arrow.com) any of the following preconfigu |Hardware profile |Appliance |Performance / Monitoring |Physical specifications | ||||| |**C5600** | [HPE ProLiant DL360](appliance-catalog/hpe-proliant-dl360.md) | **Max bandwidth**: 3Gbp/s <br>**Max devices**: 12,000 <br> 32 Cores/32G RAM/5.6TB | **Mounting**: 1U <br>**Ports**: 15x RJ45 or 8x SFP (OPT) |-|**E1800, E1000, E500** | [HPE ProLiant DL20/DL20 Plus](appliance-catalog/hpe-proliant-dl20-plus-enterprise.md) <br> (4SFF) | **Max bandwidth**: 1 Gbp/s<br>**Max devices**: 10,000 <br> 8 Cores/32G RAM/1.8TB | **Mounting**: 1U <br>**Ports**: 8x RJ45 or 6x SFP (OPT) | +|**E1800** | [HPE ProLiant DL20/DL20 Plus](appliance-catalog/hpe-proliant-dl20-plus-enterprise.md) <br> (4SFF) | **Max bandwidth**: 1 Gbp/s<br>**Max devices**: 10,000 <br> 8 Cores/32G RAM/1.8TB | **Mounting**: 1U <br>**Ports**: 8x RJ45 or 6x SFP (OPT) | +|**L500** | [Dell Edge 5200](appliance-catalog/dell-edge-5200.md) <br> (Rugged MIL-STD-810G) | **Max bandwidth**: 60Mbp/s<br>**Max devices**: 1,000 <br> 8 Cores/32G RAM/100GB | **Mounting**: Wall Mount<br>**Ports**: 3x RJ45 | |**L500** | [HPE ProLiant DL20/DL20 Plus](appliance-catalog/hpe-proliant-dl20-plus-smb.md) <br> (NHP 2LFF) | **Max bandwidth**: 200Mbp/s<br>**Max devices**: 1,000 <br> 4 Cores/8G RAM/500GB | **Mounting**: 1U<br>**Ports**: 4x RJ45 | |**L100** | [YS-Techsystems YS-FIT2](appliance-catalog/ys-techsystems-ys-fit2.md) <br>(Rugged MIL-STD-810G) | **Max bandwidth**: 10Mbp/s <br>**Max devices**: 100 <br> 4 Cores/8G RAM/128GB | **Mounting**: DIN/VESA<br>**Ports**: 2x RJ45 |-|**L64** | [Dell Edge 5200](appliance-catalog/dell-edge-5200.md) <br> (Rugged MIL-STD-810G) | **Max bandwidth**: 60Mbp/s<br>**Max devices**: 1,000 <br> 8 Cores/32G RAM/100GB | **Mounting**: Wall Mount<br>**Ports**: 3x RJ45 | + > [!NOTE] You can purchase any of the following appliances for your OT on-premises managem |Hardware profile |Appliance |Max sensors |Physical specifications | |||||-|**E1800, E1000, E500** | [HPE ProLiant DL20/DL20 Plus](appliance-catalog/hpe-proliant-dl20-plus-enterprise.md) <br> (4SFF) | 300 | **Mounting**: 1U <br>**Ports**: 8x RJ45 or 6x SFP (OPT) | +|**E1800** | [HPE ProLiant DL20/DL20 Plus](appliance-catalog/hpe-proliant-dl20-plus-enterprise.md) <br> (4SFF) | 300 | **Mounting**: 1U <br>**Ports**: 8x RJ45 or 6x SFP (OPT) | ## Next steps |
| defender-for-iot | Ot Virtual Appliances | https://github.com/MicrosoftDocs/azure-docs/commits/main/articles/defender-for-iot/organizations/ot-virtual-appliances.md | For all deployments, bandwidth results for virtual machines may vary, depending |Hardware profile |Performance / Monitoring |Physical specifications | |||| |**C5600** | **Max bandwidth**: 2.5 Gb/sec <br>**Max monitored assets**: 12,000 | **vCPU**: 32 <br>**Memory**: 32 GB <br>**Storage**: 5.6 TB (600 IOPS) |-|**E1800, E1000, E500** | **Max bandwidth**: 800 Mb/sec <br>**Max monitored assets**: 10,000 | **vCPU**: 8 <br>**Memory**: 32 GB <br>**Storage**: 1.8 TB (300 IOPS) | +|**E1800** | **Max bandwidth**: 800 Mb/sec <br>**Max monitored assets**: 10,000 | **vCPU**: 8 <br>**Memory**: 32 GB <br>**Storage**: 1.8 TB (300 IOPS) | +|**E1000** | **Max bandwidth**: 800 Mb/sec <br>**Max monitored assets**: 10,000 | **vCPU**: 8 <br>**Memory**: 32 GB <br>**Storage**: 1 TB (300 IOPS) | +|**E500** | **Max bandwidth**: 800 Mb/sec <br>**Max monitored assets**: 10,000 | **vCPU**: 8 <br>**Memory**: 32 GB <br>**Storage**: 500 GB (300 IOPS) | |**L500** | **Max bandwidth**: 160 Mb/sec <br>**Max monitored assets**: 1,000 | **vCPU**: 4 <br>**Memory**: 8 GB <br>**Storage**: 500 GB (150 IOPS) | |**L100** | **Max bandwidth**: 100 Mb/sec <br>**Max monitored assets**: 800 | **vCPU**: 4 <br>**Memory**: 8 GB <br>**Storage**: 100 GB (150 IOPS) | |**L64** | **Max bandwidth**: 10 Mb/sec <br>**Max monitored assets**: 100 | **vCPU**: 4 <br>**Memory**: 8 GB <br>**Storage**: 60 GB (150 IOPS) | An on-premises management console on a virtual appliance is supported for enterp | Specification | Requirements | | | - |+| Hardware profile | E1800 | | vCPU | 8 | | Memory | 32 GB | | Storage | 1.8 TB | |
| defender-for-iot | Release Notes | https://github.com/MicrosoftDocs/azure-docs/commits/main/articles/defender-for-iot/organizations/release-notes.md | Now you can get a summary of the log and system information that gets added to y Alerts are now available in Defender for IoT in the Azure portal. Work with alerts to enhance the security and operation of your IoT/OT network. -The new **Alerts** page is currently in Public Preview, and provides: +The new **Alerts** page is currently in Public Preview, and provides: - An aggregated, real-time view of threats detected by network sensors. - Remediation steps for devices and network processes. |
| digital-twins | Quickstart 3D Scenes Studio | https://github.com/MicrosoftDocs/azure-docs/commits/main/articles/digital-twins/quickstart-3d-scenes-studio.md | In this section, you'll use the *Azure Digital Twins data simulator* tool to gen This sample scenario represents a package distribution center that contains six robotic arms. Each arm has a digital twin with properties to track how many boxes the arm fails to pick up, along with the IDs of the missed boxes. -1. Navigate to the [data simulator](https://explorer.digitaltwins.azure.net/tools/data-pusher). +1. Navigate to the [data simulator](https://explorer.digitaltwins.azure.net/tools/data-pusher) in your web browser. 1. In the **Instance URL** space, enter the *host name* of your Azure Digital Twins instance from the [previous section](#collect-host-name). Set the **Simulation Type** to *Robot Arms*. 1. Use the **Generate environment** button to create a sample environment with models and twins. (If you already have models and twins in your instance, this will not delete them, it will just add more.) |
| event-grid | Event Schema Policy | https://github.com/MicrosoftDocs/azure-docs/commits/main/articles/event-grid/event-schema-policy.md | Title: Azure Policy as an Event Grid source description: This article describes how to use Azure Policy as an Event Grid event source. It provides the schema and links to tutorial and how-to articles.- + Previously updated : 07/12/2022 Last updated : 07/19/2022 # Azure Policy as an Event Grid source |
| expressroute | Expressroute Howto Circuit Portal Resource Manager | https://github.com/MicrosoftDocs/azure-docs/commits/main/articles/expressroute/expressroute-howto-circuit-portal-resource-manager.md | description: In this quickstart, you learn how to create, provision, verify, upd Previously updated : 04/13/2022 Last updated : 07/18/2022 From a browser, navigate to the [Azure portal](https://portal.azure.com) and sig 1. On the Azure portal menu, select **+ Create a resource**. Search for **ExpressRoute** and then select **Create**. - :::image type="content" source="./media/expressroute-howto-circuit-portal-resource-manager/create-an-expressroute-circuit.png" alt-text="Create an ExpressRoute circuit"::: + :::image type="content" source="./media/expressroute-howto-circuit-portal-resource-manager/create-an-expressroute-circuit.png" alt-text=" Screenshot of ExpressRoute circuit resource."::: 1. On the **Create ExpressRoute** page. Provide the **Resource Group**, **Region**, and **Name** for the circuit. Then select **Next: Configuration >**. - :::image type="content" source="./media/expressroute-howto-circuit-portal-resource-manager/expressroute-create-basic.png" alt-text="Configure the resource group and region"::: +| Setting | Value | +| | | +| Resource group | Select **Create new**. Enter **ExpressRouteResourceGroup** </br> Select **OK**. | +| Region | West US 2 | +| Name | TestERCircuit | ++ :::image type="content" source="./media/expressroute-howto-circuit-portal-resource-manager/expressroute-create-basic.png" alt-text=" Screenshot of how to configure the resource group and region."::: 1. When you're filling in the values on this page, make sure that you specify the correct SKU tier (Local, Standard, or Premium) and data metering billing model (Unlimited or Metered). - :::image type="content" source="./media/expressroute-howto-circuit-portal-resource-manager/expressroute-create-configuration.png" alt-text="Configure the circuit"::: + :::image type="content" source="./media/expressroute-howto-circuit-portal-resource-manager/expressroute-create-configuration.png" alt-text="Screenshot of how to configure the circuit."::: | Setting | Description | | | | From a browser, navigate to the [Azure portal](https://portal.azure.com) and sig You can view all the circuits that you created by searching for **ExpressRoute circuits** in the search box at the top of the portal. All Expressroute circuits created in the subscription will appear here. **View the properties** You can view the properties of the circuit by selecting it. On the Overview page for your circuit, you'll find the **Service Key**. Provide the service key to the service provider to complete the provisioning process. The service key is unique to your circuit. ### Send the service key to your connectivity provider for provisioning When you create a new ExpressRoute circuit, the circuit is in the following stat Provider status: **Not provisioned**<BR> Circuit status: **Enabled** The circuit changes to the following state when the connectivity provider is currently enabling it for you: Circuit status: **Enabled** You can view the properties of the circuit that you're interested in by selecting it. Check the **Provider status** and ensure that it has moved to **Provisioned** before you continue. ### Create your routing configuration You can do the following tasks with no downtime: To modify an ExpressRoute circuit, select **Configuration**. ## <a name="delete"></a>Deprovisioning an ExpressRoute circuit If the ExpressRoute circuit service provider provisioning state is **Provisionin You can delete your ExpressRoute circuit by selecting the **Delete** icon. Ensure the provider status is *Not provisioned* before proceeding. ## Next steps |
| expressroute | Howto Linkvnet Cli | https://github.com/MicrosoftDocs/azure-docs/commits/main/articles/expressroute/howto-linkvnet-cli.md | Title: 'Tutorial: Link a VNet to an ExpressRoute circuit - Azure CLI' description: This tutorial shows you how to link virtual networks (VNets) to ExpressRoute circuits by using the Resource Manager deployment model and Azure CLI. - Previously updated : 08/10/2021 Last updated : 07/18/2022 -+ -# Tutorial: Connect a virtual network to an ExpressRoute circuit using CLI +# Tutorial: Connect a virtual network to an ExpressRoute circuit using Azure CLI This tutorial shows you how to link virtual networks (VNets) to Azure ExpressRoute circuits using Azure CLI. To link using Azure CLI, the virtual networks must be created using the Resource Manager deployment model. They can either be in the same subscription, or part of another subscription. If you want to use a different method to connect your VNet to an ExpressRoute circuit, you can select an article from the following list: This tutorial shows you how to link virtual networks (VNets) to Azure ExpressRou > * [Azure portal](expressroute-howto-linkvnet-portal-resource-manager.md) > * [PowerShell](expressroute-howto-linkvnet-arm.md) > * [Azure CLI](howto-linkvnet-cli.md)-> * [Video - Azure portal](https://azure.microsoft.com/documentation/videos/azure-expressroute-how-to-create-a-connection-between-your-vpn-gateway-and-expressroute-circuit) > * [PowerShell (classic)](expressroute-howto-linkvnet-classic.md) > In this tutorial, you learn how to: * In order to create the connection from the ExpressRoute circuit to the target ExpressRoute virtual network gateway, the number of address spaces advertised from the local or peered virtual networks needs to be equal to or less than **200**. Once the connection has been successfully created, you can add additional address spaces, up to 1,000, to the local or peered virtual networks. +* Review guidance for [connectivity between virtual networks over ExpressRoute](virtual-network-connectivity-guidance.md). + ## Connect a virtual network in the same subscription to a circuit You can connect a virtual network gateway to an ExpressRoute circuit by using the example. Make sure that the virtual network gateway is created and is ready for linking before you run the command. az network vpn-connection delete --name ERConnection --resource-group ExpressRou ## Next steps -In this tutorial, you learned how to connect a virtual network to a circuit in the same subscription and a different subscription. For more information about the ExpressRoute gateway, see: +In this tutorial, you learned how to connect a virtual network to a circuit in the same subscription and in a different subscription. For more information about the ExpressRoute gateway, see: [ExpressRoute virtual network gateways](expressroute-about-virtual-network-gateways.md). ++To learn how to configure route filters for Microsoft peering using Azure CLI, advance to the next tutorial. > [!div class="nextstepaction"]-> [About ExpressRoute virtual network gateways](expressroute-about-virtual-network-gateways.md) +> [Configure route filters for Microsoft peering](how-to-routefilter-cli.md) + |
| frontdoor | Best Practices | https://github.com/MicrosoftDocs/azure-docs/commits/main/articles/frontdoor/best-practices.md | + + Title: Azure Front Door - Best practices +description: This page provides information about how to configure Azure Front Door based on Microsoft's best practices. ++documentationcenter: '' ++++ na + Last updated : 07/10/2022++++# Best practices for Front Door ++This article summarizes best practices for using Azure Front Door. ++## General best practices ++### Avoid combining Traffic Manager and Front Door ++For most solutions, you should use *either* Front Door *or* [Azure Traffic Manager](/azure/traffic-manager/traffic-manager-overview). ++Traffic Manager is a DNS-based load balancer. It sends traffic directly to your origin's endpoints. In contrast, Front Door terminates connections at points of presence (PoPs) near to the client and establishes separate long-lived connections to the origins. The products work differently and are intended for different use cases. ++If you combine both Front Door and Traffic Manager together, it's unlikely that you'll increase the resiliency or performance of your solution. Also, if you have health probes configured on both services, you might accidentally overload your servers with the volume of health probe traffic. ++If you need content caching and delivery (CDN), TLS termination, advanced routing capabilities, or a web application firewall (WAF), consider using Front Door. For simple global load balancing with direct connections from your client to your endpoints, consider using Traffic Manager. For more information about selecting a load balancing option, see [Load-balancing options](/azure/architecture/guide/technology-choices/load-balancing-overview). ++### Use the latest API version and SDK version ++When you work with Front Door by using APIs, ARM templates, Bicep, or Azure SDKs, it's important to use the latest available API or SDK version. API and SDK updates occur when new functionality is available, and also contain important security patches and bug fixes. ++## TLS best practices ++### Use end-to-end TLS ++Front Door terminates TCP and TLS connections from clients. It then establishes new connections from each point of presence (PoP) to the origin. It's a good practice to secure each of these connections with TLS, even for origins that are hosted in Azure. This approach ensures that your data is always encrypted during transit. ++For more information, see [End-to-end TLS with Azure Front Door](end-to-end-tls.md). ++### Use HTTP to HTTPS redirection ++It's a good practice for clients to use HTTPS to connect to your service. However, sometimes you need to accept HTTP requests to allow for older clients or clients who might not understand the best practice. ++You can configure Front Door to automatically redirect HTTP requests to use the HTTPS protocol. You should enable the *Redirect all traffic to use HTTPS* setting on your route. ++### Use managed TLS certificates ++When Front Door manages your TLS certificates, it reduces your operational costs, and helps you to avoid costly outages caused by forgetting to renew a certificate. Front Door automatically issues and rotates managed TLS certificates. ++For more information, see [Configure HTTPS on an Azure Front Door custom domain using the Azure portal](standard-premium/how-to-configure-https-custom-domain.md). ++### Use 'Latest' version for customer-managed certificates ++If you decide to use your own TLS certificates, then consider setting the Key Vault certificate version to 'Latest'. By using 'Latest', you avoid having to reconfigure Front Door to use new versions of your certificate and waiting for the certificate to be deployed throughout Front Door's environments. ++For more information, see [Select the certificate for Azure Front Door to deploy](standard-premium/how-to-configure-https-custom-domain.md#select-the-certificate-for-azure-front-door-to-deploy). ++## Domain name best practices ++### Use the same domain name on Front Door and your origin ++Front Door can rewrite the `Host` header of incoming requests. This feature can be helpful when you manage a set of customer-facing custom domain names that route to a single origin. The feature can also help when you want to avoid configuring custom domain names in Front Door and at your origin. However, when you rewrite the `Host` header, request cookies and URL redirections might break. In particular, when you use platforms like Azure App Service, features like [session affinity](/azure/app-service/configure-common#configure-general-settings) and [authentication and authorization](/azure/app-service/overview-authentication-authorization) might not work correctly. ++Before you rewrite the `Host` header of your requests, carefully consider whether your application is going to work correctly. ++For more information, see [Preserve the original HTTP host name between a reverse proxy and its back-end web application](/azure/architecture/best-practices/host-name-preservation). ++## Web application firewall (WAF) ++### Enable the WAF ++For internet-facing applications, we recommend you enable the Front Door web application firewall (WAF) and configure it to use managed rules. When you use a WAF and Microsoft-managed rules, your application is protected from a range of attacks. ++For more information, see [Web Application Firewall (WAF) on Azure Front Door](web-application-firewall.md). ++### Follow WAF best practices ++The WAF for Front Door has its own set of best practices for its configuration and use. For more information, see [Best practices for Web Application Firewall on Azure Front Door](../web-application-firewall/afds/waf-front-door-best-practices.md). ++## Health probe best practices ++### Disable health probes when thereΓÇÖs only one origin in an origin group ++Front Door's health probes are designed to detect situations where an origin is unavailable or unhealthy. When a health probe detects a problem with an origin, Front Door can be configured to send traffic to another origin in the origin group. ++If you only have a single origin, Front Door always routes traffic to that origin even if its health probe reports an unhealthy status. The status of the health probe doesn't do anything to change Front Door's behavior. In this scenario, health probes don't provide a benefit and you should disable them to reduce the traffic on your origin. ++For more information, see [Health probes](health-probes.md). ++### Select good health probe endpoints ++Consider the location where you tell Front Door's health probe to monitor. It's usually a good idea to monitor a webpage or location that you specifically design for health monitoring. Your application logic can consider the status of all of the critical components required to serve production traffic including application servers, databases, and caches. That way, if any component fails, Front Door can route your traffic to another instance of your service. ++For more information, see the [Health Endpoint Monitoring pattern](/azure/architecture/patterns/health-endpoint-monitoring) ++### Use HEAD health probes ++Health probes can use either the GET or HEAD HTTP method. It's a good practice to use the HEAD method for health probes, which reduces the amount of traffic load on your origins. ++For more information, see [Supported HTTP methods for health probes](health-probes.md#supported-http-methods-for-health-probes). ++## Next steps ++Learn how to [create an Front Door profile](create-front-door-portal.md). |
| governance | Route State Change Events | https://github.com/MicrosoftDocs/azure-docs/commits/main/articles/governance/policy/tutorials/route-state-change-events.md | Title: "Tutorial: Route policy state change events to Event Grid with Azure CLI" description: In this tutorial, you configure Event Grid to listen for policy state change events and call a webhook. Previously updated : 06/29/2022+ Last updated : 07/19/2022 - # Tutorial: Route policy state change events to Event Grid with Azure CLI send the events to a web app that collects and displays the messages. `az --version`. If you need to install or upgrade, see [Install Azure CLI](/cli/azure/install-azure-cli). -- Even if you've previously used Azure Policy or Event Grid, re-register their respective resource- providers: -- ```azurecli-interactive - # Log in first with az login if you're not using Cloud Shell -- # Provider register: Register the Azure Policy provider - az provider register --namespace Microsoft.PolicyInsights -- # Provider register: Register the Azure Event Grid provider - az provider register --namespace Microsoft.EventGrid - ``` - [!INCLUDE [cloud-shell-try-it.md](../../../../includes/cloud-shell-try-it.md)] ## Create a resource group az group create --name <resource_group_name> --location westus Now that we have a resource group, we create a [system topic](../../../event-grid/system-topics.md). A system topic in Event Grid represents one or more events published by Azure services such as Azure Policy and Azure Event Hubs. This system topic-uses the `Microsoft.PolicyInsights.PolicyStates` topic type for Azure Policy state changes. Replace -`<SubscriptionID>` in the **scope** parameter with the ID of your subscription and -`<resource_group_name>` in **resource-group** parameter with the previously created resource group. +uses the `Microsoft.PolicyInsights.PolicyStates` topic type for Azure Policy state changes. ++First, you'll need to register the `PolicyInsights` and `EventGrid` resource providers (RPs) at the appropriate management scope. Whereas the Azure portal auto-registers any RPs you invoke for the first time, Azure CLI does not. ```azurecli-interactive # Log in first with az login if you're not using Cloud Shell -az eventgrid system-topic create --name PolicyStateChanges --location global --topic-type Microsoft.PolicyInsights.PolicyStates --source "/subscriptions/<subscriptionID>" --resource-group "<resource_group_name>" +# Register the required RPs at the management group scope +az provider register --namespace Microsoft.PolicyInsights -m <managementGroupId> +az provider register --namespace Microsoft.EventGrid -m <managementGroupId> ++# Alternatively, register the required RPs at the subscription scope (defaults to current subscription context) +az provider register --namespace Microsoft.PolicyInsights +az provider register --namespace Microsoft.EventGrid +``` ++Next, replace `<subscriptionId>` in the **scope** parameter with the ID of your subscription and +`<resource_group_name>` in **resource-group** parameter with the previously created resource group. ++```azurecli-interactive +az eventgrid system-topic create --name PolicyStateChanges --location global --topic-type Microsoft.PolicyInsights.PolicyStates --source "/subscriptions/<subscriptionId>" --resource-group "<resource_group_name>" ``` If your Event Grid system topic will be applied to the management group scope, then the Azure CLI `--source` parameter syntax is a bit different. Here's an example: hold the Event Grid topic: ```azurecli-interactive # Log in first with az login if you're not using Cloud Shell -az policy assignment create --name 'requiredtags-events' --display-name 'Require tag on RG' --scope '<ResourceGroupScope>' --policy '<policy definition ID>' --params '{ \"tagName\": { \"value\": \"EventTest\" } }' +az policy assignment create --name 'requiredtags-events' --display-name 'Require tag on RG' --scope '<resourceGroupScope>' --policy '<policy definition ID>' --params '{ \"tagName\": { \"value\": \"EventTest\" } }' ``` The preceding command uses the following information: The preceding command uses the following information: - **Scope** - A scope determines what resources or grouping of resources the policy assignment gets enforced on. It could range from a subscription to resource groups. Be sure to replace <scope> with the name of your resource group. The format for a resource group scope is- `/subscriptions/<SubscriptionID>/resourceGroups/<ResourceGroup>`. + `/subscriptions/<subscriptionId>/resourceGroups/<resourceGroup>`. - **Policy** - The policy definition ID, based on which you're using to create the assignment. In this case, it's the ID of policy definition _Require a tag on resource groups_. To get the policy definition ID, run this command: event notification to appear in the web app. The resource group we created show ## Trigger a change on the resource group To make the resource group compliant, a tag with the name **EventTest** is required. Add the tag to-the resource group with the following command replacing `<SubscriptionID>` with your subscription ID -and `<ResourceGroup>` with the name of the resource group: +the resource group with the following command replacing `<subscriptionId>` with your subscription ID +and `<resourceGroup>` with the name of the resource group: ```azurecli-interactive # Log in first with az login if you're not using Cloud Shell -az tag create --resource-id '/subscriptions/<SubscriptionID>/resourceGroups/<ResourceGroup>' --tags EventTest=true +az tag create --resource-id '/subscriptions/<SubscriptionID>/resourceGroups/<resourceGroup>' --tags EventTest=true ``` After adding the required tag to the resource group, wait for a **Microsoft.PolicyInsights.PolicyStateChanged** event notification to appear in the web app. Expand the event and the `data.complianceState` value now shows _Compliant_. +## Troubleshooting ++If you see an error similar to one of the following, please make sure that you've registered both resource providers at the scope to which you're subscribing (management group or subscription): ++- `Deployment has failed with the following error: {"code":"Publisher Notification Error","message":"Failed to enable publisher notifications.","details":[{"code":"Publisher Provider Error","message":"GET request for <uri> failed with status code: Forbidden, code: AuthorizationFailed and message: The client '<identifier>' with object id '<identifier>' does not have authorization to perform action 'microsoft.policyinsights/eventGridFilters/read' over scope '<scope>/providers/microsoft.policyinsights/eventGridFilters/_default' or the scope is invalid. If access was recently granted, please refresh your credentials.."}]}` +- `Deployment has failed with the following error: {'code':'Publisher Notification Error','message':'Failed to enable publisher notifications.','details':[{'code':'ApiVersionNotSupported','message':'Event Grid notifications are currently not supported by microsoft.policyinsights in global. Try re-registering Microsoft.EventGrid provider if this is your first event subscription in this region.'}]}` + ## Clean up resources If you plan to continue working with this web app and Azure Policy event subscription, don't clean |
| governance | Starter | https://github.com/MicrosoftDocs/azure-docs/commits/main/articles/governance/resource-graph/samples/starter.md | Title: Starter query samples description: Use Azure Resource Graph to run some starter queries, including counting resources, ordering resources, or by a specific tag. Previously updated : 07/07/2021++ Last updated : 07/19/2022 # Starter Resource Graph query samples -[tutorial for KQL](/azure/kusto/query/tutorial) to understand how to compose requests for the +[KQL tutorial](/azure/kusto/query/tutorial) to understand how to compose requests for the resources you're looking for. We'll walk through the following starter queries: We'll walk through the following starter queries: - [Show first five virtual machines by name and their OS type](#show-sorted) - [Count virtual machines by OS type](#count-os) - [Show resources that contain storage](#show-storage)+- [List all virtual network subnets](#list-subnets) - [List all public IP addresses](#list-publicip) - [Count resources that have IP addresses configured by subscription](#count-resources-by-ip) - [List resources with a specific tag value](#list-tag) Search-AzGraph -Query "Resources | where type contains 'storage' | distinct type +## <a name="list-subnets"></a>List all Azure virtual network subnets ++This query returns a list of Azure virtual networks (VNets) including subnet names and address prefixes. Thanks to [Saul Dolgin](https://github.com/sdolgin) for the contribution. ++```kusto +Resources +| where type == 'microsoft.network/virtualnetworks' +| extend subnets = properties.subnets +| mv-expand subnets +| project name, subnets.name, subnets.properties.addressPrefix, location, resourceGroup, subscriptionId +``` ++# [Azure CLI](#tab/azure-cli) ++```azurecli +az graph query -q "Resources | where type == 'microsoft.network/virtualnetworks' | extend subnets = properties.subnets | mv-expand subnets | project name, subnets.name, subnets.properties.addressPrefix, location, resourceGroup, subscriptionId" +``` ++# [Azure PowerShell](#tab/azure-powershell) ++```azurepowershell-interactive +Search-AzGraph -Query "Resources | where type == 'microsoft.network/virtualnetworks' | extend subnets = properties.subnets | mv-expand subnets | project name, subnets.name, subnets.properties.addressPrefix, location, resourceGroup, subscriptionId +``` ++# [Portal](#tab/azure-portal) +++- Azure portal: <a href="https://portal.azure.com/?feature.customportal=false#blade/HubsExtension/ArgQueryBlade/query/Resources%0A%7C%20where%20type%20%3D%3D%20%27microsoft.network%2Fvirtualnetworks%27%0A%7C%20extend%20subnets%20%3D%20properties.subnets%0A%7C%20mv-expand%20subnets%0A%7C%20project%20name%2C%20subnets.name%2C%20subnets.properties.addressPrefix%2C%20location%2C%20resourceGroup%2C%20subscriptionId" target="_blank">portal.Azure.com</a> +- Azure Government portal: <a href="https://portal.azure.us/?feature.customportal=false#blade/HubsExtension/ArgQueryBlade/query/Resources%0A%7C%20where%20type%20%3D%3D%20%27microsoft.network%2Fvirtualnetworks%27%0A%7C%20extend%20subnets%20%3D%20properties.subnets%0A%7C%20mv-expand%20subnets%0A%7C%20project%20name%2C%20subnets.name%2C%20subnets.properties.addressPrefix%2C%20location%2C%20resourceGroup%2C%20subscriptionId" target="_blank">portal.Azure.us</a> +- Azure China 21Vianet portal: <a href="https://portal.azure.cn/?feature.customportal=false#blade/HubsExtension/ArgQueryBlade/query/Resources%0A%7C%20where%20type%20%3D%3D%20%27microsoft.network%2Fvirtualnetworks%27%0A%7C%20extend%20subnets%20%3D%20properties.subnets%0A%7C%20mv-expand%20subnets%0A%7C%20project%20name%2C%20subnets.name%2C%20subnets.properties.addressPrefix%2C%20location%2C%20resourceGroup%2C%20subscriptionId" target="_blank">portal.Azure.cn</a> +++ ## <a name="list-publicip"></a>List all public IP addresses Similar to the previous query, find everything that is a type with the word **publicIPAddresses**. |
| hdinsight | Apache Hadoop Deep Dive Advanced Analytics | https://github.com/MicrosoftDocs/azure-docs/commits/main/articles/hdinsight/hadoop/apache-hadoop-deep-dive-advanced-analytics.md | description: Learn how advanced analytics uses algorithms to process big data in Previously updated : 01/01/2020 Last updated : 07/19/2022 # Deep dive - advanced analytics |
| hdinsight | Hdinsight Hadoop Collect Debug Heap Dump Linux | https://github.com/MicrosoftDocs/azure-docs/commits/main/articles/hdinsight/hdinsight-hadoop-collect-debug-heap-dump-linux.md | description: Enable heap dumps for Apache Hadoop services from Linux-based HDIns Previously updated : 01/02/2020 Last updated : 07/19/2022 # Enable heap dumps for Apache Hadoop services on Linux-based HDInsight To modify the configuration for a service, use the following steps: > [!NOTE] > The entries for the **Restart** button may be different for other services. -8. Once the services have been restarted, use the **Service Actions** button to **Turn Off Maintenance Mode**. This Ambari to resume monitoring for alerts for the service. +8. Once the services have been restarted, use the **Service Actions** button to **Turn Off Maintenance Mode**. This Ambari to resume monitoring for alerts for the service. |
| hdinsight | Hdinsight Hadoop Script Actions Linux | https://github.com/MicrosoftDocs/azure-docs/commits/main/articles/hdinsight/hdinsight-hadoop-script-actions-linux.md | Title: Develop script actions to customize Azure HDInsight clusters description: Learn how to use Bash scripts to customize HDInsight clusters. Script actions allow you to run scripts during or after cluster creation to change cluster configuration settings or install additional software. Previously updated : 11/28/2019 Last updated : 07/19/2022 # Script action development with HDInsight Replace `INFILE` with the file containing the BOM. `OUTFILE` should be a new fil * Learn how to [Customize HDInsight clusters using script action](hdinsight-hadoop-customize-cluster-linux.md) * Use the [HDInsight .NET SDK reference](/dotnet/api/overview/azure/hdinsight) to learn more about creating .NET applications that manage HDInsight-* Use the [HDInsight REST API](/rest/api/hdinsight/) to learn how to use REST to perform management actions on HDInsight clusters. +* Use the [HDInsight REST API](/rest/api/hdinsight/) to learn how to use REST to perform management actions on HDInsight clusters. |
| hdinsight | Apache Hive Warehouse Connector | https://github.com/MicrosoftDocs/azure-docs/commits/main/articles/hdinsight/interactive-query/apache-hive-warehouse-connector.md | It is important to note that you can view the WLM resource plans from both the c Hive Warehouse Connector needs separate clusters for Spark and Interactive Query workloads. Follow these steps to set up these clusters in Azure HDInsight. +### Supported Cluster types & versions ++| HWC Version | Spark Version | InteractiveQuery Version | +|::|::|| +| v1 | Spark 2.4 \| HDI 4.0 | Interactive Query 3.1 \| HDI 4.0 | +| v2 | Spark 3.1 \| HDI 5.0 | Interactive Query 3.1 \| HDI 5.0 | + ### Create clusters 1. Create an HDInsight Spark **4.0** cluster with a storage account and a custom Azure virtual network. For information on creating a cluster in an Azure virtual network, see [Add HDInsight to an existing virtual network](../../hdinsight/hdinsight-plan-virtual-network-deployment.md#existingvnet). kinit USERNAME * [HWC integration with Apache Zeppelin](./apache-hive-warehouse-connector-zeppelin.md) * [Examples of interacting with Hive Warehouse Connector using Zeppelin, Livy, spark-submit, and pyspark](https://community.hortonworks.com/articles/223626/integrating-apache-hive-with-apache-spark-hive-war.html) * [Submitting Spark Applications via Spark-submit utility](https://spark.apache.org/docs/2.4.0/submitting-applications.html)+* [HWC 1.0 supported APIs](./hive-warehouse-connector-apis.md) +* [HWC 2.0 supported APIs](./hive-warehouse-connector-v2-apis.md) |
| hdinsight | Hive Llap Sizing Guide | https://github.com/MicrosoftDocs/azure-docs/commits/main/articles/hdinsight/interactive-query/hive-llap-sizing-guide.md | Title: HDInsight Interactive Query Cluster(LLAP) sizing guide description: LLAP sizing guide --++ Previously updated : 05/10/2022 Last updated : 07/19/2022 # Azure HDInsight Interactive Query Cluster (Hive LLAP) sizing guide |
| hdinsight | Hive Migration Across Storage Accounts | https://github.com/MicrosoftDocs/azure-docs/commits/main/articles/hdinsight/interactive-query/hive-migration-across-storage-accounts.md | Title: Hive workload migration to new account in Azure Storage description: Hive workload migration to new account in Azure Storage---++ Previously updated : 05/26/2022 Last updated : 07/19/2022 # Hive workload migration to new account in Azure Storage |
| hdinsight | Hive Warehouse Connector Apis | https://github.com/MicrosoftDocs/azure-docs/commits/main/articles/hdinsight/interactive-query/hive-warehouse-connector-apis.md | Title: Hive Warehouse Connector APIs in Azure HDInsight description: Learn about the different APIs of Hive Warehouse Connector.--++ Previously updated : 07/29/2021 Last updated : 07/19/2022 # Hive Warehouse Connector APIs in Azure HDInsight |
| hdinsight | Hive Warehouse Connector V2 Apis | https://github.com/MicrosoftDocs/azure-docs/commits/main/articles/hdinsight/interactive-query/hive-warehouse-connector-v2-apis.md | + + Title: Hive Warehouse Connector 2.0 APIs in Azure HDInsight +description: Learn about how to use HWC 2.0 Supported APIs ++++ Last updated : 07/15/2022+++# Hive Warehouse Connector 2.0 APIs in Azure HDInsight ++This article lists all the APIs supported by Hive warehouse connector 2.0. All the examples shown below are run using spark-shell and hive warehouse connector session. ++How to create Hive warehouse connector session: ++```scala +import com.hortonworks.hwc.HiveWarehouseSession +val hive = HiveWarehouseSession.session(spark).build() +``` ++## Prerequisite ++Complete the [Hive Warehouse Connector setup](./apache-hive-warehouse-connector.md#hive-warehouse-connector-setup) steps. +++## Supported APIs ++- Set the database: + ```scala + hive.setDatabase("<database-name>") + ``` ++- List all databases: + ```scala + hive.showDatabases() + ``` ++- List all tables in the current database + ```scala + hive.showTables() + ``` ++- Describe a table ++ ```scala + // Describes the table <table-name> in the current database + hive.describeTable("<table-name>") + ``` ++ ```scala + // Describes the table <table-name> in <database-name> + hive.describeTable("<database-name>.<table-name>") + ``` ++- Drop a database ++ ```scala + // ifExists and cascade are boolean variables + hive.dropDatabase("<database-name>", ifExists, cascade) + ``` ++- Drop a table in the current database ++ ```scala + // ifExists and purge are boolean variables + hive.dropTable("<table-name>", ifExists, purge) + ``` ++- Create a database + ```scala + // ifNotExists is boolean variable + hive.createDatabase("<database-name>", ifNotExists) + ``` ++- Create a table in current database + ```scala + // Returns a builder to create table + val createTableBuilder = hive.createTable("<table-name>") + ``` ++ Builder for create-table supports only the below operations: ++ ```scala + // Create only if table does not exists already + createTableBuilder = createTableBuilder.ifNotExists() + ``` ++ ```scala + // Add columns + createTableBuilder = createTableBuilder.column("<column-name>", "<datatype>") + ``` ++ ```scala + // Add partition column + createTableBuilder = createTableBuilder.partition("<partition-column-name>", "<datatype>") + ``` + ```scala + // Add table properties + createTableBuilder = createTableBuilder.prop("<key>", "<value>") + ``` + ```scala + // Creates a bucketed table, + // Parameters are numOfBuckets (integer) followed by column names for bucketing + createTableBuilder = createTableBuilder.clusterBy(numOfBuckets, "<column1>", .... , "<columnN>") + ``` ++ ```scala + // Creates the table + createTableBuilder.create() + ``` ++ > [!NOTE] + > This API creates an ORC formatted table at default location. For other features/options or to create table using hive queries, use `executeUpdate` API. +- Read a table ++ ```scala + // Returns a Dataset<Row> that contains data of <table-name> in the current database + hive.table("<table-name>") + ``` ++- Execute DDL commands on HiveServer2 ++ ```scala + // Executes the <hive-query> against HiveServer2 + // Returns true or false if the query succeeded or failed respectively + hive.executeUpdate("<hive-query>") + ``` ++ ```scala + // Executes the <hive-query> against HiveServer2 + // Throws exception, if propagateException is true and query threw excpetion in HiveServer2 + // Returns true or false if the query succeeded or failed respectively + hive.executeUpdate("<hive-query>", propagateException) // propagate exception is boolean value + ``` ++- Execute Hive query and load result in Dataset ++ - Executing query via LLAP daemons. **[Recommended]** + ```scala + // <hive-query> should be a hive query + hive.executeQuery("<hive-query>") + ``` + - Executing query through HiveServer2 via JDBC. ++ Set `spark.datasource.hive.warehouse.smartExecution` to `false` in spark configs before starting spark session to use this API + ```scala + hive.execute("<hive-query>") + ``` ++- Close Hive warehouse connector session + ```scala + // Closes all the open connections and + // release resources/locks from HiveServer2 + hive.close() + ``` ++- Execute Hive Merge query ++ This API creates a Hive merge query of below format ++ ``` + MERGE INTO <current-db>.<target-table> AS <targetAlias> USING <source expression/table> AS <sourceAlias> + ON <onExpr> + WHEN MATCHED [AND <updateExpr>] THEN UPDATE SET <nameValuePair1> ... <nameValuePairN> + WHEN MATCHED [AND <deleteExpr>] THEN DELETE + WHEN NOT MATCHED [AND <insertExpr>] THEN INSERT VALUES <value1> ... <valueN> + ``` ++ ```scala + val mergeBuilder = hive.mergeBuilder() // Returns a builder for merge query + ``` + Builder supports the following operations: ++ ```scala + mergeBuilder.mergeInto("<taget-table>", "<targetAlias>") + ``` ++ ```scala + mergeBuilder.using("<source-expression/table>", "<sourceAlias>") + ``` ++ ```scala + mergeBuilder.on("<onExpr>") + ``` ++ ```scala + mergeBuilder.whenMatchedThenUpdate("<updateExpr>", "<nameValuePair1>", ... , "<nameValuePairN>") + ``` ++ ```scala + mergeBuilder.whenMatchedThenDelete("<deleteExpr>") + ``` ++ ```scala + mergeBuilder.whenNotMatchedInsert("<insertExpr>", "<value1>", ... , "<valueN>"); + ``` ++ ```scala + // Executes the merge query + mergeBuilder.merge() + ``` ++- Write a Dataset to Hive Table in batch + ```scala + df.write.format("com.microsoft.hwc.v2") + .option("table", tableName) + .mode(SaveMode.Type) + .save() + ``` + - TableName should be of form `<db>.<table>` or `<table>`. If no database name is provided, the table will searched/created in the current database ++ - SaveMode types are: ++ - Append: Appends the dataset to the given table ++ - Overwrite: Overwrites the data in the given table with dataset ++ - Ignore: Skips write if table already exists, no error thrown ++ - ErrorIfExists: Throws error if table already exists +++- Write a Dataset to Hive Table using HiveStreaming + ```scala + df.write.format("com.microsoft.hwc.v2.batch.stream.write") + .option("database", databaseName) + .option("table", tableName) + .option("metastoreUri", "<HMS_URI>") + // .option("metastoreKrbPrincipal", principal), add if executing in ESP cluster + .save() + + // To write to static partition + df.write.format("com.microsoft.hwc.v2.batch.stream.write") + .option("database", databaseName) + .option("table", tableName) + .option("partition", partition) + .option("metastoreUri", "<HMS URI>") + // .option("metastoreKrbPrincipal", principal), add if executing in ESP cluster + .save() + ``` + > [!NOTE] + > Stream writes always append data. +- Writing a spark stream to a Hive Table + ```scala + stream.writeStream + .format("com.microsoft.hwc.v2") + .option("metastoreUri", "<HMS_URI>") + .option("database", databaseName) + .option("table", tableName) + //.option("partition", partition) , add if inserting data in partition + //.option("metastoreKrbPrincipal", principal), add if executing in ESP cluster + .start() + ``` +## Next steps +* [HWC and Apache Spark operations](./apache-hive-warehouse-connector-operations.md) +* [Use Interactive Query with HDInsight](./apache-interactive-query-get-started.md) +* [HWC integration with Apache Zeppelin](./apache-hive-warehouse-connector-zeppelin.md) +* [Examples of interacting with Hive Warehouse Connector using Zeppelin, Livy, spark-submit, and pyspark](https://community.hortonworks.com/articles/223626/integrating-apache-hive-with-apache-spark-hive-war.html) +* [Submitting Spark Applications via Spark-submit utility](https://spark.apache.org/docs/2.4.0/submitting-applications.html) |
| hdinsight | Hive Workload Management | https://github.com/MicrosoftDocs/azure-docs/commits/main/articles/hdinsight/interactive-query/hive-workload-management.md | |
| hdinsight | Interactive Query Troubleshoot Hive Logs Diskspace Full Headnodes | https://github.com/MicrosoftDocs/azure-docs/commits/main/articles/hdinsight/interactive-query/interactive-query-troubleshoot-hive-logs-diskspace-full-headnodes.md | Title: Troubleshoot Hive logs fill up disk space Azure HDInsight description: This article provides troubleshooting steps to follow when Apache Hive logs are filling up the disk space on the head nodes in Azure HDInsight. -- Previously updated : 03/04/2022++ Last updated : 07/19/2022 # Scenario: Apache Hive logs are filling up the disk space on the head nodes in Azure HDInsight |
| hdinsight | Quickstart Bicep | https://github.com/MicrosoftDocs/azure-docs/commits/main/articles/hdinsight/interactive-query/quickstart-bicep.md | Title: 'Quickstart: Create Interactive Query cluster using Bicep - Azure HDInsight' description: This quickstart shows how to use Bicep to create an Interactive Query cluster in Azure HDInsight.--++ Previously updated : 04/14/2022 Last updated : 07/19/2022 #Customer intent: As a developer new to Interactive Query on Azure, I need to see how to create an Interactive Query cluster. |
| hdinsight | Troubleshoot Workload Management Issues | https://github.com/MicrosoftDocs/azure-docs/commits/main/articles/hdinsight/interactive-query/troubleshoot-workload-management-issues.md | |
| hdinsight | Workload Management Commands | https://github.com/MicrosoftDocs/azure-docs/commits/main/articles/hdinsight/interactive-query/workload-management-commands.md | |
| hdinsight | Apache Spark Connect To Sql Database | https://github.com/MicrosoftDocs/azure-docs/commits/main/articles/hdinsight/spark/apache-spark-connect-to-sql-database.md | Learn how to connect an Apache Spark cluster in Azure HDInsight with Azure SQL D ## Prerequisites * Azure HDInsight Spark cluster. Follow the instructions at [Create an Apache Spark cluster in HDInsight](apache-spark-jupyter-spark-sql.md).- * Azure SQL Database. Follow the instructions at [Create a database in Azure SQL Database](/azure/azure-sql/database/single-database-create-quickstart). Make sure you create a database with the sample **AdventureWorksLT** schema and data. Also, make sure you create a server-level firewall rule to allow your client's IP address to access the SQL database. The instructions to add the firewall rule is available in the same article. Once you've created your SQL database, make sure you keep the following values handy. You need them to connect to the database from a Spark cluster. - * Server name. - * Database name. - * Azure SQL Database admin user name / password. + * Server name. + * Database name. + * Azure SQL Database admin user name / password. + * SQL Server Management Studio (SSMS). Follow the instructions at [Use SSMS to connect and query data](/azure/azure-sql/database/connect-query-ssms). Start by creating a Jupyter Notebook associated with the Spark cluster. You use 1. From the [Azure portal](https://portal.azure.com/), open your cluster. 1. Select **Jupyter Notebook** underneath **Cluster dashboards** on the right side. If you don't see **Cluster dashboards**, select **Overview** from the left menu. If prompted, enter the admin credentials for the cluster. - :::image type="content" source="./media/apache-spark-connect-to-sql-database/hdinsight-spark-cluster-dashboard-jupyter-notebook.png " alt-text="Jupyter Notebook on Apache Spark" border="true"::: - > [!NOTE] + > [!NOTE] > You can also access the Jupyter Notebook on Spark cluster by opening the following URL in your browser. Replace **CLUSTERNAME** with the name of your cluster:- > + > > `https://CLUSTERNAME.azurehdinsight.net/jupyter`- 1. In the Jupyter Notebook, from the top-right corner, click **New**, and then click **Spark** to create a Scala notebook. Jupyter Notebooks on HDInsight Spark cluster also provide the **PySpark** kernel for Python2 applications, and the **PySpark3** kernel for Python3 applications. For this article, we create a Scala notebook. - :::image type="content" source="./media/apache-spark-connect-to-sql-database/kernel-jupyter-notebook-on-spark.png " alt-text="Kernels for Jupyter Notebook on Spark" border="true"::: - For more information about the kernels, see [Use Jupyter Notebook kernels with Apache Spark clusters in HDInsight](apache-spark-jupyter-notebook-kernels.md). +For more information about the kernels, see [Use Jupyter Notebook kernels with Apache Spark clusters in HDInsight](apache-spark-jupyter-notebook-kernels.md). - > [!NOTE] - > In this article, we use a Spark (Scala) kernel because streaming data from Spark into SQL Database is only supported in Scala and Java currently. Even though reading from and writing into SQL can be done using Python, for consistency in this article, we use Scala for all three operations. +> [!NOTE] +> In this article, we use a Spark (Scala) kernel because streaming data from Spark into SQL Database is only supported in Scala and Java currently. Even though reading from and writing into SQL can be done using Python, for consistency in this article, we use Scala for all three operations. 1. A new notebook opens with a default name, **Untitled**. Click the notebook name and enter a name of your choice. - :::image type="content" source="./media/apache-spark-connect-to-sql-database/hdinsight-spark-jupyter-notebook-name.png " alt-text="Provide a name for the notebook" border="true"::: + :::image type="content" source="./media/apache-spark-connect-to-sql-database/new-hdinsight-spark-jupyter-notebook-name.png " alt-text="Provide a name for the notebook" border="true"::: -You can now start creating your application. + You can now start creating your application. ## Read data from Azure SQL Database In this section, you read data from a table (for example, **SalesLT.Address**) t 1. In a new Jupyter Notebook, in a code cell, paste the following snippet and replace the placeholder values with the values for your database. - ```scala - // Declare the values for your database -- val jdbcUsername = "<SQL DB ADMIN USER>" - val jdbcPassword = "<SQL DB ADMIN PWD>" - val jdbcHostname = "<SQL SERVER NAME HOSTING SDL DB>" //typically, this is in the form or servername.database.windows.net - val jdbcPort = 1433 - val jdbcDatabase ="<AZURE SQL DB NAME>" - ``` + ```scala + // Declare the values for your database + + val jdbcUsername = "<SQL DB ADMIN USER>" + val jdbcPassword = "<SQL DB ADMIN PWD>" + val jdbcHostname = "<SQL SERVER NAME HOSTING SDL DB>" //typically, this is in the form or servername.database.windows.net + val jdbcPort = 1433 + val jdbcDatabase ="<AZURE SQL DB NAME>" + ``` Press **SHIFT + ENTER** to run the code cell. - 1. Use the snippet below to build a JDBC URL that you can pass to the Spark dataframe APIs. The code creates a `Properties` object to hold the parameters. Paste the snippet in a code cell and press **SHIFT + ENTER** to run. - ```scala - import java.util.Properties -- val jdbc_url = s"jdbc:sqlserver://${jdbcHostname}:${jdbcPort};database=${jdbcDatabase};encrypt=true;trustServerCertificate=false;hostNameInCertificate=*.database.windows.net;loginTimeout=60;" - val connectionProperties = new Properties() - connectionProperties.put("user", s"${jdbcUsername}") - connectionProperties.put("password", s"${jdbcPassword}") - ``` + ```scala + import java.util.Properties + + val jdbc_url = s"jdbc:sqlserver://${jdbcHostname}:${jdbcPort};database=${jdbcDatabase};encrypt=true;trustServerCertificate=false;hostNameInCertificate=*.database.windows.net;loginTimeout=60;" + val connectionProperties = new Properties() + connectionProperties.put("user", s"${jdbcUsername}") + connectionProperties.put("password", s"${jdbcPassword}") + ``` 1. Use the snippet below to create a dataframe with the data from a table in your database. In this snippet, we use a `SalesLT.Address` table that is available as part of the **AdventureWorksLT** database. Paste the snippet in a code cell and press **SHIFT + ENTER** to run. - ```scala - val sqlTableDF = spark.read.jdbc(jdbc_url, "SalesLT.Address", connectionProperties) - ``` + ```scala + val sqlTableDF = spark.read.jdbc(jdbc_url, "SalesLT.Address", connectionProperties) + ``` 1. You can now do operations on the dataframe, such as getting the data schema: - ```scala - sqlTableDF.printSchema - ``` + ```scala + sqlTableDF.printSchema + ``` You see an output similar to the following image: In this section, you read data from a table (for example, **SalesLT.Address**) t 1. You can also do operations like, retrieve the top 10 rows. - ```scala - sqlTableDF.show(10) - ``` + ```scala + sqlTableDF.show(10) + ``` 1. Or, retrieve specific columns from the dataset. - ```scala - sqlTableDF.select("AddressLine1", "City").show(10) - ``` + ```scala + sqlTableDF.select("AddressLine1", "City").show(10) + ``` ## Write data into Azure SQL Database In this section, we use a sample CSV file available on the cluster to create a t 1. In a new Jupyter Notebook, in a code cell, paste the following snippet and replace the placeholder values with the values for your database. - ```scala - // Declare the values for your database -- val jdbcUsername = "<SQL DB ADMIN USER>" - val jdbcPassword = "<SQL DB ADMIN PWD>" - val jdbcHostname = "<SQL SERVER NAME HOSTING SDL DB>" //typically, this is in the form or servername.database.windows.net - val jdbcPort = 1433 - val jdbcDatabase ="<AZURE SQL DB NAME>" - ``` + ```scala + // Declare the values for your database + + val jdbcUsername = "<SQL DB ADMIN USER>" + val jdbcPassword = "<SQL DB ADMIN PWD>" + val jdbcHostname = "<SQL SERVER NAME HOSTING SDL DB>" //typically, this is in the form or servername.database.windows.net + val jdbcPort = 1433 + val jdbcDatabase ="<AZURE SQL DB NAME>" + ``` Press **SHIFT + ENTER** to run the code cell. - 1. The following snippet builds a JDBC URL that you can pass to the Spark dataframe APIs. The code creates a `Properties` object to hold the parameters. Paste the snippet in a code cell and press **SHIFT + ENTER** to run. - ```scala - import java.util.Properties -- val jdbc_url = s"jdbc:sqlserver://${jdbcHostname}:${jdbcPort};database=${jdbcDatabase};encrypt=true;trustServerCertificate=false;hostNameInCertificate=*.database.windows.net;loginTimeout=60;" - val connectionProperties = new Properties() - connectionProperties.put("user", s"${jdbcUsername}") - connectionProperties.put("password", s"${jdbcPassword}") - ``` + ```scala + import java.util.Properties + + val jdbc_url = s"jdbc:sqlserver://${jdbcHostname}:${jdbcPort};database=${jdbcDatabase};encrypt=true;trustServerCertificate=false;hostNameInCertificate=*.database.windows.net;loginTimeout=60;" + val connectionProperties = new Properties() + connectionProperties.put("user", s"${jdbcUsername}") + connectionProperties.put("password", s"${jdbcPassword}") + ``` 1. Use the following snippet to extract the schema of the data in HVAC.csv and use the schema to load the data from the CSV in a dataframe, `readDf`. Paste the snippet in a code cell and press **SHIFT + ENTER** to run. - ```scala - val userSchema = spark.read.option("header", "true").csv("wasbs:///HdiSamples/HdiSamples/SensorSampleData/hvac/HVAC.csv").schema - val readDf = spark.read.format("csv").schema(userSchema).load("wasbs:///HdiSamples/HdiSamples/SensorSampleData/hvac/HVAC.csv") - ``` + ```scala + val userSchema = spark.read.option("header", "true").csv("wasbs:///HdiSamples/HdiSamples/SensorSampleData/hvac/HVAC.csv").schema + val readDf = spark.read.format("csv").schema(userSchema).load("wasbs:///HdiSamples/HdiSamples/SensorSampleData/hvac/HVAC.csv") + ``` 1. Use the `readDf` dataframe to create a temporary table, `temphvactable`. Then use the temporary table to create a hive table, `hvactable_hive`. - ```scala - readDf.createOrReplaceTempView("temphvactable") - spark.sql("create table hvactable_hive as select * from temphvactable") - ``` + ```scala + readDf.createOrReplaceTempView("temphvactable") + spark.sql("create table hvactable_hive as select * from temphvactable") + ``` 1. Finally, use the hive table to create a table in your database. The following snippet creates `hvactable` in Azure SQL Database. - ```scala - spark.table("hvactable_hive").write.jdbc(jdbc_url, "hvactable", connectionProperties) - ``` + ```scala + spark.table("hvactable_hive").write.jdbc(jdbc_url, "hvactable", connectionProperties) + ``` 1. Connect to the Azure SQL Database using SSMS and verify that you see a `dbo.hvactable` there. In this section, we use a sample CSV file available on the cluster to create a t 1. Run a query in SSMS to see the columns in the table. - ```sql - SELECT * from hvactable - ``` + ```sql + SELECT * from hvactable + ``` ## Stream data into Azure SQL Database In this section, we stream data into the `hvactable` that you created in the pre 1. As a first step, make sure there are no records in the `hvactable`. Using SSMS, run the following query on the table. - ```sql - TRUNCATE TABLE [dbo].[hvactable] - ``` -+ ```sql + TRUNCATE TABLE [dbo].[hvactable] + ``` 1. Create a new Jupyter Notebook on the HDInsight Spark cluster. In a code cell, paste the following snippet and then press **SHIFT + ENTER**: - ```scala - import org.apache.spark.sql._ - import org.apache.spark.sql.types._ - import org.apache.spark.sql.functions._ - import org.apache.spark.sql.streaming._ - import java.sql.{Connection,DriverManager,ResultSet} - ``` + ```scala + import org.apache.spark.sql._ + import org.apache.spark.sql.types._ + import org.apache.spark.sql.functions._ + import org.apache.spark.sql.streaming._ + import java.sql.{Connection,DriverManager,ResultSet} + ``` 1. We stream data from the **HVAC.csv** into the `hvactable`. HVAC.csv file is available on the cluster at `/HdiSamples/HdiSamples/SensorSampleData/HVAC/`. In the following snippet, we first get the schema of the data to be streamed. Then, we create a streaming dataframe using that schema. Paste the snippet in a code cell and press **SHIFT + ENTER** to run. - ```scala - val userSchema = spark.read.option("header", "true").csv("wasbs:///HdiSamples/HdiSamples/SensorSampleData/hvac/HVAC.csv").schema - val readStreamDf = spark.readStream.schema(userSchema).csv("wasbs:///HdiSamples/HdiSamples/SensorSampleData/hvac/") - readStreamDf.printSchema - ``` + ```scala + val userSchema = spark.read.option("header", "true").csv("wasbs:///HdiSamples/HdiSamples/SensorSampleData/hvac/HVAC.csv").schema + val readStreamDf = spark.readStream.schema(userSchema).csv("wasbs:///HdiSamples/HdiSamples/SensorSampleData/hvac/") + readStreamDf.printSchema + ``` 1. The output shows the schema of **HVAC.csv**. The `hvactable` has the same schema as well. The output lists the columns in the table. In this section, we stream data into the `hvactable` that you created in the pre 1. Finally, use the following snippet to read data from the HVAC.csv and stream it into the `hvactable` in your database. Paste the snippet in a code cell, replace the placeholder values with the values for your database, and then press **SHIFT + ENTER** to run. - ```scala - val WriteToSQLQuery = readStreamDf.writeStream.foreach(new ForeachWriter[Row] { - var connection:java.sql.Connection = _ - var statement:java.sql.Statement = _ -- val jdbcUsername = "<SQL DB ADMIN USER>" - val jdbcPassword = "<SQL DB ADMIN PWD>" - val jdbcHostname = "<SQL SERVER NAME HOSTING SDL DB>" //typically, this is in the form or servername.database.windows.net - val jdbcPort = 1433 - val jdbcDatabase ="<AZURE SQL DB NAME>" - val driver = "com.microsoft.sqlserver.jdbc.SQLServerDriver" - val jdbc_url = s"jdbc:sqlserver://${jdbcHostname}:${jdbcPort};database=${jdbcDatabase};encrypt=true;trustServerCertificate=false;hostNameInCertificate=*.database.windows.net;loginTimeout=30;" -- def open(partitionId: Long, version: Long):Boolean = { - Class.forName(driver) - connection = DriverManager.getConnection(jdbc_url, jdbcUsername, jdbcPassword) - statement = connection.createStatement - true - } -- def process(value: Row): Unit = { - val Date = value(0) - val Time = value(1) - val TargetTemp = value(2) - val ActualTemp = value(3) - val System = value(4) - val SystemAge = value(5) - val BuildingID = value(6) -- val valueStr = "'" + Date + "'," + "'" + Time + "'," + "'" + TargetTemp + "'," + "'" + ActualTemp + "'," + "'" + System + "'," + "'" + SystemAge + "'," + "'" + BuildingID + "'" - statement.execute("INSERT INTO " + "dbo.hvactable" + " VALUES (" + valueStr + ")") - } -- def close(errorOrNull: Throwable): Unit = { - connection.close - } - }) -- var streamingQuery = WriteToSQLQuery.start() - ``` + ```scala + val WriteToSQLQuery = readStreamDf.writeStream.foreach(new ForeachWriter[Row] { + var connection:java.sql.Connection = _ + var statement:java.sql.Statement = _ + + val jdbcUsername = "<SQL DB ADMIN USER>" + val jdbcPassword = "<SQL DB ADMIN PWD>" + val jdbcHostname = "<SQL SERVER NAME HOSTING SDL DB>" //typically, this is in the form or servername.database.windows.net + val jdbcPort = 1433 + val jdbcDatabase ="<AZURE SQL DB NAME>" + val driver = "com.microsoft.sqlserver.jdbc.SQLServerDriver" + val jdbc_url = s"jdbc:sqlserver://${jdbcHostname}:${jdbcPort};database=${jdbcDatabase};encrypt=true;trustServerCertificate=false;hostNameInCertificate=*.database.windows.net;loginTimeout=30;" + + def open(partitionId: Long, version: Long):Boolean = { + Class.forName(driver) + connection = DriverManager.getConnection(jdbc_url, jdbcUsername, jdbcPassword) + statement = connection.createStatement + true + } + + def process(value: Row): Unit = { + val Date = value(0) + val Time = value(1) + val TargetTemp = value(2) + val ActualTemp = value(3) + val System = value(4) + val SystemAge = value(5) + val BuildingID = value(6) + + val valueStr = "'" + Date + "'," + "'" + Time + "'," + "'" + TargetTemp + "'," + "'" + ActualTemp + "'," + "'" + System + "'," + "'" + SystemAge + "'," + "'" + BuildingID + "'" + statement.execute("INSERT INTO " + "dbo.hvactable" + " VALUES (" + valueStr + ")") + } + + def close(errorOrNull: Throwable): Unit = { + connection.close + } + }) + + var streamingQuery = WriteToSQLQuery.start() + ``` 1. Verify that the data is being streamed into the `hvactable` by running the following query in SQL Server Management Studio (SSMS). Every time you run the query, it shows the number of rows in the table increasing. - ```sql - SELECT COUNT(*) FROM hvactable - ``` + ```sql + SELECT COUNT(*) FROM hvactable + ``` ## Next steps |
| hdinsight | Troubleshoot Debug Wasb | https://github.com/MicrosoftDocs/azure-docs/commits/main/articles/hdinsight/spark/troubleshoot-debug-wasb.md | Title: Debug WASB file operations in Azure HDInsight description: Describes troubleshooting steps and possible resolutions for issues when interacting with Azure HDInsight clusters. Previously updated : 02/18/2020 Last updated : 07/19/2022 # Debug WASB file operations in Azure HDInsight If you didn't see your problem or are unable to solve your issue, visit one of t * Connect with [@AzureSupport](https://twitter.com/azuresupport) - the official Microsoft Azure account for improving customer experience. Connecting the Azure community to the right resources: answers, support, and experts. -* If you need more help, you can submit a support request from the [Azure portal](https://portal.azure.com/?#blade/Microsoft_Azure_Support/HelpAndSupportBlade/). Select **Support** from the menu bar or open the **Help + support** hub. For more detailed information, review [How to create an Azure support request](../../azure-portal/supportability/how-to-create-azure-support-request.md). Access to Subscription Management and billing support is included with your Microsoft Azure subscription, and Technical Support is provided through one of the [Azure Support Plans](https://azure.microsoft.com/support/plans/). +* If you need more help, you can submit a support request from the [Azure portal](https://portal.azure.com/?#blade/Microsoft_Azure_Support/HelpAndSupportBlade/). Select **Support** from the menu bar or open the **Help + support** hub. For more detailed information, review [How to create an Azure support request](../../azure-portal/supportability/how-to-create-azure-support-request.md). Access to Subscription Management and billing support is included with your Microsoft Azure subscription, and Technical Support is provided through one of the [Azure Support Plans](https://azure.microsoft.com/support/plans/). |
| hdinsight | Apache Storm Deploy Monitor Topology Linux | https://github.com/MicrosoftDocs/azure-docs/commits/main/articles/hdinsight/storm/apache-storm-deploy-monitor-topology-linux.md | description: Learn how to deploy, monitor, and manage Apache Storm topologies us Previously updated : 12/18/2019 Last updated : 07/19/2022 # Deploy and manage Apache Storm topologies on Azure HDInsight |
| healthcare-apis | Dicom Services Overview | https://github.com/MicrosoftDocs/azure-docs/commits/main/articles/healthcare-apis/dicom/dicom-services-overview.md | Title: Overview of the DICOM service - Azure Health Data Services description: In this article, you'll learn concepts of DICOM and the DICOM service.-+ Previously updated : 06/03/2022- Last updated : 07/11/2022+ # Overview of the DICOM service FHIR™ is becoming an important standard for clinical data and provides ext DICOM service needs an Azure subscription to configure and run the required components. These components are, by default, created inside of an existing or new Azure Resource Group to simplify management. Additionally, an Azure Active Directory account is required. For each instance of DICOM service, we create a combination of isolated and multi-tenant resource. +## DICOM server ++The Medical Imaging Server for DICOM (hereby known as DICOM server) is an open source DICOM server that is easily deployed on Azure. It allows standards-based communication with any DICOMwebΓäó enabled systems, and injects DICOM metadata into a FHIR server to create a holistic view of patient data. See [DICOM server](https://github.com/microsoft/dicom-server). + ## Summary This conceptual article provided you with an overview of DICOM and the DICOM service. |
| healthcare-apis | Get Started With Health Data Services | https://github.com/MicrosoftDocs/azure-docs/commits/main/articles/healthcare-apis/get-started-with-health-data-services.md | To ensure that your MedTech service works properly, it must have granted access You can also do the following: - Create a new FHIR service or use an existing one in the same or different workspace - Create a new event hub or use an existing one -- Assign roles to allow the MedTech service to access [Event Hubs](./../healthcare-apis/iot/deploy-iot-connector-in-azure.md#granting-the-medtech-service-access) and [FHIR service](./../healthcare-apis/iot/deploy-iot-connector-in-azure.md#accessing-the-medtech-service-from-the-fhir-service)+- Assign roles to allow the MedTech service to access [Event Hubs](./../healthcare-apis/iot/deploy-iot-connector-in-azure.md#granting-access-to-the-device-message-event-hub) and [FHIR service](./../healthcare-apis/iot/deploy-iot-connector-in-azure.md#granting-access-to-the-fhir-service) - Send data to the event hub, which is associated with the MedTech service For more information, see [Get started with the MedTech service](./../healthcare-apis/iot/get-started-with-iot.md). |
| healthcare-apis | Github Projects | https://github.com/MicrosoftDocs/azure-docs/commits/main/articles/healthcare-apis/github-projects.md | Title: Related GitHub Projects for Azure Health Data Services description: List all Open Source (GitHub) repositories -+ Last updated 06/06/2022-+ # GitHub Projects This solution enables you to transform the data into tabular format as it gets w * [microsoft/healthkit-on-fhir](https://github.com/microsoft/healthkit-on-fhir): a Swift library that automates the export of Apple HealthKit Data to a FHIR Server. +## DICOM service ++The DICOM service provides an open-source [Medical Imaging Server](https://github.com/microsoft/dicom-server) for DICOM that is easily deployed on Azure. It allows standards-based communication with any DICOMwebΓäó enabled systems, and injects DICOM metadata into a FHIR server to create a holistic view of patient data. See [DICOM service](./dicom/get-started-with-dicom.md) for more information. ## Next steps |
| healthcare-apis | Deploy Iot Connector In Azure | https://github.com/MicrosoftDocs/azure-docs/commits/main/articles/healthcare-apis/iot/deploy-iot-connector-in-azure.md | Title: Deploy the MedTech service in the Azure portal - Azure Health Data Services -description: In this article, you'll learn how to deploy the MedTech service in the Azure portal using either a quickstart template or manually. + Title: Deploy the MedTech service using the Azure portal - Azure Health Data Services +description: In this article, you'll learn how to deploy the MedTech service in the Azure portal using either a quickstart template or manual steps. Previously updated : 07/07/2022 Last updated : 07/19/2022 In this quickstart, you'll learn how to deploy the MedTech service in the Azure ## Deploy the MedTech service with a quickstart template -If you already have an active Azure account, you can use this [](https://portal.azure.com/#create/Microsoft.Template/uri/https%3A%2F%2Fraw.githubusercontent.com%2FAzure%2Fazure-quickstart-templates%2Fmaster%2Fquickstarts%2Fmicrosoft.healthcareapis%2Fworkspaces%2Fiotconnectors%2Fazuredeploy.json) button to deploy a MedTech service that will include the following resources and permissions: +If you already have an active Azure account, you can use this [](https://portal.azure.com/#create/Microsoft.Template/uri/https%3A%2F%2Fraw.githubusercontent.com%2FAzure%2Fazure-quickstart-templates%2Fmaster%2Fquickstarts%2Fmicrosoft.healthcareapis%2Fworkspaces%2Fiotconnectors%2Fazuredeploy.json) button to deploy a MedTech service that will include the following resources and roles: * An Azure Event Hubs Namespace and device message Azure event hub (the event hub is named: **devicedata**). * An Azure event hub consumer group (the consumer group is named: **$Default**). * An Azure event hub sender role (the sender role is named: **devicedatasender**). * An Azure Health Data Services workspace. * An Azure Health Data Services FHIR service.- * An Azure Health Data Services MedTech service including the necessary system-assigned [managed identity](../../active-directory/managed-identities-azure-resources/overview.md) permissions to the device message event hub (**Azure Events Hubs Receiver**) and FHIR service (**FHIR Data Writer**). + * An Azure Health Data Services MedTech service including the necessary [system-assigned managed identity](../../active-directory/managed-identities-azure-resources/overview.md) roles to the device message event hub (**Azure Events Hubs Receiver**) and FHIR service (**FHIR Data Writer**). -When the Azure portal launches, the following fields must be filled out: - * **Subscription** - Choose the Azure subscription you would like to use for the deployment. - * **Resource Group** - Choose an existing Resource Group or create a new Resource Group. - * **Region** - The Azure region of the Resource Group used for the deployment. This field will auto-fill based on the Resource Group region. - * **Basename** - Will be used to append the name the Azure services to be deployed. - * **Location** - Use the drop-down list to select a supported Azure region for the Azure Health Data Services (could be the same or different region than your Resource Group). +> [!TIP] +> +> By using the drop down menus, you can find all the values that can be selected. You can also begin to type the value to begin the search for the resource, however, selecting the resource from the drop down menu will ensure that there are no typos. +> +> :::image type="content" source="media\iot-deploy-quickstart-in-portal\display-drop-down-box.png" alt-text="Screenshot of Azure portal page displaying drop down menu example." lightbox="media\iot-deploy-quickstart-in-portal\display-drop-down-box.png"::: +> -Leave the **Device Mapping** and **Destination Mapping** fields with their default values. +1. When the Azure portal launches, the following fields must be filled out: -Select the **Review + create** button once the fields are filled out. + :::image type="content" source="media\iot-deploy-quickstart-in-portal\iot-deploy-quickstart-options.png" alt-text="Screenshot of Azure portal page displaying deployment options for the Azure Health Data Service MedTech service." lightbox="media\iot-deploy-quickstart-in-portal\iot-deploy-quickstart-options.png"::: + * **Subscription** - Choose the Azure subscription you would like to use for the deployment. + * **Resource Group** - Choose an existing Resource Group or create a new Resource Group. + * **Region** - The Azure region of the Resource Group used for the deployment. This field will auto-fill based on the Resource Group region. + * **Basename** - Will be used to append the name the Azure services to be deployed. + * **Location** - Use the drop-down list to select a supported Azure region for the Azure Health Data Services (could be the same or different region than your Resource Group). -After the validation has passed, select the **Create** button to begin the deployment. +2. Leave the **Device Mapping** and **Destination Mapping** fields with their default values. +3. Select the **Review + create** button once the fields are filled out. -After a successful deployment, there will be remaining configurations that will need to be completed by you for a fully functional MedTech service: - * Provide a working device mapping file. For more information, see [How to use device mappings](how-to-use-device-mappings.md). - * Provide a working destination mapping file. For more information, see [How to use FHIR destination mappings](how-to-use-fhir-mappings.md). - * Use the Shared access policies (SAS) key (**devicedatasender**) for connecting your device or application to the MedTech service device message event hub (**devicedata**). For more information, see [Connection string for a specific event hub in a namespace](../../event-hubs/event-hubs-get-connection-string.md#connection-string-for-a-specific-event-hub-in-a-namespace). +4. After the validation has passed, select the **Create** button to begin the deployment. -> [!IMPORTANT] -> If you're going to allow access from multiple services to the device message event hub, it is highly recommended that each service has its own event hub consumer group. -> -> Consumer groups enable multiple consuming applications to each have a separate view of the event stream, and to read the stream independently at their own pace and with their own offsets. For more information, see [Consumer groups](../../event-hubs/event-hubs-features.md#consumer-groups). -> -> Examples: ->* Two MedTech services accessing the same device message event hub. ->* A MedTech service and a storage writer application accessing the same device message event hub. + :::image type="content" source="media\iot-deploy-quickstart-in-portal\iot-deploy-quickstart-create.png" alt-text="Screenshot of Azure portal page displaying validation box and Create button for the Azure Health Data Service MedTech service." lightbox="media\iot-deploy-quickstart-in-portal\iot-deploy-quickstart-create.png"::: ++5. After a successful deployment, there will be remaining configurations that will need to be completed by you for a fully functional MedTech service: + * Provide a working device mapping file. For more information, see [How to use device mappings](how-to-use-device-mappings.md). + * Provide a working destination mapping file. For more information, see [How to use FHIR destination mappings](how-to-use-fhir-mappings.md). + * Use the Shared access policies (SAS) key (**devicedatasender**) for connecting your device or application to the MedTech service device message event hub (**devicedata**). For more information, see [Connection string for a specific event hub in a namespace](../../event-hubs/event-hubs-get-connection-string.md#connection-string-for-a-specific-event-hub-in-a-namespace). ++ > [!IMPORTANT] + > If you're going to allow access from multiple services to the device message event hub, it is highly recommended that each service has its own event hub consumer group. + > + > Consumer groups enable multiple consuming applications to each have a separate view of the event stream, and to read the stream independently at their own pace and with their own offsets. For more information, see [Consumer groups](../../event-hubs/event-hubs-features.md#consumer-groups). + > + > **Examples:** + > * Two MedTech services accessing the same device message event hub. + > * A MedTech service and a storage writer application accessing the same device message event hub. ## Deploy the MedTech service manually ## Prerequisites -It's important that you have the following prerequisites completed before you begin the steps of creating a MedTech service instance in Azure Health Data Services. +It's important that you have the following prerequisites completed before you begin the steps of creating a MedTech service instance in Azure Health Data * [Azure account](https://azure.microsoft.com/free/search/?OCID=AID2100131_SEM_c4b0772dc7df1f075552174a854fd4bc:G:s&ef_id=c4b0772dc7df1f075552174a854fd4bc:G:s&msclkid=c4b0772dc7df1f075552174a854fd4bc) * [Resource group deployed in the Azure portal](../../azure-resource-manager/management/manage-resource-groups-portal.md)-* [Event Hubs namespace and event hub deployed in the Azure portal](../../event-hubs/event-hubs-create.md) +* [Azure Event Hubs namespace and event hub deployed in the Azure portal](../../event-hubs/event-hubs-create.md) * [Workspace deployed in Azure Health Data Services](../healthcare-apis-quickstart.md) * [FHIR service deployed in Azure Health Data Services](../fhir/fhir-portal-quickstart.md) -1. Sign in the [Azure portal](https://portal.azure.com), and then enter your Health Data Services workspace resource name in the **Search** bar field. +> [!TIP] +> +> By using the drop down menus, you can find all the values that can be selected. You can also begin to type the value to begin the search for the resource, however, selecting the resource from the drop down menu will ensure that there are no typos. +> +> :::image type="content" source="media\iot-deploy-quickstart-in-portal\display-drop-down-box.png" alt-text="Screenshot of Azure portal page displaying drop down menu example." lightbox="media\iot-deploy-quickstart-in-portal\display-drop-down-box.png"::: +> ++1. Sign into the [Azure portal](https://portal.azure.com), and then enter your Health Data Services workspace resource name in the **Search** bar field located at the middle top of your screen. The name of the workspace you'll be deploying into will be of your own choosing. For this example deployment of the MedTech service, we'll be using a workspace named `azuredocsdemo`. -  + :::image type="content" source="media\iot-deploy-manual-in-portal\find-workspace-in-portal.png" alt-text="Screenshot of Azure portal and entering the workspace that will be used for the MedTech service deployment." lightbox="media\iot-deploy-manual-in-portal\find-workspace-in-portal.png"::: -2. Select **Deploy MedTech service**. +2. Select the **Deploy MedTech service** button. -  + :::image type="content" source="media\iot-deploy-manual-in-portal\select-deploy-medtech-service-button.png" alt-text="Screenshot of Azure Health Data Services workspace with a red box around the Deploy MedTech service button." lightbox="media\iot-deploy-manual-in-portal\select-deploy-medtech-service-button.png"::: -3. Next, select **Add MedTech service**. +3. Select the **Add MedTech service** button. -  + :::image type="content" source="media\iot-deploy-manual-in-portal\select-add-medtech-service-button.png" alt-text="Screenshot of workspace and red box round the Add MedTech service button." lightbox="media\iot-deploy-manual-in-portal\select-add-medtech-service-button.png"::: ## Configure the MedTech service to ingest data -Under the **Basics** tab, complete the required fields under **Instance details**. +1. Under the **Basics** tab, complete the required fields under **MedTech service details** page section. - + :::image type="content" source="media\iot-deploy-manual-in-portal\deploy-medtech-service-basics.png" alt-text="Screenshot of create MedTech services basics information with red boxes around the required information." lightbox="media\iot-deploy-manual-in-portal\deploy-medtech-service-basics.png"::: -1. Enter the **MedTech service name**. + 1. Enter the **MedTech service name**. - The **MedTech service name** is a friendly name for the MedTech service. Enter a unique name for your MedTech service. As an example, you can name it `healthdemo-iot`. + The **MedTech service name** is a friendly, unique name for your MedTech service. For this example, we'll name the MedTech service `mt-azuredocsdemo`. -2. Enter the **Event Hub name**. + 2. Enter the **Event Hubs Namespace**. - The event hub name is the name of the **Event Hubs Instance** that you've deployed. + The Event Hubs Namespace is the name of the **Event Hubs Namespace** that you've previously deployed. For this example, we'll use `eh-azuredocsdemo` for use with our MedTech service device messages. - For information about Azure Event Hubs, see [Quickstart: Create an event hub using Azure portal](../../event-hubs/event-hubs-create.md#create-an-event-hubs-namespace). + > [!TIP] + > For information about deploying an Azure Event Hubs Namespace, see [Create an Event Hubs Namespace](../../event-hubs/event-hubs-create.md#create-an-event-hubs-namespace). + > + > For more information about Azure Event Hubs Namespaces, see [Namespace](../../event-hubs/event-hubs-features.md?WT.mc_id=Portal-Microsoft_Healthcare_APIs#namespace) in the Features and terminology in Azure Event Hubs document. -3. Enter the **Consumer Group**. + 3. Enter the **Events Hubs name**. - The Consumer Group name is located by using the **Search** bar to go to the Event Hubs instance that you've deployed and by selecting the **Consumer groups** blade. + The Event Hubs name is the event hub that you previously deployed within the Event Hubs Namespace. For this example, we'll use `devicedata` for use with our MedTech service device messages. + + > [!TIP] + > + > For information about deploying an Azure event hub, see [Create an event hub](../../event-hubs/event-hubs-create.md#create-an-event-hub). -  + 4. Enter the **Consumer group**. -> [!IMPORTANT] -> If you're going to allow access from multiple services to the device message event hub, it is highly recommended that each service has its own event hub consumer group. -> -> Consumer groups enable multiple consuming applications to each have a separate view of the event stream, and to read the stream independently at their own pace and with their own offsets. For more information, see [Consumer groups](../../event-hubs/event-hubs-features.md#consumer-groups). -> -> Examples: ->* Two MedTech services accessing the same device message event hub. ->* A MedTech service and a storage writer application accessing the same device message event hub. + The Consumer group name is located by going to the **Overview** page of the Event Hubs Namespace and selecting the event hub to be used for the MedTech service device messages. In this example, the event hub is named `devicedata`. ++ :::image type="content" source="media\iot-deploy-manual-in-portal\select-medtech-service-event-hub.png" alt-text="Screenshot of Event Hubs overview and red box around the event hub to be used for the MedTech service device messages." lightbox="media\iot-deploy-manual-in-portal\select-medtech-service-event-hub.png"::: -4. Enter the name of the **Fully Qualified Namespace**. + 5. Once inside of the event hub, select the **Consumer groups** button under **Entities** to display the name of the consumer group to be used by your MedTech service. - The **Fully Qualified Namespace** is the **Host name** located on your Event Hubs Namespace's **Overview** page. + :::image type="content" source="media\iot-deploy-manual-in-portal\select-event-hub-consumer-groups.png" alt-text="Screenshot of event hub overview and red box around the consumer groups button." lightbox="media\iot-deploy-manual-in-portal\select-event-hub-consumer-groups.png"::: -  + 6. By default, a consumer group named **$Default** is created during the deployment of an event hub. Use this consumer group for your MedTech service deployment. - For more information about Event Hubs Namespaces, see [Namespace](../../event-hubs/event-hubs-features.md?WT.mc_id=Portal-Microsoft_Healthcare_APIs#namespace) in the Features and terminology in Azure Event Hubs document. + :::image type="content" source="media\iot-deploy-manual-in-portal\display-event-hub-consumer-group.png" alt-text="Screenshot of event hub consumer groups with red box around the consumer group to be used with the MedTech service." lightbox="media\iot-deploy-manual-in-portal\display-event-hub-consumer-group.png"::: -5. Select **Next: Device mapping**. + > [!IMPORTANT] + > + > If you're going to allow access from multiple services to the device message event hub, it is highly recommended that each service has its own event hub consumer group. + > + > Consumer groups enable multiple consuming applications to each have a separate view of the event stream, and to read the stream independently at their own pace and with their own offsets. For more information, see [Consumer groups](../../event-hubs/event-hubs-features.md#consumer-groups). + > + > Examples: + > * Two MedTech services accessing the same device message event hub. + > * A MedTech service and a storage writer application accessing the same device message event hub. + +2. Select **Next: Device mapping** button. ++ :::image type="content" source="media\iot-deploy-manual-in-portal\select-device-mapping-button.png" alt-text="Screenshot of MedTech services basics information filled out and a red box around the Device mapping button." lightbox="media\iot-deploy-manual-in-portal\select-device-mapping-button.png"::: ## Configure the Device mapping properties > [!TIP]-> The IoMT Connector Data Mapper is an open source tool to visualize the mapping configuration for normalizing a device's input data, and then transform it to FHIR resources. Developers can use this tool to edit and test Devices and FHIR destination mappings, and to export the data to upload to an MedTech service in the Azure portal. This tool also helps developers understand their device's Device and FHIR destination mapping configurations. >-> For more information, see the open source documentation: +> The IoMT Connector Data Mapper is an open source tool to visualize the mapping configuration for normalizing a device's input data, and then transforming it into FHIR resources. You can use this tool to edit and test Device and FHIR destination mappings, and to export the mappings to be uploaded to a MedTech service in the Azure portal. This tool also helps you understand your device's Device and FHIR destination mapping configurations. +> +> For more information regarding Device mappings, see our GitHub open source and Azure Docs documentation: > > [IoMT Connector Data Mapper](https://github.com/microsoft/iomt-fhir/tree/master/tools/data-mapper) > > [Device Content Mapping](https://github.com/microsoft/iomt-fhir/blob/master/docs/Configuration.md#device-content-mapping)+> +> [How to use Device mappings](how-to-use-device-mappings.md) ++1. Under the **Device mapping** tab, enter the Device mapping JSON code for use with your MedTech service. -1. Under the **Device Mapping** tab, enter the Device mapping JSON code associated with your MedTech service. + :::image type="content" source="media\iot-deploy-manual-in-portal\configure-device-mapping-empty.png" alt-text="Screenshot of empty Device mapping page with red box around required information." lightbox="media\iot-deploy-manual-in-portal\configure-device-mapping-empty.png"::: -  +2. Once Device mapping is configured, select the **Next: Destination >** button to configure the destination properties associated with your MedTech service. -2. Select **Next: Destination >** to configure the destination properties associated with your MedTech service. + :::image type="content" source="media\iot-deploy-manual-in-portal\configure-device-mapping-completed.png" alt-text="Screenshot of Device mapping page and the Destination button with red box around both." lightbox="media\iot-deploy-manual-in-portal\configure-device-mapping-completed.png"::: -## Configure the FHIR destination mapping properties +## Configure Destination properties -Under the **Destination** tab, enter the destination properties associated with the MedTech service. +1. Under the **Destination** tab, enter the destination properties associated with your MedTech service. -  + :::image type="content" source="media\iot-deploy-manual-in-portal\configure-destination-mapping-empty.png" alt-text="Screenshot of Destination mapping page with red box around required information." lightbox="media\iot-deploy-manual-in-portal\configure-destination-mapping-empty.png"::: -1. Enter the Azure Resource ID of the **FHIR service**. + 1. Name of your **FHIR server**. - The **FHIR Server** name (also known as the **FHIR service**) is located by using the **Search** bar to go to the FHIR service that you've deployed and by selecting the **Properties** blade. Copy and paste the **Resource ID** string to the **FHIR Server** text field. + The **FHIR Server** name (also known as the **FHIR service**) is located by using the **Search** bar at the top of the screen to go to the FHIR service that you've deployed and by selecting the **Properties** button. Copy and paste the **Name** string into the **FHIR Server** text field. In this example, the **FHIR Server** name is `fs-azuredocsdemo`. -  + :::image type="content" source="media\iot-deploy-manual-in-portal\get-fhir-service-name.png" alt-text="Screenshot of the FHIR Server properties with a red box around the Properties button and FHIR service name."lightbox="media\iot-deploy-manual-in-portal\get-fhir-service-name.png"::: -2. Enter the **Destination Name**. + 2. Enter the **Destination Name**. - The **Destination Name** is a friendly name for the destination. Enter a unique name for your destination. As an example, you can name it `iotmedicdevice`. + The **Destination Name** is a friendly name for the destination. Enter a unique name for your destination. In this example, the **Destination Name** is `fs-azuredocsdemo`. -3. Select **Create** or **Lookup** for the **Resolution Type**. + 3. Select **Create** or **Lookup** for the **Resolution Type**. > [!NOTE] > For the MedTech service destination to create a valid observation resource in the FHIR service, a device resource and patient resource **must** exist in the FHIR service, so the observation can properly reference the device that created the data, and the patient the data was measured from. There are two modes the MedTech service can use to resolve the device and patient resources. - **Create** + **Create** - The MedTech service destination attempts to retrieve a device resource from the FHIR Server using the device identifier included in the event hub message. It also attempts to retrieve a patient resource from the FHIR service using the patient identifier included in the event hub message. If either resource isn't found, new resources will be created (device, patient, or both) containing just the identifier contained in the event hub message. When you use the **Create** option, both a device identifier and a patient identifier can be configured in the device mapping. In other words, when the MedTech service destination is in **Create** mode, it can function normally **without** adding device and patient resources to the FHIR service. + The MedTech service destination attempts to retrieve a device resource from the FHIR service using the [device identifier](https://www.hl7.org/fhir/device-definitions.html#Device.identifier) included in the normalized message. It also attempts to retrieve a patient resource from the FHIR service using the [patient identifier](https://www.hl7.org/fhir/patient-definitions.html#Patient.identifier) included in the normalized message. If either resource isn't found, new resources will be created (device, patient, or both) containing just the identifier contained in the normalized message. When you use the **Create** option, both a device identifier and a patient identifier can be configured in the device mapping. In other words, when the MedTech service destination is in **Create** mode, it can function normally **without** adding device and patient resources to the FHIR service. - **Lookup** + **Lookup** - The MedTech service destination attempts to retrieve a device resource from the FHIR service using the device identifier included in the event hub message. If the device resource isn't found, an error will occur, and the data won't be processed. For **Lookup** to function properly, a device resource with an identifier matching the device identifier included in the event hub message **must** exist and the device resource **must** have a reference to a patient resource that also exists. In other words, when the MedTech service destination is in the Lookup mode, device and patient resources **must** be added to the FHIR service before data can be processed. + The MedTech service destination attempts to retrieve a device resource from the FHIR service using the device identifier included in the normalized message. If the device resource isn't found, an error will occur, and the data won't be processed. For **Lookup** to function properly, a device resource with an identifier matching the device identifier included in the normalized message **must** exist and the device resource **must** have a reference to a patient resource that also exists. In other words, when the MedTech service destination is in the Lookup mode, device and patient resources **must** be added to the FHIR service before data can be processed. If the MedTech service attempts to look up resources that don't exist on the FHIR service, a **DeviceNotFoundException** and/or a **PatientNotFoundException** error(s) will be generated based on which resources aren't present. - For more information, see the open source documentation [FHIR destination mapping](https://github.com/microsoft/iomt-fhir/blob/master/docs/Configuration.md#fhir-mapping). + > [!TIP] + > + > For more information regarding Destination mappings, see our GitHub and Azure Docs documentation: + > + > [FHIR mapping](https://github.com/microsoft/iomt-fhir/blob/master/docs/Configuration.md#fhir-mapping). + > + > [How to us FHIR destination mappings](how-to-use-fhir-mappings.md) -4. Under **Destination Mapping**, enter the JSON code inside the code editor. +2. Under **Destination Mapping**, enter the JSON code inside the code editor. - For information about the Mapper Tool, see [IoMT Connector Data Mapper Tool](https://github.com/microsoft/iomt-fhir/tree/master/tools/data-mapper). + > [!TIP] + > + > For information about the Mapper Tool, see [IoMT Connector Data Mapper Tool](https://github.com/microsoft/iomt-fhir/tree/master/tools/data-mapper). -5. You may select **Review + create**, or you can select **Next: Tags >** if you want to configure tags. +3. You may select the **Review + create** button, or you can optionally select the **Next: Tags >** button if you want to configure tags. ++ :::image type="content" source="media\iot-deploy-manual-in-portal\configure-destination-mapping-completed.png" alt-text="Screenshot of Destination mapping page with red box around both required information." lightbox="media\iot-deploy-manual-in-portal\configure-destination-mapping-completed.png"::: ## (Optional) Configure Tags Tags are name and value pairs used for categorizing resources. For more information about tags, see [Use tags to organize your Azure resources and management hierarchy](../../azure-resource-manager/management/tag-resources.md). -Under the **Tags** tab, enter the tag properties associated with the MedTech service. +1. Under the **Tags** tab, enter the tag properties associated with the MedTech service. -  + :::image type="content" source="media\iot-deploy-manual-in-portal\optional-create-tags.png" alt-text="Screenshot of optional tags creation page with red box around both required information." lightbox="media\iot-deploy-manual-in-portal\optional-create-tags.png"::: -1. Enter a **Name**. -2. Enter a **Value**. -3. Select **Review + create**. + 1. Enter a **Name**. + 2. Enter a **Value**. ++2. Once you've entered your tag(s), select the **Review + create** button. - You should notice a **Validation success** message like what's shown in the image below. +3. You should notice a **Validation success** message like what's shown in the image below. -  + :::image type="content" source="media\iot-deploy-manual-in-portal\validate-and-review-medtech-service.png" alt-text="Screenshot of validation success and a red box around the Create button." lightbox="media\iot-deploy-manual-in-portal\validate-and-review-medtech-service.png"::: > [!NOTE]+ > > If your MedTech service didn't validate, review the validation failure message, and troubleshoot the issue. It's recommended that you review the properties under each MedTech service tab that you've configured. -4. Next, select **Create**. +## Create your MedTech service - The newly deployed MedTech service will display inside your Azure Resource groups page. +1. Select the **Create** button to begin the deployment of your MedTech service. -  + :::image type="content" source="media\iot-deploy-manual-in-portal\create-medtech-service.png" alt-text="Screenshot of a red box around the Create button for the MedTech service." lightbox="media\iot-deploy-manual-in-portal\create-medtech-service.png"::: - Now that your MedTech service has been deployed, we're going to walk through the steps of assigning permissions to access the event hub and FHIR service. +2. The deployment status of your MedTech service will be displayed. -## Granting the MedTech service access + :::image type="content" source="media\iot-deploy-manual-in-portal\deploy-medtech-service-status.png" alt-text="Screenshot of the MedTech service deployment status and a red box around deployment information." lightbox="media\iot-deploy-manual-in-portal\deploy-medtech-service-status.png"::: -To ensure that your MedTech service works properly, it must have granted access permissions to the event hub and FHIR service. +3. Once your MedTech service is successfully deployed, select the **Go to resource** button to be taken to your MedTech service. -### Accessing the MedTech service from the event hub + :::image type="content" source="media\iot-deploy-manual-in-portal\created-medtech-service.png" alt-text="Screenshot of the MedTech service deployment status and a red box around Go to resource button." lightbox="media\iot-deploy-manual-in-portal\created-medtech-service.png"::: -1. In the **Azure Resource group** list, select the name of your **Event Hubs Namespace**. +4. Now that your MedTech service has been deployed, we're going to walk through the steps of assigning access roles. Your MedTech service's system-assigned managed identity will require access to your device message event hub and your FHIR service. -2. Select the **Access control (IAM)** blade, and then select **+ Add**. + :::image type="content" source="media\iot-deploy-manual-in-portal\display-medtech-service-configurations.png" alt-text="Screenshot of the MedTech service main configuration page." lightbox="media\iot-deploy-manual-in-portal\display-medtech-service-configurations.png"::: -  +## Granting the MedTech service access to the device message event hub and FHIR service -3. Select **Add role assignment**. +To ensure that your MedTech service works properly, it's system-assigned managed identity must be granted access via role assignments to your device message event hub and FHIR service. -  - -4. Select the **Role**, and then select **Azure Event Hubs Data Receiver**. +### Granting access to the device message event hub ++1. In the **Search** bar at the top center of the Azure portal, enter and select the name of your **Event Hubs Namespace** that was previously created for your MedTech service device messages. ++ :::image type="content" source="media\iot-deploy-manual-in-portal\search-for-event-hubs-namespace.png" alt-text="Screenshot of the Azure portal search bar with red box around the search bar and Azure Event Hubs Namespace." lightbox="media\iot-deploy-manual-in-portal\search-for-event-hubs-namespace.png"::: -  +2. Select the **Event Hubs** button under **Entities**. - The Azure Event Hubs Data Receiver role allows the MedTech service that's being assigned this role to receive data from this event hub. + :::image type="content" source="media\iot-deploy-manual-in-portal\select-medtech-service-event-hubs-button.png" alt-text="Screenshot of the MedTech service Azure Event Hubs Namespace with red box around the Event Hubs button." lightbox="media\iot-deploy-manual-in-portal\select-medtech-service-event-hubs-button.png"::: + +3. Select the event hub that will be used for your MedTech service device messages. For this example, the device message event hub is named `devicedata'. - For more information about application roles, see [Authentication & Authorization for Azure Health Data Services](.././authentication-authorization.md). + :::image type="content" source="media\iot-deploy-manual-in-portal\select-event-hub-for-device-messages.png" alt-text="Screenshot of the device message event hub with red box around the Access control (IAM) button." lightbox="media\iot-deploy-manual-in-portal\select-event-hub-for-device-messages.png"::: -5. Select **Assign access to**, and keep the default option selected **User, group, or service principal**. +4. Select the **Access control (IAM)** button. + + :::image type="content" source="media\iot-deploy-manual-in-portal\select-event-hub-access-control-iam-button.png" alt-text="Screenshot of event hub landing page and a red box around the Access control (IAM) button." lightbox="media\iot-deploy-manual-in-portal\select-event-hub-access-control-iam-button.png"::: -6. In the **Select** field, enter the security principal for your MedTech service. +5. Select the **Add role assignment** button. - `<your workspace name>/iotconnectors/<your MedTech service name>` + :::image type="content" source="media\iot-deploy-manual-in-portal\select-event-hub-add-role-assignment-button.png" alt-text="Screenshot of the Access control (IAM) page and a red box around the Add role assignment button." lightbox="media\iot-deploy-manual-in-portal\select-event-hub-add-role-assignment-button.png"::: - When you deploy a MedTech service, it creates a system-assigned managed identity. The system-assigned managed identify name is a concatenation of the workspace name, resource type (that's the MedTech service), and the name of the MedTech service. +6. On the **Add role assignment** page, select the **View** button directly across from the **Azure Event Hubs Data Receiver** role. -7. Select **Save**. + :::image type="content" source="media\iot-deploy-manual-in-portal\event-hub-add-role-assignment-available-roles.png" alt-text="Screenshot of the Access control (IAM) page and a red box around the Azure Event Hubs Data Receiver text and View button." lightbox="media\iot-deploy-manual-in-portal\event-hub-add-role-assignment-available-roles.png"::: - After the role assignment has been successfully added to the event hub, a notification will display a green check mark with the text "Add Role assignment." This message indicates that the MedTech service can now read from the event hub. + The Azure Event Hubs Data Receiver role allows the MedTech service that's being assigned this role to receive device message data from this event hub. -  + > [!TIP] + > For more information about application roles, see [Authentication & Authorization for Azure Health Data Services](.././authentication-authorization.md). -For more information about authoring access to Event Hubs resources, see [Authorize access with Azure Active Directory](../../event-hubs/authorize-access-azure-active-directory.md). +7. Select the **Select role** button. -### Accessing the MedTech service from the FHIR service + :::image type="content" source="media\iot-deploy-manual-in-portal\event-hub-select-role-button.png" alt-text="Screenshot of the Azure Events Hubs Data Receiver role with a red box around the Select role button." lightbox="media\iot-deploy-manual-in-portal\event-hub-select-role-button.png"::: -1. In the **Azure Resource group list**, select the name of your **FHIR service**. - -2. Select the **Access control (IAM)** blade, and then select **+ Add**. +8. Select the **Next** button. ++ :::image type="content" source="media\iot-deploy-manual-in-portal\select-event-hub-roles-next-button.png" alt-text="Screenshot of the Azure Events Hubs Data Receiver role with a red box around the Next button." lightbox="media\iot-deploy-manual-in-portal\select-event-hub-roles-next-button.png"::: ++9. In the **Add role assignment** page, select **Managed identity** next to **Assign access to** and **+ Select members** next to **Members**. ++ :::image type="content" source="media\iot-deploy-manual-in-portal\select-event-hubs-managed-identity-and-members-buttons.png" alt-text="Screenshot of the Add role assignment page with a red box around the Managed identity and + Select members buttons." lightbox="media\iot-deploy-manual-in-portal\select-event-hubs-managed-identity-and-members-buttons.png"::: -3. Select **Add role assignment**. +10. When the **Select managed identities** box opens, under the **Managed identity** box, select **MedTech service,** and find your MedTech service system-assigned managed identity under the **Select** box. Once the system-assigned managed identity for your MedTech service is found, select it, and then select the **Select** button. -  + > [!TIP] + > + > The system-assigned managed identify name for your MedTech service is a concatenation of the workspace name and the name of your MedTech service. + > + > **"your workspace name"/"your MedTech service name"** or **"your workspace name"/iotconnectors/"your MedTech service name"** + > + > For example: + > + > **azuredocsdemo/mt-azuredocsdemo** or **azuredocsdemo/iotconnectors/mt-azuredocsdemo** -4. Select the **Role**, and then select **FHIR Data Writer**. + :::image type="content" source="media\iot-deploy-manual-in-portal\select-medtech-service-mi-for-event-hub-access.png" alt-text="Screenshot of the Select managed identities page with a red box around the Managed identity drop-down box, the selected managed identity and the Select button." lightbox="media\iot-deploy-manual-in-portal\select-medtech-service-mi-for-event-hub-access.png"::: - The FHIR Data Writer role provides read and write access that the MedTech service uses to function. Because the MedTech service is deployed as a separate resource, the FHIR service will receive requests from the MedTech service. If the FHIR service doesnΓÇÖt know who's making the request, or if it doesn't have the assigned role, it will deny the request as unauthorized. +11. On the **Add role assignment** page, select the **Review + assign** button. - For more information about application roles, see [Authentication & Authorization for Azure Health Data Services](.././authentication-authorization.md). + :::image type="content" source="media\iot-deploy-manual-in-portal\select-review-assign-for-event-hub-managed-identity-add.png" alt-text="Screenshot of the Add role assignment page with a red box around the Review + assign button." lightbox="media\iot-deploy-manual-in-portal\select-review-assign-for-event-hub-managed-identity-add.png"::: -5. In the **Select** field, enter the security principal for your MedTech service. +12. On the **Add role assignment** confirmation page, select the **Review + assign** button. - `<your workspace name>/iotconnectors/<your MedTech service name>` + :::image type="content" source="media\iot-deploy-manual-in-portal\select-review-assign-for-event-hub-managed-identity-confirmation.png" alt-text="Screenshot of the Add role assignment confirmation page with a red box around the Review + assign button." lightbox="media\iot-deploy-manual-in-portal\select-review-assign-for-event-hub-managed-identity-confirmation.png"::: -6. Select **Save**. +13. After the role assignment has been successfully added to the event hub, a notification will display on your screen with a green check mark. This notification indicates that your MedTech service can now read from your device message event hub. -  + :::image type="content" source="media\iot-deploy-manual-in-portal\validate-medtech-service-managed-identity-added-to-event-hub.png" alt-text="Screenshot of the MedTech service system-assigned managed identity being successfully granted access to the event hub with a red box around the message." lightbox="media\iot-deploy-manual-in-portal\validate-medtech-service-managed-identity-added-to-event-hub.png"::: - For more information about assigning roles to the FHIR service, see [Configure Azure Role-based Access Control (RBAC)](.././configure-azure-rbac.md). + > [!TIP] + > + > For more information about authorizing access to Event Hubs resources, see [Authorize access with Azure Active Directory](../../event-hubs/authorize-access-azure-active-directory.md). ++### Granting access to the FHIR service ++The steps for granting your MedTech service system-assigned managed identity access to your FHIR service are the same steps that you took to grant access to your device message event hub. The only exception will be that your MedTech service system-assigned managed identity will require **FHIR Data Writer** access versus **Azure Event Hubs Data Receiver**. ++The **FHIR Data Writer** role provides read and write access to your FHIR service, which your MedTech service uses to access or persist data. Because the MedTech service is deployed as a separate resource, the FHIR service will receive requests from the MedTech service. If the FHIR service doesnΓÇÖt know who's making the request, it will deny the request as unauthorized. +++> [!TIP] +> +> For more information about assigning roles to the FHIR service, see [Configure Azure Role-based Access Control (RBAC)](.././configure-azure-rbac.md) +> +> For more information about application roles, see [Authentication & Authorization for Azure Health Data Services](.././authentication-authorization.md). ## Next steps -In this article, you've learned how to deploy a MedTech service in the Azure portal. To learn more about the device and FHIR destination mapping files for the MedTech service, see +In this article, you've learned how to deploy a MedTech service using the Azure portal. To learn more about how to troubleshoot your MedTech service or Frequently Asked Questions (FAQs) about the MedTech service, see ->[!div class="nextstepaction"] ->[How to use Device mappings](how-to-use-device-mappings.md) +> [!div class="nextstepaction"] +> +> [Troubleshoot the MedTech service](iot-troubleshoot-guide.md) >->[How to use FHIR destination mappings](how-to-use-fhir-mappings.md) +> [Frequently asked questions (FAQs) about the MedTech service](iot-connector-faqs.md) FHIR® is a registered trademark of Health Level Seven International, registered in the U.S. Trademark Office and is used with their permission. |
| healthcare-apis | Get Started With Iot | https://github.com/MicrosoftDocs/azure-docs/commits/main/articles/healthcare-apis/iot/get-started-with-iot.md | -# Get started with MedTech service in Azure Health Data Services +# Get started with the MedTech service in the Azure Health Data Services -This article outlines the basic steps to get started with Azure MedTech service in [Azure Health Data Services](../healthcare-apis-overview.md). MedTech service ingests health data from a medical device using Azure Event Hubs service. It then persists the data to the Azure Fast Healthcare Interoperability Resources (FHIR®) service as Observation resources. This data processing procedure makes it possible to link FHIR service Observations to patient and device resources. +This article outlines the basic steps to get started with the Azure MedTech service in the [Azure Health Data Services](../healthcare-apis-overview.md). The MedTech service ingests health data from a medical device using the Azure Event Hubs service. It then persists the data to the Azure Fast Healthcare Interoperability Resources (FHIR®) service as Observation resources. This data processing procedure makes it possible to link FHIR service Observations to patient and device resources. -The following diagram shows the four-step data flow that enables MedTech service to receive data from a device and send it to FHIR service. +The following diagram shows the four-step data flow that enables the MedTech service to receive data from a device and send it to the FHIR service. - Step 1 introduces the subscription and permissions prerequisites needed. -- Step 2 shows how Azure services are provisioned for MedTech services.+- Step 2 shows how Azure services are provisioned for the MedTech services. -- Step 3 represents the flow of data sent from devices to the event hub and MedTech service.+- Step 3 represents the flow of data sent from devices to the event hub and the MedTech service. -- Step 4 demonstrates the path needed to verify data sent to FHIR service. +- Step 4 demonstrates the path needed to verify data sent to the FHIR service. -[](media/get-started-with-iot.png#lightbox) +[](media/iot-get-started/get-started-with-iot.png#lightbox) -Follow these four steps and you'll be able to deploy MedTech service effectively: +Follow these four steps and you'll be able to deploy the MedTech service effectively: -## Step 1: Prerequisites for using Azure Health Data Services +## Step 1: Prerequisites for using the Azure Health Data Services Before you can begin sending data from a device, you need to determine if you have the appropriate Azure subscription and Azure RBAC (Role-Based Access Control) roles. If you already have the appropriate subscription and roles, you can skip this step. -- If you don't have an Azure subscription, see [Subscription decision guide](https://docs.microsoft.com/azure/cloud-adoption-framework/decision-guides/subscriptions/)+- If you don't have an Azure subscription, see [Subscription decision guide](/azure/cloud-adoption-framework/decision-guides/subscriptions/). -- You must have the appropriate RBAC roles for the subscription resources you want to use. The roles required for a user to complete the provisioning would be Contributor AND User Access Administrator OR Owner. The Contributor role allows the user to provision resources, and the User Access Administrator role allows the user to grant access so resources can send data between them. The Owner role can perform both. For more information, see [Azure role-based access control](https://docs.microsoft.com/azure/cloud-adoption-framework/ready/considerations/roles).+- You must have the appropriate RBAC roles for the subscription resources you want to use. The roles required for a user to complete the provisioning would be Contributor AND User Access Administrator OR Owner. The Contributor role allows the user to provision resources, and the User Access Administrator role allows the user to grant access so resources can send data between them. The Owner role can perform both. For more information, see [Azure role-based access control](/azure/cloud-adoption-framework/ready/considerations/roles). ## Step 2: Provision services and obtain permissions -After obtaining the required prerequisites, you must create a workspace and provision instances of Event Hubs service, FHIR service, and MedTech service. You must also give Event Hubs permission to read data from your device and give MedTech service permission to read and write to FHIR service. +After obtaining the required prerequisites, you must create a workspace and provision instances of the Event Hubs service, FHIR service, and MedTech service. You must also give the Event Hubs permission to read data from your device and give the MedTech service permission to read and write to the FHIR service. ### Create a resource group and workspace -You must first create a resource group to contain the deployed instances of workspace, Event Hubs service, FHIR service, and MedTech service. A [workspace](../workspace-overview.md) is required as a container for Azure Health Data Services. After you create a workspace from the [Azure portal](../healthcare-apis-quickstart.md), a FHIR service and MedTech service can be deployed to the workspace. +You must first create a resource group to contain the deployed instances of a workspace, Event Hubs service, FHIR service, and MedTech service. A [workspace](../workspace-overview.md) is required as a container for the Azure Health Data Services. After you create a workspace from the [Azure portal](../healthcare-apis-quickstart.md), a FHIR service and MedTech service can be deployed to the workspace. > [!NOTE]-> There are limits to the number of workspaces and the number of MedTech service instances you can create in each Azure subscription. For more information, see [IoT Connector FAQs](iot-connector-faqs.md). +> There are limits to the number of workspaces and the number of MedTech service instances you can create in each Azure subscription. For more information, see [MedTech service FAQs](iot-connector-faqs.md). ### Provision an Event Hubs instance to a namespace In order to provision an Event Hubs service, an Event Hubs namespace must first be provisioned, because Event Hubs namespaces are logical containers for event hubs. Namespace must be associated with a resource. The event hub and namespace need to be provisioned in the same Azure subscription. For more information, see [Event Hubs](../../event-hubs/event-hubs-create.md). -Once an event hub is provisioned, you must give permission to the event hub to read data from the device. Then, MedTech service can retrieve data from the event hub using a [system-assigned managed identity](../../active-directory/managed-identities-azure-resources/overview.md). This managed identity is assigned an Azure Event Hubs data receiver role. For more information on how to assign the managed-identity role to MedTech service from an Event Hubs service instance, see [Granting MedTech service access](../../healthcare-apis/iot/deploy-iot-connector-in-azure.md#granting-the-medtech-service-access). +Once an event hub is provisioned, you must give permission to the event hub to read data from the device. Then, MedTech service can retrieve data from the event hub using a [system-assigned managed identity](../../active-directory/managed-identities-azure-resources/overview.md). This system-assigned managed identity is assigned the **Azure Event Hubs Data Receiver** role. For more information on how to assign access to the MedTech service from an Event Hubs service instance, see [Granting access to the device message event hub](deploy-iot-connector-in-azure.md#granting-access-to-the-device-message-event-hub). ### Provision a FHIR service instance to the same workspace -You must provision a [FHIR service](../fhir/fhir-portal-quickstart.md) instance in your workspace. MedTech service persists the data to FHIR service store using the system-managed identity. See details on how to assign the role to MedTech service from [FHIR service](../../healthcare-apis/iot/deploy-iot-connector-in-azure.md#accessing-the-medtech-service-from-the-fhir-service). +You must provision a [FHIR service](../fhir/fhir-portal-quickstart.md) instance in your workspace. The MedTech service persists the data to FHIR service store using the system-managed identity. See details on how to assign the role to the MedTech service from the [FHIR service](deploy-iot-connector-in-azure.md#granting-access-to-the-fhir-service). -Once FHIR service is provisioned, you must give MedTech service permission to read and write to FHIR service. This permission enables the data to be persisted in the FHIR service store using system-assigned managed identity. See details on how to assign the role to MedTech service from [FHIR service](../../healthcare-apis/iot/deploy-iot-connector-in-azure.md#accessing-the-medtech-service-from-the-fhir-service). +Once the FHIR service is provisioned, you must give the MedTech service permission to read and write to FHIR service. This permission enables the data to be persisted in the FHIR service store using system-assigned managed identity. See details on how to assign the **FHIR Data Writer** role to the MedTech service from the [FHIR service](deploy-iot-connector-in-azure.md#granting-access-to-the-fhir-service). ++By design, the MedTech service retrieves data from the specified event hub using the system-assigned managed identity. For more information on how to assign the role to the MedTech service from [Event Hubs](deploy-iot-connector-in-azure.md#granting-access-to-the-device-message-event-hub). ### Provision a MedTech service instance in the workspace You must provision a MedTech service instance from the [Azure portal](deploy-iot-connector-in-azure.md) in your workspace. You can make the provisioning process easier and more efficient by automating everything with Azure PowerShell, Azure CLI, or Azure REST API. You can find automation scripts at the [Azure Health Data Services samples](https://github.com/microsoft/healthcare-apis-samples/tree/main/src/scripts) website. +The MedTech service persists the data to the FHIR store using the system-managed identity. See details on how to assign the role to the MedTech service from the [FHIR service](deploy-iot-connector-in-azure.md#granting-access-to-the-fhir-service). + ## Step 3: Send the data When the relevant services are provisioned, you can send event data from the device to MedTech service using an event hub. The event data is routed in the following manner: When the relevant services are provisioned, you can send event data from the dev ## Step 4: Verify the data -If the data isn't mapped or if the mapping isn't authored properly, the data is skipped. If there are no problems with the [device mapping](./how-to-use-device-mappings.md) or the [FHIR destination mapping](./how-to-use-fhir-mappings.md), the data is persisted in the FHIR service. +If the data isn't mapped or if the mapping isn't authored properly, the data is skipped. If there are no problems with the [device mapping](./how-to-use-device-mappings.md) or the [FHIR destination mapping](how-to-use-fhir-mappings.md), the data is persisted in the FHIR service. ### Metrics -You can verify that the data is correctly persisted into FHIR service by using [MedTech service metrics](./how-to-display-metrics.md) in the Azure portal. --FHIR® is a registered trademark of Health Level Seven International, registered in the U.S. Trademark Office and used with their permission. +You can verify that the data is correctly persisted into the FHIR service by using the [MedTech service metrics](how-to-display-metrics.md) in the Azure portal. ## Next steps This article only described the basic steps needed to get started using MedTech service. For information about deploying MedTech service in the workspace, see >[!div class="nextstepaction"]->[Deploy MedTech service in the Azure portal](deploy-iot-connector-in-azure.md) +>[Deploy the MedTech service in the Azure portal](deploy-iot-connector-in-azure.md) ++FHIR® is a registered trademark of Health Level Seven International, registered in the U.S. Trademark Office and is used with their permission. |
| healthcare-apis | Iot Connector Faqs | https://github.com/MicrosoftDocs/azure-docs/commits/main/articles/healthcare-apis/iot/iot-connector-faqs.md | Here are some of the frequently asked questions about the MedTech service. ## MedTech service: The basics -### What are the differences between the Azure API for FHIR MedTech service and the Azure Health Data Services MedTech service? +### What are the differences between the Azure IoT Connector for FHIR and the Azure Health Data Services MedTech service? -Azure Health Data Services MedTech service is the successor to the Azure API for Fast Healthcare Interoperability Resources (FHIR®) MedTech service. +Azure Health Data Services MedTech service is the successor to the Azure IoT Connector for Fast Healthcare Interoperability Resources (FHIR®). -Several improvements have been introduced including customer-hosted device message ingestion endpoints (for example: an Azure Event Hub), the use of Managed Identities, and Azure Role-Based Access Control (Azure RBAC). +Several improvements have been introduced including customer-hosted device message ingestion endpoints (for example: an Azure Event Hubs), the use of a system-assigned managed identity, and Azure role-based access control (Azure RBAC). -### Can I use MedTech service with a different FHIR service other than the Azure Health Data Services FHIR service? +> [!IMPORTANT] +> +> As of September 2022, the IoT Connector feature within the Azure API for FHIR will be retired and replaced with the [MedTech service](../../healthcare-apis/iot/deploy-iot-connector-in-azure.md) for enhanced service quality and functionality. +> +> All new users are directed to deploy and use the MedTech service feature within the Azure Health Data Services. +> For more information about the MedTech service, see [What is the MedTech service?](../../healthcare-apis/iot/iot-connector-overview.md). -No. The Azure Health Data Services MedTech service currently only supports the Azure Health Data Services FHIR service for persistence of data. The open-source version of the MedTech service supports the use of different FHIR services. For more information, see the [Open-source projects](iot-git-projects.md) section. +### Can I use the MedTech service with a different FHIR service other than the Azure Health Data Services FHIR service? ++No. The Azure Health Data Services MedTech service currently only supports the Azure Health Data Services FHIR service for persistence of data. The open-source version of the MedTech service supports the use of different FHIR services. ++For more information, see the [Open-source projects](iot-git-projects.md) section of our documentation. ### What versions of FHIR does the MedTech service support? The MedTech service currently only supports the persistence of [HL7 FHIR® R4](https://www.hl7.org/implement/standards/product_brief.cfm?product_id=491). -### What are the subscription quota limits for MedTech service? +### What are the subscription quota limits for the MedTech service? * 25 MedTech services per Subscription (not adjustable) * 10 MedTech services per workspace (not adjustable) The MedTech service currently only supports the persistence of [HL7 FHIR® R ### Can I use the MedTech service with device messages from Apple®, Google®, or Fitbit® devices? -Yes. MedTech service supports device messages from all these platforms. For more information, see the [Open-source projects](iot-git-projects.md) section. +Yes. The MedTech service supports device messages from all these vendors. ++For more information, see the [Open-source projects](iot-git-projects.md) section of our documentation. ## More frequently asked questions [FAQs about the Azure Health Data Services](../healthcare-apis-faqs.md) Yes. MedTech service supports device messages from all these platforms. For more [FAQs about Azure Health Data Services DICOM service](../dicom/dicom-services-faqs.yml) -(FHIR®) is a registered trademark of [HL7](https://hl7.org/fhir/) and is used with the permission of HL7. +FHIR® is a registered trademark of Health Level Seven International, registered in the U.S. Trademark Office and is used with their permission. |
| healthcare-apis | Iot Connector Overview | https://github.com/MicrosoftDocs/azure-docs/commits/main/articles/healthcare-apis/iot/iot-connector-overview.md | -MedTech service is an optional service of the Azure Health Data Services designed to ingest health data from multiple and disparate Internet of Medical Things (IoMT) devices and persisting the health data in a FHIR service. +The MedTech service is an optional service of the Azure Health Data Services designed to ingest health data from multiple and disparate Internet of Medical Things (IoMT) devices and persisting the health data in a Fast Healthcare Interoperability Resources (FHIR®) service. -MedTech service is important because health data collected from patients and health care consumers can be fragmented from access across multiple systems, device types, and formats. Managing healthcare data can be difficult, however, trying to gain insight from the data can be one of the biggest barriers to population and personal wellness understanding as well as sustaining health. +The MedTech service is important because health data collected from patients and health care consumers can be fragmented from access across multiple systems, device types, and formats. Managing healthcare data can be difficult, however, trying to gain insight from the data can be one of the biggest barriers to population and personal wellness understanding and sustaining health. -MedTech service transforms device data into Fast Healthcare Interoperability Resources (FHIR┬«)-based Observation resources and then persists the transformed messages into Azure Health Data Services FHIR service. Allowing for a unified approach to health data access, standardization, and trend capture enabling the discovery of operational and clinical insights, connecting new device applications, and enabling new research projects. +The MedTech service transforms device data into FHIR-based Observation resources and then persists the transformed messages into the Azure Health Data Services FHIR service. Allowing for a unified approach to health data access, standardization, and trend capture enabling the discovery of operational and clinical insights, connecting new device applications, and enabling new research projects. -Below is an overview of what the MedTech service does after IoMT device data is received. Each step will be further explained in the [MedTech service data flow](./iot-data-flow.md) article. +Below is an overview of what the MedTech service does after IoMT device data is received. Each step will be further explained in the [The MedTech service data flows](./iot-data-flow.md) article. > [!NOTE] > Learn more about [Azure Event Hubs](../../event-hubs/index.yml) use cases, features and architectures. ## Scalable -MedTech service is designed out-of-the-box to support growth and adaptation to the changes and pace of healthcare by using autoscaling features. The service enables developers to modify and extend the capabilities to support additional device mapping template types and FHIR resources. +The MedTech service is designed out-of-the-box to support growth and adaptation to the changes and pace of healthcare by using autoscaling features. The service enables developers to modify and extend the capabilities to support more device mapping template types and FHIR resources. ## Configurable -MedTech service is configured by using [Device](./how-to-use-device-mappings.md) and [FHIR destination](./how-to-use-fhir-mappings.md) mappings. The mappings instruct the filtering and transformation of your IoMT device messages into the FHIR format. +The MedTech service is configured by using [Device](./how-to-use-device-mappings.md) and [FHIR destination](./how-to-use-fhir-mappings.md) mappings. The mappings instruct the filtering and transformation of your IoMT device messages into the FHIR format. The different points for extension are: * Normalization: Health data from disparate devices can be aligned and standardized into a common format to make sense of the data from a unified lens and capture trends. The different points for extension are: ## Extensible -MedTech service may also be used with our [open-source projects](./iot-git-projects.md) for ingesting IoMT device data from the following wearables: +The MedTech service may also be used with our [open-source projects](./iot-git-projects.md) for ingesting IoMT device data from the following wearables: * Fitbit® * Apple® * Google® -MedTech service may also be used with the following Microsoft solutions to provide more functionalities and insights: +The MedTech service may also be used with the following Microsoft solutions to provide more functionalities and insights: * [Azure Machine Learning Service](./iot-connector-machine-learning.md) * [Microsoft Power BI](./iot-connector-power-bi.md) * [Microsoft Teams](./iot-connector-teams.md) ## Secure-MedTech service uses Azure [Resource-based Access Control](../../role-based-access-control/overview.md) and [Managed Identities](../../active-directory/managed-identities-azure-resources/overview.md) for granular security and access control of your MedTech service assets. +The MedTech service uses [Azure role-based access control (Azure RBAC)](../../role-based-access-control/overview.md) and a [system-assigned managed identity](../../active-directory/managed-identities-azure-resources/overview.md) for granular security and access control of your MedTech service assets. ## Next steps -For more information about MedTech service data flow, see +In this article, you learned about the MedTech service. To learn about the MedTech service data flows and how to deploy the MedTech service in the Azure portal, see >[!div class="nextstepaction"]->[MedTech service data flow](./iot-data-flow.md) --For more information about deploying MedTech service, see +>[The MedTech service data flows](./iot-data-flow.md) >[!div class="nextstepaction"]->[Deploying MedTech service in the Azure portal](./deploy-iot-connector-in-azure.md) +>[Deploy the MedTech service using the Azure portal](./deploy-iot-connector-in-azure.md) -(FHIR®) is a registered trademark of [HL7](https://hl7.org/fhir/) and is used with the permission of HL7. +FHIR® is a registered trademark of Health Level Seven International, registered in the U.S. Trademark Office and is used with their permission. |
| healthcare-apis | Iot Data Flow | https://github.com/MicrosoftDocs/azure-docs/commits/main/articles/healthcare-apis/iot/iot-data-flow.md | Title: Data flow in the MedTech service - Azure Health Data Services -description: Understand MedTech service's data flow. MedTech service ingests, normalizes, groups, transforms, and persists IoMT data to FHIR service. + Title: Data flows in the MedTech service - Azure Health Data Services +description: Understand the MedTech service's data flows. The MedTech service ingests, normalizes, groups, transforms, and persists IoMT data to FHIR service. Previously updated : 03/25/2022 Last updated : 07/19/2022 -# MedTech service data flow +# The MedTech service data flows -This article provides an overview of the MedTech service data flow. You'll learn about the different data processing stages within the MedTech service that transforms device data into Fast Healthcare Interoperability Resources (FHIR®)-based [Observation](https://www.hl7.org/fhir/observation.html) resources. +This article provides an overview of the MedTech service data flows. You'll learn about the different data processing stages within the MedTech service that transforms device data into Fast Healthcare Interoperability Resources (FHIR®)-based [Observation](https://www.hl7.org/fhir/observation.html) resources. Data from health-related devices or medical devices flows through a path in which the MedTech service transforms data into FHIR, and then data is stored on and accessed from the FHIR service. The health data path follows these steps in this order: ingest, normalize, group, transform, and persist. In this data flow, health data is retrieved from the device in the first step of ingestion. After the data is received, it's processed or normalized per user-selected or user-created schema templates, so that the health data is simpler to process and can be grouped. Health data is grouped into three Operate parameters. After the health data is normalized and grouped, it can be processed or transformed through FHIR destination mappings, and then saved or persisted on the FHIR service. -This article goes into more depth about each step in the data flow. The next steps are [how to deploy the MedTech service](deploy-iot-connector-in-azure.md) by using Device mappings (the normalization step) and FHIR destination mappings (the transform step). +This article goes into more depth about each step in the data flow. The next steps are [Deploy the MedTech service using the Azure portal](deploy-iot-connector-in-azure.md) by using Device mappings (the normalization step) and FHIR destination mappings (the transformation step). -The next sections describe the stages that IoMT (Internet of Medical Things) data goes through once received from an event hub and into the MedTech service. +This next section of the article describes the stages that IoMT (Internet of Medical Things) data goes through once received from an event hub and into the MedTech service. ## Ingest Ingest is the first stage where device data is received into the MedTech service. The ingestion endpoint for device data is hosted on an [Azure Event Hubs](../../event-hubs/index.yml). Azure Event Hubs platform supports high scale and throughput with ability to receive and process millions of messages per second. It also enables the MedTech service to consume messages asynchronously, removing the need for devices to wait while device data gets processed. Once the Observation FHIR resource is generated in the Transform stage, the reso ## Next steps -Learn how to create Device and FHIR destination mappings. +To learn how to create Device and FHIR destination mappings, see > [!div class="nextstepaction"] > [Device mappings](how-to-use-device-mappings.md) Learn how to create Device and FHIR destination mappings. > [!div class="nextstepaction"] > [FHIR destination mappings](how-to-use-fhir-mappings.md) -(FHIR®) is a registered trademark of [HL7](https://hl7.org/fhir/) and is used with the permission of HL7. +FHIR® is a registered trademark of Health Level Seven International, registered in the U.S. Trademark Office and is used with their permission. |
| iot-central | Howto Map Data | https://github.com/MicrosoftDocs/azure-docs/commits/main/articles/iot-central/core/howto-map-data.md | To create a mapping in your IoT Central application, choose one of the following :::image type="content" source="media/howto-map-data/raw-data.png" alt-text="Screenshot that shows the **Add alias** option on the **Raw data** view."::: -The left-hand side of the **Map data** panel shows the latest message from your device. Hover to mouse pointer over any part of the data and select **Add Alias**. The JSONPath expression is copied to **JSON path**. Add an **Alias** name with no more than 64 characters. Add as many mappings as you need and then select **Save**: +The left-hand side of the **Map data** panel shows the latest message from your device. Hover to mouse pointer over any part of the data and select **Add Alias**. The JSONPath expression is copied to **JSON path**. Add an **Alias** name with no more than 64 characters. You can't use the alias to refer to a field in a complex object defined in the device template. ++Add as many mappings as you need and then select **Save**: :::image type="content" source="media/howto-map-data/map-data.png" alt-text="Screenshot of the **Map data** view showing the Json path and alias."::: |
| iot-edge | Tutorial Configure Est Server | https://github.com/MicrosoftDocs/azure-docs/commits/main/articles/iot-edge/tutorial-configure-est-server.md | On the IoT Edge device, update the IoT Edge configuration file to use device cer default = "https://localhost:8085/.well-known/est" ``` + > [!NOTE] + > In this example, IoT Edge uses username and password to authenticate to the EST server *everytime* it needs to obtain a certificate. This method isn't recommended in production because 1) it requires storing a secret in plaintext and 2) IoT Edge should use an identity certificate to authenticate to the EST server too. To modify for production: + > + > 1. Consider using long-lived *bootstrap certificates* that can be stored onto the device during manufacturing [similar to the recommended approach for DPS](../iot-hub/iot-hub-x509ca-concept.md). To see how to configure bootstrap certificate for EST server, see [Authenticate a Device Using Certificates Issued Dynamically via EST](https://github.com/Azure/iotedge/blob/main/edgelet/doc/est.md). + > 1. Configure `[cert_issuance.est.identity_auto_renew]` using the [same syntax](https://github.com/Azure/iotedge/blob/39b5c1ffee47235549fdf628591853a8989af989/edgelet/contrib/config/linux/template.toml#L232) as the provisioning certificate auto-renew configuration above. + > + > This way, IoT Edge certificate service uses the bootstrap certificate for initial authentication with EST server, and requests an identity certificate for future EST requests to the same server. If, for some reason, the EST identity certificate expires before renewal, IoT Edge falls back to using the bootstrap certificate. + 1. Run `sudo iotedge config apply` to apply the new settings. 1. Run `sudo iotedge check` to verify your IoT Edge device configuration. All **configuration checks** should succeed. For this tutorial, you can ignore production readiness errors and warnings, DNS server warnings, and connectivity checks. You can immediately reissue the device identity certificates by removing the exi You should notice the certificate **Validity** date range has changed. -The following are optional other ways you can test certificate renewal. These checks demonstrate how DPS renews certificates when a device is reprovisioned or after certificate expiration. After each test, you can verify new thumbprints in the Azure portal and use `openssl` command to verify the new certificate. +The following are optional other ways you can test certificate renewal. These checks demonstrate how IoT Edge renews certificates from the EST server when they expire or are missing. After each test, you can verify new thumbprints in the Azure portal and use `openssl` command to verify the new certificate. -1. Try deleting the device from IoT Hub. DPS reprovisions the device in a few minutes with a new certificate and thumbprints. -1. Try running `sudo iotedge system reprovision` on the device. DPS reprovisions the device in a few minutes with a new certificate and thumbprints. 1. Try waiting a day for the certificate to expire. The test EST server is configured to create certificates that expire after one day. IoT Edge automatically renews the certificate.+1. Try adjusting the percentage in `threshold` for auto renewal set in `config.toml` (currently set to 80% in the example configuration). For example, set it to `10%` and observe the certificate renewal every ~2 hours. +1. Try adjusting the `threshold` to an integer followed by `m` (minutes). For example, set it to `60m` and observe certificate renewal 1 hours before expiry. ## Clean up resources You can keep the resources and configurations that you created in this tutorial ## Next steps +* To use EST server to issue Edge CA certificates, see [example configuration](https://github.com/Azure/iotedge/blob/main/edgelet/doc/est.md#edge-ca-certificate). * Using username and password to bootstrap authentication to EST server isn't recommended for production. Instead, consider using long-lived *bootstrap certificates* that can be stored onto the device during manufacturing [similar to the recommended approach for DPS](../iot-hub/iot-hub-x509ca-concept.md). To see how to configure bootstrap certificate for EST server, see [Authenticate a Device Using Certificates Issued Dynamically via EST](https://github.com/Azure/iotedge/blob/main/edgelet/doc/est.md).-* To use EST server to issue IoT Edge CA certificates, see [example configuration](https://github.com/Azure/iotedge/blob/main/edgelet/doc/est.md#edge-ca-certificate). * EST server can be used to issue certificates for all devices in a hierarchy as well. Depending on if you have ISA-95 requirements, it may be necessary to run a chain of EST servers with one at every layer or use the API proxy module to forward the requests. To learn more, see [Kevin's blog](https://kevinsaye.wordpress.com/2021/07/21/deep-dive-creating-hierarchies-of-azure-iot-edge-devices-isa-95-part-3/). * For enterprise grade solutions, consider: [GlobalSign IoT Edge Enroll](https://www.globalsign.com/en/iot-edge-enroll) or [DigiCert IoT Device Manager](https://www.digicert.com/iot/iot-device-manager) * To learn more about certificates, see [Understand how Azure IoT Edge uses certificates](iot-edge-certs.md). |
| key-vault | How To Integrate Certificate Authority | https://github.com/MicrosoftDocs/azure-docs/commits/main/articles/key-vault/certificates/how-to-integrate-certificate-authority.md | Title: Integrating Key Vault with DigiCert certificate authority description: This article describes how to integrate Key Vault with DigiCert certificate authority so you can provision, manage, and deploy certificates for your network. -+ tags: azure-resource-manager Last updated 01/24/2022-+ |
| key-vault | Soft Delete Change | https://github.com/MicrosoftDocs/azure-docs/commits/main/articles/key-vault/general/soft-delete-change.md | -If a secret is deleted and the key vault does not have soft-delete protection, it is deleted permanently. Although users can currently opt out of soft-delete during key vault creation, this ability is depreciated. **In February 2025, Microsoft will enable soft-delete protection on all key vaults, and users will no longer be able to opt out of or turn off soft-delete.** This will protect secrets from accidental or malicious deletion by a user. +If a secret is deleted and the key vault does not have soft-delete protection, it is deleted permanently. Although users can currently opt out of soft-delete during key vault creation, this ability is deprecated. **In February 2025, Microsoft will enable soft-delete protection on all key vaults, and users will no longer be able to opt out of or turn off soft-delete.** This will protect secrets from accidental or malicious deletion by a user. :::image type="content" source="../media/softdeletediagram.png" alt-text="Diagram showing how a key vault is deleted with soft-delete protection versus without soft-delete protection."::: |
| key-vault | How To Configure Key Rotation | https://github.com/MicrosoftDocs/azure-docs/commits/main/articles/key-vault/keys/how-to-configure-key-rotation.md | Title: Configure key auto-rotation in Azure Key Vault + Title: Configure cryptographic key auto-rotation in Azure Key Vault description: Use this guide to learn how to configure automated the rotation of a key in Azure Key Vault -# Configure key auto-rotation in Azure Key Vault +# Configure cryptographic key auto-rotation in Azure Key Vault ## Overview+Automated cryptographic key rotation in [Key Vault](../general/overview.md) allows users to configure Key Vault to automatically generate a new key version at a specified frequency. To configure roation you can use key rotation policy, which can be defined on each individual key. -Automated key rotation in [Key Vault](../general/overview.md) allows users to configure Key Vault to automatically generate a new key version at a specified frequency. For more information about how keys are versioned, see [Key Vault objects, identifiers, and versioning](../general/about-keys-secrets-certificates.md#objects-identifiers-and-versioning). +Our recommendation is to rotate encryption keys at least every two years to meet cryptographic best practices. -You can use rotation policy to configure rotation for each individual key. Our recommendation is to rotate encryption keys at least every two years to meet cryptographic best practices. +For more information about objects in Key Vault are versioned, see [Key Vault objects, identifiers, and versioning](../general/about-keys-secrets-certificates.md#objects-identifiers-and-versioning). +## Integarion with Azure services This feature enables end-to-end zero-touch rotation for encryption at rest for Azure services with customer-managed key (CMK) stored in Azure Key Vault. Please refer to specific Azure service documentation to see if the service covers end-to-end rotation. For more information about data encryption in Azure, see: There's an additional cost per scheduled key rotation. For more information, see Key Vault key rotation feature requires key management permissions. You can assign a "Key Vault Crypto Officer" role to manage rotation policy and on-demand rotation. -For more information on how to use Key Vault RBAC permission model and assign Azure roles, see: -[Use an Azure RBAC to control access to keys, certificates and secrets](../general/rbac-guide.md) +For more information on how to use Key Vault RBAC permission model and assign Azure roles, see [Use an Azure RBAC to control access to keys, certificates and secrets](../general/rbac-guide.md) > [!NOTE] > If you use an access policies permission model, it is required to set 'Rotate', 'Set Rotation Policy', and 'Get Rotation Policy' key permissions to manage rotation policy on keys. |
| load-balancer | Quickstart Load Balancer Standard Internal Portal | https://github.com/MicrosoftDocs/azure-docs/commits/main/articles/load-balancer/quickstart-load-balancer-standard-internal-portal.md | |
| load-testing | How To High Scale Load | https://github.com/MicrosoftDocs/azure-docs/commits/main/articles/load-testing/how-to-high-scale-load.md | -In this article, learn how to set up a load test for high-scale load by using Azure Load Testing Preview. To simulate a large number of virtual users, you'll configure the test engine instances. +In this article, learn how to set up a load test for high-scale load with Azure Load Testing Preview. ++Configure multiple test engine instances to scale out the number of virtual users for your load test and simulate a high number of requests per second. To achieve an optimal load distribution, you can monitor the test instance health metrics in the Azure Load Testing dashboard. > [!IMPORTANT] > Azure Load Testing is currently in preview. For legal terms that apply to Azure features that are in beta, in preview, or otherwise not yet released into general availability, see the [Supplemental Terms of Use for Microsoft Azure Previews](https://azure.microsoft.com/support/legal/preview-supplemental-terms/). In this article, learn how to set up a load test for high-scale load by using Az ## Determine requests per second -The maximum number of *requests per second* (RPS) that Azure Load Testing can generate depends on the application's *latency* and the number of *virtual users* (VUs). Application latency is the total time from sending an application request by the test engine to receiving the response. +The maximum number of *requests per second* (RPS) that Azure Load Testing can generate for your load test depends on the application's *latency* and the number of *virtual users* (VUs). Application latency is the total time from sending an application request by the test engine, to receiving the response. The virtual user count is the number of parallel requests that Azure Load Testing performs at a given time. ++To calculate the number of requests per second, apply the following formula: RPS = (# of VUs) * (1/latency in seconds). ++For example, if application latency is 20 milliseconds (0.02 second), and you're generating a load of 2,000 VUs, you can achieve around 100,000 RPS (2000 * 1/0.02s). -You can apply the following formula: RPS = (# of VUs) * (1/latency in seconds). +To achieve a target number of requests per second, configure the total number of virtual users for your load test. -For example, if application latency is 20 milliseconds (0.02 seconds), and you're generating a load of 2,000 VUs, you can achieve around 100,000 RPS (2000 * 1/0.02s). +> [!NOTE] +> Apache JMeter only reports requests that made it to the server and back, either successful or not. If Apache JMeter is unable to connect to your application, the actual number of requests per second will be lower than the maximum value. Possible causes might be that the server is too busy to handle the request, or that an TLS/SSL certificate is missing. To diagnose connection problems, you can check the **Errors** chart in the load testing dashboard and [download the load test log files](./how-to-find-download-logs.md). -Apache JMeter only reports requests that made it to the server and back, either successful or not. If Apache JMeter is unable to connect to your application, the actual number of requests per second will be lower than the maximum value. Possible causes might be that the server is too busy to handle the request, or that an TLS/SSL certificate is missing. To diagnose connection problems, you can check the **Errors** chart in the load testing dashboard and [download the load test log files](./how-to-find-download-logs.md). +## Test engine instances and virtual users -## Test engine instances +In the Apache JMeter script, you can specify the number of parallel threads. Each thread represents a virtual user that accesses the application endpoint in parallel. We recommend that you keep the number of threads in a script below a maximum of 250. -In Azure Load Testing, *test engine* instances are responsible for executing a test plan. If you use an Apache JMeter script to create the test plan, each test engine executes the Apache JMeter script. +In Azure Load Testing, *test engine* instances are responsible for running the Apache JMeter script. You can configure the number of instances for a load test. All test engine instances run in parallel. -The test engine instances run in parallel. They allow you to define how you want to scale out the load test execution for your application. +The total number of virtual users for a load test is then: VUs = (# threads) * (# test engine instances). -In the Apache JMeter script, you define the number of parallel threads. This number indicates how many threads each test engine instance executes in parallel. Each thread represents a virtual user. We recommend that you keep the number of threads below a maximum of 250. +To simulate a target number of virtual users, you can configure the parallel threads in the JMeter script, and the engine instances for the load test accordingly. [Monitor the test engine metrics](#monitor-engine-instance-metrics) to optimize the number of instances. -For example, to simulate 1,000 threads (or virtual users), set the number of threads in the Apache JMeter script to 250. Then configure the test with four test engine instances (that is, 4 x 250 threads). +For example, to simulate 1,000 virtual users, set the number of threads in the Apache JMeter script to 250. Then configure the load test with four test engine instances (that is, 4 x 250 threads). The location of the Azure Load Testing resource determines the location of the test engine instances. All test engine instances within a Load Testing resource are hosted in the same Azure region. In this section, you configure the scaling settings of your load test. 1. Select **Apply** to modify the test and use the new configuration when you rerun it. +## Monitor engine instance metrics ++To make sure that the test engine instances themselves aren't a performance bottleneck, you can monitor resource metrics of the test engine instance. A high resource usage for a test instance might negatively influence the results of the load test. ++Azure Load Testing reports four resource metrics for each instance: ++- CPU percentage. +- Memory percentage. +- Network bytes per second. +- Number of virtual users. ++A test engine instance is considered healthy if the average CPU percentage or memory percentage over the duration of the test run remains below 75%. ++To view the engine resource metrics: ++1. Go to your Load Testing resource. On the left pane, select **Tests** to view the list of load tests. +1. In the list, select your load test to view the list of test runs. +1. In the test run list, select your test run. +1. In the test run dashboard, select the **Engine health** to view the engine resource metrics. + + Optionally, select a specific test engine instance by using the filters controls. +++### Troubleshoot unhealthy engine instances ++If one or multiple instances show a high resource usage, it could impact the test results. To resolve the issue, try one or more of the following steps: ++- Reduce the number of threads (virtual users) per test engine. To achieve a target number of virtual users, you might increase the number of engine instances for the load test. ++- Ensure that your script is effective, with no redundant code. ++- If the engine health status is unknown, re-run the test. + ## Next steps - For more information about comparing test results, see [Compare multiple test results](./how-to-compare-multiple-test-runs.md). |
| logic-apps | Logic Apps Data Operations Code Samples | https://github.com/MicrosoftDocs/azure-docs/commits/main/articles/logic-apps/logic-apps-data-operations-code-samples.md | To try the [**Parse JSON** action example](../logic-apps/logic-apps-perform-data "Succeeded" ] }+ } }, ``` |
| logic-apps | Single Tenant Overview Compare | https://github.com/MicrosoftDocs/azure-docs/commits/main/articles/logic-apps/single-tenant-overview-compare.md | With the **Logic App (Standard)** resource type, you can create these workflow t For easier debugging, you can enable run history for a stateless workflow, which has some impact on performance, and then disable the run history when you're done. For more information, see [Create single-tenant based workflows in Visual Studio Code](create-single-tenant-workflows-visual-studio-code.md#enable-run-history-stateless) or [Create single-tenant based workflows in the Azure portal](create-single-tenant-workflows-visual-studio-code.md#enable-run-history-stateless). +> [!IMPORTANT] +> You have to decide on the workflow type, either stateful or stateless, to implement at creation time. +> Changes to the workflow type after creation results in runtime errors. + ### Summary differences between stateful and stateless workflows <center> |
| machine-learning | How To Configure Cli | https://github.com/MicrosoftDocs/azure-docs/commits/main/articles/machine-learning/how-to-configure-cli.md | |
| machine-learning | How To Deploy Batch With Rest | https://github.com/MicrosoftDocs/azure-docs/commits/main/articles/machine-learning/how-to-deploy-batch-with-rest.md | Now, let's look at other options for invoking the batch endpoint. When it comes - An `InputData` property has `JobInputType` and `Uri` keys. When you are specifying a single file, use `"JobInputType": "UriFile"`, and when you are specifying a folder, use `'JobInputType": "UriFolder"`. -- When the file or folder is on Azure ML registered datastore, the syntax for the `Uri` is `azureml://datastores/<datastore-name>/paths/<path-on-datastore>` for folder, and `azureml://datastores/<datastore-name>/paths/<path-on-datastore>/<file-name>` for a specific file. You can also use the longer form to represent the same path, such as `azureml://subscriptions/<subscription_id>/resourceGroups/<resource-group-name>/workspaces/<workspace-name>/datastores/<datastore-name>/paths/<path-on-datastore>/`.+- When the file or folder is on Azure ML registered datastore, the syntax for the `Uri` is `azureml://datastores/<datastore-name>/paths/<path-on-datastore>` for folder, and `azureml://datastores/<datastore-name>/paths/<path-on-datastore>/<file-name>` for a specific file. You can also use the longer form to represent the same path, such as `azureml://subscriptions/<subscription-id>/resourceGroups/<resource-group-name>/workspaces/<workspace-name>/datastores/<datastore-name>/paths/<path-on-datastore>/`. -- When the file or folder is registered as V2 data asset as `uri_folder` or `uri_file`, the syntax for the `Uri` is `\"azureml://data/<data-name>/versions/<data-version>/\"` (short form) or `\"azureml://subscriptions/<subscription_id>/resourceGroups/<resource-group-name>/workspaces/<workspace-name>/data/<data-name>/versions/<data-version>/\"` (long form).+- When the file or folder is registered as V2 data asset as `uri_folder` or `uri_file`, the syntax for the `Uri` is `\"azureml://locations/<location-name>/workspaces/<workspace-name>/data/<data-name>/versions/<data-version>"` (Asset ID form) or `\"/subscriptions/<subscription-id>/resourcegroups/<resource-group-name>/providers/Microsoft.MachineLearningServices/workspaces/<workspace-name>/data/<data-name>/versions/<data-version>\"` (ARM ID form). - When the file or folder is a publicly accessible path, the syntax for the URI is `https://<public-path>` for folder, `https://<public-path>/<file-name>` for a specific file. Below are some examples using different types of input data. \"InputData\": { \"mnistInput\": { \"JobInputType\" : \"UriFolder\",- \"Uri": \"azureml://data/$DATA_NAME/versions/$DATA_VERSION/\" + \"Uri": \"azureml://locations/$LOCATION_NAME/workspaces/$WORKSPACE_NAME/data/$DATA_NAME/versions/$DATA_VERSION/\" } } } |
| machine-learning | How To Enable Data Collection | https://github.com/MicrosoftDocs/azure-docs/commits/main/articles/machine-learning/how-to-enable-data-collection.md | |
| machine-learning | How To Migrate From V1 | https://github.com/MicrosoftDocs/azure-docs/commits/main/articles/machine-learning/how-to-migrate-from-v1.md | |
| machine-learning | Reference Yaml Component Command | https://github.com/MicrosoftDocs/azure-docs/commits/main/articles/machine-learning/reference-yaml-component-command.md | |
| machine-learning | Reference Yaml Compute Aml | https://github.com/MicrosoftDocs/azure-docs/commits/main/articles/machine-learning/reference-yaml-compute-aml.md | |
| machine-learning | Reference Yaml Compute Instance | https://github.com/MicrosoftDocs/azure-docs/commits/main/articles/machine-learning/reference-yaml-compute-instance.md | |
| machine-learning | Reference Yaml Compute Vm | https://github.com/MicrosoftDocs/azure-docs/commits/main/articles/machine-learning/reference-yaml-compute-vm.md | |
| machine-learning | Reference Yaml Environment | https://github.com/MicrosoftDocs/azure-docs/commits/main/articles/machine-learning/reference-yaml-environment.md | |
| machine-learning | Reference Yaml Job Pipeline | https://github.com/MicrosoftDocs/azure-docs/commits/main/articles/machine-learning/reference-yaml-job-pipeline.md | |
| machine-learning | Reference Yaml Overview | https://github.com/MicrosoftDocs/azure-docs/commits/main/articles/machine-learning/reference-yaml-overview.md | |
| machine-learning | Reference Yaml Workspace | https://github.com/MicrosoftDocs/azure-docs/commits/main/articles/machine-learning/reference-yaml-workspace.md | |
| machine-learning | Tutorial Pipeline Python Sdk | https://github.com/MicrosoftDocs/azure-docs/commits/main/articles/machine-learning/tutorial-pipeline-python-sdk.md | The data you use for training is usually in one of the locations below: * Web * Big Data Storage services (for example, Azure Blob, Azure Data Lake Storage, SQL) -Azure ML uses a `Data` object to register a reusable definition of data, and consume data within a pipeline. In the section below, you'll consume some data from web url as one example. Data from other sources can be created as well. +Azure ML uses a `Data` object to register a reusable definition of data, and consume data within a pipeline. In the section below, you'll consume some data from web url as one example. Data from other sources can be created as well. `Data` assets from other sources can be created as well. [!Notebook-python[] (~/azureml-examples-main/tutorials/e2e-ds-experience/e2e-ml-workflow.ipynb?name=credit_data)] -This code just created a `Data` asset, ready to be consumed as an input by the pipeline that you'll define in the next sections. In addition, you can register the dataset to your workspace so it becomes reusable across pipelines. +This code just created a `Data` asset, ready to be consumed as an input by the pipeline that you'll define in the next sections. In addition, you can register the data to your workspace so it becomes reusable across pipelines. -Registering the dataset will enable you to: +Registering the data asset will enable you to: -* Reuse and share the dataset in future pipelines -* Use versions to track the modification to the dataset -* Use the dataset from Azure ML designer, which is Azure ML's GUI for pipeline authoring +* Reuse and share the data asset in future pipelines +* Use versions to track the modification to the data asset +* Use the data asset from Azure ML designer, which is Azure ML's GUI for pipeline authoring Since this is the first time that you're making a call to the workspace, you may be asked to authenticate. Once the authentication is complete, you'll then see the dataset registration completion message. In the future, you can fetch the same dataset from the workspace using `credit_d Each step of an Azure ML pipeline can use a different compute resource for running the specific job of that step. It can be single or multi-node machines with Linux or Windows OS, or a specific compute fabric like Spark. -In this section, you'll provision a Linux compute cluster. +In this section, you'll provision a Linux [compute cluster](how-to-create-attach-compute-cluster.md?tabs=python). See the [full list on VM sizes and prices](https://azure.microsoft.com/pricing/details/machine-learning/) . For this tutorial you only need a basic cluster, so we'll use a Standard_DS3_v2 model with 2 vCPU cores, 7 GB RAM and create an Azure ML Compute. This section shows different logged metrics. In this example. mlflow `autologgin ## Deploy the model as an online endpoint -Now deploy your machine learning model as a web service in the Azure cloud. --To deploy a machine learning service, you'll usually need: +Now deploy your machine learning model as a web service in the Azure cloud, an [`online endpoint`](concept-endpoints.md). +To deploy a machine learning service, you usually need: * The model assets (filed, metadata) that you want to deploy. You've already registered these assets in your training component. * Some code to run as a service. The code executes the model on a given input request. This entry script receives data submitted to a deployed web service and passes it to the model, then returns the model's response to the client. The script is specific to your model. The entry script must understand the data that the model expects and returns. When using a MLFlow model, as in this tutorial, this script is automatically created for you |
| marketplace | Isv App License Management | https://github.com/MicrosoftDocs/azure-docs/commits/main/articles/marketplace/isv-app-license-management.md | + + Title: About ISV app license management - Microsoft AppSource and Azure Marketplace +description: Learn about managing ISV app licenses through Microsoft. ++++++ Last updated : 07/18/2022+++# About ISV app license management ++Applies to the following offer types: ++- Dynamics 365 apps on Dataverse and Power Apps +- Power BI visual ++_ISV app license management_ enables independent software vendors (ISVs) who build solutions and manage and enforce licenses for their solutions using systems provided by Microsoft. There are differences in the way ISV app license management works for different offer types. ++To learn more, see: ++- [ISV app license management for Dynamics 365 apps on Dataverse and Power Apps](isv-app-license.md) +- [ISV app license management for Power BI visual](isv-app-license-power-bi-visual.md) |
| marketplace | Isv App License Power Bi Visual | https://github.com/MicrosoftDocs/azure-docs/commits/main/articles/marketplace/isv-app-license-power-bi-visual.md | + + Title: ISV app license management for Power BI visual offers - Microsoft AppSource and Azure Marketplace +description: Learn about managing ISV app licenses for Power BI visual offers through Microsoft. ++++++ Last updated : 07/19/2022+++# ISV app license management for Power BI visual offers ++Applies to the following offer type: ++- Power BI visual ++ISV app license management enables independent software vendors (ISVs) who build Power BI visual solutions using Power BI/Power Platform suite of products to manage and enforce licenses for their solutions using systems provided by Microsoft. By adopting this, ISVs can: +- Enable customers to assign and unassign licenses of ISV products using familiar tools such as Microsoft 365 admin center, which customers use to manage Office and Power BI licenses. +- Leverage the runtime Power BI license API to enforce licenses and ensure that only licensed users can access their solutions. +- Save themselves the effort of building and maintaining their own license management and transaction system. ++ISV app license management currently supports: +- A named user license model. Each license must be assigned to an Azure AD user or Azure AD security group. ++## Pre-requisites ++To manage your ISV app licenses, you need to comply with the following pre-requisites. ++1. Have a valid [Microsoft Partner Network account](/partner-center/mpn-create-a-partner-center-account). +1. Be signed up for commercial marketplace program. For more information, see [Create a commercial marketplace account in Partner Center](create-account.md). +1. Your developer team has the development environments and tools required to create Power BI visuals solutions. See [Develop your own Power BI visual and Tutorial: Develop a Power BI circle card visual](/power-bi/developer/visuals/develop-power-bi-visuals). ++## High-level process ++These steps illustrate the high-level process to manage ISV app licenses: ++### Step 1: ISV creates a transactable offer in Partner Center ++ISV creates an offer in Partner Center and chooses to transact through MicrosoftΓÇÖs commerce system and enable Microsoft to manage the licenses of these visuals. The ISV also defines at least one plan and configures pricing information and availability. ++### Step 2: ISV adds license enforcement to their Power BI visual solution package ++ISV creates a Power BI visual solution package for the offer that leverages Power BI runtime license to perform [license enforcement](https://go.microsoft.com/fwlink/?linkid=2201222) as per the plan that the user has access to. ++### Step 3: Customers purchase subscription to ISV products ++Customers discover ISVΓÇÖs offer in AppSource. Customers purchase subscription to the offer from [AppSource](https://appsource.microsoft.com/) and get licenses for the Power BI visual. ++### Step 4: Customers manage subscription ++Customers can manage the subscriptions of these visuals and offers in [Microsoft 365 admin center](https://admin.microsoft.com/Adminportal/Home#/subscriptions), just like they normally do for any of their other subscriptions, such as Office or Power BI subscriptions. ++### Step 5: Customers assign licenses ++Customers can assign licenses of these Power BI visuals in license pages under the billing node in [Microsoft 365 admin center](https://admin.microsoft.com/Adminportal/Home#/subscriptions). Customers can assign licenses to users or groups. Doing so will enable these users to launch the Power BI visual. ++### Step 6: ISV enforces runtime checks ++ISV enforces license check based on the plans that user has access to. ++### Step 7: ISV can view reports ++ISVs can view information on: +- Revenue details and payout information +- Orders purchased / renewed / canceled over time and by geography +- Assigned licenses over time and by geography ++<! [ +| Step | Details | +| | - | +| ISV creates a transactable offer in Partner Center. | ISV creates an offer in Partner Center and chooses to transact through MicrosoftΓÇÖs commerce system and enable Microsoft to manage the licenses of these visuals. The ISV also defines at least one plan and configures pricing information and availability. | +| ISV adds license enforcement to their Power BI visual solution package | ISV creates a Power BI visual solution package for the offer that leverages Power BI runtime license to perform license enforcement as per the plan that the user has access to. | +| Customers purchase subscription to ISV products | Customers discover ISVΓÇÖs offer in AppSource. Customers purchase subscription to the offer from [AppSource](https://appsource.microsoft.com/) and get licenses for the Power BI visual. | +| Customers manage subscription | Customers can manage the subscriptions of these visuals and offers in [Microsoft 365 admin center](https://admin.microsoft.com/Adminportal/Home#/subscriptions), just like they normally do for any of their other subscriptions, such as Office or Power BI subscriptions. | +| Customers assign licenses | Customers can assign licenses of these Power BI visuals in license pages under the billing node in [Microsoft 365 admin center](https://admin.microsoft.com/Adminportal/Home#/subscriptions). Customers can assign licenses to users or groups. Doing so will enable these users to launch the Power BI visual. | +| ISV enforces runtime checks | ISV enforces license check based on the plans that user has access to. | +| ISV can view reports | ISVs can view information on:<br>- Revenue details and payout information<br>- Orders purchased / renewed / canceled over time and by geography<br>- Assigned licenses over time and by geography | +]() > ++## Offer listing page on AppSource ++After your offer is published, the options you chose will drive which buttons appear to a user. This screenshot shows an offer listing page on AppSource. ++[  ](./media/isv-app-license/power-bi-transact-appsource.png#lightbox) ++## Next steps ++- [Plan a Power BI visual offer](marketplace-power-bi-visual.md) +- [Create a Power BI visual offer](power-bi-visual-offer-setup.md) |
| marketplace | Isv App License | https://github.com/MicrosoftDocs/azure-docs/commits/main/articles/marketplace/isv-app-license.md | Title: ISV app license management - Microsoft AppSource and Azure Marketplace -description: Learn about managing ISV app licenses through Microsoft. + Title: ISV app license management for Dynamics 365 apps on Dataverse and Power Apps - Microsoft AppSource and Azure Marketplace +description: Learn about managing ISV app licenses through Microsoft for Dynamics 365 apps on Dataverse and Power Apps. -# ISV app license management +# ISV app license management for Dynamics 365 apps on Dataverse and Power Apps Applies to the following offer type: When a user within the customerΓÇÖs organization tries to run an application, Mi ### Step 7: View reports ISVs can view information on:-- Orders purchased, renewed, or cancelled over time and by geography.+- Orders purchased, renewed, or canceled over time and by geography. - Provisioned and assigned licenses over a period of time and by geography. |
| marketplace | Marketplace Commercial Transaction Capabilities And Considerations | https://github.com/MicrosoftDocs/azure-docs/commits/main/articles/marketplace/marketplace-commercial-transaction-capabilities-and-considerations.md | description: This article describes pricing, billing, invoicing, and payout cons Previously updated : 06/29/2022 Last updated : 07/18/2022 The transact publishing option is currently supported for the following offer ty | Offer type | Billing cadence | Metered billing | Pricing model | | | - | - | - | | Azure Application <br>(Managed application) | Monthly | Yes | Usage-based |-| Azure Virtual Machine | Monthly<sup>1</sup> | No | Usage-based, BYOL | +| Azure Virtual Machine | Monthly [1] | No | Usage-based, BYOL | | Software as a service (SaaS) | Monthly and annual | Yes | Flat rate, per user, usage-based. |-| Dynamics 365 apps on Dataverse and Power Apps<sup>2</sup> | Monthly and annual | No | Per user | +| Dynamics 365 apps on Dataverse and Power Apps [2] | Monthly and annual | No | Per user | +| Power BI visual [3] | Monthly and annual | No | Per user | -<sup>1</sup> Azure Virtual Machine offers support usage-based billing plans. These plans are billed monthly for hourly use of the subscription based on per core, per core size, or per market and core size usage. +[1] Azure Virtual Machine offers support usage-based billing plans. These plans are billed monthly for hourly use of the subscription based on per core, per core size, or per market and core size usage. -<sup>2</sup> Dynamics 365 apps on Dataverse and Power Apps offers that you transact through Microsoft are automatically enabled for license management. See [ISV app license management](isv-app-license.md). +[2] Dynamics 365 apps on Dataverse and Power Apps offers that you transact through Microsoft are automatically enabled for license management. See [ISV app license management for Dynamics 365 apps on Dataverse and Power Apps](isv-app-license.md). ++[3] Power BI visual offers that you transact through Microsoft are automatically enabled for license management. See [ISV app license management for Power BI visual offers](isv-app-license-power-bi-visual.md). ### Metered billing The ability to transact through Microsoft is available for the following commerc - **Dynamics 365 Dataverse apps and Power Apps**: Select ΓÇ£Per userΓÇ¥ pricing to enable Dynamics 365 Dataverse apps and Power Apps to be sold in AppSource marketplace. Customers can manage licenses of these offers in Microsoft Admin Center. +- **Power BI visual**: Select "Managing license and selling with Microsoft" to enable your offer to be transactable in Microsoft AppSource and get license management. Customers can manage licenses of these offers in Microsoft Admin Center. + ## Private plans You can create a private plan for an offer, complete with negotiated, deal-specific pricing, or custom configurations. |
| migrate | Tutorial App Containerization Java Kubernetes | https://github.com/MicrosoftDocs/azure-docs/commits/main/articles/migrate/tutorial-app-containerization-java-kubernetes.md | description: Tutorial:Containerize & migrate Java web applications to Azure Kube -+ Last updated 6/30/2021 |
| mysql | Concepts Service Tiers Storage | https://github.com/MicrosoftDocs/azure-docs/commits/main/articles/mysql/flexible-server/concepts-service-tiers-storage.md | We recommend that you <!--turn on storage auto-grow or to--> set up an alert to Storage auto-grow prevents your server from running out of storage and becoming read-only. If storage auto-grow is enabled, the storage automatically grows without impacting the workload. Storage auto-grow is enabled by default for all new server creates. For servers with less than equal to 100 GB provisioned storage, the provisioned storage size is increased by 5 GB when the free storage is below 10% of the provisioned storage. For servers with more than 100 GB of provisioned storage, the provisioned storage size is increased by 5% when the free storage space is below 10 GB of the provisioned storage size. Maximum storage limits as specified above apply. Refresh the server instance to see the updated storage provisioned under **Settings** on the **Compute + Storage** page. -For example, if you have provisioned 1000 GB of storage, and the actual utilization goes over 990 GB, the server storage size is increased to 1050 GB. Alternatively, if you have provisioned 10 GB of storage, the storage size is increase to 15 GB when less than 1 GB of storage is free. +For example, if you have provisioned 1000 GB of storage, and the actual utilization goes over 990 GB, the server storage size is increased to 1050 GB. Alternatively, if you have provisioned 20 GB of storage, the storage size is increase to 25 GB when less than 2 GB of storage is free. Remember that storage once auto-scaled up, cannot be scaled down. |
| networking | Networking Partners Msp | https://github.com/MicrosoftDocs/azure-docs/commits/main/articles/networking/networking-partners-msp.md | Use the links in this section for more information about managed cloud networkin |[Interxion](https://www.interxion.com/products/interconnection/cloud-connect/support-your-cloud-strategy/)|[Azure Networking Assessment - Five Days](https://azuremarketplace.microsoft.com/en-us/marketplace/consulting-services/interxionhq.inxn_azure_networking_assessment)||||| |[IX Reach](https://www.ixreach.com/services/sdn-cloud-connect/)||[ExpressRoute by IX Reach, a BSO company](https://azuremarketplace.microsoft.com/en-us/marketplace/apps/ixreach.cloudconnect?tab=Overview)|||| |[KoçSistem](https://azure.kocsistem.com.tr/en)|[KoçSistem Managed Cloud Services for Azure](https://azuremarketplace.microsoft.com/en-us/marketplace/apps/kocsistem.kocsistemcloudmanagementtool?tab=Overview)|[KoçSistem Azure ExpressRoute Management](https://azuremarketplace.microsoft.com/en-us/marketplace/apps/kocsistem.ks_azure_express_route?tab=Overview)|[KoçSistem Azure Virtual WAN Management](https://azuremarketplace.microsoft.com/en-us/marketplace/apps/kocsistem.ks_azure_virtual_wan?tab=Overview)||[`KoçSistem Azure Security Center Managed Service`](https://azuremarketplace.microsoft.com/en-us/marketplace/apps/kocsistem.ks_azure_security_center?tab=Overview)|-|[Liquid Telecom](https://liquidcloud.africa/)|[Liquid Managed ExpressRoute for Azure (Microsoft preferred solution badge)](https://azuremarketplace.microsoft.com/marketplace/apps/liquidtelecommunicationsoperationslimited.42cfee0b-8f07-4948-94b0-c9fc3e1ddc42?tab=Overview); [Liquid Azure Expert Services](https://azuremarketplace.microsoft.com/marketplace/apps/liquidtelecommunicationsoperationslimited.5dab29ab-bb14-4df8-8978-9a8608a41ad7?tab=Overview)||||| +|[Liquid Telecom](https://liquidcloud.africa/)| [Liquid Azure Expert Services](https://azuremarketplace.microsoft.com/marketplace/apps/liquidtelecommunicationsoperationslimited.5dab29ab-bb14-4df8-8978-9a8608a41ad7?tab=Overview)|[Liquid Managed ExpressRoute for Azure](https://azuremarketplace.microsoft.com/en-us/marketplace/apps/liquidtelecommunicationsoperationslimited.42cfee0b-8f07-4948-94b0-c9fc3e1ddc42?tab=Overview)|||| |[Lumen](https://www.lumen.com/en-us/solutions/hybrid-cloud.html)||[ExpressRoute Consulting |[Macquarie Telecom](https://macquariecloudservices.com/azure-managed-services/)|[Azure Managed Services by Macquarie Cloud](https://azuremarketplace.microsoft.com/en-us/marketplace/apps/macquariecloudservices.managed_services?tab=Overview); [Azure Extend by Macquarie Cloud Services](https://azuremarketplace.microsoft.com/en-us/marketplace/apps/macquariecloudservices.azure_extend?tab=Overview)||[Azure Deploy by Macquarie Cloud Services](https://azuremarketplace.microsoft.com/marketplace/apps/macquariecloudservices.azure_deploy?tab=Overview); [SD-WAN Virtual Edge offer by Macquarie Cloud Services](https://azuremarketplace.microsoft.com/en-us/marketplace/apps/macquariecloudservices.azure_deploy?tab=Overview)||[Managed Security by Macquarie Cloud Services](https://azuremarketplace.microsoft.com/en-us/marketplace/apps/macquariecloudservices.managed_security?tab=Overview)| |[Megaport](https://www.megaport.com/services/microsoft-expressroute/)||[Managed Routing Service for ExpressRoute](https://azuremarketplace.microsoft.com/en-us/marketplace/apps/megaport1582290752989.megaport_mcr?tab=Overview)|||| Use the links in this section for more information about managed cloud networkin |[Orange Business Services](https://www.orange-business.com/en/partners/orange-business-services-become-microsoft-azure-networking-managed-services-provider)||[ExpressRoute Network Study : 3-week implementation](https://azuremarketplace.microsoft.com/en-us/marketplace/consulting-services/orangebusinessservicessa1603182943272.expressroute_study_obs_connectivity)||| |[Orixcom]( https://www.orixcom.com/cloud-solutions/)||[Orixcom Managed ExpressRoute](https://azuremarketplace.microsoft.com/en-us/marketplace/apps/orixcom.orixcom_managed_expressroute?tab=Overview)|[Orixcom SD-WAN](https://azuremarketplace.microsoft.com/en-us/marketplace/apps/orixcom.orixcom_sd_wan?tab=Overview)||| |[Proximus](https://www.proximus.be/en/companies-and-public-sector/?)|[Proximus Azure Services - Operational Framework](https://azuremarketplace.microsoft.com/en-us/marketplace/apps/proximusnv1580135963165.pas-lighthouse?tab=Reviews)|||||-|[Servent](https://www.servent.co.uk/)|[Azure Advanced Networking – Five Day Assessment ](https://azuremarketplace.microsoft.com/en-us/marketplace/consulting-services/servent.servent-azure-advanced-networking?tab=Overview)|[Express Route – Three Day Assessment ](https://azuremarketplace.microsoft.com/en-us/marketplace/consulting-services/servent.servent-azure-express-route?tab=Overview)|[Azure Virtual WAN – Three Day Assessment ](https://azuremarketplace.microsoft.com/en-us/marketplace/consulting-services/servent.servent-azure-virtual-wan?tab=Overview)||| +|[Servent](https://www.servent.co.uk/)|[Azure Advanced Networking – Five Day Assessment ](https://azuremarketplace.microsoft.com/en-us/marketplace/consulting-services/servent.servent-azure-advanced-networking?tab=Overview)|[ExpressRoute – Three Day Assessment ](https://azuremarketplace.microsoft.com/en-us/marketplace/consulting-services/servent.servent-azure-express-route?tab=Overview)|[Azure Virtual WAN – Three Day Assessment ](https://azuremarketplace.microsoft.com/en-us/marketplace/consulting-services/servent.servent-azure-virtual-wan?tab=Overview)||| |[SoftBank]( https://www.softbank.jp/biz/nw/nwp/cloud_access/direct_access_for_az/)|[Azure Network Consulting Service: 1-Week Assessment](https://azuremarketplace.microsoft.com/en-us/marketplace/consulting-services/sbmpn.softbank_nw_msp_service_azure); [Azure Assessment Service: 1-Week](https://azuremarketplace.microsoft.com/en-us/marketplace/consulting-services/sbmpn.softbank_msp_service_azure_01?tab=Overview&pub_source=email&pub_status=success)||||| |[TCTS](https://www.tatacommunications-ts.com/index.php)|Azure Migration: 3-Week Assessment||||| |[Tata Communications](https://www.tatacommunications.com/about/our-alliances/microsoft-alliance/)||[Managed Azure ExpressRoute](https://azuremarketplace.microsoft.com/en-us/marketplace/apps/tata_communications.managed_expressroute?tab=Overview)|[Managed Virtual WAN](https://azuremarketplace.microsoft.com/en-us/marketplace/apps/tata_communications.managed_azure_vwan_for_sdwan?tab=Overview)||| Use the links in this section for more information about managed cloud networkin |[Telia](https://business.teliacompany.com/global-solutions/Business-Defined-Networking/Hybrid-Networking)|[Azure landing zone: 5-Day workshops](https://azuremarketplace.microsoft.com/en-us/marketplace/consulting-services/telia.ps_caf_far_001)||[Telia Cloud First Azure vWAN](https://azuremarketplace.microsoft.com/en-us/marketplace/apps/telia.telia_cloud_first_azure_vwan?tab=Overview)|[Telia IoT Platform](https://azuremarketplace.microsoft.com/en-us/marketplace/apps/telia.telia_iot_platform?tab=Overview)| |[Vigilant IT](https://vigilant.it/cloud-infrastructure/cloud-management/)|[Azure Health Check: 3-Day Assessment](https://azuremarketplace.microsoft.com/en-us/marketplace/consulting-services/greymatter.azurehealth)|||| |[Vandis](https://www.vandis.com/services/microsoft-azure-practice/)|[Managed NAC With Aruba ClearPass Policy Manager](https://azuremarketplace.microsoft.com/en-us/marketplace/apps/vandis.vandis_aruba_clearpass?tab=Overview)|[Vandis Managed ExpressRoute](https://azuremarketplace.microsoft.com/en-us/marketplace/apps/vandis.vandis_managed_expressroute?tab=Overview)|[Vandis Managed VWAN Powered by Fortinet](https://azuremarketplace.microsoft.com/en-us/marketplace/apps/vandis.vandis_managed_vwan_powered_by_fortinet?tab=Overview); [Vandis Managed VWAN Powered by Palo Alto Networks](https://azuremarketplace.microsoft.com/en-us/marketplace/apps/vandis.vandis_managed_vwan_powered_by_palo_alto_networks?tab=Overview); [Managed VWAN Powered by Barracuda CloudGen WAN](https://azuremarketplace.microsoft.com/en-us/marketplace/apps/vandis.vandis_barracuda_vwan?tab=Overview)|-|[Zertia](https://zertia.es/)||[Express Route – Intercloud connectivity](https://azuremarketplace.microsoft.com/en-us/marketplace/apps/zertiatelecomunicacionessl1615311863650.zertia-inter-conect-of103?tab=Overview)|[Enterprise Connectivity Suite - Virtual WAN](https://azuremarketplace.microsoft.com/en-us/marketplace/apps/zertiatelecomunicacionessl1615311863650.zertia-vw-suite-of101?tab=Overview); [Manage Virtual WAN – SD-WAN Fortinet](https://azuremarketplace.microsoft.com/en-us/marketplace/apps/zertiatelecomunicacionessl1615311863650.zertia-mvw-fortinet-of101?tab=Overview); [Manage Virtual WAN – SD-WAN Cisco Meraki](https://azuremarketplace.microsoft.com/en-us/marketplace/apps/zertiatelecomunicacionessl1615311863650.zertia-mvw-cisco-of101?tab=Overview); [Manage Virtual WAN – SD-WAN Citrix](https://azuremarketplace.microsoft.com/en-us/marketplace/apps/zertiatelecomunicacionessl1615311863650.zertia-mvw-citrix-of101?tab=Overview);||| +|[Zertia](https://zertia.es/)||[ExpressRoute – Intercloud connectivity](https://azuremarketplace.microsoft.com/en-us/marketplace/apps/zertiatelecomunicacionessl1615311863650.zertia-inter-conect-of103?tab=Overview)|[Enterprise Connectivity Suite - Virtual WAN](https://azuremarketplace.microsoft.com/en-us/marketplace/apps/zertiatelecomunicacionessl1615311863650.zertia-vw-suite-of101?tab=Overview); [Manage Virtual WAN – SD-WAN Fortinet](https://azuremarketplace.microsoft.com/en-us/marketplace/apps/zertiatelecomunicacionessl1615311863650.zertia-mvw-fortinet-of101?tab=Overview); [Manage Virtual WAN – SD-WAN Cisco Meraki](https://azuremarketplace.microsoft.com/en-us/marketplace/apps/zertiatelecomunicacionessl1615311863650.zertia-mvw-cisco-of101?tab=Overview); [Manage Virtual WAN – SD-WAN Citrix](https://azuremarketplace.microsoft.com/en-us/marketplace/apps/zertiatelecomunicacionessl1615311863650.zertia-mvw-citrix-of101?tab=Overview);||| Azure Marketplace offers for Managed ExpressRoute, Virtual WAN, Security Services and Private Edge Zone Services from the following Azure Networking MSP Partners are on our roadmap: [Amdocs](https://www.amdocs.com/); [Cirrus Core Networks](https://cirruscorenetworks.com/); [Cognizant](https://www.cognizant.com/cognizant-digital-systems-technology/cloud-enablement-services); [InterCloud](https://intercloud.com/partners/microsoft-azure/); [KINX](https://www.kinx.net/service/cloud/?lang=en); [OmniClouds](https://omniclouds.com/); [Sejong Telecom](https://www.sejongtelecom.net/en/pages/service/cloud_ms); [SES](https://www.ses.com/networks/cloud/ses-and-azure-expressroute); |
| orbital | Downlink Aqua | https://github.com/MicrosoftDocs/azure-docs/commits/main/articles/orbital/downlink-aqua.md | sudo apt install socat ```console socat -u tcp-listen:56001,fork create:/media/aqua/out.bin ```-9. Once your contact has executed, copy the output file, +9. Once your contact has executed, copy the output file from the tmpfs into your home directory to avoid being overwritten when another contact is executed. ```console-/media/aqua/out.bin out +mkdir ~/aquadata +cp /media/aqua/out.bin ~/aquadata/raw-$(date +"%FT%H%M%z").bin ```- of the tmpfs and into your home directory to avoid being overwritten when another contact is executed. > [!NOTE] > For a 10 minute long contact with AQUA while it is transmitting with 15MHz of bandwidth, you should expect to receive somewhere in the order of 450MB of data. ## Next steps -- [Configure a contact profile](contact-profile.md)-- [Schedule a contact](schedule-contact.md)+- [Collect and process Aqua satellite payload](satellite-imagery-with-orbital-ground-station.md) |
| orbital | Satellite Imagery With Orbital Ground Station | https://github.com/MicrosoftDocs/azure-docs/commits/main/articles/orbital/satellite-imagery-with-orbital-ground-station.md | Register with the [NASA DRL](https://directreadout.sci.gsfc.nasa.gov/) to downlo Transfer the installation binaries to the receiver-vm: ```console-mkdir ~/software/ -scp RT-STPS_6.0*.tar.gz azureuser@receiver-vm:~/software/rt-stps/. +ssh azureuser@receiver-vm 'mkdir -p ~/software' +scp RT-STPS_6.0*.tar.gz azureuser@receiver-vm:~/software/. ``` Alternatively, you can upload your installation binaries to a container in Azure Storage and download them to the receiver-vm using [AzCopy](../storage/common/storage-use-azcopy-v10.md) Alternatively, you can upload your installation binaries to a container in Azure ### Install rt-stps ```console-sudo yum install java (find version of java) +sudo yum install java-11-openjdk cd ~/software tar -xzvf RT-STPS_6.0.tar.gz cd ./rt-stps tar -xzvf RT-STPS_6.0_testdata.tar.gz cd ~/software/rt-stps rm ./data/* ./bin/batch.sh config/npp.xml ./testdata/input/rt-stps_npp_testdata.dat-#Verify that files exist +# Verify that files exist ls -la ./data ``` |
| private-link | Availability | https://github.com/MicrosoftDocs/azure-docs/commits/main/articles/private-link/availability.md | The following tables list the Private Link services and the regions where they'r |:-|:--|:-|:--| |Azure Machine Learning | All public regions | | GA <br/> [Learn how to create a private endpoint for Azure Machine Learning.](../machine-learning/how-to-configure-private-link.md) | |Azure Bot Service | All public regions | Supported only on Direct Line App Service extension | GA </br> [Learn how to create a private endpoint for Azure Bot Service](/azure/bot-service/dl-network-isolation-concept) |+| Azure Cognitive Services | All public regions<br/>All Government regions | | GA <br/> [Use private endpoints.](/azure/cognitive-services/cognitive-services-virtual-networks#use-private-endpoints) | ### Analytics The following tables list the Private Link services and the regions where they'r |Supported services |Available regions | Other considerations | Status | |:-|:--|:-|:--| |Azure Event Grid| All public regions<br/> All Government regions | | GA <br/> [Learn how to create a private endpoint for Azure Event Grid.](../event-grid/network-security.md) |-|Azure Service Bus | All public region<br/>All Government regions | Supported with premium tier of Azure Service Bus. [Select for tiers](../service-bus-messaging/service-bus-premium-messaging.md) | GA <br/> [Learn how to create a private endpoint for Azure Service Bus.](../service-bus-messaging/private-link-service.md) | +|Azure Service Bus | All public region<br/>All Government regions | Supported with premium tier of Azure Service Bus. [Select for tiers](../service-bus-messaging/service-bus-premium-messaging.md) | GA <br/> [Learn how to create a private endpoint for Azure Service Bus.](../service-bus-messaging/private-link-service.md) | +| Azure API Management | All public regions<br/> All Government regions | | GA <br/> [Connect privately to API Management using a private endpoint.](../event-grid/network-security.md) | ### Internet of Things (IoT) |Supported services |Available regions | Other considerations | Status | |:-|:--|:-|:--| | Azure IoT Hub | All public regions | | GA <br/> [Learn how to create a private endpoint for Azure IoT Hub.](../iot-hub/virtual-network-support.md) |-| Azure Digital Twins | All public regions supported by Azure Digital Twins | | Preview <br/> [Learn how to create a private endpoint for Azure Digital Twins.](../digital-twins/how-to-enable-private-link-portal.md) | +| Azure Digital Twins | All public regions supported by Azure Digital Twins | | Preview <br/> [Learn how to create a private endpoint for Azure Digital Twins.](/azure/api-management/private-endpoint) | ### Management and Governance The following tables list the Private Link services and the regions where they'r | | -| | -| | Azure Automation | All public regions<br/> All Government regions | | GA </br> [Learn how to create a private endpoint for Azure Automation.](../automation/how-to/private-link-security.md)| |Azure Backup | All public regions<br/> All Government regions | | GA <br/> [Learn how to create a private endpoint for Azure Backup.](../backup/private-endpoints.md) |-|Microsoft Purview | Southeast Asia, Australia East, Brazil South, North Europe, West Europe, Canada Central, East US, East US 2, EAST US 2 EUAP, South Central US, West Central US, West US 2, Central India, UK South | [Select for known limitations](../purview/catalog-private-link-troubleshoot.md#known-limitations) | GA <br/> [Learn how to create a private endpoint for Microsoft Purview.](../purview/catalog-private-link.md) | +| Microsoft Purview | Southeast Asia, Australia East, Brazil South, North Europe, West Europe, Canada Central, East US, East US 2, EAST US 2 EUAP, South Central US, West Central US, West US 2, Central India, UK South | [Select for known limitations](../purview/catalog-private-link-troubleshoot.md#known-limitations) | GA <br/> [Learn how to create a private endpoint for Microsoft Purview.](../purview/catalog-private-link.md) | +| Azure Migrate | All public regions<br/> All Government regions | | GA </br> [Discover and assess servers for migration using Private Link.](/azure/migrate/discover-and-assess-using-private-endpoints) | ### Security |
| private-link | Create Private Endpoint Template | https://github.com/MicrosoftDocs/azure-docs/commits/main/articles/private-link/create-private-endpoint-template.md | |
| private-link | Private Endpoint Dns | https://github.com/MicrosoftDocs/azure-docs/commits/main/articles/private-link/private-endpoint-dns.md | For Azure services, use the recommended zone names as described in the following | Azure Container Registry (Microsoft.ContainerRegistry/registries) / registry | privatelink.azurecr.io </br> {region}.privatelink.azurecr.io | azurecr.io </br> {region}.azurecr.io | | Azure App Configuration (Microsoft.AppConfiguration/configurationStores) / configurationStores | privatelink.azconfig.io | azconfig.io | | Azure Backup (Microsoft.RecoveryServices/vaults) / AzureBackup | privatelink.{region}.backup.windowsazure.com | {region}.backup.windowsazure.com |-| Azure Site Recovery (Microsoft.RecoveryServices/vaults) / AzureSiteRecovery | privatelink.siterecovery.windowsazure.com | {region}.hypervrecoverymanager.windowsazure.com | +| Azure Site Recovery (Microsoft.RecoveryServices/vaults) / AzureSiteRecovery | privatelink.{region}.siterecovery.windowsazure.com | {region}.siterecovery.windowsazure.com | | Azure Event Hubs (Microsoft.EventHub/namespaces) / namespace | privatelink.servicebus.windows.net | servicebus.windows.net | | Azure Service Bus (Microsoft.ServiceBus/namespaces) / namespace | privatelink.servicebus.windows.net | servicebus.windows.net | | Azure IoT Hub (Microsoft.Devices/IotHubs) / iotHub | privatelink.azure-devices.net<br/>privatelink.servicebus.windows.net<sup>1</sup> | azure-devices.net<br/>servicebus.windows.net | For Azure services, use the recommended zone names as described in the following | SignalR (Microsoft.SignalRService/SignalR) / signalR | privatelink.service.signalr.net | service.signalr.net | | Azure Monitor (Microsoft.Insights/privateLinkScopes) / azuremonitor | privatelink.monitor.azure.com<br/> privatelink.oms.opinsights.azure.com <br/> privatelink.ods.opinsights.azure.com <br/> privatelink.agentsvc.azure-automation.net <br/> privatelink.blob.core.windows.net | monitor.azure.com<br/> oms.opinsights.azure.com<br/> ods.opinsights.azure.com<br/> agentsvc.azure-automation.net <br/> blob.core.windows.net | | Cognitive Services (Microsoft.CognitiveServices/accounts) / account | privatelink.cognitiveservices.azure.com | cognitiveservices.azure.com |-| Azure File Sync (Microsoft.StorageSync/storageSyncServices) / afs | privatelink.afs.azure.net | afs.azure.net | +| Azure File Sync (Microsoft.StorageSync/storageSyncServices) / afs | privatelink.{region}.afs.azure.net | {region}.afs.azure.net | | Azure Data Factory (Microsoft.DataFactory/factories) / dataFactory | privatelink.datafactory.azure.net | datafactory.azure.net | | Azure Data Factory (Microsoft.DataFactory/factories) / portal | privatelink.adf.azure.com | adf.azure.com | | Azure Cache for Redis (Microsoft.Cache/Redis) / redisCache | privatelink.redis.cache.windows.net | redis.cache.windows.net | For Azure services, use the recommended zone names as described in the following | Azure Data Explorer (Microsoft.Kusto) | privatelink.{region}.kusto.windows.net | {region}.kusto.windows.net | | Azure Static Web Apps (Microsoft.Web/staticSites) / staticSites | privatelink.azurestaticapps.net </br> privatelink.{partitionId}.azurestaticapps.net | azurestaticapps.net </br> {partitionId}.azurestaticapps.net | | Azure Migrate (Microsoft.Migrate) / migrate projects, assessment project and discovery site | privatelink.prod.migration.windowsazure.com | prod.migration.windowsazure.com |+| Azure Managed HSM (Microsoft.Keyvault/managedHSMs) | privatelink.managedhsm.azure.net | managedhsm.azure.net | +| Azure API Management (Microsoft.ApiManagement/service) | privatelink.azure-api.net </br> privatelink.developer.azure-api.net | azure-api.net </br> developer.azure-api.net | <sup>1</sup>To use with IoT Hub's built-in Event Hub compatible endpoint. To learn more, see [private link support for IoT Hub's built-in endpoint](../iot-hub/virtual-network-support.md#built-in-event-hub-compatible-endpoint) For Azure services, use the recommended zone names as described in the following | Azure Search (Microsoft.Search/searchServices) / searchService | privatelink.search.windows.us | search.windows.us | | Azure App Configuration (Microsoft.AppConfiguration/configurationStores) / configurationStores | privatelink.azconfig.azure.us | azconfig.azure.us | | Azure Backup (Microsoft.RecoveryServices/vaults) / AzureBackup | privatelink.{region}.backup.windowsazure.us | {region}.backup.windowsazure.us |-| Azure Site Recovery (Microsoft.RecoveryServices/vaults) / AzureSiteRecovery | privatelink.siterecovery.windowsazure.us | {region}.hypervrecoverymanager.windowsazure.us | +| Azure Site Recovery (Microsoft.RecoveryServices/vaults) / AzureSiteRecovery | privatelink.{region}.siterecovery.windowsazure.us | {region}.siterecovery.windowsazure.us | | Azure Event Hubs (Microsoft.EventHub/namespaces) / namespace | privatelink.servicebus.usgovcloudapi.net | servicebus.usgovcloudapi.net| | Azure Service Bus (Microsoft.ServiceBus/namespaces) / namespace | privatelink.servicebus.usgovcloudapi.net| servicebus.usgovcloudapi.net | | Azure IoT Hub (Microsoft.Devices/IotHubs) / iotHub | privatelink.azure-devices.us<br/>privatelink.servicebus.windows.us<sup>1</sup> | azure-devices.us<br/>servicebus.usgovcloudapi.net | |
| purview | How To Data Owner Policies Arc Sql Server | https://github.com/MicrosoftDocs/azure-docs/commits/main/articles/purview/how-to-data-owner-policies-arc-sql-server.md | This how-to guide describes how a data owner can delegate authoring policies in **Enforcement of policies for this data source is available only in the following regions for Microsoft Purview** - East US+- East US 2 +- South Central US - West US 3 - Canada Central - West Europe+- North Europe - UK South - France Central+- UAE North +- Central India +- Korea Central +- Japan East - Australia East ## Security considerations |
| remote-rendering | Configure Model Conversion | https://github.com/MicrosoftDocs/azure-docs/commits/main/articles/remote-rendering/how-tos/conversion/configure-model-conversion.md | This chapter documents the options for the model conversion. ## Settings file -If a file called `<modelName>.ConversionSettings.json` is found in the input container beside the input model `<modelName>.<ext>`, then it will be used to provide additional configuration for the model conversion process. +If a file called `<modelName>.ConversionSettings.json` is found in the input container beside the input model `<modelName>.<ext>`, then it will be used to provide extra configuration for the model conversion process. For example, `box.ConversionSettings.json` would be used when converting `box.gltf`. The contents of the file should satisfy the following json schema: If a model is defined using gamma space, then these options should be set to tru * `gammaToLinearVertex` - Convert :::no-loc text="vertex"::: colors from gamma space to linear space > [!NOTE]-> For FBX files these settings are set to `true` by default. For all other file types, the default is `false`. +> For FBX, E57, PLY and XYZ files these settings are set to `true` by default. For all other file types, the default is `false`. ### Scene parameters The properties that do have an effect on point cloud conversion are: * `scaling` - same meaning as for triangular meshes. * `recenterToOrigin` - same meaning as for triangular meshes. * `axis` - same meaning as for triangular meshes. Default values are `["+x", "+y", "+z"]`, however most point cloud data will be rotated compared to renderer's own coordinate system. To compensate, in most cases `["+x", "+z", "-y"]` fixes the rotation.-* `gammaToLinearVertex` - similar to triangular meshes, this flag can be used when point colors are expressed in gamma space. In practice, when enabled, makes the point cloud appear darker. +* `gammaToLinearVertex` - similar to triangular meshes, this flag indicates whether point colors should be converted from gamma space to linear space. Default value for point cloud formats (E57, PLY and XYZ) is true. + * `generateCollisionMesh` - similar to triangular meshes, this flag needs to be enabled to support [spatial queries](../../overview/features/spatial-queries.md). But unlike for triangular meshes, this flag doesn't incurs longer conversion times, larger output file sizes, or longer runtime loading times. So disabling this flag can't be considered an optimization. ## Memory optimizations -Memory consumption of loaded content may become a bottleneck on the rendering system. If the memory payload becomes too large, it may compromise rendering performance or cause the model to not load altogether. This paragraph discusses some important strategies to reduce the memory footprint. +Memory consumption of loaded content may become a bottleneck on the rendering system. If the memory payload becomes too large, it may compromise rendering performance, or cause the model to not load altogether. This paragraph discusses some important strategies to reduce the memory footprint. > [!NOTE] > The following optimizations apply to triangular meshes. There is no way to optimize the output of point clouds through conversion settings. |
| remote-rendering | Debug Rendering | https://github.com/MicrosoftDocs/azure-docs/commits/main/articles/remote-rendering/overview/features/debug-rendering.md | void EnableDebugRenderingEffects(RenderingSession session, bool highlight) // Enable frame counter text overlay on the server side rendering settings.RenderFrameCount = true; - // Enable polygon count text overlay on the server side rendering - settings.RenderPolygonCount = true; + // Enable triangle-/point count text overlay on the server side rendering + settings.RenderPrimitiveCount = true; // Enable wireframe rendering of object geometry on the server settings.RenderWireframe = true; void EnableDebugRenderingEffects(ApiHandle<RenderingSession> session, bool highl // Enable frame counter text overlay on the server side rendering settings->SetRenderFrameCount(true); - // Enable polygon count text overlay on the server side rendering - settings->SetRenderPolygonCount(true); + // Enable triangle-/point count text overlay on the server side rendering + settings->SetRenderPrimitiveCount(true); // Enable wireframe rendering of object geometry on the server settings->SetRenderWireframe(true); |
| remote-rendering | Performance Queries | https://github.com/MicrosoftDocs/azure-docs/commits/main/articles/remote-rendering/overview/features/performance-queries.md | Client-side application performance might be a bottleneck, too. For an in-depth ## Client/server timeline -Before going into detail regarding the various latency values, it is worthwhile to have a look at the synchronization points between client and server on the timeline: +Before going into detail regarding the various latency values, it's worthwhile to have a look at the synchronization points between client and server on the timeline:  The retrieved `FrameStatistics` object holds the following members: | VideoFramesReceived | The number of frames received from the server in the last second. | | VideoFrameReusedCount | Number of received frames in the last second that were used on the device more than once. Non-zero values indicate that frames had to be reused and reprojected either due to network jitter or excessive server rendering time. | | VideoFramesSkipped | Number of received frames in the last second that were decoded, but not shown on display because a newer frame has arrived. Non-zero values indicate that network jittering caused multiple frames to be delayed and then arrive on the client device together in a burst. |-| VideoFramesDiscarded | Very similar to **VideoFramesSkipped**, but the reason for being discarded is that a frame came in so late that it can't even be correlated with any pending pose anymore. If this discarding happens, there is some severe network contention.| +| VideoFramesDiscarded | Very similar to **VideoFramesSkipped**, but the reason for being discarded is that a frame came in so late that it can't even be correlated with any pending pose anymore. If this discarding happens, there's some severe network contention.| | VideoFrameMinDelta | Minimum amount of time between two consecutive frames arriving during the last second. Together with VideoFrameMaxDelta, this range gives an indication of jitter caused either by the network or video codec. | | VideoFrameMaxDelta | Maximum amount of time between two consecutive frames arriving during the last second. Together with VideoFrameMinDelta, this range gives an indication of jitter caused either by the network or video codec. | The sum of all latency values is typically much larger than the available frame Lastly,`TimeSinceLastPresent`, `VideoFrameMinDelta`, and `VideoFrameMaxDelta` give an idea of the variance of incoming video frames and local present calls. High variance means instable frame rate. -None of the values above gives clear indication of pure network latency (the red arrows in the illustration), because the exact time that the server is busy rendering needs to be subtracted from the roundtrip value `LatencyPoseToReceive`. The server-side portion of the overall latency is information that is unavailable to the client. However, the next paragraph explains how this value is approximated through additional input from the server and exposed through the `NetworkLatency` value. +None of the values above gives clear indication of pure network latency (the red arrows in the illustration), because the exact time that the server is busy rendering needs to be subtracted from the roundtrip value `LatencyPoseToReceive`. The server-side portion of the overall latency is information that is unavailable to the client. However, the next paragraph explains how this value is approximated through extra input from the server and exposed through the `NetworkLatency` value. ## Performance assessment queries Contrary to the `FrameStatistics` object, the `PerformanceAssessment` object con | UtilizationGPU | Total server GPU utilization in percent | | MemoryCPU | Total server main memory utilization in percent | | MemoryGPU | Total dedicated video memory utilization in percent of the server GPU |-| NetworkLatency | The approximate average roundtrip network latency in milliseconds. In the illustration above, this value corresponds to the sum of the red arrows. The value is computed by subtracting actual server rendering time from the `LatencyPoseToReceive` value of `FrameStatistics`. While this approximation is not accurate, it gives some indication of the network latency, isolated from the latency values computed on the client. | -| PolygonsRendered | The number of triangles rendered in one frame. This number also includes the triangles that are culled later during rendering. That means, this number does not vary a lot across different camera positions, but performance can vary drastically, depending on the triangle culling rate.| +| NetworkLatency | The approximate average roundtrip network latency in milliseconds. In the illustration above, this value corresponds to the sum of the red arrows. The value is computed by subtracting actual server rendering time from the `LatencyPoseToReceive` value of `FrameStatistics`. While this approximation isn't accurate, it gives some indication of the network latency, isolated from the latency values computed on the client. | +| PolygonsRendered | The number of triangles rendered in one frame. This number also includes the triangles that are culled later during rendering. That means, this number doesn't vary a lot across different camera positions, but performance can vary drastically, depending on the triangle culling rate.| +| PointsRendered | The number of points in point clouds rendered in one frame. Same culling criteria as mentioned above for `PolygonsRendered` apply here.| To help you assess the values, each portion comes with a quality classification like **Great**, **Good**, **Mediocre**, or **Bad**.-This assessment metric provides a rough indication of the server's health, but it should not be seen as absolute. For example, assume you see a 'mediocre' score for the GPU time. It is considered mediocre because it gets close to the limit for the overall frame time budget. In your case however, it might be a good value nonetheless, because you are rendering a complex model. +This assessment metric provides a rough indication of the server's health, but it shouldn't be seen as absolute. For example, assume you see a 'mediocre' score for the GPU time. It's considered mediocre because it gets close to the limit for the overall frame time budget. In your case however, it might be a good value nonetheless, because you're rendering a complex model. ## Statistics debug output |
| remote-rendering | Vm Sizes | https://github.com/MicrosoftDocs/azure-docs/commits/main/articles/remote-rendering/reference/vm-sizes.md | For the [example PowerShell scripts](../samples/powershell-example-scripts.md), ### How the renderer evaluates the number of primitives -The number of primitives that are considered for the limitation test are the number of primitives that are actually passed to the renderer. This geometry is typically the sum of all instantiated meshes, but there are also exceptions. The following geometry is **not included**: +The number of primitives that are considered for the limitation test are the number of primitives (triangles and points) that are actually passed to the renderer. This geometry is typically the sum of all instantiated meshes, but there are also exceptions. The following geometry is **not included**: * Loaded model instances that are fully outside the view frustum. * Models or model parts that are switched to invisible, using the [hierarchical state override component](../overview/features/override-hierarchical-state.md). Accordingly, it's possible to write an application that targets the `standard` s There are two ways to determine the number of primitives of a model or scene that contribute to the budget limit of the `standard` configuration size: * On the model conversion side, retrieve the [conversion output json file](../how-tos/conversion/get-information.md), and check the `numFaces` entry in the [*inputStatistics* section](../how-tos/conversion/get-information.md#the-inputstatistics-section). This number denotes the triangle count in triangular meshes and number of points in point clouds respectively.-* If your application is dealing with dynamic content, the number of rendered primitives can be queried dynamically during runtime. Use a [performance assessment query](../overview/features/performance-queries.md#performance-assessment-queries) and check for the `polygonsRendered` member in the `FrameStatistics` struct. The `PolygonsRendered` field will be set to `bad` when the renderer hits the primitive limitation. The checkerboard background is always faded in with some delay to ensure user action can be taken after this asynchronous query. User action can, for instance, be hiding or deleting model instances. +* If your application is dealing with dynamic content, the number of rendered primitives can be queried dynamically during runtime. Use a [performance assessment query](../overview/features/performance-queries.md#performance-assessment-queries) and check for the sum of the values in the two members `PolygonsRendered` and `PointsRendered` in the `PerformanceAssessment` struct. The `PolygonsRendered` / `PointsRendered` field will be set to `bad` when the renderer hits the primitive limitation. The checkerboard background is always faded in with some delay to ensure user action can be taken after this asynchronous query. User action can, for instance, be hiding or deleting model instances. ## Pricing |
| role-based-access-control | Built In Roles | https://github.com/MicrosoftDocs/azure-docs/commits/main/articles/role-based-access-control/built-in-roles.md | Can manage Azure AD Domain Services and related network configurations [Learn mo > | [Microsoft.Insights](resource-provider-operations.md#microsoftinsights)/AlertRules/Resolved/Action | Classic metric alert resolved | > | [Microsoft.Insights](resource-provider-operations.md#microsoftinsights)/AlertRules/Throttled/Action | Classic metric alert rule throttled | > | [Microsoft.Insights](resource-provider-operations.md#microsoftinsights)/AlertRules/Incidents/Read | Read a classic metric alert incident |+> | [Microsoft.Insights](resource-provider-operations.md#microsoftinsights)/Logs/Read | Reading data from all your logs | +> | [Microsoft.Insights](resource-provider-operations.md#microsoftinsights)/Metrics/Read | Read metrics | +> | [Microsoft.Insights](resource-provider-operations.md#microsoftinsights)/DiagnosticSettings/* | Creates, updates, or reads the diagnostic setting for Analysis Server | +> | [Microsoft.Insights](resource-provider-operations.md#microsoftinsights)/DiagnosticSettingsCategories/Read | Read diagnostic settings categories | > | [Microsoft.AAD](resource-provider-operations.md#microsoftaad)/register/action | Register Domain Service | > | [Microsoft.AAD](resource-provider-operations.md#microsoftaad)/unregister/action | Unregister Domain Service | > | [Microsoft.AAD](resource-provider-operations.md#microsoftaad)/domainServices/* | | Can manage Azure AD Domain Services and related network configurations [Learn mo "Microsoft.Insights/AlertRules/Resolved/Action", "Microsoft.Insights/AlertRules/Throttled/Action", "Microsoft.Insights/AlertRules/Incidents/Read",+ "Microsoft.Insights/Logs/Read", + "Microsoft.Insights/Metrics/Read", + "Microsoft.Insights/DiagnosticSettings/*", + "Microsoft.Insights/DiagnosticSettingsCategories/Read", "Microsoft.AAD/register/action", "Microsoft.AAD/unregister/action", "Microsoft.AAD/domainServices/*", Can view Azure AD Domain Services and related network configurations > | [Microsoft.Resources](resource-provider-operations.md#microsoftresources)/subscriptions/resourceGroups/read | Gets or lists resource groups. | > | [Microsoft.Insights](resource-provider-operations.md#microsoftinsights)/AlertRules/Read | Read a classic metric alert | > | [Microsoft.Insights](resource-provider-operations.md#microsoftinsights)/AlertRules/Incidents/Read | Read a classic metric alert incident |+> | [Microsoft.Insights](resource-provider-operations.md#microsoftinsights)/Logs/Read | Reading data from all your logs | +> | [Microsoft.Insights](resource-provider-operations.md#microsoftinsights)/Metrics/read | Read metrics | +> | [Microsoft.Insights](resource-provider-operations.md#microsoftinsights)/DiagnosticSettings/read | Read a resource diagnostic setting | +> | [Microsoft.Insights](resource-provider-operations.md#microsoftinsights)/DiagnosticSettingsCategories/Read | Read diagnostic settings categories | > | [Microsoft.AAD](resource-provider-operations.md#microsoftaad)/domainServices/*/read | | > | [Microsoft.Network](resource-provider-operations.md#microsoftnetwork)/virtualNetworks/read | Get the virtual network definition | > | [Microsoft.Network](resource-provider-operations.md#microsoftnetwork)/virtualNetworks/subnets/read | Gets a virtual network subnet definition | Can view Azure AD Domain Services and related network configurations "Microsoft.Resources/subscriptions/resourceGroups/read", "Microsoft.Insights/AlertRules/Read", "Microsoft.Insights/AlertRules/Incidents/Read",+ "Microsoft.Insights/Logs/Read", + "Microsoft.Insights/Metrics/read", + "Microsoft.Insights/DiagnosticSettings/read", + "Microsoft.Insights/DiagnosticSettingsCategories/Read", "Microsoft.AAD/domainServices/*/read", "Microsoft.Network/virtualNetworks/read", "Microsoft.Network/virtualNetworks/subnets/read", Can read all monitoring data (metrics, logs, etc.). See also [Get started with r > | **NotActions** | | > | *none* | | > | **DataActions** | |-> | *none* | | +> | [Microsoft.Monitor](resource-provider-operations.md#microsoftmonitor)/accounts/data/metrics/read | Read metrics data in any Monitoring Account | > | **NotDataActions** | | > | *none* | | Can read all monitoring data (metrics, logs, etc.). See also [Get started with r "Microsoft.Support/*" ], "notActions": [],- "dataActions": [], + "dataActions": [ + "Microsoft.Monitor/accounts/data/metrics/read" + ], "notDataActions": [] } ], |
| role-based-access-control | Resource Provider Operations | https://github.com/MicrosoftDocs/azure-docs/commits/main/articles/role-based-access-control/resource-provider-operations.md | Click the resource provider name in the following table to see the list of opera | **Monitor** | | [Microsoft.AlertsManagement](#microsoftalertsmanagement) | | [Microsoft.Insights](#microsoftinsights) |+| [Microsoft.Monitor](#microsoftmonitor) | | [Microsoft.OperationalInsights](#microsoftoperationalinsights) | | [Microsoft.OperationsManagement](#microsoftoperationsmanagement) | | [Microsoft.WorkloadMonitor](#microsoftworkloadmonitor) | Azure service: Microsoft.HybridConnectivity > | Microsoft.HybridConnectivity/endpoints/write | Create or update the endpoint to the target resource. | > | Microsoft.HybridConnectivity/endpoints/delete | Deletes the endpoint access to the target resource. | > | Microsoft.HybridConnectivity/endpoints/listCredentials/action | List the endpoint access credentials to the resource. |-> | Microsoft.HybridConnectivity/endpoints/listManagedProxyDetails/action | List the managed proxy details to the resource. | > | Microsoft.HybridConnectivity/Locations/OperationStatuses/read | read OperationStatuses | > | Microsoft.HybridConnectivity/operations/read | Get the list of Operations | Azure service: [Application Gateway](../application-gateway/index.yml), [Azure B > | Microsoft.Network/networkInterfaces/delete | Deletes a network interface | > | Microsoft.Network/networkInterfaces/effectiveRouteTable/action | Get Route Table configured On Network Interface Of The Vm | > | Microsoft.Network/networkInterfaces/effectiveNetworkSecurityGroups/action | Get Network Security Groups configured On Network Interface Of The Vm |+> | Microsoft.Network/networkInterfaces/rnmEffectiveRouteTable/action | Get Route Table configured On Network Interface Of The Vm In RNM Format | +> | Microsoft.Network/networkInterfaces/rnmEffectiveNetworkSecurityGroups/action | Get Network Security Groups configured On Network Interface Of The Vm In RNM Format | > | Microsoft.Network/networkInterfaces/UpdateParentNicAttachmentOnElasticNic/action | Updates the parent NIC associated to the elastic NIC | > | Microsoft.Network/networkInterfaces/diagnosticIdentity/read | Gets Diagnostic Identity Of The Resource | > | Microsoft.Network/networkInterfaces/ipconfigurations/read | Gets a network interface ip configuration definition. | Azure service: [Storage](../storage/index.yml) > | Microsoft.Storage/storageAccounts/blobServices/containers/blobs/immutableStorage/runAsSuperUser/action | | > | Microsoft.Storage/storageAccounts/blobServices/containers/blobs/tags/read | Returns the result of reading blob tags | > | Microsoft.Storage/storageAccounts/blobServices/containers/blobs/tags/write | Returns the result of writing blob tags |+> | Microsoft.Storage/storageAccounts/fileServices/readFileBackupSemantics/action | Read File Backup Sematics Privilege | +> | Microsoft.Storage/storageAccounts/fileServices/writeFileBackupSemantics/action | Write File Backup Sematics Privilege | +> | Microsoft.Storage/storageAccounts/fileServices/takeOwnership/action | File Take Ownership Privilege | > | Microsoft.Storage/storageAccounts/fileServices/fileshares/files/read | Returns a file/folder or a list of files/folders | > | Microsoft.Storage/storageAccounts/fileServices/fileshares/files/write | Returns the result of writing a file or creating a folder | > | Microsoft.Storage/storageAccounts/fileServices/fileshares/files/delete | Returns the result of deleting a file/folder | Azure service: [Data Factory](../data-factory/index.yml) > | Microsoft.DataFactory/factories/querytriggerruns/action | Queries the Trigger Runs. | > | Microsoft.DataFactory/factories/querypipelineruns/action | Queries the Pipeline Runs. | > | Microsoft.DataFactory/factories/querydebugpipelineruns/action | Queries the Debug Pipeline Runs. |+> | Microsoft.DataFactory/factories/adflinkconnections/read | Reads ADF Link Connection. | +> | Microsoft.DataFactory/factories/adflinkconnections/delete | Deletes ADF Link Connection. | +> | Microsoft.DataFactory/factories/adflinkconnections/write | Create or update ADF Link Connection | > | Microsoft.DataFactory/factories/dataflows/read | Reads Data Flow. | > | Microsoft.DataFactory/factories/dataflows/delete | Deletes Data Flow. | > | Microsoft.DataFactory/factories/dataflows/write | Create or update Data Flow | Azure service: [Azure Database for MySQL](../mysql/index.yml) > | Action | Description | > | | | > | Microsoft.DBforMySQL/getPrivateDnsZoneSuffix/action | Gets the private dns zone suffix. |+> | Microsoft.DBforMySQL/assessForMigration/action | Performs a migration assessment with the specified parameters. | > | Microsoft.DBforMySQL/privateEndpointConnectionsApproval/action | Determines if user is allowed to approve a private endpoint connection | > | Microsoft.DBforMySQL/register/action | Register MySQL Resource Provider | > | Microsoft.DBforMySQL/checkNameAvailability/action | Verify whether given server name is available for provisioning worldwide for a given subscription. | > | Microsoft.DBforMySQL/flexibleServers/read | Returns the list of servers or gets the properties for the specified server. | > | Microsoft.DBforMySQL/flexibleServers/write | Creates a server with the specified parameters or updates the properties or tags for the specified server. | > | Microsoft.DBforMySQL/flexibleServers/delete | Deletes an existing server. |+> | Microsoft.DBforMySQL/flexibleServers/cutoverMigration/action | Performs a migration cutover with the specified parameters. | > | Microsoft.DBforMySQL/flexibleServers/failover/action | Failovers a specific server. | > | Microsoft.DBforMySQL/flexibleServers/restart/action | Restarts a specific server. | > | Microsoft.DBforMySQL/flexibleServers/start/action | Starts a specific server. | > | Microsoft.DBforMySQL/flexibleServers/stop/action | Stops a specific server. |+> | Microsoft.DBforMySQL/flexibleServers/administrators/read | Returns the list of administrators for a server or gets the properties for the specified administrator | +> | Microsoft.DBforMySQL/flexibleServers/administrators/write | Creates an administrator with the specified parameters or updates an existing administrator | +> | Microsoft.DBforMySQL/flexibleServers/administrators/delete | Deletes an existing server administrator. | > | Microsoft.DBforMySQL/flexibleServers/backups/write | | > | Microsoft.DBforMySQL/flexibleServers/backups/read | Returns the list of backups for a server or gets the properties for the specified backup. | > | Microsoft.DBforMySQL/flexibleServers/configurations/read | Returns the list of MySQL server configurations or gets the configurations for the specified server. | Azure service: [Azure Database for MySQL](../mysql/index.yml) > | Microsoft.DBforMySQL/flexibleServers/firewallRules/read | Returns the list of firewall rules for a server or gets the properties for the specified firewall rule. | > | Microsoft.DBforMySQL/flexibleServers/firewallRules/delete | Deletes an existing firewall rule. | > | Microsoft.DBforMySQL/flexibleServers/logFiles/read | Return a list of server log files for a server with file download links |+> | Microsoft.DBforMySQL/flexibleServers/outboundIp/read | Get the outbound ip of server | > | Microsoft.DBforMySQL/flexibleServers/providers/Microsoft.Insights/diagnosticSettings/read | Gets the disagnostic setting for the resource | > | Microsoft.DBforMySQL/flexibleServers/providers/Microsoft.Insights/diagnosticSettings/write | Creates or updates the diagnostic setting for the resource | > | Microsoft.DBforMySQL/flexibleServers/providers/Microsoft.Insights/logDefinitions/read | Gets the available logs for MySQL servers | Azure service: [Azure SQL Database](/azure/azure-sql/database/index), [Azure SQL > | Microsoft.Sql/locations/databaseAzureAsyncOperation/read | Gets the status of a database operation. | > | Microsoft.Sql/locations/databaseEncryptionProtectorRevalidateAzureAsyncOperation/read | Revalidate key for azure sql database azure async operation | > | Microsoft.Sql/locations/databaseEncryptionProtectorRevalidateOperationResults/read | Revalidate key for azure sql database operation results |+> | Microsoft.Sql/locations/databaseEncryptionProtectorRevertAzureAsyncOperation/read | Revert key for azure sql database azure async operation | +> | Microsoft.Sql/locations/databaseEncryptionProtectorRevertOperationResults/read | Revert key for azure sql database operation results | > | Microsoft.Sql/locations/databaseOperationResults/read | Gets the status of a database operation. | > | Microsoft.Sql/locations/deletedServerAsyncOperation/read | Gets in-progress operations on deleted server | > | Microsoft.Sql/locations/deletedServerOperationResults/read | Gets in-progress operations on deleted server | Azure service: [Azure SQL Database](/azure/azure-sql/database/index), [Azure SQL > | Microsoft.Sql/servers/databases/dataWarehouseQueries/dataWarehouseQuerySteps/read | Returns the distributed query step information of data warehouse query for selected step ID | > | Microsoft.Sql/servers/databases/dataWarehouseUserActivities/read | Retrieves the user activities of a SQL Data Warehouse instance which includes running and suspended queries | > | Microsoft.Sql/servers/databases/encryptionProtector/revalidate/action | Revalidate the database encryption protector |+> | Microsoft.Sql/servers/databases/encryptionProtector/revert/action | Revertthe database encryption protector | > | Microsoft.Sql/servers/databases/extendedAuditingSettings/read | Retrieve details of the extended blob auditing policy configured on a given database | > | Microsoft.Sql/servers/databases/extendedAuditingSettings/write | Change the extended blob auditing policy for a given database | > | Microsoft.Sql/servers/databases/extensions/write | Performs a database extension operation. | Azure service: [Azure Databricks](/azure/databricks/) > | Action | Description | > | | | > | Microsoft.Databricks/register/action | Register to Databricks. |+> | Microsoft.Databricks/accessConnectors/read | Retrieves a list of Azure Databricks Access Connectors | +> | Microsoft.Databricks/accessConnectors/write | Creates an Azure Databricks Access Connector | +> | Microsoft.Databricks/accessConnectors/delete | Removes Azure Databricks Access Connector | > | Microsoft.Databricks/locations/getNetworkPolicies/action | Get Network Intent Polices for a subnet based on the location used by NRP | > | Microsoft.Databricks/locations/operationstatuses/read | Reads the operation status for the resource. | > | Microsoft.Databricks/operations/read | Gets the list of operations. | Azure service: [Azure Bot Service](/azure/bot-service/) > | Microsoft.BotService/botServices/read | Read a Bot Service | > | Microsoft.BotService/botServices/write | Write a Bot Service | > | Microsoft.BotService/botServices/delete | Delete a Bot Service |+> | Microsoft.BotService/botServices/createemailsigninurl/action | Create a sign in url for email channel modern auth | > | Microsoft.BotService/botServices/channels/read | Read a Bot Service Channel | > | Microsoft.BotService/botServices/channels/write | Write a Bot Service Channel | > | Microsoft.BotService/botServices/channels/delete | Delete a Bot Service Channel | Azure service: [Cognitive Services](../cognitive-services/index.yml) > | Microsoft.CognitiveServices/accounts/AudioContentCreation/ExportTasks/CharacterPredictionTasks/SubmitPredictContentTypesTask/action | Create predict ssml content type task. | > | Microsoft.CognitiveServices/accounts/AudioContentCreation/ExportTasks/CharacterPredictionTasks/SubmitPredictSsmlTagsTask/action | Create predict ssml tag task. | > | Microsoft.CognitiveServices/accounts/AudioContentCreation/ExportTasks/CharacterPredictionTasks/read | Query ACC predict ssml content type tasks. |+> | Microsoft.CognitiveServices/accounts/AudioContentCreation/ExportTasks/ImportResourceFilesTasks/read | Import resource files tasks. | > | Microsoft.CognitiveServices/accounts/AudioContentCreation/Metadata/IsCurrentSubscriptionInGroup/action | Check whether current subscription is in specific group kind. | > | Microsoft.CognitiveServices/accounts/AudioContentCreation/Metadata/BlobEntitiesEndpointWithSas/read | Query blob url with SAS of artifacts. | > | Microsoft.CognitiveServices/accounts/AudioContentCreation/Metadata/CustomvoiceGlobalSettings/read | Query customvoice global settings. | Azure service: [Cognitive Services](../cognitive-services/index.yml) > | Microsoft.CognitiveServices/accounts/OpenAI/deployments/delete | Deletes a deployment. | > | Microsoft.CognitiveServices/accounts/OpenAI/deployments/read | Gets information about deployments. | > | Microsoft.CognitiveServices/accounts/OpenAI/deployments/write | Updates deployments. |+> | Microsoft.CognitiveServices/accounts/OpenAI/deployments/embeddings/action | Return the embeddings for a given prompt. | +> | Microsoft.CognitiveServices/accounts/OpenAI/deployments/completions/write | Create a completion from a chosen model | > | Microsoft.CognitiveServices/accounts/OpenAI/engines/read | Read engine information. | > | Microsoft.CognitiveServices/accounts/OpenAI/engines/completions/action | Create a completion from a chosen model | > | Microsoft.CognitiveServices/accounts/OpenAI/engines/search/action | Search for the most relevant documents using the current engine. |+> | Microsoft.CognitiveServices/accounts/OpenAI/engines/generate/action | Sample from the model via POST request. | +> | Microsoft.CognitiveServices/accounts/OpenAI/engines/completions/write | Create a completion from a chosen model | +> | Microsoft.CognitiveServices/accounts/OpenAI/engines/completions/browser_stream/read | (Intended for browsers only.) Stream generated text from the model via GET request.<br>This method is provided because the browser-native EventSource method can only send GET requests.<br>It supports a more limited set of configuration options than the POST variant. | +> | Microsoft.CognitiveServices/accounts/OpenAI/engines/generate/read | (Intended for browsers only.) Stream generated text from the model via GET request.<br>This method is provided because the browser-native EventSource method can only send GET requests.<br>It supports a more limited set of configuration options than the POST variant. | > | Microsoft.CognitiveServices/accounts/OpenAI/files/delete | Deletes files. | > | Microsoft.CognitiveServices/accounts/OpenAI/files/read | Gets information about files. | > | Microsoft.CognitiveServices/accounts/OpenAI/files/import/action | Creates a file by uploading data. | Azure service: [Cognitive Services](../cognitive-services/index.yml) > | Microsoft.CognitiveServices/accounts/OpenAI/fine-tunes/read | Gets information about fine-tuned models. | > | Microsoft.CognitiveServices/accounts/OpenAI/fine-tunes/events/read | Gets event information for a fine-tuning model adaptation. | > | Microsoft.CognitiveServices/accounts/OpenAI/models/read | Gets information about fine-tuned models |+> | Microsoft.CognitiveServices/accounts/OpenAI/openapi/read | Get OpenAI Info | > | Microsoft.CognitiveServices/accounts/Personalizer/rank/action | A personalization rank request. | > | Microsoft.CognitiveServices/accounts/Personalizer/evaluations/action | Submit a new evaluation. | > | Microsoft.CognitiveServices/accounts/Personalizer/configurations/client/action | Get the client configuration. | Azure service: [Event Grid](../event-grid/index.yml) > | Microsoft.EventGrid/domains/listKeys/action | List keys for a domain | > | Microsoft.EventGrid/domains/regenerateKey/action | Regenerate key for a domain | > | Microsoft.EventGrid/domains/PrivateEndpointConnectionsApproval/action | Approve PrivateEndpointConnections for domains |+> | Microsoft.EventGrid/domains/eventSubscriptions/write | Create or update a Domain eventSubscription | +> | Microsoft.EventGrid/domains/eventSubscriptions/read | Read a Domain eventSubscription | +> | Microsoft.EventGrid/domains/eventSubscriptions/delete | Delete a Domain eventSubscription | +> | Microsoft.EventGrid/domains/eventSubscriptions/getFullUrl/action | Get full url for the Domain event subscription | +> | Microsoft.EventGrid/domains/eventSubscriptions/getDeliveryAttributes/action | Get Domain EventSubscription Delivery Attributes | > | Microsoft.EventGrid/domains/privateEndpointConnectionProxies/validate/action | Validate PrivateEndpointConnectionProxies for domains | > | Microsoft.EventGrid/domains/privateEndpointConnectionProxies/read | Read PrivateEndpointConnectionProxies for domains | > | Microsoft.EventGrid/domains/privateEndpointConnectionProxies/write | Write PrivateEndpointConnectionProxies for domains | Azure service: [Event Grid](../event-grid/index.yml) > | Microsoft.EventGrid/domains/topics/read | Read a domain topic | > | Microsoft.EventGrid/domains/topics/write | Create or update a domain topic | > | Microsoft.EventGrid/domains/topics/delete | Delete a domain topic |+> | Microsoft.EventGrid/domains/topics/eventSubscriptions/write | Create or update a DomainTopic eventSubscription | +> | Microsoft.EventGrid/domains/topics/eventSubscriptions/read | Read a DomainTopic eventSubscription | +> | Microsoft.EventGrid/domains/topics/eventSubscriptions/delete | Delete a DomainTopic eventSubscription | +> | Microsoft.EventGrid/domains/topics/eventSubscriptions/getFullUrl/action | Get full url for the DomainTopic event subscription | +> | Microsoft.EventGrid/domains/topics/eventSubscriptions/getDeliveryAttributes/action | Get DomainTopic EventSubscription Delivery Attributes | > | Microsoft.EventGrid/eventSubscriptions/write | Create or update an eventSubscription | > | Microsoft.EventGrid/eventSubscriptions/read | Read an eventSubscription | > | Microsoft.EventGrid/eventSubscriptions/delete | Delete an eventSubscription | Azure service: [Event Grid](../event-grid/index.yml) > | Microsoft.EventGrid/topics/listKeys/action | List keys for a topic | > | Microsoft.EventGrid/topics/regenerateKey/action | Regenerate key for a topic | > | Microsoft.EventGrid/topics/PrivateEndpointConnectionsApproval/action | Approve PrivateEndpointConnections for topics |+> | Microsoft.EventGrid/topics/eventSubscriptions/write | Create or update a Topic eventSubscription | +> | Microsoft.EventGrid/topics/eventSubscriptions/read | Read a Topic eventSubscription | +> | Microsoft.EventGrid/topics/eventSubscriptions/delete | Delete a Topic eventSubscription | +> | Microsoft.EventGrid/topics/eventSubscriptions/getFullUrl/action | Get full url for the Topic event subscription | +> | Microsoft.EventGrid/topics/eventSubscriptions/getDeliveryAttributes/action | Get Topic EventSubscription Delivery Attributes | > | Microsoft.EventGrid/topics/privateEndpointConnectionProxies/validate/action | Validate PrivateEndpointConnectionProxies for topics | > | Microsoft.EventGrid/topics/privateEndpointConnectionProxies/read | Read PrivateEndpointConnectionProxies for topics | > | Microsoft.EventGrid/topics/privateEndpointConnectionProxies/write | Write PrivateEndpointConnectionProxies for topics | Azure service: [Azure Active Directory B2C](../active-directory-b2c/index.yml) > | Microsoft.AzureActiveDirectory/b2cDirectories/read | View B2C Directory resource | > | Microsoft.AzureActiveDirectory/b2cDirectories/delete | Delete B2C Directory resource | > | Microsoft.AzureActiveDirectory/b2ctenants/read | Lists all B2C tenants where the user is a member |+> | Microsoft.AzureActiveDirectory/ciamDirectories/write | Create or update CIAM Directory resource | +> | Microsoft.AzureActiveDirectory/ciamDirectories/read | View CIAM Directory resource | +> | Microsoft.AzureActiveDirectory/ciamDirectories/delete | Delete CIAM Directory resource | > | Microsoft.AzureActiveDirectory/guestUsages/write | Create or update Guest Usages resource | > | Microsoft.AzureActiveDirectory/guestUsages/read | View Guest Usages resource | > | Microsoft.AzureActiveDirectory/guestUsages/delete | Delete Guest Usages resource | Azure service: [Key Vault](../key-vault/index.yml) > | Microsoft.KeyVault/locations/deletedVaults/read | View the properties of a soft deleted key vault | > | Microsoft.KeyVault/locations/deletedVaults/purge/action | Purge a soft deleted key vault | > | Microsoft.KeyVault/locations/managedHsmOperationResults/read | Check the result of a long run operation |-> | Microsoft.KeyVault/locations/notifyNetworkSecurityPerimeterUpdatesAvailable/write | Check if the configuration of the Network Security Perimeter needs updating. | > | Microsoft.KeyVault/locations/operationResults/read | Check the result of a long run operation | > | Microsoft.KeyVault/managedHSMs/read | View the properties of a Managed HSM | > | Microsoft.KeyVault/managedHSMs/write | Create a new Managed HSM or update the properties of an existing Managed HSM | Azure service: [Key Vault](../key-vault/index.yml) > | Microsoft.KeyVault/vaults/keys/read | List the keys in a specified vault, or read the current version of a specified key. | > | Microsoft.KeyVault/vaults/keys/write | Creates the first version of a new key if it does not exist. If it already exists, then the existing key is returned without any modification. This API does not create subsequent versions, and does not update existing keys. | > | Microsoft.KeyVault/vaults/keys/versions/read | List the versions of a specified key, or read the specified version of a key. |-> | Microsoft.KeyVault/vaults/networkSecurityPerimeterAssociationProxies/delete | Delete an association proxy to a Network Security Perimeter resource of Microsoft.Network provider. | -> | Microsoft.KeyVault/vaults/networkSecurityPerimeterAssociationProxies/read | Delete an association proxy to a Network Security Perimeter resource of Microsoft.Network provider. | -> | Microsoft.KeyVault/vaults/networkSecurityPerimeterAssociationProxies/write | Change the state of an association to a Network Security Perimeter resource of Microsoft.Network provider | -> | Microsoft.KeyVault/vaults/networkSecurityPerimeterConfigurations/read | Read the Network Security Perimeter configuration stored in a vault. | -> | Microsoft.KeyVault/vaults/networkSecurityPerimeterConfigurations/reconcile/action | Reconcile the Network Security Perimeter configuration stored in a vault with NRP's (Microsoft.Network Resource Provider) copy. | > | Microsoft.KeyVault/vaults/privateEndpointConnectionProxies/read | View the state of a connection proxy to a Private Endpoint resource of Microsoft.Network provider | > | Microsoft.KeyVault/vaults/privateEndpointConnectionProxies/write | Change the state of a connection proxy to a Private Endpoint resource of Microsoft.Network provider | > | Microsoft.KeyVault/vaults/privateEndpointConnectionProxies/delete | Delete a connection proxy to a Private Endpoint resource of Microsoft.Network provider | Azure service: [Key Vault](../key-vault/index.yml) > | Microsoft.KeyVault/vaults/secrets/readMetadata/action | List or view the properties of a secret, but not its value. | > | Microsoft.KeyVault/vaults/secrets/getSecret/action | Gets the value of a secret. | > | Microsoft.KeyVault/vaults/secrets/setSecret/action | Sets the value of a secret. If the secret does not exist, the first version is created. Otherwise, a new version is created with the specified value. |-> | Microsoft.KeyVault/vaults/storageaccounts/read | Read definition of managed storage accounts and SAS. | +> | Microsoft.KeyVault/vaults/storageaccounts/read | Read definition of managed storage accounts. | > | Microsoft.KeyVault/vaults/storageaccounts/set/action | Creates or updates the definition of a managed storage account. | > | Microsoft.KeyVault/vaults/storageaccounts/delete | Delete the definition of a managed storage account. | > | Microsoft.KeyVault/vaults/storageaccounts/backup/action | Creates a backup file of the definition of a managed storage account and its SAS (Shared Access Signature). | Azure service: [Key Vault](../key-vault/index.yml) > | Microsoft.KeyVault/vaults/storageaccounts/restore/action | Restores the definition of a managed storage account and its SAS (Shared Access Signature) from a backup file generated by Key Vault. | > | Microsoft.KeyVault/vaults/storageaccounts/sas/set/action | Creates or updates the SAS (Shared Access Signature) definition for a managed storage account. | > | Microsoft.KeyVault/vaults/storageaccounts/sas/delete | Delete the SAS (Shared Access Signature) definition for a managed storage account. |+> | Microsoft.KeyVault/vaults/storageaccounts/sas/read | Read the SAS (Shared Access Signature) definition for a managed storage account. | ### Microsoft.Security Azure service: [Azure Monitor](../azure-monitor/index.yml) > | Microsoft.Insights/Metrics/Write | Write metrics | > | Microsoft.Insights/Telemetry/Write | Write telemetry | +### Microsoft.Monitor ++Azure service: [Azure Monitor](../azure-monitor/index.yml) ++> [!div class="mx-tableFixed"] +> | Action | Description | +> | | | +> | microsoft.monitor/accounts/read | Read any Monitoring Account | +> | microsoft.monitor/accounts/write | Create or Update any Monitoring Account | +> | microsoft.monitor/accounts/delete | Delete any Monitoring Account | +> | microsoft.monitor/accounts/metrics/read | Read Monitoring Account metrics | +> | microsoft.monitor/accounts/metrics/write | Write Monitoring Account metrics | +> | **DataAction** | **Description** | +> | microsoft.monitor/accounts/data/logs/read | Read logs data in any Monitoring Account | +> | microsoft.monitor/accounts/data/logs/write | Write logs data to any Monitoring Account | +> | microsoft.monitor/accounts/data/metrics/read | Read metrics data in any Monitoring Account | +> | microsoft.monitor/accounts/data/metrics/write | Write metrics data to any Monitoring Account | + ### Microsoft.OperationalInsights Azure service: [Azure Monitor](../azure-monitor/index.yml) Azure service: [Azure Monitor](../azure-monitor/index.yml) > | Microsoft.OperationalInsights/workspaces/query/ACSCallDiagnostics/read | Read data from the ACSCallDiagnostics table | > | Microsoft.OperationalInsights/workspaces/query/ACSCallSummary/read | Read data from the ACSCallSummary table | > | Microsoft.OperationalInsights/workspaces/query/ACSChatIncomingOperations/read | Read data from the ACSChatIncomingOperations table |+> | Microsoft.OperationalInsights/workspaces/query/ACSEmailSendMailOperational/read | Read data from the ACSEmailSendMailOperational table | +> | Microsoft.OperationalInsights/workspaces/query/ACSEmailStatusUpdateOperational/read | Read data from the ACSEmailStatusUpdateOperational table | +> | Microsoft.OperationalInsights/workspaces/query/ACSEmailUserEngagementOperational/read | Read data from the ACSEmailUserEngagementOperational table | > | Microsoft.OperationalInsights/workspaces/query/ACSNetworkTraversalDiagnostics/read | Read data from the ACSNetworkTraversalDiagnostics table | > | Microsoft.OperationalInsights/workspaces/query/ACSNetworkTraversalIncomingOperations/read | Read data from the ACSNetworkTraversalIncomingOperations table | > | Microsoft.OperationalInsights/workspaces/query/ACSSMSIncomingOperations/read | Read data from the ACSSMSIncomingOperations table | Azure service: [Azure Monitor](../azure-monitor/index.yml) > | Microsoft.OperationalInsights/workspaces/query/ADPRequests/read | Read data from the ADPRequests table | > | Microsoft.OperationalInsights/workspaces/query/ADReplicationResult/read | Read data from the ADReplicationResult table | > | Microsoft.OperationalInsights/workspaces/query/ADSecurityAssessmentRecommendation/read | Read data from the ADSecurityAssessmentRecommendation table |+> | Microsoft.OperationalInsights/workspaces/query/ADTDataHistoryOperation/read | Read data from the ADTDataHistoryOperation table | > | Microsoft.OperationalInsights/workspaces/query/ADTDigitalTwinsOperation/read | Read data from the ADTDigitalTwinsOperation table | > | Microsoft.OperationalInsights/workspaces/query/ADTEventRoutesOperation/read | Read data from the ADTEventRoutesOperation table | > | Microsoft.OperationalInsights/workspaces/query/ADTModelsOperation/read | Read data from the ADTModelsOperation table | Azure service: [Azure Monitor](../azure-monitor/index.yml) > | Microsoft.OperationalInsights/workspaces/query/AmlInferencingEvent/read | Read data from the AmlInferencingEvent table | > | Microsoft.OperationalInsights/workspaces/query/AmlModelsEvent/read | Read data from the AmlModelsEvent table | > | Microsoft.OperationalInsights/workspaces/query/AmlOnlineEndpointConsoleLog/read | Read data from the AmlOnlineEndpointConsoleLog table |+> | Microsoft.OperationalInsights/workspaces/query/AmlOnlineEndpointTrafficLog/read | Read data from the AmlOnlineEndpointTrafficLog table | > | Microsoft.OperationalInsights/workspaces/query/AmlPipelineEvent/read | Read data from the AmlPipelineEvent table | > | Microsoft.OperationalInsights/workspaces/query/AmlRunEvent/read | Read data from the AmlRunEvent table | > | Microsoft.OperationalInsights/workspaces/query/AmlRunStatusChangedEvent/read | Read data from the AmlRunStatusChangedEvent table | Azure service: [Azure Monitor](../azure-monitor/index.yml) > | Microsoft.OperationalInsights/workspaces/query/CloudAppEvents/read | Read data from the CloudAppEvents table | > | Microsoft.OperationalInsights/workspaces/query/CommonSecurityLog/read | Read data from the CommonSecurityLog table | > | Microsoft.OperationalInsights/workspaces/query/ComputerGroup/read | Read data from the ComputerGroup table |+> | Microsoft.OperationalInsights/workspaces/query/ConfidentialWatchlist/read | Read data from the ConfidentialWatchlist table | > | Microsoft.OperationalInsights/workspaces/query/ConfigurationChange/read | Read data from the ConfigurationChange table | > | Microsoft.OperationalInsights/workspaces/query/ConfigurationData/read | Read data from the ConfigurationData table | > | Microsoft.OperationalInsights/workspaces/query/ContainerImageInventory/read | Read data from the ContainerImageInventory table | Azure service: [Azure Monitor](../azure-monitor/index.yml) > | Microsoft.OperationalInsights/workspaces/query/DeviceRegistryEvents/read | Read data from the DeviceRegistryEvents table | > | Microsoft.OperationalInsights/workspaces/query/DeviceSkypeHeartbeat/read | Read data from the DeviceSkypeHeartbeat table | > | Microsoft.OperationalInsights/workspaces/query/DeviceSkypeSignIn/read | Read data from the DeviceSkypeSignIn table |+> | Microsoft.OperationalInsights/workspaces/query/DeviceTvmSecureConfigurationAssessment/read | Read data from the DeviceTvmSecureConfigurationAssessment table | +> | Microsoft.OperationalInsights/workspaces/query/DeviceTvmSoftwareInventory/read | Read data from the DeviceTvmSoftwareInventory table | +> | Microsoft.OperationalInsights/workspaces/query/DeviceTvmSoftwareVulnerabilities/read | Read data from the DeviceTvmSoftwareVulnerabilities table | > | Microsoft.OperationalInsights/workspaces/query/DHAppReliability/read | Read data from the DHAppReliability table | > | Microsoft.OperationalInsights/workspaces/query/DHDriverReliability/read | Read data from the DHDriverReliability table | > | Microsoft.OperationalInsights/workspaces/query/DHLogonFailures/read | Read data from the DHLogonFailures table | Azure service: [Azure Monitor](../azure-monitor/index.yml) > | Microsoft.OperationalInsights/workspaces/query/PowerBIDatasetsWorkspace/read | Read data from the PowerBIDatasetsWorkspace table | > | Microsoft.OperationalInsights/workspaces/query/PowerBIDatasetsWorkspacePreview/read | Read data from the PowerBIDatasetsWorkspacePreview table | > | Microsoft.OperationalInsights/workspaces/query/PowerBIReportUsageTenant/read | Read data from the PowerBIReportUsageTenant table |+> | Microsoft.OperationalInsights/workspaces/query/PowerBIReportUsageWorkspace/read | Read data from the PowerBIReportUsageWorkspace table | > | Microsoft.OperationalInsights/workspaces/query/ProjectActivity/read | Read data from the ProjectActivity table | > | Microsoft.OperationalInsights/workspaces/query/ProtectionStatus/read | Read data from the ProtectionStatus table | > | Microsoft.OperationalInsights/workspaces/query/PurviewDataSensitivityLogs/read | Read data from the PurviewDataSensitivityLogs table | Azure service: [Azure Monitor](../azure-monitor/index.yml) > | Microsoft.OperationalInsights/workspaces/query/SQLSecurityAuditEvents/read | Read data from the SQLSecurityAuditEvents table | > | Microsoft.OperationalInsights/workspaces/query/SqlVulnerabilityAssessmentResult/read | Read data from the SqlVulnerabilityAssessmentResult table | > | Microsoft.OperationalInsights/workspaces/query/SqlVulnerabilityAssessmentScanStatus/read | Read data from the SqlVulnerabilityAssessmentScanStatus table |+> | Microsoft.OperationalInsights/workspaces/query/StorageAntimalwareScanResults/read | Read data from the StorageAntimalwareScanResults table | > | Microsoft.OperationalInsights/workspaces/query/StorageBlobLogs/read | Read data from the StorageBlobLogs table | > | Microsoft.OperationalInsights/workspaces/query/StorageCacheOperationEvents/read | Read data from the StorageCacheOperationEvents table | > | Microsoft.OperationalInsights/workspaces/query/StorageCacheUpgradeEvents/read | Read data from the StorageCacheUpgradeEvents table | Azure service: [Azure Kubernetes Service (AKS)](/azure/aks/) > | Microsoft.KubernetesConfiguration/namespaces/read | Get Namespace Resource | > | Microsoft.KubernetesConfiguration/namespaces/listUserCredential/action | Get User Credentials for the parent cluster of the namespace resource. | > | Microsoft.KubernetesConfiguration/operations/read | Gets available operations of the Microsoft.KubernetesConfiguration resource provider. |+> | Microsoft.KubernetesConfiguration/privateLinkScopes/write | Creates or updates private link scope. | +> | Microsoft.KubernetesConfiguration/privateLinkScopes/delete | Deletes private link scope. | +> | Microsoft.KubernetesConfiguration/privateLinkScopes/read | Gets private link scope | +> | Microsoft.KubernetesConfiguration/privateLinkScopes/privateEndpointConnectionProxies/write | Creates or updates private endpoint connection proxy. | +> | Microsoft.KubernetesConfiguration/privateLinkScopes/privateEndpointConnectionProxies/delete | Deletes private endpoint connection proxy | +> | Microsoft.KubernetesConfiguration/privateLinkScopes/privateEndpointConnectionProxies/read | Gets private endpoint connection proxy. | +> | Microsoft.KubernetesConfiguration/privateLinkScopes/privateEndpointConnectionProxies/validate/action | Validates private endpoint connection proxy object. | +> | Microsoft.KubernetesConfiguration/privateLinkScopes/privateEndpointConnectionProxies/updatePrivateEndpointProperties/action | Updates patch on private endpoint connection proxy. | +> | Microsoft.KubernetesConfiguration/privateLinkScopes/privateEndpointConnectionProxies/operations/read | Updates patch on private endpoint connection proxy. | +> | Microsoft.KubernetesConfiguration/privateLinkScopes/privateEndpointConnections/write | Creates or updates private endpoint connection. | +> | Microsoft.KubernetesConfiguration/privateLinkScopes/privateEndpointConnections/delete | Deletes private endpoint connection. | +> | Microsoft.KubernetesConfiguration/privateLinkScopes/privateEndpointConnections/read | Gets private endpoint connection. | > | Microsoft.KubernetesConfiguration/sourceControlConfigurations/write | Creates or updates source control configuration. | > | Microsoft.KubernetesConfiguration/sourceControlConfigurations/read | Gets source control configuration. | > | Microsoft.KubernetesConfiguration/sourceControlConfigurations/delete | Deletes source control configuration. | Azure service: [Site Recovery](../site-recovery/index.yml) > | Action | Description | > | | | > | Microsoft.RecoveryServices/register/action | Registers subscription for given Resource Provider |-> | MICROSOFT.RECOVERYSERVICES/Locations/backupCrossRegionRestore/action | Trigger Cross region restore. | -> | MICROSOFT.RECOVERYSERVICES/Locations/backupCrrJob/action | Get Cross Region Restore Job Details in the secondary region for Recovery Services Vault. | -> | MICROSOFT.RECOVERYSERVICES/Locations/backupCrrJobs/action | List Cross Region Restore Jobs in the secondary region for Recovery Services Vault. | -> | MICROSOFT.RECOVERYSERVICES/Locations/backupPreValidateProtection/action | | -> | MICROSOFT.RECOVERYSERVICES/Locations/backupStatus/action | Check Backup Status for Recovery Services Vaults | -> | MICROSOFT.RECOVERYSERVICES/Locations/backupValidateFeatures/action | Validate Features | +> | microsoft.recoveryservices/Locations/backupCrossRegionRestore/action | Trigger Cross region restore. | +> | microsoft.recoveryservices/Locations/backupCrrJob/action | Get Cross Region Restore Job Details in the secondary region for Recovery Services Vault. | +> | microsoft.recoveryservices/Locations/backupCrrJobs/action | List Cross Region Restore Jobs in the secondary region for Recovery Services Vault. | +> | microsoft.recoveryservices/Locations/backupPreValidateProtection/action | | +> | microsoft.recoveryservices/Locations/backupStatus/action | Check Backup Status for Recovery Services Vaults | +> | microsoft.recoveryservices/Locations/backupValidateFeatures/action | Validate Features | > | Microsoft.RecoveryServices/locations/allocateStamp/action | AllocateStamp is internal operation used by service | > | Microsoft.RecoveryServices/locations/checkNameAvailability/action | Check Resource Name Availability is an API to check if resource name is available | > | Microsoft.RecoveryServices/locations/allocatedStamp/read | GetAllocatedStamp is internal operation used by service |-> | MICROSOFT.RECOVERYSERVICES/Locations/backupAadProperties/read | Get AAD Properties for authentication in the third region for Cross Region Restore. | -> | MICROSOFT.RECOVERYSERVICES/Locations/backupCrrOperationResults/read | Returns CRR Operation Result for Recovery Services Vault. | -> | MICROSOFT.RECOVERYSERVICES/Locations/backupCrrOperationsStatus/read | Returns CRR Operation Status for Recovery Services Vault. | -> | MICROSOFT.RECOVERYSERVICES/Locations/backupProtectedItem/write | Create a backup Protected Item | -> | MICROSOFT.RECOVERYSERVICES/Locations/backupProtectedItems/read | Returns the list of all Protected Items. | +> | microsoft.recoveryservices/Locations/backupAadProperties/read | Get AAD Properties for authentication in the third region for Cross Region Restore. | +> | microsoft.recoveryservices/Locations/backupCrrOperationResults/read | Returns CRR Operation Result for Recovery Services Vault. | +> | microsoft.recoveryservices/Locations/backupCrrOperationsStatus/read | Returns CRR Operation Status for Recovery Services Vault. | +> | microsoft.recoveryservices/Locations/backupProtectedItem/write | Create a backup Protected Item | +> | microsoft.recoveryservices/Locations/backupProtectedItems/read | Returns the list of all Protected Items. | > | Microsoft.RecoveryServices/locations/operationStatus/read | Gets Operation Status for a given Operation | > | Microsoft.RecoveryServices/operations/read | Operation returns the list of Operations for a Resource Provider |-> | MICROSOFT.RECOVERYSERVICES/Vaults/backupJobsExport/action | Export Jobs | -> | MICROSOFT.RECOVERYSERVICES/Vaults/backupSecurityPIN/action | Returns Security PIN Information for Recovery Services Vault. | -> | MICROSOFT.RECOVERYSERVICES/Vaults/backupTriggerValidateOperation/action | Validate Operation on Protected Item | -> | MICROSOFT.RECOVERYSERVICES/Vaults/backupValidateOperation/action | Validate Operation on Protected Item | +> | microsoft.recoveryservices/Vaults/backupJobsExport/action | Export Jobs | +> | microsoft.recoveryservices/Vaults/backupSecurityPIN/action | Returns Security PIN Information for Recovery Services Vault. | +> | microsoft.recoveryservices/Vaults/backupTriggerValidateOperation/action | Validate Operation on Protected Item | +> | microsoft.recoveryservices/Vaults/backupValidateOperation/action | Validate Operation on Protected Item | > | Microsoft.RecoveryServices/Vaults/write | Create Vault operation creates an Azure resource of type 'vault' | > | Microsoft.RecoveryServices/Vaults/read | The Get Vault operation gets an object representing the Azure resource of type 'vault' | > | Microsoft.RecoveryServices/Vaults/delete | The Delete Vault operation deletes the specified Azure resource of type 'vault' |-> | MICROSOFT.RECOVERYSERVICES/Vaults/backupconfig/read | Returns Configuration for Recovery Services Vault. | -> | MICROSOFT.RECOVERYSERVICES/Vaults/backupconfig/write | Updates Configuration for Recovery Services Vault. | -> | MICROSOFT.RECOVERYSERVICES/Vaults/backupEncryptionConfigs/read | Gets Backup Resource Encryption Configuration. | -> | MICROSOFT.RECOVERYSERVICES/Vaults/backupEncryptionConfigs/write | Updates Backup Resource Encryption Configuration | -> | MICROSOFT.RECOVERYSERVICES/Vaults/backupEngines/read | Returns all the backup management servers registered with vault. | -> | MICROSOFT.RECOVERYSERVICES/Vaults/backupFabrics/refreshContainers/action | Refreshes the container list | -> | MICROSOFT.RECOVERYSERVICES/Vaults/backupFabrics/backupProtectionIntent/delete | Delete a backup Protection Intent | -> | MICROSOFT.RECOVERYSERVICES/Vaults/backupFabrics/backupProtectionIntent/read | Get a backup Protection Intent | -> | MICROSOFT.RECOVERYSERVICES/Vaults/backupFabrics/backupProtectionIntent/write | Create a backup Protection Intent | -> | MICROSOFT.RECOVERYSERVICES/Vaults/backupFabrics/operationResults/read | Returns status of the operation | -> | MICROSOFT.RECOVERYSERVICES/Vaults/backupFabrics/operationsStatus/read | Returns status of the operation | -> | MICROSOFT.RECOVERYSERVICES/Vaults/backupFabrics/protectableContainers/read | Get all protectable containers | -> | MICROSOFT.RECOVERYSERVICES/Vaults/backupFabrics/protectionContainers/delete | Deletes the registered Container | -> | MICROSOFT.RECOVERYSERVICES/Vaults/backupFabrics/protectionContainers/inquire/action | Do inquiry for workloads within a container | -> | MICROSOFT.RECOVERYSERVICES/Vaults/backupFabrics/protectionContainers/read | Returns all registered containers | -> | MICROSOFT.RECOVERYSERVICES/Vaults/backupFabrics/protectionContainers/write | Creates a registered container | -> | MICROSOFT.RECOVERYSERVICES/Vaults/backupFabrics/protectionContainers/items/read | Get all items in a container | -> | MICROSOFT.RECOVERYSERVICES/Vaults/backupFabrics/protectionContainers/operationResults/read | Gets result of Operation performed on Protection Container. | -> | MICROSOFT.RECOVERYSERVICES/Vaults/backupFabrics/protectionContainers/operationsStatus/read | Gets status of Operation performed on Protection Container. | -> | MICROSOFT.RECOVERYSERVICES/Vaults/backupFabrics/protectionContainers/protectedItems/backup/action | Performs Backup for Protected Item. | -> | MICROSOFT.RECOVERYSERVICES/Vaults/backupFabrics/protectionContainers/protectedItems/delete | Deletes Protected Item | -> | MICROSOFT.RECOVERYSERVICES/Vaults/backupFabrics/protectionContainers/protectedItems/read | Returns object details of the Protected Item | -> | MICROSOFT.RECOVERYSERVICES/Vaults/backupFabrics/protectionContainers/protectedItems/recoveryPointsRecommendedForMove/action | Get Recovery points recommended for move to another tier | -> | MICROSOFT.RECOVERYSERVICES/Vaults/backupFabrics/protectionContainers/protectedItems/write | Create a backup Protected Item | -> | MICROSOFT.RECOVERYSERVICES/Vaults/backupFabrics/protectionContainers/protectedItems/operationResults/read | Gets Result of Operation Performed on Protected Items. | -> | MICROSOFT.RECOVERYSERVICES/Vaults/backupFabrics/protectionContainers/protectedItems/operationsStatus/read | Returns the status of Operation performed on Protected Items. | -> | MICROSOFT.RECOVERYSERVICES/Vaults/backupFabrics/protectionContainers/protectedItems/recoveryPoints/accessToken/action | Get AccessToken for Cross Region Restore. | -> | MICROSOFT.RECOVERYSERVICES/Vaults/backupFabrics/protectionContainers/protectedItems/recoveryPoints/move/action | Move Recovery point to another tier | -> | MICROSOFT.RECOVERYSERVICES/Vaults/backupFabrics/protectionContainers/protectedItems/recoveryPoints/provisionInstantItemRecovery/action | Provision Instant Item Recovery for Protected Item | -> | MICROSOFT.RECOVERYSERVICES/Vaults/backupFabrics/protectionContainers/protectedItems/recoveryPoints/read | Get Recovery Points for Protected Items. | -> | MICROSOFT.RECOVERYSERVICES/Vaults/backupFabrics/protectionContainers/protectedItems/recoveryPoints/restore/action | Restore Recovery Points for Protected Items. | -> | MICROSOFT.RECOVERYSERVICES/Vaults/backupFabrics/protectionContainers/protectedItems/recoveryPoints/revokeInstantItemRecovery/action | Revoke Instant Item Recovery for Protected Item | -> | MICROSOFT.RECOVERYSERVICES/Vaults/backupJobs/cancel/action | Cancel the Job | -> | MICROSOFT.RECOVERYSERVICES/Vaults/backupJobs/read | Returns all Job Objects | -> | MICROSOFT.RECOVERYSERVICES/Vaults/backupJobs/operationResults/read | Returns the Result of Job Operation. | -> | MICROSOFT.RECOVERYSERVICES/Vaults/backupJobs/operationsStatus/read | Returns the status of Job Operation. | -> | MICROSOFT.RECOVERYSERVICES/Vaults/backupOperationResults/read | Returns Backup Operation Result for Recovery Services Vault. | -> | MICROSOFT.RECOVERYSERVICES/Vaults/backupOperations/read | Returns Backup Operation Status for Recovery Services Vault. | -> | MICROSOFT.RECOVERYSERVICES/Vaults/backupPolicies/delete | Delete a Protection Policy | -> | MICROSOFT.RECOVERYSERVICES/Vaults/backupPolicies/read | Returns all Protection Policies | -> | MICROSOFT.RECOVERYSERVICES/Vaults/backupPolicies/write | Creates Protection Policy | -> | MICROSOFT.RECOVERYSERVICES/Vaults/backupPolicies/operationResults/read | Get Results of Policy Operation. | -> | MICROSOFT.RECOVERYSERVICES/Vaults/backupPolicies/operations/read | Get Status of Policy Operation. | -> | MICROSOFT.RECOVERYSERVICES/Vaults/backupProtectableItems/read | Returns list of all Protectable Items. | -> | MICROSOFT.RECOVERYSERVICES/Vaults/backupProtectedItems/read | Returns the list of all Protected Items. | -> | MICROSOFT.RECOVERYSERVICES/Vaults/backupProtectionContainers/read | Returns all containers belonging to the subscription | -> | MICROSOFT.RECOVERYSERVICES/Vaults/backupProtectionIntents/read | List all backup Protection Intents | -> | MICROSOFT.RECOVERYSERVICES/Vaults/backupResourceGuardProxies/delete | The Delete ResourceGuard proxy operation deletes the specified Azure resource of type 'ResourceGuard proxy' | -> | MICROSOFT.RECOVERYSERVICES/Vaults/backupResourceGuardProxies/read | Get the list of ResourceGuard proxies for a resource | -> | MICROSOFT.RECOVERYSERVICES/Vaults/backupResourceGuardProxies/read | Get ResourceGuard proxy operation gets an object representing the Azure resource of type 'ResourceGuard proxy' | -> | MICROSOFT.RECOVERYSERVICES/Vaults/backupResourceGuardProxies/unlockDelete/action | Unlock delete ResourceGuard proxy operation unlocks the next delete critical operation | -> | MICROSOFT.RECOVERYSERVICES/Vaults/backupResourceGuardProxies/write | Create ResourceGuard proxy operation creates an Azure resource of type 'ResourceGuard Proxy' | -> | MICROSOFT.RECOVERYSERVICES/Vaults/backupstorageconfig/read | Returns Storage Configuration for Recovery Services Vault. | -> | MICROSOFT.RECOVERYSERVICES/Vaults/backupstorageconfig/write | Updates Storage Configuration for Recovery Services Vault. | -> | MICROSOFT.RECOVERYSERVICES/Vaults/backupUsageSummaries/read | Returns summaries for Protected Items and Protected Servers for a Recovery Services . | -> | MICROSOFT.RECOVERYSERVICES/Vaults/backupValidateOperationResults/read | Validate Operation on Protected Item | -> | MICROSOFT.RECOVERYSERVICES/Vaults/backupValidateOperationsStatuses/read | Validate Operation on Protected Item | +> | microsoft.recoveryservices/Vaults/backupconfig/read | Returns Configuration for Recovery Services Vault. | +> | microsoft.recoveryservices/Vaults/backupconfig/write | Updates Configuration for Recovery Services Vault. | +> | microsoft.recoveryservices/Vaults/backupEncryptionConfigs/read | Gets Backup Resource Encryption Configuration. | +> | microsoft.recoveryservices/Vaults/backupEncryptionConfigs/write | Updates Backup Resource Encryption Configuration | +> | microsoft.recoveryservices/Vaults/backupEngines/read | Returns all the backup management servers registered with vault. | +> | microsoft.recoveryservices/Vaults/backupFabrics/refreshContainers/action | Refreshes the container list | +> | microsoft.recoveryservices/Vaults/backupFabrics/backupProtectionIntent/delete | Delete a backup Protection Intent | +> | microsoft.recoveryservices/Vaults/backupFabrics/backupProtectionIntent/read | Get a backup Protection Intent | +> | microsoft.recoveryservices/Vaults/backupFabrics/backupProtectionIntent/write | Create a backup Protection Intent | +> | microsoft.recoveryservices/Vaults/backupFabrics/operationResults/read | Returns status of the operation | +> | microsoft.recoveryservices/Vaults/backupFabrics/operationsStatus/read | Returns status of the operation | +> | microsoft.recoveryservices/Vaults/backupFabrics/protectableContainers/read | Get all protectable containers | +> | microsoft.recoveryservices/Vaults/backupFabrics/protectionContainers/delete | Deletes the registered Container | +> | microsoft.recoveryservices/Vaults/backupFabrics/protectionContainers/inquire/action | Do inquiry for workloads within a container | +> | microsoft.recoveryservices/Vaults/backupFabrics/protectionContainers/read | Returns all registered containers | +> | microsoft.recoveryservices/Vaults/backupFabrics/protectionContainers/write | Creates a registered container | +> | microsoft.recoveryservices/Vaults/backupFabrics/protectionContainers/items/read | Get all items in a container | +> | microsoft.recoveryservices/Vaults/backupFabrics/protectionContainers/operationResults/read | Gets result of Operation performed on Protection Container. | +> | microsoft.recoveryservices/Vaults/backupFabrics/protectionContainers/operationsStatus/read | Gets status of Operation performed on Protection Container. | +> | microsoft.recoveryservices/Vaults/backupFabrics/protectionContainers/protectedItems/backup/action | Performs Backup for Protected Item. | +> | microsoft.recoveryservices/Vaults/backupFabrics/protectionContainers/protectedItems/delete | Deletes Protected Item | +> | microsoft.recoveryservices/Vaults/backupFabrics/protectionContainers/protectedItems/read | Returns object details of the Protected Item | +> | microsoft.recoveryservices/Vaults/backupFabrics/protectionContainers/protectedItems/recoveryPointsRecommendedForMove/action | Get Recovery points recommended for move to another tier | +> | microsoft.recoveryservices/Vaults/backupFabrics/protectionContainers/protectedItems/write | Create a backup Protected Item | +> | microsoft.recoveryservices/Vaults/backupFabrics/protectionContainers/protectedItems/operationResults/read | Gets Result of Operation Performed on Protected Items. | +> | microsoft.recoveryservices/Vaults/backupFabrics/protectionContainers/protectedItems/operationsStatus/read | Returns the status of Operation performed on Protected Items. | +> | microsoft.recoveryservices/Vaults/backupFabrics/protectionContainers/protectedItems/recoveryPoints/accessToken/action | Get AccessToken for Cross Region Restore. | +> | microsoft.recoveryservices/Vaults/backupFabrics/protectionContainers/protectedItems/recoveryPoints/move/action | Move Recovery point to another tier | +> | microsoft.recoveryservices/Vaults/backupFabrics/protectionContainers/protectedItems/recoveryPoints/provisionInstantItemRecovery/action | Provision Instant Item Recovery for Protected Item | +> | microsoft.recoveryservices/Vaults/backupFabrics/protectionContainers/protectedItems/recoveryPoints/read | Get Recovery Points for Protected Items. | +> | microsoft.recoveryservices/Vaults/backupFabrics/protectionContainers/protectedItems/recoveryPoints/restore/action | Restore Recovery Points for Protected Items. | +> | microsoft.recoveryservices/Vaults/backupFabrics/protectionContainers/protectedItems/recoveryPoints/revokeInstantItemRecovery/action | Revoke Instant Item Recovery for Protected Item | +> | microsoft.recoveryservices/Vaults/backupJobs/cancel/action | Cancel the Job | +> | microsoft.recoveryservices/Vaults/backupJobs/read | Returns all Job Objects | +> | microsoft.recoveryservices/Vaults/backupJobs/operationResults/read | Returns the Result of Job Operation. | +> | microsoft.recoveryservices/Vaults/backupJobs/operationsStatus/read | Returns the status of Job Operation. | +> | microsoft.recoveryservices/Vaults/backupOperationResults/read | Returns Backup Operation Result for Recovery Services Vault. | +> | microsoft.recoveryservices/Vaults/backupOperations/read | Returns Backup Operation Status for Recovery Services Vault. | +> | microsoft.recoveryservices/Vaults/backupPolicies/delete | Delete a Protection Policy | +> | microsoft.recoveryservices/Vaults/backupPolicies/read | Returns all Protection Policies | +> | microsoft.recoveryservices/Vaults/backupPolicies/write | Creates Protection Policy | +> | microsoft.recoveryservices/Vaults/backupPolicies/operationResults/read | Get Results of Policy Operation. | +> | microsoft.recoveryservices/Vaults/backupPolicies/operations/read | Get Status of Policy Operation. | +> | microsoft.recoveryservices/Vaults/backupProtectableItems/read | Returns list of all Protectable Items. | +> | microsoft.recoveryservices/Vaults/backupProtectedItems/read | Returns the list of all Protected Items. | +> | microsoft.recoveryservices/Vaults/backupProtectionContainers/read | Returns all containers belonging to the subscription | +> | microsoft.recoveryservices/Vaults/backupProtectionIntents/read | List all backup Protection Intents | +> | microsoft.recoveryservices/Vaults/backupResourceGuardProxies/delete | The Delete ResourceGuard proxy operation deletes the specified Azure resource of type 'ResourceGuard proxy' | +> | microsoft.recoveryservices/Vaults/backupResourceGuardProxies/read | Get the list of ResourceGuard proxies for a resource | +> | microsoft.recoveryservices/Vaults/backupResourceGuardProxies/read | Get ResourceGuard proxy operation gets an object representing the Azure resource of type 'ResourceGuard proxy' | +> | microsoft.recoveryservices/Vaults/backupResourceGuardProxies/unlockDelete/action | Unlock delete ResourceGuard proxy operation unlocks the next delete critical operation | +> | microsoft.recoveryservices/Vaults/backupResourceGuardProxies/write | Create ResourceGuard proxy operation creates an Azure resource of type 'ResourceGuard Proxy' | +> | microsoft.recoveryservices/Vaults/backupstorageconfig/read | Returns Storage Configuration for Recovery Services Vault. | +> | microsoft.recoveryservices/Vaults/backupstorageconfig/write | Updates Storage Configuration for Recovery Services Vault. | +> | microsoft.recoveryservices/Vaults/backupUsageSummaries/read | Returns summaries for Protected Items and Protected Servers for a Recovery Services . | +> | microsoft.recoveryservices/Vaults/backupValidateOperationResults/read | Validate Operation on Protected Item | +> | microsoft.recoveryservices/Vaults/backupValidateOperationsStatuses/read | Validate Operation on Protected Item | > | Microsoft.RecoveryServices/Vaults/certificates/write | The Update Resource Certificate operation updates the resource/vault credential certificate. | > | Microsoft.RecoveryServices/Vaults/extendedInformation/read | The Get Extended Info operation gets an object's Extended Info representing the Azure resource of type ?vault? | > | Microsoft.RecoveryServices/Vaults/extendedInformation/write | The Get Extended Info operation gets an object's Extended Info representing the Azure resource of type ?vault? | Azure service: [Site Recovery](../site-recovery/index.yml) > | Microsoft.RecoveryServices/Vaults/monitoringAlerts/write | Resolves the alert. | > | Microsoft.RecoveryServices/Vaults/monitoringConfigurations/read | Gets the Recovery services vault notification configuration. | > | Microsoft.RecoveryServices/Vaults/monitoringConfigurations/write | Configures e-mail notifications to Recovery services vault. |-> | MICROSOFT.RECOVERYSERVICES/Vaults/privateEndpointConnectionProxies/delete | Wait for a few minutes and then try the operation again. If the issue persists, please contact Microsoft support. | -> | MICROSOFT.RECOVERYSERVICES/Vaults/privateEndpointConnectionProxies/read | Get all protectable containers | -> | MICROSOFT.RECOVERYSERVICES/Vaults/privateEndpointConnectionProxies/validate/action | Get all protectable containers | -> | MICROSOFT.RECOVERYSERVICES/Vaults/privateEndpointConnectionProxies/write | Get all protectable containers | -> | MICROSOFT.RECOVERYSERVICES/Vaults/privateEndpointConnectionProxies/operationsStatus/read | Get all protectable containers | -> | MICROSOFT.RECOVERYSERVICES/Vaults/privateEndpointConnections/delete | Delete Private Endpoint requests. This call is made by Backup Admin. | -> | MICROSOFT.RECOVERYSERVICES/Vaults/privateEndpointConnections/write | Approve or Reject Private Endpoint requests. This call is made by Backup Admin. | -> | MICROSOFT.RECOVERYSERVICES/Vaults/privateEndpointConnections/operationsStatus/read | Returns the operation status for a private endpoint connection. | +> | microsoft.recoveryservices/Vaults/privateEndpointConnectionProxies/delete | Wait for a few minutes and then try the operation again. If the issue persists, please contact Microsoft support. | +> | microsoft.recoveryservices/Vaults/privateEndpointConnectionProxies/read | Get all protectable containers | +> | microsoft.recoveryservices/Vaults/privateEndpointConnectionProxies/validate/action | Get all protectable containers | +> | microsoft.recoveryservices/Vaults/privateEndpointConnectionProxies/write | Get all protectable containers | +> | microsoft.recoveryservices/Vaults/privateEndpointConnectionProxies/operationsStatus/read | Get all protectable containers | +> | microsoft.recoveryservices/Vaults/privateEndpointConnections/delete | Delete Private Endpoint requests. This call is made by Backup Admin. | +> | microsoft.recoveryservices/Vaults/privateEndpointConnections/write | Approve or Reject Private Endpoint requests. This call is made by Backup Admin. | +> | microsoft.recoveryservices/Vaults/privateEndpointConnections/operationsStatus/read | Returns the operation status for a private endpoint connection. | > | Microsoft.RecoveryServices/Vaults/providers/Microsoft.Insights/diagnosticSettings/read | Azure Backup Diagnostics | > | Microsoft.RecoveryServices/Vaults/providers/Microsoft.Insights/diagnosticSettings/write | Azure Backup Diagnostics | > | Microsoft.RecoveryServices/Vaults/providers/Microsoft.Insights/logDefinitions/read | Azure Backup Logs | Azure service: [Site Recovery](../site-recovery/index.yml) > | Microsoft.RecoveryServices/vaults/replicationVaultSettings/read | Read any | > | Microsoft.RecoveryServices/vaults/replicationVaultSettings/write | Create or Update any | > | Microsoft.RecoveryServices/vaults/replicationvCenters/read | Read any vCenters |-> | MICROSOFT.RECOVERYSERVICES/Vaults/usages/read | Returns usage details for a Recovery Services Vault. | +> | microsoft.recoveryservices/Vaults/usages/read | Returns usage details for a Recovery Services Vault. | > | Microsoft.RecoveryServices/vaults/usages/read | Read any Vault Usages | > | Microsoft.RecoveryServices/Vaults/vaultTokens/read | The Vault Token operation can be used to get Vault Token for vault level backend operations. | |
| route-server | Route Injection In Spokes | https://github.com/MicrosoftDocs/azure-docs/commits/main/articles/route-server/route-injection-in-spokes.md | This dual functionality often is interesting, but at times it can be detrimental However, there is an alternative, more dynamic approach. It is possible using different Azure Route Servers for different functionality: one of them will be responsible for interacting with the Virtual Network Gateways, and the other one for interacting with the Virtual Network routing. The following diagram shows a possible design for this: In the figure above, Azure Route Server 1 in the hub is used to inject the prefixes from the SDWAN into ExpressRoute. Since the spokes are peered with the hub VNet without the "Use Remote Gateways" and "Allow Gateway Transit" VNet peering options, the spokes will not learn these routes (neither the SDWAN prefixes nor the ExpressRoute prefixes). |
| search | Monitor Azure Cognitive Search | https://github.com/MicrosoftDocs/azure-docs/commits/main/articles/search/monitor-azure-cognitive-search.md | -[Azure Monitor](../azure-monitor/overview.md) is enabled with every subscription to provide monitoring capabilities over all Azure resources, including Cognitive Search. When you sign up for search, Azure Monitor collects [**activity logs**](../azure-monitor/agents/data-sources.md#azure-activity-log) and [**metrics**](../azure-monitor/essentials/data-platform-metrics.md) as soon as you start using the service. +[Azure Monitor](../azure-monitor/overview.md) is enabled with every subscription to provide monitoring capabilities over all Azure resources, including Cognitive Search. When you sign up for search, Azure Monitor collects [**activity logs**](../azure-monitor/data-sources.md#azure-activity-log) and [**metrics**](../azure-monitor/essentials/data-platform-metrics.md) as soon as you start using the service. + Optionally, you can enable diagnostic settings to collect [**resource logs**](../azure-monitor/essentials/resource-logs.md). Resource logs contain detailed information about search service operations that's useful for deeper analysis and investigation. For REST calls, use an [admin API key](search-security-api-keys.md) and [Postman ## Monitor activity logs -In Azure Cognitive Search, [**activity logs**](../azure-monitor/agents/data-sources.md#azure-activity-log) reflect control plane activity, such as service and capacity updates, or API key usage or management. Activity logs are collected [free of charge](../azure-monitor/usage-estimated-costs.md#pricing-model), with no configuration required. Data retention is 90 days, but you can configure durable storage for longer retention. +In Azure Cognitive Search, [**activity logs**](../azure-monitor/data-sources.md#azure-activity-log) reflect control plane activity, such as service and capacity updates, or API key usage or management. Activity logs are collected [free of charge](../azure-monitor/usage-estimated-costs.md#pricing-model), with no configuration required. Data retention is 90 days, but you can configure durable storage for longer retention. 1. In the Azure portal, find your search service. From the menu on the left, select **Activity logs** to view the logs for your search service. |
| search | Query Odata Filter Orderby Syntax | https://github.com/MicrosoftDocs/azure-docs/commits/main/articles/search/query-odata-filter-orderby-syntax.md | -Azure Cognitive Search supports a subset of the OData expression syntax for **$filter**, **$orderby**, and **$select** expressions. Filter expressions are evaluated during query parsing, constraining search to specific fields or adding match criteria used during index scans. Order-by expressions are applied as a post-processing step over a result set to sort the documents that are returned. Select expressions determine which document fields are included in the result set. The syntax of these expressions is distinct from the [simple](query-simple-syntax.md) or [full](query-lucene-syntax.md) query syntax that is used in the **search** parameter, although there's some overlap in the syntax for referencing fields. +This article provides an overview of the OData expression language used in $filter, $order-by, and $select expressions in Azure Cognitive Search. The language is presented "bottom-up" starting with the most basic elements. The OData expressions that you can construct in a query request range from simple to highly complex, but they all share common elements. Shared elements include: -This article provides an overview of the OData expression language used in filters, order-by, and select expressions. The language is presented "bottom-up", starting with the most basic elements and building on them. The top-level syntax for each parameter is described in a separate article: ++ **Field paths**, which refer to specific fields of your index.++ **Constants**, which are literal values of a certain data type. -- [$filter syntax](search-query-odata-filter.md)-- [$orderby syntax](search-query-odata-orderby.md)-- [$select syntax](search-query-odata-select.md)+Once you understand these common concepts, you can continue with the top-level syntax for each expression: -OData expressions range from simple to highly complex, but they all share common elements. The most basic parts of an OData expression in Azure Cognitive Search are: ++ [**$filter**](search-query-odata-filter.md) expressions are evaluated during query parsing, constraining search to specific fields or adding match criteria used during index scans. ++ [**$orderby**](search-query-odata-orderby.md) expressions are applied as a post-processing step over a result set to sort the documents that are returned. ++ [**$select**](search-query-odata-select.md) expressions determine which document fields are included in the result set. -- **Field paths**, which refer to specific fields of your index.-- **Constants**, which are literal values of a certain data type.+The syntax of these expressions is distinct from the [simple](query-simple-syntax.md) or [full](query-lucene-syntax.md) query syntax used in the **search** parameter, although there's some overlap in the syntax for referencing fields. > [!NOTE] > Terminology in Azure Cognitive Search differs from the [OData standard](https://www.odata.org/documentation/) in a few ways. What we call a **field** in Azure Cognitive Search is called a **property** in OData, and similarly for **field path** versus **property path**. An **index** containing **documents** in Azure Cognitive Search is referred to more generally in OData as an **entity set** containing **entities**. The Azure Cognitive Search terminology is used throughout this reference. An interactive syntax diagram is also available: A field path is composed of one or more **identifiers** separated by slashes. Each identifier is a sequence of characters that must start with an ASCII letter or underscore, and contain only ASCII letters, digits, or underscores. The letters can be upper- or lower-case. -An identifier can refer either to the name of a field, or to a **range variable** in the context of a [collection expression](search-query-odata-collection-operators.md) (`any` or `all`) in a filter. A range variable is like a loop variable that represents the current element of the collection. For complex collections, that variable represents an object, which is why you can use field paths to refer to sub-fields of the variable. This is analogous to dot notation in many programming languages. +An identifier can refer either to the name of a field, or to a **range variable** in the context of a [collection expression](search-query-odata-collection-operators.md) (`any` or `all`) in a filter. A range variable is like a loop variable that represents the current element of the collection. For complex collections, that variable represents an object, which is why you can use field paths to refer to subfields of the variable. This is analogous to dot notation in many programming languages. Examples of field paths are shown in the following table: | Field path | Description | | | | | `HotelName` | Refers to a top-level field of the index |-| `Address/City` | Refers to the `City` sub-field of a complex field in the index; `Address` is of type `Edm.ComplexType` in this example | -| `Rooms/Type` | Refers to the `Type` sub-field of a complex collection field in the index; `Rooms` is of type `Collection(Edm.ComplexType)` in this example | -| `Stores/Address/Country` | Refers to the `Country` sub-field of the `Address` sub-field of a complex collection field in the index; `Stores` is of type `Collection(Edm.ComplexType)` and `Address` is of type `Edm.ComplexType` in this example | -| `room/Type` | Refers to the `Type` sub-field of the `room` range variable, for example in the filter expression `Rooms/any(room: room/Type eq 'deluxe')` | -| `store/Address/Country` | Refers to the `Country` sub-field of the `Address` sub-field of the `store` range variable, for example in the filter expression `Stores/any(store: store/Address/Country eq 'Canada')` | +| `Address/City` | Refers to the `City` subfield of a complex field in the index; `Address` is of type `Edm.ComplexType` in this example | +| `Rooms/Type` | Refers to the `Type` subfield of a complex collection field in the index; `Rooms` is of type `Collection(Edm.ComplexType)` in this example | +| `Stores/Address/Country` | Refers to the `Country` subfield of the `Address` subfield of a complex collection field in the index; `Stores` is of type `Collection(Edm.ComplexType)` and `Address` is of type `Edm.ComplexType` in this example | +| `room/Type` | Refers to the `Type` subfield of the `room` range variable, for example in the filter expression `Rooms/any(room: room/Type eq 'deluxe')` | +| `store/Address/Country` | Refers to the `Country` subfield of the `Address` subfield of the `store` range variable, for example in the filter expression `Stores/any(store: store/Address/Country eq 'Canada')` | The meaning of a field path differs depending on the context. In filters, a field path refers to the value of a *single instance* of a field in the current document. In other contexts, such as **$orderby**, **$select**, or in [fielded search in the full Lucene syntax](query-lucene-syntax.md#bkmk_fields), a field path refers to the field itself. This difference has some consequences for how you use field paths in filters. -Consider the field path `Address/City`. In a filter, this refers to a single city for the current document, like "San Francisco". In contrast, `Rooms/Type` refers to the `Type` sub-field for many rooms (like "standard" for the first room, "deluxe" for the second room, and so on). Since `Rooms/Type` doesn't refer to a *single instance* of the sub-field `Type`, it can't be used directly in a filter. Instead, to filter on room type, you would use a [lambda expression](search-query-odata-collection-operators.md) with a range variable, like this: +Consider the field path `Address/City`. In a filter, this refers to a single city for the current document, like "San Francisco". In contrast, `Rooms/Type` refers to the `Type` subfield for many rooms (like "standard" for the first room, "deluxe" for the second room, and so on). Since `Rooms/Type` doesn't refer to a *single instance* of the subfield `Type`, it can't be used directly in a filter. Instead, to filter on room type, you would use a [lambda expression](search-query-odata-collection-operators.md) with a range variable, like this: ```odata Rooms/any(room: room/Type eq 'deluxe') ``` -In this example, the range variable `room` appears in the `room/Type` field path. That way, `room/Type` refers to the type of the current room in the current document. This is a single instance of the `Type` sub-field, so it can be used directly in the filter. +In this example, the range variable `room` appears in the `room/Type` field path. That way, `room/Type` refers to the type of the current room in the current document. This is a single instance of the `Type` subfield, so it can be used directly in the filter. ### Using field paths An interactive syntax diagram is also available: > [!NOTE] > See [OData expression syntax reference for Azure Cognitive Search](search-query-odata-syntax-reference.md) for the complete EBNF. -The **$orderby** and **$select** parameters are both comma-separated lists of simpler expressions. The **$filter** parameter is a Boolean expression that is composed of simpler sub-expressions. These sub-expressions are combined using logical operators such as [`and`, `or`, and `not`](search-query-odata-logical-operators.md), comparison operators such as [`eq`, `lt`, `gt`, and so on](search-query-odata-comparison-operators.md), and collection operators such as [`any` and `all`](search-query-odata-collection-operators.md). +## Next steps -The **$filter**, **$orderby**, and **$select** parameters are explored in more detail in the following articles: --- [OData $filter syntax in Azure Cognitive Search](search-query-odata-filter.md)-- [OData $orderby syntax in Azure Cognitive Search](search-query-odata-orderby.md)-- [OData $select syntax in Azure Cognitive Search](search-query-odata-select.md)+The **$orderby** and **$select** parameters are both comma-separated lists of simpler expressions. The **$filter** parameter is a Boolean expression that is composed of simpler subexpressions. These subexpressions are combined using logical operators such as [`and`, `or`, and `not`](search-query-odata-logical-operators.md), comparison operators such as [`eq`, `lt`, `gt`, and so on](search-query-odata-comparison-operators.md), and collection operators such as [`any` and `all`](search-query-odata-collection-operators.md). -## See also +The **$filter**, **$orderby**, and **$select** parameters are explored in more detail in the following articles: -- [Faceted navigation in Azure Cognitive Search](search-faceted-navigation.md)-- [Filters in Azure Cognitive Search](search-filters.md)-- [Search Documents (Azure Cognitive Search REST API)](/rest/api/searchservice/Search-Documents)-- [Lucene query syntax](query-lucene-syntax.md)-- [Simple query syntax in Azure Cognitive Search](query-simple-syntax.md)++ [OData $filter syntax in Azure Cognitive Search](search-query-odata-filter.md)++ [OData $orderby syntax in Azure Cognitive Search](search-query-odata-orderby.md)++ [OData $select syntax in Azure Cognitive Search](search-query-odata-select.md) |
| search | Search Query Odata Filter | https://github.com/MicrosoftDocs/azure-docs/commits/main/articles/search/search-query-odata-filter.md | -translation.priority.mt: - - "de-de" - - "es-es" - - "fr-fr" - - "it-it" - - "ja-jp" - - "ko-kr" - - "pt-br" - - "ru-ru" - - "zh-cn" - - "zh-tw" Last updated : 07/18/2022 # OData $filter syntax in Azure Cognitive Search -Azure Cognitive Search uses [OData filter expressions](query-odata-filter-orderby-syntax.md) to apply additional criteria to a search query besides full-text search terms. This article describes the syntax of filters in detail. For more general information about what filters are and how to use them to realize specific query scenarios, see [Filters in Azure Cognitive Search](search-filters.md). +In Azure Cognitive Search, the **$filter** parameter specifies inclusion or exclusion criteria for returning matches in search results. This article describes the OData syntax of **$filter** and provides examples. ++Field path construction and constants are described in the [OData language overview in Azure Cognitive Search](query-odata-filter-orderby-syntax.md). For more information about filter scenarios, see [Filters in Azure Cognitive Search](search-filters.md). ## Syntax |
| search | Search Query Odata Orderby | https://github.com/MicrosoftDocs/azure-docs/commits/main/articles/search/search-query-odata-orderby.md | -translation.priority.mt: - - "de-de" - - "es-es" - - "fr-fr" - - "it-it" - - "ja-jp" - - "ko-kr" - - "pt-br" - - "ru-ru" - - "zh-cn" - - "zh-tw" Last updated : 07/18/2022 + # OData $orderby syntax in Azure Cognitive Search - You can use the [OData **$orderby** parameter](query-odata-filter-orderby-syntax.md) to apply a custom sort order for search results in Azure Cognitive Search. This article describes the syntax of **$orderby** in detail. For more general information about how to use **$orderby** when presenting search results, see [How to work with search results in Azure Cognitive Search](search-pagination-page-layout.md). +In Azure Cognitive Search, the **$orderby** parameter specifies custom sort order for search results. This article describes the OData syntax of **$orderby** and provides examples. ++Field path construction and constants are described in the [OData language overview in Azure Cognitive Search](query-odata-filter-orderby-syntax.md). For more information about sorting and search results composition, see [How to work with search results in Azure Cognitive Search](search-pagination-page-layout.md). ## Syntax |
| search | Search Query Odata Select | https://github.com/MicrosoftDocs/azure-docs/commits/main/articles/search/search-query-odata-select.md | -translation.priority.mt: - - "de-de" - - "es-es" - - "fr-fr" - - "it-it" - - "ja-jp" - - "ko-kr" - - "pt-br" - - "ru-ru" - - "zh-cn" - - "zh-tw" Last updated : 07/18/2022 + # OData $select syntax in Azure Cognitive Search - You can use the [OData **$select** parameter](query-odata-filter-orderby-syntax.md) to choose which fields to include in search results from Azure Cognitive Search. This article describes the syntax of **$select** in detail. For more general information about how to use **$select** when presenting search results, see [How to work with search results in Azure Cognitive Search](search-pagination-page-layout.md). +In Azure Cognitive Search, the **$select** parameter specifies which fields to include in search results. This article describes the OData syntax of **$select** and provides examples. ++Field path construction and constants are described in the [OData language overview in Azure Cognitive Search](query-odata-filter-orderby-syntax.md). For more information about search result composition, see [How to work with search results in Azure Cognitive Search](search-pagination-page-layout.md). ## Syntax The **$select** parameter comes in two forms: When using the second form, you may only specify retrievable fields in the list. -If you list a complex field without specifying its sub-fields explicitly, all retrievable sub-fields will be included in the query result set. For example, assume your index has an `Address` field with `Street`, `City`, and `Country` sub-fields that are all retrievable. If you specify `Address` in **$select**, the query results will include all three sub-fields. +If you list a complex field without specifying its subfields explicitly, all retrievable subfields will be included in the query result set. For example, assume your index has an `Address` field with `Street`, `City`, and `Country` subfields that are all retrievable. If you specify `Address` in **$select**, the query results will include all three subfields. ## Examples -Include the `HotelId`, `HotelName`, and `Rating` top-level fields in the results, as well as the `City` sub-field of `Address`: +Include the `HotelId`, `HotelName`, and `Rating` top-level fields in the results, and include the `City` subfield of `Address`: ```odata-filter-expr $select=HotelId, HotelName, Rating, Address/City An example result might look like this: } ``` -Include the `HotelName` top-level field in the results, as well as all sub-fields of `Address`, and the `Type` and `BaseRate` sub-fields of each object in the `Rooms` collection: +Include the `HotelName` top-level field in the results. Include all subfields of `Address`. Include the `Type` and `BaseRate` subfields of each object in the `Rooms` collection: ```odata-filter-expr $select=HotelName, Address, Rooms/Type, Rooms/BaseRate |
| search | Search Query Odata Syntax Reference | https://github.com/MicrosoftDocs/azure-docs/commits/main/articles/search/search-query-odata-syntax-reference.md | -Azure Cognitive Search uses [OData expressions](https://docs.oasis-open.org/odat). +Azure Cognitive Search uses [OData expressions](https://docs.oasis-open.org/odat). This article describes all these forms of OData expressions using a formal grammar. There is also an [interactive diagram](#syntax-diagram) to help visually explore the grammar. We can describe the subset of the OData language supported by Azure Cognitive Se - [`$filter`](search-query-odata-filter.md), defined by the `filter_expression` rule. - [`$orderby`](search-query-odata-orderby.md), defined by the `order_by_expression` rule. - [`$select`](search-query-odata-select.md), defined by the `select_expression` rule.-- Field paths, defined by the `field_path` rule. Field paths are used throughout the API. They can refer to either top-level fields of an index, or sub-fields with one or more [complex field](search-howto-complex-data-types.md) ancestors.+- Field paths, defined by the `field_path` rule. Field paths are used throughout the API. They can refer to either top-level fields of an index, or subfields with one or more [complex field](search-howto-complex-data-types.md) ancestors. After the EBNF is a browsable [syntax diagram](https://en.wikipedia.org/wiki/Syntax_diagram) that allows you to interactively explore the grammar and the relationships between its rules. |
| sentinel | Configure Data Transformation | https://github.com/MicrosoftDocs/azure-docs/commits/main/articles/sentinel/configure-data-transformation.md | Before you start configuring DCRs for data transformation: - **Learn more about data transformation and DCRs in Azure Monitor and Microsoft Sentinel**. For more information, see: - [Data collection rules in Azure Monitor](../azure-monitor/essentials/data-collection-rule-overview.md)- - [Custom logs API in Azure Monitor Logs (Preview)](../azure-monitor/logs/custom-logs-overview.md) - - [Ingestion-time transformations in Azure Monitor Logs (preview)](../azure-monitor/logs/ingestion-time-transformations.md) + - [Logs ingestion API in Azure Monitor Logs (Preview)](../azure-monitor/logs/logs-ingestion-api-overview.md) + - [Transformations in Azure Monitor Logs (preview)](../azure-monitor/essentials/data-collection-transformations.md) - [Data transformation in Microsoft Sentinel (preview)](data-transformation.md) - **Verify data connector support**. Make sure that your data connectors are supported for data transformation. Before you start configuring DCRs for data transformation: Use the following procedures from the Log Analytics and Azure Monitor documentation to configure your data transformation DCRs: -[Direct ingestion through the DCR-based Custom Logs API](../azure-monitor/logs/custom-logs-overview.md): -- Walk through a tutorial for [ingesting custom logs using the Azure portal](../azure-monitor/logs/tutorial-custom-logs.md).-- Walk through a tutorial for [ingesting custom logs using Azure Resource Manager (ARM) templates and REST API](../azure-monitor/logs/tutorial-custom-logs-api.md).+[Direct ingestion through the DCR-based Custom Logs API](../azure-monitor/logs/logs-ingestion-api-overview.md): +- Walk through a tutorial for [ingesting logs using the Azure portal](../azure-monitor/logs/tutorial-logs-ingestion-portal.md). +- Walk through a tutorial for [ingesting logs using Azure Resource Manager (ARM) templates and REST API](../azure-monitor/logs/tutorial-logs-ingestion-api.md). -[Ingestion-time data transformation](../azure-monitor/logs/ingestion-time-transformations.md): -- Walk through a tutorial for [configuring ingestion-time transformation using the Azure portal](../azure-monitor/logs/tutorial-ingestion-time-transformations.md).-- Walk through a tutorial for [configuring ingestion-time transformation using Azure Resource Manager (ARM) templates and REST API](../azure-monitor/logs/tutorial-ingestion-time-transformations-api.md).- +[Workspace transformations](../azure-monitor/essentials/data-collection-transformations.md#workspace-transformation-dcr): +- Walk through a tutorial for [configuring workspace transformation using the Azure portal](../azure-monitor/logs/tutorial-workspace-transformations-portal.md). +- Walk through a tutorial for [configuring workspace transformation using Azure Resource Manager (ARM) templates and REST API](../azure-monitor/logs/tutorial-workspace-transformations-api.md).- [More on data collection rules](../azure-monitor/essentials/data-collection-rule-overview.md): - [Structure of a data collection rule in Azure Monitor (preview)](../azure-monitor/essentials/data-collection-rule-structure.md)-- [Data collection rule transformations in Azure Monitor (preview)](../azure-monitor/essentials/data-collection-rule-transformations.md)+- [Data collection transformations in Azure Monitor (preview)](../azure-monitor/essentials/data-collection-transformations.md) When you're done, come back to Microsoft Sentinel to verify that your data is being ingested based on your newly-configured transformation. It make take up to 60 minutes for the data transformation configurations to apply. Use one of the following methods: For more information about data transformation and DCRs, see: - [Custom data ingestion and transformation in Microsoft Sentinel (preview)](data-transformation.md)-- [Ingestion-time transformations in Azure Monitor Logs (preview)](../azure-monitor/logs/ingestion-time-transformations.md)-- [Custom logs API in Azure Monitor Logs (Preview)](../azure-monitor/logs/custom-logs-overview.md)-- [Data collection rule transformations in Azure Monitor (preview)](../azure-monitor/essentials/data-collection-rule-transformations.md)+- [Data collection transformations in Azure Monitor Logs (preview)](../azure-monitor/essentials/data-collection-transformations.md) +- [Logs ingestion API in Azure Monitor Logs (Preview)](../azure-monitor/logs/logs-ingestion-api-overview.md) - [Structure of a data collection rule in Azure Monitor (preview)](../azure-monitor/essentials/data-collection-rule-structure.md) - [Configure data collection for the Azure Monitor agent](../azure-monitor/agents/data-collection-rule-azure-monitor-agent.md) |
| sentinel | Connect Microsoft 365 Defender | https://github.com/MicrosoftDocs/azure-docs/commits/main/articles/sentinel/connect-microsoft-365-defender.md | -> [!IMPORTANT] -> -> **Microsoft Defender for Cloud Apps** was formerly known as **Microsoft Cloud App Security** or **MCAS**. -> -> You may see the old names still in use for a period of time. ---## Background - Microsoft Sentinel's [Microsoft 365 Defender](/microsoft-365/security/mtp/microsoft-threat-protection) connector with incident integration allows you to stream all Microsoft 365 Defender incidents and alerts into Microsoft Sentinel, and keeps the incidents synchronized between both portals. Microsoft 365 Defender incidents include all their alerts, entities, and other relevant information, and they group together, and are enriched by, alerts from Microsoft 365 Defender's component services **Microsoft Defender for Endpoint**, **Microsoft Defender for Identity**, **Microsoft Defender for Office 365**, and **Microsoft Defender for Cloud Apps**, as well as alerts from other services such as **Microsoft Purview Data Loss Prevention (DLP)**. The connector also lets you stream **advanced hunting** events from *all* of the above components into Microsoft Sentinel, allowing you to copy those Defender components' advanced hunting queries into Microsoft Sentinel, enrich Sentinel alerts with the Defender components' raw event data to provide additional insights, and store the logs with increased retention in Log Analytics. |
| sentinel | Data Connectors Reference | https://github.com/MicrosoftDocs/azure-docs/commits/main/articles/sentinel/data-connectors-reference.md | The Agari connector uses an environment variable to store log access timestamps. | | | | **Data ingestion method** | **[Common Event Format (CEF)](connect-common-event-format.md) over Syslog** <br><br>[Configure CEF log forwarding for AI Analyst](#configure-cef-log-forwarding-for-ai-analyst) | | **Log Analytics table(s)** | [CommonSecurityLog](/azure/azure-monitor/reference/tables/commonsecuritylog) |-| **DCR support** | [Workspace transformation DCR](../azure-monitor/logs/tutorial-ingestion-time-transformations.md) | +| **DCR support** | [Workspace transformation DCR](../azure-monitor/logs/tutorial-workspace-transformations-portal.md) | | **Supported by** | [Darktrace](https://customerportal.darktrace.com/) | Configure Darktrace to forward Syslog messages in CEF format to your Azure works | | | | **Data ingestion method** | **[Common Event Format (CEF)](connect-common-event-format.md) over Syslog** <br><br>[Configure CEF log forwarding for AI Vectra Detect](#configure-cef-log-forwarding-for-ai-vectra-detect)| | **Log Analytics table(s)** | [CommonSecurityLog](/azure/azure-monitor/reference/tables/commonsecuritylog) |-| **DCR support** | [Workspace transformation DCR](../azure-monitor/logs/tutorial-ingestion-time-transformations.md) | +| **DCR support** | [Workspace transformation DCR](../azure-monitor/logs/tutorial-workspace-transformations-portal.md) | | **Supported by** | [Vectra AI](https://www.vectra.ai/support) | For more information, see the Cognito Detect Syslog Guide, which can be download | | | | **Data ingestion method** | **[Common Event Format (CEF)](connect-common-event-format.md) over Syslog**, with a Kusto function parser | | **Log Analytics table(s)** | [CommonSecurityLog](/azure/azure-monitor/reference/tables/commonsecuritylog) |-| **DCR support** | [Workspace transformation DCR](../azure-monitor/logs/tutorial-ingestion-time-transformations.md) | +| **DCR support** | [Workspace transformation DCR](../azure-monitor/logs/tutorial-workspace-transformations-portal.md) | | **Kusto function alias:** | AkamaiSIEMEvent | | **Kusto function URL:** | https://raw.githubusercontent.com/Azure/Azure-Sentinel/master/Solutions/Akamai%20Security%20Events/Parsers/AkamaiSIEMEvent.txt | | **Vendor documentation/<br>installation instructions** | [Configure Security Information and Event Management (SIEM) integration](https://developer.akamai.com/tools/integrations/siem)<br>[Set up a CEF connector](https://developer.akamai.com/tools/integrations/siem/siem-cef-connector). | For more information, see the Cognito Detect Syslog Guide, which can be download | | | | **Data ingestion method** | **Azure service-to-service integration: <br>[Connect Microsoft Sentinel to Amazon Web Services to ingest AWS service log data](connect-aws.md?tabs=ct)** (Top connector article) | | **Log Analytics table(s)** | AWSCloudTrail |-| **DCR support** | [Workspace transformation DCR](../azure-monitor/logs/tutorial-ingestion-time-transformations.md) | +| **DCR support** | [Workspace transformation DCR](../azure-monitor/logs/tutorial-workspace-transformations-portal.md) | | **Supported by** | Microsoft | For more information, see the Cognito Detect Syslog Guide, which can be download | | | | **Data ingestion method** | **Azure service-to-service integration: <br>[Connect Microsoft Sentinel to Amazon Web Services to ingest AWS service log data](connect-aws.md?tabs=s3)** (Top connector article) | | **Log Analytics table(s)** | AWSCloudTrail<br>AWSGuardDuty<br>AWSVPCFlow |-| **DCR support** | [Workspace transformation DCR](../azure-monitor/logs/tutorial-ingestion-time-transformations.md) | +| **DCR support** | [Workspace transformation DCR](../azure-monitor/logs/tutorial-workspace-transformations-portal.md) | | **Supported by** | Microsoft | For more information, see the Cognito Detect Syslog Guide, which can be download | | | | **Data ingestion method** | **[Common Event Format (CEF)](connect-common-event-format.md) over Syslog**, with a Kusto function parser | | **Log Analytics table(s)** | [CommonSecurityLog](/azure/azure-monitor/reference/tables/commonsecuritylog) |-| **DCR support** | [Workspace transformation DCR](../azure-monitor/logs/tutorial-ingestion-time-transformations.md) | +| **DCR support** | [Workspace transformation DCR](../azure-monitor/logs/tutorial-workspace-transformations-portal.md) | | **Kusto function alias:** | ArubaClearPass | | **Kusto function URL:** | https://raw.githubusercontent.com/Azure/Azure-Sentinel/master/Solutions/Aruba%20ClearPass/Parsers/ArubaClearPass.txt | | **Vendor documentation/<br>installation instructions** | Follow Aruba's instructions to [configure ClearPass](https://www.arubanetworks.com/techdocs/ClearPass/6.7/PolicyManager/Content/CPPM_UserGuide/Admin/syslogExportFilters_add_syslog_filter_general.htm). | For more information, see the Cognito Detect Syslog Guide, which can be download | **Data ingestion method** | **Azure service-to-service integration: <br>[Connect Azure Active Directory data to Microsoft Sentinel](connect-azure-active-directory.md)** (Top connector article) | | **License prerequisites/<br>Cost information** | <li>Azure Active Directory P1 or P2 license for sign-in logs<li>Any Azure AD license (Free/O365/P1/P2) for other log types<br>Other charges may apply | | **Log Analytics table(s)** | SigninLogs<br>AuditLogs<br>AADNonInteractiveUserSignInLogs<br>AADServicePrincipalSignInLogs<br>AADManagedIdentitySignInLogs<br>AADProvisioningLogs<br>ADFSSignInLogs |-| **DCR support** | [Workspace transformation DCR](../azure-monitor/logs/tutorial-ingestion-time-transformations.md) | +| **DCR support** | [Workspace transformation DCR](../azure-monitor/logs/tutorial-workspace-transformations-portal.md) | | **Supported by** | Microsoft | For more information, see the Cognito Detect Syslog Guide, which can be download | **Data ingestion method** | **Azure service-to-service integration: <br>[API-based connections](connect-azure-windows-microsoft-services.md#api-based-connections)** | | **License prerequisites/<br>Cost information** | [Azure AD Premium P2 subscription](https://azure.microsoft.com/pricing/details/active-directory/)<br>Other charges may apply | | **Log Analytics table(s)** | SecurityAlert |-| **DCR support** | [Workspace transformation DCR](../azure-monitor/logs/tutorial-ingestion-time-transformations.md) | +| **DCR support** | [Workspace transformation DCR](../azure-monitor/logs/tutorial-workspace-transformations-portal.md) | | **Supported by** | Microsoft | > [!NOTE] You will only see the storage types that you actually have defined resources for | | | | **Data ingestion method** | [**Syslog**](connect-syslog.md) | | **Log Analytics table(s)** | [Syslog](/azure/azure-monitor/reference/tables/syslog) |-| **DCR support** | [Workspace transformation DCR](../azure-monitor/logs/tutorial-ingestion-time-transformations.md) | +| **DCR support** | [Workspace transformation DCR](../azure-monitor/logs/tutorial-workspace-transformations-portal.md) | | **Kusto function alias:** | CGFWFirewallActivity | | **Kusto function URL:** | https://raw.githubusercontent.com/Azure/Azure-Sentinel/master/Solutions/Barracuda%20CloudGen%20Firewall/Parsers/CGFWFirewallActivity | | **Vendor documentation/<br>installation instructions** | https://aka.ms/Sentinel-barracudacloudfirewall-connector | See Barracuda instructions - note the assigned facilities for the different type | | | | **Data ingestion method** | [**Syslog**](connect-syslog.md) | | **Log Analytics table(s)** | [Syslog](/azure/azure-monitor/reference/tables/syslog) |-| **DCR support** | [Workspace transformation DCR](../azure-monitor/logs/tutorial-ingestion-time-transformations.md) | +| **DCR support** | [Workspace transformation DCR](../azure-monitor/logs/tutorial-workspace-transformations-portal.md) | | **Kusto function alias:** | CylancePROTECT | | **Kusto function URL:** | https://aka.ms/Sentinel-cylanceprotect-parser | | **Vendor documentation/<br>installation instructions** | [Cylance Syslog Guide](https://docs.blackberry.com/content/dam/docs-blackberry-com/release-pdfs/en/cylance-products/syslog-guides/Cylance%20Syslog%20Guide%20v2.0%20rev12.pdf) | See Barracuda instructions - note the assigned facilities for the different type | | | | **Data ingestion method** | **[Common Event Format (CEF)](connect-common-event-format.md) over Syslog**, with a Kusto function parser | | **Log Analytics table(s)** | [CommonSecurityLog](/azure/azure-monitor/reference/tables/commonsecuritylog) |-| **DCR support** | [Workspace transformation DCR](../azure-monitor/logs/tutorial-ingestion-time-transformations.md) | +| **DCR support** | [Workspace transformation DCR](../azure-monitor/logs/tutorial-workspace-transformations-portal.md) | | **Kusto function alias:** | SymantecDLP | | **Kusto function URL:** | https://aka.ms/Sentinel-symantecdlp-parser | | **Vendor documentation/<br>installation instructions** | [Configuring the Log to a Syslog Server action](https://help.symantec.com/cs/DLP15.7/DLP/v27591174_v133697641/Configuring-the-Log-to-a-Syslog-Server-action?locale=EN_US) | See Barracuda instructions - note the assigned facilities for the different type | | | | **Data ingestion method** | **[Common Event Format (CEF)](connect-common-event-format.md) over Syslog** <br><br>Available from the [Check Point solution](sentinel-solutions-catalog.md#check-point)| | **Log Analytics table(s)** | [CommonSecurityLog](/azure/azure-monitor/reference/tables/commonsecuritylog) |-| **DCR support** | [Workspace transformation DCR](../azure-monitor/logs/tutorial-ingestion-time-transformations.md) | +| **DCR support** | [Workspace transformation DCR](../azure-monitor/logs/tutorial-workspace-transformations-portal.md) | | **Vendor documentation/<br>installation instructions** | [Log Exporter - Check Point Log Export](https://supportcenter.checkpoint.com/supportcenter/portal?eventSubmit_doGoviewsolutiondetails=&solutionid=sk122323) | | **Supported by** | [Check Point](https://www.checkpoint.com/support-services/contact-support/) | See Barracuda instructions - note the assigned facilities for the different type | | | | **Data ingestion method** | **[Common Event Format (CEF)](connect-common-event-format.md) over Syslog** <br><br>Available in the [Cisco ASA solution](sentinel-solutions-catalog.md#cisco)| | **Log Analytics table(s)** | [CommonSecurityLog](/azure/azure-monitor/reference/tables/commonsecuritylog) |-| **DCR support** | [Workspace transformation DCR](../azure-monitor/logs/tutorial-ingestion-time-transformations.md) | +| **DCR support** | [Workspace transformation DCR](../azure-monitor/logs/tutorial-workspace-transformations-portal.md) | | **Vendor documentation/<br>installation instructions** | [Cisco ASA Series CLI Configuration Guide](https://www.cisco.com/c/en/us/support/docs/security/pix-500-series-security-appliances/63884-config-asa-00.html) | | **Supported by** | Microsoft | See Barracuda instructions - note the assigned facilities for the different type | | | | **Data ingestion method** | **[Common Event Format (CEF)](connect-common-event-format.md) over Syslog** <br><br>[Extra configuration for Cisco Firepower eStreamer](#extra-configuration-for-cisco-firepower-estreamer)| | **Log Analytics table(s)** | [CommonSecurityLog](/azure/azure-monitor/reference/tables/commonsecuritylog) |-| **DCR support** | [Workspace transformation DCR](../azure-monitor/logs/tutorial-ingestion-time-transformations.md) | +| **DCR support** | [Workspace transformation DCR](../azure-monitor/logs/tutorial-workspace-transformations-portal.md) | | **Vendor documentation/<br>installation instructions** | [eStreamer eNcore for Sentinel Operations Guide](https://www.cisco.com/c/en/us/td/docs/security/firepower/670/api/eStreamer_enCore/eStreamereNcoreSentinelOperationsGuide_409.html) | | **Supported by** | [Cisco](https://www.cisco.com/c/en/us/support/https://docsupdatetracker.net/index.html) Configure eNcore to stream data via TCP to the Log Analytics Agent. This configu | | | | **Data ingestion method** | [**Syslog**](connect-syslog.md)<br><br> Available in the [Cisco ISE solution](sentinel-solutions-catalog.md#cisco)| | **Log Analytics table(s)** | [Syslog](/azure/azure-monitor/reference/tables/syslog) |-| **DCR support** | [Workspace transformation DCR](../azure-monitor/logs/tutorial-ingestion-time-transformations.md) | +| **DCR support** | [Workspace transformation DCR](../azure-monitor/logs/tutorial-workspace-transformations-portal.md) | | **Kusto function alias:** | CiscoMeraki | | **Kusto function URL:** | https://aka.ms/Sentinel-ciscomeraki-parser | | **Vendor documentation/<br>installation instructions** | [Meraki Device Reporting documentation](https://documentation.meraki.com/General_Administration/Monitoring_and_Reporting/Meraki_Device_Reporting_-_Syslog%2C_SNMP_and_API) | Configure eNcore to stream data via TCP to the Log Analytics Agent. This configu | | | | **Data ingestion method** | [**Syslog**](connect-syslog.md) | | **Log Analytics table(s)** | [Syslog](/azure/azure-monitor/reference/tables/syslog) |-| **DCR support** | [Workspace transformation DCR](../azure-monitor/logs/tutorial-ingestion-time-transformations.md) | +| **DCR support** | [Workspace transformation DCR](../azure-monitor/logs/tutorial-workspace-transformations-portal.md) | | **Kusto function alias:** | CiscoUCS | | **Kusto function URL:** | https://aka.ms/Sentinel-ciscoucs-function | | **Vendor documentation/<br>installation instructions** | [Set up Syslog for Cisco UCS - Cisco](https://www.cisco.com/c/en/us/support/docs/servers-unified-computing/ucs-manager/110265-setup-syslog-for-ucs.html#configsremotesyslog) | Configure eNcore to stream data via TCP to the Log Analytics Agent. This configu | | | | **Data ingestion method** | **[Common Event Format (CEF)](connect-common-event-format.md) over Syslog** | | **Log Analytics table(s)** | [CommonSecurityLog](/azure/azure-monitor/reference/tables/commonsecuritylog) |-| **DCR support** | [Workspace transformation DCR](../azure-monitor/logs/tutorial-ingestion-time-transformations.md) | +| **DCR support** | [Workspace transformation DCR](../azure-monitor/logs/tutorial-workspace-transformations-portal.md) | | **Vendor documentation/<br>installation instructions** | To configure WAF, see [Support WIKI - WAF Configuration with NetScaler](https://support.citrix.com/article/CTX234174).<br><br>To configure CEF logs, see [CEF Logging Support in the Application Firewall](https://support.citrix.com/article/CTX136146).<br><br>To forward the logs to proxy, see [Configuring Citrix ADC appliance for audit logging](https://docs.citrix.com/en-us/citrix-adc/current-release/system/audit-logging/configuring-audit-logging.html). | | **Supported by** | [Citrix Systems](https://www.citrix.com/support/) | Configure eNcore to stream data via TCP to the Log Analytics Agent. This configu | | | | **Data ingestion method** | **[Common Event Format (CEF)](connect-common-event-format.md) over Syslog** | | **Log Analytics table(s)** | [CommonSecurityLog](/azure/azure-monitor/reference/tables/commonsecuritylog) |-| **DCR support** | [Workspace transformation DCR](../azure-monitor/logs/tutorial-ingestion-time-transformations.md) | +| **DCR support** | [Workspace transformation DCR](../azure-monitor/logs/tutorial-workspace-transformations-portal.md) | | **Vendor documentation/<br>installation instructions** | [Security Information and Event Management (SIEM) Applications](https://docs.cyberark.com/Product-Doc/OnlineHelp/PAS/Latest/en/Content/PASIMP/DV-Integrating-with-SIEM-Applications.htm) | | **Supported by** | [CyberArk](https://www.cyberark.com/customer-support/) | Configure eNcore to stream data via TCP to the Log Analytics Agent. This configu | **Data ingestion method** | **Azure service-to-service integration: <br>[API-based connections](connect-azure-windows-microsoft-services.md#api-based-connections)** <br><br> Also available as part of the [Microsoft Sentinel 4 Dynamics 365 solution](sentinel-solutions-catalog.md#azure)| | **License prerequisites/<br>Cost information** | <li>[Microsoft Dynamics 365 production license](/office365/servicedescriptions/microsoft-dynamics-365-online-service-description). Not available for sandbox environments.<li>At least one user assigned a Microsoft/Office 365 [E1 or greater](/power-platform/admin/enable-use-comprehensive-auditing#requirements) license.<br>Other charges may apply | | **Log Analytics table(s)** | Dynamics365Activity |-| **DCR support** | [Workspace transformation DCR](../azure-monitor/logs/tutorial-ingestion-time-transformations.md) | +| **DCR support** | [Workspace transformation DCR](../azure-monitor/logs/tutorial-workspace-transformations-portal.md) | | **Supported by** | Microsoft | For more information, see the Eset documentation. | | | | **Data ingestion method** | [**Syslog**](connect-syslog.md) | | **Log Analytics table(s)** | [Syslog](/azure/azure-monitor/reference/tables/syslog) |-| **DCR support** | [Workspace transformation DCR](../azure-monitor/logs/tutorial-ingestion-time-transformations.md) | +| **DCR support** | [Workspace transformation DCR](../azure-monitor/logs/tutorial-workspace-transformations-portal.md) | | **Kusto function alias:** | ExabeamEvent | | **Kusto function URL:** | https://aka.ms/Sentinel-Exabeam-parser | | **Vendor documentation/<br>installation instructions** | [Configure Advanced Analytics system activity notifications](https://docs.exabeam.com/en/advanced-analytics/i54/advanced-analytics-administration-guide/113254-configure-advanced-analytics.html#UUID-7ce5ff9d-56aa-93f0-65de-c5255b682a08) | For more information, see the Eset documentation. | | | | **Data ingestion method** | **[Common Event Format (CEF)](connect-common-event-format.md) over Syslog** | | **Log Analytics table(s)** | [CommonSecurityLog](/azure/azure-monitor/reference/tables/commonsecuritylog) |-| **DCR support** | [Workspace transformation DCR](../azure-monitor/logs/tutorial-ingestion-time-transformations.md) | +| **DCR support** | [Workspace transformation DCR](../azure-monitor/logs/tutorial-workspace-transformations-portal.md) | | **Vendor documentation/<br>installation instructions** | [ExtraHop Detection SIEM Connector](https://aka.ms/asi-syslog-extrahop-forwarding) | | **Supported by** | [ExtraHop](https://www.extrahop.com/support/) | For more information, see the Eset documentation. | | | | **Data ingestion method** | **[Common Event Format (CEF)](connect-common-event-format.md) over Syslog** | | **Log Analytics table(s)** | [CommonSecurityLog](/azure/azure-monitor/reference/tables/commonsecuritylog) |-| **DCR support** | [Workspace transformation DCR](../azure-monitor/logs/tutorial-ingestion-time-transformations.md) | +| **DCR support** | [Workspace transformation DCR](../azure-monitor/logs/tutorial-workspace-transformations-portal.md) | | **Vendor documentation/<br>installation instructions** | [Configuring Application Security Event Logging](https://aka.ms/asi-syslog-f5-forwarding) | | **Supported by** | [F5 Networks](https://support.f5.com/csp/home) | For more information, see the Eset documentation. | | | | **Data ingestion method** | **[Common Event Format (CEF)](connect-common-event-format.md) over Syslog** | | **Log Analytics table(s)** | [CommonSecurityLog](/azure/azure-monitor/reference/tables/commonsecuritylog) |-| **DCR support** | [Workspace transformation DCR](../azure-monitor/logs/tutorial-ingestion-time-transformations.md) | +| **DCR support** | [Workspace transformation DCR](../azure-monitor/logs/tutorial-workspace-transformations-portal.md) | | **Vendor documentation/<br>installation instructions** | [Forcepoint CASB and Microsoft Sentinel](https://forcepoint.github.io/docs/casb_and_azure_sentinel/) | | **Supported by** | [Forcepoint](https://support.forcepoint.com/) | For more information, see the Eset documentation. | | | | **Data ingestion method** | **[Common Event Format (CEF)](connect-common-event-format.md) over Syslog** | | **Log Analytics table(s)** | [CommonSecurityLog](/azure/azure-monitor/reference/tables/commonsecuritylog) |-| **DCR support** | [Workspace transformation DCR](../azure-monitor/logs/tutorial-ingestion-time-transformations.md) | +| **DCR support** | [Workspace transformation DCR](../azure-monitor/logs/tutorial-workspace-transformations-portal.md) | | **Vendor documentation/<br>installation instructions** | [Forcepoint Cloud Security Gateway and Microsoft Sentinel](https://forcepoint.github.io/docs/csg_and_sentinel/) | | **Supported by** | [Forcepoint](https://support.forcepoint.com/) | For more information, see the Eset documentation. | | | | **Data ingestion method** | **[Common Event Format (CEF)](connect-common-event-format.md) over Syslog** | | **Log Analytics table(s)** | [CommonSecurityLog](/azure/azure-monitor/reference/tables/commonsecuritylog) |-| **DCR support** | [Workspace transformation DCR](../azure-monitor/logs/tutorial-ingestion-time-transformations.md) | +| **DCR support** | [Workspace transformation DCR](../azure-monitor/logs/tutorial-workspace-transformations-portal.md) | | **Vendor documentation/<br>installation instructions** | [Forcepoint Next-Gen Firewall and Microsoft Sentinel](https://forcepoint.github.io/docs/ngfw_and_azure_sentinel/) | | **Supported by** | [Forcepoint](https://support.forcepoint.com/) | For more information, see the Eset documentation. | | | | **Data ingestion method** | **[Common Event Format (CEF)](connect-common-event-format.md) over Syslog** | | **Log Analytics table(s)** | [CommonSecurityLog](/azure/azure-monitor/reference/tables/commonsecuritylog) |-| **DCR support** | [Workspace transformation DCR](../azure-monitor/logs/tutorial-ingestion-time-transformations.md) | +| **DCR support** | [Workspace transformation DCR](../azure-monitor/logs/tutorial-workspace-transformations-portal.md) | | **Vendor documentation/<br>installation instructions** | [Install this first! ForgeRock Common Audit (CAUD) for Microsoft Sentinel](https://github.com/javaservlets/SentinelAuditEventHandler) | | **Supported by** | [ForgeRock](https://www.forgerock.com/support) | For more information, see the Eset documentation. | | | | **Data ingestion method** | **[Common Event Format (CEF)](connect-common-event-format.md) over Syslog** <br><br>[Send Fortinet logs to the log forwarder](#send-fortinet-logs-to-the-log-forwarder) <br><br>Available in the [Fortinet Fortigate solution](sentinel-solutions-catalog.md#fortinet-fortigate)| | **Log Analytics table(s)** | [CommonSecurityLog](/azure/azure-monitor/reference/tables/commonsecuritylog) |-| **DCR support** | [Workspace transformation DCR](../azure-monitor/logs/tutorial-ingestion-time-transformations.md) | +| **DCR support** | [Workspace transformation DCR](../azure-monitor/logs/tutorial-workspace-transformations-portal.md) | | **Vendor documentation/<br>installation instructions** | [Fortinet Document Library](https://aka.ms/asi-syslog-fortinet-fortinetdocumentlibrary)<br>Choose your version and use the *Handbook* and *Log Message Reference* PDFs. | | **Supported by** | [Fortinet](https://support.fortinet.com/) | Add http://localhost:8081/ under **Authorized redirect URIs** while creating [We | | | | **Data ingestion method** | **[Common Event Format (CEF)](connect-common-event-format.md) over Syslog** | | **Log Analytics table(s)** | [CommonSecurityLog](/azure/azure-monitor/reference/tables/commonsecuritylog) |-| **DCR support** | [Workspace transformation DCR](../azure-monitor/logs/tutorial-ingestion-time-transformations.md) | +| **DCR support** | [Workspace transformation DCR](../azure-monitor/logs/tutorial-workspace-transformations-portal.md) | | **Vendor documentation/<br>installation instructions** | [Illusive Networks Admin Guide](https://support.illusivenetworks.com/hc/en-us/sections/360002292119-Documentation-by-Version) | | **Supported by** | [Illusive Networks](https://illusive.com/support/) | Add http://localhost:8081/ under **Authorized redirect URIs** while creating [We | | | | **Data ingestion method** | **[Common Event Format (CEF)](connect-common-event-format.md) over Syslog** <br><br>Available in the [Imperva Cloud WAF solution](sentinel-solutions-catalog.md#imperva)| | **Log Analytics table(s)** | [CommonSecurityLog](/azure/azure-monitor/reference/tables/commonsecuritylog) |-| **DCR support** | [Workspace transformation DCR](../azure-monitor/logs/tutorial-ingestion-time-transformations.md) | +| **DCR support** | [Workspace transformation DCR](../azure-monitor/logs/tutorial-workspace-transformations-portal.md) | | **Vendor documentation/<br>installation instructions** | [Steps for Enabling Imperva WAF Gateway Alert Logging to Microsoft Sentinel](https://community.imperva.com/blogs/craig-burlingame1/2020/11/13/steps-for-enabling-imperva-waf-gateway-alert) | | **Supported by** | [Imperva](https://www.imperva.com/support/technical-support/) | Add http://localhost:8081/ under **Authorized redirect URIs** while creating [We | | | | **Data ingestion method** | [**Syslog**](connect-syslog.md)<br><br> available in the [InfoBlox Threat Defense solution](sentinel-solutions-catalog.md#infoblox) | | **Log Analytics table(s)** | [Syslog](/azure/azure-monitor/reference/tables/syslog) |-| **DCR support** | [Workspace transformation DCR](../azure-monitor/logs/tutorial-ingestion-time-transformations.md) | +| **DCR support** | [Workspace transformation DCR](../azure-monitor/logs/tutorial-workspace-transformations-portal.md) | | **Kusto function alias:** | InfobloxNIOS | | **Kusto function URL:** | https://aka.ms/sentinelgithubparsersinfoblox | | **Vendor documentation/<br>installation instructions** | [NIOS SNMP and Syslog Deployment Guide](https://www.infoblox.com/wp-content/uploads/infoblox-deployment-guide-slog-and-snmp-configuration-for-nios.pdf) | Add http://localhost:8081/ under **Authorized redirect URIs** while creating [We | | | | **Data ingestion method** | [**Syslog**](connect-syslog.md) | | **Log Analytics table(s)** | [Syslog](/azure/azure-monitor/reference/tables/syslog) |-| **DCR support** | [Workspace transformation DCR](../azure-monitor/logs/tutorial-ingestion-time-transformations.md) | +| **DCR support** | [Workspace transformation DCR](../azure-monitor/logs/tutorial-workspace-transformations-portal.md) | | **Kusto function alias:** | JuniperSRX | | **Kusto function URL:** | https://aka.ms/Sentinel-junipersrx-parser | | **Vendor documentation/<br>installation instructions** | [Configure Traffic Logging (Security Policy Logs) for SRX Branch Devices](https://kb.juniper.net/InfoCenter/index?page=content&id=KB16509&actp=METADATA)<br>[Configure System Logging](https://kb.juniper.net/InfoCenter/index?page=content&id=kb16502) | Add http://localhost:8081/ under **Authorized redirect URIs** while creating [We | **Data ingestion method** | **Azure service-to-service integration: <br>[API-based connections](connect-azure-windows-microsoft-services.md#api-based-connections)** | | **License prerequisites/<br>Cost information** | [Valid license for Microsoft Defender for Endpoint deployment](/microsoft-365/security/defender-endpoint/production-deployment) | **Log Analytics table(s)** | SecurityAlert |-| **DCR support** | [Workspace transformation DCR](../azure-monitor/logs/tutorial-ingestion-time-transformations.md) | +| **DCR support** | [Workspace transformation DCR](../azure-monitor/logs/tutorial-workspace-transformations-portal.md) | | **Supported by** | Microsoft | Add http://localhost:8081/ under **Authorized redirect URIs** while creating [We | | | | **Data ingestion method** | **Azure service-to-service integration: <br>[API-based connections](connect-azure-windows-microsoft-services.md#api-based-connections)** | | **Log Analytics table(s)** | SecurityAlert |-| **DCR support** | [Workspace transformation DCR](../azure-monitor/logs/tutorial-ingestion-time-transformations.md) | +| **DCR support** | [Workspace transformation DCR](../azure-monitor/logs/tutorial-workspace-transformations-portal.md) | | **Supported by** | Microsoft | Add http://localhost:8081/ under **Authorized redirect URIs** while creating [We | | | | **Data ingestion method** | **Azure service-to-service integration: <br>[API-based connections](connect-azure-windows-microsoft-services.md#api-based-connections)** | | **Log Analytics table(s)** | SecurityAlert |-| **DCR support** | [Workspace transformation DCR](../azure-monitor/logs/tutorial-ingestion-time-transformations.md) | +| **DCR support** | [Workspace transformation DCR](../azure-monitor/logs/tutorial-workspace-transformations-portal.md) | | **Supported by** | Microsoft | Add http://localhost:8081/ under **Authorized redirect URIs** while creating [We | **Data ingestion method** | **Azure service-to-service integration: <br>[API-based connections](connect-azure-windows-microsoft-services.md#api-based-connections)** | | **License prerequisites/<br>Cost information** | You must have a valid license for [Office 365 ATP Plan 2](/microsoft-365/security/office-365-security/office-365-atp#office-365-atp-plan-1-and-plan-2) | **Log Analytics table(s)** | SecurityAlert |-| **DCR support** | [Workspace transformation DCR](../azure-monitor/logs/tutorial-ingestion-time-transformations.md) | +| **DCR support** | [Workspace transformation DCR](../azure-monitor/logs/tutorial-workspace-transformations-portal.md) | | **Supported by** | Microsoft | Add http://localhost:8081/ under **Authorized redirect URIs** while creating [We | **Data ingestion method** | **Azure service-to-service integration: <br>[API-based connections](connect-azure-windows-microsoft-services.md#api-based-connections)** | | **License prerequisites/<br>Cost information** | Your Office 365 deployment must be on the same tenant as your Microsoft Sentinel workspace.<br>Other charges may apply. | | **Log Analytics table(s)** | OfficeActivity |-| **DCR support** | [Workspace transformation DCR](../azure-monitor/logs/tutorial-ingestion-time-transformations.md) | +| **DCR support** | [Workspace transformation DCR](../azure-monitor/logs/tutorial-workspace-transformations-portal.md) | | **Supported by** | Microsoft | Add http://localhost:8081/ under **Authorized redirect URIs** while creating [We | | | | **Data ingestion method** | [**Syslog**](connect-syslog.md), with, [ASIM parsers](normalization-about-parsers.md) based on Kusto functions | | **Log Analytics table(s)** | [Syslog](/azure/azure-monitor/reference/tables/syslog) |-| **DCR support** | [Workspace transformation DCR](../azure-monitor/logs/tutorial-ingestion-time-transformations.md) | +| **DCR support** | [Workspace transformation DCR](../azure-monitor/logs/tutorial-workspace-transformations-portal.md) | | **Supported by** | Microsoft | Add http://localhost:8081/ under **Authorized redirect URIs** while creating [We | | | | **Data ingestion method** | **[Common Event Format (CEF)](connect-common-event-format.md) over Syslog**, with a Kusto function parser | | **Log Analytics table(s)** | [CommonSecurityLog](/azure/azure-monitor/reference/tables/commonsecuritylog) |-| **DCR support** | [Workspace transformation DCR](../azure-monitor/logs/tutorial-ingestion-time-transformations.md) | +| **DCR support** | [Workspace transformation DCR](../azure-monitor/logs/tutorial-workspace-transformations-portal.md) | | **Kusto function alias:** | Morphisec | | **Kusto function URL** | https://github.com/Azure/Azure-Sentinel/blob/master/Solutions/Morphisec/Parsers/Morphisec/ | | **Supported by** | [Morphisec](https://www.morphisec.com) | Add http://localhost:8081/ under **Authorized redirect URIs** while creating [We | | | | **Data ingestion method** | **[Common Event Format (CEF)](connect-common-event-format.md) over Syslog**, with a Kusto lookup and enrichment function<br><br>[Configure Onapsis to send CEF logs to the log forwarder](#configure-onapsis-to-send-cef-logs-to-the-log-forwarder) | | **Log Analytics table(s)** | [CommonSecurityLog](/azure/azure-monitor/reference/tables/commonsecuritylog) |-| **DCR support** | [Workspace transformation DCR](../azure-monitor/logs/tutorial-ingestion-time-transformations.md) | +| **DCR support** | [Workspace transformation DCR](../azure-monitor/logs/tutorial-workspace-transformations-portal.md) | | **Kusto function alias:** | incident_lookup | | **Kusto function URL** | https://raw.githubusercontent.com/Azure/Azure-Sentinel/master/Solutions/Onapsis%20Platform/Parsers/OnapsisLookup.txt | | **Supported by** | [Onapsis](https://onapsis.force.com/s/login/) | Refer to the Onapsis in-product help to set up log forwarding to the Log Analyti | | | | **Data ingestion method** | **[Common Event Format (CEF)](connect-common-event-format.md) over Syslog** | | **Log Analytics table(s)** | [CommonSecurityLog](/azure/azure-monitor/reference/tables/commonsecuritylog) |-| **DCR support** | [Workspace transformation DCR](../azure-monitor/logs/tutorial-ingestion-time-transformations.md) | +| **DCR support** | [Workspace transformation DCR](../azure-monitor/logs/tutorial-workspace-transformations-portal.md) | | **Vendor documentation/<br>installation instructions** | [One Identity Safeguard for Privileged Sessions Administration Guide](https://aka.ms/sentinel-cef-oneidentity-forwarding) | | **Supported by** | [One Identity](https://support.oneidentity.com/) | Refer to the Onapsis in-product help to set up log forwarding to the Log Analyti | | | | **Data ingestion method** | **[Common Event Format (CEF)](connect-common-event-format.md) over Syslog**, with a Kusto function parser | | **Log Analytics table(s)** | [CommonSecurityLog](/azure/azure-monitor/reference/tables/commonsecuritylog) |-| **DCR support** | [Workspace transformation DCR](../azure-monitor/logs/tutorial-ingestion-time-transformations.md) | +| **DCR support** | [Workspace transformation DCR](../azure-monitor/logs/tutorial-workspace-transformations-portal.md) | | **Kusto function alias:** | OSSECEvent | | **Kusto function URL:** | https://aka.ms/Sentinel-OSSEC-parser | | **Vendor documentation/<br>installation instructions** | [OSSEC documentation](https://www.ossec.net/docs/)<br>[Sending alerts via syslog](https://www.ossec.net/docs/docs/manual/output/syslog-output.html) | Refer to the Onapsis in-product help to set up log forwarding to the Log Analyti | | | | **Data ingestion method** | **[Common Event Format (CEF)](connect-common-event-format.md) over Syslog** <br><br>Also available in the [Palo Alto PAN-OS and Prisma solutions](sentinel-solutions-catalog.md#palo-alto)| | **Log Analytics table(s)** | [CommonSecurityLog](/azure/azure-monitor/reference/tables/commonsecuritylog) |-| **DCR support** | [Workspace transformation DCR](../azure-monitor/logs/tutorial-ingestion-time-transformations.md) | +| **DCR support** | [Workspace transformation DCR](../azure-monitor/logs/tutorial-workspace-transformations-portal.md) | | **Vendor documentation/<br>installation instructions** | [Common Event Format (CEF) Configuration Guides](https://aka.ms/asi-syslog-paloalto-forwarding)<br>[Configure Syslog Monitoring](https://aka.ms/asi-syslog-paloalto-configure) | | **Supported by** | [Palo Alto Networks](https://www.paloaltonetworks.com/company/contact-support) | Refer to the Onapsis in-product help to set up log forwarding to the Log Analyti | | | | **Data ingestion method** | [**Syslog**](connect-syslog.md) | | **Log Analytics table(s)** | [Syslog](/azure/azure-monitor/reference/tables/syslog) |-| **DCR support** | [Workspace transformation DCR](../azure-monitor/logs/tutorial-ingestion-time-transformations.md) | +| **DCR support** | [Workspace transformation DCR](../azure-monitor/logs/tutorial-workspace-transformations-portal.md) | | **Kusto function alias:** | PulseConnectSecure | | **Kusto function URL:** | https://aka.ms/sentinelgithubparserspulsesecurevpn | | **Vendor documentation/<br>installation instructions** | [Configuring Syslog](https://docs.pulsesecure.net/WebHelp/Content/PCS/PCS_AdminGuide_8.2/Configuring%20Syslog.htm) | If a longer timeout duration is required, consider upgrading to an [App Service | | | | **Data ingestion method** | **Azure service-to-service integration: <br>[Log Analytics agent-based connections](connect-azure-windows-microsoft-services.md?tabs=LAA#windows-agent-based-connections) (Legacy)** | | **Log Analytics table(s)** | SecurityEvents |-| **DCR support** | [Workspace transformation DCR](../azure-monitor/logs/tutorial-ingestion-time-transformations.md) | +| **DCR support** | [Workspace transformation DCR](../azure-monitor/logs/tutorial-workspace-transformations-portal.md) | | **Supported by** | Microsoft | Follow the instructions to obtain the credentials. | | | | **Data ingestion method** | **[Common Event Format (CEF)](connect-common-event-format.md) over Syslog** | | **Log Analytics table(s)** | [CommonSecurityLog](/azure/azure-monitor/reference/tables/commonsecuritylog) |-| **DCR support** | [Workspace transformation DCR](../azure-monitor/logs/tutorial-ingestion-time-transformations.md) | +| **DCR support** | [Workspace transformation DCR](../azure-monitor/logs/tutorial-workspace-transformations-portal.md) | | **Vendor documentation/<br>installation instructions** | [Log > Syslog](http://help.sonicwall.com/help/sw/eng/7020/26/2/3/content/Log_Syslog.120.2.htm)<br>Select facility local4 and ArcSight as the Syslog format. | | **Supported by** | [SonicWall](https://www.sonicwall.com/support/) | Follow the instructions to obtain the credentials. | | | | **Data ingestion method** | [**Syslog**](connect-syslog.md) | | **Log Analytics table(s)** | [Syslog](/azure/azure-monitor/reference/tables/syslog) |-| **DCR support** | [Workspace transformation DCR](../azure-monitor/logs/tutorial-ingestion-time-transformations.md) | +| **DCR support** | [Workspace transformation DCR](../azure-monitor/logs/tutorial-workspace-transformations-portal.md) | | **Kusto function alias:** | SophosXGFirewall | | **Kusto function URL:** | https://aka.ms/sentinelgithubparserssophosfirewallxg | | **Vendor documentation/<br>installation instructions** | [Add a syslog server](https://docs.sophos.com/nsg/sophos-firewall/18.5/Help/en-us/webhelp/onlinehelp/nsg/tasks/SyslogServerAdd.html) | Follow the instructions to obtain the credentials. | | | | **Data ingestion method** | [**Syslog**](connect-syslog.md) | | **Log Analytics table(s)** | [Syslog](/azure/azure-monitor/reference/tables/syslog) |-| **DCR support** | [Workspace transformation DCR](../azure-monitor/logs/tutorial-ingestion-time-transformations.md) | +| **DCR support** | [Workspace transformation DCR](../azure-monitor/logs/tutorial-workspace-transformations-portal.md) | | **Kusto function alias:** | SymantecProxySG | | **Kusto function URL:** | https://aka.ms/sentinelgithubparserssymantecproxysg | | **Vendor documentation/<br>installation instructions** | [Sending Access Logs to a Syslog server](https://knowledge.broadcom.com/external/article/166529/sending-access-logs-to-a-syslog-server.html) | Follow the instructions to obtain the credentials. | | | | **Data ingestion method** | [**Syslog**](connect-syslog.md) | | **Log Analytics table(s)** | [Syslog](/azure/azure-monitor/reference/tables/syslog) |-| **DCR support** | [Workspace transformation DCR](../azure-monitor/logs/tutorial-ingestion-time-transformations.md) | +| **DCR support** | [Workspace transformation DCR](../azure-monitor/logs/tutorial-workspace-transformations-portal.md) | | **Kusto function alias:** | SymantecVIP | | **Kusto function URL:** | https://aka.ms/sentinelgithubparserssymantecvip | | **Vendor documentation/<br>installation instructions** | [Configuring syslog](https://help.symantec.com/cs/VIP_EG_INSTALL_CONFIG/VIP/v134652108_v128483142/Configuring-syslog?locale=EN_US) | Follow the instructions to obtain the credentials. | | | | **Data ingestion method** | **[Common Event Format (CEF)](connect-common-event-format.md) over Syslog** | | **Log Analytics table(s)** | [CommonSecurityLog](/azure/azure-monitor/reference/tables/commonsecuritylog) |-| **DCR support** | [Workspace transformation DCR](../azure-monitor/logs/tutorial-ingestion-time-transformations.md) | +| **DCR support** | [Workspace transformation DCR](../azure-monitor/logs/tutorial-workspace-transformations-portal.md) | | **Vendor documentation/<br>installation instructions** | [Secure Syslog/CEF Logging](https://thy.center/ss/link/syslog) | | **Supported by** | [Thycotic](https://thycotic.force.com/support/s/) | Follow the instructions to obtain the credentials. | | | | **Data ingestion method** | **[Common Event Format (CEF)](connect-common-event-format.md) over Syslog**, with a Kusto function parser | | **Log Analytics table(s)** | [CommonSecurityLog](/azure/azure-monitor/reference/tables/commonsecuritylog) |-| **DCR support** | [Workspace transformation DCR](../azure-monitor/logs/tutorial-ingestion-time-transformations.md) | +| **DCR support** | [Workspace transformation DCR](../azure-monitor/logs/tutorial-workspace-transformations-portal.md) | | **Kusto function alias:** | TrendMicroDeepSecurity | | **Kusto function URL** | https://aka.ms/TrendMicroDeepSecurityFunction | | **Vendor documentation/<br>installation instructions** | [Forward Deep Security events to a Syslog or SIEM server](https://aka.ms/Sentinel-trendMicro-connectorInstructions) | Follow the instructions to obtain the credentials. | | | | **Data ingestion method** | **[Common Event Format (CEF)](connect-common-event-format.md) over Syslog**, with a Kusto function parser | | **Log Analytics table(s)** | [CommonSecurityLog](/azure/azure-monitor/reference/tables/commonsecuritylog) |-| **DCR support** | [Workspace transformation DCR](../azure-monitor/logs/tutorial-ingestion-time-transformations.md) | +| **DCR support** | [Workspace transformation DCR](../azure-monitor/logs/tutorial-workspace-transformations-portal.md) | | **Kusto function alias:** | TrendMicroTippingPoint | | **Kusto function URL** | https://aka.ms/Sentinel-trendmicrotippingpoint-function | | **Vendor documentation/<br>installation instructions** | Send Syslog messages in ArcSight CEF Format v4.2 format. | Follow the instructions to obtain the credentials. | | | | **Data ingestion method** | [**Syslog**](connect-syslog.md) | | **Log Analytics table(s)** | [Syslog](/azure/azure-monitor/reference/tables/syslog) |-| **DCR support** | [Workspace transformation DCR](../azure-monitor/logs/tutorial-ingestion-time-transformations.md) | +| **DCR support** | [Workspace transformation DCR](../azure-monitor/logs/tutorial-workspace-transformations-portal.md) | | **Kusto function alias:** | VMwareESXi | | **Kusto function URL:** | https://aka.ms/Sentinel-vmwareesxi-parser | | **Vendor documentation/<br>installation instructions** | [Enabling syslog on ESXi 3.5 and 4.x](https://kb.vmware.com/s/article/1016621)<br>[Configure Syslog on ESXi Hosts](https://docs.vmware.com/en/VMware-vSphere/5.5/com.vmware.vsphere.monitoring.doc/GUID-9F67DB52-F469-451F-B6C8-DAE8D95976E7.html) | Follow the instructions to obtain the credentials. | | | | **Data ingestion method** | [**Syslog**](connect-syslog.md) | | **Log Analytics table(s)** | [Syslog](/azure/azure-monitor/reference/tables/syslog) |-| **DCR support** | [Workspace transformation DCR](../azure-monitor/logs/tutorial-ingestion-time-transformations.md) | +| **DCR support** | [Workspace transformation DCR](../azure-monitor/logs/tutorial-workspace-transformations-portal.md) | | **Kusto function alias:** | WatchGuardFirebox | | **Kusto function URL:** | https://aka.ms/Sentinel-watchguardfirebox-parser | | **Vendor documentation/<br>installation instructions** | [Microsoft Sentinel Integration Guide](https://www.watchguard.com/help/docs/help-center/en-us/Content/Integration-Guides/General/Microsoft_Azure_Sentinel.html) | Follow the instructions to obtain the credentials. | | | | **Data ingestion method** | **[Common Event Format (CEF)](connect-common-event-format.md) over Syslog** | | **Log Analytics table(s)** | [CommonSecurityLog](/azure/azure-monitor/reference/tables/commonsecuritylog) |-| **DCR support** | [Workspace transformation DCR](../azure-monitor/logs/tutorial-ingestion-time-transformations.md) | +| **DCR support** | [Workspace transformation DCR](../azure-monitor/logs/tutorial-workspace-transformations-portal.md) | | **Vendor documentation/<br>installation instructions** | Contact [WireX support](https://wirexsystems.com/contact-us/) in order to configure your NFP solution to send Syslog messages in CEF format. | | **Supported by** | [WireX Systems](mailto:support@wirexsystems.com) | Follow the instructions to obtain the credentials. | | | | **Data ingestion method** | **Azure service-to-service integration: <br>[Log Analytics agent-based connections](connect-azure-windows-microsoft-services.md?tabs=LAA#windows-agent-based-connections) (Legacy)** | | **Log Analytics table(s)** | DnsEvents<br>DnsInventory |-| **DCR support** | [Workspace transformation DCR](../azure-monitor/logs/tutorial-ingestion-time-transformations.md) | +| **DCR support** | [Workspace transformation DCR](../azure-monitor/logs/tutorial-workspace-transformations-portal.md) | | **Supported by** | Microsoft | For more information, see [Connect Zimperium to Microsoft Sentinel](#zimperium-m | | | | **Data ingestion method** | **[Common Event Format (CEF)](connect-common-event-format.md) over Syslog** | | **Log Analytics table(s)** | [CommonSecurityLog](/azure/azure-monitor/reference/tables/commonsecuritylog) |-| **DCR support** | [Workspace transformation DCR](../azure-monitor/logs/tutorial-ingestion-time-transformations.md) | +| **DCR support** | [Workspace transformation DCR](../azure-monitor/logs/tutorial-workspace-transformations-portal.md) | | **Vendor documentation/<br>installation instructions** | [Zscaler and Microsoft Sentinel Deployment Guide](https://aka.ms/ZscalerCEFInstructions) | | **Supported by** | [Zscaler](https://help.zscaler.com/submit-ticket-links) | |
| sentinel | Data Transformation | https://github.com/MicrosoftDocs/azure-docs/commits/main/articles/sentinel/data-transformation.md | Log Analytics' custom data ingestion process gives you a high level of control o Microsoft Sentinel gives you two tools to control this process: -- The [**custom logs API**](../azure-monitor/logs/custom-logs-overview.md) allows you to send custom-format logs from any data source to your Log Analytics workspace, and store those logs either in certain specific standard tables, or in custom-formatted tables that you create. You have full control over the creation of these custom tables, down to specifying the column names and types. You create [**Data collection rules (DCRs)**](../azure-monitor/essentials/data-collection-rule-overview.md) to define, configure, and apply transformations to these data flows.+- The [**Logs ingestion API**](../azure-monitor/logs/logs-ingestion-api-overview.md) allows you to send custom-format logs from any data source to your Log Analytics workspace, and store those logs either in certain specific standard tables, or in custom-formatted tables that you create. You have full control over the creation of these custom tables, down to specifying the column names and types. You create [**Data collection rules (DCRs)**](../azure-monitor/essentials/data-collection-rule-overview.md) to define, configure, and apply transformations to these data flows. -- [**Ingestion-time data transformation**](../azure-monitor/logs/ingestion-time-transformations.md) uses DCRs to apply basic KQL queries to incoming standard logs (and certain types of custom logs) before they're stored in your workspace. These transformations can filter out irrelevant data, enrich existing data with analytics or external data, or mask sensitive or personal information.+- [**Data collection transformation**](../azure-monitor/essentials/data-collection-transformations.md) uses DCRs to apply basic KQL queries to incoming standard logs (and certain types of custom logs) before they're stored in your workspace. These transformations can filter out irrelevant data, enrich existing data with analytics or external data, or mask sensitive or personal information. These two tools will be explained in more detail below. Ingestion-time transformations can also be used to mask or remove personal infor The following image shows where ingestion-time data transformation enters the data ingestion flow into Microsoft Sentinel. -Microsoft Sentinel collects data into the Log Analytics workspace from multiple sources. Data from built-in data connectors is processed in Log Analytics using some combination of hardcoded workflows and ingestion-time transformations, and data ingested directly into the custom logs API endpoint is , and then stored in either standard or custom tables. +Microsoft Sentinel collects data into the Log Analytics workspace from multiple sources. Data from built-in data connectors is processed in Log Analytics using some combination of hardcoded workflows and ingestion-time transformations, and data ingested directly into the logs ingestion API endpoint is , and then stored in either standard or custom tables. :::image type="content" source="media/data-transformation/data-transformation-architecture.png" alt-text="Diagram of the Microsoft Sentinel data transformation architecture."::: In Log Analytics, data collection rules (DCRs) determine the data flow for diffe Support for DCRs in Microsoft Sentinel includes: -- *Standard DCRs*, currently supported only for AMA-based connectors and workflows using the new [custom logs API](../azure-monitor/logs/custom-logs-overview.md). +- *Standard DCRs*, currently supported only for AMA-based connectors and workflows using the new [Logs ingestion API](../azure-monitor/logs/logs-ingestion-api-overview.md). Each connector or log source workflow can have its own dedicated *standard DCR*, though multiple connectors or sources can share a common *standard DCR* as well. The following table describes DCR support for Microsoft Sentinel data connector | Data connector type | DCR support | | - | -- |-| **Direct ingestion via [Custom Logs API](../azure-monitor/logs/custom-logs-overview.md)** | Standard DCRs | +| **Direct ingestion via [Logs ingestion API](../azure-monitor/logs/logs-ingestion-api-overview.md)** | Standard DCRs | | [**AMA standard logs**](connect-azure-windows-microsoft-services.md?tabs=AMA#windows-agent-based-connections), such as: <li>[Windows Security Events via AMA](data-connectors-reference.md#windows-security-events-via-ama)<li>[Windows Forwarded Events](data-connectors-reference.md#windows-forwarded-events-preview)<li>[CEF data](connect-common-event-format.md)<li>[Syslog data](connect-syslog.md) | Standard DCRs | | [**MMA standard logs**](connect-azure-windows-microsoft-services.md?tabs=LAA#windows-agent-based-connections), such as <li>[Syslog data](connect-syslog.md)<li>[CommonSecurityLog](connect-azure-windows-microsoft-services.md) | Workspace transformation DCRs | | [**Diagnostic settings-based connections**](connect-azure-windows-microsoft-services.md#diagnostic-settings-based-connections) | Workspace transformation DCRs, based on the [supported output tables](../azure-monitor/logs/tables-feature-support.md) for specific data connectors | Ingestion-time data transformation currently has the following known issues for - It make take up to 60 minutes for the data transformation configurations to apply. -- KQL syntax: Not all operators are supported. For more information, see [**KQL limitations** and **Supported KQL features**](../azure-monitor/essentials/data-collection-rule-transformations.md#kql-limitations) in the Azure Monitor documentation.+- KQL syntax: Not all operators are supported. For more information, see [**KQL limitations** and **Supported KQL features**](../azure-monitor/essentials/data-collection-transformations-structure.md#kql-limitations) in the Azure Monitor documentation. ## Next steps Learn more about Microsoft Sentinel data connector types. For more information, For more in-depth information on ingestion-time transformation, the Custom Logs API, and data collection rules, see the following articles in the Azure Monitor documentation: -- [Ingestion-time transformations in Azure Monitor Logs (preview)](../azure-monitor/logs/ingestion-time-transformations.md)-- [Custom logs API in Azure Monitor Logs (Preview)](../azure-monitor/logs/custom-logs-overview.md)+- [Data collection transformations in Azure Monitor Logs (preview)](../azure-monitor/essentials/data-collection-transformations.md) +- [Logs ingestion API in Azure Monitor Logs (Preview)](../azure-monitor/logs/logs-ingestion-api-overview.md) - [Data collection rules in Azure Monitor](../azure-monitor/essentials/data-collection-rule-overview.md) |
| sentinel | Migration Export Ingest | https://github.com/MicrosoftDocs/azure-docs/commits/main/articles/sentinel/migration-export-ingest.md | To ingest your historical data into Azure Data Explorer (ADX) (option 1 in the [ To ingest your historical data into Microsoft Sentinel Basic Logs (option 2 in the [diagram above](#export-data-from-the-legacy-siem)): 1. If you don't have an existing Log Analytics workspace, create a new workspace and [install Microsoft Sentinel](quickstart-onboard.md#enable-microsoft-sentinel-).-1. [Create an App registration to authenticate against the API](../azure-monitor/logs/tutorial-custom-logs.md#configure-application). -1. [Create a data collection endpoint](../azure-monitor/logs/tutorial-custom-logs.md#create-data-collection-endpoint). This endpoint acts as the API endpoint that accepts the data. -1. [Create a custom log table](../azure-monitor/logs/tutorial-custom-logs.md#add-custom-log-table) to store the data, and provide a data sample. In this step, you can also define a transformation before the data is ingested. -1. [Collect information from the data collection rule](../azure-monitor/logs/tutorial-custom-logs.md#collect-information-from-dcr) and assign permissions to the rule. +1. [Create an App registration to authenticate against the API](../azure-monitor/logs/tutorial-logs-ingestion-portal.md#configure-application). +1. [Create a data collection endpoint](../azure-monitor/logs/tutorial-logs-ingestion-portal.md#create-data-collection-endpoint). This endpoint acts as the API endpoint that accepts the data. +1. [Create a custom log table](../azure-monitor/logs/tutorial-logs-ingestion-portal.md#add-custom-log-table) to store the data, and provide a data sample. In this step, you can also define a transformation before the data is ingested. +1. [Collect information from the data collection rule](../azure-monitor/logs/tutorial-logs-ingestion-portal.md#collect-information-from-dcr) and assign permissions to the rule. 1. [Change the table from Analytics to Basic Logs](../azure-monitor/logs/basic-logs-configure.md). 1. Run the [Custom Log Ingestion script](https://github.com/Azure/Azure-Sentinel/tree/master/Tools/CustomLogsIngestion-DCE-DCR). The script asks for the following details: - Path to the log files to ingest |
| sentinel | Migration Ingestion Tool | https://github.com/MicrosoftDocs/azure-docs/commits/main/articles/sentinel/migration-ingestion-tool.md | The [custom log ingestion tool](https://github.com/Azure/Azure-Sentinel/tree/mas ### Direct API -With this option, you [ingest your custom logs into Azure Monitor Logs](../azure-monitor/logs/tutorial-custom-logs.md). You ingest the logs with a PowerShell script that uses a REST API. Alternatively, you can use any other programming language to perform the ingestion, and you can use other Azure services to abstract the compute layer, such as Azure Functions or Azure Logic Apps. +With this option, you [ingest your custom logs into Azure Monitor Logs](../azure-monitor/logs/tutorial-logs-ingestion-portal.md). You ingest the logs with a PowerShell script that uses a REST API. Alternatively, you can use any other programming language to perform the ingestion, and you can use other Azure services to abstract the compute layer, such as Azure Functions or Azure Logic Apps. ## Azure Data Explorer |
| sentinel | Migration | https://github.com/MicrosoftDocs/azure-docs/commits/main/articles/sentinel/migration.md | Title: Plan your migration to Microsoft Sentinel | Microsoft Docs description: Discover the reasons for migrating from a legacy SIEM, and learn how to plan out the different phases of your migration. + Last updated 05/03/2022 When planning the discover phase, use the following guidance to identify your us In this article, you learned how to plan and prepare for your migration. > [!div class="nextstepaction"]-> [Track your migration with a workbook](migration-track.md) +> [Track your migration with a workbook](migration-track.md) |
| sentinel | Skill Up Resources | https://github.com/MicrosoftDocs/azure-docs/commits/main/articles/sentinel/skill-up-resources.md | SOC efficiency** webinar. [YouTube](https://youtu.be/148mr8anqtI), [Presentation Microsoft Sentinel supports two new features for data ingestion and transformation. These features, provided by Log Analytics, act on your data even before it's stored in your workspace. -* The first of these features is the [**custom logs API.**](../azure-monitor/logs/custom-logs-overview.md) It allows you to send custom-format logs from any data source to your Log Analytics workspace, and store those logs either in certain specific standard tables, or in custom-formatted tables that you create. The actual ingestion of these logs can be done by direct API calls. You can use Log Analytics [data collection rules (DCRs)](../azure-monitor/essentials/data-collection-rule-overview.md) to define and configure these workflows. +* The first of these features is the [**Logs ingestion API.**](../azure-monitor/logs/logs-ingestion-api-overview.md) It allows you to send custom-format logs from any data source to your Log Analytics workspace, and store those logs either in certain specific standard tables, or in custom-formatted tables that you create. The actual ingestion of these logs can be done by direct API calls. You can use Log Analytics [data collection rules (DCRs)](../azure-monitor/essentials/data-collection-rule-overview.md) to define and configure these workflows. -* The second feature is [**ingestion-time data transformation for standard logs**](../azure-monitor/logs/ingestion-time-transformations.md). It uses [DCRs](../azure-monitor/essentials/data-collection-rule-overview.md) to filter out irrelevant data, to enrich or tag your data, or to hide sensitive or personal information. Data transformation can be configured at ingestion time for the following types of built-in data connectors: +* The second feature is [**workspace data transformations for standard logs**](../azure-monitor/essentials/data-collection-transformations.md#workspace-transformation-dcr). It uses [DCRs](../azure-monitor/essentials/data-collection-rule-overview.md) to filter out irrelevant data, to enrich or tag your data, or to hide sensitive or personal information. Data transformation can be configured at ingestion time for the following types of built-in data connectors: * AMA-based data connectors (based on the new Azure Monitor Agent) * MMA-based data connectors (based on the legacy Log Analytics Agent) * Data connectors that use Diagnostic settings |
| sentinel | Whats New | https://github.com/MicrosoftDocs/azure-docs/commits/main/articles/sentinel/whats-new.md | For more information, see: Microsoft Sentinel supports two new features for data ingestion and transformation. These features, provided by Log Analytics, act on your data even before it's stored in your workspace. -The first of these features is the [**custom logs API**](../azure-monitor/logs/custom-logs-overview.md). It allows you to send custom-format logs from any data source to your Log Analytics workspace, and store those logs either in certain specific standard tables, or in custom-formatted tables that you create. The actual ingestion of these logs can be done by direct API calls. You use Log Analytics [**data collection rules (DCRs)**](../azure-monitor/essentials/data-collection-rule-overview.md) to define and configure these workflows. +The first of these features is the [**Logs ingestion API**](../azure-monitor/logs/logs-ingestion-api-overview.md). It allows you to send custom-format logs from any data source to your Log Analytics workspace, and store those logs either in certain specific standard tables, or in custom-formatted tables that you create. The actual ingestion of these logs can be done by direct API calls. You use Log Analytics [**data collection rules (DCRs)**](../azure-monitor/essentials/data-collection-rule-overview.md) to define and configure these workflows. -The second feature is [**ingestion-time data transformation**](../azure-monitor/logs/ingestion-time-transformations.md) for standard logs. It uses [**DCRs**](../azure-monitor/essentials/data-collection-rule-overview.md) to filter out irrelevant data, to enrich or tag your data, or to hide sensitive or personal information. Data transformation can be configured at ingestion time for the following types of built-in data connectors: +The second feature is [**workspace transformations**](../azure-monitor/essentials/data-collection-transformations.md#workspace-transformation-dcr) for standard logs. It uses [**DCRs**](../azure-monitor/essentials/data-collection-rule-overview.md) to filter out irrelevant data, to enrich or tag your data, or to hide sensitive or personal information. Data transformation can be configured at ingestion time for the following types of built-in data connectors: - AMA-based data connectors (based on the new Azure Monitor Agent) - MMA-based data connectors (based on the legacy Log Analytics Agent) |
| service-fabric | Service Fabric Reliable Actors Timers Reminders | https://github.com/MicrosoftDocs/azure-docs/commits/main/articles/service-fabric/service-fabric-reliable-actors-timers-reminders.md | To unregister a reminder, an actor calls the `UnregisterReminderAsync`(C#) or `u ```csharp IActorReminder reminder = GetReminder("Pay cell phone bill");-Task reminderUnregistration = UnregisterReminderAsync(reminder); +Task reminderUnregistration = await UnregisterReminderAsync(reminder); ``` ```Java ActorReminder reminder = getReminder("Pay cell phone bill"); |
| site-recovery | Azure To Azure Support Matrix | https://github.com/MicrosoftDocs/azure-docs/commits/main/articles/site-recovery/azure-to-azure-support-matrix.md | Debian 8 | Includes support for all 8. *x* versions [Supported kernel versions]( Debian 9 | Includes support for 9.1 to 9.13. Debian 9.0 is not supported. [Supported kernel versions](#supported-debian-kernel-versions-for-azure-virtual-machines) Debian 10 | [Supported kernel versions](#supported-debian-kernel-versions-for-azure-virtual-machines) SUSE Linux Enterprise Server 12 | SP1, SP2, SP3, SP4, SP5 [(Supported kernel versions)](#supported-suse-linux-enterprise-server-12-kernel-versions-for-azure-virtual-machines)-SUSE Linux Enterprise Server 15 | 15, SP1, SP2[(Supported kernel versions)](#supported-suse-linux-enterprise-server-15-kernel-versions-for-azure-virtual-machines) +SUSE Linux Enterprise Server 15 | 15, SP1, SP2, SP3 [(Supported kernel versions)](#supported-suse-linux-enterprise-server-15-kernel-versions-for-azure-virtual-machines) SUSE Linux Enterprise Server 11 | SP3<br/><br/> Upgrade of replicating machines from SP3 to SP4 isn't supported. If a replicated machine has been upgraded, you need to disable replication and re-enable replication after the upgrade. SUSE Linux Enterprise Server 11 | SP4 Oracle Linux | 6.4, 6.5, 6.6, 6.7, 6.8, 6.9, 6.10, 7.0, 7.1, 7.2, 7.3, 7.4, 7.5, 7.6, [7.7](https://support.microsoft.com/help/4531426/update-rollup-42-for-azure-site-recovery), [7.8](https://support.microsoft.com/help/4573888/), [7.9](https://support.microsoft.com/help/4597409), [8.0](https://support.microsoft.com/help/4573888/), [8.1](https://support.microsoft.com/help/4573888/), [8.2](https://support.microsoft.com/topic/update-rollup-55-for-azure-site-recovery-kb5003408-b19c8190-5f88-43ea-85b1-d9e0cc5ca7e8), [8.3](https://support.microsoft.com/topic/update-rollup-55-for-azure-site-recovery-kb5003408-b19c8190-5f88-43ea-85b1-d9e0cc5ca7e8) (running the Red Hat compatible kernel or Unbreakable Enterprise Kernel Release 3, 4, 5, and 6 (UEK3, UEK4, UEK5, UEK6), [8.4](https://support.microsoft.com/topic/update-rollup-59-for-azure-site-recovery-kb5008707-66a65377-862b-4a4c-9882-fd74bdc7a81e), 8.5 <br/><br/>8.1 (running on all UEK kernels and RedHat kernel <= 3.10.0-1062.* are supported in [9.35](https://support.microsoft.com/help/4573888/) Support for rest of the RedHat kernels is available in [9.36](https://support.microsoft.com/help/4578241/)) Oracle Linux | 6.4, 6.5, 6.6, 6.7, 6.8, 6.9, 6.10, 7.0, 7.1, 7.2, 7.3, 7.4, 7.5, 16.04 LTS | [9.45](https://support.microsoft.com/topic/update-rollup-58-for-azure-site-recovery-kb5007075-37ba21c3-47d9-4ea9-9130-a7d64f517d5d) | No new 16.04 LTS kernels supported in this release. | 16.04 LTS | [9.44](https://support.microsoft.com/topic/update-rollup-57-for-azure-site-recovery-kb5006172-9fccc879-6e0c-4dc8-9fec-e0600cf94094) | 4.4.0-21-generic to 4.4.0-206-generic,<br/>4.8.0-34-generic to 4.8.0-58-generic,<br/>4.10.0-14-generic to 4.10.0-42-generic,<br/>4.11.0-13-generic to 4.11.0-14-generic,<br/>4.13.0-16-generic to 4.13.0-45-generic,<br/>4.15.0-13-generic to 4.15.0-140-generic<br/>4.11.0-1009-azure to 4.11.0-1016-azure,<br/>4.13.0-1005-azure to 4.13.0-1018-azure <br/>4.15.0-1012-azure to 4.15.0-1111-azure| |||+18.04 LTS |[9.49](https://support.microsoft.com/en-us/topic/update-rollup-62-for-azure-site-recovery-e7aff36f-b6ad-4705-901c-f662c00c402b) | 4.15.0-1139-azure </br> 4.15.0-1142-azure </br> 4.15.0-1145-azure </br> 4.15.0-180-generic </br> 4.15.0-184-generic </br> 4.15.0-187-generic </br> 4.15.0-188-generic </br> 5.4.0-1080-azure </br> 5.4.0-1083-azure </br> 5.4.0-1085-azure </br> 5.4.0-113-generic </br> 5.4.0-117-generic </br> 5.4.0-120-generic </br> 5.4.0-121-generic | 18.04 LTS |[9.48](https://support.microsoft.com/topic/update-rollup-61-for-azure-site-recovery-kb5012960-a1cc029b-03ad-446f-9365-a00b41025d39) | 4.15.0-1134-azure </br> 4.15.0-1136-azure </br> 4.15.0-173-generic </br> 4.15.0-175-generic </br> 5.4.0-105-generic </br> 5.4.0-1073-azure </br> 5.4.0-1074-azure </br> 5.4.0-107-generic </br> 5.4.0-109-generic </br> 5.4.0-110-generic | 18.04 LTS |[9.47](https://support.microsoft.com/topic/update-rollup-60-for-azure-site-recovery-k5011122-883a93a7-57df-4b26-a1c4-847efb34a9e8) | 5.4.0-92-generic </br> 4.15.0-166-generic </br> 4.15.0-1129-azure </br> 5.4.0-1065-azure </br> 4.15.0-1130-azure </br> 4.15.0-167-generic </br> 5.4.0-1067-azure </br> 5.4.0-1068-azure </br> 5.4.0-94-generic </br> 5.4.0-96-generic </br> 5.4.0-97-generic </br> 5.4.0-99-generic </br> 4.15.0-1131-azure </br> 4.15.0-169-generic </br> 5.4.0-100-generic </br> 5.4.0-1069-azure </br> 5.4.0-1070-azure | 18.04 LTS |[9.46](https://support.microsoft.com/topic/update-rollup-59-for-azure-site-recovery-kb5008707-66a65377-862b-4a4c-9882-fd74bdc7a81e) | 4.15.0-1126-azure </br> 4.15.0-1125-azure </br> 4.15.0-1123-azure </br> 5.4.0-1058-azure </br> 4.15.0-162-generic </br> 4.15.0-161-generic </br> 4.15.0-156-generic </br> 5.4.0-1061-azure to 5.4.0-1063-azure </br> 5.4.0-90-generic </br> 5.4.0-89-generic </br> 9.46 hotfix patch** </br> 4.15.0-1127-azure </br> 4.15.0-163-generic </br> 5.4.0-1064-azure </br> 5.4.0-91-generic | 18.04 LTS |[9.45](https://support.microsoft.com/topic/update-rollup-58-for-azure-site-recovery-kb5007075-37ba21c3-47d9-4ea9-9130-a7d64f517d5d) | 4.15.0-1123-azure </br> 5.4.0-1058-azure </br> 4.15.0-156-generic </br> 4.15.0-1125-azure </br> 4.15.0-161-generic </br> 5.4.0-1061-azure </br> 5.4.0-1062-azure </br> 5.4.0-89-generic |-18.04 LTS | [9.44](https://support.microsoft.com/topic/update-rollup-57-for-azure-site-recovery-kb5006172-9fccc879-6e0c-4dc8-9fec-e0600cf94094) | 4.15.0-20-generic to 4.15.0-140-generic </br> 4.18.0-13-generic to 4.18.0-25-generic </br> 5.0.0-15-generic to 5.0.0-65-generic </br> 5.3.0-19-generic to 5.3.0-72-generic </br> 5.4.0-37-generic to 5.4.0-70-generic </br> 4.15.0-1009-azure to 4.15.0-1111-azure </br> 4.18.0-1006-azure to 4.18.0-1025-azure </br> 5.0.0-1012-azure to 5.0.0-1036-azure </br> 5.3.0-1007-azure to 5.3.0-1035-azure </br> 5.4.0-1020-azure to 5.4.0-1043-azure </br> 4.15.0-1114-azure </br> 4.15.0-143-generic </br> 5.4.0-1047-azure </br> 5.4.0-73-generic </br> 4.15.0-1115-azure </br> 4.15.0-144-generic </br> 5.4.0-1048-azure </br> 5.4.0-74-generic </br> 4.15.0-1121-azure </br> 4.15.0-151-generic </br> 4.15.0-153-generic </br> 5.3.0-76-generic </br> 5.4.0-1055-azure </br> 5.4.0-80-generic </br> 4.15.0-147-generic </br> 4.15.0-153-generic </br> 5.4.0-1056-azure </br> 5.4.0-81-generic </br> 4.15.0-1122-azure </br> 4.15.0-154-generic | ||| 20.04 LTS |[9.48](https://support.microsoft.com/topic/update-rollup-61-for-azure-site-recovery-kb5012960-a1cc029b-03ad-446f-9365-a00b41025d39) | 5.4.0-1074-azure </br> 5.4.0-107-generic </br> 5.4.0-1077-azure </br> 5.4.0-1078-azure </br> 5.4.0-109-generic </br> 5.4.0-110-generic | 20.04 LTS |[9.47](https://support.microsoft.com/topic/update-rollup-60-for-azure-site-recovery-k5011122-883a93a7-57df-4b26-a1c4-847efb34a9e8) | 5.4.0-1065-azure </br> 5.4.0-92-generic </br> 5.4.0-1067-azure </br> 5.4.0-1068-azure </br> 5.4.0-94-generic </br> 5.4.0-96-generic </br> 5.4.0-97-generic </br> 5.4.0-99-generic </br> 5.4.0-100-generic </br> 5.4.0-1069-azure </br> 5.4.0-1070-azure | Debian 8 | [9.46](https://support.microsoft.com/topic/update-rollup-59-for-azure Debian 8 | [9.45](https://support.microsoft.com/topic/update-rollup-58-for-azure-site-recovery-kb5007075-37ba21c3-47d9-4ea9-9130-a7d64f517d5d) | No new Debian 8 kernels supported in this release. | Debian 8 | [9.44](https://support.microsoft.com/topic/update-rollup-57-for-azure-site-recovery-kb5006172-9fccc879-6e0c-4dc8-9fec-e0600cf94094) | 3.16.0-4-amd64 to 3.16.0-11-amd64, 4.9.0-0.bpo.4-amd64 to 4.9.0-0.bpo.11-amd64 | |||+Debian 9.1 | [9.49](https://support.microsoft.com/en-us/topic/update-rollup-62-for-azure-site-recovery-e7aff36f-b6ad-4705-901c-f662c00c402b) | 4.9.0-19-amd64 Debian 9.1 | [9.48](https://support.microsoft.com/topic/update-rollup-61-for-azure-site-recovery-kb5012960-a1cc029b-03ad-446f-9365-a00b41025d39) | 4.9.0-18-amd64 </br> 4.19.0-0.bpo.19-amd64 </br> 4.19.0-0.bpo.17-cloud-amd64 to 4.19.0-0.bpo.19-cloud-amd64 Debian 9.1 | [9.47](https://support.microsoft.com/topic/update-rollup-60-for-azure-site-recovery-k5011122-883a93a7-57df-4b26-a1c4-847efb34a9e8) | 4.9.0-16-amd64, 4.9.0-17-amd64 Debian 9.1 | [9.46](https://support.microsoft.com/topic/update-rollup-59-for-azure-site-recovery-kb5008707-66a65377-862b-4a4c-9882-fd74bdc7a81e) | No new Debian 9.1 kernels supported in this release. Debian 9.1 | [9.45](https://support.microsoft.com/topic/update-rollup-58-for-azure-site-recovery-kb5007075-37ba21c3-47d9-4ea9-9130-a7d64f517d5d) | 4.19.0-0.bpo.18-amd64 </br> 4.19.0-0.bpo.18-cloud-amd64-Debian 9.1 | [9.44](https://support.microsoft.com/topic/update-rollup-57-for-azure-site-recovery-kb5006172-9fccc879-6e0c-4dc8-9fec-e0600cf94094) | 4.9.0-1-amd64 to 4.9.0-15-amd64 </br> 4.19.0-0.bpo.1-amd64 to 4.19.0-0.bpo.16-amd64 </br> 4.19.0-0.bpo.1-cloud-amd64 to 4.19.0-0.bpo.16-cloud-amd64 |||+Debian 10 | [9.49](https://support.microsoft.com/en-us/topic/update-rollup-62-for-azure-site-recovery-e7aff36f-b6ad-4705-901c-f662c00c402b) | 4.19.0-21-amd64 </br> 4.19.0-21-cloud-amd64 </br> 5.10.0-0.bpo.15-amd64 </br> 5.10.0-0.bpo.15-cloud-amd64 Debian 10 | [9.48](https://support.microsoft.com/topic/update-rollup-61-for-azure-site-recovery-kb5012960-a1cc029b-03ad-446f-9365-a00b41025d39) | 4.19.0-20-amd64 </br> 4.19.0-20-cloud-amd64 </br> 5.8.0-0.bpo.2-amd64, 5.8.0-0.bpo.2-cloud-amd64, 5.9.0-0.bpo.2-amd64, 5.9.0-0.bpo.2-cloud-amd64, 5.9.0-0.bpo.5-amd64, 5.9.0-0.bpo.5-cloud-amd64, 5.10.0-0.bpo.7-amd64, 5.10.0-0.bpo.7-cloud-amd64, 5.10.0-0.bpo.9-amd64, 5.10.0-0.bpo.9-cloud-amd64, 5.10.0-0.bpo.11-amd64, 5.10.0-0.bpo.11-cloud-amd64, 5.10.0-0.bpo.12-amd64, 5.10.0-0.bpo.12-cloud-amd64 | Debian 10 | [9.47](https://support.microsoft.com/topic/update-rollup-60-for-azure-site-recovery-k5011122-883a93a7-57df-4b26-a1c4-847efb34a9e8) | No new Debian 10 kernels supported in this release. Debian 10 | [9.46](https://support.microsoft.com/topic/update-rollup-59-for-azure-site-recovery-kb5008707-66a65377-862b-4a4c-9882-fd74bdc7a81e) | No new Debian 10 kernels supported in this release. Debian 10 | [9.45](https://support.microsoft.com/topic/update-rollup-58-for-azure-site-recovery-kb5007075-37ba21c3-47d9-4ea9-9130-a7d64f517d5d) | 4.19.0-18-amd64 </br> 4.19.0-18-cloud-amd64-Debian 10 | [9.44](https://support.microsoft.com/topic/update-rollup-57-for-azure-site-recovery-kb5006172-9fccc879-6e0c-4dc8-9fec-e0600cf94094) | 4.19.0-6-amd64 to 4.19.0-16-amd64 </br> 4.19.0-6-cloud-amd64 to 4.19.0-16-cloud-amd64 </br> > [!Note] > To support latest Linux kernels within 15 days of release, Azure Site Recovery rolls out hot fix patch on top of latest mobility agent version. This fix is rolled out in between two major version releases. To update to latest version of mobility agent (including hot fix patch) follow steps mentioned in [this article](service-updates-how-to.md#azure-vm-disaster-recovery-to-azure). This patch is currently rolled out for mobility agents used in Azure to Azure DR scenario. Debian 10 | [9.44](https://support.microsoft.com/topic/update-rollup-57-for-azur **Release** | **Mobility service version** | **Kernel version** | | | |+SUSE Linux Enterprise Server 12 (SP1, SP2, SP3, SP4, SP5) | [9.49](https://support.microsoft.com/en-us/topic/update-rollup-62-for-azure-site-recovery-e7aff36f-b6ad-4705-901c-f662c00c402b) | 4.12.14-16.100-azure:5 | SUSE Linux Enterprise Server 12 (SP1, SP2, SP3, SP4, SP5) | [9.48](https://support.microsoft.com/topic/update-rollup-61-for-azure-site-recovery-kb5012960-a1cc029b-03ad-446f-9365-a00b41025d39) | 4.12.14-122.110-default:5 </br> 4.12.14-122.113-default:5 </br> 4.12.14-122.116-default:5 </br> 4.12.14-122.121-default:5 | SUSE Linux Enterprise Server 12 (SP1, SP2, SP3, SP4, SP5) | [9.47](https://support.microsoft.com/topic/update-rollup-60-for-azure-site-recovery-k5011122-883a93a7-57df-4b26-a1c4-847efb34a9e8) | All [stock SUSE 12 SP1,SP2,SP3,SP4,SP5 kernels](https://www.suse.com/support/kb/doc/?id=000019587) are supported.</br></br> 4.12.14-16.85-azure:5 </br> 4.12.14-122.106-default:5 </br> 4.12.14-16.88-azure:5 </br> 4.12.14-122.110-default:5 | SUSE Linux Enterprise Server 12 (SP1, SP2, SP3, SP4, SP5) | [9.46](https://support.microsoft.com/en-us/topic/update-rollup-59-for-azure-site-recovery-kb5008707-66a65377-862b-4a4c-9882-fd74bdc7a81e) | All [stock SUSE 12 SP1,SP2,SP3,SP4,SP5 kernels](https://www.suse.com/support/kb/doc/?id=000019587) are supported.</br></br> 4.12.14-16.80-azure | SUSE Linux Enterprise Server 12 (SP1, SP2, SP3, SP4, SP5) | [9.45](https://support.microsoft.com/topic/update-rollup-58-for-azure-site-recovery-kb5007075-37ba21c3-47d9-4ea9-9130-a7d64f517d5d) | No new SLES 12 kernels supported in this release. |-SUSE Linux Enterprise Server 12 (SP1, SP2, SP3, SP4, SP5) | [9.44](https://support.microsoft.com/en-us/topic/update-rollup-57-for-azure-site-recovery-kb5006172-9fccc879-6e0c-4dc8-9fec-e0600cf94094) | All [stock SUSE 12 SP1,SP2,SP3,SP4,SP5 kernels](https://www.suse.com/support/kb/doc/?id=000019587) are supported.</br></br> 4.4.138-4.7-azure to 4.4.180-4.31-azure,</br>4.12.14-6.3-azure to 4.12.14-6.43-azure </br> 4.12.14-16.7-azure to 4.12.14-16.56-azure </br> 4.12.14-16.65-azure </br> 4.12.14-16.68-azure | #### Supported SUSE Linux Enterprise Server 15 kernel versions for Azure virtual machines **Release** | **Mobility service version** | **Kernel version** | | | |-SUSE Linux Enterprise Server 15, SP1, SP2 | [9.48](https://support.microsoft.com/topic/update-rollup-61-for-azure-site-recovery-kb5012960-a1cc029b-03ad-446f-9365-a00b41025d39) | 5.3.18-59.5-default:3 +SUSE Linux Enterprise Server 15, SP1, SP2, SP3 | [9.48](https://support.microsoft.com/topic/update-rollup-61-for-azure-site-recovery-kb5012960-a1cc029b-03ad-446f-9365-a00b41025d39) | 5.3.18-59.5-default:3 </br> 5.3.18-150300.38.59-azure:3 </br> 5.3.18-150300.38.62-azure:3 </br> SUSE Linux Enterprise Server 15, SP1, SP2 | [9.47](https://support.microsoft.com/topic/update-rollup-60-for-azure-site-recovery-k5011122-883a93a7-57df-4b26-a1c4-847efb34a9e8) | By default, all [stock SUSE 15, SP1, SP2 kernels](https://www.suse.com/support/kb/doc/?id=000019587) are supported.</br></br> 5.3.18-38.31-azure </br> 5.3.18-38.8-azure </br> 5.3.18-57-default </br> 5.3.18-59.10-default </br> 5.3.18-59.13-default </br> 5.3.18-59.16-default </br> 5.3.18-59.19-default </br> 5.3.18-59.24-default </br> 5.3.18-59.27-default </br> 5.3.18-59.30-default </br> 5.3.18-59.34-default </br> 5.3.18-59.37-default </br> 5.3.18-59.5-default </br> 5.3.18-38.34-azure:3 </br> 5.3.18-150300.59.43-default:3 </br> 5.3.18-150300.59.46-default:3 </br> 5.3.18-59.40-default:3 </br> SUSE Linux Enterprise Server 15, SP1, SP2 | [9.46](https://support.microsoft.com/topic/update-rollup-59-for-azure-site-recovery-kb5008707-66a65377-862b-4a4c-9882-fd74bdc7a81e) | By default, all [stock SUSE 15, SP1, SP2 kernels](https://www.suse.com/support/kb/doc/?id=000019587) are supported.</br></br> 4.12.14-5.5-azure to 4.12.14-5.47-azure </br></br> 4.12.14-8.5-azure to 4.12.14-8.55-azure </br> 5.3.18-16-azure </br> 5.3.18-18.5-azure to 5.3.18-18.58-azure </br> 5.3.18-18.69-azure </br> 5.3.18-18.72-azure </br> 5.3.18-18.75-azure SUSE Linux Enterprise Server 15, SP1, SP2 | [9.45](https://support.microsoft.com/topic/update-rollup-58-for-azure-site-recovery-kb5007075-37ba21c3-47d9-4ea9-9130-a7d64f517d5d) | By default, all [stock SUSE 15, SP1, SP2 kernels](https://www.suse.com/support/kb/doc/?id=000019587) are supported.</br></br> 4.12.14-5.5-azure to 4.12.14-5.47-azure </br></br> 4.12.14-8.5-azure to 4.12.14-8.55-azure </br> 5.3.18-16-azure </br> 5.3.18-18.5-azure to 5.3.18-18.58-azure </br> 5.3.18-18.69-azure |
| site-recovery | Vmware Physical Azure Support Matrix | https://github.com/MicrosoftDocs/azure-docs/commits/main/articles/site-recovery/vmware-physical-azure-support-matrix.md | Oracle Linux | 6.4, 6.5, 6.6, 6.7, 6.8, 6.9, 6.10, 7.0, 7.1, 7.2, 7.3, 7.4, 7.5, ||| 16.04 LTS | [9.44](https://support.microsoft.com/topic/update-rollup-57-for-azure-site-recovery-kb5006172-9fccc879-6e0c-4dc8-9fec-e0600cf94094), [9.45](https://support.microsoft.com/topic/update-rollup-58-for-azure-site-recovery-kb5007075-37ba21c3-47d9-4ea9-9130-a7d64f517d5d), [9.46](https://support.microsoft.com/topic/update-rollup-59-for-azure-site-recovery-kb5008707-66a65377-862b-4a4c-9882-fd74bdc7a81e), [9.47](https://support.microsoft.com/topic/883a93a7-57df-4b26-a1c4-847efb34a9e8), [9.48](https://support.microsoft.com/topic/update-rollup-61-for-azure-site-recovery-kb5012960-a1cc029b-03ad-446f-9365-a00b41025d39) | 4.4.0-21-generic to 4.4.0-210-generic,<br/>4.8.0-34-generic to 4.8.0-58-generic,<br/>4.10.0-14-generic to 4.10.0-42-generic,<br/>4.11.0-13-generic, 4.11.0-14-generic,<br/>4.13.0-16-generic to 4.13.0-45-generic,<br/>4.15.0-13-generic to 4.15.0-142-generic<br/>4.11.0-1009-azure to 4.11.0-1016-azure,<br/>4.13.0-1005-azure to 4.13.0-1018-azure <br/>4.15.0-1012-azure to 4.15.0-1113-azure </br> 4.15.0-101-generic to 4.15.0-107-generic | |||+18.04 LTS |[9.49](https://support.microsoft.com/en-us/topic/update-rollup-62-for-azure-site-recovery-e7aff36f-b6ad-4705-901c-f662c00c402b) | 4.15.0-1139-azure </br> 4.15.0-1142-azure </br> 4.15.0-1145-azure </br> 4.15.0-180-generic </br> 4.15.0-184-generic </br> 4.15.0-187-generic </br> 4.15.0-188-generic </br> 5.4.0-1080-azure </br> 5.4.0-1083-azure </br> 5.4.0-1085-azure </br> 5.4.0-113-generic </br> 5.4.0-117-generic </br> 5.4.0-120-generic </br> 5.4.0-121-generic </br> 18.04 LTS |[9.48](https://support.microsoft.com/en-us/topic/update-rollup-61-for-azure-site-recovery-kb5012960-a1cc029b-03ad-446f-9365-a00b41025d39) | 4.15.0-1009-azure to 4.15.0-1138-azure </br> 4.15.0-101-generic to 4.15.0-177-generic </br> 4.18.0-1006-azure to 4.18.0-1025-azure </br> 4.18.0-13-generic to 4.18.0-25-generic </br> 5.0.0-1012-azure to 5.0.0-1036-azure </br> 5.0.0-15-generic to 5.0.0-65-generic </br> 5.3.0-1007-azure to 5.3.0-1035-azure </br> 5.3.0-19-generic to 5.3.0-76-generic </br> 5.4.0-1020-azure to 5.4.0-1078-azure </br> 5.4.0-37-generic to 5.4.0-110-generic | 18.04 LTS |[9.47](https://support.microsoft.com/topic/update-rollup-60-for-azure-site-recovery-k5011122-883a93a7-57df-4b26-a1c4-847efb34a9e8) | 4.15.0-1126-azure </br> 4.15.0-1127-azure </br> 4.15.0-1129-azure </br> 4.15.0-162-generic </br> 4.15.0-163-generic </br> 4.15.0-166-generic </br> 5.4.0-1063-azure </br> 5.4.0-1064-azure </br> 5.4.0-1065-azure </br> 5.4.0-90-generic </br> 5.4.0-91-generic </br> 5.4.0-92-generic | 18.04 LTS |[9.46](https://support.microsoft.com/topic/update-rollup-59-for-azure-site-recovery-kb5008707-66a65377-862b-4a4c-9882-fd74bdc7a81e) | 4.15.0-1123-azure </br> 4.15.0-1124-azure </br> 4.15.0-1125-azure</br> 4.15.0-156-generic </br> 4.15.0-158-generic </br> 4.15.0-159-generic </br> 4.15.0-161-generic </br> 5.4.0-1058-azure </br> 5.4.0-1059-azure </br> 5.4.0-1061-azure </br> 5.4.0-1062-azure </br> 5.4.0-84-generic </br> 5.4.0-86-generic </br> 5.4.0-87-generic </br> 5.4.0-89-generic | 18.04 LTS |[9.45](https://support.microsoft.com/topic/update-rollup-58-for-azure-site-recovery-kb5007075-37ba21c3-47d9-4ea9-9130-a7d64f517d5d) | 4.15.0-1123-azure </br> 5.4.0-1058-azure </br> 4.15.0-156-generic </br> 4.15.0-1125-azure </br> 4.15.0-161-generic </br> 5.4.0-1061-azure </br> 5.4.0-1062-azure </br> 5.4.0-89-generic |-18.04 LTS | [9.44](https://support.microsoft.com/topic/update-rollup-57-for-azure-site-recovery-kb5006172-9fccc879-6e0c-4dc8-9fec-e0600cf94094) | 4.15.0-20-generic to 4.15.0-140-generic </br> 4.18.0-13-generic to 4.18.0-25-generic </br> 5.0.0-15-generic to 5.0.0-65-generic </br> 5.3.0-19-generic to 5.3.0-72-generic </br> 5.4.0-37-generic to 5.4.0-70-generic </br> 4.15.0-1009-azure to 4.15.0-1111-azure </br> 4.18.0-1006-azure to 4.18.0-1025-azure </br> 5.0.0-1012-azure to 5.0.0-1036-azure </br> 5.3.0-1007-azure to 5.3.0-1035-azure </br> 5.4.0-1020-azure to 5.4.0-1043-azure </br> 4.15.0-1114-azure </br> 4.15.0-143-generic </br> 5.4.0-1047-azure </br> 5.4.0-73-generic </br> 4.15.0-1115-azure </br> 4.15.0-144-generic </br> 5.4.0-1048-azure </br> 5.4.0-74-generic </br> 4.15.0-1121-azure </br> 4.15.0-151-generic </br> 5.3.0-76-generic </br> 5.4.0-1055-azure </br> 5.4.0-80-generic </br> 4.15.0-147-generic </br> 4.15.0-153-generic </br> 5.4.0-1056-azure </br> 5.4.0-81-generic </br> 4.15.0-1122-azure </br> 4.15.0-154-generic | ||| 20.04 LTS |[9.48](https://support.microsoft.com/topic/update-rollup-61-for-azure-site-recovery-kb5012960-a1cc029b-03ad-446f-9365-a00b41025d39) | 5.4.0-26-generic to 5.4.0-110-generic </br> 5.4.0-1010-azure to 5.4.0-1078-azure </br> 5.8.0-1033-azure to 5.8.0-1043-azure </br> 5.8.0-23-generic to 5.8.0-63-generic </br> 5.11.0-22-generic to 5.11.0-46-generic </br> 5.11.0-1007-azure to 5.11.0-1028-azure | 20.04 LTS |[9.47](https://support.microsoft.com/topic/update-rollup-60-for-azure-site-recovery-k5011122-883a93a7-57df-4b26-a1c4-847efb34a9e8) | 5.4.0-1063-azure </br> 5.4.0-1064-azure </br> 5.4.0-1065-azure </br> 5.4.0-90-generic </br> 5.4.0-91-generic </br> 5.4.0-92-generic | Debian 7 | [9.44](https://support.microsoft.com/topic/update-rollup-57-for-azure ||| Debian 8 | [9.44](https://support.microsoft.com/topic/update-rollup-57-for-azure-site-recovery-kb5006172-9fccc879-6e0c-4dc8-9fec-e0600cf94094) [9.45](https://support.microsoft.com/topic/update-rollup-58-for-azure-site-recovery-kb5007075-37ba21c3-47d9-4ea9-9130-a7d64f517d5d), [9.46](https://support.microsoft.com/topic/update-rollup-59-for-azure-site-recovery-kb5008707-66a65377-862b-4a4c-9882-fd74bdc7a81e), [9.47](https://support.microsoft.com/topic/883a93a7-57df-4b26-a1c4-847efb34a9e8), [9.48](https://support.microsoft.com/topic/update-rollup-61-for-azure-site-recovery-kb5012960-a1cc029b-03ad-446f-9365-a00b41025d39) | 3.16.0-4-amd64 to 3.16.0-11-amd64, 4.9.0-0.bpo.4-amd64 to 4.9.0-0.bpo.12-amd64 | |||+Debian 9.1 | [9.49](https://support.microsoft.com/en-us/topic/update-rollup-62-for-azure-site-recovery-e7aff36f-b6ad-4705-901c-f662c00c402b) | 4.9.0-19-amd64 </br> Debian 9.1 | [9.48](https://support.microsoft.com/topic/update-rollup-61-for-azure-site-recovery-kb5012960-a1cc029b-03ad-446f-9365-a00b41025d39) | 4.9.0-17-amd64 to 4.9.0-19-amd64 </br> 4.19.0-0.bpo.19-cloud-amd64 </br> Debian 9.1 | [9.47](https://support.microsoft.com/topic/update-rollup-60-for-azure-site-recovery-k5011122-883a93a7-57df-4b26-a1c4-847efb34a9e8) | 4.9.0-17-amd64 </br> Debian 9.1 | [9.46](https://support.microsoft.com/topic/update-rollup-59-for-azure-site-recovery-kb5008707-66a65377-862b-4a4c-9882-fd74bdc7a81e) | 4.9.0-1-amd64 to 4.9.0-15-amd64 </br> 4.19.0-0.bpo.1-amd64 to 4.19.0-0.bpo.16-amd64 </br> 4.19.0-0.bpo.1-cloud-amd64 to 4.19.0-0.bpo.16-cloud-amd64 </br> 4.19.0-0.bpo.18-amd64 </br> 4.19.0-0.bpo.18-cloud-amd64 Debian 9.1 | [9.45](https://support.microsoft.com/topic/update-rollup-58-for-azure-site-recovery-kb5007075-37ba21c3-47d9-4ea9-9130-a7d64f517d5d) | 4.9.0-1-amd64 to 4.9.0-15-amd64 </br> 4.19.0-0.bpo.1-amd64 to 4.19.0-0.bpo.16-amd64 </br> 4.19.0-0.bpo.1-cloud-amd64 to 4.19.0-0.bpo.16-cloud-amd64 </br> 4.19.0-0.bpo.18-amd64 </br> 4.19.0-0.bpo.18-cloud-amd64 </br>-Debian 9.1 | [9.44](https://support.microsoft.com/topic/update-rollup-57-for-azure-site-recovery-kb5006172-9fccc879-6e0c-4dc8-9fec-e0600cf94094) | 4.9.0-1-amd64 to 4.9.0-15-amd64 </br> 4.19.0-0.bpo.1-amd64 to 4.19.0-0.bpo.16-amd64 </br> 4.19.0-0.bpo.1-cloud-amd64 to 4.19.0-0.bpo.16-cloud-amd64 </br> |||+Debian 10 | [9.49](https://support.microsoft.com/en-us/topic/update-rollup-62-for-azure-site-recovery-e7aff36f-b6ad-4705-901c-f662c00c402b) | 4.19.0-21-amd64 </br> 4.19.0-21-cloud-amd64 </br> 5.10.0-0.bpo.15-amd64 </br> 5.10.0-0.bpo.15-cloud-amd64 Debian 10 | [9.48](https://support.microsoft.com/en-us/topic/update-rollup-61-for-azure-site-recovery-kb5012960-a1cc029b-03ad-446f-9365-a00b41025d39) | 4.19.0-19-cloud-amd64, 4.19.0-20-cloud-amd64 </br> 4.19.0-19-amd64, 4.19.0-20-amd64 Debian 10 | [9.47](https://support.microsoft.com/topic/update-rollup-60-for-azure-site-recovery-k5011122-883a93a7-57df-4b26-a1c4-847efb34a9e8) | No new kernels supported. Debian 10 | [9.46](https://support.microsoft.com/topic/update-rollup-59-for-azure-site-recovery-kb5008707-66a65377-862b-4a4c-9882-fd74bdc7a81e) | 4.9.0-1-amd64 to 4.9.0-15-amd64 <br/> 4.19.0-18-amd64 </br> 4.19.0-18-cloud-amd64 Debian 10 | [9.45](https://support.microsoft.com/topic/update-rollup-58-for-azure-site-recovery-kb5007075-37ba21c3-47d9-4ea9-9130-a7d64f517d5d), [9.46](https://support.microsoft.com/topic/update-rollup-59-for-azure-site-recovery-kb5008707-66a65377-862b-4a4c-9882-fd74bdc7a81e) | 4.9.0-1-amd64 to 4.9.0-15-amd64 <br/> 4.19.0-18-amd64 </br> 4.19.0-18-cloud-amd64-Debian 10 | [9.44](https://support.microsoft.com/topic/update-rollup-57-for-azure-site-recovery-kb5006172-9fccc879-6e0c-4dc8-9fec-e0600cf94094) | 4.19.0-6-amd64 to 4.19.0-16-amd64 </br> 4.19.0-6-cloud-amd64 to 4.19.0-16-cloud-amd64 ### SUSE Linux Enterprise Server 12 supported kernel versions **Release** | **Mobility service version** | **Kernel version** | | | |+SUSE Linux Enterprise Server 12 (SP1,SP2,SP3,SP4, SP5) | [9.49](https://support.microsoft.com/en-us/topic/update-rollup-62-for-azure-site-recovery-e7aff36f-b6ad-4705-901c-f662c00c402b) | All [stock SUSE 12 SP1,SP2,SP3,SP4,SP5 kernels](https://www.suse.com/support/kb/doc/?id=000019587) are supported. </br> 4.12.14-16.100-azure:5 | SUSE Linux Enterprise Server 12 (SP1,SP2,SP3,SP4, SP5) | [9.48](https://support.microsoft.com/en-us/topic/update-rollup-61-for-azure-site-recovery-kb5012960-a1cc029b-03ad-446f-9365-a00b41025d39) | All [stock SUSE 12 SP1,SP2,SP3,SP4,SP5 kernels](https://www.suse.com/support/kb/doc/?id=000019587) are supported. </br> 4.12.14-16.85-azure:5 </br> 4.12.14-16.88-azure:5 </br> 4.12.14-122.106-default:5 </br> 4.12.14-122.110-default:5 </br> 4.12.14-122.113-default:5 </br> 4.12.14-122.116-default:5 </br> 4.12.14-122.12-default:5 </br> 4.12.14-122.121-default:5 | SUSE Linux Enterprise Server 12 (SP1,SP2,SP3,SP4, SP5) | [9.47](https://support.microsoft.com/topic/update-rollup-60-for-azure-site-recovery-k5011122-883a93a7-57df-4b26-a1c4-847efb34a9e8) | All [stock SUSE 12 SP1,SP2,SP3,SP4,SP5 kernels](https://www.suse.com/support/kb/doc/?id=000019587) are supported.</br></br> 4.12.14-16.80-azure </br> 4.12.14-122.103-default </br> 4.12.14-122.98-default5 | SUSE Linux Enterprise Server 12 (SP1,SP2,SP3,SP4, SP5) | [9.46](https://support.microsoft.com/topic/update-rollup-59-for-azure-site-recovery-kb5008707-66a65377-862b-4a4c-9882-fd74bdc7a81e) | All [stock SUSE 12 SP1,SP2,SP3,SP4,SP5 kernels](https://www.suse.com/support/kb/doc/?id=000019587) are supported.</br></br> 4.4.138-4.7-azure to 4.4.180-4.31-azure,</br>4.12.14-6.3-azure to 4.12.14-6.43-azure </br> 4.12.14-16.7-azure to 4.12.14-16.65-azure </br> 4.12.14-16.68-azure </br> 4.12.14-16.73-azure </br> 4.12.14-16.76-azure </br> 4.12.14-122.88-default </br> 4.12.14-122.91-default | SUSE Linux Enterprise Server 12 (SP1,SP2,SP3,SP4, SP5) | [9.45](https://support.microsoft.com/en-us/topic/update-rollup-58-for-azure-site-recovery-kb5007075-37ba21c3-47d9-4ea9-9130-a7d64f517d5d) | All [stock SUSE 12 SP1,SP2,SP3,SP4,SP5 kernels](https://www.suse.com/support/kb/doc/?id=000019587) are supported.</br></br> 4.4.138-4.7-azure to 4.4.180-4.31-azure,</br>4.12.14-6.3-azure to 4.12.14-6.43-azure </br> 4.12.14-16.7-azure to 4.12.14-16.65-azure </br> 4.12.14-16.68-azure </br> 4.12.14-16.76-azure |-SUSE Linux Enterprise Server 12 (SP1,SP2,SP3,SP4, SP5) | [9.44](https://support.microsoft.com/topic/update-rollup-57-for-azure-site-recovery-kb5006172-9fccc879-6e0c-4dc8-9fec-e0600cf94094) | All [stock SUSE 12 SP1,SP2,SP3,SP4,SP5 kernels](https://www.suse.com/support/kb/doc/?id=000019587) are supported.</br></br> 4.4.138-4.7-azure to 4.4.180-4.31-azure,</br>4.12.14-6.3-azure to 4.12.14-6.43-azure </br> 4.12.14-16.7-azure to 4.12.14-16.65-azure </br> 4.12.14-16.68-azure | ### SUSE Linux Enterprise Server 15 supported kernel versions **Release** | **Mobility service version** | **Kernel version** | | | |-SUSE Linux Enterprise Server 15, SP1, SP2 | [9.48](https://support.microsoft.com/en-us/topic/update-rollup-61-for-azure-site-recovery-kb5012960-a1cc029b-03ad-446f-9365-a00b41025d39) | By default, all [stock SUSE 15, SP1, SP2 kernels](https://www.suse.com/support/kb/doc/?id=000019587) are supported.</br> 5.3.18-150300.38.37-azure:3 </br> 5.3.18-150300.38.40-azure:3 </br> 5.3.18-38.34-azure:3 to 5.3.18-59.40-default:3 </br> 5.3.18-150300.59.43-default:3 tp 5.3.18-150300.59.68-default:3 | +SUSE Linux Enterprise Server 15, SP1, SP2, SP3 | [9.49](https://support.microsoft.com/en-us/topic/update-rollup-62-for-azure-site-recovery-e7aff36f-b6ad-4705-901c-f662c00c402b) | By default, all [stock SUSE 15, SP1, SP2, SP3 kernels](https://www.suse.com/support/kb/doc/?id=000019587) are supported.</br> 5.3.18-150300.38.59-azure:3 </br> 5.3.18-150300.38.62-azure:3 | +SUSE Linux Enterprise Server 15, SP1, SP2, SP3 | [9.48](https://support.microsoft.com/en-us/topic/update-rollup-61-for-azure-site-recovery-kb5012960-a1cc029b-03ad-446f-9365-a00b41025d39) | By default, all [stock SUSE 15, SP1, SP2, SP3 kernels](https://www.suse.com/support/kb/doc/?id=000019587) are supported.</br> 5.3.18-150300.38.37-azure:3 </br> 5.3.18-150300.38.40-azure:3 </br> 5.3.18-38.34-azure:3 to 5.3.18-59.40-default:3 </br> 5.3.18-150300.59.43-default:3 to 5.3.18-150300.59.68-default:3 </br> 5.3.18-150300.38.59-azure:3 </br> 5.3.18-150300.38.62-azure:3 | SUSE Linux Enterprise Server 15, SP1, SP2 | [9.47](https://support.microsoft.com/topic/update-rollup-60-for-azure-site-recovery-k5011122-883a93a7-57df-4b26-a1c4-847efb34a9e8) | By default, all [stock SUSE 15, SP1, SP2 kernels](https://www.suse.com/support/kb/doc/?id=000019587) are supported.</br></br> 5.3.18-18.72-azure: </br> 5.3.18-18.75-azure: </br> 5.3.18-24.93-default </br> 5.3.18-24.96-default </br> 5.3.18-36-azure </br> 5.3.18-38.11-azure </br> 5.3.18-38.14-azure </br> 5.3.18-38.17-azure </br> 5.3.18-38.22-azure </br> 5.3.18-38.25-azure </br> 5.3.18-38.28-azure </br> 5.3.18-38.3-azure </br> 5.3.18-38.31-azure </br> 5.3.18-38.8-azure </br> 5.3.18-57-default </br> 5.3.18-59.10-default </br> 5.3.18-59.13-default </br> 5.3.18-59.16-default </br> 5.3.18-59.19-default </br> 5.3.18-59.24-default </br> 5.3.18-59.27-default </br> 5.3.18-59.30-default </br> 5.3.18-59.34-default </br> 5.3.18-59.37-default </br> 5.3.18-59.5-default | SUSE Linux Enterprise Server 15, SP1, SP2 | [9.46](https://support.microsoft.com/topic/update-rollup-59-for-azure-site-recovery-kb5008707-66a65377-862b-4a4c-9882-fd74bdc7a81e) | By default, all [stock SUSE 15, SP1, SP2 kernels](https://www.suse.com/support/kb/doc/?id=000019587) are supported.</br></br> 4.12.14-5.5-azure to 4.12.14-5.47-azure </br></br> 4.12.14-8.5-azure to 4.12.14-8.55-azure </br> 5.3.18-16-azure </br> 5.3.18-18.5-azure to 5.3.18-18.58-azure </br> 5.3.18-18.66-azure </br> 5.3.18-18.69-azure </br> 5.3.18-24.83-default </br> 5.3.18-24.86-default | SUSE Linux Enterprise Server 15, SP1, SP2 | [9.45](https://support.microsoft.com/en-us/topic/update-rollup-58-for-azure-site-recovery-kb5007075-37ba21c3-47d9-4ea9-9130-a7d64f517d5d) | By default, all [stock SUSE 15, SP1, SP2 kernels](https://www.suse.com/support/kb/doc/?id=000019587) are supported.</br></br> 4.12.14-5.5-azure to 4.12.14-5.47-azure </br></br> 4.12.14-8.5-azure to 4.12.14-8.55-azure </br> 5.3.18-16-azure </br> 5.3.18-18.5-azure to 5.3.18-18.58-azure </br> 5.3.18-18.69-azure-SUSE Linux Enterprise Server 15, SP1, SP2 | [9.44](https://support.microsoft.com/topic/update-rollup-57-for-azure-site-recovery-kb5006172-9fccc879-6e0c-4dc8-9fec-e0600cf94094) | By default, all [stock SUSE 15, SP1, SP2 kernels](https://www.suse.com/support/kb/doc/?id=000019587) are supported.</br></br> 4.12.14-5.5-azure to 4.12.14-5.47-azure </br></br> 4.12.14-8.5-azure to 4.12.14-8.55-azure </br> 5.3.18-16-azure </br> 5.3.18-18.5-azure to 5.3.18-18.58-azure ## Linux file systems/guest storage |
| spring-cloud | How To Config Server | https://github.com/MicrosoftDocs/azure-docs/commits/main/articles/spring-cloud/how-to-config-server.md | Now that your configuration files are saved in a repository, you need to connect 5. Select **Validate**. -  +  6. When validation is complete, select **Apply** to save your changes. -  +  7. Updating the configuration can take a few minutes. -  +  8. You should get a notification when the configuration is complete. The information from your YAML file should be displayed in the Azure portal. Sel ## Using Azure Repos for Azure Spring Apps Configuration -Azure Spring Apps can access Git repositories that are public, secured by SSH, or secured using HTTP basic authentication. We'll use that last option, as its easier to create and manage with Azure Repos. +Azure Spring Apps can access Git repositories that are public, secured by SSH, or secured using HTTP basic authentication. We'll use that last option, as it's easier to create and manage with Azure Repos. ### Get repo url and credentials |
| spring-cloud | How To Maven Deploy Apps | https://github.com/MicrosoftDocs/azure-docs/commits/main/articles/spring-cloud/how-to-maven-deploy-apps.md | The following procedure creates an instance of Azure Spring Apps using the Azure 3. Select **Azure Spring Apps** from the results. - :::image type="content" source="media/spring-cloud-quickstart-launch-app-portal/find-spring-cloud-start.png" alt-text="Screenshot of Azure portal showing Azure Spring Apps service in search results."::: + :::image type="content" source="media/how-to-maven-deploy-apps/find-spring-cloud-start.png" alt-text="Screenshot of Azure portal showing Azure Spring Apps service in search results."::: 4. On the Azure Spring Apps page, select **Create**. - :::image type="content" source="media/spring-cloud-quickstart-launch-app-portal/spring-cloud-create.png" alt-text="Screenshot of Azure portal showing Azure Spring Apps resource with Create button highlighted."::: + :::image type="content" source="media/how-to-maven-deploy-apps/spring-cloud-create.png" alt-text="Screenshot of Azure portal showing Azure Spring Apps resource with Create button highlighted."::: 5. Fill out the form on the Azure Spring Apps **Create** page. Consider the following guidelines: The following procedure creates an instance of Azure Spring Apps using the Azure - **Service Details/Name**: Specify the **\<service instance name\>**. The name must be between 4 and 32 characters long and can contain only lowercase letters, numbers, and hyphens. The first character of the service name must be a letter and the last character must be either a letter or a number. - **Location**: Select the region for your service instance. - :::image type="content" source="media/spring-cloud-quickstart-launch-app-portal/portal-start.png" alt-text="Screenshot of Azure portal showing Azure Spring Apps Create page."::: + :::image type="content" source="media/how-to-maven-deploy-apps/portal-start.png" alt-text="Screenshot of Azure portal showing Azure Spring Apps Create page."::: 6. Select **Review and create**. |
| spring-cloud | Quickstart Provision Service Instance | https://github.com/MicrosoftDocs/azure-docs/commits/main/articles/spring-cloud/quickstart-provision-service-instance.md | The following procedure creates an instance of Azure Spring Apps using the Azure 3. Select **Azure Spring Apps** from the results. - :::image type="content" source="media/spring-cloud-quickstart-launch-app-portal/find-spring-cloud-start.png" alt-text="Screenshot of Azure portal showing Azure Spring Apps service in search results."::: + :::image type="content" source="media/quickstart-provision-service-instance/find-spring-cloud-start.png" alt-text="Screenshot of Azure portal showing Azure Spring Apps service in search results."::: 4. On the Azure Spring Apps page, select **Create**. - :::image type="content" source="media/spring-cloud-quickstart-launch-app-portal/spring-cloud-create.png" alt-text="Screenshot of Azure portal showing Azure Spring Apps resource with Create button highlighted."::: + :::image type="content" source="media/quickstart-provision-service-instance/spring-cloud-create.png" alt-text="Screenshot of Azure portal showing Azure Spring Apps resource with Create button highlighted."::: 5. Fill out the form on the Azure Spring Apps **Create** page. Consider the following guidelines: The following procedure creates an instance of Azure Spring Apps using the Azure - **Location**: Select the location for your service instance. - Select **Standard** for the **Pricing tier** option. - :::image type="content" source="media/spring-cloud-quickstart-launch-app-portal/portal-start.png" alt-text="Screenshot of Azure portal showing Azure Spring Apps Create page."::: + :::image type="content" source="media/quickstart-provision-service-instance/portal-start.png" alt-text="Screenshot of Azure portal showing Azure Spring Apps Create page."::: 6. Select **Review and create**. |
| spring-cloud | Quickstart Setup Config Server | https://github.com/MicrosoftDocs/azure-docs/commits/main/articles/spring-cloud/quickstart-setup-config-server.md | Title: "Quickstart - Set up Azure Spring Apps Config Server" -description: Describes the set up of Azure Spring Apps Config Server for app deployment. +description: Describes the setup of Azure Spring Apps Config Server for app deployment. Previously updated : 10/12/2021 Last updated : 7/19/2022 zone_pivot_groups: programming-languages-spring-cloud Azure Spring Apps Config Server is centralized configuration service for distrib ## Prerequisites -* [Install JDK 8 or JDK 11](/azure/developer/java/fundamentals/java-jdk-install) -* [Sign up for an Azure subscription](https://azure.microsoft.com/free/) -* (Optional) [Install the Azure CLI version 2.0.67 or higher](/cli/azure/install-azure-cli) and install the Azure Spring Apps extension with command: `az extension add --name spring` -* (Optional) [Install the Azure Toolkit for IntelliJ](https://plugins.jetbrains.com/plugin/8053-azure-toolkit-for-intellij/) and [sign-in](/azure/developer/java/toolkit-for-intellij/create-hello-world-web-app#installation-and-sign-in) +* [JDK 8 or JDK 11](/azure/developer/java/fundamentals/java-jdk-install) +* An Azure subscription. If you don't have a subscription, create a [free account](https://azure.microsoft.com/free/?WT.mc_id=A261C142F) before you begin. +* Optionally, [Azure CLI version 2.0.67 or higher](/cli/azure/install-azure-cli). Install the Azure Spring Apps extension with the following command: `az extension add --name spring` +* Optionally, [the Azure Toolkit for IntelliJ](https://plugins.jetbrains.com/plugin/8053-azure-toolkit-for-intellij/). ## Azure Spring Apps Config Server procedures The following procedure sets up the Config Server using the Azure portal to depl 1. Go to the service **Overview** page and select **Config Server**. -2. In the **Default repository** section, set **URI** to `https://github.com/azure-samples/spring-petclinic-microservices-config`. +1. In the **Default repository** section, set **URI** to `https://github.com/azure-samples/spring-petclinic-microservices-config`. -3. Select **Validate**. +1. Select **Validate**. - :::image type="content" source="media/spring-cloud-quickstart-launch-app-portal/portal-config.png" alt-text="Screenshot of Azure portal showing Config Server page."::: + :::image type="content" source="media/quickstart-setup-config-server/portal-config.png" alt-text="Screenshot of Azure portal showing Config Server page." lightbox="media/quickstart-setup-config-server/portal-config.png"::: -4. When validation is complete, select **Apply** to save your changes. +1. When validation is complete, select **Apply** to save your changes. - :::image type="content" source="media/spring-cloud-quickstart-launch-app-portal/validate-complete.png" alt-text="Screenshot of Azure portal showing Config Server page with Apply button highlighted."::: + :::image type="content" source="media/quickstart-setup-config-server/validate-complete.png" alt-text="Screenshot of Azure portal showing Config Server page with Apply button highlighted." lightbox="media/quickstart-setup-config-server/validate-complete.png"::: -5. Updating the configuration can take a few minutes. -- :::image type="content" source="media/spring-cloud-quickstart-launch-app-portal/updating-config.png" alt-text="Screenshot of Azure portal showing Config Server page with Updating status message."::: --6. You should get a notification when the configuration is complete. +Updating the configuration can take a few minutes. You should get a notification when the configuration is complete. #### [CLI](#tab/Azure-CLI) az spring config-server git set -n <service instance name> --uri https://github. ::: zone-end > [!TIP]-> If you are using a private repository for Config Server, please refer to our [tutorial on setting up authentication](./how-to-config-server.md). +> For information on using a private repository for Config Server, see [Configure a managed Spring Cloud Config Server in Azure Spring Apps](./how-to-config-server.md). ## Troubleshooting of Azure Spring Apps Config Server -The following procedure explains how to troubleshoot config server settings. +The following procedure explains how to troubleshoot Config Server settings. 1. In the Azure portal, go to the service **Overview** page and select **Logs**.-1. Select **Queries** and **Show the application logs that contain the "error" or "exception" terms"**. -1. Select **Run**. -1. If you find the error **java.lang.illegalStateException** in logs, this indicates that spring cloud service cannot locate properties from config server. - :::image type="content" source="media/spring-cloud-quickstart-setup-config-server/setup-config-server-query.png" alt-text="Screenshot of Azure portal showing Azure Spring Apps query." lightbox="media/spring-cloud-quickstart-setup-config-server/setup-config-server-query.png"::: +1. In the **Queries** pane under **Show the application logs that contain the "error" or "exception" terms**, + select **Run**. -1. Go to the service **Overview** page. -1. Select **Diagnose and solve problems**. -1. Select **Config Server** detector. + :::image type="content" source="media/quickstart-setup-config-server/setup-config-server-query.png" alt-text="Screenshot of Azure portal showing Azure Spring Apps query." lightbox="media/quickstart-setup-config-server/setup-config-server-query.png"::: - :::image type="content" source="media/spring-cloud-quickstart-setup-config-server/setup-config-server-diagnose.png" alt-text="Screenshot of Azure portal showing Diagnose and solve problems page with Config Server button highlighted." lightbox="media/spring-cloud-quickstart-setup-config-server/setup-config-server-diagnose.png"::: + The following error in the logs indicates that the Spring Apps service can't locate properties from Config Server: `java.lang.illegalStateException` -1. Select **Config Server Health Check**. +1. Go to the service **Overview** page. ++1. Select **Diagnose and solve problems**. - :::image type="content" source="media/spring-cloud-quickstart-setup-config-server/setup-config-server-genie.png" alt-text="Screenshot of Azure portal showing Diagnose and solve problems page and the Availability and Performance tab." lightbox="media/spring-cloud-quickstart-setup-config-server/setup-config-server-genie.png"::: +1. Under **Availability and Performance**, select **Troubleshoot**. -1. Select **Config Server Status** to see more details from the detector. + :::image type="content" source="media/quickstart-setup-config-server/setup-config-server-diagnose.png" alt-text="Screenshot of Azure portal showing Diagnose and solve problems page." lightbox="media/quickstart-setup-config-server/setup-config-server-diagnose.png"::: - :::image type="content" source="media/spring-cloud-quickstart-setup-config-server/setup-config-server-health-status.png" alt-text="Screenshot of Azure portal showing Diagnose and solve problems page with Config Server Health Status highlighted." lightbox="media/spring-cloud-quickstart-setup-config-server/setup-config-server-health-status.png"::: + Azure portal displays the **Availability and Performance** page, which provides various information about Config Server health status. ## Clean up resources -If you plan to continue working with subsequent quickstarts and tutorials, you might want to leave these resources in place. When no longer needed, delete the resource group, which deletes the resources in the resource group. To delete the resource group by using Azure CLI, use the following commands: +If you plan to continue working with subsequent quickstarts and tutorials, you might want to leave these resources in place. When you no longer need it, delete the resource group, which deletes the resources in the resource group. To delete the resource group, enter the following commands in the Azure CLI: ```azurecli echo "Enter the Resource Group name:" && |
| spring-cloud | Quickstart | https://github.com/MicrosoftDocs/azure-docs/commits/main/articles/spring-cloud/quickstart.md | The following procedure creates an instance of Azure Spring Apps using the Azure 1. Select *Azure Spring Apps* from the results. - :::image type="content" source="media/spring-cloud-quickstart-launch-app-portal/find-spring-cloud-start.png" alt-text="Screenshot of Azure portal showing Azure Spring Apps service in search results."::: + :::image type="content" source="media/quickstart/find-spring-cloud-start.png" alt-text="Screenshot of Azure portal showing Azure Spring Apps service in search results."::: 1. On the Azure Spring Apps page, select **Create**. - :::image type="content" source="media/spring-cloud-quickstart-launch-app-portal/spring-cloud-create.png" alt-text="Screenshot of Azure portal showing Azure Spring Apps resource with Create button highlighted."::: + :::image type="content" source="media/quickstart/spring-cloud-create.png" alt-text="Screenshot of Azure portal showing Azure Spring Apps resource with Create button highlighted."::: 1. Fill out the form on the Azure Spring Apps **Create** page. Consider the following guidelines: The following procedure creates an instance of Azure Spring Apps using the Azure * **Service Details/Name**: Specify the **\<service instance name\>**. The name must be between 4 and 32 characters long and can contain only lowercase letters, numbers, and hyphens. The first character of the service name must be a letter and the last character must be either a letter or a number. * **Region**: Select the region for your service instance. - :::image type="content" source="media/spring-cloud-quickstart-launch-app-portal/portal-start.png" alt-text="Screenshot of Azure portal showing Azure Spring Apps Create page."::: + :::image type="content" source="media/quickstart/portal-start.png" alt-text="Screenshot of Azure portal showing Azure Spring Apps Create page."::: 1. Select **Review and create**. The following procedure creates an instance of Azure Spring Apps using the Azure 3. Select **Azure Spring Apps** from the results. - :::image type="content" source="media/spring-cloud-quickstart-launch-app-portal/find-spring-cloud-start.png" alt-text="Screenshot of Azure portal showing Azure Spring Apps service in search results."::: + :::image type="content" source="media/quickstart/find-spring-cloud-start.png" alt-text="Screenshot of Azure portal showing Azure Spring Apps service in search results."::: 4. On the Azure Spring Apps page, select **Create**. - :::image type="content" source="media/spring-cloud-quickstart-launch-app-portal/spring-cloud-create.png" alt-text="Screenshot of Azure portal showing Azure Spring Apps resource with Create button highlighted."::: + :::image type="content" source="media/quickstart/spring-cloud-create.png" alt-text="Screenshot of Azure portal showing Azure Spring Apps resource with Create button highlighted."::: 5. Fill out the form on the Azure Spring Apps **Create** page. Consider the following guidelines: The following procedure creates an instance of Azure Spring Apps using the Azure - **Service Details/Name**: Specify the **\<service instance name\>**. The name must be between 4 and 32 characters long and can contain only lowercase letters, numbers, and hyphens. The first character of the service name must be a letter and the last character must be either a letter or a number. - **Location**: Select the region for your service instance. - :::image type="content" source="media/spring-cloud-quickstart-launch-app-portal/portal-start.png" alt-text="Screenshot of Azure portal showing Azure Spring Apps Create page."::: + :::image type="content" source="media/quickstart/portal-start.png" alt-text="Screenshot of Azure portal showing Azure Spring Apps Create page."::: 6. Select **Review and create**. |
| storage | Storage Blob Event Quickstart | https://github.com/MicrosoftDocs/azure-docs/commits/main/articles/storage/blobs/storage-blob-event-quickstart.md | You've triggered the event, and Event Grid sent the message to the endpoint you "contentType": "text/plain", "contentLength": 0, "blobType": "BlockBlob",- "url": "https://myblobstorageaccount.blob.core.windows.net/testcontainer/testblob1.txt", + "url": "https://myblobstorageaccount.blob.core.windows.net/testcontainer/testfile.txt", "sequencer": "00000000000000EB0000000000046199", "storageDiagnostics": { "batchId": "dffea416-b46e-4613-ac19-0371c0c5e352" |
| storage | Geo Redundant Design | https://github.com/MicrosoftDocs/azure-docs/commits/main/articles/storage/common/geo-redundant-design.md | Title: Use geo-redundancy to design highly available applications description: Learn how to use geo-redundant storage to design a highly available application that is flexible enough to handle outages. -+ Previously updated : 02/18/2021- Last updated : 07/19/2022+ |
| stream-analytics | Service Bus Managed Identity | https://github.com/MicrosoftDocs/azure-docs/commits/main/articles/stream-analytics/service-bus-managed-identity.md | Now that your managed identity is configured, you're ready to add the Service 1. Fill out the rest of the properties and select **Save**. +### Limitation +Test connection on the azure portal is not expected to work when authentication mode for Service Bus is set to user-assigned or system-assigned managed identity. + ## Next steps * [Understand outputs from Azure Stream Analytics](stream-analytics-define-outputs.md) |
| synapse-analytics | Backup And Restore | https://github.com/MicrosoftDocs/azure-docs/commits/main/articles/synapse-analytics/sql-data-warehouse/backup-and-restore.md | order by run_id desc ## User-Defined Restore Points -This feature enables you to manually trigger snapshots to create restore points of your data warehouse before and after large modifications. This capability ensures that restore points are logically consistent, which provides additional data protection in case of any workload interruptions or user errors for quick recovery time. User-defined restore points are available for seven days and are automatically deleted on your behalf. You cannot change the retention period of user-defined restore points. **42 user-defined restore points** are guaranteed at any point in time so they must be [deleted](/powershell/module/azurerm.sql/remove-azurermsqldatabaserestorepoint) before creating another restore point. You can trigger snapshots to create user-defined restore points through [PowerShell](/powershell/module/az.sql/new-azsqldatabaserestorepoint?toc=/azure/synapse-analytics/sql-data-warehouse/toc.json&bc=/azure/synapse-analytics/sql-data-warehouse/breadcrumb/toc.jsont#examples) or the Azure portal. +This feature enables you to manually trigger snapshots to create restore points of your data warehouse before and after large modifications. This capability ensures that restore points are logically consistent, which provides additional data protection in case of any workload interruptions or user errors for quick recovery time. User-defined restore points are available for seven days and are automatically deleted on your behalf. You cannot change the retention period of user-defined restore points. **42 user-defined restore points** are guaranteed at any point in time so they must be [deleted](/powershell/module/azurerm.sql/remove-azurermsqldatabaserestorepoint) before creating another restore point. You can trigger snapshots to create user-defined restore points through [PowerShell](/powershell/module/az.synapse/new-azsynapsesqlpoolrestorepoint?toc=/azure/synapse-analytics/sql-data-warehouse/toc.json&bc=/azure/synapse-analytics/sql-data-warehouse/breadcrumb/toc.jsont#examples) or the Azure portal. > [!NOTE] > If you require restore points longer than 7 days, please vote for this capability [here](https://feedback.azure.com/d365community/idea/4c446fd9-0b25-ec11-b6e6-000d3a4f07b8). You can also create a user-defined restore point and restore from the newly created restore point to a new data warehouse. Once you have restored, you have the dedicated SQL pool online and can pause it indefinitely to save compute costs. The paused database incurs storage charges at the Azure Synapse storage rate. If you need an active copy of the restored data warehouse, you can resume which should take only a few minutes. When you drop a dedicated SQL pool, a final snapshot is created and saved for se ## Geo-backups and disaster recovery -A geo-backup is created once per day to a [paired data center](../../availability-zones/cross-region-replication-azure.md?toc=/azure/synapse-analytics/sql-data-warehouse/toc.json&bc=/azure/synapse-analytics/sql-data-warehouse/breadcrumb/toc.json). The RPO for a geo-restore is 24 hours. You can restore the geo-backup to a server in any other region where dedicated SQL pool is supported. A geo-backup ensures you can restore data warehouse in case you cannot access the restore points in your primary region. +A geo-backup is created once per day to a [paired data center](../../availability-zones/cross-region-replication-azure.md?toc=/azure/synapse-analytics/sql-data-warehouse/toc.json&bc=/azure/synapse-analytics/sql-data-warehouse/breadcrumb/toc.json). The RPO for a geo-restore is 24 hours. A geo-restore is always a data movement operation and the RTO will depend on the data size. Only the latest geo-backup is retained. You can restore the geo-backup to a server in any other region where dedicated SQL pool is supported. A geo-backup ensures you can restore data warehouse in case you cannot access the restore points in your primary region. If you do not require geo-backups for your dedicated SQL pool, you can disable them and save on disaster recovery storage costs. To do so, refer to [How to guide: Disable geo-backups for a dedicated SQL pool (formerly SQL DW)](disable-geo-backup.md). Note that if you disable geo-backups, you will not be able to recover your dedicated SQL pool to your paired Azure region if your primary Azure data center is unavailable. To confirm that your paired data center is in a different country, refer to [Azu You will notice the Azure bill has a line item for Storage and a line item for Disaster Recovery Storage. The storage charge is the total cost for storing your data in the primary region along with the incremental changes captured by snapshots. For a more detailed explanation of how snapshots are charged, refer to [Understanding how Snapshots Accrue Charges](/rest/api/storageservices/Understanding-How-Snapshots-Accrue-Charges?toc=/azure/synapse-analytics/sql-data-warehouse/toc.json&bc=/azure/synapse-analytics/sql-data-warehouse/breadcrumb/toc.json). The geo-redundant charge covers the cost for storing the geo-backups. -The total cost for your primary data warehouse and seven days of snapshot changes is rounded to the nearest TB. For example, if your data warehouse is 1.5 TB and the snapshots captures 100 GB, you are billed for 2 TB of data at Azure Premium Storage rates. +The total cost for your primary data warehouse and seven days of snapshot changes is rounded to the nearest TB. For example, if your data warehouse is 1.5 TB and the snapshots captures 100 GB, you are billed for 2 TB of data at Azure standard storage rates. If you are using geo-redundant storage, you receive a separate storage charge. The geo-redundant storage is billed at the standard Read-Access Geographically Redundant Storage (RA-GRS) rate. |
| traffic-manager | Quickstart Create Traffic Manager Profile | https://github.com/MicrosoftDocs/azure-docs/commits/main/articles/traffic-manager/quickstart-create-traffic-manager-profile.md | For this quickstart, you'll need two instances of a web application deployed in | Resource group | Select **Create new** and enter *myResourceGroupTM1* in the text box.| | Name | Enter a unique **Name** for your web app. This example uses *myWebAppEastUS*. | | Publish | Select **Code**. |- | Runtime stack | Select **ASP.NET V4.7**. | + | Runtime stack | Select **ASP.NET V4.8**. | | Operating System | Select **Windows**. | | Region | Select **East US**. | | Windows Plan | Select **Create new** and enter *myAppServicePlanEastUS* in the text box. | | Sku and size | Select **Standard S1 100 total ACU, 1.75-GB memory**. | -1. Select the **Monitoring** tab, or select **Next: Monitoring**. Under **Monitoring**, set **Application Insights** > **Enable Application Insights** to **No**. +1. Select the **Monitoring** tab, or select **Next** to the **Monitoring** tab. Under **Monitoring**, set **Application Insights > Enable Application Insights** to **No**. 1. Select **Review and create**. Add the website in the *East US* as primary endpoint to route all the user traff :::image type="content" source="./media/quickstart-create-traffic-manager-profile/add-traffic-manager-endpoint.png" alt-text="Screenshot of where you add an endpoint to your Traffic Manager profile."::: -1. Select **OK**. +1. Select **Add**. 1. To create a failover endpoint for your second Azure region, repeat steps 3 and 4 with these settings: | Setting | Value | Add the website in the *East US* as primary endpoint to route all the user traff | Target resource | Select **Choose an app service** > **West Europe**. | | Priority | Select **2**. All traffic goes to this failover endpoint if the primary endpoint is unhealthy. | -1. Select **OK**. +1. Select **Add**. When you're done adding the two endpoints, they're displayed in **Traffic Manager profile**. Notice that their monitoring status is **Online** now. The primary endpoint isn't available, so you were routed to the failover endpoin ## Clean up resources -When you're done, delete the resource groups, web applications, and all related resources. To do so, select each individual item from your dashboard and select **Delete** at the top of each page. +When you're done using the private link service, delete the resource group to clean up the resources used in this quickstart. ++1. Enter **myResourceGroupTM1** in the search box at the top of the portal, and select **myResourceGroupTM1** from the search results. ++1. Select **Delete resource group**. ++1. In **TYPE THE RESOURCE GROUP NAME**, enter **myResourceGroupTM1**. ++1. Select **Delete**. ++1. Repeat steps 1-4 for the second resource group **myResourceGroupTM2**. + ## Next steps |
| virtual-machines | Concepts Restore Points | https://github.com/MicrosoftDocs/azure-docs/commits/main/articles/virtual-machines/concepts-restore-points.md | + + Title: Support matrix for VM restore points +description: Support matrix for VM restore points ++++ Last updated : 07/05/2022++++# Support matrix for VM restore points ++This article summarizes the support matrix and limitations of using [VM restore points](virtual-machines-create-restore-points.md). +++## VM restore points support matrix ++The following table summarizes the support matrix for VM restore points. ++**Scenarios** | **Supported by VM restore points** + | +**VMs using Managed disks** | Yes +**VMs using unmanaged disks** | No +**VMs using Ultra Disks** | No. Exclude these disks and create a VM restore point. +**VMs using Ephemeral OS Disks** | No. Exclude these disks and create a VM restore point. +**VMs using shared disks** | No. Exclude these disks and create a VM restore point. +**VMs with extensions** | Yes +**VMs with trusted launch** | Yes +**Confidential VMs** | Yes +**Generation 2 VMs (UEFI boot)** | Yes +**VMs with NVMe disks (Storage optimized - Lsv2-series)** | Yes +**VMs in Proximity placement groups** | Yes +**VMs in an availability set** | Yes. You can create VM restore points for individual VMs within an availability set. You need to create restore points for all the VMs within an availability set to protect an entire availability set instance. +**VMs inside VMSS with uniform orchestration** | No +**VMs inside VMSS with flexible orchestration** | Yes. You can create VM restore points for individual VMs within the virtual machine scale set flex. However, you need to create restore points for all the VMs within the virtual machine scale set flex to protect an entire virtual machine scale set flex instance. +**Spot VMs (Low priority VMs)** | Yes +**VMs with dedicated hosts** | Yes +**VMs with Host caching enabled** | Yes +**VMs created from marketplace images** | Yes +**VMs created from custom images** | Yes +**VM with HUB (Hybrid Use Benefit) license** | Yes +**VMs migrated from on-prem using Azure Migrate** | Yes +**VMs with RBAC policies** | Yes +**Temporary disk in VMs** | Yes. You can create VM restore point for VMs with temporary disks. However, the restore points created don't contain the data from the temporary disks. +**VMs with standard HDDs** | Yes +**VMs with standard SSDs** | Yes +**VMs with premium SSDs** | Yes +**VMs with ZRS disks** | Yes +**VMs with server-side encryption using service-managed keys** | Yes +**VMs with server-side encryption using customer-managed keys** | Yes +**VMs with double encryption at rest** | Yes +**VMs with Host based encryption enabled with PMK/CMK/Double encryption** | Yes +**VMs with ADE (Azure Disk Encryption)** | Yes +**VMs using Accelerated Networking** | Yes +**Frequency supported** | Three hours for app consistent restore points. One hour for [crash consistent restore points (preview)](https://github.com/Azure/Virtual-Machine-Restore-Points/tree/main/Crash%20consistent%20VM%20restore%20points%20(preview)) ++## Operating system support ++### Windows ++The following Windows operating systems are supported when creating restore points for Azure VMs running on Windows. ++- Windows 10 Client (64 bit only) +- Windows Server 2022 (Datacenter/Datacenter Core/Standard) +- Windows Server 2019 (Datacenter/Datacenter Core/Standard) +- Windows Server 2016 (Datacenter/Datacenter Core/Standard) +- Windows Server 2012 R2 (Datacenter/Standard) +- Windows Server 2012 (Datacenter/Standard) +- Windows Server 2008 R2 (RTM and SP1 Standard) +- Windows Server 2008 (64 bit only) ++Restore points don't support 32-bit operating systems. ++### Linux ++For Azure VM Linux VMs, restore points support the list of Linux [distributions endorsed by Azure](../virtual-machines/linux/endorsed-distros.md). Note the following: ++- Restore points don't support Core OS Linux. +- Restore points don't support 32-bit operating systems. +- Other bring-your-own Linux distributions might work as long as the [Azure VM agent for Linux](../virtual-machines/extensions/agent-linux.md) is available on the VM, and as long as Python is supported. +- Restore points don't support a proxy-configured Linux VM if it doesn't have Python version 2.7 or higher installed. +- Restore points don't back up NFS files that are mounted from storage, or from any other NFS server, to Linux or Windows machines. It only backs up disks that are locally attached to the VM. ++## Other limitations ++- Restore points are supported only for managed disks. +- Ultra-disks, Ephemeral OS disks, and Shared disks aren't supported. +- Restore points APIs require an API of version 2021-03-01 or later. +- A maximum of 500 VM restore points can be retained at any time for a VM, irrespective of the number of restore point collections. +- Concurrent creation of restore points for a VM isn't supported. +- Movement of Virtual Machines (VM) between Resource Groups (RG), or Subscriptions isn't supported when the VM has restore points. Moving the VM between Resource Groups or Subscriptions won't update the source VM reference in the restore point and will cause a mismatch of ARM processor IDs between the actual VM and the restore points. + > [!Note] + > Public preview of cross-region creation and copying of VM restore points is available, with the following limitations: + > - Private links aren't supported when copying restore points across regions or creating restore points in a region other than the source VM. + > - Customer-managed key encrypted restore points, when copied to a target region or created directly in the target region are created as platform-managed key encrypted restore points. + > - No portal support for cross region copy and cross region creation of restore points ++## Next steps ++- Learn how to create VM restore points using [CLI](virtual-machines-create-restore-points-cli.md), [Azure portal](virtual-machines-create-restore-points-portal.md), and [PowerShell](virtual-machines-create-restore-points-powershell.md). |
| virtual-machines | Create Restore Points | https://github.com/MicrosoftDocs/azure-docs/commits/main/articles/virtual-machines/create-restore-points.md | + + Title: Create Virtual Machine restore points +description: Creating Virtual Machine Restore Points with API ++++ Last updated : 02/14/2022+++++# Quickstart: Create VM restore points using APIs ++You can protect your data by taking backups at regular intervals. Azure VM restore point APIs are a lightweight option you can use to implement granular backup and retention policies. VM restore points support application consistency for VMs running Windows operating systems and support file system consistency for VMs running Linux operating system. ++You can use the APIs to create restore points for your source VM in either the same region, or in other regions. You can also copy existing VM restore points between regions. ++## Prerequisites ++- [Learn more](concepts-restore-points.md) about the requirements for a VM restore point. +- Consider the [limitations](virtual-machines-create-restore-points.md#limitations) before creating a restore point. ++## Create VM restore points ++The following sections outline the steps you need to take to create VM restore points with the Azure Compute REST APIs. ++You can find more information in the [Restore Points](/rest/api/compute/restore-points), [PowerShell](/powershell/module/az.compute/new-azrestorepoint), and [Restore Point Collections](/rest/api/compute/restore-point-collections) API documentation. ++### Step 1: Create a VM restore point collection ++Before you create VM restore points, you must create a restore point collection. A restore point collection holds all the restore points for a specific VM. Depending on your needs, you can create VM restore points in the same region as the VM, or in a different region. +To create a restore point collection, call the restore point collection's Create or Update API. +- If you're creating restore point collection in the same region as the VM, then specify the VM's region in the location property of the request body. +- If you're creating the restore point collection in a different region than the VM, specify the target region for the collection in the location property, but also specify the source restore point collection ARM resource ID in the request body. + +To create a restore point collection, call the restore point collection's [Create or Update](/rest/api/compute/restore-point-collections/create-or-update) API. ++### Step 2: Create a VM restore point ++After you create the restore point collection, the next step is to create a VM restore point within the restore point collection. For more information about restore point creation, see the [Restore Points - Create](/rest/api/compute/restore-points/create) API documentation. ++> [!TIP] +> To save space and costs, you can exclude any disk from either local region or cross-region VM restore points. To exclude a disk, add its identifier to the `excludeDisks` property in the request body. ++### Step 3: Track the status of the VM restore point creation ++Restore point creation in your local region will be completed within a few seconds. Scenarios, which involve the creation of cross-region restore points will take considerably longer. To track the status of the creation operation, follow the guidance in [Get restore point copy or replication status](#get-restore-point-copy-or-replication-status). This is only applicable for scenarios where the restore points are created in a different region than the source VM. ++## Get restore point copy or replication status ++Creation of a cross-region VM restore point is a long running operation. The VM restore point can be used to restore a VM only after the operation is completed for all disk restore points. To track the operation's status, call the [Restore Point - Get](/rest/api/compute/restore-points/get) API on the target VM restore point and include the `instanceView` parameter. The return will include the percentage of data that has been copied at the time of the request. ++During restore point creation, the `ProvisioningState` will appear as `Creating` in the response. If creation fails, `ProvisioningState` is set to `Failed`. ++## Next steps +- [Learn more](manage-restore-points.md) about managing restore points. +- Create restore points using the [Azure portal](virtual-machines-create-restore-points-portal.md), [CLI](virtual-machines-create-restore-points-cli.md), or [PowerShell](virtual-machines-create-restore-points-powershell.md). +- [Learn more](backup-recovery.md) about Backup and restore options for virtual machines in Azure. |
| virtual-machines | Dedicated Hosts How To | https://github.com/MicrosoftDocs/azure-docs/commits/main/articles/virtual-machines/dedicated-hosts-how-to.md | Last updated 09/01/2021 + #Customer intent: As an IT administrator, I want to learn about more about using a dedicated host for my Azure virtual machines This article guides you through how to create an Azure [dedicated host](dedicate ## Limitations - The sizes and hardware types available for dedicated hosts vary by region. Refer to the host [pricing page](https://aka.ms/ADHPricing) to learn more.+- Not all Azure VM SKUs, regions and availability zones support ultra disks, for more information about this topic, see [Azure ultra disks](disks-enable-ultra-ssd.md) . Ultra disk support for dedicated hosts is currently in preview. - The fault domain count of the virtual machine scale set can't exceed the fault domain count of the host group. ## Create a host group -A **host group** is a resource that represents a collection of dedicated hosts. You create a host group in a region and an availability zone, and add hosts to it. When planning for high availability, there are more options. You can use one or both of the following options with your dedicated hosts: +A **host group** is a resource that represents a collection of dedicated hosts. You create a host group in a region and an availability zone, and add hosts to it. You can use one or both of the following options with your dedicated hosts to ensure high availability: - Span across multiple availability zones. In this case, you're required to have a host group in each of the zones you wish to use. - Span across multiple fault domains, which are mapped to physical racks. In either case, you need to provide the fault domain count for your host group. You can also decide to use both availability zones and fault domains. +Enabling ultra disks (Preview) is a host group level setting and can't be changed after a host group is created. ++If you intend to use LSv2 or M series VMs, with ultra disks (Preview) on dedicated hosts, set host group's **Fault domain count** to **1**. + ### [Portal](#tab/portal) In this example, we'll create a host group using one availability zone and two fault domains. In this example, we'll create a host group using one availability zone and two f 1. For **Host group name**, type *myHostGroup*. 1. For **Location**, select **East US**. 1. For **Availability Zone**, select **1**.+1. Select **Enable Ultra SSD** (Preview) to use ultra disks with supported Virtual Machines. 1. For **Fault domain count**, select **2**. 1. Select **Automatic placement** to automatically assign VMs and scale set instances to an available host in this group. 1. Select **Review + create** and then wait for validation. Not all host SKUs are available in all regions, and availability zones. You can ```azurecli-interactive az vm list-skus -l eastus2 -r hostGroups/hosts -o table ```+You can also verify if a VM series supports ultra disks (Preview). ++```azurecli-interactive +subscription="<mySubID>" +# example value is southeastasia +region="<myLocation>" +# example value is Standard_E64s_v3 +vmSize="<myVMSize>" ++az vm list-skus --resource-type virtualMachines --location $region --query "[?name=='$vmSize'].locationInfo[0].zoneDetails[0].Name" --subscription $subscription +``` In this example, we'll use [az vm host group create](/cli/azure/vm/host/group#az-vm-host-group-create) to create a host group using both availability zones and fault domains. az vm host group create \ Add the `--automatic-placement true` parameter to have your VMs and scale set instances automatically placed on hosts, within a host group. For more information, see [Manual vs. automatic placement](dedicated-hosts.md#manual-vs-automatic-placement). +Add the `--ultra-ssd-enabled true` (Preview) parameter to enable creation of VMs that can support ultra disks. + **Other examples** az vm host group create \ --platform-fault-domain-count 2 ``` +The following code snippet uses [az vm host group create](/cli/azure/vm/host/group#az-vm-host-group-create) to create a host group that supports ultra disks (Preview) and auto placement of VMs enabled. ++```azurecli-interactive +az vm host group create \ + --name myFDHostGroup \ + -g myDHResourceGroup \ + -z 1 \ + --ultra-ssd-enabled true \ + --platform-fault-domain-count 2 \ + --automatic-placement true +``` ### [PowerShell](#tab/powershell) This example uses [New-AzHostGroup](/powershell/module/az.compute/new-azhostgroup) to create a host group in zone 1, with 2 fault domains. $location = "EastUS" New-AzResourceGroup -Location $location -Name $rgName $hostGroup = New-AzHostGroup `- -Location $location ` -Name myHostGroup `- -PlatformFaultDomain 2 ` -ResourceGroupName $rgName `- -Zone 1 + -Location $location ` + -Zone 1 ` + -EnableUltraSSD ` + -PlatformFaultDomain 2 ` + -SupportAutomaticPlacement true ``` +Add the `-SupportAutomaticPlacement true` parameter to have your VMs and scale set instances automatically placed on hosts, within a host group. For more information about this topic, see [Manual vs. automatic placement ](dedicated-hosts.md#manual-vs-automatic-placement). +++Add the `-EnableUltraSSD` (Preview) parameter to enable creation of VMs that can support ultra disks. -Add the `-SupportAutomaticPlacement true` parameter to have your VMs and scale set instances automatically placed on hosts, within a host group. For more information, see [Manual vs. automatic placement](dedicated-hosts.md#manual-vs-automatic-placement). $dHost = New-AzHost ` Now create a VM on the host. +If you would like to create a VM with ultra disks support, make sure the host group in which the VM will be placed is ultra SSD enabled (Preview). Once you've confirmed, create the VM in the same host group. See [Deploy an ultra disk](disks-enable-ultra-ssd.md#deploy-an-ultra-disk) for the steps to attach an ultra disk to a VM. + ### [Portal](#tab/portal) 1. Choose **Create a resource** in the upper left corner of the Azure portal. You can add an existing VM to a dedicated host, but the VM must first be Stop\De - The VM size must be in the same size family as the dedicated host. For example, if your dedicated host is DSv3, then the VM size could be Standard_D4s_v3, but it couldn't be a Standard_A4_v2. - The VM needs to be located in same region as the dedicated host.-- The VM can't be part of a proximity placement group. Remove the VM from the proximity placement group before moving it to a dedicated host. For more information, see [Move a VM out of a proximity placement group](./windows/proximity-placement-groups.md#move-an-existing-vm-out-of-a-proximity-placement-group)+- The VM can't be part of a proximity placement group. Remove the VM from the proximity placement group before moving it to a dedicated host. For more information about this topic, see [Move a VM out of a proximity placement group](./windows/proximity-placement-groups.md#move-an-existing-vm-out-of-a-proximity-placement-group) - The VM can't be in an availability set. - If the VM is in an availability zone, it must be the same availability zone as the host group. The availability zone settings for the VM and the host group must match. az vm update - n myVM -g myResourceGroup --host myHost az vm start -n myVM -g myResourceGroup ``` -For automatically placed VMs, only update the host group. For more information, see [Manual vs. automatic placement](dedicated-hosts.md#manual-vs-automatic-placement). +For automatically placed VMs, only update the host group. For more information about this topic, see [Manual vs. automatic placement](dedicated-hosts.md#manual-vs-automatic-placement). Replace the values with your own information. az vm host get-instance-view \ --name myHost ``` -The output will look similar to this: +The output will look similar to the below example: ```json { Get-AzHost ` -InstanceView ``` -The output will look similar to this: +The output will look similar to the below example: ``` ResourceGroupName : myDHResourceGroup Once you've deleted all of your hosts, you may delete the host group using [az v az vm host group delete -g myDHResourceGroup --host-group myHostGroup ``` -You can also delete the entire resource group in a single command. This will delete all resources created in the group, including all of the VMs, hosts and host groups. +You can also delete the entire resource group in a single command. The following command will delete all resources created in the group, including all of the VMs, hosts and host groups. ```azurecli-interactive az group delete -n myDHResourceGroup Once you've deleted all of your hosts, you may delete the host group using [Remo Remove-AzHost -ResourceGroupName $rgName -Name myHost ``` -You can also delete the entire resource group in a single command using [Remove-AzResourceGroup](/powershell/module/az.resources/remove-azresourcegroup). This will delete all resources created in the group, including all of the VMs, hosts and host groups. +You can also delete the entire resource group in a single command using [Remove-AzResourceGroup](/powershell/module/az.resources/remove-azresourcegroup). This following command will delete all resources created in the group, including all of the VMs, hosts and host groups. ```azurepowershell-interactive Remove-AzResourceGroup -Name $rgName Remove-AzResourceGroup -Name $rgName ## Next steps -- For more information, see the [Dedicated hosts](dedicated-hosts.md) overview.+- For more information about this topic, see the [Dedicated hosts](dedicated-hosts.md) overview. - There's sample template, available at [Azure Quickstart Templates](https://github.com/Azure/azure-quickstart-templates/blob/master/quickstarts/microsoft.compute/vm-dedicated-hosts/README.md), which uses both zones and fault domains for maximum resiliency in a region. |
| virtual-machines | Manage Restore Points | https://github.com/MicrosoftDocs/azure-docs/commits/main/articles/virtual-machines/manage-restore-points.md | + + Title: Manage Virtual Machine restore points +description: Managing Virtual Machine Restore Points +++++ Last updated : 07/05/2022++++# Manage VM restore points ++This article explains how to copy and restore a VM from a VM restore point and track the progress of the copy operation. This article also explains how to create a disk from a disk restore point and to create a shared access signature for a disk. ++## Copy a VM restore point between regions ++The VM restore point APIs can be used to restore a VM in a different region than the source VM. +Use the following steps: ++### Step 1: Create a destination VM restore point collection ++To copy an existing VM restore point from one region to another, your first step is to create a restore point collection in the target or destination region. To do this, reference the restore point collection from the source region as detailed in [Create a VM restore point collection](create-restore-points.md#step-1-create-a-vm-restore-point-collection). ++### Step 2: Create the destination VM restore point ++After the restore point collection is created, trigger the creation of a restore point in the target restore point collection. Ensure that you've referenced the restore point in the source region that you want to copy and specified the source restore point's identifier in the request body. The source VM's location is inferred from the target restore point collection in which the restore point is being created. +See the [Restore Points - Create](/rest/api/compute/restore-points/create) API documentation to create a `RestorePoint`. ++### Step 3: Track copy status ++To track the status of the copy operation, follow the guidance in the [Get restore point copy or replication status](#get-restore-point-copy-or-replication-status) section below. This is only applicable for scenarios where the restore points are copied to a different region than the source VM. ++## Get restore point copy or replication status ++Creation of a cross-region VM restore point is a long running operation. The VM restore point can be used to restore a VM only after the operation is completed for all disk restore points. To track the operation's status, call the [Restore Point - Get](/rest/api/compute/restore-points/get) API on the target VM restore point and include the `instanceView` parameter. The return will include the percentage of data that has been copied at the time of the request. ++During restore point creation, the `ProvisioningState` will appear as `Creating` in the response. If creation fails, `ProvisioningState` is set to `Failed`. ++## Create a disk using disk restore points ++You can use the VM restore points APIs to restore a VM disk, which can then be used to create a new VM. +Use the following steps: ++### Step 1: Retrieve disk restore point identifiers ++Call the [Restore Point Collections - Get](/rest/api/compute/restore-point-collections/get) API on the restore point collection to get access to associated restore points and their IDs. Each VM restore point will in turn contain individual disk restore point identifiers. ++### Step 2: Create a disk ++After you have the list of disk restore point IDs, you can use the [Disks - Create Or Update](/rest/api/compute/disks/create-or-update) API to create a disk from the disk restore points. ++## Restore a VM with a restore point ++To restore a full VM from a VM restore point, you must restore individual disks from each disk restore point. This process is described in the [Create a disk](#create-a-disk-using-disk-restore-points) section. After you restore all the disks, create a new VM and attach the restored disks to the new VM. +You can also use the [ARM template](https://github.com/Azure/Virtual-Machine-Restore-Points/blob/main/RestoreVMFromRestorePoint.json) to restore a full VM along with all the disks. ++## Get a shared access signature for a disk ++To create a Shared Access Signature (SAS) for a disk within a VM restore point, pass the ID of the disk restore points via the `BeginGetAccess` API. If no active SAS exists on the restore point snapshot, a new SAS is created. The new SAS URL is returned in the response. If an active SAS already exists, the SAS duration is extended, and the pre-existing SAS URL is returned in the response. ++For more information about granting access to snapshots, see the [Grant Access](/rest/api/compute/snapshots/grant-access) API documentation. ++## Next steps ++[Learn more](backup-recovery.md) about Backup and restore options for virtual machines in Azure. |
| virtual-machines | Restore Point Troubleshooting | https://github.com/MicrosoftDocs/azure-docs/commits/main/articles/virtual-machines/restore-point-troubleshooting.md | + + Title: Troubleshoot restore point failures +description: Symptoms, causes, and resolutions of restore point failures related to agent, extension, and disks. + Last updated : 07/13/2022++++++# Troubleshoot restore point failures: Issues with the agent or extension ++This article provides troubleshooting steps that can help you resolve restore point errors related to communication with the VM agent and extension. +++## Step-by-step guide to troubleshoot restore point failures ++Most common restore point failures can be resolved by following the troubleshooting steps listed below: ++### Step 1: Check the health of Azure VM ++- **Ensure Azure VM provisioning state is 'Running'**: + If the [VM provisioning state](states-billing.md) is in the **Stopped/Deallocated/Updating** state, it interferes with the restore point operation. In the Azure portal, go to **Virtual Machines** > **Overview** and ensure the VM status is **Running** and retry the restore point operation. +- **Review pending OS updates or reboots**: Ensure there are no pending OS updates or pending reboots on the VM. ++### Step 2: Check the health of Azure VM Guest Agent service ++**Ensure Azure VM Guest Agent service is started and up-to-date**: +- On a Windows VM: + - Navigate to **services.msc** and ensure **Windows Azure VM Guest Agent service** is up and running. Also, ensure the [latest version](https://go.microsoft.com/fwlink/?LinkID=394789&clcid=0x409) is installed. [Learn more](#the-agent-is-installed-in-the-vm-but-its-unresponsive-for-windows-vms). + - The Azure VM Agent is installed by default on any Windows VM deployed from an Azure Marketplace image from the portal, PowerShell, Command Line Interface, or an Azure Resource Manager template. A [manual installation of the Agent](../virtual-machines/extensions/agent-windows.md#manual-installation) may be necessary when you create a custom VM image that's deployed to Azure. + - Review the support matrix to check if VM runs on the [supported Windows operating system](concepts-restore-points.md#operating-system-support). +- On Linux VM, + - Ensure the Azure VM Guest Agent service is running by executing the command `ps -e`. Also, ensure the [latest version](../virtual-machines/extensions/update-linux-agent.md) is installed. [Learn more](#the-agent-installed-in-the-vm-is-out-of-date-for-linux-vms). + - Ensure the [Linux VM agent dependencies on system packages](../virtual-machines/extensions/agent-linux.md#requirements) have the supported configuration. For example: Supported Python version is 2.6 and above. + - Review the support matrix to check if VM runs on the [supported Linux operating system.](concepts-restore-points.md#operating-system-support). ++### Step 3: Check the health of Azure VM Extension ++- **Ensure all Azure VM Extensions are in 'provisioning succeeded' state**: + If any extension is in a failed state, then it can interfere with the restore point operation. + - In the Azure portal, go to **Virtual machines** > **Settings** > **Extensions** > **Extensions status** and check if all the extensions are in **provisioning succeeded** state. + - Ensure all [extension issues](../virtual-machines/extensions/overview.md#troubleshoot-extensions) are resolved and retry the restore point operation. +- **Ensure COM+ System Application** is up and running. Also, the **Distributed Transaction Coordinator service** should be running as **Network Service account**. ++Follow the troubleshooting steps in [troubleshoot COM+ and MSDTC issues](/azure/backup/backup-azure-vms-troubleshoot#extensionsnapshotfailedcom--extensioninstallationfailedcom--extensioninstallationfailedmdtcextension-installationoperation-failed-due-to-a-com-error) in case of issues. ++### Step 4: Check the health of Azure VM Snapshot Extension ++Restore points use the VM Snapshot Extension to take an application consistent snapshot of the Azure virtual machine. Restore points install the extension as part of the first restore point creation operation. ++- **Ensure VMSnapshot extension isn't in a failed state**: Follow the steps in [Troubleshooting](/azure/backup/backup-azure-troubleshoot-vm-backup-fails-snapshot-timeout.md#usererrorvmprovisioningstatefailedthe-vm-is-in-failed-provisioning-state) to verify and ensure the Azure VM snapshot extension is healthy. ++- **Check if antivirus is blocking the extension**: Certain antivirus software can prevent extensions from executing. + + At the time of the restore point failure, verify if there are log entries in **Event Viewer Application logs** with *faulting application name: IaaSBcdrExtension.exe*. If you see entries, the antivirus configured in the VM could be restricting the execution of the VMSnapshot extension. Test by excluding the following directories in the antivirus configuration and retry the restore point operation. + - `C:\Packages\Plugins\Microsoft.Azure.RecoveryServices.VMSnapshot` + - `C:\WindowsAzure\Logs\Plugins\Microsoft.Azure.RecoveryServices.VMSnapshot` ++- **Check if network access is required**: Extension packages are downloaded from the Azure Storage extension repository and extension status uploads are posted to Azure Storage. [Learn more](../virtual-machines/extensions/features-windows.md#network-access). + - If you're on a non-supported version of the agent, you need to allow outbound access to Azure storage in that region from the VM. + - If you've blocked access to `168.63.129.16` using the guest firewall or with a proxy, extensions will fail regardless of the above. Ports 80, 443, and 32526 are required. [Learn more](../virtual-machines/extensions/features-windows.md#network-access). ++- **Ensure DHCP is enabled inside the guest VM**: This is required to get the host or fabric address from DHCP for the restore point to work. If you need a static private IP, you should configure it through the **Azure portal**, or **PowerShell** and make sure the DHCP option inside the VM is enabled. [Learn more](#the-snapshot-status-cant-be-retrieved-or-a-snapshot-cant-be-taken). ++- **Ensure the VSS writer service is up and running**: + Follow these steps to [troubleshoot VSS writer issues](/azure/backup/backup-azure-vms-troubleshoot.md#extensionfailedvsswriterinbadstatesnapshot-operation-failed-because-vss-writers-were-in-a-bad-state). ++## Common issues ++### DiskRestorePointUsedByCustomer - There is an active shared access signature outstanding for disk restore point ++**Error code**: DiskRestorePointUsedByCustomer ++**Error message**: There is an active shared access signature outstanding for disk restore point. Call EndGetAccess before deleting the restore point. ++You can't delete a restore point if there are active Shared Access Signatures (SAS) on any of the underlying disk restore points. End the shared access on the disk restore points and retry the operation. ++### OperationNotAllowed - Changes were made to the Virtual Machine while the operation 'Create Restore Point' was in progress. ++**Error code**: OperationNotAllowed ++**Error message**: Changes were made to the Virtual Machine while the operation 'Create Restore Point' was in progress. Operation Create Restore Point cannot be completed at this time. Please try again later. ++Restore point creation fails if there are changes being made in parallel to the VM model, for example, a new disk being attached or an existing disk being detached. This is to ensure data integrity of the restore point that is created. Retry creating the restore point once the VM model has been updated. ++### OperationNotAllowed - Operation 'Create Restore Point' is not allowed as disk(s) have not been allocated successfully. ++**Error code**: OperationNotAllowed ++**Error message**: Operation 'Create Restore Point' is not allowed as disk(s) have not been allocated successfully. Please exclude these disk(s) using excludeDisks property and retry. ++If any one of the disks attached to the VM isn't allocated properly, the restore point fails. You must exclude these disks before triggering creation of restore points for the VM. If you're using ARM processor API to create a restore point, to exclude a disk, add its identifier to the excludeDisks property in the request body. If you're using [CLI](virtual-machines-create-restore-points-cli.md#exclude-disks-when-creating-a-restore-point), [PowerShell](virtual-machines-create-restore-points-powershell.md#exclude-disks-from-the-restore-point), or [Portal](virtual-machines-create-restore-points-portal.md#step-2-create-a-vm-restore-point), set the respective parameters. ++### OperationNotAllowed - Creation of Restore Point of a Virtual Machine with Shared disks is not supported. ++**Error code**: VMRestorePointClientError ++**Error message**: Creation of Restore Point of a Virtual Machine with Shared disks is not supported. You may exclude this disk from the restore point via excludeDisks property. ++Restore points are currently not supported for shared disks. You need to exclude these disks before triggering creation of restore point for the VM. If you are using ARM processor API to create restore point, to exclude a disk, add its identifier to the excludeDisks property in the request body. If you are using [CLI](virtual-machines-create-restore-points-cli.md#exclude-disks-when-creating-a-restore-point), [PowerShell](virtual-machines-create-restore-points-powershell.md#exclude-disks-from-the-restore-point), or [Portal](virtual-machines-create-restore-points-portal.md#step-2-create-a-vm-restore-point), follow the respective steps. ++### VMAgentStatusCommunicationError - VM agent unable to communicate with compute service ++**Error code**: VMAgentStatusCommunicationError ++**Error message**: VM has not reported status for VM agent or extensions. ++The Azure VM agent might be stopped, outdated, in an inconsistent state, or not installed. These states prevent the creation of restore points. ++- In the Azure portal, go to **Virtual Machines** > **Settings** > **Properties** and ensure that the VM **Status** is **Running** and **Agent status** is **Ready**. If the VM agent is stopped or is in an inconsistent state, restart the agent. + - [Restart](#the-agent-is-installed-in-the-vm-but-its-unresponsive-for-windows-vms) the Guest Agent for Windows VMs. + - [Restart](#the-agent-installed-in-the-vm-is-out-of-date-for-linux-vms) the Guest Agent for Linux VMs. +- In the Azure portal, go to **Virtual Machines** > **Settings** > **Extensions** and ensure all extensions are in **provisioning succeeded** state. If not, follow these [steps](/azure/backup/backup-azure-troubleshoot-vm-backup-fails-snapshot-timeout.md#usererrorvmprovisioningstatefailedthe-vm-is-in-failed-provisioning-state) to resolve the issue. ++### VMRestorePointInternalError - Restore Point creation failed due to an internal execution error while creating VM snapshot. Please retry the operation after some time.Internal ++**Error code**: VMRestorePointInternalError ++**Error message**: Restore Point creation failed due to an internal execution error while creating VM snapshot. Please retry the operation after some time. ++After you trigger a restore point operation, the compute service starts the job by communicating with the VM backup extension to take a point-in-time snapshot. Any of the following conditions might prevent the snapshot from being triggered. If the snapshot isn't triggered, restore point creation will fail. Complete the following troubleshooting steps in the order listed, and then retry your operation: ++**Cause 1: [The agent is installed in the VM, but it's unresponsive (for Windows VMs)](#the-agent-is-installed-in-the-vm-but-its-unresponsive-for-windows-vms)** ++**Cause 2: [The agent installed in the VM is out of date (for Linux VMs)](#the-agent-installed-in-the-vm-is-out-of-date-for-linux-vms)** ++**Cause 3: [The snapshot status can't be retrieved, or a snapshot can't be taken](#the-snapshot-status-cant-be-retrieved-or-a-snapshot-cant-be-taken)** ++**Cause 4: [VM-Agent configuration options aren't set (for Linux VMs)](#vm-agent-configuration-options-are-not-set-for-linux-vms)** ++**Cause 5: [Application control solution is blocking IaaSBcdrExtension.exe](#application-control-solution-is-blocking-iaasbcdrextensionexe)** ++This error could also occur when one of the extension failures puts the VM into provisioning failed state. If the above steps didn't resolve your issue, then do the following: + + In the Azure portal, go to **Virtual Machines** > **Settings** > **Extensions** and ensure all extensions are in **provisioning succeeded** state. [Learn more](states-billing.md) about Provisioning states. ++- If any extension is in a failed state, it can interfere with the restore point operation. Ensure the extension issues are resolved and retry the restore point operation. +- If the VM provisioning state is in an updating state, it can interfere with the restore point operation. Ensure that it's healthy and retry the restore point operation. ++### VMRestorePointClientError - Restore Point creation failed due to COM+ error. ++**Error code**: VMRestorePointClientError ++**Error message**: Restore Point creation failed due to COM+ error. Please restart windows service "COM+ System Application" (COMSysApp). If the issue persists, restart the VM. ++Restore point operations fail if the COM+ service is not running or if there are any errors with this service. Restart the COM+ System Application, and restart the VM and retry the restore point operation. ++### VMRestorePointClientError - Restore Point creation failed due to insufficient memory available in COM+ memory quota. ++**Error code**: VMRestorePointClientError ++**Error message**: Restore Point creation failed due to insufficient memory available in COM+ memory quota. Please restart windows service "COM+ System Application" (COMSysApp). If the issue persists, restart the VM. ++Restore point operations fail if there's insufficient memory in the COM+ service. Restarting the COM+ System Application service and the VM usually frees up the memory. Once restarted, retry the restore point operation. ++### VMRestorePointClientError - Restore Point creation failed due to VSS Writers in bad state. ++**Error code**: VMRestorePointClientError ++**Error message**: Restore Point creation failed due to VSS Writers in bad state. Restart VSS Writer services and reboot VM. ++Restore point creation invokes VSS writers to flush in-memory IOs to the disk before taking snapshots to achieve application consistency. If the VSS writers are in bad state, it affects the restore point creation operation. Restart the VSS writer service and restart the VM before retrying the operation. ++### VMRestorePointClientError - Restore Point creation failed due to failure in installation of Visual C++ Redistributable for Visual Studio 2012. ++**Error code**: VMRestorePointClientError ++**Error message**: Restore Point creation failed due to failure in installation of Visual C++ Redistributable for Visual Studio 2012. Please install Visual C++ Redistributable for Visual Studio 2012. If you are observing issues with installation or if it is already installed and you are observing this error, please restart the VM to clean installation issues. ++Restore point operations require Visual C++ Redistributable for Visual Studio 2021. Download Visual C++ Redistributable for Visual Studio 2012 and restart the VM before retrying the restore point operation. ++### VMRestorePointClientError - Restore Point creation failed as the maximum allowed snapshot limit of one or more disk blobs has been reached. Please delete some existing restore points of this VM and then retry. ++**Error code**: VMRestorePointClientError ++**Error message**: Restore Point creation failed as the maximum allowed snapshot limit of one or more disk blobs has been reached. Please delete some existing restore points of this VM and then retry. ++The number of restore points across the restore point collections and resource groups for a VM can't exceed 500. To create a new restore point, delete the existing restore points. ++### VMRestorePointClientError - Restore Point creation failed with the error "COM+ was unable to talk to the Microsoft Distributed Transaction Coordinator". ++**Error code**: VMRestorePointClientError ++**Error message**: Restore Point creation failed with the error "COM+ was unable to talk to the Microsoft Distributed Transaction Coordinator". ++Follow these steps to resolve this error: + - Open services.msc from an elevated command prompt + - Make sure that **Log On As** value for **Distributed Transaction Coordinator** service is set to **Network Service** and the service is running. + - If this service fails to start, reinstall this service. +++### VMRestorePointClientError - Restore Point creation failed due to inadequate VM resources. ++**Error code**: VMRestorePointClientError ++**Error message**: Restore Point creation failed due to inadequate VM resources. Increase VM resources by changing the VM size and retry the operation. To resize the virtual machine, refer https://azure.microsoft.com/blog/resize-virtual-machines/. ++Creating a restore point requires enough compute resource to be available. If you get the above error when creating a restore point, you need resize the VM and choose a higher VM size. Follow the steps in [how to resize your VM](https://azure.microsoft.com/blog/resize-virtual-machines/). Once the VM is resized, retry the restore point operation. ++### VMRestorePointClientError - Restore point creation failed due to no network connectivity on the virtual machine. ++**Error code**: VMRestorePointClientError ++**Error message**: Restore Point creation failed due to no network connectivity on the virtual machine. Ensure that VM has network access. Either allowlist the Azure datacenter IP ranges or set up a proxy server for network access. For more information, see https://go.microsoft.com/fwlink/?LinkId=800034. If you are already using proxy server, make sure that proxy server settings are configured correctly. ++After you trigger creation of restore point, the compute service starts communicating with the VM snapshot extension to take a point-in-time snapshot. Any of the following conditions might prevent the snapshot from being triggered. If the snapshot isn't triggered, a restore point failure might occur. Complete the following troubleshooting step, and then retry your operation: ++**[The snapshot status can't be retrieved, or a snapshot can't be taken].(#the-snapshot-status-cant-be-retrieved-or-a-snapshot-cant-be-taken)** ++### VMRestorePointClientError - RestorePoint creation failed since a concurrent 'Create RestorePoint' operation was triggered on the VM. ++**Error code**: VMRestorePointClientError ++**Error message**: RestorePoint creation failed since a concurrent 'Create RestorePoint' operation was triggered on the VM. ++Your recent restore point creation failed because there's already an existing restore point being created. You can't create a new restore point until the current restore point is fully created. Ensure the restore point creation operation currently in progress is completed before triggering another restore point creation operation. + +To check the restore points in progress, do the following steps: ++1. Sign in to the Azure portal, select **All services**. Enter **Recovery Services** and select **Restore point collection**. The list of Restore point collections appears. +2. From the list of Restore point collections, select a Restore point collection in which the restore point is being created. +3. Select **Settings** > **Restore points** to view all the restore points. If a restore point is in progress, wait for it to complete. +4. Retry creating a new restore point. ++### DiskRestorePointClientError - Keyvault associated with DiskEncryptionSet is not found. ++**Error code**: DiskRestorePointClientError ++**Error message**: Keyvault associated with DiskEncryptionSet not found. The resource may have been deleted due to which Restore Point creation failed. Please retry the operation after re-creating the missing resource with the same name. ++If you are creating restore points for a VM that has encrypted disks, you must ensure the keyvault where the keys are stored, is available. We use the same keys to create encrypted restore points. ++### BadRequest - This request can be made with api-version '2021-03-01' or newer ++**Error code**: BadRequest ++**Error message**: This request can be made with api-version '2022-03-01' or newer. ++Restore points are supported only with API version 2022-03-01 or later. If you are using REST APIs to create and manage restore points, use the specified API version when calling the restore point API. ++### InternalError / InternalExecutionError / InternalOperationError - An internal execution error occurred. Please retry later. ++**Error code**: InternalError / InternalExecutionError / InternalOperationError ++**Error message**: An internal execution error occurred. Please retry later. ++After you trigger creation of restore point, the compute service starts communicating with the VM snapshot extension to take a point-in-time snapshot. Any of the following conditions might prevent the snapshot from being triggered. If the snapshot isn't triggered, a restore point failure might occur. Complete the following troubleshooting steps in the order listed, and then retry your operation: ++- **Cause 1: [The agent is installed in the VM, but it's unresponsive (for Windows VMs)](#the-agent-is-installed-in-the-vm-but-its-unresponsive-for-windows-vms)**. +- **Cause 2: [The agent installed in the VM is out of date (for Linux VMs)](#the-agent-installed-in-the-vm-is-out-of-date-for-linux-vms)**. +- **Cause 3: [The snapshot status can't be retrieved, or a snapshot can't be taken](#the-snapshot-status-cant-be-retrieved-or-a-snapshot-cant-be-taken)**. +- **Cause 4: [Compute service does not have permission to delete the old restore points because of a resource group lock](#remove-lock-from-the-recovery-point-resource-group)**. +- **Cause 5**: There's an extension version/bits mismatch with the Windows version you're running, or the following module is corrupt: ++ **C:\Packages\Plugins\Microsoft.Azure.RecoveryServices.VMSnapshot\\<extension version\>\iaasvmprovider.dll** + + To resolve this issue, check if the module is compatible with x86 (32-bit)/x64 (64-bit) version of _regsvr32.exe_, and then follow these steps: ++ 1. In the affected VM, go to **Control panel** > **Program and features**. + 1. Uninstall **Visual C++ Redistributable x64** for **Visual Studio 2013**. + 1. Reinstall **Visual C++ Redistributable** for **Visual Studio 2013** in the VM. To install, follow these steps: + 1. Go to the folder: **C:\Packages\Plugins\Microsoft.Azure.RecoveryServices.VMSnapshot\\<LatestVersion\>**. + 1. Search and run the **vcredist2013_x64** file to install. + 1. Retry the restore point operation. ++### OSProvisioningClientError - Restore points operation failed due to an error. For details, see restore point provisioning error Message details ++**Error code**: OSProvisioningClientError ++**Error message**: OS Provisioning did not finish in the allotted time. This error occurred too many times consecutively from image. Make sure the image has been properly prepared (generalized). ++This error is reported from the IaaS VM. Take necessary actions as described in the error message and retry the operation. ++### AllocationFailed - Restore points operation failed due to an error. For details, see restore point provisioning error Message details ++**Error code**: AllocationFailed ++**Error message**: Allocation failed. If you are trying to add a new VM to an Availability Set or update/resize an existing VM in an Availability Set, please note that such Availability Set allocation is scoped to a single cluster, and it is possible that the cluster is out of capacity. [Learn more](https://aka.ms/allocation-guidance) about improving likelihood of allocation success. ++This error is reported from the IaaS VM. Take necessary actions as described in the error message and retry the operation. ++## Causes and solutions ++### The agent is installed in the VM, but it's unresponsive (for Windows VMs) ++#### Solution ++The VM agent might have been corrupted, or the service might have been stopped. Reinstalling the VM agent helps get the latest version. It also helps restart communication with the service. ++1. Determine whether the Microsoft Azure Guest Agent service is running in the VM services (services.msc). Try to restart the Microsoft Azure Guest Agent service and initiate the restore point operation. +2. If the Microsoft Azure Guest Agent service isn't visible in services, in Control Panel, go to **Programs and Features** to determine whether the Microsoft Azure Guest Agent service is installed. +3. If the Microsoft Azure Guest Agent appears in **Programs and Features**, uninstall the Microsoft Azure Guest Agent. +4. Download and install the [latest version of the agent MSI](https://go.microsoft.com/fwlink/?LinkID=394789&clcid=0x409). You must have Administrator rights to complete the installation. +5. Verify that the Microsoft Azure Guest Agent services appear in services. +6. Retry the restore point operation. +++Also, verify that [Microsoft .NET 4.5 is installed](/dotnet/framework/migration-guide/how-to-determine-which-versions-are-installed) in the VM. .NET 4.5 is required for the VM agent to communicate with the service. ++### The agent installed in the VM is out of date (for Linux VMs) ++#### Solution ++Most agent-related or extension-related failures for Linux VMs are caused by issues that affect an outdated VM agent. To troubleshoot this issue, follow these general guidelines: ++1. Follow the instructions for [updating the Linux VM agent](../virtual-machines/extensions/update-linux-agent.md). ++ > [!NOTE] + > We *strongly recommend* that you update the agent only through a distribution repository. We don't recommend downloading the agent code directly from GitHub and updating it. If the latest agent for your distribution is not available, contact distribution support for instructions on how to install it. To check for the most recent agent, go to the [Windows Azure Linux agent](https://github.com/Azure/WALinuxAgent/releases) page in the GitHub repository. ++2. Ensure that the Azure agent is running on the VM by running the following command: `ps -e` ++ If the process isn't running, restart it by using the following commands: ++ - For Ubuntu: `service walinuxagent start` + - For other distributions: `service waagent start` ++3. [Configure the auto restart agent](https://github.com/Azure/WALinuxAgent/wiki/Known-Issues#mitigate_agent_crash). +4. Retry the restore point operation. If the failure persists, collect the following logs from the VM: ++ - /var/lib/waagent/*.xml + - /var/log/waagent.log + - /var/log/azure/* ++If you require verbose logging for waagent, follow these steps: ++1. In the /etc/waagent.conf file, locate the following line: **Enable verbose logging (y|n)**. +2. Change the **Logs.Verbose** value from *n* to *y*. +3. Save the change, and then restart waagent by completing the steps described earlier in this section. ++### VM-Agent configuration options are not set (for Linux VMs) ++A configuration file (/etc/waagent.conf) controls the actions of waagent. Configuration File Options **Extensions.Enable** should be set to **y** and **Provisioning.Agent** should be set to **auto** for restore points to work. +For the full list of VM-Agent Configuration File Options, see https://github.com/Azure/WALinuxAgent#configuration-file-options. ++### Application control solution is blocking IaaSBcdrExtension.exe ++If you're running [AppLocker](/windows/security/threat-protection/windows-defender-application-control/applocker/what-is-applocker) (or another application control solution), and the rules are publisher or path based, they may block the **IaaSBcdrExtension.exe** executable from running. ++#### Solution ++Exclude the `/var/lib` path or the **IaaSBcdrExtension.exe** executable from AppLocker (or other application control software.) ++### The snapshot status can't be retrieved, or a snapshot can't be taken ++Restore points rely on issuing a snapshot command to the underlying storage account. Restore point can fail either because it has no access to the storage account, or because the execution of the snapshot task is delayed. ++#### Solution ++The following conditions might cause the snapshot task to fail: ++| Cause | Solution | +| | | +| The VM status is reported incorrectly because the VM is shut down in Remote Desktop Protocol (RDP). | If you shut down the VM in RDP, check the portal to determine whether the VM status is correct. If it's not correct, shut down the VM in the portal by using the **Shutdown** option on the VM dashboard. | +| The VM can't get the host or fabric address from DHCP. | DHCP must be enabled inside the guest for restore point to work. If the VM can't get the host or fabric address from DHCP response 245, it can't download or run any extensions. If you need a static private IP, you should configure it through the **Azure portal**, or **PowerShell** and make sure the DHCP option inside the VM is enabled. [Learn more](../virtual-network/ip-services/virtual-networks-static-private-ip-arm-ps.md) about setting up a static IP address with PowerShell. ++### Remove lock from the recovery point resource group ++1. Sign in to the [Azure portal](https://portal.azure.com/). +2. Go to **All Resources**, select the restore point collection resource group. +3. In the **Settings** section, select **Locks** to display the locks. +4. To remove the lock, select **Delete**. ++ :::image type="content" source="./media/restore-point-troubleshooting/delete-lock-inline.png" alt-text="Screenshot of Delete lock in Azure portal." lightbox="./media/restore-point-troubleshooting/delete-lock-expanded.png"::: |
| virtual-machines | Trusted Launch | https://github.com/MicrosoftDocs/azure-docs/commits/main/articles/virtual-machines/trusted-launch.md | Azure offers trusted launch as a seamless way to improve the security of [genera **VM size support**: - B-series - DCsv2-series+- DCsv3-series, DCdsv3-series - Dv4-series, Dsv4-series, Dsv3-series, Dsv2-series - Dav4-series, Dasv4-series - Ddv4-series, Ddsv4-series |
| virtual-machines | Virtual Machines Create Restore Points Cli | https://github.com/MicrosoftDocs/azure-docs/commits/main/articles/virtual-machines/virtual-machines-create-restore-points-cli.md | + + Title: Creating Virtual Machine Restore Points using Azure CLI +description: Creating Virtual Machine Restore Points using Azure CLI +++++ Last updated : 06/30/2022+++++# Create virtual machine restore points using Azure CLI ++You can protect your data and guard against extended downtime by creating [VM restore points](virtual-machines-create-restore-points.md#about-vm-restore-points) at regular intervals. You can create VM restore points, and [exclude disks](#exclude-disks-when-creating-a-restore-point) while creating the restore point, using Azure CLI. Azure CLI is used to create and manage Azure resources using command line or scripts. Alternatively, you can create VM restore points using the [Azure portal](virtual-machines-create-restore-points-portal.md) or using [PowerShell](virtual-machines-create-restore-points-powershell.md). ++The [az restore-point](/cli/azure/restore-point) module is used to create and manage restore points from the command line or in scripts. ++In this tutorial, you learn how to: ++> [!div class="checklist"] +> * [Create a VM restore point collection](#step-1-create-a-vm-restore-point-collection) +> * [Create a VM restore point](#step-2-create-a-vm-restore-point) +> * [Track the progress of Copy operation](#step-3-track-the-status-of-the-vm-restore-point-creation) +> * [Restore a VM](#restore-a-vm-from-vm-restore-point) ++- Learn more about the [support requirements](concepts-restore-points.md) and [limitations](virtual-machines-create-restore-points.md#limitations) before creating a restore point. ++## Step 1: Create a VM restore point collection ++Use the [az restore-point collection create](/cli/azure/restore-point/collection#az-restore-point-collection-create) command to create a VM restore point collection, as shown below: +``` +az restore-point collection create --location "norwayeast" --source-id "/subscriptions/{subscription-id}/resourceGroups/ExampleRg/providers/Microsoft.Compute/virtualMachines/ExampleVM" --tags myTag1="tagValue1" --resource-group "ExampleRg" --collection-name "ExampleRpc" +``` +## Step 2: Create a VM restore point ++Create a VM restore point with the [az restore-point create](/cli/azure/restore-point#az-restore-point-create) command as follows: ++``` +az restore-point create --resource-group "ExampleRg" --collection-name "ExampleRpc" --name "ExampleRp" +``` +### Exclude disks when creating a restore point +Exclude the disks that you do not want to be a part of the restore point with the `--exclude-disks` parameter, as follows: +``` +az restore-point create --exclude-disks "/subscriptions/{subscription-id}/resourceGroups/ExampleRg/providers/Microsoft.Compute/disks/ExampleDisk1" --resource-group "ExampleRg" --collection-name "ExampleRpc" --name "ExampleRp" +``` +## Step 3: Track the status of the VM restore point creation +Use the [az restore-point show](/cli/azure/restore-point#az-restore-point-show) command to track the progress of the VM restore point creation. +``` +az restore-point show --resource-group "ExampleRg" --collection-name "ExampleRpc" --name "ExampleRp" +``` +## Restore a VM from VM restore point +To restore a VM from a VM restore point, first restore individual disks from each disk restore point. You can also use the [ARM template](https://github.com/Azure/Virtual-Machine-Restore-Points/blob/main/RestoreVMFromRestorePoint.json) to restore a full VM along with all the disks. +``` +# Create Disks from disk restore points +$osDiskRestorePoint = az restore-point show --resource-group "ExampleRg" --collection-name "ExampleRpc" --name "ExampleRp" --query "sourceMetadata.storageProfile.dataDisks[0].diskRestorePoint.id" +$dataDisk1RestorePoint = az restore-point show --resource-group "ExampleRg" --collection-name "ExampleRpcTarget" --name "ExampleRpTarget" ΓÇôquery "sourceMetadata.storageProfile.dataDisks[0].diskRestorePoint.id" +$dataDisk2RestorePoint = az restore-point show --resource-group "ExampleRg" --collection-name "ExampleRpcTarget" --name "ExampleRpTarget" ΓÇôquery "sourceMetadata.storageProfile.dataDisks[0].diskRestorePoint.id" + +az disk create --resource-group ΓÇ£ExampleRgΓÇ¥ --name ΓÇ£ExampleOSDiskΓÇ¥ --sku Premium_LRS --size-gb 128 --source $osDiskRestorePoint ++az disk create --resource-group ΓÇ£ExampleRgΓÇ¥ --name ΓÇ£ExampleDataDisk1ΓÇ¥ --sku Premium_LRS --size-gb 128 --source $dataDisk1RestorePoint ++az disk create --resource-group ΓÇ£ExampleRgΓÇ¥ --name ΓÇ£ExampleDataDisk1ΓÇ¥ --sku Premium_LRS --size-gb 128 --source $dataDisk2RestorePoint +``` +Once you have created the disks, [create a new VM](/azure/virtual-machines/scripts/create-vm-from-managed-os-disks.md) and [attach these restored disks](/azure/virtual-machines/linux/add-disk.md#attach-an-existing-disk) to the newly created VM. ++## Next steps +[Learn more](/azure/virtual-machines/backup-recovery.md) about Backup and restore options for virtual machines in Azure. |
| virtual-machines | Virtual Machines Create Restore Points Portal | https://github.com/MicrosoftDocs/azure-docs/commits/main/articles/virtual-machines/virtual-machines-create-restore-points-portal.md | + + Title: Creating Virtual Machine Restore Points using Azure portal +description: Creating Virtual Machine Restore Points using Azure portal +++++ Last updated : 06/30/2022+++++# Create virtual machine restore points using Azure portal ++You can create virtual machine restore points through the Azure portal. You can protect your data and guard against extended downtime by creating [VM restore points](virtual-machines-create-restore-points.md#about-vm-restore-points) at regular intervals. This article shows you how to create VM restore points using the Azure portal. Alternatively, you can create VM restore points using the [Azure CLI](virtual-machines-create-restore-points-cli.md) or using [PowerShell](virtual-machines-create-restore-points-powershell.md). + +In this tutorial, you learn how to: ++> [!div class="checklist"] +> * [Create a VM restore point collection](#step-1-create-a-vm-restore-point-collection) +> * [Create a VM restore point](#step-2-create-a-vm-restore-point) +> * [Track the progress of Copy operation](#step-3-track-the-status-of-the-vm-restore-point-creation) +> * [Restore a VM](#restore-a-vm-from-a-restore-point) ++## Prerequisites ++- Learn more about the [support requirements](concepts-restore-points.md) and [limitations](virtual-machines-create-restore-points.md#limitations) before creating a restore point. ++## Step 1: Create a VM restore point collection +Use the following steps to create a VM restore points collection: ++1. Sign in to the [Azure portal](https://portal.azure.com). +1. In the Search box, enter **Restore Point Collections**. ++ :::image type="content" source="./media/virtual-machines-create-restore-points-portal/create-restore-points-search.png" alt-text="Screenshot of search bar in Azure portal."::: ++2. Select **+ Create** to create a new Restore Point Collection. ++ :::image type="content" source="./media/virtual-machines-create-restore-points-portal/create-restore-points-create.png" alt-text="Screenshot of Create screen."::: ++3. Enter the details and select the VM for which you want to create a restore point collection. ++ :::image type="content" source="./media/virtual-machines-create-restore-points-portal/create-restore-points-collection.png" alt-text="Screenshot of Create a restore point collection screen."::: ++4. Select **Next: Restore Point** to create your first restore point or select **Review + Create** to create an empty restore point collection. ++ :::image type="content" source="./media/virtual-machines-create-restore-points-portal/create-restore-points-review.png" alt-text="Screenshot of validation successful screen."::: ++## Step 2: Create a VM restore point +Use the following steps to create a VM restore point: ++1. Navigate to the restore point collection where you want to create restore points and select **+ Create a restore point** to create new restore point for the VM. ++ :::image type="content" source="./media/virtual-machines-create-restore-points-portal/create-restore-points-creation.png" alt-text="Screenshot of Restore points tab."::: ++2. Enter a name for the restore point and other required details and select **Next: Disks >**. ++ :::image type="content" source="./media/virtual-machines-create-restore-points-portal/create-restore-points-basics.png" alt-text="Screenshot of Basics tab of Create a restore point screen."::: ++3. Select the disks to be included in the restore point. ++ :::image type="content" source="./media/virtual-machines-create-restore-points-portal/create-restore-points-disks.png" alt-text="Screenshot of selected disks."::: ++4. Select **Review + create** to validate the settings. Once validation is completed, select **Create** to create the restore point. ++ :::image type="content" source="./media/virtual-machines-create-restore-points-portal/create-restore-points-validate.png" alt-text="Screenshot of Review + Create screen."::: + + +## Step 3: Track the status of the VM restore point creation ++1. Select the notification to track the progress of the restore point creation. ++ :::image type="content" source="./media/virtual-machines-create-restore-points-portal/create-restore-points-progress.png" alt-text="Screenshot of progress of VM restore point creation."::: + +## Restore a VM from a restore point +To restore a VM from a VM restore point, first restore individual disks from each disk restore point. You can also use the [ARM template](https://github.com/Azure/Virtual-Machine-Restore-Points/blob/main/RestoreVMFromRestorePoint.json) to restore a VM along with all the disks. ++1. Select **Create a disk from a restore point** to restore a disk from a disk restore point. Do this for all the disks that you want to restore. ++ :::image type="content" source="./media/virtual-machines-create-restore-points-portal/create-restore-points-create-disk.png" alt-text="Screenshot of progress of disk creation."::: ++2. Enter the details in the **Create a managed disk** dialog to create disks from the restore points. +Once the disks are created, [create a new VM](/azure/virtual-machines/windows/create-vm-specialized-portal#create-a-vm-from-a-disk.md) and [attach these restored disks](/azure/virtual-machines/windows/attach-managed-disk-portal.md) to the newly created VM. ++ :::image type="content" source="./media/virtual-machines-create-restore-points-portal/create-restore-points-manage-disk.png" alt-text="Screenshot of progress of Create a managed disk screen."::: ++## Next steps +[Learn more](backup-recovery.md) about Backup and restore options for virtual machines in Azure. + |
| virtual-machines | Virtual Machines Create Restore Points Powershell | https://github.com/MicrosoftDocs/azure-docs/commits/main/articles/virtual-machines/virtual-machines-create-restore-points-powershell.md | + + Title: Creating Virtual Machine Restore Points using PowerShell +description: Creating Virtual Machine Restore Points using PowerShell +++++ Last updated : 06/30/2022+++++# Create virtual machine restore points using PowerShell +++You can create Virtual Machine restore points using PowerShell scripts. +The [Azure PowerShell Az](/powershell/azure/new-azureps-module-az) module is used to create and manage Azure resources from the command line or in scripts. ++You can protect your data and guard against extended downtime by creating [VM restore points](virtual-machines-create-restore-points.md#about-vm-restore-points) at regular intervals. This article shows you how to create VM restore points, and [exclude disks](#exclude-disks-from-the-restore-point) from the restore point, using the [Az.Compute](/powershell/module/az.compute) module. Alternatively, you can create VM restore points using the [Azure CLI](virtual-machines-create-restore-points-cli.md) or in the [Azure portal](virtual-machines-create-restore-points-portal.md). ++In this tutorial, you learn how to: ++> [!div class="checklist"] +> * [Create a VM restore point collection](#step-1-create-a-vm-restore-point-collection) +> * [Create a VM restore point](#step-2-create-a-vm-restore-point) +> * [Track the progress of Copy operation](#step-3-track-the-status-of-the-vm-restore-point-creation) +> * [Restore a VM](#restore-a-vm-from-vm-restore-point) ++## Prerequisites ++- Learn more about the [support requirements](concepts-restore-points.md) and [limitations](virtual-machines-create-restore-points.md#limitations) before creating a restore point. ++## Step 1: Create a VM restore point collection +Use the [New-AzRestorePointCollection](/powershell/module/az.compute/get-azrestorepoint) cmdlet to create a VM restore point collection. ++``` +New-AzRestorePointCollection -ResourceGroupName ExampleRG -Name ExampleRPC -VmId ΓÇ£/subscriptions/{SubscriptionId}/resourcegroups/ ExampleRG/providers/microsoft.compute/virtualmachines/Example-vm-1ΓÇ¥ -Location ΓÇ£WestEuropeΓÇ¥ +``` ++## Step 2: Create a VM restore point +Create a VM restore point with the [New-AzRestorePoint](/powershell/module/az.compute/new-azrestorepoint) cmdlet as shown below: +``` +New-AzRestorePoint -ResourceGroupName ExampleRG -RestorePointCollectionName ExampleRPC -Name ExampleRP +``` ++### Exclude disks from the restore point +Exclude certain disks that you do not want to be a part of the restore point with the `-DisksToExclude` parameter, as follows: +``` +New-AzRestorePoint -ResourceGroupName ExampleRG -RestorePointCollectionName ExampleRPC -Name ExampleRP -DisksToExclude ΓÇ£/subscriptions/{SubscriptionId}/resourcegroups/ ExampleRG/providers/Microsoft.Compute/disks/example-vm-1-data_disk_1ΓÇ¥ +``` ++## Step 3: Track the status of the VM restore point creation +You can track the progress of the VM restore point creation using the [Get-AzRestorePoint](/powershell/module/az.compute/get-azrestorepoint) cmdlet, as follows: +``` +Get-AzRestorePoint -ResourceGroupName ExampleRG -RestorePointCollectionName ExampleRPC -Name ExampleRP +``` +## Restore a VM from VM restore point +To restore a VM from a VM restore point, first restore individual disks from each disk restore point. You can also use the [ARM template](https://github.com/Azure/Virtual-Machine-Restore-Points/blob/main/RestoreVMFromRestorePoint.json) to restore a full VM along with all the disks. +``` +# Create Disks from disk restore points +$restorePoint = Get-AzRestorePoint -ResourceGroupName ExampleRG -RestorePointCollectionName ExampleRPC -Name ExampleRP ++$osDiskRestorePoint = $restorePoint.SourceMetadata.StorageProfile.OsDisk.DiskRestorePoint.Id +$dataDisk1RestorePoint = $restorePoint.sourceMetadata.storageProfile.dataDisks[0].diskRestorePoint.id +$dataDisk2RestorePoint = $restorePoint.sourceMetadata.storageProfile.dataDisks[1].diskRestorePoint.id + +New-AzDisk -DiskName ΓÇ£ExampleOSDiskΓÇ¥ (New-AzDiskConfig -Location eastus -CreateOption Restore -SourceResourceId $osDiskRestorePoint) -ResourceGroupName ExampleRg ++New-AzDisk -DiskName ΓÇ£ExampleDataDisk1ΓÇ¥ (New-AzDiskConfig -Location eastus -CreateOption Restore -SourceResourceId $dataDisk1RestorePoint) -ResourceGroupName ExampleRg ++New-AzDisk -DiskName ΓÇ£ExampleDataDisk2ΓÇ¥ (New-AzDiskConfig -Location eastus -CreateOption Restore -SourceResourceId $dataDisk2RestorePoint) -ResourceGroupName ExampleRg ++``` +After you create the disks, [create a new VM](/azure/virtual-machines/windows/create-vm-specialized-portal.md) and [attach these restored disks](/azure/virtual-machines/windows/attach-disk-ps.md#using-managed-disks) to the newly created VM. ++## Next steps +[Learn more](backup-recovery.md) about Backup and restore options for virtual machines in Azure. |
| virtual-machines | Virtual Machines Create Restore Points | https://github.com/MicrosoftDocs/azure-docs/commits/main/articles/virtual-machines/virtual-machines-create-restore-points.md | Title: Using Virtual Machine Restore Points description: Using Virtual Machine Restore Points--++ -+ Last updated 02/14/2022-+ -# Create VM restore points (Preview) +# Overview of VM restore points -Business continuity and disaster recovery (BCDR) solutions are primarily designed to address site-wide data loss. Solutions that operate at this scale will often manage and execute automated failovers and failbacks across multiple regions. Azure VM restore point APIs are a lightweight option you can use to implement granular backup and retention policies. +Business continuity and disaster recovery (BCDR) solutions are primarily designed to address site-wide data loss. Solutions that operate at this scale will often manage and execute automated failovers and failbacks across multiple regions. Azure VM restore points can be used to implement granular backup and retention policies. -You can protect your data and guard against extended downtime by creating virtual machine (VM) restore points at regular intervals. There are several backup options available for virtual machines (VMs), depending on your use-case. You can read about additional [Backup and restore options for virtual machines in Azure](backup-recovery.md). +You can protect your data and guard against extended downtime by creating virtual machine (VM) restore points at regular intervals. There are several backup options available for virtual machines (VMs), depending on your use-case. For more information, see [Backup and restore options for virtual machines in Azure](backup-recovery.md). ## About VM restore points -An individual VM restore point is a resource that stores VM configuration and point-in-time application consistent snapshots of all the managed disks attached to the VM. VM restore points can be leveraged to easily capture multi-disk consistent backups. VM restore points contains a disk restore point for each of the attached disks. A disk restore point consists of a snapshot of an individual managed disk. +An individual VM restore point is a resource that stores VM configuration and point-in-time application consistent snapshots of all the managed disks attached to the VM. You can use VM restore points to easily capture multi-disk consistent backups. VM restore points contain a disk restore point for each of the attached disks and a disk restore point consists of a snapshot of an individual managed disk. -VM restore points support application consistency for VMs running Windows operating systems and support file system consistency for VMs running Linux operating system. Application consistent restore points use VSS writers (or pre/post scripts for Linux) to ensure the consistency of the application data before a restore point is created. To get an application consistent restore point the application running in the VM needs to provide a VSS writer (for Windows) or pre and post scripts (for Linux) to achieve application consistency. +VM restore points support application consistency for VMs running Windows operating systems and support file system consistency for VMs running Linux operating system. Application consistent restore points use VSS writers (or pre/post scripts for Linux) to ensure the consistency of the application data before a restore point is created. To get an application consistent restore point, the application running in the VM needs to provide a VSS writer (for Windows), or pre and post scripts (for Linux) to achieve application consistency. VM restore points are organized into restore point collections. A restore point collection is an Azure Resource Management resource that contains the restore points for a specific VM. If you want to utilize ARM templates for creating restore points and restore point collections, visit the public [Virtual-Machine-Restore-Points](https://github.com/Azure/Virtual-Machine-Restore-Points) repository on GitHub. The following image illustrates the relationship between restore point collectio :::image type="content" source="media/virtual-machines-create-restore-points-api/restore-point-hierarchy.png" alt-text="A diagram illustrating the relationship between the restore point collection parent and the restore point child objects."::: -You can use the APIs to create restore points for your source VM in either the same region, or in other regions. You can also copy existing VM restore points between regions. - VM restore points are incremental. The first restore point stores a full copy of all disks attached to the VM. For each successive restore point for a VM, only the incremental changes to your disks are backed up. To reduce your costs, you can optionally exclude any disk when creating a restore point for your VM. -Keep the following restrictions in mind when you work with VM restore points: --- The restore points APIs work with managed disks only.-- Ultra disks, Ephemeral OS Disks, and Shared Disks aren't supported.-- The restore points APIs require API version 2021-03-01 or better.-- There is a limit of 200 VM restore points that can be created for a particular VM.-- Concurrent creation of restore points for a VM is not supported.-- Private links are not supported when:- - Copying restore points across regions. - - Creating restore points in a region other than the source VM. -- Currently, cross-region creation and copy of VM restore points are only available in the following regions:-- | Area | Regions | - |--|-| - |**Americas** | East US, East US 2, Central US, North Central US, <br/>South Central US, West Central US, West US, West US 2 | - |**Asia Pacific** | Central India, South India | - |**Europe** | Germany West central, North Europe, West Europe | --## Create VM restore points --The following sections outline the steps you need to take to create VM restore points with the Azure Compute REST APIs. --You can find more information in the [Restore Points](/rest/api/compute/restore-points), [PowerShell](/powershell/module/az.compute/new-azrestorepoint), and [Restore Point Collections](/rest/api/compute/restore-point-collections) API documentation. --### Step 1: Create a VM restore point collection --Before you create VM restore points, you must create a restore point collection. A restore point collection holds all of the restore points for a specific VM. Depending on your needs, you can create VM restore points in the same region as the VM, or in a different region. -To create a restore point collection, call the restore point collection's Create or Update API. If you're creating restore point collection in the same region as the VM, then specify the VM's region in the location property of the request body. If you're creating the restore point collection in a different region than the VM, specify the target region for the collection in the location property, but also specify the source restore point collection ARM resource ID in the request body. - -To create a restore point collection, call the restore point collection's [Create or Update](/rest/api/compute/restore-point-collections/create-or-update) API. --### Step 2: Create a VM restore point --After the restore point collection is created, create a VM restore point within the restore point collection. For more information about restore point creation, see the [Restore Points - Create](/rest/api/compute/restore-points/create) API documentation. --> [!TIP] -> To save space and costs, you can exclude any disk from either local region or cross-region VM restore points. To exclude a disk, add its identifier to the `excludeDisks` property in the request body. --### Step 3: Track the status of the VM restore point creation --Restore point creation in your local region will be completed within a few seconds. Scenarios which involve the creation of cross-region restore points will take considerably longer. To track the status of the creation operation, follow the guidance within the [Get restore point copy or replication status](#get-restore-point-copy-or-replication-status) section below. This is only applicable for scenarios where the restore points are created in a different region than the source VM. --## Copy a VM restore point between regions --The VM restore point APIs can be used to restore a VM in a different region than the source VM. --### Step 1: Create a destination VM restore point collection --To copy an existing VM restore point from one region to another, your first step is to create a restore point collection in the target or destination region. To do this, reference the restore point collection from the source region. Follow the guidance within the [Step 1: Create a VM restore point collection](#step-1-create-a-vm-restore-point-collection) section above. --### Step 2: Create the destination VM restore point --After the restore point collection is created, trigger the creation of a restore point in the target restore point collection. Ensure that you've referenced the restore point in the source region that you want to copy. Ensure also that you've specified the source restore point's identifier in the request body. The source VM's location will be inferred from the target restore point collection in which the restore point is being created. -Refer to the [Restore Points - Create](/rest/api/compute/restore-points/create) API documentation to create a `RestorePoint`. --### Step 3: Track copy status --To track the status of the copy operation, follow the guidance within the [Get restore point copy or replication status](#get-restore-point-copy-or-replication-status) section below. This is only applicable for scenarios where the restore points are copied to a different region than the source VM. --## Get restore point copy or replication status --Creation of a cross-region VM restore point is a long running operation. The VM restore point can be used to restore a VM only after the operation is completed for all disk restore points. To track the operation's status, call the [Restore Point - Get](/rest/api/compute/restore-points/get) API on the target VM restore point and include the `instanceView` parameter. The return will include the percentage of data that has been copied at the time of the request. --During restore point creation, the `ProvisioningState` will appear as `Creating` in the response. If creation fails, `ProvisioningState` will be set to `Failed`. --## Create a disk using disk restore points --You can use the VM restore points APIs to restore a VM disk, which can then be used to create a new VM. --### Step 1: Retrieve disk restore point identifiers --Call the [Restore Point Collections - Get](/rest/api/compute/restore-point-collections/get) API on the restore point collection to get access to associated restore points and their IDs. Each VM restore point will in turn contain individual disk restore point identifiers. --### Step 2: Create a disk +## Restore points for VMs inside Virtual Machine Scale Set and Availability Set (AvSet) -After you have the list of disk restore point IDs, you can use the [Disks - Create Or Update](/rest/api/compute/disks/create-or-update) API to create a disk from the disk restore points. +Currently, restore points can only be created in one VM at a time, that is, you cannot create a single restore point across multiple VMs. Due to this limitation, we currently support creating restore points for individual VMs with a Virtual Machine Scale Set and Availability Set. If you want to back up your entire Virtual Machine Scale Set instance or your Availability Set instance, you must individually create restore points for all the VMs that are part of the instance. -## Restore a VM with a restore point +> [!Note] +> Virtual Machine Scale Set with Unified orchestration is not supported by restore points. You cannot create restore points of VMs inside a Virtual Machine Scale Set with Unified orchestration. -To restore a full VM from a VM restore point, first restore individual disks from each disk restore point. This process is described in the [Create a disk](#create-a-disk-using-disk-restore-points) section. After all disks are restored, create a new VM and attach the restored disks to the new VM. -## Get a shared access signature for a disk +## Limitations -To create a shared access signature (SAS) for a disk within a VM restore point, pass the ID of the disk restore points via the `BeginGetAccess` API. If no active SAS exists on the restore point snapshot, a new SAS will be created. The new SAS URL will be returned in the response. If an active SAS already exists, the SAS duration will be extended and the pre-existing SAS URL will be returned in the response. +- Restore points are supported only for managed disks. +- Ultra-disks, Ephemeral OS disks, and Shared disks are not supported. +- Restore points APIs require an API of version 2021-03-01 or later. +- A maximum of 500 VM restore points can be retained at any time for a VM, irrespective of the number of restore point collections. +- Concurrent creation of restore points for a VM is not supported. +- Movement of Virtual Machines (VM) between Resource Groups (RG), or Subscriptions is not supported when the VM has restore points. Moving the VM between Resource Groups or Subscriptions will not update the source VM reference in the restore point and will cause a mismatch of ARM IDs between the actual VM and the restore points. + > [!Note] + > Public preview of cross-region creation and copying of VM restore points is available, with the following limitations: + > - Private links are not supported when copying restore points across regions or creating restore points in a region other than the source VM. + > - Customer-managed key encrypted restore points, when copied to a target region or created directly in the target region are created as platform-managed key encrypted restore points. -For more information about granting access to snapshots, see the [Grant Access](/rest/api/compute/snapshots/grant-access) API documentation. +## Troubleshoot VM restore points +Most common restore points failures are attributed to the communication with the VM agent and extension, and can be resolved by following the troubleshooting steps listed in the [troubleshooting](restore-point-troubleshooting.md) article. ## Next steps -Read more about [Backup and restore options for virtual machines in Azure](backup-recovery.md). +- [Create a VM restore point](create-restore-points.md). +- [Learn more](backup-recovery.md) about Backup and restore options for virtual machines in Azure. |
| virtual-machines | Oracle Database Backup Azure Storage | https://github.com/MicrosoftDocs/azure-docs/commits/main/articles/virtual-machines/workloads/oracle/oracle-database-backup-azure-storage.md | In this section, we will be using Oracle Recovery Manager (RMAN) to take a full 2. In this example, we are limiting the size of RMAN backup pieces to 1 TiB. Please note the RMAN backup MAXPIECESIZE can go upto 4TiB as Azure standard file shares and Premium File Shares have a maximum file size limit of 4 TiB. For more information, see [Azure Files Scalability and Performance Targets](../../../storage/files/storage-files-scale-targets.md).) ```bash- RMAN> configure channel device type disk maxpiecesize 1000G; + RMAN> configure channel device type disk maxpiecesize 4000G; ``` 3. Confirm the configuration change details: |
| virtual-machines | Jboss Eap On Azure Migration | https://github.com/MicrosoftDocs/azure-docs/commits/main/articles/virtual-machines/workloads/redhat/jboss-eap-on-azure-migration.md | Title: JBoss EAP to Azure virtual machines virtual machine scale sets migration description: This guide provides information on how to migrate your enterprise Java applications from another application server to JBoss EAP and from traditional on-premises server to Azure RHEL VM and virtual machine scale sets. -+ |
| virtual-machines | Azure Monitor Alerts Portal | https://github.com/MicrosoftDocs/azure-docs/commits/main/articles/virtual-machines/workloads/sap/azure-monitor-alerts-portal.md | Title: Configure Alerts in Azure Monitor for SAP Solutions by using the Azure portal + Title: Configure Alerts in Azure Monitor for SAP Solutions by using the Azure portal(Preview) description: Learn how to use a browser method for configuring alerts in Azure Monitor for SAP Solutions. Last updated 08/30/2021 # Configure Alerts in Azure Monitor for SAP Solutions by using the Azure portal -In this article, we'll walk through steps to configure alerts in Azure Monitor for SAP Solutions. We'll configure alerts and notifications from the [Azure portal](https://azure.microsoft.com/features/azure-portal) using its browser-based interface. +In this article, we'll walk through steps to configure alerts in Azure Monitor for SAP solutions (AMS). We'll configure alerts and notifications from the [Azure portal](https://azure.microsoft.com/features/azure-portal) using its browser-based interface. ++This content applies to both versions of the service, AMS and AMS (classic). ## Prerequisites Deploy the Azure Monitor for SAP Solutions resource with at least one provider. - SAP HANA - Microsoft SQL server - High-availability (pacemaker) cluster+- IBM Db2 ## Sign in to the portal |
| virtual-machines | Azure Monitor Providers | https://github.com/MicrosoftDocs/azure-docs/commits/main/articles/virtual-machines/workloads/sap/azure-monitor-providers.md | -This article describes the various providers currently available for Azure Monitor for SAP Solutions. +This article describes the various providers currently available for Azure Monitor for SAP solutions (AMS). ++This content applies to both versions of the service, AMS and AMS (classic). In the context of Azure Monitor for SAP Solutions, a *provider type* refers to a specific *provider*. For example, *SAP HANA*, which is configured for a specific component within the SAP landscape, like SAP HANA database. A provider contains the connection information for the corresponding component and helps to collect telemetry data from that component. One Azure Monitor for SAP Solutions resource (also known as SAP monitor resource) can be configured with multiple providers of the same provider type or multiple providers of multiple provider types. For public preview, the following provider types are supported: - Microsoft SQL Server - High-availability cluster - Operating system (OS)+- IBM Db2 (available with new version) -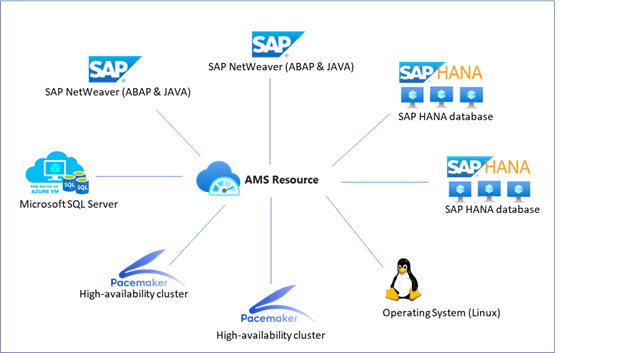 + We recommend you configure at least one provider from the available provider types when deploying the SAP monitor resource. By configuring a provider, you start data collection from the corresponding component for which the provider is configured. You can configure one or more providers of provider type SAP NetWeaver to enable For the current release, the following SOAP web methods are the standard, out-of-box methods invoked by AMS. -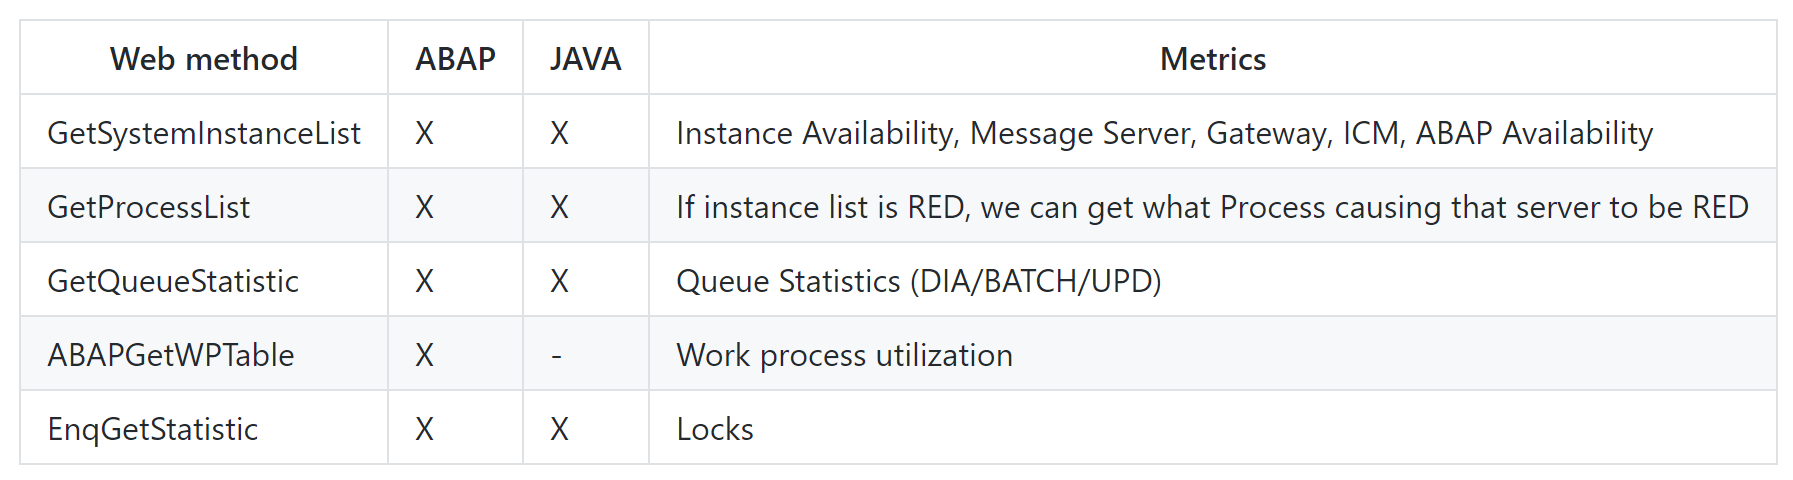 + In public preview, you can expect to see the following data with the SAP NetWeaver provider: - System and instance availability In public preview, you can expect to see the following data with the SAP NetWeav - Queue usage - Enqueue lock statistics - + ## Provider type: SAP HANA Configuring the SAP HANA provider requires: We recommend you configure the SAP HANA provider against SYSTEMDB; however, more providers can be configured against other database tenants. - + ## Provider type: Microsoft SQL server Configuring Microsoft SQL Server provider requires: - The SQL Server port number - The SQL Server username and password - + ## Provider type: High-availability cluster You can configure one or more providers of provider type *High-availability cluster* to enable data collection from Pacemaker cluster within the SAP landscape. The High-availability cluster provider connects to Pacemaker using the [ha_cluster_exporter](https://github.com/ClusterLabs/ha_cluster_exporter) for **SUSE** based clusters and by using [Performance co-pilot](https://access.redhat.com/articles/6139852) for **RHEL** based clusters. AMS then pulls telemetry data from the database and pushes it to Log Analytics workspace in your subscription. The High-availability cluster provider collects data every 60 seconds from Pacemaker. In public preview, you can expect to see the following data with the High-availa - Trends - [others](https://github.com/ClusterLabs/ha_cluster_exporter/blob/master/doc/metrics.md) - + To configure a High-availability cluster provider, two primary steps are involved: To configure an OS (Linux) provider, two primary steps are involved: > [!Warning] > Ensure Node Exporter keeps running after node reboot. +## Provider type: IBM Db2 ++You can configure one or more IBM Db2 providers. The following data is available with this provider type: ++- Database availability +- Number of connections +- Logical and physical reads +- Waits and current locks +- Top 20 runtime and executions ++ +- ## Next steps Learn how to deploy Azure Monitor for SAP Solutions from the Azure portal. |
| virtual-machines | Azure Monitor Sap Quickstart Powershell | https://github.com/MicrosoftDocs/azure-docs/commits/main/articles/virtual-machines/workloads/sap/azure-monitor-sap-quickstart-powershell.md | -This article describes how you can create Azure Monitor for SAP Solutions resources using the +This article describes how you can create Azure Monitor for SAP solutions (AMS) resources using the [Az.HanaOnAzure](/powershell/module/az.hanaonazure/#sap-hana-on-azure) PowerShell module. +This content only applies to the AMS (classic) version of the service. > [!CAUTION] > Azure Monitor for SAP Solutions is currently in public preview. This preview version is provided without a service level agreement. It's not recommended for production workloads. Certain features might not be supported or might have constrained capabilities. For more information, see [Supplemental Terms of Use for Microsoft Azure Previews](https://azure.microsoft.com/support/legal/preview-supplemental-terms/). |
| virtual-machines | Azure Monitor Sap Quickstart | https://github.com/MicrosoftDocs/azure-docs/commits/main/articles/virtual-machines/workloads/sap/azure-monitor-sap-quickstart.md | Last updated 07/18/2022 # Deploy Azure Monitor for SAP Solutions by using the Azure portal -In this article, we'll walk through deploying Azure Monitor for SAP Solutions from the [Azure portal](https://azure.microsoft.com/features/azure-portal). Using the portal's browser-based interface, we'll both deploy Azure Monitor for SAP Solutions and configure providers. +In this article, we'll walk through deploying Azure Monitor for SAP solutions (AMS) from the [Azure portal](https://azure.microsoft.com/features/azure-portal). Using the portal's browser-based interface, we'll deploy AMS and configure providers. +This content applies to both versions of the service, AMS and AMS (classic). ## Sign in to the portal Sign in to the [Azure portal](https://portal.azure.com). ## Create a monitoring resource -1. Under **Marketplace**, select **Azure Monitor for SAP Solutions**. +###### For Azure Monitor for SAP solutions - :::image type="content" source="./media/azure-monitor-sap/azure-monitor-quickstart-1.png" alt-text="Screenshot that shows selecting the Azure Monitor for SAP solutions offer from Azure Marketplace." lightbox="./media/azure-monitor-sap/azure-monitor-quickstart-1.png"::: +1. In Azure **Search**, select **Azure Monitor for SAP Solutions**. -2. On the **Basics** tab, provide the required values. If applicable, you can use an existing Log Analytics workspace. -- :::image type="content" source="./media/azure-monitor-sap/azure-monitor-quickstart-2.png" alt-text="Screenshot that shows configuration options on the Basics tab." lightbox="./media/azure-monitor-sap/azure-monitor-quickstart-2.png"::: -- When you're selecting a virtual network, ensure that the systems you want to monitor are reachable from within that virtual network. -- > [!IMPORTANT] - > Selecting **Share** for **Share data with Microsoft support** enables our support teams to help you with troubleshooting. --## Configure providers --### SAP NetWeaver provider --The SAP start service provides a host of services, including monitoring the SAP system. We're using SAPControl, which is a SOAP web service interface that exposes these capabilities. The SAPControl web service interface differentiates between [protected and unprotected](https://wiki.scn.sap.com/wiki/display/SI/Protected+web+methods+of+sapstartsrv) web service methods. For how to configure authorization for SAPControl, see [SAP Note 1563660](https://launchpad.support.sap.com/#/notes/0001563660). --To fetch specific metrics, you need to unprotect some methods for the current release. Follow these steps for each SAP system: --1. Open an SAP GUI connection to the SAP server. -2. Sign in by using an administrative account. -3. Execute transaction RZ10. -4. Select the appropriate profile (*DEFAULT.PFL*). -5. Select **Extended Maintenance** > **Change**. -6. Select the profile parameter "service/protectedwebmethods" and modify to have the following value, then click Copy: -- ```service/protectedwebmethods instruction - SDEFAULT -GetQueueStatistic -ABAPGetWPTable -EnqGetStatistic -GetProcessList --7. Go back and select **Profile** > **Save**. -8. After saving the changes for this parameter, please restart the SAPStartSRV service on each of the instances in the SAP system. (Restarting the services will not restart the SAP system; it will only restart the SAPStartSRV service (in Windows) or daemon process (in Unix/Linux)) - 8a. On Windows systems, this can be done in a single window using the SAP Microsoft Management Console (MMC) / SAP Management Console(MC). Right-click on each instance and choose All Tasks -> Restart Service. - -- 8b. On Linux systems, use the below command where NN is the SAP instance number to restart the host which is logged into. - - ```RestartService - sapcontrol -nr <NN> -function RestartService - -9. Once the SAP service is restarted, please check to ensure the updated web method protection exclusion rules have been applied for each instance by running the following command: +  -**Logged as \<sidadm\>** - `sapcontrol -nr <NN> -function ParameterValue service/protectedwebmethods` -**Logged as different user** - `sapcontrol -nr <NN> -function ParameterValue service/protectedwebmethods -user "<adminUser>" "<adminPassword>"` - The output should look like :- -  --10. To conclude and validate, a test query can be done against web methods to validate ( replace the hostname , instance number and method name ) leverage the below powershell script --```Powershell command to test unprotect method -$SAPHostName = "<hostname>" -$InstanceNumber = "<instancenumber>" -$Function = "ABAPGetWPTable" -[System.Net.ServicePointManager]::ServerCertificateValidationCallback = {$true} -$sapcntrluri = "https://" + $SAPHostName + ":5" + $InstanceNumber + "14/?wsdl" -$sapcntrl = New-WebServiceProxy -uri $sapcntrluri -namespace WebServiceProxy -class sapcntrl -$FunctionObject = New-Object ($sapcntrl.GetType().NameSpace + ".$Function") -$sapcntrl.$Function($FunctionObject) -``` -11. **Repeat Steps 3-10 for each instance profile **. -->[!Important] ->It is critical that the sapstartsrv service is restarted on each instance of the SAP system for the SAPControl web methods to be unprotected. These read-only SOAP API are required for the NetWeaver provider to fetch metric data from the SAP System and failure to unprotect these methods will lead to empty or missing visualizations on the NetWeaver metric workbook. - ->[!Tip] -> Use an access control list (ACL) to filter the access to a server port. For more information, see [this SAP note](https://launchpad.support.sap.com/#/notes/1495075). --To install the NetWeaver provider on the Azure portal: --1. Make sure you've completed the earlier prerequisite steps and that the server has been restarted. -1. On the Azure portal, under **Azure Monitor for SAP Solutions**, select **Add provider**, and then: -- 1. For **Type**, select **SAP NetWeaver**. -- 1. For **Hostname**, enter the host name of the SAP system. -- 1. For **Subdomain**, enter a subdomain if one applies. -- 1. For **Instance No**, enter the instance number that corresponds to the host name you entered. -- 1. For **SID**, enter the system ID. - - 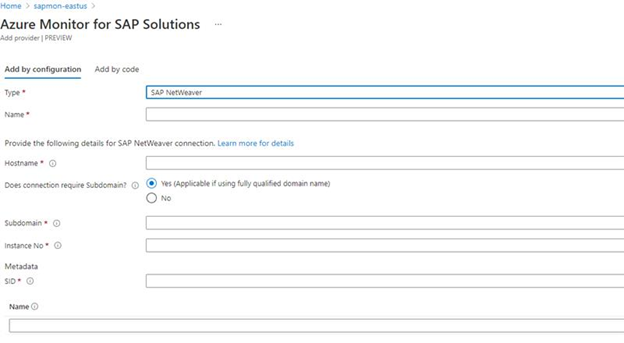 --1. When you're finished, select **Add provider**. Continue to add providers as needed, or select **Review + create** to complete the deployment. -->[!Important] ->If the SAP application servers (ie. virtual machines) are part of a network domain, such as one managed by Azure Active Directory, then it is critical that the corresponding subdomain is provided in the Subdomain text box. The Azure Monitor for SAP collector VM that exists inside the Virtual Network is not joined to the domain and as such will not be able to resolve the hostname of instances inside the SAP system unless the hostname is a fully qualified domain name. Failure to provide this will result in missing / incomplete visualizations in the NetWeaver workbook. - ->For example, if the hostname of the SAP system has a fully qualified domain name of "myhost.mycompany.global.corp" then please enter a Hostname of "myhost" and provide a Subdomain of "mycompany.global.corp". When the NetWeaver provider invokes the GetSystemInstanceList API on the SAP system, SAP returns the hostnames of all instances in the system. The collector VM will use this list to make additional API calls to fetch metrics specific to each instance's features (e.g. ABAP, J2EE, MESSAGESERVER, ENQUE, ENQREP, etc…). If specified, the collector VM will then use the subdomain "mycompany.global.corp" to build the fully qualified domain name of each instance in the SAP system. +2. On the **Basics** tab, provide the required values. If applicable, you can use an existing Log Analytics workspace. ->Please DO NOT specify an IP Address for the hostname field if the SAP system is a part of network domain. - -### SAP HANA provider +  -1. Select the **Providers** tab to add the providers you want to configure. You can add multiple providers one after another, or add them after you deploy the monitoring resource. - :::image type="content" source="./media/azure-monitor-sap/azure-monitor-quickstart-3.png" alt-text="Screenshot showing the tab where you add providers." lightbox="./media/azure-monitor-sap/azure-monitor-quickstart-3.png"::: +###### For Azure Monitor for SAP solutions (Classic) -1. Select **Add provider**, and then: +1. In Azure **Marketplace** or **Search**, select **Azure Monitor for SAP Solutions (Classic)**. - 1. For **Type**, select **SAP HANA**. +  - > [!IMPORTANT] - > Ensure that a SAP HANA provider is configured for the SAP HANA `master` node. - 1. For **IP address**, enter the private IP address for the HANA server. -- 1. For **Database tenant**, enter the name of the tenant you want to use. You can choose any tenant, but we recommend using **SYSTEMDB** because it enables a wider array of monitoring areas. -- 1. For **SQL port**, enter the port number associated with your HANA database. It should be in the format of *[3]* + *[instance#]* + *[13]*. An example is **30013**. -- 1. For **Database username**, enter the username you want to use. Ensure the database user has the *monitoring* and *catalog read* roles assigned. -- :::image type="content" source="./media/azure-monitor-sap/azure-monitor-quickstart-4.png" alt-text="Screenshot showing configuration options for adding an SAP HANA provider." lightbox="./media/azure-monitor-sap/azure-monitor-quickstart-4.png"::: --1. When you're finished, select **Add provider**. Continue to add providers as needed, or select **Review + create** to complete the deployment. -- -### Microsoft SQL Server provider --1. Before you add the Microsoft SQL Server provider, run the following script in SQL Server Management Studio to create a user with the appropriate permissions for configuring the provider. -- ```sql - USE [<Database to monitor>] - DROP USER [AMS] - GO - USE [master] - DROP USER [AMS] - DROP LOGIN [AMS] - GO - CREATE LOGIN [AMS] WITH PASSWORD=N'<password>', DEFAULT_DATABASE=[<Database to monitor>], DEFAULT_LANGUAGE=[us_english], CHECK_EXPIRATION=OFF, CHECK_POLICY=OFF - CREATE USER AMS FOR LOGIN AMS - ALTER ROLE [db_datareader] ADD MEMBER [AMS] - ALTER ROLE [db_denydatawriter] ADD MEMBER [AMS] - GRANT CONNECT TO AMS - GRANT VIEW SERVER STATE TO AMS - GRANT VIEW SERVER STATE TO AMS - GRANT VIEW ANY DEFINITION TO AMS - GRANT EXEC ON xp_readerrorlog TO AMS - GO - USE [<Database to monitor>] - CREATE USER [AMS] FOR LOGIN [AMS] - ALTER ROLE [db_datareader] ADD MEMBER [AMS] - ALTER ROLE [db_denydatawriter] ADD MEMBER [AMS] - GO - ``` --1. Select **Add provider**, and then: -- 1. For **Type**, select **Microsoft SQL Server**. -- 1. Fill out the remaining fields by using information associated with your SQL Server instance. -- :::image type="content" source="./media/azure-monitor-sap/azure-monitor-quickstart-6.png" alt-text="Screenshot showing configuration options for adding a Microsoft SQL Server provider." lightbox="./media/azure-monitor-sap/azure-monitor-quickstart-6.png"::: --1. When you're finished, select **Add provider**. Continue to add providers as needed, or select **Review + create** to complete the deployment. --### High-availability cluster (Pacemaker) provider --Before adding providers for high-availability (pacemaker) clusters, please install appropriate agent for your environment. +2. On the **Basics** tab, provide the required values. If applicable, you can use an existing Log Analytics workspace. -For **SUSE** based clusters, ensure ha_cluster_provider is installed in each node. See how to install [HA cluster exporter](https://github.com/ClusterLabs/ha_cluster_exporter#installation). Supported SUSE versions: SLES for SAP 12 SP3 and above. - -For **RHEL** based clusters, ensure performance co-pilot (PCP) and pcp-pmda-hacluster sub package is installed in each node. See how to install [PCP HACLUSTER agent] (https://access.redhat.com/articles/6139852). Supported RHEL versions: 8.2, 8.4 and above. - -After completing above pre-requisite installation, create a provider for each cluster node. + :::image type="content" source="./media/azure-monitor-sap/azure-monitor-quickstart-2.png" alt-text="Screenshot that shows configuration options on the Basics tab." lightbox="./media/azure-monitor-sap/azure-monitor-quickstart-2.png"::: -1. Select **Add provider**, and then: + When you're selecting a virtual network, ensure that the systems you want to monitor are reachable from within that virtual network. -1. For **Type**, select **High-availability cluster (Pacemaker)**. - -1. Configure providers for each node of cluster by entering endpoint URL in **HA Cluster Exporter Endpoint**. For **SUSE** based clusters enter **http://\<IP address\>:9664/metrics**. For **RHEL** based cluster, enter **http://\<IP address\>:44322/metrics?names=ha_cluster** - -1. Enter the system ID, host name, and cluster name in the respective boxes. - > [!IMPORTANT]- > Host name refers to actual host name in the VM. Please use "hostname -s" command for both SUSE and RHEL based clusters. --1. When you're finished, select **Add provider**. Continue to add providers as needed, or select **Review + create** to complete the deployment. + > Selecting **Share** for **Share data with Microsoft support** enables our support teams to help you with troubleshooting. This feature is available only for Azure Monitor for SAP solutions (Classic) -### OS (Linux) provider --1. Select **Add provider**, and then: -- 1. For **Type**, select **OS (Linux)**. -- >[!IMPORTANT] - > To configure an OS (Linux) provider, ensure the [latest version of node_exporter](https://prometheus.io/download/#node_exporter) is installed in each host (BareMetal or virtual machine) you want to monitor. [Learn more](https://github.com/prometheus/node_exporter). -- 1. For **Name**, enter a name that will be the identifier for the BareMetal instance. -- 1. For **Node Exporter Endpoint**, enter **http://IP:9100/metrics**. -- >[!IMPORTANT] - >Use the private IP address of the Linux host. Ensure that the host and Azure Monitor for SAP resource are in the same virtual network. - > - >Firewall port 9100 should be opened on the Linux host. If you're using `firewall-cmd`, use the following commands: - > - >`firewall-cmd --permanent --add-port=9100/tcp` - > - >`firewall-cmd --reload` - > - >If you're using `ufw`, use the following commands: - > - >`ufw allow 9100/tcp` - > - >`ufw reload` - > - > If the Linux host is an Azure virtual machine (VM), ensure that all applicable network security groups allow inbound traffic at port 9100 from `VirtualNetwork` as the source. - -1. When you're finished, select **Add provider**. Continue to add providers as needed, or select **Review + create** to complete the deployment. ## Next steps After completing above pre-requisite installation, create a provider for each cl Learn more about Azure Monitor for SAP Solutions. > [!div class="nextstepaction"]-> [Monitor SAP on Azure](monitor-sap-on-azure.md) +> [Configure AMS Providers](configure-netweaver-azure-monitor-sap-solutions.md) |
| virtual-machines | Configure Db 2 Azure Monitor Sap Solutions | https://github.com/MicrosoftDocs/azure-docs/commits/main/articles/virtual-machines/workloads/sap/configure-db-2-azure-monitor-sap-solutions.md | + + Title: Create IBM Db2 provider for Azure Monitor for SAP solutions(preview) +description: This article provides details to configure an IBM DB2 provider for Azure Monitor for SAP solutions (AMS). ++++ Last updated : 07/06/2022+++++++# Create IBM Db2 provider for Azure Monitor for SAP solutions ++This article explains how to create an IBM Db2 provider for Azure Monitor for SAP solutions (AMS) through the Azure portal. This content applies only to AMS, not the AMS (classic) version. +++To create the IBM Db2 provider for AMS: ++1. Sign in to the [Azure portal](https://portal.azure.com). +1. Go to the AMS service. +1. Open the AMS resource you want to modify. +1. On the resource's menu, under **Settings**, select **Providers**. +1. Select **Add** to add a new provider. + 1. For **Type**, select **IBM Db2**. + 1. Enter the IP address for the hostname. + 1. Enter the database name. + 1. Enter the database port. + 1. Save your changes. +1. Configure more providers for each instance of the database. + |
| virtual-machines | Configure Ha Cluster Azure Monitor Sap Solutions | https://github.com/MicrosoftDocs/azure-docs/commits/main/articles/virtual-machines/workloads/sap/configure-ha-cluster-azure-monitor-sap-solutions.md | + + Title: Create a High Availability Pacemaker cluster provider for Azure Monitor for SAP solutions(preview) +description: Learn how to configure High Availability (HA) Pacemaker cluster providers for Azure Monitor for SAP solutions (AMS). ++++ Last updated : 07/06/2022++++++# Create a High Availability cluster provider for Azure Monitor for SAP solutions ++This article explains how to create a High Availability (HA) Pacemaker cluster provider for Azure Monitor for SAP solutions (AMS). This content applies to both AMS and AMS (classic) versions. ++## Install HA agent ++Before adding providers for HA (Pacemaker) clusters, install the appropriate agent for your environment in each cluster node. ++For SUSE-based clusters, install **ha_cluster_provider** in each node. For more information, see [the HA cluster exporter installation guide](https://github.com/ClusterLabs/ha_cluster_exporter#installation). Supported SUSE versions include SLES for SAP 12 SP3 and above. ++For RHEL-based clusters, install **performance co-pilot (PCP)** and the **pcp-pmda-hacluster** sub package in each node.For more information, see the [PCP HACLUSTER agent installation guide](https://access.redhat.com/articles/6139852). Supported RHEL versions include 8.2, 8.4 and above. ++For RHEL-based pacemaker clusters, also install [PMProxy](https://access.redhat.com/articles/6139852) in each node. +++## Create provider for AMS ++1. Sign in to the [Azure portal](https://portal.azure.com). +1. Go to the AMS service. +1. Open your AMS resource. +1. In the resource's menu, under **Settings**, select **Providers**. +1. Select **Add** to add a new provider. +++++ +++6. For **Type**, select **High-availability cluster (Pacemaker)**. +1. Configure providers for each node of the cluster by entering the endpoint URL for **HA Cluster Exporter Endpoint**. + 1. For SUSE-based clusters, enter `http://<'IP address'> :9664/metrics`. + 1. For RHEL-based clusters, enter `http://<'IP address'>:44322/metrics?names=ha_cluster`. +1. Enter the system identifiers, host names, and cluster names. For the system identifier, enter a unique SAP system identifier for each cluster. For the hostname, the value refers to an actual hostname in the VM. Use `hostname -s` for SUSE- and RHEL-based clusters. +1. Select **Add provider** to save. +1. Continue to add more providers as needed. +1. Select **Review + create** to review the settings. +1. Select **Create** to finish creating the resource. ++###### For SUSE based cluster +++ ++###### For RHEL based cluster ++ |
| virtual-machines | Configure Hana Azure Monitor Sap Solutions | https://github.com/MicrosoftDocs/azure-docs/commits/main/articles/virtual-machines/workloads/sap/configure-hana-azure-monitor-sap-solutions.md | + + Title: Configure SAP HANA provider for Azure Monitor for SAP solutions (Preview) +description: Learn how to configure the SAP HANA provider for Azure Monitor for SAP solutions (AMS) through the Azure portal. ++++ Last updated : 07/06/2022++++++# Configure SAP HANA provider for AMS ++This article explains how to configure the SAP HANA provider for Azure Monitor for SAP solutions (AMS) through the Azure portal. There are instructions to set up the [current version](#configure-ams) and the [classic version](#configure-ams-classic) of AMS. +++## Configure AMS ++1. Sign in to the [Azure portal](https://portal.azure.com). +1. Search for and select **Azure Monitors for SAP solutions** in the search bar. +1. On the AMS service page, select **Create**. +1. On the AMS creation page, enter your basic resource information on the **Basics** tab. +1. On the **Providers** tab: + * Select **Add provider**. + * On the creation pane, for **Type**, select **SAP HANA**. ++  +++ * For **IP address**, enter the IP address or hostname of the server that runs the SAP HANA instance that you want to monitor. If you're using a hostname, make sure there is connectivity within the virtual network. + * For **Database tenant**, enter the HANA database that you want to connect to. It's recommended to use **SYSTEMDB**, because tenant databases don't have all monitoring views. For legacy single-container HANA 1.0 instances, leave this field blank. + * For **Instance number**, enter the instance number of the database (0-99). The SQL port is automatically determined based on the instance number. + * For **Database username**, enter the dedicated SAP HANA database user. This user needs the **MONITORING** or **BACKUP CATALOG READ** role assignment. For non-production SAP HANA instances, use **SYSTEM** instead. + * For **Database password**, enter the password for the database username. You can either enter the password directly or use a secret inside Azure Key Vault. +1. Save your changes to the AMS resource. ++## Configure AMS (classic) +++To configure the SAP HANA provider for AMS (classic): ++1. Sign in to the [Azure portal](https://portal.azure.com). +1. Search for and select the **Azure Monitors for SAP Solutions (classic)** service in the search bar. +1. On the AMS (classic) service page, select **Create**. +1. On the creation page's **Basics** tab, enter the basic information for your AMS instance. +1. On the **Providers** tab, add the providers that you want to configure. You can add multiple providers during creation. You can also add more providers after you deploy the AMS resource. For each provider: + * Select **Add provider**. + * For **Type**, select **SAP HANA**. Make sure that you configure an SAP HANA provider for the main node. + * For **IP address**, enter the private IP address for the HANA server. + * For **Database tenant**, enter the name of the tenant that you want to use. You can choose any tenant. However, it's recommended to use **SYSTEMDB**, because this tenant has more monitoring areas. + * For **SQL port**, enter the port number for your HANA database. The format begins with 3, includes the instance number, and ends in 13. For example, 30013 is the SQL port for the instance 001. + * For **Database username**, enter the username that you want to use. Make sure the database user has **monitoring** and **catalog read** role assignments. + * Select **Add provider** to finish adding the provider. ++1. Select **Review + create** to review and validate your configuration. +1. Select **Create** to finish creating the AMS resource. |
| virtual-machines | Configure Linux Os Azure Monitor Sap Solutions | https://github.com/MicrosoftDocs/azure-docs/commits/main/articles/virtual-machines/workloads/sap/configure-linux-os-azure-monitor-sap-solutions.md | + + Title: Configure Linux provider for Azure Monitor for SAP solutions(preview) +description: This article explains how to configure a Linux OS provider for Azure Monitor for SAP solutions (AMS). ++++ Last updated : 07/06/2022++++# Configure Linux provider for Azure Monitor for SAP solutions ++This article explains how you can create a Linux OS provider for Azure Monitor for SAP solutions (AMS) resources. This content applies to both versions of the service, AMS and AMS (classic). ++++Before you begin, install [node exporter version 1.3.0](https://prometheus.io/download/#node_exporter) in each SAP host (BareMetal or virtual machine) that you want to monitor. For more information, see [the node exporter GitHub repository](https://github.com/prometheus/node_exporter). ++1. Sign in to the [Azure portal](https://portal.azure.com). +1. Go to the AMS or AMS (classic) service. +1. Select **Create** to make a new AMS resource. +1. Select **Add provider**. +1. Configure the following settings for the new provider: + 1. For **Type**, select **OS (Linux)**. + 1. For **Name**, enter a name that will be the identifier for the BareMetal instance. + 1. For **Node Exporter Endpoint**, enter `http://IP:9100/metrics`. + 1. For the IP address, use the private IP address of the Linux host. Make sure the host and AMS resource are in the same virtual network. +1. Open firewall port 9100 on the Linux host. + 1. If you're using `firewall-cmd`, run `_firewall-cmd_ _--permanent_ _--add-port=9100/tcp_ ` then `_firewall-cmd_ _--reload_`. + 1. If you're using `ufw`, run `_ufw_ _allow_ _9100/tcp_` then `_ufw_ _reload_`. +1. If the Linux host is an Azure virtual machine (VM), make sure that all applicable network security groups (NSGs) allow inbound traffic at port 9100 from **VirtualNetwork** as the source. +1. Select **Add provider** to save your changes. +1. Continue to add more providers as needed. +1. Select **Review + create** to review the settings. +1. Select **Create** to finish creating the resource. |
| virtual-machines | Configure Netweaver Azure Monitor Sap Solutions | https://github.com/MicrosoftDocs/azure-docs/commits/main/articles/virtual-machines/workloads/sap/configure-netweaver-azure-monitor-sap-solutions.md | + + Title: Configure SAP NetWeaver for Azure Monitor for SAP solutions (preview) +description: Learn how to configure SAP NetWeaver for use with Azure Monitor for SAP solutions (AMS). ++++ Last updated : 07/06/2022++++++# Configure SAP NetWeaver for Azure Monitor for SAP solutions ++This article explains how to configure SAP NetWeaver for use with Azure Monitor for SAP solutions (AMS). You can use SAP NetWeaver with both versions of the service, AMS and AMS (classic). +The SAP start service provides multiple services, including monitoring the SAP system. AMS and AMS (classic) use **SAPControl**, which is a SOAP web service interface that exposes these capabilities. The **SAPControl** interface [differentiates between protected and unprotected web service methods](https://wiki.scn.sap.com/wiki/display/SI/Protected+web+methods+of+sapstartsrv). It's necessary to unprotect some methods to use AMS with NetWeaver. ++## Configure NetWeaver for AMS +++### Unprotect methods for metrics ++To fetch specific metrics, you need to unprotect some methods in each SAP system: ++1. Open an SAP GUI connection to the SAP server. ++1. Sign in with an administrative account. ++1. Execute transaction **RZ10**. ++1. Select the appropriate profile (`_DEFAULT.PFL_`). ++1. Select **Extended Maintenance** > **Change**. ++1. Select the profile parameter `service/protectedwebmethods`. ++1. Modify the following: ++ `service/protectedwebmethods` + + `SDEFAULT -GetQueueStatistic -ABAPGetWPTable -EnqGetStatistic -GetProcessList` ++1. Select **Copy**. ++1. Select **Profile** > **Save** to save the changes. ++1. Restart the **SAPStartSRV** service on each instance in the SAP system. Restarting the services doesn't restart the entire system. This process only restarts **SAPStartSRV** (on Windows) or the daemon process (in Unix or Linux). ++ 1. On Windows systems, use the SAP Microsoft Management Console (MMC) or SAP Management Console (MC) to restart the service. Right-click each instance. Then, choose **All Tasks** > **Restart Service**. + + 1. On Linux systems, use the following commands to restart the host. Replace `<instance number` with your SAP system's instance number. + + `RestartService` + + `sapcontrol -nr <instance number> -function RestartService` + +You must restart the **SAPStartSRV** service on each instance of your SAP system to unprotect the **SAPControl** web methods. The read-only SOAP API is required for the NetWeaver provider to fetch metric data from your SAP system. If you don't unprotect these methods, there will be empty or missing visualizations in the NetWeaver metric workbook. +++### Check updated rules ++After you restart the SAP service, check that your updated rules are applied to each instance. ++1. Log in to the SAP system as `sidadm`. ++1. Run the following command. Replace `<instance number>` with your system's instance number. ++ `sapcontrol -nr <instance number>; -function ParameterValue service/protectedwebmethods` ++1. Log in as another user. ++1. Run the following command. Again, replace `<instance number>` with your system's instance number. Also replace `<admin user>` with your administrator username, and `<admin password>` with the password. ++ `sapcontrol -nr <instance number> -function ParameterValue service/protectedwebmethods -user "<admin user>" "<admin password>"` ++1. Review the output, which should look like the following sample output: ++ +++Repeat these steps for each instance profile. ++To validate the rules, run a test query against the web methods. Replace the `<hostname>` with your hostname, `<instance number>` with your SAP instance number, and the method name with the appropriate method. ++ ```powershell + $SAPHostName = "<hostname>" + + $InstanceNumber = "<instance number>" + + $Function = "ABAPGetWPTable" + + [System.Net.ServicePointManager]::ServerCertificateValidationCallback = {$true} + + $sapcntrluri = "https://" + $SAPHostName + ":5" + $InstanceNumber + "14/?wsdl" + + $sapcntrl = New-WebServiceProxy -uri $sapcntrluri -namespace WebServiceProxy -class sapcntrl + + $FunctionObject = New-Object ($sapcntrl.GetType().NameSpace + ".$Function") + + $sapcntrl.$Function($FunctionObject) + ``` +++### Set up RFC metrics ++For AS ABAP applications only, you can set up the NetWeaver RFC metrics. ++Create or upload the following role in the SAP NW ABAP system. AMS requires this role to connect to SAP. The role uses least privilege access. ++1. Log in to your SAP system. +1. Download and unzip [Z_AMS_NETWEAVER_MONITORING.zip](https://github.com/Azure/Azure-Monitor-for-SAP-solutions-preview/files/8710130/Z_AMS_NETWEAVER_MONITORING.zip). +1. Use the transaction code **PFCG** > **Role Upload**. +1. Upload the **Z_AMS_NETWEAVER_MONITORING.SAP** file from the ZIP file. +1. Select **Execute** to generate the role. +1. Exit the SAP system. ++Create and authorize a new RFC user. ++1. Log in to the SAP system. +1. Create an RFC user. +1. Assign the role **Z_AMS_NETWEAVER_MONITORING** to the user. This is the role that you uploaded in the previous section. ++Enable **SMON** to monitor the system performance. ++1. Enable the **SDF/SMON** snapshot service for your system. +1. Configure **SDF/SMON** metrics to be aggregated every minute. +1. Make sure the version of **ST-PI** is **SAPK-74005INSTPI**. +1. Turn on daily monitoring. For instructions, see [SAP Note 2651881](https://userapps.support.sap.com/sap/support/knowledge/en/2651881). +1. It's recommended to schedule **SDF/SMON** as a background job in your target SAP client each minute. Log in to SAP and use **TCODE /SDF/SMON** to configure the setting. +1. To use an SAP access control list (ACL) to restrict access by IP address, add the IP address of the **sapmon** collector VM to the ACL. ++Enable SAP Internet Communication Framework (ICF): ++1. Log in to the SAP system. +1. Go to transaction code **SICF**. +1. Go to the service path `/default_host/sap/bc/soap/`. +1. Activate the services **wsdl**, **wsdl11** and **RFC**. ++It's also recommended to check that you enabled the ICF ports. ++1. Log in to the SAP service. +1. Right-click the ping service and choose **Test Service**. SAP starts your default browser. +1. Navigate to the ping service using the configured port. +1. If the port can't be reached, or the test fails, open the port in the SAP VM. + 1. For Linux, run the following commands. Replace `<your port>` with your configured port. + + `sudo firewall-cmd --permanent --zone=public --add-port=<your port>/TCP ` + + `sudo firewall-cmd --reload ` ++ 1. For Windows, open Windows Defender Firewall from the Start menu. Select **Advanced settings** in the side menu, then select **Inbound Rules**. To open a port, select **New Rule**. Add your port and set the protocol to TCP. ++### Add NetWeaver provider ++To add the NetWeaver provider: ++1. Sign in to the [Azure portal](https://portal.azure.com). +1. Go to the AMS service page. +1. Select **Create** to open the resource creation page. +1. Enter information for the **Basics** tab. +1. Select the **Providers** tab. Then, select **Add provider**. +1. Configure the new provider: + 1. For **Type**, select **SAP NetWeaver**. + 1. For **System ID (SID)**, enter the three-character SAP system identifier. + 1. For **Application Server**, enter the IP address or the fully qualified domain name (FQDN) of the SAP NetWeaver system to monitor. For example, `sapservername.contoso.com` where `sapservername` is the hostname and `contoso.com` is the domain. +1. Save your changes. ++If you're using a hostname, make sure there's connectivity from the virtual network that you used to create the AMS resource. ++- For **Instance number**, specify the instance number of SAP NetWeaver (00-99) +- For **Host file entries**, provide the DNS mappings for all SAP VMs associated with the SID. ++Enter all SAP application servers and ASCS host file entries in **Host file entries**. ++ Enter host file mappings in comma-separated format. The expected format for each entry is IP address, FQDN, hostname. + + For example: **192.X.X.X sapservername.contoso.com sapservername,192.X.X.X sapservername2.contoso.com sapservername2** ++ To determine all SAP hostnames associated with the SID, log in to the SAP system using the `sidadm` user. Then, run the following command: ++ `/usr/sap/hostctrl/exe/sapcontrol -nr <instancenumber> -function GetSystemInstanceList` ++Make sure that host file entries are provided for all hostnames that the command returns. ++- For **SAP client ID**, provide the SAP client identifier. +- For **SAP HTTP Port**, enter the port that your ICF is running. For example, 8110. +- For **SAP username**, enter the name of the user that you created to connect to the SAP system. +- For **SAP password**, enter the password for the user. +++## Configure NetWeaver for AMS (classic) +++To fetch specific metrics, you need to unprotect some methods for the current release. Follow these steps for each SAP system: ++1. Open an SAP GUI connection to the SAP server. +2. Sign in by using an administrative account. +3. Execute transaction RZ10. +4. Select the appropriate profile (*DEFAULT.PFL*). +5. Select **Extended Maintenance** > **Change**. +6. Select the profile parameter "service/protectedwebmethods" and modify to have the following value, then click Copy: ++ ```service/protectedwebmethods instruction + SDEFAULT -GetQueueStatistic -ABAPGetWPTable -EnqGetStatistic -GetProcessList ++7. Go back and select **Profile** > **Save**. +8. After saving the changes for this parameter, restart the SAPStartSRV service on each of the instances in the SAP system. (Restarting the services will not restart the SAP system; it will only restart the SAPStartSRV service (in Windows) or daemon process (in Unix/Linux)). ++ 8a. On Windows systems, this can be done in a single window using the SAP Microsoft Management Console (MMC) / SAP Management Console(MC). Right-click on each instance and choose All Tasks -> Restart Service. +++ +  +++ 8b. On Linux systems, use the below command where NN is the SAP instance number to restart the host which is logged into. + + ```RestartService + sapcontrol -nr <NN> -function RestartService + ``` +9. Once the SAP service is restarted, check to ensure the updated web method protection exclusion rules have been applied for each instance by running the following command: ++**Logged as \<sidadm\>** + `sapcontrol -nr <NN> -function ParameterValue service/protectedwebmethods` ++**Logged as different user** + `sapcontrol -nr <NN> -function ParameterValue service/protectedwebmethods -user "<adminUser>" "<adminPassword>"` ++ The output should look like :- +  ++10. To conclude and validate, run a test query against web methods to validate (replace the hostname , instance number and, method name ) + + Use the below PowerShell script ++ ```Powershell command to test unprotect method + $SAPHostName = "<hostname>" + $InstanceNumber = "<instancenumber>" + $Function = "ABAPGetWPTable" + [System.Net.ServicePointManager]::ServerCertificateValidationCallback = {$true} + $sapcntrluri = "https://" + $SAPHostName + ":5" + $InstanceNumber + "14/?wsdl" + $sapcntrl = New-WebServiceProxy -uri $sapcntrluri -namespace WebServiceProxy -class sapcntrl + $FunctionObject = New-Object ($sapcntrl.GetType().NameSpace + ".$Function") + $sapcntrl.$Function($FunctionObject) + ``` +11. **Repeat Steps 3-10 for each instance profile**. ++>[!Important] +>It is critical that the sapstartsrv service is restarted on each instance of the SAP system for the SAPControl web methods to be unprotected. These read-only SOAP API are required for the NetWeaver provider to fetch metric data from the SAP System and failure to unprotect these methods will lead to empty or missing visualizations on the NetWeaver metric workbook. + +>[!Tip] +> Use an access control list (ACL) to filter the access to a server port. For more information, see [this SAP note](https://launchpad.support.sap.com/#/notes/1495075). ++To install the NetWeaver provider in the Azure portal: ++1. Make sure you've completed the earlier steps and restarted the server. ++1. Sign in to the Azure portal. ++1. Go to the **Azure Monitor for SAP Solutions** service. ++1. Select **Create** to add a new AMS resource. ++1. Select **Add provider**. ++ 1. For **Type**, select **SAP NetWeaver**. ++ 1. For **Hostname**, enter the host name of the SAP system. ++ 1. For **Subdomain**, enter a subdomain if applicable. ++ 1. For **Instance No**, enter the instance number that corresponds to the host name you entered. ++ 1. For **SID**, enter the system ID. ++1. Select **Add provider** to save your changes. ++1. Continue to add more providers as needed. ++1. Select **Review + create** to review the deployment. ++1. Select **Create** to finish creating the resource. +++If the SAP application servers (VMs) are part of a network domain, such as an Azure Active Directory (Azure AD) managed domain, you must provide the corresponding subdomain. The AMS collector VM exists inside the virtual network, and isn't joined to the domain. AMS can't resolve the hostname of instances inside the SAP system unless the hostname is an FQDN. If you don't provide the subdomain, there will be missing or incomplete visualizations in the NetWeaver workbook. ++For example, if the hostname of the SAP system has an FQDN of `myhost.mycompany.contoso.com`: ++- The hostname is `myhost` +- The subdomain is `mycompany.contoso.com` ++When the NetWeaver provider invokes the **GetSystemInstanceList** API on the SAP system, SAP returns the hostnames of all instances in the system. The collect VM uses this list to make more API calls to fetch metrics for each instances features. For example, ABAP, J2EE, MESSAGESERVER, ENQUE, ENQREP, and more. If you specify the subdomain, the collect VM uses the subdomain to build the FQDN of each instance in the system. ++Don't specify an IP address for the hostname if your SAP system is part of network domain. |
| virtual-machines | Configure Sql Server Azure Monitor Sap Solutions | https://github.com/MicrosoftDocs/azure-docs/commits/main/articles/virtual-machines/workloads/sap/configure-sql-server-azure-monitor-sap-solutions.md | + + Title: Configure SQL Server for Azure Monitor for SAP solutions (Preview) +description: Learn how to configure SQL Server for Azure Monitor for SAP solutions (AMS). ++++ Last updated : 07/06/2022+++++++# Configure SQL Server for Azure Monitor for SAP solutions ++This article explains how to configure the Microsoft SQL server provider for Azure Monitor for SAP solutions (AMS) through the Azure portal. ++## Open Windows port ++Open the Windows port in the local firewall of SQL Server and the network security group (NSG) where SQL Server and Azure Monitor for SAP solutions (AMS) exist. The default port is 1433. ++## Configure SQL server ++Configure SQL Server to accept logins from Windows and SQL Server: ++1. Open SQL Server Management Studio (SSMS). +1. Open **Server Properties** > **Security** > **Authentication** +1. Select **SQL Server and Windows authentication mode**. +1. Select **OK** to save your changes. +1. Restart SQL Server to complete the changes. +++## Create AMS user for SQL Server ++Create a user for AMS to log in to SQL Server using the following script. Make sure to replace: ++- `<Database to monitor>` with your SAP database's name +- `<password>` with the password for your user ++You can replace the example information for the AMS user with any other SQL username. ++```sql +USE [<Database to monitor>] +DROP USER [AMS] +GO +USE [master] +DROP USER [AMS] +DROP LOGIN [AMS] +GO +CREATE LOGIN [AMS] WITH + PASSWORD=N'<password>', + DEFAULT_DATABASE=[<Database to monitor>], + DEFAULT_LANGUAGE=[us_english], + CHECK_EXPIRATION=OFF, + CHECK_POLICY=OFF +CREATE USER AMS FOR LOGIN AMS +ALTER ROLE [db_datareader] ADD MEMBER [AMS] +ALTER ROLE [db_denydatawriter] ADD MEMBER [AMS] +GRANT CONNECT TO AMS +GRANT VIEW SERVER STATE TO AMS +GRANT VIEW ANY DEFINITION TO AMS +GRANT EXEC ON xp_readerrorlog TO AMS +GO +USE [<Database to monitor>] +CREATE USER [AMS] FOR LOGIN [AMS] +ALTER ROLE [db_datareader] ADD MEMBER [AMS] +ALTER ROLE [db_denydatawriter] ADD MEMBER [AMS] +GO +``` ++## Install AMS provider ++To install the provider from AMS: ++1. Open the AMS resource in the Azure portal. +1. In the resource menu, under **Settings**, select **Providers**. +1. On the provider page, select **Add** to add a new provider. +1. On the **Add provider** page, enter all required information: + 1. For **Type**, select **Microsoft SQL Server**. + 1. For **Name**, enter a name for the provider. + 1. For **Host name**, enter the IP address of the hostname. + 1. For **Port**, enter the port on which SQL Server is listening. The default is 1433. + 1. For **SQL username**, enter a username for the SQL Server account. + 1. For **Password**, enter a password for the account. + 1. For **SID**, enter the SAP system identifier (SID). + 1. Select **Create** to create the provider +1. Repeat the previous step as needed to create more providers. +1. Select **Review + create** to complete the deployment. ++ |
| virtual-machines | Create Network Azure Monitor Sap Solutions | https://github.com/MicrosoftDocs/azure-docs/commits/main/articles/virtual-machines/workloads/sap/create-network-azure-monitor-sap-solutions.md | + + Title: Set up network for Azure Monitor for SAP solutions (Preview) +description: This article provides details to consider network setup while setting up Azure monitor for SAP solutions. ++++ Last updated : 07/06/2022++++# Set up network for Azure monitor for SAP solutions ++Before you can deploy Azure Monitor for SAP solutions (AMS), you need to configure an Azure virtual network with all necessary settings. ++## Configure new subnet +++> [!IMPORTANT] +> The following steps apply to both *current* and *classic* versions of AMS. ++Create a [new subnet with an **IPv4/28** block or larger](../../../azure-functions/functions-networking-options.md#subnets). Then, make sure there's network connectivity between the new subnet and any target systems that you want to monitor. ++You'll use this new subnet to host Azure Functions, which is the telemetry collection engine for AMS. For more information, see how to [integrate your app with an Azure virtual network](../../../app-service/overview-vnet-integration.md). ++## Configure outbound internet access ++> [!IMPORTANT] +> The following steps only apply to the *current* version of AMS, and not the *classic* version. +++In many use cases, you might choose to restrict or block outbound internet access to your SAP network environment. However, AMS requires network connectivity between the [subnet that you configured](#configure-new-subnet) and the systems that you want to monitor. Before you deploy an AMS resource, you need to configure outbound internet access or the deployment will fail. ++There are multiple methods to address restricted or blocked outbound internet access. Choose the method that works best for your use case: ++- [Use the **Route All** feature in Azure functions](#use-route-all) +- [Use service tags with a network security group (NSG) in your virtual network](#use-service-tags) +- [Use a private endpoint for your subnet](#use-private-endpoint) +++### Use Route All ++**Route All** is a [standard feature of virtual network integration](../../../azure-functions/functions-networking-options.md#virtual-network-integration) in Azure Functions, which is deployed as part of AMS. Enabling or disabling this setting only impacts traffic from Azure Functions. This setting doesn't impact any other incoming or outgoing traffic within your virtual network. ++You can configure the **Route All** setting when you create an AMS resource through the Azure portal. If your SAP environment doesn't allow outbound internet access, disable **Route All**. If your SAP environment allows outbound internet access, keep the default setting to enable **Route All**. ++> [!NOTE] +> You can only use this option before you deploy an AMS resource. It's not possible to change the **Route All** setting after you create the AMS resource. ++### Use service tags ++If you use NSGs, you can create AMS-related [virtual network service tags](../../../virtual-network/service-tags-overview.md) to allow appropriate traffic flow for your deployment. A service tag represents a group of IP address prefixes from a given Azure service. ++> [!NOTE] +> You can use this option after you've deployed an AMS resource. ++1. Find the subnet associated with your AMS managed resource group: + 1. Sign in to the [Azure portal](https://portal.azure.com). + 1. Search for or select the AMS service. + 1. On the **Overview** page for AMS, select your AMS resource. + 1. On the managed resource group's page, select the Azure Functions app. + 1. On the app's page, select the **Networking** tab. Then, select **VNET Integration**. + 1. Review and note the subnet details. You'll need the subnet's IP address to create rules in the next step. +1. Select the subnet's name to find the associated NSG. Note the NSG's information. +3. Set new NSG rules for outbound network traffic: + 1. Go to the NSG resource in the Azure portal. + 1. On the NSG's menu, under **Settings**, select **Outbound security rules**. + 1. Select the **Add** button to add the following new rules: ++| **Priority** | **Name** | **Port** | **Protocol** | **Source** | **Destination** | **Action** | +|--|--|-|--||-|| +| 450 | allow_monitor | 443 | TCP | | AzureMonitor | Allow | +| 501 | allow_keyVault | 443 | TCP | | AzureKeyVault | Allow | +| 550 | allow_storage | 443 | TCP | | Storage | Allow | +| 600 | allow_azure_controlplane | 443 | Any | | AzureResourceManager | Allow | +| 660 | deny_internet | Any | Any | Any | Internet | Deny | +++ AMS subnet IP refers to Ip of subnet associated with AMS resource + + ++For the rules that you create, **allow_vnet** must have a lower priority than **deny_internet**. All other rules also need to have a lower priority than **allow_vnet**. However, the remaining order of these other rules is interchangeable. + +### Use private endpoint +You can enable a private endpoint by creating a new subnet in the same virtual network as the system that you want to monitor. No other resources can use this subnet, so it's not possible to use the same subnet as Azure Functions for your private endpoint. +To create a private endpoint for AMS: +++1. [Create a new subnet](../../../virtual-network/virtual-network-manage-subnet.md#add-a-subnet) in the same virtual network as the SAP system that you're monitoring. +1. In the Azure portal, go to your AMS resource. +1. On the **Overview** page for the AMS resource, select the **Managed resource group**. +A private endpoint connection needs to be created for the following resources inside the managed resource group: + 1. Key-vault, + 2. Storage-account, and + 3. Log-analytics workspace ++ + +###### Key Vault ++Only 1 private endpoint is required for all the key vault resources (secrets, certificates, and keys). Once a private endpoint is created for key vault, the vault resources cannot be accessed from systems outside the given vnet. ++1. On the key vault resource's menu, under **Settings**, select **Networking**. +1. Select the **Private endpoint connections** tab. +1. Select **Create** to open the endpoint creation page. +1. On the **Basics** tab, enter or select all required information. +1. On the **Resource** tab, enter or select all required information. For the key vault resource, there's only one sub-resource available, the vault. +1. On the **Virtual Network** tab, select the virtual network and the subnet that you created specifically for the endpoint. It's not possible to use the same subnet as the Azure Functions app. +1. On the **DNS** tab, for **Integrate with private DNS zone**, select **Yes**. If necessary, add tags. +1. Select **Review + create** to create the private endpoint. +1. On the **Networking** page again, select the **Firewalls and virtual networks** tab. + 1. For **Allow access from**, select **Allow public access from all networks**. + 1. Select **Apply** to save the changes. + +### Create storage endpoint ++It's necessary to create a separate private endpoint for each Azure Storage account resource, including the queue, table, storage blob, and file. If you create a private endpoint for the storage queue, it's not possible to access the resource from systems outside of the virtual networking, including the Azure portal. However, other resources in the same storage account are accessible. ++Repeat the following process for each type of storage sub-resource (table, queue, blob, and file): ++1. On the storage account's menu, under **Settings**, select **Networking**. +1. Select the **Private endpoint connections** tab. +1. Select **Create** to open the endpoint creation page. +1. On the **Basics** tab, enter or select all required information. +1. On the **Resource** tab, enter or select all required information. For the **Target sub-resource**, select one of the sub-resource types (table, queue, blob, or file). +1. On the **Virtual Network** tab, select the virtual network and the subnet that you created specifically for the endpoint. It's not possible to use the same subnet as the Azure Functions app. +1. On the **DNS** tab, for **Integrate with private DNS zone**, select **Yes**. If necessary, add tags. +1. Select **Review + create** to create the private endpoint. +1. On the **Networking** page again, select the **Firewalls and virtual networks** tab. + 1. For **Allow access from**, select **Allow public access from all networks**. + 1. Select **Apply** to save the changes. ++### Create log analytics endpoint ++It's not possible to create a private endpoint directly for a Log Analytics workspace. To enable a private endpoint for this resource, you can connect the resource to an [Azure Monitor Private Link Scope (AMPLS)](../../../azure-monitor/logs/private-link-security.md). Then, you can create a private endpoint for the AMPLS resource. ++If possible, create the private endpoint before you allow any system to access the Log Analytics workspace through a public endpoint. Otherwise, you'll need to restart the Function App before you can access the Log Analytics workspace through the private endpoint. ++1. Go to the Log Analytics workspace in the Azure portal. +1. In the resource menu, under **Settings**, select **Network isolation**. +1. Select **Add** to create a new AMPLS setting. +1. Select the appropriate scope for the endpoint. Then, select **Apply**. +To enable private endpoint for Azure Monitor Private Link Scope, go to Private Endpoint connections tab under configure. +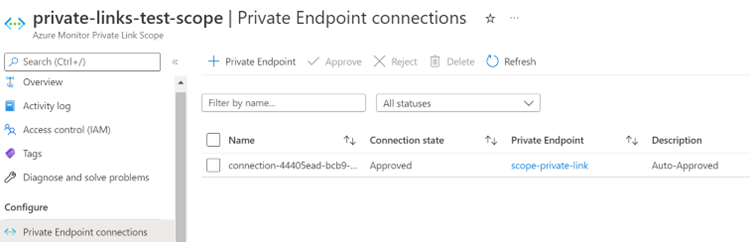 ++1. Select the **Private endpoint connections** tab. +1. Select **Create** to open the endpoint creation page. +1. On the **Basics** tab, enter or select all required information. +1. On the **Resource** tab, enter or select all required information. +1. On the **Virtual Network** tab, select the virtual network and the subnet that you created specifically for the endpoint. It's not possible to use the same subnet as the Azure Functions app. +1. On the **DNS** tab, for **Integrate with private DNS zone**, select **Yes**. If necessary, add tags. +1. Select **Review + create** to create the private endpoint. +1. Go to the Log Analytics workspace in the Azure portal. +1. In the resource's menu, under **Settings**, select **Network Isolation**. +1. Under **Virtual networks access configuration**: + 1. Set **Accept data ingestion from public networks not connected through a Private Link Scope** to **No**. This setting disables data ingestion from any system outside the virtual network. + 1. Set **Accept queries from public networks not connected through a Private Link Scope** to **Yes**. This setting allows workbooks to display data. +1. Select **Save**. ++If you enable a private endpoint after any system accessed the Log Analytics workspace through a public endpoint, restart the Function App before moving forward. Otherwise, you can't access the Log Analytics workspace through the private endpoint. ++1. Go to the AMS resource in the Azure portal. +1. On the **Overview** page, select the name of the **Managed resource group**. +1. On the managed resource group's page, select the **Function App**. +1. On the Function App's **Overview** page, select **Restart**. ++Next, find and note important IP address ranges. ++1. Find the AMS resource's IP address range. + 1. Go to the AMS resource in the Azure portal. + 1. On the resource's **Overview** page, select the **vNet/subnet** to go to the virtual network. + 1. Note the IPv4 address range, which belongs to the source system. +1. Find the IP address range for the key vault and storage account. + 1. Go to the resource group that contains the AMS resource in the Azure portal. + 1. On the **Overview** page, note the **Private endpoint** in the resource group. + 1. In the resource group's menu, under **Settings**, select **DNS configuration**. + 1. On the **DNS configuration** page, note the **IP addresses** for the private endpoint. ++ 1. For Log analytics private endpoint: Go to the private endpoint created for Azure Monitor Private Link Scope resource. + +  ++1. On the private endpoint's menu, under **Settings**, select **DNS configuration**. +1. On the **DNS configuration** page, note the associated IP addresses. +1. Go to the AMS resource in the Azure portal. +1. On the **Overview** page, select the **vNet/subnet** to go to that resource. +1. On the virtual network page, select the subnet that you used to create the AMS resource. ++1. Go to the NSG resource in the Azure portal. +1. In the NSG menu, under **Settings**, select **Outbound security rules**. +The below image contains the required security rules for AMS resource to work. + +++| Priority | Description | +| -- | - | +| 550 | Allow the source IP for making calls to source system to be monitored. | +| 600 | Allow the source IP for making calls AzureResourceManager service tag. | +| 650 | Allow the source IP to access key-vault resource using private endpoint IP. | +| 700 | Allow the source IP to access storage-account resources using private endpoint IP. (Include IPs for each of storage account sub resources: table, queue, file, and blob) | +| 800 | Allow the source IP to access log-analytics workspace resource using private endpoint IP. | |
| virtual-machines | Monitor Sap On Azure Reference | https://github.com/MicrosoftDocs/azure-docs/commits/main/articles/virtual-machines/workloads/sap/monitor-sap-on-azure-reference.md | Title: Monitor SAP on Azure data reference + Title: Monitor SAP on Azure data reference (Preview) description: Important reference material needed when you monitor SAP on Azure. |
| virtual-machines | Monitor Sap On Azure | https://github.com/MicrosoftDocs/azure-docs/commits/main/articles/virtual-machines/workloads/sap/monitor-sap-on-azure.md | +> [!IMPORTANT] +> Azure Monitor for SAP solutions is currently in PREVIEW. +> See the [Supplemental Terms of Use for Microsoft Azure Previews](https://azure.microsoft.com/support/legal/preview-supplemental-terms/) for legal terms that apply to Azure features that are in beta, preview, or otherwise not yet released into general availability. + When you have critical applications and business processes relying on Azure resources, you'll want to monitor those resources for their availability, performance, and operation. This article describes how to monitor SAP running on Azure using Azure Monitor for SAP Solutions. Azure Monitor for SAP Solutions uses specific parts of the [Azure Monitor](../../../azure-monitor/overview.md) infrastructure. +> [!Note] +> There are currently two versions of Azure Monitor for SAP solutions. Old one is Azure Monitor for SAP Solutions (Classic) and new one is Azure Monitor for SAP solutions. This article will talk about both the versions. + ## Overview Azure Monitor for SAP Solutions is an Azure-native monitoring product for anyone running their SAP landscapes on Azure. It works with both [SAP on Azure Virtual Machines](./hana-get-started.md) and [SAP on Azure Large Instances](./hana-overview-architecture.md). With Azure Monitor for SAP Solutions, you can collect telemetry data from Azure You can monitor different components of an SAP landscape, such as Azure virtual machines (VMs), high-availability cluster, SAP HANA database, SAP NetWeaver, and so on, by adding the corresponding **provider** for that component. For more information, see [Deploy Azure Monitor for SAP Solutions by using the Azure portal](azure-monitor-sap-quickstart.md). -Supported infrastructure: +The following table provides a quick comparison of the Azure Monitor for SAP solutions (Classic) and Azure Monitor for SAP solutions. ++|| Azure Monitor for SAP solutions | Azure Monitor for SAP solutions (Classic) | +|--||-| +| Architecture Style | Azure Function based Collector architecture | VM based collector architecture | +| Supported Database | Microsoft SQL Server<br>SAP HANA<br>IBM Db2 | Microsoft SQL Server<br>SAP HANA +| -- Azure virtual machine-- Azure Large Instance -Supported databases: -- SAP HANA Database-- Microsoft SQL server Azure Monitor for SAP Solutions uses the [Azure Monitor](../../../azure-monitor/overview.md) capabilities of [Log Analytics](../../../azure-monitor/logs/log-analytics-overview.md) and [Workbooks](../../../azure-monitor/visualize/workbooks-overview.md). With it, you can: -- Create [custom visualizations](../../../azure-monitor/visualize/workbooks-getting-started.md) by editing the default Workbooks provided by Azure Monitor for SAP Solutions. +- Create [custom visualizations](../../../azure-monitor/visualize/workbooks-overview.md) by editing the default Workbooks provided by Azure Monitor for SAP Solutions. - Write [custom queries](../../../azure-monitor/logs/log-analytics-tutorial.md). - Create [custom alerts](../../../azure-monitor/alerts/alerts-log.md) by using Azure Log Analytics workspace. - Take advantage of the [flexible retention period](../../../azure-monitor/logs/data-retention-archive.md) in Azure Monitor Logs/Log Analytics. SAP NetWeaver telemetry: - Work process usage statistics and trends - Enqueue Lock statistics and trends - Queue usage statistics and trends+- +IBM Db2 telemetry: +- DB availability +- Number of Connections, Logical and Physical Reads +- Waits and Current Locks +- Top 20 Runtime and Executions + ## Data sharing with Microsoft +> [!Note] +> This feature is only applicable for Azure Monitor for SAP solutions (Classic) version. + Azure Monitor for SAP Solutions collects system metadata to provide improved support for SAP on Azure. No PII/EUII is collected. You can enable data sharing with Microsoft when you create Azure Monitor for SAP Solutions resource by choosing *Share* from the drop-down. We recommend that you enable data sharing. Data sharing gives Microsoft support and engineering teams information about your environment, which helps us provide better support for your mission-critical SAP on Azure solution. ## Architecture overview+> [!Note] +> This content would apply to both versions. ++### Azure Monitor for SAP solutions ++The following diagram shows, at a high level, how Azure Monitor for SAP solutions collects telemetry from the SAP HANA database. The architecture is the same whether SAP HANA is deployed on Azure VMs or Azure Large Instances. ++ ++++The key components of the architecture are: ++- The **Azure portal**, which is where you can access the marketplace and the AMS (classic) service. +- The **AMS (classic) resource**, where you can view monitoring telemetry. +- The **managed resource group**, which is deployed automatically as part of the AMS resource's deployment. The resources inside the managed resource group help to collect telemetry. Key resources include: + - An **Azure Functions resource** that hosts the monitoring code, which is the logic that collects telemetry from the source systems and transfers the data to the monitoring framework. + - An **[Azure Key Vault resource](../../../key-vault/general/basic-concepts.md)**, which securely holds the SAP HANA database credentials and stores information about [providers](./azure-monitor-providers.md). + - The **Log Analytics workspace**, which is the destination for storing telemetry data. Optionally, you can choose to use an existing workspace in the same subscription as your AMS resource at deployment. + + [Azure Workbooks](../../../azure-monitor/visualize/workbooks-overview.md) provides customizable visualization of the telemetry in Log Analytics. To automatically refresh your workbooks or visualizations, pin the items to the Azure dashboard. The maximum refresh frequency is every 30 minutes. + + You can also use Kusto query language (KQL) to [run log queries](../../../azure-monitor/logs/log-query-overview.md) against the raw tables inside the Log Analytics workspace. +++### Azure Monitor for SAP solutions (classic) -The following diagram shows, at a high level, how Azure Monitor for SAP Solutions collects telemetry from SAP HANA database. The architecture is the same whether SAP HANA is deployed on Azure VMs or Azure Large Instances. +The following diagram shows, at a high level, how Azure Monitor for SAP solutions (classic) collects telemetry from the SAP HANA database. The architecture is the same whether SAP HANA is deployed on Azure VMs or Azure Large Instances.  The key components of the architecture are: Here are the key highlights of the architecture: - **Multi-instance** - You can monitor multiple instances of a given component type (for example, HANA database, high availability (HA) cluster, Microsoft SQL server, SAP NetWeaver) across multiple SAP SIDs within a VNET with a single resource of Azure Monitor for SAP Solutions. - **Multi-provider** - The preceding architecture diagram shows the SAP HANA provider as an example. Similarly, you can configure more providers for corresponding components to collect data from those components. For example, HANA DB, HA cluster, Microsoft SQL server, and SAP NetWeaver. + - **Extensible query framework** - SQL queries to collect telemetry data are written in [JSON](https://github.com/Azure/AzureMonitorForSAPSolutions/blob/master/sapmon/content/SapHana.json). More SQL queries to collect more telemetry data can be easily added. You can request specific telemetry data to be added to Azure Monitor for SAP Solutions. Do so by leaving feedback using the link at the end of this article. You can also leave feedback by contacting your account team. ## Analyzing metrics You can configure alerts in Azure Monitor for SAP Solutions from the Azure porta You have several options to deploy Azure Monitor for SAP Solutions and configure providers: - You can deploy Azure Monitor for SAP Solutions right from the Azure portal. For more information, see [Deploy Azure Monitor for SAP Solutions by using the Azure portal](azure-monitor-sap-quickstart.md). - Use Azure PowerShell. For more information, see [Deploy Azure Monitor for SAP Solutions with Azure PowerShell](azure-monitor-sap-quickstart-powershell.md).-- Use the CLI extension. For more information, see the [SAP HANA Command Module](https://github.com/Azure/azure-hanaonazure-cli-extension#sapmonitor).+- Use the CLI extension. For more information, see the [SAP HANA Command Module](https://github.com/Azure/azure-hanaonazure-cli-extension#sapmonitor) (applicable for only Azure Monitor for SAP solutions (classic) version) ## Pricing Azure Monitor for SAP Solutions is a free product (no license fee). You're responsible for paying the cost of the underlying components in the managed resource group. You're also responsible for consumption costs associated with data use and retention. For more information, see standard Azure pricing documents:-- [Azure VM pricing](https://azure.microsoft.com/pricing/details/virtual-machines/linux/)+- [Azure Functions Pricing](https://azure.microsoft.com/pricing/details/functions/#pricing) +- [Azure VM pricing (applicable to Azure Monitor for SAP solutions (classic))](https://azure.microsoft.com/pricing/details/virtual-machines/linux/) - [Azure Key vault pricing](https://azure.microsoft.com/pricing/details/key-vault/) - [Azure storage account pricing](https://azure.microsoft.com/pricing/details/storage/queues/) - [Azure Log Analytics and alerts pricing](https://azure.microsoft.com/pricing/details/monitor/) |
| web-application-firewall | Waf Front Door Best Practices | https://github.com/MicrosoftDocs/azure-docs/commits/main/articles/web-application-firewall/afds/waf-front-door-best-practices.md | + + Title: Best practices for Web Application Firewall on Azure Front Door +description: In this article, you learn about the best practices for using the web application firewall with Azure Front Door. ++++ Last updated : 07/18/2022+++++# Best practices for Web Application Firewall (WAF) on Azure Front Door ++This article summarizes best practices for using the web application firewall (WAF) on Azure Front Door. ++## General best practices ++### Enable the WAF ++For internet-facing applications, we recommend you enable a web application firewall (WAF) and configure it to use managed rules. When you use a WAF and Microsoft-managed rules, your application is protected from a range of attacks. ++### Tune your WAF ++The rules in your WAF should be tuned for your workload. If you don't tune your WAF, it might accidentally block requests that should be allowed. Tuning might involve creating [rule exclusions](waf-front-door-exclusion.md) to reduce false positive detections. ++While you tune your WAF, consider using [detection mode](waf-front-door-policy-settings.md#waf-mode), which logs requests and the actions the WAF would normally take, but doesn't actually block any traffic. ++For more information, see [Tuning Web Application Firewall (WAF) for Azure Front Door](waf-front-door-tuning.md). ++### Use prevention mode ++After you've tuned your WAF, you should configure it to [run in prevention mode](waf-front-door-policy-settings.md#waf-mode). By running in prevention mode, you ensure the WAF actually blocks requests that it detects are malicious. Running in detection mode is useful while you tune and configure your WAF, but provides no protection. ++## Managed ruleset best practices ++### Enable default rule sets ++Microsoft's default rule sets are designed to protect your application by detecting and blocking common attacks. The rules are based on a various sources including the OWASP top 10 attack types and information from Microsoft Threat Intelligence. ++For more information, see [Azure-managed rule sets](afds-overview.md#azure-managed-rule-sets). ++### Enable bot management rules ++Bots are responsible for a significant proportion of traffic to web applications. The WAF's bot protection rule set categorizes bots based on whether they're good, bad, or unknown. Bad bots can then be blocked, while good bots like search engine crawlers are allowed through to your application. ++For more information, see [Bot protection rule set](afds-overview.md#bot-protection-rule-set). ++### Use the latest ruleset versions ++Microsoft regularly updates the managed rules to take account of the current threat landscape. Ensure that you regularly check for updates to Azure-managed rule sets. ++For more information, see [Web Application Firewall DRS rule groups and rules](waf-front-door-drs.md). ++## Rate limiting best practices ++### Add rate limiting ++Front Door's WAF enables you to control the number of requests allowed from each client's IP address over a period of time. It's a good practice to add rate limiting to reduce the impact of clients accidentally or intentionally sending large amounts of traffic to your service, such as during a [*retry storm*](/azure/architecture/antipatterns/retry-storm/). ++For more information, see the following resources: +- [Configure a Web Application Firewall rate limit rule using Azure PowerShell](waf-front-door-rate-limit-powershell.md). +- [Why do additional requests above the threshold configured for my rate limit rule get passed to my backend server?](waf-faq.yml#why-do-additional-requests-above-the-threshold-configured-for-my-rate-limit-rule-get-passed-to-my-backend-server-) ++## Geo-filtering best practices ++### Geo-filter traffic ++Many web applications are designed for users within a specific geographic region. If this situation applies to your application, consider implementing geo-filtering to block requests that come from outside of the countries you expect to receive traffic from. ++For more information, see [What is geo-filtering on a domain for Azure Front Door Service?](waf-front-door-tutorial-geo-filtering.md). ++### Specify the unknown (ZZ) location ++Some IP addresses aren't mapped to locations in our dataset. When an IP address can't be mapped to a location, the WAF assigns the traffic to the unknown (ZZ) country. To avoid blocking valid requests from these IP addresses, consider allowing the unknown (ZZ) country through your geo-filter. ++For more information, see [What is geo-filtering on a domain for Azure Front Door Service?](waf-front-door-tutorial-geo-filtering.md). ++## Logging ++### Add diagnostic settings to save your WAF's logs ++Front Door's WAF integrates with Azure Monitor. It's important to save the WAF logs to a destination like Log Analytics. You should review the WAF logs regularly. Reviewing logs helps you to [tune your WAF policies to reduce false-positive detections](#tune-your-waf), and to understand whether your application has been the subject of attacks. ++For more information, see [Azure Web Application Firewall monitoring and logging](waf-front-door-monitor.md). ++### Send logs to Microsoft Sentinel ++Microsoft Sentinel is a security information and event management (SIEM) system, which imports logs and data from multiple sources to understand the threat landscape for your web application and overall Azure environment. Front Door's WAF logs should be imported into Microsoft Sentinel or another SIEM so that your internet-facing properties are included in its analysis. For Microsoft Sentinel, use the Azure WAF connector to easily import your WAF logs. ++For more information, see [Using Microsoft Sentinel with Azure Web Application Firewall](../waf-sentinel.md). ++## Next steps ++Learn how to [create a Front Door WAF policy](waf-front-door-create-portal.md). |
| web-application-firewall | Best Practices | https://github.com/MicrosoftDocs/azure-docs/commits/main/articles/web-application-firewall/ag/best-practices.md | + + Title: Best practices for Web Application Firewall on Azure Application Gateway +description: In this tutorial, you learn about the best practices for using the web application firewall with Application Gateway. ++++ Last updated : 07/18/2022++++# Best practices for Web Application Firewall on Application Gateway ++This article summarizes best practices for using the web application firewall (WAF) on Azure Application Gateway. ++## General best practices ++### Enable the WAF ++For internet-facing applications, we recommend you enable a web application firewall (WAF) and configure it to use managed rules. When you use a WAF and Microsoft-managed rules, your application is protected from a range of attacks. ++### Use WAF policies ++WAF policies are the new resource type for managing your Application Gateway WAF. If you have older WAFs that use WAF Configuration resources, you should migrate to WAF policies to take advantage of the latest features. ++For more information, see the following resources: +- [Migrate Web Application Firewall policies using Azure PowerShell](./migrate-policy.md) +- [Upgrade Application Gateway WAF configuration to WAF policy using Azure Firewall Manager](../shared/manage-policies.md#upgrade-application-gateway-waf-configuration-to-waf-policy) ++### Tune your WAF ++The rules in your WAF should be tuned for your workload. If you don't tune your WAF, it might accidentally block requests that should be allowed. Tuning might involve creating [rule exclusions](application-gateway-waf-configuration.md) to reduce false positive detections. ++While you tune your WAF, consider using [detection mode](create-waf-policy-ag.md#configure-waf-rules-optional), which logs requests and the actions the WAF would normally take, but doesn't actually block any traffic. ++For more information, see [Troubleshoot Web Application Firewall (WAF) for Azure Application Gateway](web-application-firewall-troubleshoot.md). ++### Use prevention mode ++After you've tuned your WAF, you should configure it to [run in prevention mode](create-waf-policy-ag.md#configure-waf-rules-optional). By running in prevention mode, you ensure the WAF actually blocks requests that it detects are malicious. Running in detection mode is useful while you tune and configure your WAF, but provides no protection. ++## Managed ruleset best practices ++### Enable core rule sets ++Microsoft's core rule sets are designed to protect your application by detecting and blocking common attacks. The rules are based on a various sources including the OWASP top 10 attack types and information from Microsoft Threat Intelligence. ++For more information, see [Web Application Firewall CRS rule groups and rules](application-gateway-crs-rulegroups-rules.md). ++### Enable bot management rules ++Bots are responsible for a significant proportion of traffic to web applications. The WAF's bot protection rule set categorizes bots based on whether they're good, bad, or unknown. Bad bots can then be blocked, while good bots like search engine crawlers are allowed through to your application. ++For more information, see [Azure Web Application Firewall on Azure Application Gateway bot protection overview](bot-protection-overview.md). ++### Use the latest ruleset versions ++Microsoft regularly updates the managed rules to take account of the current threat landscape. Ensure that you regularly check for updates to Azure-managed rule sets. ++For more information, see [Web Application Firewall CRS rule groups and rules](application-gateway-crs-rulegroups-rules.md). ++## Geo-filtering best practices ++### Geo-filter traffic ++Many web applications are designed for users within a specific geographic region. If this situation applies to your application, consider implementing geo-filtering to block requests that come from outside of the countries you expect to receive traffic from. ++For more information, see [Geomatch custom rules](geomatch-custom-rules.md). ++## Logging ++### Add diagnostic settings to save your WAF's logs ++Application Gateway's WAF integrates with Azure Monitor. It's important to save the WAF logs to a destination like Log Analytics. You should review the WAF logs regularly. Reviewing logs helps you to [tune your WAF policies to reduce false-positive detections](#tune-your-waf), and to understand whether your application has been the subject of attacks. ++For more information, see [Azure Web Application Firewall Monitoring and Logging](application-gateway-waf-metrics.md). ++### Send logs to Microsoft Sentinel ++Microsoft Sentinel is a security information and event management (SIEM) system, which imports logs and data from multiple sources to understand the threat landscape for your web application and overall Azure environment. Application Gateway's WAF logs should be imported into Microsoft Sentinel or another SIEM so that your internet-facing properties are included in its analysis. For Microsoft Sentinel, use the Azure WAF connector to easily import your WAF logs. ++For more information, see [Using Microsoft Sentinel with Azure Web Application Firewall](../waf-sentinel.md). ++## Next steps ++Learn how to [enable the WAF on an Application Gateway](application-gateway-web-application-firewall-portal.md). |
| web-application-firewall | Geomatch Custom Rules | https://github.com/MicrosoftDocs/azure-docs/commits/main/articles/web-application-firewall/ag/geomatch-custom-rules.md | Custom rules allow you to create tailored rules to suit the exact needs of your To create a geo-filtering custom rule in the Azure portal, simply select *Geo location* as the Match Type, and then select the country/region or countries/regions you want to allow/block from your application. When creating geomatch rules with Azure PowerShell or Azure Resource Manager, use the match variable `RemoteAddr` and the operator `Geomatch`. For more information, see [how to create custom rules in PowerShell](configure-waf-custom-rules.md) and more [custom rule examples](create-custom-waf-rules.md). +> [!NOTE] +> Geo-filtering works based on mapping each request's IP address to a country or region. There might be some IP addresses in the data set that are not yet mapped to a country or region. To avoid accidentally blocking legitimate users, Application Gateway's WAF allows requests from unknown IP addresses. + ## Country/Region codes If you are using the Geomatch operator, the selectors can be any of the following two-digit country/region codes. |